

2
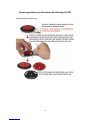
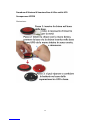
Manual for Fixed Receiver
Operating Instructions
◆Number Registering
1) Standby mode, press the key [FUN] for 3 seconds till [F1] appears on the screen.
2) Press the key [ENT] till [01] [001] or [001-01] appears.
3) Press the key [UP], [[MOVE]] or [DOWN] to choose the registration number you wanted.
4) Press the call button, waiting for the number flashes on the screen with sound signals.
5) Press the key [ESC], and [F1] appears.
6) Press the key [ESC] again, back to standby mode. The registration is finished.
7) Repeat step 3)~4)to register all the call buttons you need, and then press the key [ESC] twice
back to standby mode.
◆Sound Setting
1) Standby mode, press the key [FUN] for 3 seconds till [F1] appears on the screen.
2) Use the key [UP] to choose [F2].
3) Press the key [ENT] and [01] appears.
4) Use the key [UP], [DOWN] to choose a type of sound (12 kinds totally).
5) Press the key [ENT], and [F2] appears
6) Press the key [ESC] again and back to standby mode.
◆Display Time Setting
1) Standby mode, press the key [FUN] for 3 seconds till [F1] appears on the screen.
2) Use the key [UP] to choose [F3].
3) Press the key [ENT], and [20] appears on the screen.
4) Use the key [UP], [DOWN] to choose the display time wanted. [00] means unlimited display,
figures 01-99 mean the corresponding time from 1~ 99 seconds.
5) Press the key [ENT], and [F3] appears.
6) Press the key [ESC] and back to standby mode.
◆Sound Length Setting
1) Standby mode, press the key [FUN] for 3 seconds and [F1] appears on the screen.
2) Use the key [UP] to choose [F4].
3) Press the key [ENT] and [01] appears on the screen.
4) Use the key [UP] or [DOWN] to choose the length of sound you want. Numbers 01-15 mean 15
kinds of the length. 01 means 2 seconds, 02 means 4 seconds, and so on.
5) Press the key [ENT], and [F4] appears again.
6) Press the key [ESC] and back to standby mode.
◆Volume Adjusting
※For APE9000, APE9300, APE9500 and APE9600 only. (The volume of the other models can be
changed with the volume controlling knob on the top of the receivers.)
1) Standby mode, press the key [UP] or [DOWN] to choose the volume, 01~15 means 15 kinds of

3
volumes.
2) Press the key [ESC], and back to standby mode.
◆Different Sounds for Different Pagers
(APE1900/APE2900/APE8000/ APE8200 not included)
1) Standby mode, press the key [FUN] for 3 seconds and [F1] appears on the screen.
2) Press the key [UP] to choose [F5].
3) Press the key [ENT] and [01] appears on the screen.
4) Use the key [UP], [MOVE] or [DOWN] to choose a sound.
5) Press the key [ENT] and [01] or [001] appears.
6) Use the key [UP], [MOVE] or [DOWN] to choose the number you want.
7) Press the call button, and the number flashes on the screen with sounds and then stop.
8) Press the key [ESC] and [F5] appears again, the registration is finished.
9) Press key [ESC] again to back to standby mode.
10) Repeat step 4) ~8) if more than one pagers needed to be registered.
◆Time Setting (for APE1900/APE2900/APE8000 /APE8200)
1) Standby mode, press the key [FUN] for 3 seconds till [F1] appears on the screen.
2) Use the key [UP] to choose [F5]
3) Press the key [ENT] and the current time, such as [13-29] displays on the screen,
4) Use the key [UP], [MOVE] or [DOWN] to the right time.
5) Press the key [ENT], and [F5] appears again.
6) Press the key [ESC] and back to standby mode.
◆Deleting the registered numbers or initializing the receiver
1) Standby mode, press the key [FUN] for 3 seconds till [F1] appears on the screen.
2) Use the key [UP] to choose [F6].
3) Press the key [ENT], the registered minimum number appears.
4) Use the key [UP], [MOVE], or [DOWN] to choose the number to be deleted.
5) Press the key [ENT], delete the number when it flashes with sounds. Then the next registered
number appears on the screen.
If initialization is needed, press the key [ENT], the numbers keep changing on the screen. When
[00]、[000]or[000-00] appears, the initializing is completed.
6) Press the key [ESC] and [F6] appears
7) Press the key [ESC] once more, back to standby mode, the number deleting is done.
※Special functions
◆Choose the button [cancel] with or without Sounds (for multi-button pagers)
1) Standby mode, press the key [FUN] for 3 seconds till [F1] appears on the screen.
2) Use the key [UP] to choose [F7].
3) Press the key [ENT] and [01] appears on the screen.
4) Use the key [UP], [MOVE] or [DOWN] to choose a number from 01 to 20. 01-10 means with
sounds, and 11-20 means without sounds when press the key [cancel].

4
5) Press the key [ENT] and [F7] appears again.
6) Press the key [ESC], back to standby mode.
◆Number display mode setting( all-digital display or digits beginning with an English letter,
for APE1200/APE1500/APE1800/APE1900/APE2000/APE2500/APE2600/APE2900/APE9500 )
1) Standby mode, press the key [FUN] for 3 seconds till [F1] appears on the screen.
2) Use the key [UP] to choose [F8].
3) Press the key [ENT] and [01] appears.
4) Use the key [UP], [MOVE], or [DOWN] to choose a number. 01~10 is all-digital display (default
setting), and 11~20 is digits beginning with an English letter ( A,B,C,D,E,F,H,P,J or L) display.
5) Press the key [ENT] and [F8] appears on the screen.
6) Press the key [ESC], back to standby mode.
◆Same or different sounds for multi buttons(forAPE1600/APE1800/APE2500/APE9600)
1) Standby mode, press the key [FUN] for 3 seconds till [F1] appears.
2) Use the key [UP] to choose [F8] (for APE1600/APE9600) or [F9] (for APE1800 / APE2500)
3) Press the key [ENT] and [00] appears on the screen.
4) Use the key [UP] or [DOWN] to choose a number. [01] means the same sound for different
buttons and [00] means different sounds for different buttons (default setting).
5) Press the key [ENT] and [F8] or [F9] appears on the screen.
6) Press the key [ESC] and back to standby mode.
Special Instruction for APE8000
◆Register the remote controller
1) Press the key [D] on standby mode (time display mode) and [F1] appears on the screen.
2) Press the key [D] again and the screen is on standby
3) Press the key [B] and [F1] appears on the screen.
4) Press the key [B] again and the registration is done.
Note: All the register steps should be finished within 2 minutes after the receiver is turned on.
The remote controller should be registered again when the receiver is turned on every time.
◆Specific Methods of Operation Are the Same with Other Hosts
The following is illustrations for each function key:
D: [FUN] (function-option key) / [ENT](enter)
B: [ESC] (escape)
A: [MOVE] (move)
C: [UP](up)
Volume adjustment:
1) Standby mode, press the key [C] to adjust the volume. Number 01~15 means 15 kinds of
volume.
2) Press the key [B], back to standby mode and the volume setting is done.

5
Cautions:
1、Please keep the wireless calling products away from the below interference sources
1) Base stations of mobile equipment.
2) Refrigerators、air conditioners and other high-powered electric appliances.
3) Large ultrasonic equipment in hospitals.
2、Installation notes
1) Plug in the adapter first (no wet hands) and connect with the receiver after power light on.
Then, turn on the receiver.
2) Any abnormality founded, please contact with SINGCALL customer service. To avoid
unnecessary troubles, please don’t disassemble the products by yourself.
3) It is recommended to use original accessories.
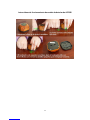
4) The pagers needed to be registered to the receiver before use. Keep the call buttons at least
30cm away from the receiver and make sure no one else presses the call buttons during the
registration. It is normal if one or two pagers can not be registered successfully when so many
pagers are registered at a time. Register the failed ones again. Check the receiving distance
before fixing the registered pagers.
5) Draw out the antenna of the registered receiver before use.
6) Please adjust the frequency of the walkie-talkie out of the range 433.92±10MHZ to avoid
disturbance if the wireless calling system and the walkie-talkie are using in the same place.
7) Pagers cannot direct contact with metal bases
8) Pasting the pagers on smooth surface for pasting on rough surface, such as wallpaper, is likely
to drop.
9) Please keep dry to avoid circuit oxidation.
10) The weather (Weather conditions will influence) influences the receive distance.


8
1 Registrierungsnummer
1)Bei Stand-By Modell FUN (Funktionstasten) für ca. 2 Sekunden drücken, bis F1 auf LCD
Bildschirm gezeigt ist.
2)Eingangtaste(ENT) einmal drücken und das Bildschirm zeigt 01,001 oder 001 01
3)Up Taste Move Taste und Down Taste benutzen um die gewünschte Registrierungsnummer
auszuwählen.
4)Die entsprechende Rufgerät drücken. Die Nummer im Bildschirm halte mit der Musik nach die
Blink.
5) Ausgangstaste noch einaml drücken und das Bilschirm zeigt F1.
6) ENT Taste lange drücken bis zum Stand-By-Modell, die Nummerregistrierung ist fertig.
7)Für Registierung mehrerer Nummer, die Schritte 3 und 4 folgen.ESC Taste zwei mal drücken
und die Registierung ist fertig.
2 Die Stimmetyp zu wählen
1)Bei Stand-By Modell FUN (Funktionstasten) für ca. 3 Sekunden drücken, bis F1 auf LCD
Bildschirm gezeigt ist.
2)“UP“ Taste benutzen um F2 auszuwählen.
3)Eingangtaste(ENT) drücken und das Bildschirm zeigt 01
4)“UP“ Taste und “DOWN“ Taste sind für die Auswahl der Art der Musik.Nummer 00 11
bedeuten 12 Typ polyphoner Musik und Nummer 12 bedeutet Stimme Berichts
※Stimme Berichts ist nur für APE2000 und APE9000 HostComputer
5)Eingangtaste(ENT) noch mal drücken und das Bildschirm zeigt F2
6)ESC Taste drücken bis zum Stand-By-Modell:Die Auswahl der Stimme ist fertig
3 Anzeige der Zeit anzeigen
1)Unter Stand-By Modell, FUN Funktionstaste für ca. 3 Sekunden drücken bis F1 auf Bildschirm
gezeigt.
2)“UP“ Taste benutzen um F3 auszuwählen.
3)Eingangtaste(ENT) noch mal drücken und das Bildschirm zeigt 20
4)UP Taste Down Taste Benutzen Sie um die gewünschte Zeit zu wählen.000 zeigt unendliche
Anzeige.Die entsprchenden Nummer zeigt die Zeit von 1 Sekund bis 99 Sekunden
5)Eingangtaste(ENT) noch mal drücken und das Bildschirm zeigt F3
6)ESC Taste drücken bis zum Stand-By-Modell:Die Auswahl der Zeit ist fertig
4 Ton Längeneinstellung
1)Bei Stand-By Modell FUN (Funktionstasten) für ca. 2 Sekunden drücken, bis F1 auf LCD
Bildschirm gezeigt ist.
2)“UP“ Taste benutzen um F4 auszuwählen.
3)Eingangtaste(ENT) noch mal drücken und das Bildschirm zeigt 01
4)UP Taste Down Taste Benutzen Sie um die gewünschte Zeit für die Stimme zu wählen.01 15
bedeuten 15 Zeitlänge.Eine Ziffer bedeutet zwei Sekunden.
5)Eingangtaste(ENT) noch mal drücken und das Bildschirm zeigt F3
6)ESC Taste drücken bis zum Stand-By-Modell:Die Auswahl der Zeit für die Stimme ist fertig

9
5 Lautstärke Auswahl
※Diese Schritt ist nur für APE9000 APE9300 APE9500 und APE9600 geeignet.Benutzen Sie die
obere Volume Poti-Knopf für die andere Geräte
1)Unter Stand By Modell Sie UP Tasre DOWN Taste benutzen umd die gewüschente Stimme
auszuwählen.01 15 bedeuten 15 Musikschintte
2)Die Ausgangstaste ESC noch einmal drücken bis zum Stand—By.Die Lautstärkeauswahl ist
fertig.
6 Die Methode die verschiedliche Rufgeräte unterschiedliche Stimme einrichtet.
1)Bei Stand-By Modell FUN (Funktionstasten) für ca. 2 Sekunden drücken, bis F1 auf LCD
Bildschirm gezeigt ist.
2)“UP“ Taste benutzen um F5 auszuwählen.
3)Eingangtaste(ENT) noch mal drücken und das Bildschirm zeigt 01
4) (UP) Taste (MOVE) Taste und (DOWN) Taste benutzen um die gewünschte Musik zu wählen..
5)Eingangtaste(ENT) noch mal drücken und das Bildschirm zeigt 01 001
6)(UP) Taste (MOVE) Taste und (DOWN) Taste benutzen um die gewünschte Nummer zu wählen..
7)Die entsprechende Rufgerät drücken. Die Nummer im Bildschirm halte mit der Musik nach die
Blink.
8)ESC noch mal drücken.Das Bildschirm zeigt F5 und die Nummerregistierung ist fertig.
9)ESC Taste drücken bis zum Stand-By-Modell:Die Auswahl der Zeit für die Stimme ist fertig
10)Für Registierung mehrerer Nummer, die Schritte 3 und 4 folgen.ESC Taste zwei mal drücken
und die Registierung ist fertig.
7 Zeiteinstellung nur für APE8000 und APE 8200 geeignet
1)Bei Stand-By Modell FUN (Funktionstasten) für ca. 3 Sekunden drücken, bis F1 auf LCD
Bildschirm gezeigt ist.
2)“UP“ Taste benutzen um F5 auszuwählen.
3)Eingangstaste ENT noch mal drücken.Das Bildschirm zeigt jetzt Zeit z.B 13 29
4)(UP) Taste (MOVE) Taste und (DOWN) Taste benutzen um die standard Zeit zu wählen..
5)Eingangtaste(ENT) noch mal drücken und das Bildschirm zeigt F5
6)ESC Taste drücken bis zum Stand-By-Modell:Die Auswahl der Zeit ist fertig
8 Nummer Löschen und Initialisierung
1)Bei Stand-By Modell FUN (Funktionstasten) für ca. 2 Sekunden drücken, bis F1 auf LCD
Bildschirm gezeigt ist.
2)“UP“ Taste benutzen um F6 auszuwählen.
3)ENT noch mal drücken und das Bildschirm zeigt die kelinste registierte Nummer
4)(UP) Taste (MOVE) Taste und (DOWN) Taste benutzen um zu löschende Nummer zu wählen.
5)Die Eingabetaste (ENT) noch mal drücken.Löschen Sie mit der Musik nach die Blink die
Nummer. Die Anzeige erscheint nächste registrierte Nummer; Wenn Sie initialisieren möchten, dr
ücken und halten Sie die Enter-Taste (HNO.Das Bildschrim hat Anzahlveränderung.Später auf dem
Display erscheint [00], [000] oder [000-00], was darauf hinweist, dass die Initialisierung
erfolgreich war.

10
6)Ausgangtaste ESC noch mal drücken.Das Bildschirm zeigt F6
7)ESC Taste drücken bis zum Stand-By-Modell:Die Löschen der Nummer ist fertig
※ Die folgenden 3 Funktionen sind für die Kunden die besonder Bedarf haben.
1 Wählen Sie ob die Abbrechen Taste Musik hat.(für mehrer Taste Rufgeräte eignet
1)Bei Stand-By Modell FUN (Funktionstasten) für ca. 2 Sekunden drücken, bis F1 auf LCD
Bildschirm gezeigt ist.
2)“UP“ Taste benutzen um F7 auszuwählen.
3)ENT Taste noch mal drücken Sie noch mal und das Bildschirm zeigt 01
4)(UP) Taste (MOVE) Taste und (DOWN) Taste benutzen um den Bereich der 01-bis 10-stellig zu
wählen.Die Nummer zwischen 01 und 10 zeigt"Abbrechen"-Musik (Host Werkseinstellung ist
Musik)Wenn Sie den Nummer von 11 bis 20 wählen,bedeute "Abbrechen" ohne Musik.
5)Eingangtaste(ENT) drücken und das Bildschirm zeigt F7
6)ESC Taste drücken bis zum Stand-By-Modell.Die Auswahl für die“Löschen” Taste für die Musik
ist fertig
2 Der Anzeigestyp der Nummer zu wählen (alle Nummer oder alle Englische Buchstabe
nur für APE2500/2600/2900/7000/7200/7800/9500/8000/8200 geeignet)
1)Im Breitschaft drücken Sie FUN(Funktionstaste) für 2 Sekunden.Das Bildschirm zeigt F1
2)“UP“ Taste benutzen um F8 auszuwählen.
3)ENT Taste drücken und das Bildschirm zeigt 01
4) (UP) Taste und (DOWN) Taste benutzen um die Nummer zwsichen 01 und 10 zu wählen.Die
Nummer zwischen 01 und 10 bedeuten all-digital-Typ(Moderator standardmäßig auf alle
Digital-Art-Fabrik).Die Nummer zwischen 10 und 20 bedeuten Buchstaben der Alpabet Typ(Die
steigende Nachfolge der Alpahbet ist ABCDEFHPLJ).
5)(ENT) Taste drücken und das Bildschirm zeigt F7
6)ESC Taste drücken bis zum Stand-By-Modell.Die Auswahl für die Type für die Nummer ist
fertig
3 Wählen Sie mehrere Schlüssel für die gleiche Art von Musik oder andere
Musik(nur für APE7600/7800/9600 geeignet)
1)Im Breitschaft drücken Sie FUN(Funktionstaste) für 2 Sekunden.Das Bildschirm zeigt F1
2)“UP“ Taste benutzen um F8(APE7600/APE9600)oder F9(APE2500/APE7800) auszuwählen.
3)ENT Taste drücken und das Bildschirm zeigt 01
4) (UP) Taste und (DOWN) Taste benutzen um mehr als 01 wählen zeigt die gleiche Art von
Musik, repräsentiert mehr als 00 Tasten, eine andere Musik (Host von verschiedenen
Musikwerkseinstellung ) wählen
5)Eingangtaste(ENT) drücken und das Bildschirm zeigt F8 oder F9
6)ESC Taste drücken bis zum Stand-By-Modell.Die Auswahl für die gleich oder unterschiedliche
Type für die Musik für die Taste ist fertig
APE8000 Besondere Hinweis
Registierung von Remote Control
1)Bei Stand-By Modell D Taste drücken, F1 auf LCD Bildschirm gezeigt ist.

11
2)D Taste drücken bis zum Stand By Modell
3)B Taste drücken und das Bildschirm zeigt F1
4)B Tatse drücken bis zum Stand By.Die Registierung ist fertig.
Hinweis die Schritte müssen in zwei Minuten geschafft werden
Die Methoden der Operation die gleiche wie bei anderen Wirten und Funktionstasten werde
nachfolgend beschriebenen
D FUN(Auswahltaste)ENT(Eingabetaste)Funktion
B ESC(Ausgang)Funktion
A Bewegung(Links oder Rechts)Funktion
C up(shift)Funktion
Volumen einrichten:
1)Im Standby-Modus, drücken Sie die C-Taste, um die gewünschte Lautstärke auszuwählen. 01
bis 15 repräsentieren 15 Volumensegmenten .
2)Taste B drücken bis zum Standby-Modus.Die Lautstärkeregelung ist fertig.
Hinweis:
1、Es gibt Signalstörungen f ür Wireless-Produkte in folgenden Standorte
vermeiden Sie wenn Installation
1)Die Nähe Plätze von mobilen Geräten Stationen
2)Die Nähe der Kühlschränke, Klimaanlagen oder andere High-Power-elektrische Felder
3)In der Nähe von Ultraschallgeräte in einem großen Krankenhaus
2、Bitte beachten Sie bei der Installation des Produkts
1)Host-Netzadapterbuchse soll zuerst zu Stromversorgung geleitet(darauf achten, nicht mit
nassen Händen ber ühren).Nach die Leutchtung der Licht verbinden Sie der Haupt
Computer.Danach öffnen Sie Schalter und benuten
2)Wenn as Produkt abnormal gefundenist, rufen Sie bitte anAftermarket-Hersteller.Bitte nehmen
Sie das Produkt nicht willkürlich auseinander, um unnötigen Ärger zu vermeiden
3)Unsere Produkte sind nach die ausgewählt Produktleistung auf die beste Konfiguration
Zubehör.Wie empfehlen Ihnen die Verwendung von Original-Zubehör (zB Netzteile, Batterien)
4)Der Rufgerät und Haupt Computer können nur nach der Registierung benutzt werden.Bei
Registierung müssen zwei Geräte entfernt werden,am besten von 30 cm.Bei Registierung können
die andere Leute das Rufgeräte nocht drücken.Wenn Sie mehrer Nummer einmal registrien
möchten und einige Nummer ist nicht registriert,ist es normal und die Nummer brauchen nur
noch mal registiert werden.
5)Ziehen Sie die Master Antenne nach die Registierung
6)Wenn Sie mit Sprechgerät zusammen benutzen,bitte richten Sie Gegensprechanlageband
ausser 344.92Mhz plus minus 10 Mhz oder Störung werde erzeugt.
7)Rufgerät kann nicht direkt an die Metallgrundmaterial
8)Rufgeräte müssen auf einer glatten Oberfläche eingfügt werden,weil es im raue Oberfläche
leicht zu fallen ist (wie Tapete)
9)Feuchten Orten führen leicht oxidiert Schaltung. Schützen Sie vor Feuchtigkeit
10)Regenwetter und sonniger Empfang wird einige Unterschiede erzeugen.


14
1. Numéro d’enregistrement
1) En état de guetter l’occasion, appuyer bouton FUN 3 minutes, F1 apparaît sur l’écran.
2) Appuyer une fois bouton d’entrer ENT, l’écran montre [01]、[001] ou [001-01].
3) Utiliser bouton haut UP, bouton MOVE et DOWN pour choisir le numéro qui doit être
enregistré.
4) Appuyer une fois l’appeleur qui doit être enregistré avec la musique d’accord, le numéro sur
l’écran clignote et puis s’arrête.
5) Appuyer une fois bouton ESC, F1 apparaît sur l’écran.
6) Appuyer encore une fois bouton ESC pour entrer en état de guetter l’occasion, finir le numéro
d’enregistrement.
7) S’il faut enregistrer en même temps plusieurs numéros, on peut répéter le processus de 3) et 4).
2. Choix de genre de voix
1) En état de guetter l’occasion, appuyer bouton FUN 3 minutes, F1 apparaît sur l’écran.
2) Utiliser bouton UP choisir F2.
3) Appuyer une fois bouton ENT, 01 apparaît sur l’écran.
4) Utiliser bouton UP, DOWN choisir le genre de musique. Choisir 00-11 exprime 12 genres de
musiques d’accord, choisir 12 exprime l’annonce de numéro à voix.
※ l’annonce de numéro à voix est applicable seulement à l’hôte de série APE2000 et APE9000
5) Appuyer une fois bouton ENT, F2 apparaît sur l’écran.
6) Appuyer encore une fois bouton ESC pour entrer en état de guetter l’occasion, finir le choix de
genre de voix.
3. Choix de durée d’indication de numéro
1) En état de guetter l’occasion, appuyer bouton FUN 3 minutes, F1 apparaît sur l’écran.
2) Utiliser bouton UP choisir F3.
3) Appuyer une fois bouton ENT, 20 apparaît sur l’écran.
4) Utiliser bouton UP et DOWN pour choisir la durée d’indication qui doit être choisie. 00
exprime l’infini, chaque chiffre exprime la durée correspondante, d’une seconde à 99 secondes.
5) Appuyer une fois bouton ENT, F3 apparaît sur l’écran.
6) Appuyer une fois bouton ESC pour entrer en état de guetter l’occasion, finir le choix de durée
d’indication.
4. Choix de durée de voix
1) En état de guetter l’occasion, appuyer bouton FUN 3 minutes, F1 apparaît sur l’écran.
2) Utiliser bouton UP choisir F4.
3) Appuyer une fois bouton ENT, 01 apparaît sur l’écran.
4) Utiliser bouton UP et DOWN pour choisir la durée de voix. 01-15 exprime quinze parties de
durée, 1 exprime deux secondes.
5) Appuyer une fois bouton ENT, F4 apparaît sur l’écran.
6) Appuyer une fois bouton ESC pour entrer en état de guetter l’occasion, finir le choix de durée
de voix.
5. Ajustement de volume

15
※cette étape est seulement applicable à l’hôte de série APE9000, APE9300, APE9500 et
APE9600, pour l’hôte d’autres types, merci d’utiliser le bouton de potentiomètre de volume pour
l’ajuster.
1) En état de guetter l’occasion, utiliser bouton UP, DOWN pour choisir le volume de voix. 01-15
exprime quinze volumes.
2) Appuyer une fois bouton ESC pour entrer en état de guetter l’occasion, finir l’ajustement de
volume.
6. Façon d’installer différentes voix selon différentes appeleurs
(non applicable à l’hôte de type APE8000, APE8200).
1) En état de guetter l’occasion, appuyer bouton FUN 3 minutes, F1 apparaît sur l’écran.
2) Utiliser bouton UP, choisir F5.
3) Appuyer une fois bouton ENT, 01 apparaît sur l’écran.
4) Utiliser bouton UP, MOVE, DOWN pour choisir la musique demandée.
5) Appuyer une fois bouton ENT, 01 ou 001 apparaît sur l’écran.
6) Utiliser bouton UP, MOVE, DOWN pour choisir le numéro d’enregistrement demandé.
7) Appuyer une fois l’appeleur qui doit être enregistré, avec la musique, le chiffre sur l’écran
clignote et puis s’arrête.
8) Appuyer une fois bouton ESC, F5 apparaît sur l’écran, finir l’enregistrement de numéro.
9) Appuyer encore une fois bouton ESC pour entrer en état de guetter l’occasion.
10) S’il faut enregistrer plusieurs numéros, on peut répéter le processus de 4) à 8).
7. Ajustement de temps (applicable uniquement à l’hôte de type APE8000 et APE8200)
1) En état de guetter l’occasion, appuyer bouton FUN 3 minutes, F1 apparaît sur l’écran.
2) Utiliser bouton UP, choisir F5.
3) Appuyer une fois bouton ENT, le temps actuel apparaît sur l’écran, par exemple : 13-29.
4) Utiliser bouton UP, MOVE, DOWN pour ajuster au temps standard d’actuel.
5) Appuyer une fois bouton ENT, F5 apparaît sur l’écran.
6) Appuyer une fois bouton ESC pour entrer en état de guetter l’occasion, finir l’ajustement de
temps.
8. Cancellation de numéro et initialisation
1) En état de guetter l’occasion, appuyer bouton FUN 3 minutes, F1 apparaît sur l’écran.
2) Utiliser bouton UP, choisir F6.
3) Appuyer une fois bouton ENT, l’écran montre le minimum numéro enregistré.
4) Utiliser bouton UP, MOVE, DOWN pour choisir le numéro qui doit être supprimé.
5) Appuyer une fois bouton ENT, avec la musique, le numéro clignote et puis est supprimé,
l’écran montre le suivant numéro enregistré ; s’il faut l’initialisation, appuyer alors bouton ENT, le
changement de chiffre commence sur l’écran, après l’écran montre 00, 000, 000-00, cela veut dire
que l’initialisation est réussie.
6) Appuyer une fois bouton ESC, F6 apparaît sur l’écran.
7) Appuyer une fois bouton ESC pour entrer en état de guetter l’occasion, finir la cancellation de
numéro.

16
※ Ces trois fonctions sont pour les clients qui ont des demandes spéciales
1. Choisir bouton « annuler » avec ou sans la musique (applicable plutôt à l’appeleur
multi-bouton)
1) En état de guetter l’occasion, appuyer bouton FUN 3 minutes, F1 apparaît sur l’écran.
2) Utiliser bouton UP, choisir F7.
3) Appuyer une fois bouton ENT, 01 apparaît sur l’écran.
4) Utiliser bouton UP, DOWN choisir un chiffre libre entre 01-10 exprime l’annulation avec la
musique (acceptation tacite avec la musique pour l’hôte), choisir un chiffre libre entre 11-20
exprime l’annulation sans la musique.
5) Appuyer une fois bouton ENT, F7 apparaît sur l’écran.
6) Appuyer une fois bouton ESC pour entrer en état de guetter l’occasion, finir le choix de bouton
d’annulation avec ou sans musique.
2. Choix de type d’indication de numéro
(tout chiffre ou lettres anglais comme commencement, applicable uniquement à
APE2500/APE2600/APE2900/APE7000/APE7200/APE7800/APE9500/APE8000/APE8200)
1) En état de guetter l’occasion, appuyer bouton FUN 3 minutes, F1 apparaît sur l’écran.
2) Utiliser bouton UP, choisir F8.
3) Appuyer une fois bouton ENT, 01 apparaît sur l’écran.
4) Utiliser bouton UP, DOWN choisir un chiffre libre entre 01-10 exprime tout chiffre (acceptation
tacite est tout chiffre), choisir un chiffre libre entre 11-20 exprime les lettres anglais comme
commencement (séquence croissante de lettres est ABCDEFHPJL).
5) Appuyer une fois bouton ENT, F8 apparaît sur l’écran.
6) Appuyer une fois bouton ESC pour entrer en état de guetter l’occasion, finir le choix de type
d’indication de numéro.
3. Choix de multi-bouton pour le même genre de musique ou différents genres de
musiques (applicable uniquement à APE7600/7800/9600)
1) En état de guetter l’occasion, appuyer bouton FUN 3 minutes, F1 apparaît sur l’écran.
2) Utiliser bouton UP, choisir F8 (APE7600/APE9600) ou F9 (APE2500/APE7800).
3) Appuyer une fois bouton ENT, 00 apparaît sur l’écran.
4) Utiliser bouton UP, DOWN choix 01 exprime multi-bouton pour le même genre de musique,
choix de 00 exprime multi-bouton pour les différents genres de musiques.
Multi-bouton est passé pour différents genres de musique (acceptation tacite de l’hôte est
différents genres de musiques)
5) Appuyer une fois bouton ENT, F8 ou F9 apparaît sur l’écran.
6) Appuyer une fois bouton ESC pour entrer en état de guetter l’occasion, finir le choix de
multi-bouton pour le même genre de musique ou différents genres de musiques.
Note particulier de l’APE8000 :
Télécommande enregistré
1) En état de guetter l’occasion (état de temps), appuyer une fois bouton D, F1 apparaît sur
l’écran.
2) Appuyer une fois bouton D, l’écran entre en état de guetter l’occasion.
3) Appuyer une fois bouton B, F1 apparaît sur l’écran.

17
4) Appuyer encore une fois bouton B pour entrer en état de entre en état de guetter l’occasion et
finir l’enregistrement de télécommande.
Attention : cette étape doit être finie dans deux minutes après le démarrage.
Façon d’opération est pareil que les autres hôtes, bouton de fonctions de télécommande
ci-dessous :
D : FUN (bouton de choisir)/ENT (bouton d’entrer) fonction
B : ESC (bouton de sortir) fonction
A : MOVE (bouton gauche et droit) fonction
C : UP (bouton haut) fonction
Ajustement de volume :
1) En état de guetter l’occasion, appuyer bouton C choisir le volume demandé. 01-15 exprime
quinze volumes.
2) Appuyer une fois bouton B pour entrer en état de guetter l’occasion, finir l’ajustement de
volume.
Attention :
1. dans les situations suivantes, il y a l’interférence de signal sur le produit sans fil, il faut
possiblement l’éviter ou l’éloigner.
1) Endroits à côté de centrales d’installations mobiles.
2) A côté de machines électriques de grande puissance comme frigorifique et climatisation.
3) A côté de machines de grand ultrason de l’hôpital.
2. Attention aux points ci-dessous au moment de montage
1) Il faut connecter tout d’abord la source d’électricité de la prise d’adaptateur de source de l’hôte
(il ne faut pas le toucher avec la main mouillée), attendre que la lampe de témoin s’allume et puis
connecter avec l’hôte, ensuite ouvrir le robinet et utiliser normalement.
2) Si vous trouver l’étrange du produit, merci d’appeler le service d’après-vente pour vous
renseigner d’abord, il ne faut pas décharger le produit librement pour éviter le trouble non
nécessaire.
3) Les attachements du produit de notre société choisissent la meilleure configuration, on vous
conseil d’utiliser l’attachement d’origine (comme adaptateur de source d’électricité et pile).
4) On peut utiliser l’appeleur et l’hôte enregistrés, il faut garder une certaine distance entre les
deux au moment de l’enregistrement, la meilleur distance est hors de 30cm, il ne faut pas appuyer
l’appeleur au moment d’enregistrement, s’il y a un certain numéro n’est pas réussi pendant
l’enregistrement de plusieurs numéro d’une seule fois, c’est normal, il suffit d’enregistrer
seulement une fois. On attend le test de distance pour attacher l’appeleur.
5) Merci de tirer l’antenne de l’hôte au moment d’utilisation après l’enregistrement.
6) Quand on utilise en même temps avec le talkie-walkie, merci de régler sa bande à la déviation
de hors de 433.92Mhz plus ou moins 10Mhz.
7) L’appeleur ne faut pas toucher directement le socle de matériel métal.
8) Il faut essayer d’attacher l’appeleur sur une surface lisse, la surface rugueuse est facile à tomber
(comme papier peint).
9) L’endroit mouillé va causer l’oxydation de courant électrique, attention à l’anti-mouille.
10) Il y a la différence de la distance de réception entre temps pluvieux et beau temps.
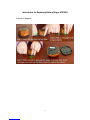
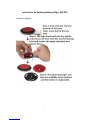
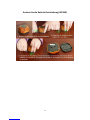
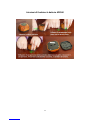
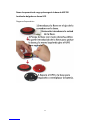
Notice d’opération de changement de pile de APE560


20
Manuale
Ⅰ.Numero di registrazione
1)Premere il tasto di selezione (FUN) per 3 secondi in modalità di standby, si
mostra [F1] sullo schermo.
2)Premere il tasto di entrare una volta (ENT), si mostra [01]、[001] o [001-01]
sullo schermo.
3)Selezionare il numero desiderato di registrazione via il tasto sopra (UP),
sinistra & destra (MOVE) e sotto (DOWN).
4)Premere cercapersone per registrazione una volta con la musica polifonica, il
numero sullo schermo è fermato dopo lampeggia.
5)Premere il tasto di uscire (ESC) una volta, si mostra [F1] sullo schermo.
6)Premere il tasto di uscire (ESC) una altra volta per entrare lo stato di standby,
il numero di registrazione è completato.
7)Si può ripetere il programma 3)~4)per registrare più numeri, infine, premere
il tasto di uscire due volte (ESC) per completare la registrazione
contemporaneamente.
Ⅱ. Selezionare il tipo di suono
1)Premere il tasto di selezione (FUN) per 3 secondi in modalità di standby, si
mostra [F1] sullo schermo.
2)Selezionare [F2] via il tasto sopra(UP).
3)Premere il tasto di entrare una volta (ENT), si mostra [01] sullo schermo.
4)Selezionare il tipo di musica via il tasto sopra (UP)e sotto (DOWN). Selezionare
00~11 per 12 tipi di musica polifonica, e 12 per il numero vocale.
※ Il numero vocale si applica per mainframe di serie di APE2000 ed APE9000
solamente.
5)Premere il tasto di entrare una volta (ENT), si mostra [F2] sullo schermo.
6)Premere il tasto di uscire (ESC) una altra volta per entrare lo stato di standby,
selezione del tipo di suono è completato.
Ⅲ. Selezionare il tempo di mostrare il numero
1)Premere il tasto di selezione (FUN) per 3 secondi in modalità di standby, si
mostra [F1] sullo schermo.
2)Selezionare [F3] via il tasto sopra(UP).
3)Premere il tasto di entrare una volta (ENT), si mostra [20] sullo schermo.
4)Selezionare il tempo da mostrare via il tasto sopra (UP )e sotto (DOWN).
Selezionare [00] per la mostrazione senza limitazione, la cifra si indica il tempo
corrispondente da 1-99 secondi.
5)Premere il tasto di entrare una volta (ENT), si mostra [F3] sullo schermo.
6)Premere il tasto di uscire (ESC) una altra volta per entrare lo stato di standby,
selezione di tempo da mostrare è completato.
Ⅳ.Selezione del periodo di suono
La pagina si sta caricando...
La pagina si sta caricando...
La pagina si sta caricando...
La pagina si sta caricando...
La pagina si sta caricando...
La pagina si sta caricando...
La pagina si sta caricando...
La pagina si sta caricando...
La pagina si sta caricando...
La pagina si sta caricando...
La pagina si sta caricando...
La pagina si sta caricando...
La pagina si sta caricando...
-
 1
1
-
 2
2
-
 3
3
-
 4
4
-
 5
5
-
 6
6
-
 7
7
-
 8
8
-
 9
9
-
 10
10
-
 11
11
-
 12
12
-
 13
13
-
 14
14
-
 15
15
-
 16
16
-
 17
17
-
 18
18
-
 19
19
-
 20
20
-
 21
21
-
 22
22
-
 23
23
-
 24
24
-
 25
25
-
 26
26
-
 27
27
-
 28
28
-
 29
29
-
 30
30
-
 31
31
-
 32
32
-
 33
33


Singcall APE2900 Manuale utente
- Tipo
- Manuale utente
in altre lingue
- français: Singcall APE2900 Manuel utilisateur
- español: Singcall APE2900 Manual de usuario
- Deutsch: Singcall APE2900 Benutzerhandbuch
Altri documenti
-
LG GD550.ASWSTG Manuale utente
-
Saeco Royal Digital SUP 015 User's And Maintenance Booklet
-
-
Philips RI 9913- SUP 016 E Manuale utente
-
FUJITSU SIEMENS SCALEO EV Manuale del proprietario
-
LG LG GD510 Twilight Manuale utente
-
LG GD510 Manuale utente
-
Denon DVD-M330 Manuale del proprietario
-
-
Alpine KCE-300BT Manuale utente