Jamara 404960 Istruzioni per l'uso
- Categoria
- Giocattoli telecomandati
- Tipo
- Istruzioni per l'uso

No. 404960
Mercedes-Benz Antos
Feuerwehr Drehleiter 2,4 GHz
23/21
Frequency bands: 2,4 GHz Frequency range: 2405 ~ 2475 MHz EIRP: < 1,6 mW (max. power transmitted)
DE - Allgemeine Hinweise
JAMARA e. K. übernimmt keine Haftung für Schäden, die an dem Produkt selbst oder durch dieses
entstehen, sofern diese auf falsche Bedienung oder Handhabungsfehler zurückzuführen sind. Der
Kunde allein trägt die volle Verantwortung für die richtige Bedienung und Handhabung; dies umfasst
insbesondere die Montage, den Ladevorgang, die Verwendung bis hin zur Wahl des Einsatzberei-
ches. Bitte beachten Sie hierzu die Bedienungs- und Gebrauchsanleitung, diese enthält wichtige
Informationen und Warnhinweise.
GB - General information
JAMARA e.K. is not liable for any damage caused to the product itself or through this, provided this
is due to improper operation or handling errors. The Customer alone bears the full responsibility for
the proper use and handling, including without limitation, the assembly, the charging process, the
use and choice of the operation area. Please refer to the operating and user instructions, it contains
important information and warnings.
FR - Remarques générales
La société JAMARA e. K. n’est pas responsable de dommages, que ce soit au niveau du modèle
ou causé par celui-ci, résultant d’une utilisation non appropriée. Seul le client est responsable con-
cernant la mise en oeuvre et l’utilisation conforme du matériel; cela va de l’assemblage, en passant
par la charge des accus et allant jusqu’au domaine d’utilisation. Pour cela, veillez lire attentivement
la notice d’assemblage et d’utilisation, celle-ci contient d’importantes informations ainsi que les con-
signes de sécurités.
IT - Informazioni generali
JAMARA e. K. non e´responsabile per danni, sostenute al prodotto stesso o attraverso questo,
dovuti ad una gestione non corretta del articolo. Solo il cliente si assume la piena responsabilità per
la manutenzione e l´utilizzo corretto dello stesso; questo include il montaggio, la ricarica, l´utilizzo,
contengono informazioni e avvertimenti molto importanti.
ES - Información general
JAMARA K. no se hace responsable de los daños causados al producto en sí o por medio de
esto, a menos que esto se debe al mal funcionamiento o errores de manejo. El cliente solo tiene la
responsabilidad completa para el uso y manejo adecuado, incluyendo, sin limitaciones, el montaje,
el proceso de carga, el uso de hasta la elección de la zona de aplicación. Por favor, consulte las
instrucciones de uso y funcionamiento, contiene información y avisos importantes.
CZ - Vyloučení odpovědnosti
PL - Wykluczenie odpowiedzialności
-
NL - Uitsluiting van de aansprakelijkheid
ervan indien deze schade voortvloeit van onjuiste bediening of foutief gebruik van het product. De
het omvat met name de montage, het ladingproces, het gebruik en de keuze van het toepassings-
gebied. Wij vragen gaarne kennis te nemen van de bedienings- en gebruiksaanwijzing die cruciale
gegevens en waarschuwing omvat.
SK - Vylúčenie zodpovednosti
-
upozornenia.
DE
Geeignet für Kinder ab 6 Jahren.
Achtung: - Für Kinder unter 36 Monaten nicht geeignet.
ERSTICKUNGSGEFAHR!
- Enthält verschluckbare Kleinteile. Von Kleinkindern unbedingt fernhalten.
- Dieses Modell ist nicht dafür bestimmt, durch Personen (einschließlich
Kinder) mit eingeschränkten physischen, sensorischen oder geistigen
Fähigkeiten oder mangels Erfahrung und/oder mangels Wissen benutzt zu
werden, es sei denn, sie werden durch eine für ihre Sicherheit zuständige
Person beaufsichtigt, wie das Gerät zu benutzen ist.
GB
Suitable for children over 6 years.
Warning: - Not suitable for children under 36 months.
RISK OF SUFFOCATION!
- Contains small parts which can be swallowed.
Keep away necessarily from children.
- This device is not intended for use by individuals (Including children) with
reduced physical sensory, mental abilities, lack of experience and / or
knowledge, unless they are supervised in how the device is to be used.
FR
Adapté pour des enfants à partir de 6 ans.
Attention: - Ne convient pas aux enfants de moins de 36 mois.
- DANGER D‘ETOUFFEMENT!
- Contient de petites pièces facilement avalables.
Garder lion nécessairement enfants.
-
(également des enfants) présentant des défaillances physiques, sensitives
ou mentales, cela s’applique aussi aux personnes n’ayant pas ou peu
d’expériences hormis si celle-ci est accompagnée par une personne
responsable et concernant la manipulation de cet appareil.
IT
Consigliato per bambini superiori ai 6 anni!
Attenzione: - Non adattato ai bambini inferioti ai 36 mesi.
PERICOLO DI SOFFOCAMENTO!
- Contiene pezzi piccoli. Tenere lontano assolutamente dei bambini.
- Questo prodotto non è destinato a essere utilizzato da persone (bambini
oppure mancanza di esperienza e/o di conoscenza. A meno che, siano
sorvegliate da una persona respon sabile della loro sicurezza su come
usare il prodotto in modo corretto.
ES
Apto para niños mayores de 6 años.
Atención: - No es recomendable para los niños menores de 36 meses.
- RIESGO DE ASFIXIA!
- Contiene piezas pequeñas. Mantenga necesariamente lejosde los niños.
- Este dispositivo no debe ser utilizado por personas(incluidos niños) con
discapacidad física, habilidades sensoriales o mentales o la falta de
experiencia y / o conocimientos, porque son responsables de su propia
persona que son supervisados en cómo usar.
CZ
Určeno pro děti od 6 let!
VAROVÁNÍ:
- NEBEZPEČÍ UDUŠENÍ!
PL
Wolno używać osobom od 6 lat!
Uwaga:
ZAWIERA MAŁE POŁYKALNE CZĘŚCI!
NL
Geschikt voor kinderen vanaf 6 jaar!
Let op: - Niet geschikt voor kinderen onder de 36 maanden.
VERSTIKKINGSGEVAAR!
- Bevat kleine onderdelen.
Het mag onder geen beding aan kleine kinderen gegeven worden.
- Dit model mag niet gebruikt worden door kinderen en personen met een
beperkte mentale capaciteit of met gebrek aan kennis, tenzij zij onder
toezicht van een voor hun veiligheid instaande persoon staan of tenzij zij
instructies kregen, hoe het model gebruikt dient te worden.
SK
Vhodné pre osoby od 6 rokov!
Pozor:
NEBEZPEČENSTVO ZADUSENIA!
DE - Gebrauchsanleitung
GB - Instruction
FR - Notice
IT - Istruzione
ES - Instrucción
CZ - Návod k použití
PL - Instrukcja użytkowania
NL - Gebruiksaanwijzing
SK - Návod na použitie

2
DE - Konformitätserklärung
Hiermit erklärt JAMARA e.K., dass das Produkt‚ „Mercedes-Benz Antos Feuerwehr
Drehleiter 2,4 GHz, No. 404960“ den Richtlinien 2014/53/EU, 2011/65/EU und
2009/48/EG entspricht.
Der vollständige Text der EU-Konformitätserklärung ist unter der folgenden
www.jamara-shop.com/Konformitaet
GB - Certicate of Conformity
Hereby JAMARA e.K. declares that the product „Mercedes-Benz Antos Feuerwehr Drehleiter
2,4 GHz, No. 404960“ complies with Directive 2014/53/EU, 2011/65/EU and 2009/48/EC.
www.jamara-shop.com/Conformity
FR - Déclaration de conformité
Par la présente, JAMARA e.K. déclare que le produit „Mercedes-Benz Antos Feuerwehr Drehleiter
2,4 GHz, No. 404960“ est conforme à la Directive 2014/53/UE, 2011/65/UE et 2009/48/CE.
www.jamara-shop.com/Conformity
IT - Dichiarazione di conformità
Con la presente JAMARA e.K. dichiara che il prodotto „Mercedes-Benz Antos Feuerwehr Drehleiter
2,4 GHz, No. 404960“ è conforme alla Direttiva 2014/53/UE, 2011/65/UE e 2009/48/CE.
www.jamara-shop.com/Conformity
ES - Declaración de conformidad
Por la presente JAMARA e.K. declara que el producto „Mercedes-Benz Antos Feuerwehr Drehleiter
2,4 GHz, No. 404960“ cumplen con las Directivas 2014/53/UE, 2011/65/UE y 2009/48/CE.
-
www.jamara-shop.com/Conformity
CZ - Prohlášení o shodě
-
www.jamara-shop.com/Conformity
PL - Deklaracja zgodności
2,4 GHz, No. 404960“ jest zgodny z dyrektywami 2014/53/UE, 2011/65/UE i 2009/48/WE.
www.jamara-shop.com/Conformity
NL - Conformiteitsverklaring
„Muldenkipper Mercedes-Benz Arocs,
No. 410118“ aan de richtlijnen 2014/53/EU, 2011/65/EU en 2009/48/EG voldoen.
www.jamara-shop.com/Conformity
SK - Vyhlásenie o zhode
GHz, No. 404960„ je v súlade so smernicami 2014/53/EÚ, 2011/65/EÚ a 2009/48/ES.
www.jamara-shop.com/Conformity
DE - Achtung!
Vor dem Betrieb: Erst Modell und dann den Sender einschalten.
gehörenden Sender einschalten. Dann das nächste Fahrzeug und den dazu gehörenden Sender
re Fahrzeuge auf denselben Sender reagieren könnten.
Bei Beendigung: Erst das Modell und dann den Sender ausschalten.
maximale Sichtweite als auch die max. Reichweite Ihres Modells hängen von vielen Faktoren wie
Witterung, Einsatzort und vorhandenen Störfrequenzen ab. Führen Sie deshalb vor jedem
Reichweitentest durch und prüfen Sie auch wie sich das Modell während des Betriebs bei einem
Signalausfall wie z.B. bei leeren Senderbatterien oder ausgeschaltetem bzw. ausgefallenem
Sender verhält.
GB - Attention!
Before operating:
appropriate transmitter. Do not switch on several models or transmitters at the same time as
multiple models could react to the same transmitter.
When nished:
your model will depend on many factors such as weather, location and interfering frequencies.
Therefore, before each use perform a range test with a second person securely holding the model
and also check how the model reacts if there is a signal failure e.g. when empty transmitter
batteries are installed.
FR - Attention!
Avant l’utilisation: Allumez en premier modèle puis seulement votre l’émetteur.
ensuite l’émetteur convenable. Puis un autre engin et l’émetteur convenable et ainsi de suite. Ne
véhicule pourront réagir à la commande d’un émetteur.
Après utilisation:
que la portée maximale dépendent de plusieurs facteurs tels que le temps, le lieu d’utilisation et
réactions du modèle en usage en cas de pertes de signal due par exemple à des piles usées ou
à un émetteur éteint.
IT - Attenzione!
Prima dell‘uso: Accendete prima il modello e poi la trasmittente.
contemporaneamente, altrimenti i vari veicoli possono rispondere alla stessa radio.
Dopo l‘uso: Spegnere prima il modello e poi la trasmittente.
del vostro modello dipendono da molti fattori, come il tempo, disturbo di frequenza e il luogo di
utilizzo. Eseguire un test prima di ogni utilizzo del modello con una seconda persona che tiene
perdita del segnale causato per esempio da una batterie scarica oppure la radio spenta.
ES - ¡Atención!
Antes del uso: Encender primero el modelo, y después la emisora.
vehículos o emisoras al mismo tiempo, de lo contrario
Después del uso: Apagar primero el modelo, y después la emisora.
frecuencia de interferencia y el lugar de utilización. Realice una prueba antes de cada uso
puede comprobar cómo el modelo reacciona durante la pérdida de señal causada por
jemplo por una batería descargada o la emisora apagada.
CZ - Varování!
Při zapínání:
Při vypínání:
PL - Uwaga!
Przed uruchomieniem:
Po zakończeniu:
NL - Let op!
In het begin: eerst het model en dan de zender inschakelen.
toegewezen zender. Vervolgens het volgende voertuig en de aan hem toegewezen zender. Nooit
meerdere voertuigen of zenders tegelijk aanzetten omdat meerdere voertuigen mogen met
dezelfde zender werken.
Bij beëindiging: eerst het model en dan de zender uitschakelen.
afstand van het model zijn afhankelijk van vele factoren zoals het weer, de werkingsplaats en
storende frequenties. Daarom dient, voor elk gebruik, een afstandtest met een andere persoon te
worden uitgevoerd die het voertuig op een veilige manier vasthoudt. Hier wordt het functioneren
van het model bij ontbrekend signaal tijdens de werking gecontroleerd als bv. bij lege batterijen
van de zender of bij een defecte zender of bij een zender die uit staat.
DE - Bitte lesen Sie die komplette Bedienungsanleitung und Sicherheits-
hinweise sorgfältig durch bevor Sie das Produkt in Betrieb nehmen.
Achtung! Warnhinweise / Sicherheitshinweise unbedingt komplett
lesen. Diese dienen Ihrer Sicherheit und können Unfälle /
Verletzungen vermeiden.
GB - Read the complete instructions and security instructions carefully before
using the product.
Caution! Please fully and carefully read warnings/ safety instructions.
These are for our own security and can avoid accidents/injuries.
FR - Veuillez lire attentivement et entièrement la notice et les consignes de
Attention! La mise en garde et les consignes de sécurités sont à lire
entièrement pour votre sécurité et éviter tout accidents et blessures.
IT - Vi preghiamo di leggere attentamente la istruzione completa e Istruzioni
per la sicurezza prima di usare il prodotto.
Attenzione! Leggere completamente le avvertenze / istruzioni di
sicurezza, questi sono per la vostra sicurezza può prevenire
incidenti / infortuni.
ES - Lea atentamente la instruccion completa y seguridad antes de poner el
producto en funcionamiento
Atención! Leer completamente las notas de advertencia /
instrucciones de seguridad estos son para su seguridad y puede
evitar accidentes / lesiones
CZ -
Upozornění! Varování / bezpečnostní pokyny musí být přečteny v
plném rozsahu! Slouží vaší bezpečnosti a mohou zabránit nehodám /
zraněním.
PL
Uwaga! Proszę uważnie przeczytać ostrzeżenia / instrukcje dotyczące
bezpieczeństwa. Są one dla naszego własnego bezpieczeństwa i
mogą pomóc uniknąć wypadków / urazów.
NL - Lees de volledige instructies en veiligingheidsinstructies zorgvuldig door
voordat u het model in gebruik neemt.
Voorzichtig! Lees aandachtig en zorgvuldig de waarschuwingen /
veiligheidsinstructies. Deze zijn voor uw eigen veiligheid en kunnen
ongevallen / verwondingen voorkomen.
SK
Upozornenie! Varovania/bezpečnostné pokyny musia byť prečítané v
celom rozsahu! Slúžia na Vašu bezpečnosť a môžu zabrániť
nehodám/zraneniam.

3
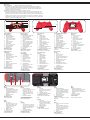
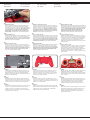
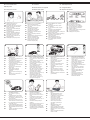
DE - Funktionen
Fernsteuerung
1. Ein/Aus Starten
2. Vorwärts/Rückwärts
3. Demo Funktion
4. Leiter hoch-/ausfahren |
Leiter runter-/einfahren
5. Sirene
6. Hupe und Sound
7. Spritz Funktion
8 Links/rechts
9. Memory / Lernfunktion
10. Leiter links/rechts
11. Ein-/Ausschalter
12. Batteriefach
Batterien einlegen
Auf Polarität achten.
GB - Functions o
Transmitter
1. Start button
2. Forward/backward
3. Demo-function
4. Extend or retract the Ladder
Extendable ladder
5 . Fire siren
6. Horn & Sound
7. Splash function
8. Left/right
9. Memory / Learning function
10. Ladder left/right
12. Battery cover
Fitting the batteries
FR - Fonctions
Radiocommande
2. Marche avant/arriére
4. L’échelle monte/sort
L’échelle descend/rentre
5. Sirène
7. Fonction de pulvérisation
8. Tourner à droite/gauche
9. Mémoire / Fonction
d’apprentissage
10. Échelle gauche / droite
11. Interrupteurs
12. Batterie
Mise en place des piles
Respectant la polarité.
IT - Funzioni
Telecomando
1. Accendi/Spegni - Avvio
2. Avanti/Indietro
3. Demo funzione
4. Estendere la scala
Scendere la scala
5. Sirena
6. Clacson e suono
7. Funzione di spruzzo
8. Sinistra/Destra
9. Memoria / Funzione di a
pprendimento
10. Scala sinistra / destra
11. Pulsante Accendi/Spegni
12. Vano batteria
Montaggio delle pile
Rispettando la polarità.
ES - Funciónes
Emisora
3. Función demo
4. Escalera arriba / salir
Escalera abajo / entrada
5. Sirena
6. Claxon y Sonido
7. Función de salpicaduras
8. Izquierda/derecha
9. Memory / Función de
aprendizaje
10. Escalera izquierda/derecha
12. Compartimiento de las pilas
Instalación de las pilas
Preste atención a la polaridad
CZ - Komponenty
Funkce
1.
3. Demo funkce
5. Sirény
7. Funkce kropení
8 Doleva/doprava
12. Krytka baterie
Vložení baterií
PL - Składniki funkcje pilota:
3. Funkcja demo
5. Sirens
7. Funkcja spryskiwania
8 w lewo/w prawo
10. Drabina w lewo/prawo
12. komora na baterie
Zakładanie baterii
biegunów
NL - Functies
Zender
1. Aan/ /uit
2. Vooruit / achteruit
3. Demo - functie
4. Ladder omhoog/uitschuiven |
Ladder omlaag/ neerlaten
5. Sirene
6. Geluidssignaal en geluid
7. Waterspuit - functie
8 Links/rechts
9. Geheugen/leer-functie
10. De ladder naar links/rechts
verplaatsen
11. Aanzetten/Uitzetten
12. Batterijcontainer
Batterij plaatsen
SK - Funkcie
Vysielač
2. Vpred / vzad
3. Demó funkció
4. Rebrík nahor/vysúvanie |
5. Siréna
6. Horn a zvuk
7. Funkcia vodnej sprchy
doprava
12. Priestor pre batérie
Vloženie batérií
1
2
3
4
5
6
7
8
9
10 11
12
2x AA
SK - Pozor!
Pred prevádzkou:
Po ukončení:
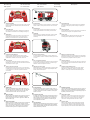
DE
Modell
Sollte das Modell nach rechts
bzw links ziehen, können Sie
dies mit dem Regler an der
Unterseite des Modells fein-
justieren.
2. EIN/AUS Schalter
3. Batteriefach
Batterien einlegen
Auf Polarität achten.
GB
Model
The directional guide on the
bottom of the model can be
used to adjust the models
straight-line-running
performance.
3. Battery cover
4. Frequency switch
Fitting the batteries
FR
Modéle
Si votre modéle devait tourner
à droite ou à gauche
compenser cela grâce au
bouton de réglage sous la
modéle.
3. Compartiment pour piles
Mise en place des piles
Respectant la polarité.
IT
Modello
Se il modello con lo sterzo al
centro non va diritto potrete
regolare la sua traiettoria con il
regolatore ubicato sotto il
modello.
3. Compartimento batteria
Montaggio delle pile
Rispettando la polarità.
ES
Modelo
Si el modelo va en derecha o
izquierda, puedes ajustar el
modelo.
3. Compartimento de la batería
Instalación de las pilas
Preste atención a la polaridad
CZ
Modelů:
3. Krytka baterií
Vložení baterií:
PL
Model
3. Komora na baterie
Zakładanie baterii
biegunów.
NL
Model
1. Hefboom voor het nivelleren de
Als het model naar rechts of
links trekt, kan het gecorrigeerd
worden met behulp van een
nauwkeurige afstelling met de
regelaar onderaan.
2. Aan/ /uit
3. Batterijcontainer
Batterij plaatsen
SK
Model
modelu.
3. Priestor pre batérie
Vloženie batérií
1 2 3
4x AA

4
DE - Batteriehinweis:
-
GB - Battery warning:
Do not mix alkaline batteries, standard (carbon-zinc) or rechar-
Rechargeable batteries are to be removed from the toy before
Rechargeable batteries are only to be charged under adult
FR - Informations concernant l‘accumulateur:
(zinc-charbon) et des
IT - Informazioni relative alle pile:
Non usare contemporaneamente pile alcaline, standard (zinco-
Le batterie ricaricabili possono essere ricaricate solo sotto la
ES - Advertencia sobre las baterías:
Las baterías recargables sólo pueden cargarse bajo la supervi-
CZ - Informace ohledně akumulátoru:
nabíjecí baterie.
PL - Informacja dotycząca akumulatora:
cynkowych) lub akumulatorowych/
NL - Informatie over de batterij:
Gebruik geen alkaline, standaard (zink-koolstof) batterijen
Verwijder de batterijen uit het speelgoed voordat het wordt
SK - Informácia ohľadom akumulátora:
DE - Achtung!
es wieder in Betrieb nehmen. Beim Austausch der Batterien muss eine Abkühlphase
von mindestens 10 Minuten eingehalten werden bis das Modell wieder betrieben wird.
Bei Überhitzung kann Beschädigung der Elektronik oder Brandgefahr die Folge sein.
GB - Attention!
When changing batteries there has to be a cooling phase of at least 10 min before model
FR - Attention!
-
ment le temps de refroidir. Lors du changement des piles, une phase de refroidissement
d´incendie peut survenir.
IT - Attenzione!
rimetterlo in funzione. Durante la sostituzione delle batterie deve essere rispettata un
-
mente azionato. Il surriscaldamento può danneggiare l’elettronica o pericolo d’incendio
possono esssere le conseguenze.
ES - ¡Atención!
de volver a ponerlo en funcionamiento. Al sustituir las baterías debe ser respetada un
período de enfriamiento de al menos 10 minutos hasta que se hace funcionar de nue-
vo el modelo. El sobrecalentamiento puede dañar la electrónica o peligro de incendio
puden ser la consecuencia.
CZ - Upozornění!
PL - Achtung!
NL - Let op!
Wacht een tijdje na elk gebruik. Gedurende deze tijd zal het model afkoelen en wordt
klaar voor het volgende gebruik. Voordat het model opnieuw wordt gestart, houd mins-
brand veroorzaken.
SK - Upozornenie!
-

5
OFFON
OFF ON
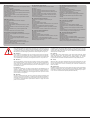
DE
1. Wassertank befüllen
Entfernen Sie den schwarzen Tankdeckel und befüllen den
Tank mit Wasser. Dazu sollte ein Trichter benützt werden.
Wenn der Tank ¾ voll ist, ist der Tankvorgang abgeschlossen
und die Wasserspritze ist einsatzbereit. Füllen Sie nur reines
Leitungswasser in den Tank und achten Sie beim Be-
tanken darauf, dass kein Wasser in die elektronischen
Bauteile ießt. Das Modell kann sonst beschädigt werden.
GB
1. Filling the Water Tank
completed and the Water Gun is ready to use. Only use pure
tap water and make sure not to get any water on electric
parts. The model can be damaged.
FR
1. Remplir le réservoir d‘eau
Enlever le bouchon noir du réservoir et remplir le réservoir
avec de l’eau. Il faudra utiliser un entonnoir. Si le réservoir est
Ne
remplir le réservoir qu’avec de l’eau potable et veiller à ce
que l’eau ne coule pas dans les pièces électroniques.
Ceci pourrait endommager le modèle.
IT
1. Riempire il serbatoio dell`acqua
Togliere il tapo nero del serbatoio e riempire il serbatoio con
acqua. Per questo deve essere utilizzato un imbuto. Quando il
serbatoio é ¾ pieno, il rifornimento é completo e la siringa
d‘acqua é pronto per l’uso. Riempire il serbatoio solo con
acqua pura del rubinetto e fare attenzione che durante il
rifornimento non scorre nessuna acqua nei componenti
elettronici. Il modello può essere danneggiato.
ES
1. Llene el tanque de agua
Remover la tapa negra del tanque y llene el tanque con agua.
para su uso. Llene el tanque sólo con agua limpia del grifo
y asegúrese de que cuando se llena no uye agua en los
componentes electrónicos. Es modelo se puede dañar.
CZ
1. Naplňte vodní nádrž
Naplňte
nádrž pouze čistou vodou z vodovodu a při plnění nádrže
zajistěte, aby se do elektroniky nedostala žádná voda.
PL
1. Napełnij zbiornik na wodę
Napełniaj zbiornik tylko czystą wodą z kranu i
upewnij się, że podczas napełniania zbiornika do
elementów elektronicznych nie dostanie się woda.
NL
1. Reservoir met water invullen
Verwijder het deksel van het zwarte reservoir en vul er met
¾ is gevuld, is het invullen voltooid en is de waterslang klaar
voor gebruik. Giet enkel schoon leidingwater in de tank en
zorg ervoor dat er tijdens het invullen geen water in de
elektronische onderdelen terechtkomt. Anders kan het model
beschadigd raken.
SK
1. Plnenie nádrže na vodu
DE
2. ON/OFF
Schalten Sie erst das Modell und dann den Sender ein, ein
kurzer Piep-Ton ertönt. Drücken Sie den Startknopf und das
Modell wird gestartet. Es ertönt ein realistisches Motoren-
geräusch. Durch erneutes drücken des Startknopfs geht das
Modell in den Standby-Modus.
GB
2. ON/OFF
short beep should sound up. Press the Start button to hear a
realistic motor sound. The model is ready for use. By pressing
the start button again, the model goes into standby mode.
FR
2. ON/OFF
signal sonore. Appuyez sur le bouton de démarrage et le
modèle est en route. Vous entendrez un bruit de moteur
réaliste. En appuyant à nouveau sur le bouton de démarrage,
le modèle se met en mode veille.
IT
2. ON/OFF
Accendere prima il modello e poi il trasmettitore, si sente un
breve segnale acustico. Premere il pulsante di avvio e il
modello viene messo in moto. Si sentirà un suono realistico
del motore. Premendo nuovamente il pulsante di avvio, il
modello entra in modalità standby.
ES
2. ON/OFF
Primero encender el modelo y luego la emisora, se oye un
tono corto. Pulse el botón star y se inicia el modelo. Suena un
ruido de motor realista. Al pulsar el botónde inicio de nuevo, el
modelo entra en modo standby.
CZ
2. ON/OFF
PL
2. ON/OFF
w tryb czuwania.
NL
2. ON/OFF
Schakel eerst het model en dan de zender aan. Er klinkt nu
een korte piep. Wanneer de „Start“-toets wordt ingedrukt, zal
het model onmiddellijk starten. Nu klinkt een realistisch
motorgeluid. Wanneer de „Start“-toets opnieuw wordt
ingedrukt, schakelt het model op de standby-modus over.
SK
2. ON/OFF
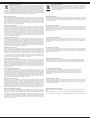
DE - Bedienung
GB - Operation
FR - Fonctionnement
IT - Funzionamento
ES - Funcionamiento
CZ - Obsluha
PL - Obsługa
NL - Bewerking
SK - Operácie
1
2

6
DE - Bedienung
GB - Operation
FR - Fonctionnement
IT - Funzionamento
ES - Funcionamiento
CZ - Obsluha
PL - Obsługa
NL - Bewerking
SK - Operácie
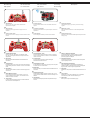
DE
5. Ausziehleiter
Starten Sie das Modell. Drücken Sie die linke Taste nach
oben fährt die Leiter aus. Drücken Sie nach unten fährt die
Leiter ein. Drücken Sie die rechte Taste nach links, bzw.
rechts schwenkt die Leiter nach links oder rechts.
GB
5. Extension ladder
Start the model. Press the left button to the top to move the
ladder upwards. Press down and the ladder will retracts.
Press the right button to the left or right and the ladder will
tilts to the left or right.
FR
5. Echelle escamotable
Mettez en marche le modèle. Appuyez poussez la touche de
gauche vers le haut ce qui fera sortir l’échelle. Poussez
celui-ci vers le bas et l’échelle rentre. Poussez la touche de
droite vers la gauche ou respectivement vers la droite et
l’échelle tournera à gauche ou respectivement à droite.
IT
5. Scala allungabile
Accendere il modello. Premendo il tasto sinistro in alto, la
si spinge il tasto destro a sinistra o a destra, la scala gira a
destra o a sinistra.
ES
5. Escalera de extensión
Encender el modelo. Pulse el botón izquierdo hacia arriba y
la escalera se mueve hacia a afuera. Pulse el botón hacia
abajo la escalera se retrae. Pulse el botón de la derecha
hacia la izquierda o hacia la derecha, la escalera se gira
hacia la izquierda o derecha.
CZ
5. Vysunutí žebříku
PL
5. Drabinka wysuwana
prawego przycisku w lewo lub w prawo powoduje wychylenie
NL
5. Uitschuifbare ladder
Schakel het model in. Druk de linker toets omhoog om de
ladder uit te schuiven. Druk de linker toets omlaag om de
ladder neer te laten. Druk de rechter knop naar links of
naar rechts - beweegt de ladder naar links of rechts.
SK
5. Vysúvací rebrík
5
4
DE
4. Links bzw. Rechts abbiegen
Drücken Sie den Gashebel vor bzw. zurück und den
Richtungshebel nach links oder rechts, biegt das Modell
vorwärts bzw. rückwärts nach links oder rechts ab.
GB
4. Turn left /right
If you push the throttle stick forward or backward and the
direction stick to the left or right, the model will drive forward
or backward to the left or right.
FR
4. Tourner à gauche ou à droite
Poussez la manette du gaz vers l‘avant ou vers l’arrière en
n’oubliant pas d’actionner le levier de direction vers la droite
ou vers la gauche. Le véhicule va prendre la direction
commandée.
IT
4. Girare a sinistra o destra
Se si tiene premuto l‘acceleratore, in avanti o indietro e la
leva di direzione a sinistra o a destra, il modello gira a destra
o sinistra.
ES
4. Giro a la izquierda o derecha
de dirección hacia izquierda o derecha, el modelo se gira
CZ
4. Odbočit vlevo nebo vpravo
dozadu, doleva nebo doprava.
PL
4. Skręcanie w lewo lub w prawo
NL
4. Linksaf of rechtsaf
links of rechts dan rijdt het model linksaf / rechtsaf naar voren
of naar achteren.
SK
4. Ohýbanie doľava alebo doprava
DE
3. Vorwärts/rückwärts
Drücken Sie den Gashebel nach vorne oder zurück, wird das
Modell vorwärts bzw. rückwärts fahren, dabei leuchten die
Scheinwerfer.
GB
3. Forward/Reverse
Push the throttle stick forward or backward, the model will
drive forward or backward and the headlights will light up.
FR
3. Avant/arrière
Poussez le levier du gaz vers l‘avant ou vers l’arrière et le
modèle fera une marche avant ou une marche arriére.
Pendant que le véhicule avance, les phares s’allument.
IT
3. Avanti/indietro
Spingere l‘acceleratore in avanti o indietro e il modello andrà
avanti o indietro, mentre questo manovra i fari sono accesi.
ES
3. Adelante/atrás
CZ
3. Vpřed/zpět
PL
3. Do przodu/do tyłu
NL
3. Vooruit / achteruit
vooruit of achteruit rijden. De koplichten branden.
SK
3. Vpred / vzad

7
DE
7. Hupe/Sound abschalten
Durch drücken der Hupe ertönt ein realistischer LKW-
Hup-Ton. Durch längeres drücken der Hupe wird der Ton
abgeschaltet.
8. Demo-Taste
Die Demo-Taste lässt das Modell automatisch Manöver
durchführen.
GB
7. Horn/Sound o
By holding down the horn-button the sound will be switched
heard.
8. Demo button
The demo button allows the model to automatically perform
manoeuvres.
FR
7. Klaxon/Éteindre le klaxon
Si vous appuyez longtemps sur le klaxon, le son en est
coupé. En appuyant sur le klaxon, vous entendrez le son
réaliste d’un klaxon de camion.
8. Touche démo
des manoeuvres automatiquement.
IT
7. Clacson/Spegnim. suono
Premendo per un tempo prolungato il clacson si spegne il
suono. Premendo il clacson, si sente un suono realistico di
clacson da camion.
8. Funzione Demo
Il pulsante demo permette al modello di eseguire
automaticamente delle manovre.
ES
7. Claxon/Apagar el sonido
el claxon suena un sonido realista
8. Botón-Demo
maniobras.
CZ
7. Klakson/Vypnutí zvuku
klaksonu.
8. Tlačítko demo
PL
7. Klakson | Wyłączanie dźwięków
8. Przycisk funkcji demo
wykona zapisany manewr.
NL
7. Geluidssignaal/geluid uitzetten
Door het indrukken van geluidssignaal weerklinkt een
realistisch geluid van de kipper. Door op het geluidssignaal
lang te drukken, wordt het geluid uitgeschakeld.
8. Demo-toets
Met de demo-knop voert het model automatisch manoeuvres
uit.
SK
7. Horn | unmute
8. Demo režim
Budú vykonané vopred nastavené pohyby.
8
DE - Bedienung
GB - Operation
FR - Fonctionnement
IT - Funzionamento
ES - Funcionamiento
CZ - Obsluha
PL - Obsługa
NL - Bewerking
SK - Operácie
DE
6. Spritzfunktion
Durch drücken der rechten oberen Taste wird die
Spritzfunktion ausgelöst.
GB
6. Spray Function
By pressing the top right button the spray function is
activated.
FR
6. Fonction de jets d’eau
Cette fonction s’active en appuyant la touche située en haut
à droite.
IT
6. Funzione spruzzo
Premendo il tasto destro in alto viene attivata la funzione
spruzzo.
ES
6. Función de salpicadura
Pulsando el botón derecho en la parte superior se activa la
salpicadura.
CZ
6. Funkce kropení
PL
6. Funkcja spryskiwania
oprysku.
NL
6. Waterspuit - functie
Druk op de toets rechtsboven om de waterspuitfunctie te
activeren.
SK
6. Funkcia vodnej sprchy
vodnej sprchy.
6
7

8
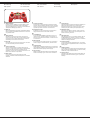
DE
9. Memory-Funktion
Drücken Sie länger die Memory-Funktions-Taste, die LED
der Fernsteuerung wechselt die Farbe und das Modell
zeichnet die Bewegungen auf. Erneutes, kurzes drücken der
Taste spielt die Bewegungen wieder ab.
10. Motor aus
Wenn dem Modell länger als 50 Sek. keine Befehle gesendet
werden, schaltet sich das Modell automatisch aus und muss
neu gestartet werden.
GB
9. Memory-funktion
Hold down the memory-function button, the LED on the
remote control will change colour and the model will record
movements. Press the button afterwards for the modell to
automatically execute the stored movements.
10. Engine o
If the model does not get any input within 50 sec., the model
FR
9. Fonction de mémoire
Appuyez aassez longtems sur le bouton de fonction de
mémoire. La couleur de la limiére LED de la radiocommande
change et tous les mouvements du modèle seront en
registrés. Si encore une fois vous appuyez brièvement sur ce
bouton les mouvements se reproduiront.
10. Moteur coupé
Si vous n’envoyez plus d’ordre pendant plus de 50
secondes, le véhicule s’éteint automatiquement et il faudra le
redémarrer.
IT
9. Funzione di memoria
Premendo per un tempo prolungato il pulsante di funzione
memoria, il LED sul telecomando cambia il colore e il modello
registra i movimenti. Premendo di nuovo il tasto brevemente,
si possano riprodurre nuovamente i movimenti svolti.
10. Spegnimento motore
spegne automaticamente e deve essere riavviato.
ES
9. Función-Memory
cambiar el color y el modelo registra los moviementos. Si
ahora vas a primir brevemente el botón, el modelo va hacer
los moviementos.
10. Motor apagado
Si no le vas a dar mas de 50 segundos nigun comandos, el
CZ
9. Paměťová funkce
10. Vypnutí motoru
model se automaticky vypne a musí se znovu nastartovat.
PL
9. Funkcja pamięci
dioda LED na pilocie zmieni kolor, a model zacznie
10. Wyłączanie silnika
NL
9. Geheugenfunctie
Druk geheugenfunctie in en houd deze ingedrukt, LED van
de afstandsbediening verandert van kleur en het model
registreert een beweging. Door deze opnieuw in te drukken,
worden de bewegingen herhaald.
10. De motor uitzetten
Als het model opdrachten gedurende 50 sec. niet ontvangt ,
zal dan automatisch uitgeschakeld worden en moet opnieuw
worden gestart.
SK
9. Pamäťová funkcia
10. Vypnutie motora
9
DE - Bedienung
GB - Operation
FR - Fonctionnement
IT - Funzionamento
ES - Funcionamiento
CZ - Obsluha
PL - Obsługa
NL - Bewerking
SK - Operácie

9
DE - Sicherheitsmaßnahmen
GB - Safety Notes
FR - Consignes de sécurités
IT - Precauzioni
ES - Recomendaciones de seguridad
CZ - Bezpečnostní opatření
PL - Środki bezpieczeństwa
NL - Veiligheidsmiddelen
SK - Bezpečnostné opatrenia
DE - Halten Sie Ihre Hände von
beweglichen Teilen fern.
GB - Keep hands away from moving parts.
FR - Garder vos mains hors de portées
des pièces mobiles.
IT - Tenere le mani lontane dalle parti
in movimento.
ES - Mantenga las manos alejadas de
las piezas móviles.
CZ
PL
NL - Houd uw handen uit de buurt van
bewegende delen.
SK
DE - Benutzung nur unter unmittelbarer
Aufsicht von Erwachsenen.
GB - Use only under direct supervision
FR - Utiliser uniquement sous la
IT - Utilizzare solo sotto la diretta
ES - Usado bajo la supervisión directa
CZ
PL
NL - Gebruiken enkel onder direct
toezicht van een volwassene.
SK
DE - Sind die Batterien leer, wechseln
Sie sie aus.
GB - The batteries are nearly, replace
the batteries.
FR - Si ce les piles sont vides, changez
ceux-ci.
IT - Controllare il stato delle batterie,
potrebbero esserescariche.
ES -
pilas por otras nuevas.
CZ
PL
NL - Indien de batterijen leeg zijn,
moeten deze worden vervangen.
SK
vymenené.
DE -
GB -
FR -
IT -
ES -
CZ -
PL -
NL
SK
X
DE - Auf die Frequenzen in Ihrem
GB - Pay attention to the frequencies in
FR - Faites attention aux fréquences
IT - Prestare attenzione alle frequenze
ES - Preste atención a las frecuencias
CZ -
PL -
NL
SK
DE - Betreiben Sie das Modell nicht bei
Regen, Schnee, Nässe oder Sand.
GB - Do not drive in rain, snow, wetness
or sand.
FR - Ne pas conduire sous la pluie, la
neige, humidité ou sable.
IT - Non guidare sotto la pioggia, neve,
umidità o sabbia.
ES - No conduzca bajo la lluvia, la
nieve, humedad o arena.
CZ -
PL -
powierzchni oraz na piasku.
NL - Het model mag niet worden
gebruikt in de regen, sneeuw en op
natte grond of zandgrond.
SK
snehu, na mokrom povrchu a
piesku. de regen, sneeuw en op
natte grond of zandgrond.
DE - Nicht auf befahrenen Straßen und
Plätzen fahren.
GB - Never drive on roads or areas used
by real vehicles.
FR - Ne roulez jamais sur la voie
publique ou des endroits
fréquentés.
IT - Non giocare sulle strade comuni.
ES - No utilice en calles o plazas
transitadas.
CZ -
místech.
PL -
placach (z ruchem drogowym).
NL - Niet op drukke straten en pleinen
rijden.
SK
DE - Fahren Sie nie außerhalb der
Reichweite Ihrer Fernsteuerung
GB - Never run out of the reach of your
remote control.
FR Laissez jamais celle-ci sortir de la
portée de votre émetteur.
IT - Non utilizzare il modello fuori la
portata della trasmittente.
ES -
de su emisora.
CZ -
PL -
sterowania
NL - Niet buiten het bereik van de
afstandsbediening rijden
SK - Nikdy nejazdite mimo dosah
X X X X
DE - Nicht direkter Sonnenbestrahlung
oder Wärme aussetzen.
GB - Do not leave in very strong
sunlight.
FR - N‘exposez jamais votre modèle
directement aux rayons du soleil.
IT - Non disporre il modello sotto il sole
oppure nel caldo.
ES - No exonga el modelo a los rayos
solares directos o fuentes de calor.
CZ -
nebo tepla vystavit.
PL -
NL - Niet blootstellen aan direct zonlicht
of hitte
SK
DE - Verschmutzungen mit einem
feuchten Tuch entfernen.
GB - Clean by using a damp cloth.
FR - Essuyez la boue avec un tissu hu
mide.
IT - l‘inquinamento possono essere
rimossi con un panno umido.
ES - Polución se puede eliminar con un
paño húmedo.
CZ
PL
NL - Verontreinigingen moeten worden
verwijderd met een vochtige doek.
SK
DE - Batterien/Akku niemals im Modell
lagern.
GB - Store batteries/battery packs
separately when not in use.
FR -
stockée dans la modèle.
IT - Conservare le batterie/
accumulatore separatamente
quando non sono in uso.
ES - Sacar siempre las batería/
separado.
CZ
neskladujte v modelu.
PL
baterii/akumulatorów w modelu.
NL - Batterijen/ accu`s niet in het model
bewaren.
SK
batériu v modeli..

10
DE - Entsorgungshinweise
Batterien und Akkumulatoren dürfen nicht im Hausmüll entsorgt werden sondern müs-
Entsorgung (getrennte Sammlung) zuzuführen. Nach Gebrauch können Sie Batterien
die reizend wirken, Allergien auslösen können oder hochreaktiv sind, ist die getrennte
Sammlung und ordnungsgemäße Verwertung wichtig für die Umwelt und Ihre Gesundheit. Sofern
-
chen Hg, Cd oder Pb gekennzeichnet ist, bedeutet dies, dass diese mehr als 0,0005 % Quecksilber
(Hg), mehr als 0,002 % Cadmium (Cd) oder mehr als 0,004 % Blei (Pb) enthält.
GB - Disposal restrictions
of batteries (seperate collection) appropriately. After use you can return batteries free of charge to
the retail store. As batteries contain substances that can be irritant, can cause allergy and are highly
reactive, separate collections and proper recycling is important to the environment and to your
health. If the batteries are marked with a chemical symbol Hg, Cd or Pb below the crossed-out waste
bin on wheels it refers to that more than 0.0005% of mercury (Hg), more than 0.002% of cadmium
(Cd) or more than 0.004% Lead (Pb) is included.
FR - Consignes de recyclage
-
tres communaux de collecte (collecte sélective). Après tout utilisation, vous avez la possibilité de
substances qui peuvent causés des irritations et pouvant provoquer des allergies, il est recom-
ces piles contiennent plus de 0,0005% de mercure (Hg), plus de plus de 0,002% de cadmium
(Cd),ou plus de 0,004% de plomb (Pb).
IT - Istruzioni per lo smaltimento
-
titi separatamente. Siete obbligati di eseguire lo smaltimento professionale delle batterie vecchie
-
merciali. Dato che le batterie contengono delle sostanze, che provocano irritazione, possono cau-
di 0,002 % Cadmio (Cd) o piu di 0,004 % Piombo (Pb).
ES - Notas sobre el reciclado
Baterías y acumuladores no deben desecharse en la basura doméstica, pero se deben desechar
(recogida selectiva). Es posible devolver las baterías después de su uso de forma gratuita en las
actividades comerciales. Dado que las baterías contienen sustancias que causan irritación, pueden
causar alergias o son altamente reactivos, la recogida selectiva y el reciclaje son importantes para
CZ - Informace týkající se likvidace
PL - Informacje dotyczące utylizacji
-
-
NL - Informatie over recycling
Batterijen en accu‘s mogen niet bij het huishoudelijk afval worden weggegooid, maar moeten apart
worden afgevoerd. De gebruiker is verplicht om de gebruikte batterijen afvoeren in overeenstem-
ming met de regels (gescheiden inzameling van afval). Na gebruik kunnen de betterijen kosteloos
allergieën leiden en zeer reactief zijn, daarom hun gescheiden inzameling en het gebruik ervan in
overeenstemming met de bepalingen zijn belangrijk voor het milieu en de gezondheid. Als de bat-
terijen op gekruiste afvalbak, zijn gemarkeerd met chemische teken Hg, Cd en Pb, betekent dat ze
meer dan 0,0005% kwik (Hg), meer dan 0,002% cadmium (Cd) of meer dan 0,004% lood bevatten.
SK - Informácie týkajúce sa likvidácie
alebo viac, ako 0,004 % olova.
DE - Entsorgungshinweise
Elektrogeräte dürfen nicht im Hausmüll entsorgt werden, sondern müssen getrennt
-
men und das Elektroaltgerät bei den kommunalen Sammelstellen abzugeben. Sollten
Ihnen selbst entfernt werden.
GB - Disposal restrictions
Electrical appliances must not be disposed of in domestic waste and must be disposed of separately.
the communal collection points. Should personal data be stored on the electrical appliance you must
remove them by yourself.
FR - Consignes de recyclage
appareils électriques dans les centres communaux de collectes. Si des informations personnelles
élimination du produit.
IT - Istruzioni per lo smaltimento
-
paratamente. Siete obbligati di rimuovere le batterie e portare l´apparecchi elettrici vecchi ai punti di
raccolta comunali. Qualora ci sono dati personali sul apparecchio elettrico, devono essere rimossi
da voi stessi.
ES - Notas sobre el reciclado
Aparatos eléctricos no pueden desecharse en la basura doméstica, pero se deben desechar de
los puntos de recogida comunales. En caso de que hay datos personales en el aparato eléctrico se
CZ - Informace týkající se likvidace
PL - Informacje dotyczące utylizacji
je samodzielnie.
NL - Informatie over recycling
Elektrische apparatuur mag niet worden afgevoerd met het huishoudelijk afval, maar moet apart
worden afgevoerd. De gebruiker moet- indien mogelijk - om de accu,suit te haln en afgeven elekt-
rische apparaten bij stedelijk afvalverzamelpunt. Als het apparaat de persoonlijke gegevens bevat,
dan moet je ze zelf verwijderen.
SK - Informácie týkajúce sa likvidácie
-
vané

11

Irrtum und technische Änderungen vorbehalten. Copyright JAMARA e.K. 2021
Kopie und Nachdruck, auch auszugsweise, nur mit Genehmigung von JAMARA e. K.
All rights reserved. Copyright JAMARA e.K. 2021
Copying or reproduction in whole or part, only with the expressed permission of JAMARA e.K.
JAMARA e.K.
Inh. Manuel Natterer
Am Lauerbühl 5 - DE-88317 Aichstetten
Tel. +49 (0) 75 65/94 12-0 - Fax +49 (0) 75 65/94 12-23
[email protected] ● www.jamara.com
Service - Tel. +49 (0) 75 65/94 12-777
service@ jamara.com
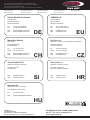
DE - Servicehändler
GB - Service centre
FR - Revendeur de service
IT - Centro assistenza
ES - Servicio asistencia
CZ - Servisní partner
PL - Partner serwisowy
NL - Servicecentrum
SK - Servisný partner
Reitter Modellbau Versand
Patricia Reitter
Degerfeldstrasse 11
DE-72461 Albstadt
Tel +49 (0) 7432 9802700
Fax +49 (0) 7432 2009594
Mail [email protected]
Web www.modellbauversand.de
Modellbau Zentral
Peter Hofer
Bresteneggstrasse 2
CH-6460 Altdorf
Tel +41 79 429 62 25
Mobil +41 41 870 02 13
Mail [email protected]
Web www.modellbau-zentral.ch
PenTec s.r.o.
Distributor Jamara for Czech Republic and Slovakia
Tel +420 235 364 664
Mobil +420 739 075 380
Mail servis@topdrony.cz
Web www.topdrony.cz
Viva-net d.o.o.
Distributor Jamara for Croatia
Ante Topic - Mimare 8
Mail [email protected]
Web www.viva-net.hr
Nettrade Kft.
Distributor Jamara for Hungary
1033 Budapest, Hévízi út 3/b
Tel +36 30 664 3835
Mail [email protected]
Janus Trade D.O.O.
Distributor Jamara for Slovenia
SI-4000 Kranj
Mail [email protected]
Web www.janustrade.si
DE
SI
JAMARA e.K.
Manuel Natterer
Am Lauerbühl 5
DE-88317 Aichstetten
Tel +49 (0) 7565 9412-0
Fax +49 (0) 7565 9412-23
Mail [email protected]
Web www.jamara.com EU
CH CZ
HR
HU
-
 1
1
-
 2
2
-
 3
3
-
 4
4
-
 5
5
-
 6
6
-
 7
7
-
 8
8
-
 9
9
-
 10
10
-
 11
11
-
 12
12


Jamara 404960 Istruzioni per l'uso
- Categoria
- Giocattoli telecomandati
- Tipo
- Istruzioni per l'uso
in altre lingue
- français: Jamara 404960 Mode d'emploi
- español: Jamara 404960 Instrucciones de operación
- Deutsch: Jamara 404960 Bedienungsanleitung
- Nederlands: Jamara 404960 Handleiding
- português: Jamara 404960 Instruções de operação
- slovenčina: Jamara 404960 Návod na používanie
- polski: Jamara 404960 Instrukcja obsługi
Documenti correlati
-
Jamara 460472 Istruzioni per l'uso
-
Jamara 404016 Istruzioni per l'uso
-
Jamara 402107 Istruzioni per l'uso
-
Jamara Mercedes-Benz Antos Feuerwehr Polizei Manuale del proprietario
-
Jamara 402106 Istruzioni per l'uso
-
Jamara 406301 Istruzioni per l'uso
-
Jamara 405072 Istruzioni per l'uso
-
Jamara 405050 Istruzioni per l'uso
-
Jamara 405112 Istruzioni per l'uso
-