Dell 1420X Projector Guida Rapida
- Categoria
- Proiettori di dati
- Tipo
- Guida Rapida

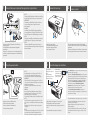
Connect the power cable and the appropriate signal cables
Connecter le câble d’alimentation et les câbles de
signal appropriés
Das Stromkabel und die passenden Signalkabel
anschließen
Collegare il cavo elettrico e i cavi segnale appropriati
Conecte el cable de alimentación y los cables de señal
apropiados
2
Remove the lens cap
Retirer le couvre-objectif
Die Objektivabdeckung entfernen
Rimuovere il tappo della lente
Quite la tapa de la lente
Régler la taille de l’image et la mise au point
Die Bildgröße und den Fokus einstellen
Regolare la dimensione dell’immagine e la messa a
fuoco
Ajuste el tamaño de la imagen y el enfoque
Adjust the image size and focus
Appuyer sur le bouton Marche/Arrêt.
Drücken Sie den Stromschalter.
Premere il pulsante di alimentazione
Pulse el botón de encendido
Press the power button
NOTE:
If nothing appears on the screen, press <Fn><F8> or
<Fn><F1> for video redirection (Dell laptops only).
It may take several seconds for the image to appear.
REMARQUE:
Si rien n’apparaît sur l’écran, appuyez sur <Fn><F8> ou
<Fn><F1> pour la redirection vidéo (pour les ordinateurs
portables Dell uniquement).
Il peut falloir quelques secondes pour que l’image
apparaisse.
HINWEIS:
Wenn nichts auf dem Bildschirm erscheint, drücken
Sie bitte die Tasten <Fn><F8> oder <Fn><F1> für die
Videoumleitung (nur bei Dell-Laptops).
Es kann einige Sekunden dauern, bis das Bild erscheint.
NOTA:
Se sullo schermo non appare nulla, premere <Fn><F8>
o <Fn><F1> per il reindirizzamento video (solo per laptop
Dell).
Potrebbero volerci diversi secondi prima che appaia
l’immagine.
NOTA:
Si nada aparece en la pantalla, pulse <Fn><F8> o <Fn><F1>
para redirección de vídeo (Sólo portátiles de Dell).
Puede que la señal tarde unos segundos en aparecer.
VGA Video
S-Video
Volume
MuteMenu
Source
Freeze
Blank
Up
Page Zoom
Down
Auto
Tirez la languette avant d’utiliser la télécommande.
Ziehen Sie die Lasche ab, bevor Sie die Fernbedienung
verwenden.
Rimuovere l'etichetta prima di utilizzare il telecomando.
Tire de la pestaña antes de usar el mando a distancia.
Pull the tab before using the
remote control
For more information about your projector, see your
User's Guide
.
Pour obtenir plus d’informations concernant votre projecteur,
consultez votre
Guide Utilisateur
.
Weitere Informationen zu dem Projektor finden Sie in der
Bedienungsanleitung
.
Per ulteriori informazioni sul proiettore, vedere la
Guida utente
.
Para más información sobre su proyector, consulte su
Guía de
Usuario
.
Press Auto Adjust to re-sync your computer to the projector
for proper image if necessary.
Appuyez sur Auto Adjust (Réglage auto) pour re-sync votre
ordinateur au projecteur pour une meilleure image si besoin.
Synchronisieren Sie Ihren Computer zur Optimierung der
Bildqualität – falls notwendig – erneut mit dem Projektor,
indem Sie auf Auto Adjust (Autom. Einrichten) drücken.
Se necessario, premere Auto Adjust (Regolazione
automatica) per sincronizzare di nuovo il computer col
proiettore ed ottenere immagini appropriate.
Pulse Auto Adjust (Ajuste automático) para volver a
sincronizar su equipo con el proyector si es necesario y ver
correctamente la imagen.
NOTE:
Connect the USB cable (not included) to use the Page
Up and Page Down options on your remote control.
REMARQUE:
Connectez le câble USB (non fourni) pour utiliser
les options Page Haut et Page Bas sur votre
télécommande.
HINWEIS:
Schließen Sie das USB-Kabel (nicht mitgeliefert)
an, um die Optionen “Page Up” (Bild auf) und “Page
Down” (Bild ab) auf der Fernbedienung zu benutzen.
NOTA:
Collegare il cavo USB (non in dotazione) per usare le
opzioni Pagina su e Pagina giù sul telecomando.
NOTA:
Conecte el cable USB (no incluido) para usar las
opciones de Retroceder Página y Avanzar Página en su
mando a distancia.
31
4 5
CRT/LCD
Focus Adjust
Réglage de la mise au
point
Fokuseinstellung
Regolazione del fuoco
Ajuste del Enfoque
Zoom Adjust
Réglage du zoom
Zoomeinstellung
Regolazione zoom
Ajuste del Zoom

VGA Video
S-Video
Volume
MuteMenu
Source
Freeze
Blank
Up
Page Zoom
Down
Auto
1
4
5
6
7
89
11
10
2 3
24
25
26
27
28
29
30
31
32
12
13
14
15
16
17
18
19
20
21
22
33
23
first
fold
first
fold
Dell™ 1420X/1430X Projector
Quick Setup Guide
Guide d’Installation
Schnelleinstellungsanleitung
Guida rapida di installazione
Guía de Configuración
www.dell.com | support.dell.
com
Printed in China
Imprimé en Chine
Gedruckt in China
Stampato in Cina
Impreso en China.
About Your Projector
A propos de Votre Projecteur |Über den Projektor | Informazioni sul proiettore | Acerca
de su Proyector
CAUTION: Before you setup and operate your Dell projector, follow the safety
information that shipped with your projector.
MISE EN GARDE : Avant de régler et d’utiliser votre projecteur Dell, observez les
informations de sécurité fournies avec votre projecteur.
ACHTUNG: Bevor Sie den Projektor von Dell einrichten und benutzen, lesen Sie
bitte aufmerksam die dem Projektor beigelegten Sicherheitshinweise.
AVVERTENZA: Prima di configurare e usare il proiettore Dell, seguire le
informazioni sulla sicurezza in dotazione con il proiettore.
PRECAUCIÓN: Antes de configurar y operar su proyector Dell, consulte la
información de seguridad que fue enviado con su proyector.
February 2012 Février 2012 Februar 2012 Febbraio 2012 Febrero de 2012
Information in this
document is subject
to change without
notice.
© 2012 Dell Inc. All
rights reserved.
Reproduction of these
materials in any manner
whatsoever without
the written permission
of Dell Inc. is strictly
forbidden.
Dell
and the
DELL
logo
are trademarks of
Dell Inc.
Dell disclaims any
proprietary interest in
the marks and names
of others.
Les informations
contenues dans le
présent document
sont susceptibles de
modification sans
préavis.
© 2012 Dell Inc. Tous
droits réservés.
La copie de ces
documents, sous quelque
forme que ce soit, sans
l’autorisation écrite de
Dell Inc. est strictement
interdite.
Dell
et le logo
DELL
sont des marques
commerciales de Dell Inc.
Dell réfute tout autre
intérêt propriétaire dans
les marques et noms des
autres constructeurs.
Die Informationen
in diesem Dokument
können ohne
Ankündigung
geändert werden.
© 2012 Dell Inc. Alle
Rechte vorbehalten.
Reproduktionen dieser
Materialien sind ohne
vorherige schriftliche
Genehmigung von
Dell Inc. strengstens
untersagt.
Dell
und das
DELL
-
Logo sind Marken von
Dell Inc.
Dell lehnt jegliches
urheberrechtliche
Interesse an Marken
und Namen von
Anderen ab.
Le informazioni
contenute in questa
pubblicazione sono
soggette a modifica
senza preavviso.
© 2012 Dell Inc. Tutti
i diritti riservati.
È severamente vietata
la riproduzione di
questi materiali, con
qualsiasi strumento,
senza l'autorizzazione
scritta di Dell Inc.
Dell
e il logo
DELL
sono marchi di
fabbrica di Dell Inc.
Dell dichiara di non
avere alcun interesse
proprietario nei
marchi e nei nomi
di altri.
La información
presente en este
documento se
encuentra sujeta a
cambios sin previo
aviso.
© 2012 Dell Inc.
Todos los derecho
sreservados.
Queda terminantemente
prohibida la reproducción
de estos materiales
de cualquier forma sin
el consentimiento por
escrito de Dell Inc.
Dell
y el logotipo
DELL
son marcas comerciales
de Dell Inc.
Dell renuncia a cualquier
interés de propiedad
sobre las marcas y
nombres de otros.
Projector Control Panel
1. Power
2. LAMP warning light
3. TEMP warning light
4. Up / Keystone
adjustment
5. Volume up
6. Right / Auto adjust
7. Volume down
8. Enter
9. Down / Keystone
adjustment
10. Menu
11. Left / Source
Remote Control
12. Power
13. Video
14. S-Video
15. Auto Adjust
16. Volume up
17. Volume down
18. Mute
19. Right
20. Zoom +
21. Zoom -
22. Page up
23. Page down
24. VGA
25. Source
26. Up
27. Left
28. Enter
29. Menu
30. Down
31. Freeze
32. Blank
33. Keystone adjustment
Up / Down
Panneau de contrôle du
projecteur
1. Marche-Arrêt
2. Voyant
d'avertissement
LAMPE
3. Voyant
d'avertissement TEMP
4. Haut / Réglage de la
déformation
5. Volume +
6. Droite / Réglage auto
7. Volume -
8. Entrer
9. Bas / Réglage de la
déformation
10. Menu
11. Gauche / Source
Télécommande
12. Alimentation
13. Video
14. S-Vidéo
15. Réglage auto
16. Volume +
17. Volume -
18. Muet
19. Droite
20. Zoom +
21. Zoom -
22. Page préc.
23. Page suiv.
24. VGA
25. Source
26. Haut
27. Gauche
28. Entrée
29. Menu
30. Bas
31. Figer
32. Vide
33. Ajustement du trapèze
Haut / Bas
Projektorbedienelement
1. Ein/Aus
2. LAMPEN-Warnlampe
3. TEMP-Warnlampe
4. Aufwärts /
Trapezkorrektur
5. Lauter
6. Rechts / Autom.
Einstellung
7. Leiser
8. Eingabe
9. Abwärts /
Trapezkorrektur
10. Menu
11. Links / Quelle
Fernbedienung
12. Energie
13. Video
14. S-Video
15. Autom. Einstellung
16. Lauter
17. Leiser
18. Stumm
19. Rechts
20. Zoom +
21. Zoom -
22. Bild-Auf
23. Bild-Ab
24. VGA
25. Quelle
26. Auf
27. Links
28. Eingabe
29. Menü
30. Ab
31. Momentaufnahme
32. Leer
33. Aufwärts / Abwärt
Trapezkorrektur
Pannello di controllo del
proiettore
1. Alimentazione
2. Spia di avviso LAMP
3. Spia di avviso TEMP
4. Su / Regolazione
distorsione
5. Volume su
6. Destra / Regolazione
automatica
7. Volume giù
8. Enter
9. Tasto Giù /
Regolazione
distorsione
10. Menu
11. Sinistra / Origine
Telecomando
12. Alimentazione
13. Video
14. S-Video
15. Regolazione
automatica
16. Volume su
17. Volume giù
18. Mute
19. Destra
20. Zoom +
21. Zoom -
22. Pagina su
23. Pagina giù
24. VGA
25. Sorgente
26. Su
27. Sinistra
28. Invia
29. Menu
30. Giù
31. Fermo immagine
32. Inattività
33. Su / Tasto Giù
Regolazione
keystone
Panel de control de
proyector
1. Alimentación
2. Luz de advertencia
LÁMPARA
3. Luz de advertencia
TEMPERATURA
4. Arriba / Ajuste de
clave
5. Subir volumen
6. Ajuste Derecha /
Automático
7. Bajar volumen
8. Aceptar
9. Abajo / Ajuste de clave
10. Menú
11. Izquierda / Fuente
Mando a distancia
12. Alimentación
13. Vídeo
14. S-Vídeo
15. Ajuste automático
16. Subir volumen
17. Bajar volumen
18. Silenciar
19. Derecho
20. Zoom +
21. Zoom -
22. Re Pág
23. Av Pág
24. VGA
25. Fuente
26. Arriba
27. Izquierdo
28. Intro
29. Menú
30. Abajo
31. Congelar
32. En blanco
33. Ajuste de deformación
trapezoidal Arriba
/ Abajo
043K3XA00
P/N: 4J.1N301.031
-
 1
1
-
 2
2

