Indesit 7OFH 1039 P IX RU/HA Guida utente
- Categoria
- Microonde
- Tipo
- Guida utente

GB
OVEN
7OFH 1039 P IX RU /HA
7OFH 1039 P RU /HA
Contents
Installation, 2-3
Positioning
Electrical connection
Data plate
Description of the appliance, 4
Overall view
Control panel
Start-up and use, 5
Control panel lock
DEMO mode
Setting the clock and timer
Starting the oven
Cooking modes, 6-9
Manual cooking modes
Automatic cooking modes
Programming the cooking mode
Practical cooking advice
Cooking advice table
Precautions and tips, 10
General safety
Disposal
Respecting and conserving the environment
Care and maintenance, 11-12
Switching the appliance off
Cleaning the appliance
Cleaning the oven door
Replacing the light bulb
Assembling the sliding rack kit
Automatic cleaning with the FAST CLEAN function
Assistance, 13
Ðóññêèé,14English,1
GB RS
Operating Instructions

2
GB
Before operating your new appliance please read
this instruction booklet carefully. It contains
important information concerning the safe operation,
installation and maintenance of the appliance.
Please keep these operating instructions for future
reference. Pass them on to possible new owners of
the appliance.
Positioning
Keep all packaging materials out of the reach of
children. It may present a choking or suffocation
hazard (see Precautions and tips).
The appliance must be installed by a qualified
professional in accordance with the instructions
provided. Incorrect installation may cause harm to
people and animals or may damage property.
Built-in appliance
Use the appropriate cabinet to ensure that the
appliance functions properly.
The panels adjacent to the oven must be made of
heat-resistant material.
Cabinets with a veneer exterior must be
assembled with glues which can withstand
temperatures of up to 100°C.
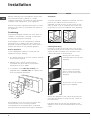
To install the oven under the counter (see
diagram) and in a kitchen unit , the cabinet must
have the following dimensions:
The appliance must not come into contact with
electrical parts once it has been installed.
The indications for consumption given on the data
plate have been calculated for this type of installation.
Ventilation
To ensure adequate ventilation is provided, the back
panel of the cabinet must be removed. It is
advisable to install the oven so that it rests on two
strips of wood, or on a completely flat surface with
an opening of at least 45 x 560 mm (see diagrams).
Centring and fixing
Position the 4 tabs on the side of the oven so that
they are lined up with the 4 holes on the outer frame.
Adjust the tabs according to the thickness of the
cabinet side panel, as shown below:
20 mm thick: take off the
removable part of the tab (see
diagram).
18 mm thick: use the first
groove, which has already
been set in the factory (see
diagram).
16 mm thick: use the second
groove (see diagram).
Secure the appliance to the cabinet by opening the
oven door and putting 4 screws into the 4 holes on
the outer frame.
All parts which ensure the safe operation of the
appliance must not be removable without the aid of
a tool.
595 mm.
595 mm.
24 m
m
.
545 m
m
.
5 mm.
567 mm.
23 mm.
593 mm.
45 mm.
558 mm.
5
47
m
m
. m
in
.
Installation
560 m
m
.
45 mm.

3
GB
Electrical connection
Ovens equipped with a three-pole power supply
cable are designed to operate with alternating
current at the voltage and frequency indicated on
the data plate located on the appliance (see below).
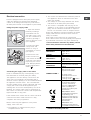
Fitting the power supply cable
1. Open the terminal
board by inserting a
screwdriver into the
side tabs of the cover.
Use the screwdriver as
a lever by pushing it
down to open the cover
(see diagram).
2. Loosen the cable
clamp screw and
remove it, using a
screwdriver as a lever
(see figure).
3. Remove the wire
contact screws L-N-
, then fasten the wires
under the screw heads,
respecting the colour
code: Blue (N), Brown
(L) and Yellow-Green
Verde (
).
Connecting the supply cable to the mains
Install a standardised plug corresponding to the
load indicated on the data plate (see table).
The appliance must be directly connected to the
mains using an omnipolar circuit-breaker with a
minimum contact opening of 3 mm installed between
the appliance and the mains. The circuit-breaker
must be suitable for the charge indicated and must
comply with current electrical regulations (the
earthing wire must not be interrupted by the circuit-
breaker). The supply cable must be positioned so
that it does not come into contact with temperatures
higher than 50°C at any point.
The installer must ensure that the correct electrical
connection has been made and that it is fully
compliant with safety regulations.
Before connecting the appliance to the power
supply, make sure that:
The appliance is earthed and the plug is
compliant with the law.
The socket can withstand the maximum power of
the appliance, which is indicated on the data
plate (see below).
The voltage is in the range between the values
indicated on the data plate (see below).
The socket is compatible with the plug of the
appliance. If the socket is incompatible with the
plug, ask an authorised technician to replace it.
Do not use extension cords or multiple sockets.
Once the appliance has been installed, the power
supply cable and the electrical socket must be
easily accessible.
The cable must not be bent or compressed.
The cable must be checked regularly and replaced
by authorised technicians only (see Assistance).
The manufacturer declines any liabilit
y should
these sa fety m easures not be o bserved.
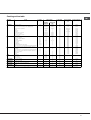
TABLE OF CHARACTERISTICS
Dimensions
width 43.5 cm
height 32 cm
depth 40 cm
Volume
56 l
Dimensions *
width 43.5 cm
height 32 cm
depth 41.5 cm
Volume *
58 l
Electrical
connections
voltage: 220-240V ~ 50Hz
maximum power absorbed
2800 W
ENERGY LABEL **
Directive 2002/40/EC on the
label of electric ovens.
Regulation EN 50304
Declared energy
consumption for Forced
convection Class
heating mode: Gratin
This appliance conforms to
the following European
Economic Community
directives: 2006/95/EEC
dated 12/12/06 (Low
Voltage) and subsequent
amendments
2004/108/EEC dated
15/12/04 (Electromagnetic
Compatibility) and
subsequent amendments -
93/68/EEC dated 22/07/93
and subsequent
amendments.
2002/96/EEC and
subsequent amendments.
1275/2008 standby/off mode
* With glass panel fitted to the inside of the door
** Without removable guide rails

4
GB
Description
of the appliance
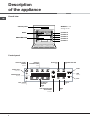
Overall view
Control panel
Control panel
GRILL
DRIPPING PAN
GUIDES for the
sliding racks
position 5
position 4
position 3
position 2
position 1
DURATION
icon
DOOR LOCK
indicator
CLOCK
icon
TIMER
icon
TEMPERATURE
display
CONTROL PANEL
POWER
button
FAST CLEAN
selector
TIME/TEMPERATURE
ADJUSTMENT
buttons
MANUAL
COOKING MODE
icons
COOKING END TIME
icon
AUTOMATIC
COOKING
MODE
icons
TIME
display
START
STOP

5
GB
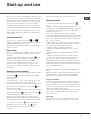
The first time you use your appliance, heat the empty
oven with its door closed at its maximum temperature
for at least half an hour. Ensure that the room is well
ventilated before switching the oven off and opening
the oven door. The appliance may emit a slightly
unpleasant odour caused by protective substances
used during the manufacturing process burning away.
The Control panel lock and DEMO mode can be
activated/deactivated even when the control panel is
switched off.
Control panel lock
To lock the oven controls, press the and
buttons simultaneously. A buzzer will sound and the
TEMPERATURE display shows "Loc".
Press again to unlock the controls. The "STOP" button
is always active.
Demo mode
The oven can operate in the DEMO mode: all heating
elements are deactivated, and the controls remain
operative.
To activate the DEMO mode, press the "+",
, and
"START" buttons simultaneously. A buzzer will
sound and the TIME display shows "DEMO".
To activate the DEMO mode, press the "+" and
"START" buttons simultaneously. A buzzer will
sound and the "DEMO" message disappears from
the display.
Setting the clock and timer
After connection to the power supply network or after a
blackout, the
button and the digits on the TIME
display will flash.
To set the time:
1. Press buttons "+" and "-"; press and hold to scroll
the numbers quicker and make setting easier.
2. Once the exact time is reached, wait 10 seconds for
the selection to be memorized, or press the
button
again to fix the setting.
To make any necessary changes, switch off the control
panel by pressing the
; button, then press the
button and follow the steps indicated.
When the set time has elapsed, the timer emits a
buzzer that will automatically stop after 6 seconds or
when any active icon on the control panel is pressed.
To set the timer, press the
button and follow the
procedure used to set the clock. The
button
switched on indicates that the timer has been
activated.
The timer does not switch the oven on or off.
Starting the oven
1. Switch the control panel on by pressing the
button.
2. Press the button corresponding to the desired
cooking mode. The TEMPERATURE display shows the
temperature of the cooking mode; the TIME display
shows the current time.
3. Press the "START" button to begin cooking.
4. The oven will begin its preheating phase, the current
temperature indicators will light up as the temperature
rises. The temperature may be adjusted by pressing
the "+" and "-" buttons.
5. When preheating is finished, a buzzer will sound
and all current temperature indicators will be turned on:
the food can then be placed in the oven.
6. During cooking it is always possible to:
- adjust the temperature by pressing the "+" and "-"
buttons;
- set the duration of a cooking mode (see Cooking
Modes);
- interrupt cooking by pressing the "STOP" button.
7. In case of a blackout, an automatic system will
reactivate the cooking mode from where it was
interrupted, provided the oven temperature has not
dropped below a certain level. Programmed cooking
modes which have not started will not be restored and
must be reprogrammed.
There is no preheating stage for the BARBECUE
mode.
Never put objects directly on the bottom of the oven;
this will avoid the enamel coating being damaged.
Always place cookware on the rack(s) provided.
Cooling ventilation
In order to cool down the external temperature of the
oven, a cooling fan generates a stream of air which
escapes between the oven control panel and the oven
door. At the beginning of the FAST CLEAN mode, the
cooling fan operates at low speed.
Once the cooking has been completed, the cooling
fan continues to operate until the oven has cooled
down sufficiently.
Oven light
When the oven is not in operation, the lamp can be
switched on at any time by opening the oven door.
Start-up and use

6
GB
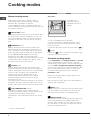
Manual cooking modes
All cooking modes have a default cooking
temperature which may be adjusted manually
between 40°C and 250°C as desired.
In the BARBECUE mode, the default power level
value is indicated as a percentage (%) and may also
be adjusted manually.
MULTILEVEL mode
All heating elements and the fan are activated. Since
the heat remains constant throughout the oven, the
air cooks and browns food in a uniform manner. A
maximum of two racks may be used at the same
time.
BARBECUE mode
The top heating element and the rotisserie spit
(where present) are activated. By pressing the +
and - buttons on the left hand side of the control
panel, the power levels that may be set will appear
on the TEMPERATURE display; these range
between 5% and 100%. The high and direct
temperature of the grill is recommended for food that
requires high surface temperature. Always cook in
this mode with the oven door closed.
GRATIN mode
The top heating element and the rotisserie spit
(where present) are activated and the fan begins to
operate. During part of the cycle the circular heating
element is also activated. This combination of
features increases the effectiveness of the
unidirectional thermal radiation of the heating
elements through forced circulation of the air
throughout the oven.
This helps prevent food from burning on the surface
and allows the heat to penetrate right into the food.
Always cook in this mode with the oven door closed.
LOW TEMPERATURE modes
This type of cooking can be used for proving,
defrosting, preparing yoghurt, heating dishes at the
required speed and slow cooking at low
temperatures. The temperature options are: 40, 65,
90 °C.
Spit roast *
To operate the
rotisserie spit (see
diagram) proceed as
follows:
1. Place the dripping pan in position 1.
2. Place the rotisserie support in position 3 and
insert the spit into the hole provided on the back
panel of the oven.
3. Start the spit roast function by selecting the
or
modes.
When the
mode is activated, the rotisserie spit
will stop if the door is opened.
Automatic cooking modes
The temperature and cooking duration are pre-set
values, guaranteeing a perfect result every time -
automatically. These values cannot be adjusted and
use the C.O.P.
®
(Programmed Optimal Cooking)
system. The cooking cycle stops automatically and
the oven indicates when the dish is cooked. You
may start cooking whether the oven has been
preheated or not.
When the cooking stage has been reached, the
oven buzzer sounds.
Do not open the oven door as this will disrupt the
duration and temperature.
MEAT mode
Use this function to cook beef, pork and lamb. Place
the meat inside the oven while it is still cold. The
dish may also be placed in a preheated oven.
BAKED CAKES mode
This function is ideal for cooking desserts which are
made using natural yeast, baking powder and
desserts which contain no yeast. Place the dish in
the oven while it is still cold. The dish may also be
placed in a preheated oven.
Cooking modes
* Only on certain models.

7
GB
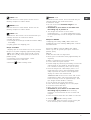
PIZZA mode
Use this function to make pizza. Please see the
following chapter for further details.
BREAD mode
Use this function to make bread. Please see the
following chapter for further details.
PIZZA mode
To obtain the best results, we recommend that you
carefully observe the instructions below:
Follow the recipe.
The weight of the dough should be between 500 g
and 700 g.
Lightly grease the dripping pan.
Recipe for PIZZA:
1 dripping pan on a low shelf level, hot or cold oven
Recipe for 3 pizzas weighing approximately 550 g:
1000 g flour, 500 ml water, 20 g salt, 20 g sugar,
100 ml olive oil, 20 g fresh yeast (or 2 sachets of
powder yeast)
Leavening at room temperature: 1 hour.
Place inside hot or cold oven.
Start the
PIZZA cooking mode.
BREAD mode
To obtain the best results, we recommend that you
carefully observe the instructions below:
Follow the recipe.
Do not exceed the maximum weight of the
dripping pan.
Remember to pour 100 ml of cold water into
the baking tray in position 5.
The dough must be left to rise at room
temperature for 1 1 ½ hours (depending on the
room temperature) or until the dough has doubled
in size.
Recipe for BREAD:
1 Dripping pan holding 1000 g Max, lower level
2 Dripping pans each holding 1000 g Max, medium
and lower levels
Recipe for 1000 g of dough: 600 g flour, 360 g
water, 11g salt, 25 g fresh yeast (or 2 sachets of
powder yeast)
Method:
Mix flour and salt in a large bowl.
Dilute yeast in lukewarm water (approximately 35
degrees).
Make a small well in the mound of flour.
Pour in water and yeast mixture.
Knead dough by stretching and folding it over itself
with the palm of your hand for 10 minutes until it
has a uniform consistency and is not too sticky.
Form the dough into a ball shape, place it in a
large bowl and cover it with transparent plastic
wrap to prevent the surface of the dough from
drying out. Select the manual LOW
TEMPERATURE function on the oven and set the
temperature to 40°C. Place the bowl inside and
leave the dough to rise for approximately 1 hour
(the dough should double in volume).
Cut the dough into equal sized loaves.
Place them in the dripping pan on oven paper.
Cover the loaves with flour.
Make incisions on the loaves.
Remember to pour 100 ml of cold water into
the baking tray in position 5. For cleaning
purposes, we recommend the use of water and
vinegar.
Place the loaves inside the oven while it is still cold.
Start the
BREAD cooking mode.
Once baked, leave the loaves on one of the grill
racks until they have cooled completely.

8
GB
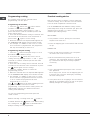
Programming cooking
A cooking mode must be selected before
programming can take place.
Programming the duration
1. Press the
; button; the button and the
numbers on the TIME display will flash.
2. To set the duration, press buttons "+" and "-";
press and hold to scroll the numbers quicker and
make setting easier.
3. Once the desired duration setting is reached, wait
10 seconds for the selection to be memorized, or
press button
again to fix the setting.
4. When the set time has elapsed, END appears on
the TEMPERATURE display and a buzzer sounds.
For example: it is 9:00 a.m. and a time of 1 hour
and 15 minutes is programmed. The programme
will stop automatically at 10:15 a.m.
Programming delayed cooking
1. Press the
button and repeat steps 1 to 3 as
described for the duration setting.
2. Then press the
button and set the end of
cooking time by pressing buttons "+" and "-"; press
and hold to scroll the numbers quicker and make
setting easier.
3. Once the end of cooking time is reached, wait 10
seconds for the selection to be memorized, or press
the
button again to fix the setting.
4. Press the START button to confirm the
programming process.
5. When the selected time has elapsed, END appears
on the TEMPERATURE display and a buzzer sounds.
For example: it is 9:00 a.m. and a time of 1 hour
and 15 minutes is programmed and the end time
is set to 12:30. The programme will start
automatically at 11:15 a.m.
The
and buttons will flash signalling that the
programmed mode has been set. After
programming, in the time before cooking starts, the
TIME display indicates the duration and end of
cooking time alternately.
To cancel a programming procedure press the
"STOP" button.
When selecting a cooking mode, the
button is
activated whereas the
button is not. When setting
the cooking time, the
button is illuminated and
delayed cooking can be programmed.
Practical cooking advice
Do not place racks in position 1 and 5 during fan-
assisted cooking. This is because excessive direct
heat can burn temperature sensitive foods.
In the BARBECUE and GRATIN cooking modes,
particularly when using the rotisserie spit, place the
dripping pan in position 1 to collect cooking
residues (fat and/or grease).
MULTILEVEL
Use positions 2 and 4, placing the food which
requires more heat on 2.
Place the dripping pan on the bottom and the rack
on top.
BARBECUE
Place the grill rack in position 3 or 4 and place
the food in the centre of the rack.
We recommend that the power level is set to
maximum. The top heating element is regulated
by a thermostat and may not always operate
constantly.
PIZZA
Use a light aluminium pizza pan. Place it on the
rack provided.
For a crispy crust, do not use the dripping pan as
it prevents the crust from forming by extending
the total cooking time.
If the pizza has a lot of toppings, we recommend
adding the mozzarella cheese on top of the pizza
halfway through the cooking process.

9
GB
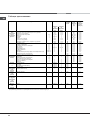
Cooking advice table
Cooking
modes
Foods
Weight
(in kg)
Rack position
Preheati ng
Recom mended
temperature
(°C)
Cooking duration
(minutes)
standa rd
guide rails
sliding guide
rails
Multile vel*
Pizza on 2 racks
Pies on two racks/cakes on 2 racks
Sponge cake on 2 racks (on the dripping pan)
Roast chicken + potatoes
Lamb
Mackerel
Lasagne
Cream puffs on 2 racks
Biscuits on 2 racks
Cheese puffs on 2 racks
Savoury pies
1+1
1
1
1
2 and 4
2 and 4
2 and 4
1 and 2/3
2
1 or 2
2
2 and 4
2 and 4
2 and 4
1 and 3
1 and 3
1 and 3
1 and 3
1 and 3
1
1
1
1 and 3
1 and 3
1 and 3
1 and 3
Yes
Yes
Yes
Yes
Yes
Yes
Yes
Yes
Yes
Yes
Yes
220-230
180
170
200-210
190-200
180
190-200
190
190
210
200
20-25
30-35
20-25
65-75
45-50
30-35
35-40
20-25
10-20
20-25
20-30
Barbecue*
Mackerel
Sole and cuttlefish
Squid and prawn kebabs
Cod fillet
Grilled vegetables
Veal steak
Sausages
Hamburgers
Toasted sandwiches (or toast)
Spit-roast chicken using rotisserie spit (where present)
Spit-roast lamb using rotisserie spit (where present)
1
0.7
0.7
0.7
0.5
0.8
0.7
4 or 5
4 or 6
1
1
4
4
4
4
3 or 4
4
4
4
4
-
-
3
3
3
3
2 or 3
3
3
3
3
-
-
No
No
No
No
No
No
No
No
No
No
No
100%
100%
100%
100%
100%
100%
100%
100%
100%
100%
100%
15-20
10-15
8-10
10-15
15-20
15-20
15-20
10-12
3-5
70-80
70-80
Gratin*
Grilled chicken
Cuttlefish
Spit-roast chicken using rotisserie spit (where present)
Spit-roast duck using rotisserie spit (where presen t)
Roast veal or beef
Roast pork
Lamb
1.5
1
1.5
1.5
1
1
1
2
2
-
-
2
2
2
2
2
-
-
2
2
2
No
No
No
No
No
No
No
210
200
210
210
210
210
210
55-60
30-35
70-80
60-70
60-75
70-80
40-45
Low
temperature
Defrosting
Proving
Dish heating
Pasteurisation
2 or 3
2 or 3
2 or 3
2 or 3
2
2
2
2
No
No
No
No
-
-
-
-
-
60-90
-
-
Automatic
pizza
Pizza (see recipe)
Focaccia (bread dough)
1
1
2
2
2
2
No
No
-
-
23-33
23-33
Automatic
bread
Bread (see recipe)
1 2 2 No
- 55
Automatic
baked cakes
Cakes made using leavened dough
1 2 or 3
2 No
- 35-55
Automatic
roast
Roasts
1 2 or 3
2 No
- 60-80
* The cooking times listed above are intended as guidelines only and may be modified according to personal tastes. Oven preheating times are set as standard and may not be
modified manually.

10
GB
Precautions and tips
This appliance has been designed and
manufactured in compliance with international safety
standards. The following warnings are provided for
safety reasons and must be read carefully.
General safety
The appliance was designed for domestic use
inside the home and is not intended for
commercial or industrial use.
The appliance must not be installed outdoors, even
in covered areas. It is extremely dangerous to
leave the appliance exposed to rain and storms.
When moving or positioning the appliance, always
use the handles provided on the sides of the oven.
Do not touch the appliance with bare feet or with
wet or damp hands and feet.
The appliance must be used by adults only for the
preparation of food, in accordance with the
instructions provided in this booklet.
Do not touch the heating elements and parts of
the oven door when the appliance is in use;
these parts become
extremely hot. Keep
children well away from the appliance.
Ensure that the power supply cables of other
electrical appliances do not come into contact
with the hot parts of the oven.
The openings used for the ventilation and
dispersion of heat must never be covered.
Always grip the oven door handle in the centre:
the ends may be hot.
Always use oven gloves when placing cookware
in the oven or when removing it.
Do not use aluminium foil to line the bottom of the
oven.
Do not place flammable materials in the oven: If
the appliance is switched on accidentally, it could
catch fire.
When unplugging the appliance, always pull the plug
from the mains socket; do not pull on the cable.
Never perform any cleaning or maintenance work
without having disconnected the appliance from
the electricity mains.
If the appliance breaks down, under no
circumstances should you attempt to perform the
repairs yourself. Repairs carried out by
inexperienced persons may cause injury or further
malfunctioning of the appliance. Contact a Service
Centre (see Assistance).
Do not rest heavy objects on the open oven door.
The appliance should not be operated by people
(including children) with reduced physical,
sensory or mental capacities, by inexperienced
individuals or by anyone who is not familiar with
the product. These individuals should, at the very
least, be supervised by someone who assumes
responsibility for their safety or receive
preliminary instructions relating to the operation of
the appliance.
Do not let children play with the appliance.
Disposal
When disposing of packaging material: observe
local legislation so that the packaging may be
reused.
The European Directive 2002/96/EC relating to
Waste Electrical and Electronic Equipment
(WEEE) states that household appliances should
not be disposed of using the normal solid urban
waste cycle. Exhausted appliances should be
collected separately in order to optimise the cost
of re-using and recycling the materials inside the
machine, while preventing potential damage to
the atmosphere and to public health. The
crossed-out dustbin is marked on all products to
remind the owner of their obligations regarding
separated waste collection.
For further information relating to the correct
disposal of exhausted household appliances,
owners may contact the public service provided
or their local dealer.
Respecting and conserving the
environment
You can help to reduce the peak load of the
electricity supply network companies by using the
oven in the hours between late afternoon and the
early hours of the morning. The cooking mode
programming options, the delayed cooking
mode (see Cooking modes) and delayed
automatic cleaning mode (see Care and
Maintenance) in particular, enable the user to
organise their time efficiently.
Always keep the oven door closed when using the
BARBECUE and GRATIN modes: This will achieve
improved results while saving energy
(approximately 10%).
Check the door seals regularly and wipe them
clean to ensure they are free of debris so that
they adhere properly to the door, thus avoiding
heat dispersion.
This product complies with the requirements of the
latest European Directive on the limitation of power
consumption of the standby mode. If no operations
are carried out for a period of 2 minutes, the
appliance automatically switches to the Clock
button. The standby mode is visualised by the low
luminosity "Watch Icon". As soon as interaction with
the machine resumes, the system's operating mode
is restored.

11
GB
Switching the appliance off
Disconnect your appliance from the electricity supply
before carrying out any work on it.
Cleaning the appliance
The stainless-steel or enamel-coated external parts
and the rubber seals may be cleaned using a
sponge that has been soaked in lukewarm water
and neutral soap. Use specialised products for the
removal of stubborn stains. After cleaning, rinse and
dry thoroughly. Do not use abrasive powders or
corrosive substances.
The inside of the oven should ideally be cleaned
after each use, while it is still lukewarm. Use hot
water and detergent, then rinse well and dry with a
soft cloth. Do not use abrasive products.
All accessories - with the exception of the sliding
racks - can be washed like everyday crockery, and
are even dishwasher safe.
We recommend that detergents are not sprayed
directly onto the control panel, but that a sponge
is used instead.
Never use steam cleaners or pressure cleaners on
the appliance.
Cleaning the oven door
Clean the glass part of the oven door using a sponge
and a non-abrasive cleaning product, then dry
thoroughly with a soft cloth. Do not use rough abrasive
material or sharp metal scrapers as these could
scratch the surface and cause the glass to crack.
For more thorough cleaning purposes, the oven door
may be removed:
1. Open the oven door fully (see diagram).
2. Lift up and turn the small levers located on the two
hinges (see diagram).
3. Grip the door on the two
external sides and close it
approximately half way. Pull the
door towards you, lifting it out
of its slot (see diagram). To
replace the door, reverse this
sequence.
Glass door
Seal
Lamp
Oven
compartment
Inspecting the seals
Check the door seals around the oven regularly. If the
seals are damaged, please contact your nearest After-
sales Service Centre (see Assistance). We recommend
that the oven is not used until the seals have been
replaced.
Replacing the light bulb
To replace the
oven light bulb:
1. Remove the glass cover using a screwdriver.
2. Remove the light bulb and replace it with a similar
one: Wattage 15 W, cap E 14.
Replace the glass cover, making sure the seal is
positioned correctly (see diagram).
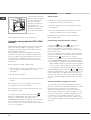
Assembling the sliding rack kit
To assemble the sliding racks:
1. Remove the two
frames, lifting them
away from the spacers
A (see figure).
2. Choose which shelf to
use with the sliding rack.
Paying attention to the
direction in which the
sliding rack is to be
extracted, position joint
B and then joint C on the
frame.
Care and maintenance
A
B
C
Left
guide rail
Right guide
rail
Direction
of extraction

12
GB
3. Secure the two frames
with the guide rails using
the holes provided on
the oven walls (see
diagram). The holes for
the left frame are
situated at the top, while
the holes for the right
frame are at the bottom.
4. Finally, fit the frames on the spacers A.
Do not place the sliding racks in position 5.
Automatic cleaning with the FAST CLEAN
function
With the FAST CLEAN mode, the internal temperature
of the oven reaches 500°C. The pyrolytic cycle is
activated and burns away food and grime residues.
Dirt is literally incinerated.
Keep children away from the appliance during the
automatic cleaning cycle as surfaces may become
very hot. Particles may ignite inside the oven due to
the spontaneous combustion process. There is no
cause for concern: this process is both normal and
hazard-free.
Before initiating the FAST CLEAN mode:
Remove large or coarse food residues from inside of
the oven using a damp sponge. Do not use
detergents.
Remove all accessories.
Do not place tea towels or pot holders over the oven
handle.
If the oven is too hot, the pyrolytic cycle may not
start. Wait for the oven to cool down.
The programme may only be started once the oven
door has been closed.
To activate the Fast Clean mode, press the
button; the TIME display will show the default
duration of 1h30 (normal cycle) while the
TEMPERATURE display will indicate "nor"; pressing
the "+" button activates the intensive cycle "int",
which lasts 2h; the "-" button activates the economy
cycle "eco", lasting 1h.
D
Safety devices
The door is locked automatically as soon as the
temperature exceeds a certain value.
Should a malfunction occur, the heating elements
will switch off.
Once the oven door has been locked, you cannot
change the duration and end time settings.
Programming is possible only after selecting the
FAST CLEAN mode.
Programming delayed automatic cleaning
1. Press the
button; the button and the
numbers on the TIME display will flash.
2. To set the duration, press buttons "+" and "-";
press and hold to scroll the numbers quicker and
make setting easier.
3. Once the desired end of cooking time is reached,
wait 10 seconds for the selection to be memorized,
or press button
again to fix the setting.
4. When the selected time has elapsed, END appears
on the TEMPERATURE display and a buzzer sounds.
For example: it is 9:00 a.m. and the Economy (ECO)
FAST CLEAN mode level has been selected: default
set time 1 hour. 12:30 is selected as the end time.
The programme will start automatically at 11:30 a.m.
Programming has been set when the
and buttons
flash. After programming, in the time before the Fast
Clean mode starts, the TIME display indicates the
duration and end of the Fast Clean mode alternately.
To cancel a programming procedure press the STOP
button.
Once the automatic cleaning cycle is over
You will have to wait until the temperature inside the
oven has cooled down sufficiently before you can open
the oven door. You will notice some white dust
deposits on the bottom and the sides of your oven;
remove these deposits with a damp sponge once the
oven has cooled down completely. Alternatively, you
can make use of the already heated oven, in which
case it is not necessary to remove the deposits, they
are completely harmless and will not affect your food in
any way.

13
GB
Warning:
The appliance is fitted with an automatic diagnostic system which detects any malfunctions. Malfunctions are
displayed by messages of the following type: ER followed by numbers.
Call for technical assistance should a malfunction occur.
Before calling for Assistance:
Check whether you can fix the problem yourself.
Restart the programme to check whether the malfunction has disappeared.
If it has not, contact the Authorised Technical Assistance Service.
Never use the services of an unauthorised technician.
Please have the following information to han d:
The message displayed on the TEMPERATURE display.
The appliance model (Mod.).
The serial number (S/N).
The latter two pieces of information can be found on the data plate located on the appliance.
Assistance

Ñîäåðæàíèå
Ìîíòàæ, 15-16
Ðàñïîëîæåíèå
Ýëåêòðè÷åñêîå ïîäêëþ÷åíèå
Ïàñïîðòíàÿ òàáëè÷êà
Îïèñàíèå èçäåëèÿ, 17
Îáùèé âèä
Êîíñîëü óïðàâëåíèÿ
Âêëþ÷åíèå è ýêñïëóàòàöèÿ, 18
Áëîêèðîâêà óïðàâëåíèé
Ðåæèì DEMO
Íàñòðîéêà ÷àñîâ è òàéìåðà
Âêëþ÷åíèå äóõîâîãî øêàôà
Ïðîãðàììû, 19-22
Ïðîãðàììû ïðèãîòîâëåíèÿ â ðó÷íîì ðåæèìå
Ïðîãðàììû ïðèãîòîâëåíèÿ â àâòîìàòè÷åñêîì
ðåæèìå
Ïðîãðàììèðîâàíèå ïðèãîòîâëåíèÿ
Ïðàêòè÷åñêèå ñîâåòû ïî ïðèãîòîâëåíèþ
Òàáëèöà ïðèãîòîâëåíèÿ
Ïðåäîñòîðîæíîñòè è ðåêîìåíäàöèè, 23
Îáùèå òðåáîâàíèÿ ïî áåçîïàñíîñòè
Óòèëèçàöèÿ
Ýêîíîìèÿ ýëåêòðîýíåðãèè è îõðàíà îêðóæàþùåé
ñðåäû
Òåõíè÷åñêîå îáñëóæèâàíèå è óõîä, 24-
25
Îáåñòî÷èâàíèå èçäåëèÿ
×èñòêà èçäåëèÿ
×èñòêà äâåðöû
Çàìåíà ëàìïî÷êè
Êðåïëåíèå êîìïëåêòà âûäâèæíûõ íàïðàâëÿþùèõ
Ïèðîëèòè÷åñêàÿ ÷èñòêà FAST CLEAN
Ñåðâèñíîå îáñëóæèâàíèå, 26
Èíñòðóêöèè ïî
ýêñïëóàòàöèè
ÄÓÕÎÂÎÉ ØÊÀÔ
RS
7OFH 1039 P IX RU /HA
7OFH 1039 P RU /HA
Ðóññêèé,14English,1
RSGB

RS
15
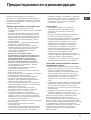
Âàæíî ñîõðàíèòü äàííîå ðóêîâîäñòâî äëÿ åãî
ïîñëåäóþùèõ êîíñóëüòàöèé.  ñëó÷àå ïðîäàæè,
ïåðåäà÷è èçäåëèÿ èëè ïðè ïåðååçäå íà íîâîå
ìåñòî æèòåëüñòâà íåîáõîäèìî ïðîâåðèòü, ÷òîáû
ðóêîâîäñòâî îñòàâàëîñü âìåñòå ñ èçäåëèåì, äëÿ
òîãî ÷òîáû åãî íîâûé âëàäåëåö ìîã îçíàêîìèòüñÿ
ñ ïðàâèëàìè ýêñïëóàòàöèè è ñ ñîîòâåòñòâóþùèìè
ïðåäóïðåæäåíèÿìè.
Âíèìàòåëüíî ïðî÷èòàéòå èíñòðóêöèè: â íèõ
ñîäåðæàòñÿ âàæíûå ñâåäåíèÿ îá óñòàíîâêå,
ýêñïëóàòàöèè è áåçîïàñíîñòè èçäåëèÿ.
Ðàñïîëîæåíèå
Íå ðàçðåøàéòå äåòÿì èãðàòü ñ óïàêîâî÷íûìè
ìàòåðèàëàìè. Óïàêîâêà äîëæíà áûòü óíè÷òîæåíà â
ñîîòâåòñòâèè ñ ïðàâèëàìè ðàçäåëüíîãî ñáîðà
ìóñîðà (ñì. Ïðåäîñòîðîæíîñòè è ðåêîìåíäàöèè).
Óñòàíîâêà èçäåëèÿ ïðîèçâîäèòñÿ â ñîîòâåòñòâèè ñ
äàííûìè èíñòðóêöèÿìè êâàëèôèöèðîâàííûìè
ñïåöèàëèñòàìè. Íåïðàâèëüíûé ìîíòàæ èçäåëèÿ
ìîæåò ñòàòü ïðè÷èíîé ïîâðåæäåíèÿ èìóùåñòâà è
ïðè÷èíèòü óùåðá ëþäÿì è äîìàøíèì æèâîòíûì.
Âñòðîåííûé ìîíòàæ
Äëÿ îáåñïå÷åíèÿ èñïðàâíîãî ôóíêöèîíèðîâàíèÿ
èçäåëèÿ êóõîííûé ýëåìåíò äîëæåí èìåòü
ñîîòâåòñòâóþùèå õàðàêòåðèñòèêè:
ïàíåëè êóõîííûõ ýëåìåíòîâ, ïðèëåãàþùèõ ê
äóõîâîìó øêàôó, äîëæíû áûòü âûïîëíåíû èç
òåðìîñòîéêîãî ìàòåðèàëà;
êëåé êóõîííûõ ýëåìåíòîâ ýëåìåíòîâ,
øïîíèðîâàííûõ äåðåâîì, äîëæåí áûòü
óñòîé÷èâûì ê òåìïåðàòóðå 100°C.
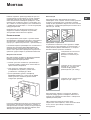
äëÿ âñòðàèâàíèÿ äóõîâîãî øêàôàïîä
êóõîííûì òîïîì (ñì. ñõåìó) èëè â ïåíàë
íèøà êóõîííîãî ýëåìåíòà äîëæíà èìåòü
ñëåäóþùèå ðàçìåðû:
Ïîñëå âñòðàèâàíèÿ èçäåëèÿ â êóõîííûé ýëåìåíò
äîëæíà áûòü èñêëþ÷åíà âîçìîæíîñòü êàñàíèÿ ê
ýëåêòðè÷åñêèìè ÷àñòÿìè. Ðàñõîä ýëåêòðîýíåðãèè,
óêàçàííûé íà ïàñïîðòíîé òàáëè÷êå èçäåëèÿ, áûë
çàìåðÿí äëÿ äàííîãî òèïà ìîíòàæà.
Âåíòèëÿöèÿ
Äëÿ îáåñïå÷åíèÿ íàäëåæàùåé âåíòèëÿöèè
íåîáõîäèìî ñíÿòü çàäíþþ ïàíåëü íèøè êóõîííîãî
ýëåìåíòà. Ðåêîìåíäóåòñÿ óñòàíîâèòü äóõîâîé
øêàô íà äâà äåðåâÿííûõ áðóñêà èëè íà ñïëîøíîå
îñíîâàíèå ñ îòâåðñòèåì äèàìåòðîì íå ìåíåå 45 õ
560 ìì (ñì. ñõåìû).
Öåíòðîâêà è êðåïëåíèå
4 êðåïåæíûõ ýëåìåíòà ñ áîêîâ äóõîâîãî øêàôà
äîëæíû áûòü îòðåãóëèðîâàíû â ñîîòâåòñòâèè ñ 4
îòâåðñòèÿìè â ðàìå â çàâèñèìîñòè îò òîëùèíû
áîêîâîé ïàíåëè êóõîííîãî ýëåìåíòà:
òîëùèíà 20 ìì: ïîëíîñòüþ
óäàëèòå ñúåìíóþ ÷àñòü
êðåïåæíîãî ýëåìåíòà (ñì.
ñõåìó);
òîëùèíà 18 ìì: èñïîëüçóéòå
ïåðâûé ïàç, ñîãëàñíî óæå
ãîòîâîé êîíôèãóðàöèè
ïðîèçâîäèòåëÿ (ñì. ñõåìó);
òîëùèíà 16 ìì: èñïîëüçóéòå
âòîðîé ïàç (ñì. ñõåìó).
Äëÿ êðåïëåíèÿ èçäåëèÿ ê êóõîííîìó ýëåìåíòó:
îòêðîéòå äâåðöó äóõîâîãî øêàôà è çàâèíòèòå 4
øóðóïà äëÿ äåðåâÿííûõ ïàíåëåé â 4 îòâåðñòèÿ â
ïåðèìåòðàëüíîé ðàìå.
Âñå çàùèòíûå ýëåìåíòû äîëæíû áûòü
çàêðåïëåíû òàêèì îáðàçîì, ÷òîáû èõ ìîæíî áûëî
ñíÿòü òîëüêî ïðè ïîìîùè ñïåöèàëüíîãî
èíñòðóìåíòà.
560 m
m
.
45 mm.
595 mm.
595 mm.
24 mm.
545 mm.
5 mm.
567 mm.
23 mm.
593 mm.
45 mm.
558 mm.
5
4
7
m
m
. m
in
.
Ìîíòàæ

16
RS
Ýëåêòðè÷åñêîå ïîäêëþ÷åíèå
Äóõîâûå øêàôû, óêîìïëåêòîâàííûå òðåõïîëþñíûì
ñåòåâûì êàáåëåì, ðàñ÷èòàíû íà ôóíêöèîíèðîâàíèå ñ
ïåðåìåííûì òîêîì ñ íàïðÿæåíèåì è ÷àñòîòîé
ýëåêòðîïèòàíèÿ, óêàçàííûìè íà ïàñïîðòíîé òàáëè÷êå
ñ äàííûìè (ñì. íèæå).
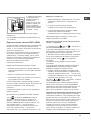
Ïîäñîåäèíåíèå ñåòåâîãî êàáåëÿ
1. Îòêðîéòå çàæèìíóþ
êîðîáêó, íàæàâ ïðè
ïîìîùè îòâåðòêè íà
âûñòóïû ñ áîêîâ
êðûøêè: ïîòÿíèòå è
îòêðîéòå êðûøêó (ñì.
ñõåìó).
2. Îòâèíòèòå âèíò
êàáåëüíîãî ñàëüíèêà è
âûíüòå åãî, ïîääåâ
îòâåðòêîé (ñì. ñõåìó).
3. Îòâèíòèòå âèíòû
êîíòàêòîâ L-N-
è
çàòåì ïðèêðåïèòå
ïðîâîäà ïîä
ãîëîâêàìè âèíòîâ,
ñîáëþäàÿ öâåòîâóþ
ìàðêèðîâêó Ñèíèé (N)
Êîðè÷íåâûé (L) Æåëòî-
çåëåíûé (
).
Ïîäñîåäèíåíèå ñåòåâîãî êàáåëÿ èçäåëèÿ ê
ñåòè ýëåêòðîïèòàíèÿ
Óñòàíîâèòå íà ñåòåâîé êàáåëü íîðìàëèçîâàííóþ
øòåïñåëüíóþ âèëêó, ðàñ÷èòàííóþ íà íàãðóçêó,
óêàçàííóþ íà ïàñïîðòíîé òàáëè÷êå (ñì. ñáîêó).
 ñëó÷àå ïðÿìîãî ïîäêëþ÷åíèÿ ê ñåòè
ýëåêòðîïèòàíèÿ ìåæäó èçäåëèåì è ñåòüþ
íåîáõîäèìî óñòàíîâèòü ìíîãîïîëþñíûé
âûêëþ÷àòåëü ñ ìèíèìàëüíûì ðàññòîÿíèåì ìåæäó
êîíòàêòàìè 3 ìì, ðàñ÷èòàííûé íà äàííóþ íàãðóçêó
è ñîîòâåòñòâóþùèé äåéñòâóþùèì íîðìàòèâàì
(âûêëþ÷àòåëü íå äîëæåí ðàçìûêàòü ïðîâîä
çàçåìëåíèÿ). Ñåòåâîé êàáåëü äîëæåí áûòü
ðàñïîëîæåí òàêèì îáðàçîì, ÷òîáû íè â îäíîé
òî÷êå åãî òåìïåðàòóðà íå ïðåâûøàëà òåìïåðàòóðó
ïîìåùåíèÿ áîëåå ÷åì íà 50°C.
Ýëåêòðîìîíòåð íåñåò îòâåòñòâåííîñòü çà
ïðàâèëüíîå ïîäêëþ÷åíèå èçäåëèÿ ê ýëåêòðè÷åñêîé
ñåòè è çà ñîáëþäåíèå ïðàâèë áåçîïàñíîñòè.
Ïåðåä ïîäêëþ÷åíèåì èçäåëèÿ ê ñåòè
ýëåêòðîïèòàíèÿ ïðîâåðüòå ñëåäóþùåå:
ñåòåâàÿ ðîçåòêà äîëæíà áûòü ñîåäèíåíà ñ
çàçåìëåíèåì è ñîîòâåòñòâîâàòü íîðìàòèâàì;
ñåòåâàÿ ðîçåòêà äîëæíà áûòü ðàñ÷èòàíà íà
ìàêñèìàëüíóþ ïîòðåáëÿåìóþ ìîùíîñòü èçäåëèÿ,
óêàçàííóþ íà ïàñïîðòíîé òàáëè÷êå (ñì. íèæå);
íàïðÿæåíèå ñåòè ýëåêòðîïèòàíèÿ äîëæíî
íàõîäèòüñÿ â ïðåäåëàõ çíà÷åíèé, óêàçàííûõ íà
ïàñïîðòíîé òàáëè÷êå (ñì. íèæå);
ñåòåâàÿ ðîçåòêà äîëæíà áûòü ñîâìåñòèìà ñî
øòåïñåëüíîé âèëêîé èçäåëèÿ. Â ïðîòèâíîì
ñëó÷àå çàìåíèòå ðîçåòêó èëè âèëêó; íå
èñïîëüçóéòå óäëèíèòåëè èëè òðîéíèêè.
Èçäåëèå äîëæíî áûòü óñòàíîâëåíî òàêèì
îáðàçîì, ÷òîáû ñåòåâîé êàáåëü è ñåòåâàÿ ðîçåòêà
áûëè ëåãêî äîñòóïíû.
Ñåòåâîé êàáåëü èçäåëèÿ íå äîëæåí áûòü ñîãíóò
èëè ñæàò.
Ðåãóëÿðíî ïðîâåðÿéòå ñîñòîÿíèå ñåòåâîãî êàáåëÿ
è â ñëó÷àå íåîáõîäèìîñòè ïîðó÷èòå åãî çàìåíó
òîëüêî óïîëíîìî÷åííûì òåõíèêàì (ñì. Ñåðâèñíîå
îáñëóæèâàíèå).
Ïðîèçâîäèòå
ëü íå íåñåò îòâåòñòâåííîñòè çà
ïîñëåäñòâèÿ íåñîáëþäåíèÿ ïåðå÷èñëåííûõ
âûøå òðåáîâàíèé.
ÏÀÑÏÎÐÒÍÀß ÒÀÁËÈ×ÊÀ
Ãàáàðèòíûå
ðàçìåðû
øèðèíà 43,5 ñì.
âûñîòà 32 ñì.
ãëóáèíà 40 ñì.
Îáúåì
56 ë
Ãàáàðèòíûå
ðàçìåðû*
øèðèíà 43,5 ñì.
âûñîòà 32 ñì.
ãëóáèíà 41,5 ñì.
Îáúåì*
58 ë
Ýëåêòðè÷åñêîå
ïîäêëþ÷åíèå
íàïðÿæåíèå ïðè 220
-
240 Â ~
50 Ãö ìàêñ. ïîãëîùàåìàÿ
ìîùíîñòü 2800 Âò
ÌÀÐÊÈÐÎÂÊÀ
ÏÎÒÐÅÁËÅÍÈß
ÝËÅÊÒÐÎÝÍÅÐÃÈÈ**
Äèðåêòèâà 2002/40/ÑÅ îá
ýòèêåòêàõ ýëåêòðè÷åñêèõ
äóõîâûõ øêàôîâ.
Íîðìàòèâ
EN 50304
Çàÿâëåíèå î ðàñõîäå
ýëåêòðîýíåðãèè êëàññà
ïðèíóäèòåëüíîé êîíâåêöèè
-
ôóíêöèÿ íàãðåâàíèÿ:
Çàïåêàíêà.
Äàííîå èçäåëèå
ñîîòâåòñòâóåò ñëåäóþùèì
Äèðåêòèâàì Åâðîïåéñêîãî
Ñîîáùåñòâà: 2006/95/
CEE
îò
12.12.06 (Íèçêîå
íàïðÿæåíèå) ñ
ïîñëåäóþùèìè
èçìåíåíèÿìè
–
2004/108/ÑÅÅ îò 15/12/04
(Ýëåêòðîìàãíèòíàÿ
ñîâìåñòèìîñòü) ñ
ïîñëåäóþùèìè
èçìåíåíèÿìè
–
93/68/ÑÅÅ îò
22/07/93 ñ ïîñëåäóþùèìè
èçìåíåíèÿìè.
-
2002/96/CE ñ
ïîñëåäóþùèìè
èçìåíåíèÿìè.
1275/2008 standby/off mode
*Ñ äâîíîé ñòåêëÿííîé äâåðöåé
**Áåç âû
ä
âèæíûé íàï
ð
àâëÿþ
ù
èõ

RS
17
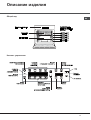
Îïèñàíèå èçäåëèÿ
Îáùèé âèä
Êîíñîëü óïðàâëåíèÿ

18
RS
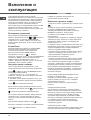
Ïðè ïåðâîì âêëþ÷åíèè äóõîâîãî øêàôà
ðåêîìåíäóåì ïðîêàëèòü åãî ïðèìåðíî â òå÷åíèå ÷àñà
ïðè ìàêñèìàëüíîé òåìïåðàòóðå ñ çàêðûòîé äâåðöåé.
Çàòåì âûêëþ÷èòå äóõîâîé øêàô, îòêðîéòå äâåðöó è
ïðîâåòðèòå ïîìåùåíèå. Çàïàõ, êîòîðûé âû ìîæåòå
ïî÷óâñòâîâàòü, âûçâàí èñïàðåíèåì âåùåñòâ,
èñïîëüçîâàííûõ äëÿ ïðåäîõðàíåíèÿ äóõîâîãî øêàôà.
Ôóíêöèè Áëîêèðîâêà óïðàâëåíèé è Ðåæèì
DEMO ìîãóò áûòü âêëþ÷åíû/îòêëþ÷åíû, äàæå åñëè
ïàíåëü óïðàâëåíèÿ îòêëþ÷åíà.
Áëîêèðîâêà óïðàâëåíèé
Äëÿ áëîêèðîâêè óïðàâëåíèé äóõîâîãî øêàôà
íàæìèòå îäíîâðåìåííî êíîïêè
è . Ðàçäàåòñÿ
çâóêîâîé ñèãíàë, íà äèñïëåå ÒÅÌÏÅÐÀÒÓÐÛ
ïîÿâëÿåòñÿ Loc. Âíîâü íàæìèòå ýòè êíîïêè äëÿ
ðàçáëîêèðîâêè óïðàâëåíèé. Êíîïêà STOP âñåãäà
âêëþ÷åíà.
Ðåæèì Demo
Äóõîâîé øêàô ìîæåò ðàáîòàòü â ðåæèìå DEMO:
îòêëþ÷àþòñÿ âñå íàãðåâàòåëüíûå ýëåìåíòû,
îñòàþòñÿ âêëþ÷åííûìè òîëüêî óïðàâëåíèÿ.
Äëÿ âêëþ÷åíèÿ ðåæèìà DEMO íàæìèòå
îäíîâðåìåííî êíîïêè +,
, è START.
Ðàçäàåòñÿ çâóêîâîé ñèãíàë, íà äèñïëåå ÂÐÅÌÅÍÈ
ïîÿâëÿåòñÿ dEMO. Äëÿ îòêëþ÷åíèÿ ðåæèìà
DEMO íàæìèòå îäíîâðåìåííî êíîïêè + è
START. Ðàçäàåòñÿ çâóêîâîé ñèãíàë, íà äèñïëåå
ÂÐÅÌÅÍÈ ãàñíåò íàäïèñü dEMO.
Íàñòðîéêà ÷àñîâ è òàéìåðà
Ïîñëå îñóùåñòâëåíèÿ ïîäñîåäèíåíèÿ ê ñåòè
ýëåêòðîïèòàíèÿ èëè ïîñëå îòêëþ÷åíèÿ íàïðÿæåíèÿ
êíîïêà
è öèôðû íà äèñïëåå ÂÐÅÌÅÍÈ ìèãàþò.
Ïîðÿäîê íàñòðîéêè âðåìåíè:
1. Íàæìèòå êíîïêè + è -; åñëè äåðæàòü èõ
íàæàòûìè, çíà÷åíèÿ ñìåíÿþòñÿ áûñòðåå äëÿ áîëåå
áûñòðîé íàñòðîéêè.
2. Âûñòàâèâ òî÷íîå âðåìÿ, ïîäîæäèòå 10 ñåê. äëÿ
ñîõðàíåíèÿ íàñòðîéêè â ïàìÿòè èëè âíîâü íàæìèòå
êíîïêó
äëÿ ñîõðàíåíèÿ íàñòðîéêè.
Äëÿ âîçìîæíîé êîððåêòèðîâêè âûêëþ÷èòå êîíñîëü
óïðàâëåíèÿ ïðè ïîìîùè êíîïêè
; íàæìèòå êíîïêó
è âûïîëíèòå óêàçàííûé ïîðÿäîê äåéñòâèé.
Ïî èñòå÷åíèè çàäàííîãî âðåìåíè òàéìåð âêëþ÷àåò
çâóêîâîé ñèãíàë, êîòîðûé ïðåðûâàåòñÿ ÷åðåç 6
ñåêóíä èëè ïîñëå íàæàòèÿ íà ëþáîé âêëþ÷åííûé
ñèìâîë.
Äëÿ íàñòðîéêè òàéìåðà íàæìèòå êíîïêó
è
âûïîëíèòå îïåðàöèè ïî íàñòðîéêå ÷àñîâ. Âêëþ÷åííàÿ
êíîïêà
ïîêàçûâàåò, ÷òî òàéìåð âêëþ÷åí.
Òàéìåð íå óïðàâëÿåò âêëþ÷åíèåì èëè
âûêëþ÷åíèåì äóõîâîãî øêàôà.
Âêëþ÷åíèå äóõîâîãî øêàôà
1. Âêëþ÷èòå êîíñîëü óïðàâëåíèÿ ïðè ïîìîùè êíîïêè
.
2. Íàæìèòå êíîïêó íóæíîé ïðîãðàììû ïðèãîòîâëåíèÿ.
Íà äèñïëåå ÒÅÌÏÅÐÀÒÖÐÛ ïîêàçûâàåòñÿ
òåìïåðàòóðà âûáðàííîé ïðîãðàììû; íà äèñïëåå
ÂÐÅÌÅÍÈ ïîêàçâàåòñÿ òåêóùåå âðåìÿ.
3. Íàæìèòå êíîïêó START äëÿ íà÷àëà
ïðèãîòîâëåíèÿ.
4. Äóõîâêà íà÷íåò íàãðåâàòüñÿ, èíäèêàòîðû òåêóùåé
òåìïåðàòóðû áóäóò çàãîðàòüñÿ ïî ìåðå ïîâûøåíèÿ
òåìïåðàòóðû. Ìîæíî èçìåíèòü òåìïåðàòóðó ïðè
ïîìîùè êíîïîê + è -.
5. Çâóêîâîé ñèãíàë è îäíîâðåìåííîå âêëþ÷åíèå âñåõ
èíäèêàòîðîâ òåìïåðàòóðû íà îäíó ñåêóíäó îçíà÷àåò,
÷òî ôàçà ïðåäâàðèòåëüíîãî íàãðåâà çàâåðøåíà:
ïîìåñòèòå â äóõîâîé øêàô ïðîäóêò.
6. Â ïðîöåññå ïðèãîòîâëåíèÿ â ëþáîé ìîìåíò ìîæíî:
- èçìåíèòü òåìïåðàòóðó ïðè ïîìîùè êíîïîê + è -;
- çàïðîãðàììèðîâàòü ïðîäîëæèòåëüíîñòü
ïðèãîòîâëåíèÿ (ñì. Ïðîãðàììû);
- ïðåðâàòü ïðèãîòîâëåíèå ïðè ïîìîùè êíîïêè STOP.
7.  ñëó÷àå âíåçàïíîãî îòêëþ÷åíèÿ ýëåêòðîïèòàíèÿ,
åñëè òåìïåðàòóðà â äóõîâîì øêàôó íå ñëèøêîì
ïîíèçèëàñü, ñðàáàòûâàåò ñèñòåìà, âîçîáíîâëÿþùàÿ
ïðîãðàììó ïðèãîòîâëåíèÿ ñ ìîìåíòà, â êîòîðûé îíà
áûëà ïðåðâàíà. Ïðîãðàììèðîâàíèå, ñäåëàííîå â
îæèäàíèè ïðîäîëæåíèÿ ïðîãðàììû, íå ñîõðàíÿåòñÿ
ïîñëå âîçâðàùåíèÿ ýëåêòðîïèòàíèÿ è äîëæíî áûòü
âûïîëíåíî ïîâòîðíî.
 ïðîãðàììå ÃÐÈËÜ ôàçà ïðåäâàðèòåëüíîãî
íàãðåâà íå ïðåäóñìîòðåíà.
Íèêîãäà íå ñòàâüòå íèêàêèå ïðåäìåòû íà äíî
äóõîâîãî øêàôà, òàê êàê îíè ìîãóò ïîâðåäèòü
ýìàëèðîâàííîå ïîêðûòèå.
Âñåãäà ñòàâüòå ïîñóäó íà ïðèëàãàþùóþñÿ
ðåøåòêó.
Îõëàäèòåëüíàÿ âåíòèëÿöèÿ
Äëÿ ïîíèæåíèÿ òåìïåðàòóðû ñíàðóæè äóõîâîãî
øêàôà â ïðîöåññå ïðèãîòîâëåíèÿ, îõëàäèòåëüíûé
âåíòèëÿòîð ñîçäàåò ïîòîê âîçäóõà ìåæäó ïåðåäíåé
ïàíåëüþ è äâåðöåé äóõîâîãî øêàôà.  íà÷àëå
ïðîãðàììû ïèðîëèòè÷åñêîé ÷èñòêè FAST CLEAN
âåíòèëÿòîð îõëàæäåíèÿ ðàáîòàåò íà ìàëîé ñêîðîñòè.
Ïî çàâåðøåíèè ïðèãîòîâëåíèÿ âåíòèëÿòîð
ïðîäîëæàåò ðàáîòàòü âïëîòü äî íàäëåæàùåãî
îõëàæäåíèÿ äóõîâêè.
Îñâåùåíèå äóõîâîãî øêàôà
Ëàìïî÷êà ìîæåò áûòü âêëþ÷åíà â ëþáîé ìîìåíò, äàæå
ïðè âûêëþ÷åííîé äóõîâêå, ïðè îòêðûâàíèè äâåðöû.
Âêëþ÷åíèå è
ýêñïëóàòàöèÿ

RS
19
Ïðîãðàììû ïðèãîòîâëåíèÿ â ðó÷íîì
ðåæèìå
Êàæäàÿ ïðîãðàììà èìååò çàäàííóþ òåìïåðàòóðó
ïðèãîòîâëåíèÿ. Òåìïåðàòóðà ìîæåò áûòü íàñòðîåíà
âðó÷íóþ, îò 40°C äî 250°C.
 ïðîãðàììå ÃÐÈËÜ çàäàííîå çíà÷åíèå ÿâëÿåòñÿ
óðîâíåì ìîùíîñòè, âûðàæåííîé â %. Ýòîò
óðîâåíü ìîæåò áûòü òàêæå íàñòðîåí âðó÷íóþ.
Ïðîãðàììà ÎÄÍÎÂÐÅÌÅÍÍÎÅ
ÏÐÈÃÎÒÎÂËÅÍÈÅ
Âêëþ÷àþòñÿ íàãðåâàòåëüíûå ýëåìåíòû è âåíòèëÿòîð.
Òàê êàê æàð ÿâëÿåòñÿ ïîñòîÿííûì âî âñåì äóõîâîì
øêàôó, âîçäóõ îáåñïå÷èâàåò îäíîðîäíîå
ïðèãîòîâëåíèå è ïîäðóìÿíèâàíèå ïðîäóêòà.
Îäíîâðåìåííî ìîæíî èñïîëüçîâàòü íå áîëåå äâóõ
óðîâíåé äóõîâîãî øêàôà.
Ïðîãðàììà ÃÐÈËÜ
Âêëþ÷àåòñÿ âåðõíèé íàãðåâàòåëüíûé ýëåìåíò è âåðòåë
(åñëè îí èìååòñÿ). Ïðè ïîìîùè êíîïîê «+» è «-»,
ðàñïîëîæåííûõ ñëåâà, íà äèñïëåå ÒÅÌÏÅÐÀÒÓÐÛ
ïîêàçûâàþòñÿ èìåþùèåñÿ óðîâíè ìîùíîñòè îò
5% äî 100%. Âûñîêàÿ òåìïåðàòóðà è æàð ïðÿìîãî
äåéñòâèÿ ãðèëÿ ðåêîìåíäóåòñÿ äëÿ ïðèãîòîâëåíèÿ
ïðîäóêòîâ, íóæäàþùèõñÿ â âûñîêîé ïîâåðõíîñòíîé
òåìïåðàòóðå. Ãîòîâüòå áëþäà ñ çàêðûòîé äâåðöåé
äóõîâîãî øêàôà.
Ïðîãðàììà ÇÀÏÅÊÀÍÊÀ
Âêëþ÷àåòñÿ âåðõíèé íàãðåâàòåëüíûé ýëåìåíò, è â
îïðåäåëåííûé ìîìåíò öèêëà òàêæå êðóãëûé
íàãðåâàòåëüíûé ýëåìåíò, âêëþ÷àþòñÿ âåíòèëÿòîð
âåðòåë (åñëè îí èìååòñÿ). Ñî÷åòàåò
îäíîíàïðàâëåííîå âûäåëåíèå æàðà ñ
ïðèíóäèòåëüíîé öèðêóëÿöèåé âîçäóõà âíóòðè
äóõîâîãî øêàôà.
Ýòî ïðåïÿòñòâóåò îáãîðàíèþ ïîâåðõíîñòè
ïðîäóêòîâ, ïîâûøàÿ ïðîíèêàþùóþ ñïîñîáíîñòü
æàðà. Ãîòîâüòå áëþäà ñ çàêðûòîé äâåðöåé
äóõîâîãî øêàôà.
Ïðîãðàììû ÍÈÇÊÀß ÒÅÌÏÅÐÀÒÓÐÀ
Ýòîò ðåæèì ïðèãîòîâëåíèÿ ñëóæèò äëÿ ðàññòîéêè
òåñòà, ðàçìîðîçêè ïðîäóêòîâ, ïðèãîòîâëåíèÿ
éîãóðòîâ, áîëåå èëè ìåíåå áûñòðîãî ðàçîãðåâà
ãîòîâûõ áëþä, äëÿ ïðîäîëæèòåëüíîãî
ïðèãîòîâëåíèÿ ïðè íèçêîé òåìïåðàòóðå. Â äàííîì
ðåæèìå ìîæíî âûáðàòü îäíó èç ñëåäóþùèõ
òåìïåðàòóð: 40, 65, 90°C.
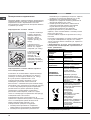
Âåðòåë*
Äëÿ âêëþ÷åíèÿ âåðòåëà
(ñì. ñõåìó) âûïîëíèòå
ñëåäóþùèå îïåðàöèè:
1. óñòàíîâèòå ïðîòèâåíü íà 1-ûé óðîâåíü;
2. óñòàíîâèòå äåðæàòåëü âåðòåëà íà 3-èé óðîâåíü
è âñòàâüòå âåðòåë â ñïåöèàëüíîå îòâåðñòèå â
çàäíåé ñòåíêå äóõîâîãî øêàôà;
3. âêëþ÷èòå âåðòåë, âûáîðàâ ïðîãðàììû
èëè
;
Ïîñëå íà÷àëà âûïîëíåíèÿ ïðîãðàììû
ïðè
îòêðûâàíèè äâåðöû äóõîâêè âåðòåë
îñòàíàâëèâàåòñÿ.
Ïðîãðàììû ïðèãîòîâëåíèÿ â
àâòîìàòè÷åñêîì ðåæèìå
Òåìïåðàòóðà è ïðîäîëæèòåëüíîñòü
ïðèãîòîâëåíèÿ çàäàþòñÿ àâòîìàòè÷å ñêè
ñèñòåìîé C.O.P.® (Îïòèìàëüíîå
çàïðîãðàììèðîâàííîå ïðèãîòîâëåíèå), ÷òî
àâòîìàòè÷åñêè ãàðàíòèðóåò èäåàëüíûé ðåçóëüòàò
ïðèãîòîâëåíèÿ. Â çàâèñèìîñòè îò âûáðàííîé
ïðîãðàììû òîëüêî åå ïðîäîëæèòåëüíîñòü ìîæåò
áûòü èçìåíåíà íà ±5/10 ìèíóò. Ïðèãîòîâëåíèå
àâòîìàòè÷åñêè ïðîäóêò çàâåðøàåòñÿ, è äóõîâîé
øêàô âêëþ÷àåò çâóêîâîé ñèãíàë, îçíà÷àþùèé, ÷òî
áëþäî ãîòîâî. Ïðèãîòîâëåíèå ìîæåò áûòü íà÷àòî â
õîëîäíîé èëè â ãîðÿ÷åé äóõîâêå.
 íà÷àëå ôàçû íà÷àëà ïðèãîòîâëåíèÿ äóõîâîé øêàô
âêëþ÷àåò çâóêîâîé ñèãíàë.
Íå îòêðûâàéòå äâåðöó äóõîâêè âî èçáåæàíèå
èçìåíåíèÿ òåìïåðàòóðû è ïðîäîëæèòåëüíîñòè
ïðèãîòîâëåíèÿ.
Ïðîãðàììà ÌßÑÎ
Ýòà ïðîãðàììà ïðåäíàçíà÷åíà äëÿ ïðèãîòîâëåíèÿ
òåëÿòèíû, ñâèíèíû, áàðàíèíû. Ïèööà ïîìåùàþòñÿ
â äóõîâêó áåç åå ïðåäâàðèòåëüíîãî íàãðåâà. Òåì
íå ìåíåå Âû ìîæåòå ðàçîãðåòü äóõîâêó ïåðåä
ïîìåùåíèåì â íåå ïðîäóêòà.
Ïðîãðàììà ÊÎÍÄÈÒÅÐÑÊÀß ÂÛÏÅ×ÊÀ
Ýòà ïðîãðàììà èäåàëüíî ïîäõîäèò äëÿ âûïå÷êè
òîðòîâ èç äðîææåâîãî, íåäðîææåâîãî òåñòà è
áèñêâèòîâ. Èçäåëèÿ ïîìåùàþòñÿ â õîëîäíóþ
äóõîâêó. Òåì íå ìåíåå Âû ìîæåòå ðàçîãðåòü
äóõîâêó ïåðåä ïîìåùåíèåì â íåå ïðîäóêòà.
Ïðîãðàììû
*
Èìååòñÿ òîëüêî â íåêîòîðûõ ìîäåëÿõ.

20
RS
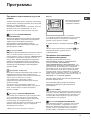
Ïðîãðàììà ÏÈÖÖÀ
Ýòà ïðîãðàììà ïðåäíàçíà÷åíà äëÿ âûïå÷êè ïèööû.
Ñìîòðèòå ðåöåïò è îïèñàíèå ïðîãðàììû â ñëåäóþùåì
ïàðàãðàôå.
Ïðîãðàììà ÕËÅÁ
Ýòà ïðîãðàììà ïðåäíàçíà÷åíà äëÿ âûïå÷êè õëåáà.
Ñìîòðèòå ðåöåïò è îïèñàíèå ïðîãðàììû â ñëåäóþùåì
ïàðàãðàôå.
Ïðîãðàììà ÏÈÖÖÀ
Äëÿ îïòèìàëüíîãî ðåçóëüòàòà ðåêîìåíäóåì ñòðîãî
ñëåäîâàòü ïðèâåäåííûì íèæå èíñòðóêöèÿì:
ñîáëþäàéòå ðåöåïò;
âåñ òåñòà äîëæåí áûòü îò 500 äî 700 ãð.
ñëåãêà ñìàæüòå ïðîòèâåíü ñëèâî÷íûì ìàñëîì.
Ðåöåïò ÏÈÖÖÛ:
1 ïðîòèâåíü, íèæíèé óðîâåíü, õîëîäíàÿ èëè ãîðÿ÷àÿ
äóõîâêà
Ðåöåïò äëÿ 3-õ ïèöö âåñîì ïðèìåðíî 550 ãð: 1000 ãð.
ìóêè, 500 ãð. âîäû, 20 ãð. ñîëè, 20 ãð. ñàõàðà, 10 ë3
îëèâêîâîãî ìàñëà, 20 ãð. Ïèâíûõ äðîææåé (èëè 2
ïàêåòèêà ñóõèõ äðîææåé)
Ðàññòîéêà òåñòà ïðè êîìíàòíîé òåìïåðàòóðå: 1 ÷àñ.
Òåñòî ïîìåùàåòñÿ â õîëîäíóþ èëè ðàçîãðåòóþ
äóõîâêó.
Âêëþ÷èòå ïðèãîòîâëåíèå
ÏÈÖÖÀ
Ïðîãðàììà ÕËÅÁ
Äëÿ îïòèìàëüíîãî ðåçóëüòàòà ðåêîìåíäóåì ñòðîãî
ñëåäîâàòü ïðèâåäåííûì íèæå èíñòðóêöèÿì:
ñîáëþäàéòå ðåöåïò;
ìàêñèìàëüíûé âåñ íà ïðîòèâåíü;
íå çàáûâàéòå íàëèòü 1 äë õîëîäíîé âîäû â
ïðîòèâåíü, óñòàíîâëåííûé íà 5-îì óðîâíå;
ðàññòîéêà òåñòà îñóùåñòâëÿåòñÿ ïðè êîìíàòíîé
òåìïåðàòóðå â òå÷åíèå 1 - 1,5 ÷àñà â çàâèñèìîñòè îò
òåìïåðàòóðû â ïîìåùåíèè, âïëîòü äî óâåëè÷åíèÿ
îáúåìà òåñòà âäâîå.
Ðåöåïò ÕËÅÁÀ:
1 ïðîòèâåíü ìàêñ. íà 1000 ãð, íèæíèé óðîâåíü
2 ïðîòèâåíÿ ìàêñ. íà 1000 ãð, íèæíèé è ñðåäíèé óðîâíè
Ðåöåïò íà 1000 ãð. òåñòà: 600 ãð. ìóêè, 360 ãð. âîäû, 11
ãð. ñîëè, 25 ãð. ñâåæèõ äðîææåé (èëè 2 ïàêåòèêà ñóõèõ
äðîææåé)
Ïðèãîòîâëåíèå:
Ñìåøàéòå â áîëüøîé ìèñêå ìóêó ñ ñîëüþ.
Ðàçâåäèòå äðîææè â òåïëîé âîäå (ïðèìåðíî 35°C).
Ñäåëàéòå â öåíòðå ìóêè ëóíêó.
Íàëåéòå â ëóíêó ðàçâåäåííûå â âîäå äðîææè.
Çàìåñèòå â òå÷åíèå 10 ìèíóò îäíîðîäíîå,
ýëàñòè÷íîå òåñòî, íå ïðèëèïàþùåå ê ðóêàì.
Ñôîðìèðóéòå èç òåñòà øàð, ïîìåñòèòå åãî â ìèñêó è
íàêðîéòå åãî ïðîçðà÷íîé êóõîííîé ïëåíêîé âî
èçáåæàíèå çàñûõàíèÿ ïîâåðõíîñòè òåñòà. Ïîìåñòèòå
ìèñêó ñ òåñòîì íà ðàññòîéêó â äóõîâîé øêàô,
âêëþ÷èâ ðó÷íîé ðåæèì ÍÈÇÊÀß ÒÅÌÏÅÐÀÒÓÐÀ
40°C è äàéòå åìó ïîäíÿòüñÿ ïðèìåðíî â òå÷åíèå 1
÷àñà (òåñòî äîëæíî óâåëè÷èòüñÿ âäâîå â îáúåìå).
Ðàçäåëèòå ïîäîøåäøåå òåñòî íà ÷àñòè.
Ðàçëîæèòå áóëêè íà ïðîòèâåíå íà ëèñòå áóìàãè äëÿ
äóõîâêè.
Ïîñûïüòå áóëêè ìóêîé.
Ñäåëàéòå ñâåðõó áóëîê íàäðåçû.
íå çàáóäüòå íàëèòü 1 äë õîëî äíîé âîäû â
ïðîòèâåíü, óñòàíîâëåííûé íà 5-ûé óðîâåíü;
Äëÿ ÷èñòêè ðåêîìåíäóåì èñïîëüçîâàòü âîäó ñ
óêñóñîì.
Ïèööà ïîìåùàþòñÿ â äóõîâêó áåç åå
ïðåäâàðèòåëüíîãî íàãðåâà.
Âêëþ÷èòå ïðèãîòîâëåíèå
ÕËÅÁ
Ïî çàâåðøåíèè âûïå÷êè âûëîæèòå ãîòîâûå
áóëêè íà ðåøåòêó âïëîòü äî èõ ïîëíîãî
îõëàæäåíèÿ.
La pagina si sta caricando...
La pagina si sta caricando...
La pagina si sta caricando...
La pagina si sta caricando...
La pagina si sta caricando...
La pagina si sta caricando...
La pagina si sta caricando...
La pagina si sta caricando...
-
 1
1
-
 2
2
-
 3
3
-
 4
4
-
 5
5
-
 6
6
-
 7
7
-
 8
8
-
 9
9
-
 10
10
-
 11
11
-
 12
12
-
 13
13
-
 14
14
-
 15
15
-
 16
16
-
 17
17
-
 18
18
-
 19
19
-
 20
20
-
 21
21
-
 22
22
-
 23
23
-
 24
24
-
 25
25
-
 26
26
-
 27
27
-
 28
28


Indesit 7OFH 1039 P IX RU/HA Guida utente
- Categoria
- Microonde
- Tipo
- Guida utente
in altre lingue
Documenti correlati
-
Indesit FZ 103 P.1 GIX Guida utente
-
Hotpoint F48R 1012.1 IX /HA Manuale del proprietario
-
Indesit FQ 101 C.1 (ICE) Guida utente
-
-
-
HOTPOINT/ARISTON FH 103 IX/HA Guida utente
-
-
-
Hotpoint Ariston CISFB 21.2 (WH) /HA Guida utente