La pagina sta caricando ...

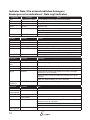
Table of Contents \ Inhalt \
Table des matières \ Indice
Safety Notice \ Sicherheitshinweise \ Consignes de sécurité \
Avvisi per la sicurezza .................................................................................................1
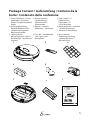
Package Content \ Lieferumfang \ Contenu de la boite \ Contenuto
della confezione ............................................................................................................5
Main Body \ Das Gerät \ Aspirateur EClean \ Corpo principale ...................6
Battery Installation \ Akku einlegen \ Installation de la batterie \
Installazione della batteria ........................................................................................8
Charging the Battery \ Akku auaden \ Chargement de la batterie \
Caricamento della batteria .................................................................................... 10
Operating Panel Introduction \ Das Bedienfeld \ Présentation du
panneau de commande \ Introduzione al pannello di controllo ...............6
Using the Recharging Dock \ Ladedock verwenden \ Utilisation de la
station de recharge \ Uso della stazione di caricamento ...............................9
Scheduling Eclean's Cleaning Time (EC 01 Enhanced) \ Saugzeitplan
des Eclean festlegen (EC 01 Enhanced) \ Programmation de la durée
de nettoyage de Eclean (EC 01 amélioré) \ Pianicazione dei tempi di
pulizia di Eclean (EC 01 ottimizzato) ................................................................... 10
Remote Control \ Fernbedienung \ Télécommande \ Telecomando ...... 32
Install Solid Freshener \ Lufterfrischer installieren \ Installation d’un
désodorisant solide \ Installazione del deodorante ..................................... 35
Maintenance - Dust bin & lter \ Wartung - Staubbehälter und Filter \
Maintenance - Bac à poussière et ltre \ Manutenzione -
Raccoglitore e ltro ................................................................................................... 37
Maintenance - Side brush & Roll brush \ Wartung - Seitliche Bürste &
Rollbürste \ Maintenance - Brosse latérale & Brosse rotative \
Manutenzione - Spazzola laterale e Spazzola rotante ................................. 39
Maintenance - Cleaning the back wheels \ Wartung - Hinterräder
reinigen \ Maintenance - Nettoyage des roulettes arrière \
Manutenzione - Pulizia delle ruote posteriori ................................................. 40
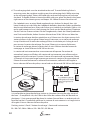
Operating Scenarios \ Einsatzgebiete \ Scénarii d’utilisation \
Situazioni pratiche .................................................................................................... 42
Troubleshooting \ Problemlösung \ Dépannage \ Risoluzione
dei problemi ................................................................................................................ 46
Product Warranty Card \ Problemlösung \ Carte de garantie du
produit \ Scheda di garanzia del prodotto ....................................................... 50
Customer Copy \ Exemplar für den Kunden \ Copie client \
Copia per il cliente .................................................................................................... 54
La pagina sta caricando ...
La pagina sta caricando ...
La pagina sta caricando ...

4
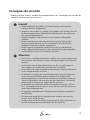
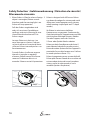
Vietato
Non smontare il prodotto. Le alte tensioni al suo interno possono
provocare gravi lesioni.
Non collocare alcun oggetto sopra il prodotto e non usarlo come seduta
né durante il funzionamento, né in stato di arresto. Prestare maggiore
attenzione quando sono presenti bambini o animali domestici.
Quando il prodotto è in uso, tenerlo lontano dal fuoco o altre sostanze
volatili o liquidi infiammabili.
Non pulire il prodotto con acqua, né usarlo su superfici bagnate (e.g.
bagno) per evitare guasti ai componenti elettrici.
Non esporre il prodotto alla luce diretta del sole, diversamente il
funzionamento della macchina può subire interferenze.
Non guardare direttamente la lampada UV, quando è accesa, per evitare
lesioni agli occhi.
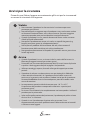
Avviso
Quando il prodotto è in uso, assicurarsi che lo scarico dell’aria non sia
bloccato da oggetti estranei per evitare guasti.
Prima dell’uso, rimuovere dal pavimento abiti, fili o cavi, borse di plastica
e qualsiasi altro oggetto che può impigliarsi nel prodotto.
Sollevare tendaggi, coperte, lenzuola e frange dei tappeti per evitare
pericoli.
Il prodotto è solo per uso domestico e non per impieghi in fabbriche
o altre attività commerciali. Se il prodotto subisce danni a causa di
cattivo uso, la garanzia sarà annullata. Prodotti inviati per la riparazione:
l’eventuale addebito di costi di manodopera e pezzi di ricambio sarà a
nostra discrezione.
La temperatura operativa ideale è compresa tra -10° C e 45° C.
L’esposizione del prodotto a temperature inferiori o superiori può
provocare guasti.
Assicurarsi che la batteria sia completamente caricata quando si utilizza il
prodotto per la prima volta.
In base alla conformazione del pavimento, il prodotto può pulire un’area
di circa 10 m² in 10 minuti.
Quando si usa il prodotto per la prima volta, osservare il suo
comportamento per evitare problemi come il blocco dovuto ad ostacoli
o l’incastro sotto oggetti.
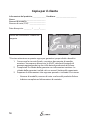
Avvisi per la sicurezza
Prima di usare Eclean, leggere accuratamente gli Avvisi per la sicurezza ed
osservare le istruzioni che seguono:

5
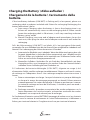
Package Content \ Lieferumfang \ Contenu de la
boite \ Contenuto della confezione
1. Eclean Main Body \ Eclean-
Hauptgerät \ Aspirateur
Eclean \ Corpo principale di
Eclean
2. Remote Control \
Fernbedienung \
Télécommande \
Telecomando
3. Filter Cotton x 2 \
Filtereinsätze \
Filtre coton x 2 \
2 Filtri di cotone
4. Rechargeable Battery \
Wiederaufladbarer Akku
\ Batterie rechargeable \
Batteria ricaricabile
5. Adapter \ Netzteil \
Adaptateur \ Adattatore
6. Recharging Dock \ Ladedock
\ Station de recharge \
Stazione di caricamento
7. Cleaning Brush \
Reinigungsbürste \ Brosse
de nettoyage \ Pennello per
la pulizia
8. Dust Bin \ Staubbehälter
\ Bac à poussière\
Raccoglitore
9. User’s Manual \
Bedienungsanleitung
\ Manuel utilisateur \
Manuale d’uso
8
9
1
2
3
4
6
7
5
Robotic Vacuum Cleaner
\ Staubsaugerroboter \
Aspirateur robotique \ Robot
aspirapolvere
Fully Automated Intelligent Dust
Buster \ Vollautomatisierter,
intelligenter Staubsauger \ Collecteur
de poussière intelligent e automatisé \
Aspirapolvere totalmente automatico
User’s Manual \ Bedienungsanleitung \
Manuel de l’utilisateur \ Manuale d’uso
Easy-Clean Life Style
La pagina sta caricando ...

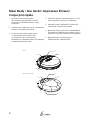
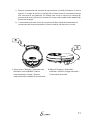
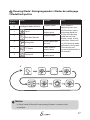
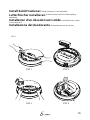
7
8
9
10
11
12
13
14
15
16
8 Ultraviolet light \ UV-Leuchte \ Lampe à
ultraviolets \ Lampada a raggi ultravioletti
9 Air outlet \ Abluftöffnungen \ Sortie de l’air \
Scarico dell’aria
10 Battery cove \ Akkufachdeckel \ Capot
du compartiment batterie \ Coperchio
scomparto batterie
11 Recharging dock connection point \
Ladedock-Anschluss \ Point de connexion
de la station de recharge \ Punto di
collegamento alla stazione di caricamento
12 Front wheel \ Vorderrad \ Roue avant \ Ruota
frontale
13 Roll brush \ Rollbürste \ Brosse rotative \
Spazzola rotante
14 Side brush \ Seitliche Bürste \ Brosse latérale \
Spazzola laterale
15 Dust suction entrance \ Saugöffnung \
Entrée de l’aspiration poussière \ Ingresso
aspirazione polvere
16 Back wheel set \ Hinterräder \ Jeu de roues
arrière \ Set di ruote posteriori
La pagina sta caricando ...

9
Utilisez exclusivement la batterie et l’adaptateur d’origine.
Ne touchez pas la batterie, l’adaptateur et/ou la fiche électrique avec les
mains mouillées.
Vérifiez que l’adaptateur est fermement branché et que la fiche n’est pas
exposée.
Avant de remettre en charge, vérifiez que la tension et l’ampérage sont
bien les mêmes que ceux de l’électricité de votre secteur.
Pour éviter tout danger, arrêtez de recharger et enlevez la batterie avant de
nettoyer ce produit.
Usare solo la batteria installata in fase di produzione e l’adattatore fornito
in dotazione.
Non toccare la batteria, l’adattatore e/o la spina con le mani bagnate.
Assicurarsi che l’adattatore sia collegato in sicurezza e che la spina non sia
esposta.
Prima di caricare la batteria, assicurarsi che la tensione e l’amperaggio
specificati corrispondano a quelli erogati all’abitazione.
Per evitare pericoli, arrestare il caricamento e rimuovere la batteria prima
di pulire il prodotto.
La pagina sta caricando ...

11
b. Manual Charging \ Manuelles
Aufladen \ Mise en charge manuelle \
Caricamento manuale
a. Auto-return Charging \ Automatische
Rückkehr zum Ladedock \ Retour
automatique en charge \ Ritorno
automatico alla stazione di caricamento
a. Ritorno automatico alla stazione di caricamento: Quando la batteria è scarica,
oppure il tempo di pulizia è terminato, Eclean tornerà automaticamente
alla stazione di caricamento. Se Eclean non riesce a trovare la stazione di
caricamento entro 20 minuti, smetterà la ricerca ed accederà alla modalità di
“Risparmio energia”.
b. Caricamento manuale: Inserire una estremità del cavo d’alimentazione nel
connettore del corpo principale e l’altra estremità ad una presa a muro.

12
Notice \ Hinweis \ Attention \ Avviso
When using Eclean for the first time, please charge the battery for 8 full
hours. Please make sure that the power indicator on Eclean flashes blue while
charging. After the battery is fully charged, the power indicator should remain
on continuously.
Bitte laden Sie den Akku bei der ersten Inbetriebnahme des Eclean
vollständig auf; dies dauert etwa 8 Stunden. Bitte stellen Sie sicher, dass die
Betriebsanzeige am Eclean während des Ladevorgangs blau blinkt. Nachdem
der Akku vollständig geladen ist, leuchtet die Betriebsanzeige konstant.
Avant d’utiliser Eclean pour la première fois, chargez complètement la batterie
pendant au moins 8 heures. Assurez-vous que l’indicateur d’alimentation
du Eclean clignote en bleu pendant la recharge. Lorsque la batterie est
complètement rechargée, le voyant d’alimentation devrait rester allumé.
Al primo utilizzo di Eclean, caricare la batteria per almeno 8 ore.
Assicurarsi che l’indicatore di alimentazione di Eclean lampeggi di
colore blu durante il caricamento. Quando la batteria è completamente
carica, l’indicatore resta acceso.

13
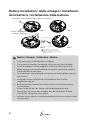
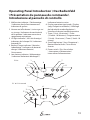
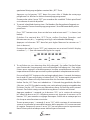
Operating Panel Introduction \ Das Bedienfeld
\ Présentation du panneau de commande \
Introduzione al pannello di controllo
1
8
9
6
2
3
4
5
7
EC01
EC 01 En hance d
1
8
9
6
2
3
4
5
7
1 Malfunction indicator \ Fehleranzeige
\ Indicateur de dysfonctionnement\
Indicatore di guasto
2
Vacuum on/off indicator \ Staubsauger ein/
aus-Anzeige \ Indicateur de marche/arrêt
de l’aspiration \ Indicatore accensione/
spegnimento aspirazione
3 UV light indicator \ UV-Licht-Anzeige \
Indicateur de la lampe UV \ Indicatore
lampada UV
4 Battery/Charge indicator \ Betriebs-/
Ladeanzeige \ Indicateur de batterie/
charge \ Indicatore Batteria/
Caricamento
5 Low-battery indicator \ Akkuanzeige
\ Indicateur de batterie déchargée \
Indicatore batteria scarica
6 Display operation time/mode \ Display
(zeigt Saugzeit und Modus) \ Affichage
de la durée/du mode d’opération \
Visualizza la durata/modalità operativa
7 Timer (* Unit: 10 minutes) \ Timer
(* Einheit: 10 Minuten) \ Programmateur
(* Unité : 10 minutes) \ Timer (* Unità: 10
minuti)
8 Start/Stop button \ Start-/Stopptaste \
Bouton Marche/Arrêt \ Tasto Avvio/
Arresto
9 Power switch \ Ein-/Ausschalter
\ Interrupteur d’alimentation \
Interruttore d’alimentazione

14
Indicator Note \ Die unterschiedlichen Anzeigen \
Remarque sur les indicateurs \ Note sugli indicatori
Indicator Function Note
Blue POWER ON, CHARGE Turn on battery (On); battery is fully recharged
Flashing Blue CHARGE Recharging
Yellow UV UV light is on
Green VAC OFF Vacuum is o
Red ERROR Collision panel is stuck with foreign object for over 3 seconds
Wheel (s) is stuck for over 10 seconds
Eclean is lifted for over 3 seconds
Flashing Red LOW BATT Low-battery indicator
Anzeige Funktion Hinweis
Blau
Eingeschaltet, Auaden
Gerät arbeitet; Akku ist voll geladen
Blaues Blinken Auaden Der Akku wird geladen.
Gelb UV Die UV-Leuchte ist eingeschaltet.
Grün Staubsauger aus Der Staubsauger ist abgeschaltet.
Rot Fehler Der Kollisionssensor wurde länger als 3 Sekunden ausgelöst.
Eines der Räder ist seit mehr als 10 Sekunden blockiert.
Der Eclean wurde länger als 3 Sekunden lang angehoben.
Rotes Blinken Akku fast leer Akkuanzeige
Indicateur Fonction Remarque
Bleu ALLUMÉ, EN CHARGE Allumez la batterie (On) ; la batterie est à pleine charge
Bleu cligno-
tant
CHARGE En cours de charge
Jaune UV La lampe UV est allumée
Vert ARRÊT ASP L'aspiration est arrêtée
Rouge ERREUR Le panneau de collision est coincé par un corps étranger
pendant plus de 3 secondes
Une ou plusieurs roues sont coincées pendant plus de 10
secondes
Eclean est soulevé depuis plus de 3 secondes
Rouge
clignotant
BATT DÉCH Indicateur de batterie déchargée
Indicatore Funzione Nota
Blu ACCESO, CARICO Robot acceso; batteria completamente carica
Blu
lampeggiante
CARICAMENTO Caricamento in corso
Giallo UV La lampada UV è accesa
Verde ASPIRAZIONE
DISATTIVATA
L’aspirazione è disattivata
Rosso ERRORE Il pannello di collisione è rimasto incastrato con un oggetto
estraneo per più di 3 secondi
Le ruote sono rimaste bloccate per più di 10 secondi
Eclean è stato sollevato per più di 3 secondi
Rosso
lampeggiante
BATTERIA SCARICA Indicatore batteria scarica

15
Alarm Note \ Hinweistöne \ Remarque sur les alarmes \
Note sugli allarmi
Alarm Note
1 short beep,1 long beep Vacuum timer is up; low-battery indicator is on;
vacuum is o
1 long beep Indicator is on
3 short beep Fully charged
3 short beep, 1 long beep Fully charged, starts clean again
Hinweistöne Hinweis
1 kurzer Piepton, 1 langer
Piepton
Die Saugzeit ist abgelaufen; die Akkuanzeige
leuchtet; der Staubsauger ist abgeschaltet.
1 langer Piepton Der Indikator leuchtet.
3 kurze Pieptöne Voll geladen.
3 kurze Pieptöne, 1 langer
Piepton
Akku vollständig geladen, die Reinigung wird
fortgesetzt.
Alarme Remarque
1 bip bref,1 bip long Le programme d’aspiration est terminé ; l'indicateur de
batterie déchargée est allumé ; l'aspiration est arrêtée
1 bip long L'indicateur est allumé
3 bips brefs À pleine charge
3 bips brefs, 1 bip long À pleine charge, le nettoyage recommence
Allarme Nota
1 avviso sonoro breve, 1 avviso
sonoro lungo
L’intervallo d’aspirazione è trascorso; l’indicatore
batteria scarica è acceso; l’aspirazione è disattivata
1 avviso sonoro lungo L'indicatore è acceso
3 avvisi sonori brevi Completamente carico
3 avvisi sonori brevi, 1 avviso
sonoro lungo
Completamente carico, ricomincia a pulire
La pagina sta caricando ...
La pagina sta caricando ...
La pagina sta caricando ...
La pagina sta caricando ...

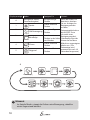
20
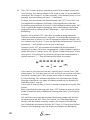
Display
numerico
Modalità Supercie adatta Nota
A Modalità Intelligente
Spazi irregolari Quando Eclean è in
funzione, premere
il tasto MODALITÀ
(usato per la selezione
della modalità)
per visualizzare la
modalità sul display.
Al contempo, Eclean
funzionerà alla
modalità indicata
sul display. (L’ora è
visualizzata sul display
automaticamente
dopo 10 secondi.)
1 Spirale
Spazi aperti o
spazi vuoti
2
Percorso casuale
Spazi irregolari
3
Perimetrale
Spazi più sporchi
vicino alle pareti
4 Serpentina
Spazi aperti o
spazi vuoti
5 Poligonale
Spazi aperti o
spazi vuoti
Avviso
In modalità Spirale, Eclean arresterà il suo movimento se entra in contatto
con qualsiasi oggetto.
A
Percorso casuale Spirale SpiralePerimetrale
PoligonaleSpiraleSerpentina Spirale

21
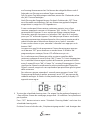
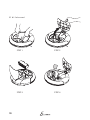
Using the Recharging Dock \ Ladedock verwenden
\ Utilisation de la station de recharge \ Uso della
stazione di caricamento
Auto vacuuming set indicator (green) \
Automatisches Saugen eingestellt (grün) \
Indicateur d’aspiration automatique (vert) \
Indicatore aspirazione automatica impostata
(verde)
Start auto vacuuming (GO) \
Automatisches Saugen starten
(GO) \ Lancer l’aspiration
automatique (GO) \ Attiva
aspirazione automatica (GO)
Battery indicator (blue)
\ Akkuanzeige (blau) \
Indicateur de batterie (Bleu)
\ Indicatore batteria (blu)
Function Indicator Note
POWER (power indicator) Blue Recharging.
Start Auto Vacuuming (press
“GO” to turn on or turn o and
indicator will display status)
Green When pressing the GO button before or during
recharging (green indicator will light up), Eclean will
enter the quick charge mode and begin cleaning
automatically when the battery is 80% full.
O After Eclean is fully recharged, the alarm will sound 3
short beeps and Eclean will be on standby.
Funktion Anzeige Hinweis
POWER
(Betriebsanzeige)
Blau Akku wird geladen.
Automatisches Saugen.
(Mit der GO-Taste schalten
Sie diese Funktion ein und
aus, der aktuelle Status wird
angezeigt.)
Grün Wenn Sie vor oder während des Ladevorgangs (grüne
Anzeige leuchtet) die LOS-Taste drücken, ruft der Eclean
den Schnelllademodus auf und beginnt automatisch
mit der Reinigung, sobald der Akku zu 80 % geladen
ist.
aus Sobald der Akku komplett geladen wurde,
hören Sie drei kurze Pieptöne, Ihr Eclean
wechselt in den Bereitschaftsmodus.

22
Fonction Indicateur Remarque
POWER (indicateur
d'alimentation)
Bleu en cours de recharge
Lancer l'aspiration
automatique
(appuyez sur « GO »
pour activer ou désactiver,
l'indicateur ache l'état)
Vert Lorsque vous appuyez sur le bouton ALLER avant
ou pendant la recharge (l’indicateur vert s’allume),
Eclean entrera en mode de recharge rapide et
commence à aspirer automatiquement lorsque la
batterie est 80% rechargée.
arrêt Une fois que votre Eclean est complètement
rechargé, l’alarme émet trois bips brefs et Eclean
se met en attente.
Funzione Indicatore Nota
POWER
(indicatore
d’alimentazione)
Blu Caricamento in corso
Attiva aspirazione
automatica
(premere il tasto “GO” per
accendere e spegnere;
l’indicatore mostrerà lo
stato)
Verde Premere il tasto “GO” prima di ricaricare o durante
il caricamento ed Eclean ricomincerà ad aspirare
quando la procedura di ricarica è completata.
Spento Quando la batteria di Eclean è completamente
carica, l’allarme emetterà 3 avvisi sonori brevi ed
Eclean accederà allo stato di standby.
Before use \ Vor dem Einsatz \ Avant utilisation \ Prima dell’uso
1. Find a suitable wall outlet. Do not place anything near the recharging dock.
2. Lay the mobile base of the recharging dock against the wall. Connect to adapter
power, use the other end and plug into the power input hole. Tie up wires to
prevent obstructing Eclean’s movement.
1. Suchen Sie sich eine Steckdose an geeigneter Stelle. Achten Sie darauf, dass sich
nichts weiter in der Nähe des Ladedocks befindet.
2. Platzieren Sie die Basis des Ladedocks so, dass Sie an der Wand anliegt. Verbinden
Sie das Netzteil mit der Steckdose, schließen Sie den Netzteilstecker an den
Netzteileingang an. Verlegen Sie die Kabel so, dass sich Ihr Eclean frei bewegen
kann.
1. Trouvez une prise murale qui convient. Ne placez rien à proximité de la station de
recharge.
2. Placez la base mobile de la station de recharge contre le mur. Connectez
l’adaptateur d’alimentation, puis branchez l’autre extrémité sur l’orifice d’entrée
de l’alimentation. Attachez les fils de façon à ne pas gêner le déplacement de
Eclean.

23
1. Trovare una presa a muro adatta. Non mettere nulla nelle vicinanze della stazione
di caricamento.
2. Appoggiare alla parete la base mobile della stazione di caricamento. Collegare
una estremità dell’adattatore alla stazione e l’altra estremità alla presa di corrente.
Arrangiare i cavi in modo da prevenire impedimenti ai movimenti di Eclean.
“Home” Test \ Ausgangspunkt-Test \ Test « Origine » \
Test “Ritorno alla stazione di caricamento”
Place Eclean near the recharging dock. Turn on Eclean and press Start. After making
sure it is operating normally, press “HOME” on the remote control and Eclean
will start “Auto-return” function. You can check if the location for the recharge dock is
appropriate. If Eclean cannot successfully reach the recharging dock, then adjust the
location of the dock. Please refer to P. 44 for optimal charger placement.
Setzen Sie den Eclean in der Nähe des Ladedocks auf den Boden. Schalten Sie den
Eclean ein, drücken Sie die Start-/Stopptaste. Wenn das Gerät normal arbeitet,
drücken Sie die “HOME”-Taste an der Fernbedienung – der Eclean sucht nun
selbsttätig nach seinem Ladedock. Auf diese Weise prüfen Sie, ob sich das Ladedock
an einer für den Eclean gut erreichbaren Stelle befindet. Falls der Eclean sein
Ladedock nicht erfolgreich erreichen kann, stellen Sie das Ladedock bitte an einer
anderen Stelle auf. Hinweise zur optimalen Platzierung des Ladegerätes finden Sie
auf S. 44.
Placez Eclean près de la station de recharge. Allumez le et appuyez sur Start. Après
avoir vérifié que l’appareil fonctionne bien, appuyez sur « HOME » (retour
automatique) sur la télécommande et Eclean commence à exécuter la fonction
de « Retour auto ». Vous pouvez vérifier si l’emplacement choisi pour la station de
recharge est approprié. Si Eclean ne parvient pas à trouver la station de recharge,
changez-la de place. Référez-vous à P.44 pour l’emplacement optimal du chargeur.
Collocare Eclean vicino alla stazione di caricamento. Accendere Eclean e premere
il tasto d’avvio. Dopo avere accertato che Eclean funziona in modo normale,
premere il tasto “HOME” del telecomando ed Eclean avvierà la funzione di
“Ritorno automatico”. Controllare che la posizione della stazione di caricamento sia
appropriata. Se Eclean non riesce a raggiungere la stazione, sistemare la posizione
della stazione di caricamento. Fare riferimento a pagina 44 per istruzioni sulla
collocazione ottimale del caricatore

24
Notice \ Hinweis \ Attention \ Avviso
After connecting the power, the alarm will sound 1 long beep and the
battery indicator will be on (Blue). That indicates electricity is connected
and the recharging dock is ready.
Do not place objects near the recharging dock to avoid obstructing Eclean
returning to the recharging dock.
To ensure longer battery life, please fully discharge Eclean and charge it for
8 hours once a month.
Nachdem das Netzteil angeschlossen wurde, hören Sie einen langen
Signalton, die Akkuanzeige leuchtet (blau) auf. Dies bedeutet, dass das
Gerät mit Strom versorgt wird und das Ladedock bereit ist.
Achten Sie darauf, dass sich keine Gegenstände in der Nähe des Ladedocks
befinden und den Rückweg Ihres Eclean stören.
Zu Gewährleistung einer langen Akkulaufzeit sollten Sie den Eclean einmal
im Monat vollständig entladen und anschließend 8 Stunden aufladen.
Après que vous ayez connecté l’alimentation, l’alarme émet un bip long et
l’indicateur de batterie s’allume (en bleu). Cela indique que l’alimentation est
connectée et que la station de recharge est prête.
Ne placez pas d’objet près de la station de recharge afin d’éviter de gêner le
retour de Eclean sur sa station.
Pour une plus longue durée de vie de la batterie, veuillez décharger
complètement Eclean puis le recharger pendant 8 heures au moins une fois par
mois.
Dopo avere collegato l’alimentazione, l’allarme emetterà 1 avviso sonoro
lungo e l’indicatore batteria si accenderà (blu). Questo significa che
l’alimentazione è collegata e che la stazione di caricamento è pronta.
Non collocare oggetti nelle vicinanze della stazione di caricamento per
evitare impedimenti al ritorno di Eclean alla stazione.
Per garantire una lunga durata della batteria, scaricare completamente e
ricaricare Eclean per 8 ore una volta al mese.

25
Scheduling Eclean's Cleaning Time (EC 01 Enhanced) \
Saugzeitplan des Eclean festlegen (EC 01 Enhanced) \
\ Programmation de la durée de nettoyage de Eclean
(EC 01 amélioré) \ Pianificazione dei tempi di pulizia
di Eclean (EC 01 ottimizzato)
You can only schedule cleaning time and enable auto cleaning function while
Eclean is connected to the recharging dock.
Nur während der Eclean am Ladedock angeschlossen ist, können Sie die geplante
Saugzeit einstellen und die automatische Reinigungsfunktion aktivieren.
Vous ne pouvez programmer la durée de nettoyage et activer la fonction de
nettoyage auto que lorsque Eclean est connecté à la station de recharge.
I tempi di pulizia possono essere pianificati e funzione di pulizia automatica può
essere abilitata solo mentre Eclean è collegato alla stazione di caricamento.
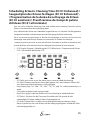
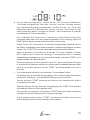
1. LCD Display Diagram \ Abbildung des LCD-Bildschirms \ Diagramme de l’écran
LCD \ Illustrazione del display LCD
• SET (left): press once to set the clock; press twice to schedule cleaning.
• GO (left): if battery and brush icons both appear, this icon indicates Eclean will
start cleaning when the battery is fully charged.
• Day display (top) ”Su”, “Mo”, ”Tu”, “We”, “Th”, “Fr”, and “Sa” indicate each day in a
week.
• CLK (right) indicates time-setting mode.
• Brush icon (right): indicates Eclean will start cleaning at scheduled time.
• SET (links): Drücken Sie die Taste zum Einstellen der Uhr einmal; durch
zweimaliges Drücken stellen Sie den Saugzeitplan ein.
• GO (links): Wenn Akku- und Bürstensymbol gleichzeitig erscheinen, zeigt
dieses Symbol an, dass der Eclean mit der Reinigung beginnt, sobald der Akku
vollständig geladen ist.

26
• Day display (oben): „Su“, „Mo“, „Tu“, „We“, „Th“, „Fr“ und „Sa“ zeigen die
einzelnen Wochentage an.
• CLK (rechts): Zeigt den Zeiteinstellungsmodus an.
• Brush icon (rechts): Zeigt an, dass der Eclean zur geplanten Zeit mit der
Reinigung beginnt.
• SET (gauche) : appuyez une fois pour régler l’horloge ; appuyez deux fois
pour programmer le nettoyage.
• GO (gauche) : si les icônes de la batterie et de la brosse apparaîssent, cette
icône indique que Eclean va commencer à nettoyer lorsque la batterie est
complètement rechargée.
• Day display (en haut) ”Su”, “Mo”, ”Tu”, “We”, “Th”, “Fr”, et “Sa” indique le jour
de la semaine.
• CLK (à droite) indique le mode de réglage du temps.
• Brush icon (à droite) : indique que Eclean va nettoyer à l’heure
programmée.
• SET (sinistra): Premere una volta per impostare l’ora, premere due volte per
pianificare la pulizia.
• GO (sinistra): Se appaiono le icone della batteria e della spazzola,
questa icona indica che Eclean avvierà la pulizia appena la batteria è
completamente carica.
• Day display (in alto): “Su”, “Mo”, “Tu”, “We”, “Th”, “Fr” e “Sa” indicano i giorni
della .
• CLK (destra) indica la modalità d’impostazione timer.
• Brush icon (destra): Indica che Eclean inizierà a pulire all’orario pianificato.
2. Managing schedule \ Zeitplan verwalten \ Gestion des programmations \
Gestione della pianificazione
Setting the clock \ Uhr einstellen \ Réglage de l’heure \ Impostazione
dell’ora
2.1. Eclean will automatically enter clock display mode upon your first
use.Default time is Sunday, 00:00 (24-hour mode).
Bei der ersten Inbetriebnahme ruft der Eclean automatisch
den Zeitanzeigemodus auf. Die Standardzeit ist Sonntag, 00:00
(24-Stunden-Modus).
Eclean va entrer automatiquement en mode d’affichage de l’heure la
première fois que vous l’utilisez. Le réglage par défaut est Dimanche,
00:00 (mode 24-heures).
Al primo utilizzo, Eclean accederà automaticamente alla modalità
di visualizzazione ora. L’ora predefinita è Do 00:00 (formato delle 24
ore).

27
2.2. Press “SET” button to set time (the display shows SET and CLK icons).The
time screen starts flashing.Press “Hr”, “Min” and “Wk” buttons to set the
correct time and date.You can speed up the selection by holding the
button.Eclean will apply the current clock setting when no operation is
performed over 1 minute (SET and CLK icons disappear).
Drücken Sie zum Einstellen der Zeit die „SET“-Taste (auf der Anzeige
werden die Symbole SET und CLK angezeigt). Der Zeitbildschirm beginnt
zu blinken. Stellen Sie die aktuelle Uhrzeit und das Datum mit den
Tasten „Hr“, „Min“ und „Wk“ ein. Sie können die Auswahl beschleunigen,
indem Sie die jeweilige Taste gedrückt halten. Der Eclean übernimmt die
aktuelle Zeiteinstellung, wenn mehr als 1 Minute lang keine Bedienung
erfolgt (die Symbole SET und CLK werden ausgeblendet)
Appuyez sur le bouton “SET” pour régler l’heure (l’affichage montre les
icônes SET et CLK). L’écran de l’heure commence à clignoter. Appuyez sur
les boutons “Hr”, “Min” et “Wk” pour régler la date et l’heure. Vous pouvez
sélectionner plus rapidement en continuant d’appuyer sur le bouton.
Eclean accepte les réglages de l’heure lorsque vous n’appuyez sur aucun
bouton pendant 1 minute (les icônes SET et CLK disparaîtront).
Premere il tasto “SET” per impostare l’ora (il display mostra le icone SET
e CLK). L’ora inizia a lampeggiare. Premere il tasto “Hr”, “Min” e “Wk” per
impostare l’ora e la data corretta. La procedura può essere accelerata
tenendo premuto il tasto. Eclean applicherà le nuove impostazioni
quando non sono eseguire operazioni per più di 1 minuto (le icone SET e
CLK spariscono).
Scheduling cleaning \ Reinigung planen \ Programmation du nettoyage \
Pianificazione della pulizia
Eclean can be scheduled to clean on daily basis or on specific days.
Sie können einen Zeitplan einrichten, nach dem der Eclean täglich oder an
bestimmten Wochentagen saugt.
Eclean peut être programmé pour nettoyer tous les jours ou certains jours
seulement.
Eclean può essere pianificato per pulire su una base giornaliera oppure in giornate
specifiche.

28
2.3. Press “SET” button to enter scheduling mode.Time and date screen will
start flashing. The setting scheme is the same as step 2.2, but the default
setting for “Wk” button is “to clean everyday”.If the cleaning time isn’t set
properly, the time display will show “-” (see below).
Drücken Sie zum Aufrufen des Zeitplanmodus die „SET“-Taste. Zeit- und
Datumbildschirm beginnen zu blinken. Die Vorgehensweise bei der
Einstellung entspricht der in Schritt 2.2; die Standardeinstellung der „Wk“-
Taste ist jedoch die tägliche Reinigung. Wenn die Saugzeit nicht richtig
eingestellt wird, erscheint auf der Zeitanzeige „-“ (vgl. nachstehende
Abbildung).
Appuyez sur le bouton “SET” pour aller au mode de programmation.
L’heure et la date commencent à clignoter. La méthode de réglage est la
même que dans la section 2.2 mais le réglage par défaut du bouton “Wk”
est “nettoyer tous les jours”. Si vous ne réglez pas correctement l’heure de
nettoyage, “-” sera affiché sur l’écran (voir ci-dessous).
Premere il tasto “SET” per accedere alla modalità di pianificazione. Il
display con la data e l’ora inizia a lampeggiare. L’impostazione è uguale a
quella del punto 2.2, però il tasto “Wk” esegue l’impostazione per “pulire
tutti i giorni”. Se l’orario per la pulizia non è impostato correttamente, il
display mostrerà “--:--” (fare riferimento alla figura che segue).
If you want to set Eclean to clean on a specific day in a week, press “Wk”
button again.”Su” (Sunday) icon will start to flash.If you want to set Eclean
to clean on Sunday, press “Wk” button again within 5 seconds to stop
“Su” from flashing. This indicates that Eclean has confirmed the Sunday
cleaning schedule.You can apply the above procedures to schedule for
other days after 5 seconds.
If you want to skip one day, just wait 5 seconds without pressing the “WK”
button.
After scheduling the cleaning time, press “SET” button to return to Clock
Mode.If Eclean has been scheduled a cleaning time, the LCD will display
as below:
Falls der Eclean an einem bestimmten Wochentag saugen soll, drücken
Sie noch einmal die „Wk“-Taste. Das Symbol „Su“ (Sonntag) beginnt zu
blinken. Falls der Eclean sonntags saugen soll, drücken Sie innerhalb
von 5 Sekunden ein weiteres Mal die „Wk“-Taste; „Su“ hört auf zu blinken.
Dadurch wird angezeigt, dass der Eclean den Zeitplan zur Reinigung

29
am Sonntag übernommen hat. Sie können das obige Verfahren nach 5
Sekunden zur Planung an anderen Tagen verwenden.
Falls Sie einen Tag überspringen möchten, warten Sie 5 Sekunden, ohne
die „Wk“-Taste zu betätigen.
Nach Planung der Saugzeit können Sie durch Drücken der „SET“-Taste
zum Uhrmodus zurückkehren. Falls am Eclean eine geplante Saugzeit
eingerichtet ist, zeigt das LCD Folgendes an:
Si vous voulez que Eclean nettoye seulement certains jours d’une
semaine, appuyez à nouveau sur le bouton “Wk”. L’icône ”Su” (Dimanche)
commencera à clignoter. Si vous voulez que Eclean nettoye chaque
Dimanche, appuyez à nouveau sur le bouton “Wk” dans les 5 secondes
pour que “Su” arrête de clignoter. Cela indique que Eclean a confirmé le
nettoyage automatique chaque dimanche. Vous pouvez continuer de la
même manière pour sélectionner d’autres jours, après 5 secondes.
Si vous voulez sauter un jour, attendez 5 secondes sans appuyer sur le
bouton “WK”.
Lorsque vous avez fini de programmer l’heure de nettoyage, appuyez
sur le bouton “SET” pour retourner au mode Heure. Si Eclean a été
programmé pour nettoyer, l’écran LCD affichera ce qui suit :
Se si vuole impostare Eclean per pulire un giorno specifico della
settimana, premere di nuovo il tasto “Wk”. L’icona “Su” inizia lampeggiare.
Se si vuole che Eclean esegua la pulizia di Domenica, premere di nuovo
entro 5 secondi il tasto “Wk” e l’icona “Su” smette di lampeggiare. Questo
significa che Eclean ha confermato la pulizia pianificata per Domenica.
Dopo 5 secondi, eseguire la stessa procedura per pianificare gli altri giorni
della settimana.
Per saltare un giorno, attendere 5 secondi senza premere il tasto “Wk”.
Dopo avere pianificato la pulizia, premere il tasto “SET” per tornare alla
modalità orologio. Se Eclean è stato pianificato per pulire, il display LCD
apparirà come segue:
3. To view the scheduled cleaning time \ So zeigen Sie die geplante Saugzeit an \
\ Pour afficher l’heure de nettoyage programmé \ Visualizzare l’ora pianificata
per la pulizia
Press “SET” button twice to enter “Schedule Cleaning Mode” and view the
scheduled cleaning tasks.
Drücken Sie zum Aufrufen des „Zeitplanreinigungsmodus“ und Anzeigen der
La pagina sta caricando ...
La pagina sta caricando ...
La pagina sta caricando ...
La pagina sta caricando ...
La pagina sta caricando ...
La pagina sta caricando ...
La pagina sta caricando ...
La pagina sta caricando ...
La pagina sta caricando ...
La pagina sta caricando ...
La pagina sta caricando ...
La pagina sta caricando ...
La pagina sta caricando ...
La pagina sta caricando ...
La pagina sta caricando ...
La pagina sta caricando ...
La pagina sta caricando ...
La pagina sta caricando ...
La pagina sta caricando ...
La pagina sta caricando ...
La pagina sta caricando ...
La pagina sta caricando ...
La pagina sta caricando ...
La pagina sta caricando ...
La pagina sta caricando ...
La pagina sta caricando ...
La pagina sta caricando ...
La pagina sta caricando ...
-
 1
1
-
 2
2
-
 3
3
-
 4
4
-
 5
5
-
 6
6
-
 7
7
-
 8
8
-
 9
9
-
 10
10
-
 11
11
-
 12
12
-
 13
13
-
 14
14
-
 15
15
-
 16
16
-
 17
17
-
 18
18
-
 19
19
-
 20
20
-
 21
21
-
 22
22
-
 23
23
-
 24
24
-
 25
25
-
 26
26
-
 27
27
-
 28
28
-
 29
29
-
 30
30
-
 31
31
-
 32
32
-
 33
33
-
 34
34
-
 35
35
-
 36
36
-
 37
37
-
 38
38
-
 39
39
-
 40
40
-
 41
41
-
 42
42
-
 43
43
-
 44
44
-
 45
45
-
 46
46
-
 47
47
-
 48
48
-
 49
49
-
 50
50
-
 51
51
-
 52
52
-
 53
53
-
 54
54
-
 55
55
-
 56
56
-
 57
57
-
 58
58
-
 59
59


AGAiT 20120918103914 Manuale utente
- Tipo
- Manuale utente
- Questo manuale è adatto anche per
in altre lingue
- English: AGAiT 20120918103914 User manual
- français: AGAiT 20120918103914 Manuel utilisateur
- Deutsch: AGAiT 20120918103914 Benutzerhandbuch
Altri documenti
-
Maxima 09380000 Manuale del proprietario
-
Shark RV750EU Istruzioni per l'uso
-
Yamaha PSS-380 Manuale del proprietario
-
-
Panasonic DVDLV50 Istruzioni per l'uso
-
 De Dietrich DLZ814I Manuale del proprietario
-
Groupe Brandt DLZ1514I Manuale del proprietario
-
-
-
