FRAMTID
HW400
GB
FR
DE
IT


ENGLISH 4
DEUTSCH 14
FRANÇAIS 24
ITALIANO 40

ENGLISH 4
Beforerstuse
Your safety and that of others is paramount.
Remove cardboard protection pieces,
protective lm and adhesive labels from
accessories.
Check the appliance for any transport
damage.
To avoid any damage do not place any
weights on the appliance. Do not expose
the appliance to atmospheric agents.
This manual and the appliance itself provide
important safety warnings, to be read and
observed at all times.
This is the attention symbol, pertaining
to safety, which alerts users to potential
risks to themselves and others.
All safety warnings are preceded by the
attention symbol and the following terms:
DANGER: indicates a hazardous
situation which, if not avoided, will
cause serious injury.
WARNING: Indicates a hazardous
situation which, if not avoided, could
cause serious injury.
All safety warnings give specic details
of the potential danger/warning present
and indicate how to reduce risk of injury,
damage and electric shock resulting from
improper use of the appliance. Carefully
observe the following instructions.
Precautionsandgeneral
recommendations
• The electrical installation and the
electrical connection must be carried
out by a qualied technician according
to the manufacturer’s instructions and
in compliance with the local safety
regulations. Do not repair or replace any
part of the appliance unless specically
stated in the user manual.
• The appliance must be disconnected
from the power supply before carrying
out any installation work.
• Earthing of the appliance is compulsory.
(required only for class I).
• The power cable must be long enough
for connecting the appliance, once
tted in its housing, to the power supply
socket.
• Do not pull the power supply cable in
order to unplug the appliance.
• The electrical components must not be
accessible to the user after installation.
• Do not touch the appliance with any wet
part of the body and do not operate it
when barefoot.
• The appliance is not intended for use
by persons (including children) with any
physical, sensory or mental impairment,
or without experience and knowledge
of the appliance, unless supervised or
previously instructed in its use by those
responsible for their safety.
• Do not repair or replace any part of the
appliance unless specically indicated
in the manual. All other maintenance
services must be carried out by a
specialised technician.
• Children must be supervised to ensure
they do not play with the appliance.
• When drilling through the wall pay
attention not to damage electric
connections and/or pipes.
• Air vents must always discharge to the
outside.
Safetyinformation 4
Productdescription 7
Controlpanel 7
Cleaningandmaintenance 7
Whattodoif... 9
Technicaldata 10
Environmentalconcerns 11
IKEAGUARANTEE 11
SafetyInformation
Contents

ENGLISH 5
• The manufacturer rejects all
responsibilities for any damage caused
by improper use or wrong settings.
• Appropriate maintenance and cleaning
ensure the good working order and
the best performance of the appliance.
Regularly clean all stubborn surface dirt
to avoid grease build up. Remove and
clean or change the lter regularly.
• Never ame cook food (ambé) under
the appliance. Using free ames might
cause re.
• Failure to observe the instructions for
cleaning the hood and replacing the
lters may result in a re.
• Exhaust air must not be vented through
a ue used for removal of fumes
produced by gas combustion appliances
or other combustible materials, but must
have a separate outlet. All national
regulations governing extraction of
fumes must be observed.
• There shall be adequate ventilation if
the hood is being used at the same time
as other appliances using gas or other
combustible materials. The negative
pressure of the room must not exceed 4
Pa (4x 10⁻⁵ bars). For this reason ensure
that the room is well ventilated.
• Do not leave frying pans unattended
when frying, as the frying oil may catch
re.
• Before touching the light bulbs, ensure
that they are cold.
• Do not use or leave the hood without
the light bulb correctly tted, as this may
cause electric shock.
• The hood is not a work surface, therefore
do not place any objects on top of it or
overload it.
• During all installation and maintenance
operations wear appropriate working
gloves.
• This appliance is not suitable for outdoor
use.
WARNING: when the hob is in use,
accessible parts of the hood may
become hot.
Installationandconnection
After unpacking the appliance, check for
any transport damage. In the event of
problems, contact the After-sales Service.
To prevent any damage, only remove
the appliance from its polystyrene foam
packaging at the time of installation.
Preparingforinstallation
WARNING: this is a heavy product; the
hood should only be lifted and
installed by two or more people.
The minimum distance between the hob and
the bottom part of the hood must not be less
than 65 cm for gas cookers and 50cm for
electric cookers.
Before installation also check the minimum
distances stated in the manual of the cooker.
If the installation instructions for the cooker
specify a greater distance between cooker
and hood, this distance must be observed.
Electricalconnection
Make sure the power voltage specied on
the appliance rating plate is the same as
the mains voltage.
This information can be found on the inside
of the hood, under the grease lter.
Power cable replacement (type H05
VV-F) must be carried out by a qualied
electrician. Contact an authorized service
centre. If the hood is tted with an electric
plug, connect the plug to a socket complying
with current regulations, located in an
accessible place.
If no plug is tted (direct wiring to the
mains), or if the socket is not located in an
accessible place, a qualied electrician
should install a standardised double pole
power switch that will enable complete
isolation from the mains in case of category
III overvoltage conditions, in accordance
with wiring rules.

ENGLISH 6
Use
The hood has been designed to be installed
and used either as a “Exhausted model”, or
as a “Recirculation model”.
Exhaustedmodel(seesymbol in
installationbooklet)
Cooking steam is sucked and channelled
outside the house through a discharge duct
(not supplied), tted to the hood steam
outlet.
Ensure that the discharge duct is correctly
tted to the air outlet, unit using an
appropriate connection system.
Important:If already installed, remove the
charcoal lter/s.
Recirculationmodel(seesymbol in
installationbooklet)
The air is ltered through one or more the
charcoal lters, and then resent into room.
Important:Ensure appropriate air
circulation around the hood.
Important:If the hood is supplied without
charcoal lters, these must be ordered and
tted before the hood can be used.
The hood should be installed away from
particularly dirty areas, windows, doors and
heat sources.
The hood is sold with all necessary
components for installation on most types of
walls or ceilings. However, ask a qualied
technician to check that the items supplied
are suitable for the type of wall/ceiling.
Keep this booklet for future consultation.

ENGLISH 7
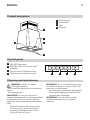
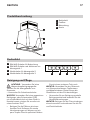
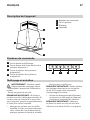
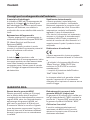
Productdescription
1
Control panel
2
Grease lter
3
Light
4
Chimney
4
1
Controlpanel
A
ON/OFF light switch
B
ON-OFF switch and suction level 1
activation
C
Suction power 2 selection switch
D
Suction power 3 selection switch
33
2
A B C D
WARNING:- Never use steam
cleaning equipment.
- Disconnect the appliance from the power
supply.
- Use safety gloves.
IMPORTANT: do not use corrosive or
abrasive detergents. If any of these products
accidentally comes into contact with the
appliance, clean immediately with a damp
cloth.
• Clean the surfaces with a damp cloth.
If it is very dirty, add a few drops of
washing up detergent to the water.
Finish off with a dry cloth.
IMPORTANT: do not use abrasive sponges
or metallic scrapers or scourers. Over time,
these can ruin the surface.
• Use detergents specically designed for
cleaning the appliance and follow the
manufacturer instructions.
IMPORTANT: clean the lters at least
monthly to remove any oil or grease
residuals.
Cleaningandmaintenance

ENGLISH 8
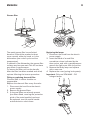
Greaselter
The metal grease lter has unlimited
duration. It should be washed at least
once a month, either by hand, or in the
dishwasher (use a short cycle and low
temperature).
If washed in the dishwasher, the grease lter
surface may become matt. This will not have
any effect on performance.
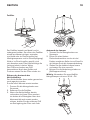
To remove the lter, pull out the handle.
After the lter has been washed and dried,
replace following the inverse procedure.
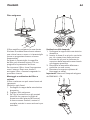
Fittingorreplacingcharcoallter
Charcoal lter is neither lavable nor
regenerable.
Replace the charcoal lter every 4 months
1. Disconnect the hood from the electric
power supply.
2. Remove the grease lters.
3. If charcoal lters are already present
(two lters tted, covering the protection
grids of the motorimpeller) and must
be replaced, turn the central handle
anticlockwise to unlock them.
Replacingthelamps
1. Disconnect the hood from the electric
power supply.
2. Insert the blade of a small at
screwdriver where indicated by the
three points, and with a gentlepressure
remove the light cover from its position.
3. Remove the faulty lamp and replace
with a new one.
4. Replace the cover (spring lock system).
Important: Only use 20W MAX - G4
halogen lamps.

ENGLISH 9
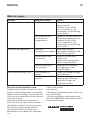
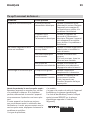
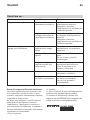
Problem Possiblecause Solution
The appliance does not work There is no mains
electrical power
Check for the presence of
mains electrical power.
Turn off the appliance and
restart it to see if the faults
persists.
The appliance is not
connected to the
electrical supply
Check if the appliance is
connected to the electrical
supply.
Turn off the appliance and
restart it to see if the faults
persists.
The hood’s suction level is not
enough
The suction speed is too
low
Check the suction speed and
adjust as necessary
The metal lters are
dirty
Check that the lters are clean
If not, clean the lters in the
dishwasher.
The air vents are
obstructed
Check the air vents for any
obstructions and remove as
necessary.
The light does not work The light bulb is broken Check the light bulb and
replace it if necessary.
The light bulb is not
correctly tted
Check that the light bulb has
been correctly tted.
If not, t the light bulb in right
way.
Whattodoif...
BeforecontactingtheAfter-salesservice:
Switch the appliance on again to see if the
problem has disappeared. If not, switch it
off again and repeat the operation after an
hour.
If your appliance still does not work properly
after carrying out the checks listed in the
troubleshooting guide and switching the
appliance on again, contact the After-sales
service, clearly explaining the problem and
specifying:
• the type of fault;
• the model;
• the type and serial number of the
appliance (given on the rating plate);
• the Service number (the number after the
word SERVICE on the rating plate inside the
appliance).

ENGLISH 10
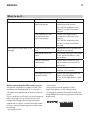
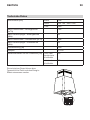
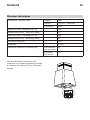
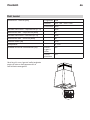
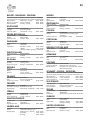
Technicaldata
Dimensions - Internal (mm) Width 598
Height min 700 - max 1030
Depth 440
Airow max - Exhaust (m
3
/h) 395
Noise max - Exhaust (dBa) 61
Airow max - Recirculating (m
3
/h) 246
Noise max - Recirculating (dBa) 67
Total Power (W) 200
Lamps 2 x 20
Installation minimun height dimensions
(cm)
gas or
combi
cookers
65
electric
cookers
50
The technical information are situated in
the rating plate on the internal side of the
appliance and in the energy label.

ENGLISH 11
Environmentalconcerns
Disposalofpacking
The packing material is 100% recyclable
and is marked with the recycle symbol . The
various parts of the packing must therefore
be disposed of responsibly and in full
compliance with local authority regulations
governing waste disposal.
Scrappingtheproduct
- This appliance is marked in compliance
with European Directive 2002/96/EC,
Waste Electrical and Electronic Equipment
(WEEE).
- By ensuring this product is disposed of
correctly, you will help prevent potential
negative consequences for the environment
and human health, which could otherwise
be caused by inappropriate waste handling
of this product.
The symbol
on the product or on the
accompanying documentation indicates that
it should not be treated as domestic waste but
must be taken to an appropriate collection
centre for the recycling of electrical and
electronic equipment.
Scrappingofhouseholdappliances
• This appliance is manufactured with
recyclable or reusable materials. Dispose of
it in accordance with local waste disposal
regulations. Before scrapping, cut off the
power supply cable.
• For further information on the treatment,
recovery and recycling of household
electrical appliances, contact your
competent local authority, the collection
service for household waste or the store
where you purchased the appliance.
Declarationofconformity
n
• This appliance has been designed,
manufactured and marketed in
compliance with:
- safety objectives of the “Low Voltage”
Directive 2006/95/EC (which
replaces 73/23/EEC and subsequent
amendments);
- the protection requirements of Directive
“EMC” 2004/108/EC.
Electrical safety of the appliance can only
be guaranteed if it is correctly connected to
an approved earthing system.
IKEAGUARANTEE
HowlongistheIKEAguaranteevalid?
This guarantee is valid for ve (5) years
from the original date of purchase of your
appliance at IKEA, unless the appliance is
named LAGAN in which case two (2) years
of guarantee apply. The original sales
receipt, is required as proof of purchase. If
service work is carried out under guarantee,
this will not extend the guarantee period for
the appliance.
Whichappliancesarenotcoveredbythe
IKEAve(5)yearsguarantee?
The range of appliances named LAGAN and
all appliances purchased in IKEA before 1st
of August 2007.
Whowillexecutetheservice?
IKEA service provider will provide the
service through its own service operations or
authorized service partner network.

ENGLISH 12
Whatdoesthisguaranteecover?
The guarantee covers faults of the
appliance, which have been caused by
faulty construction or material faults from the
date of purchase from IKEA. This guarantee
applies to domestic use only. The exceptions
are specied under the headline “What is
not covered under this guarantee?” Within
the guarantee period, the costs to remedy
the fault e.g. repairs, parts, labour and travel
will be covered, provided that the appliance
is accessible for repair without special
expenditure. On these conditions the EU
guidelines (Nr. 99/44/EG) and the respective
local regulations are applicable. Replaced
parts become the property of IKEA.
WhatwillIKEAdotocorrecttheproblem?
IKEA appointed Service Provider will
examine the product and decide, at its
sole discretion, if it is covered under this
guarantee. If considered covered, IKEA
Service Provider or its authorized service
partner through its own service operations,
will then, at its sole discretion, either repair
the defective product or replace it with the
same or a comparable product.
Whatisnotcoveredunderthisguarantee?
• Normal wear and tear.
• Deliberate or negligent damage,
damage caused by failure to observe
operating instructions, incorrect
installation or by connection to the wrong
voltage, damage caused by chemical or
electrochemical reaction, rust, corrosion
or water damage including but not
limited to damage caused by excessive
lime in the water supply, damage caused
by abnormal environmental conditions.
• Consumable parts including batteries
and lamps.
• Non-functional and decorative parts
which do not affect normal use of the
appliance, including any scratches and
possible color differences.
• Accidental damage caused by foreign
objects or substances and cleaning or
unblocking of lters, drainage systems or
soap drawers.
• Damage to the following parts: ceramic
glass, accessories, crockery and cutlery
baskets, feed and drainage pipes, seals,
lamps and lamp covers, screens, knobs,
casings and parts of casings. Unless such
damages can be proved to have been
caused by production faults.
• Cases where no fault could be found
during a technician’s visit.
• Repairs not carried out by our appointed
service providers and/or an authorized
service contractual partner or where
non-original parts have been used.
• Repairs caused by installation which is
faulty or not according to specication.
• The use of the appliance in a non-
domestic environment i.e. professional
use.
• Transportation damages. If a customer
transports the product to his home or
another address, IKEA is not liable for
any damage that may occur during
transport. However, if IKEA delivers
the product to the customer’s delivery
address, then damage to the product
that occurs during this delivery will be
covered by IKEA.
• Cost for carrying out the initial
installation of the IKEA appliance.
However, if an IKEA appointed Service
Provider or its authorized service partner
repairs or replaces the appliance
under the terms of this guarantee,
the appointed Service Provider or its
authorized service partner will reinstall
the repaired appliance or install the
replacement, if necessary.
These restrictions do not apply to fault-free
work carried out by a qualied specialist
using our original parts in order to adapt
the appliance to the technical safety
specications of another EU country.

ENGLISH 13
Howcountrylawapplies
The IKEA guarantee gives you specic legal
rights, which cover or exceed all the local
legal demands. However these conditions
do not limit in any way consumer rights
described in the local legislation.
Areaofvalidity
For appliances which are purchased in
one EU country and taken to another EU
country, the services will be provided in
the framework of the guarantee conditions
normal in the new country.
An obligation to carry out services in the
framework of the guarantee exists only if
the appliance complies and is installed in
accordance with:
- the technical specications of the country
in which the guarantee claim is made;
- the Assembly Instructions and User
Manual Safety Information.
ThededicatedAFTERSALESforIKEA
appliances
Please don’t hesitate to contact IKEA
appointed After Sales Service Provider to:
• make a service request under this
guarantee;
• ask for clarications on installation of the
IKEA appliance in the dedicated IKEA
kitchen furniture;
• ask for clarication on functions of IKEA
appliances.
To ensure that we provide you with the
best assistance, please read carefully the
Assembly Instructions and/or the User
Manual before contacting us.
Howtoreachusifyouneedourservice
Inordertoprovideyouaquicker
service,werecommendtousethe
specicphonenumberslistedonthis
manual.Alwaysrefertothenumbers
listedinthebookletofthespecic
applianceyouneedanassistancefor.
PleasealsoalwaysrefertotheIKEA
articlenumber(8digitcode)and12
digitservicenumberplacedonthe
ratingplateofyourappliance.
SAVETHESALESRECEIPT!
It is your proof of purchase and
required for the guarantee to apply.
The sales receipt also reports the IKEA
name and article number (8 digit code)
for each of the appliances you have
purchased.
Doyouneedextrahelp?
For any additional questions not related
to After Sales of your appliances please
contact your nearest IKEA store call centre.
We recommend you read the appliance
documentation carefully before contacting us.
Please refer to the last
page of this manual for the
full list of IKEA appointed
After Sales Service Provider
and relative national phone
numbers.

DEUTSCH 14
VordemerstenGebrauch
Ihre eigene Sicherheit und die der Anderen
ist sehr wichtig.
Entfernen Sie Kartonteile, Schutzfolien und
Klebeetiketten von den Zubehörteilen.
Kontrollieren Sie das Gerät auf eventuelle
Transportschäden.
Stellen Sie keine Gegenstände auf dem
Gerät ab, um Beschädigungen zu
vermeiden.
Vermeiden Sie es, das Gerät
Witterungseinüssen auszusetzen.
Diese Anweisungen sowie das Gerät
beinhalten wichtige Sicherheitshinweise, die
Sie durchlesen und stets beachten sollten.
Dieses Symbol warnt vor möglichen
Gefahren für die Sicherheit des
Benutzers und andere Personen.
Alle Warnhinweise beginnen mit diesem
Warnsymbol und enthalten einen der
folgenden Begriffe:
GEFAHR: Weist auf eine
Gefahrensituation hin, die zu schweren
Verletzungen führt, wenn sie nicht
vermieden wird.
ACHTUNG: Weist auf eine
Gefahrensituation hin, die bei
mangelnder Vorsicht zu schweren
Verletzungen führt.
Alle Warnhinweise nennen das mögliche
Sicherheitsrisiko und geben an, wie die
Gefahr von Verletzungen, Schäden und
Stromschlägen durch bestimmungsfremden
Gebrauch des Gerätes vermieden werden
kann. Halten Sie sich genau an folgende
Anweisungen.
Vorsichtsmaßnahmenundallgemeine
Empfehlungen
• Die Installation muss unter Beachtung
der bestehenden Vorschriften und
Gesetze von einem konzessionierten
Fachmann gemäß den
Herstelleranweisungen und in
Übereinstimmung mit den geltenden
Sicherheitsvorschriften des Landes
vorgenommen werden. Reparieren Sie
das Gerät nicht selbst und tauschen Sie
keine Teile aus, wenn dies vom
Benutzerhandbuch nicht ausdrücklich
vorgesehen ist.
• Halten Sie das Gerät von der
Stromversorgung getrennt, bis der
Einbau durchgeführt wurde.
• Das Gerät muss vorschriftsmäßig
geerdet werden. (nur für Klasse I
erforderlich)
• Das Netzkabel muss lang genug sein,
um das in die Küchenzeile eingebaute
Gerät an das Stromnetz anzuschließen.
• Ziehen Sie nicht am Netzkabel des
Gerätes, um den Stecker aus der
Steckdose zu ziehen.
• Nach der Installation dürfen Strom
führende Teile für den Benutzer nicht
mehr zugänglich sein.
• Berühren Sie das Gerät nicht mit
feuchten Händen und benutzen Sie es
nicht, wenn Sie barfuß sind.
• Das Gerät darf ohne Aufsicht weder von
Kindern noch von Personen mit
herabgesetzten körperlichen, sensuellen
oder mentalen Fähigkeiten oder ohne
die erforderliche Erfahrung und Kenntnis
benutzt werden, es sei denn, sie wurden
Sicherheitshinweise 1
4
Produktbeschreibung 17
Bedienfeld 17
ReinigungundPege 17
Wastun,wenn... 19
TechnischeDaten 20
HinweisezumUmweltschutz 21
IKEAGARANTIE 21
Sicherheitshinweise
Inhalt

DEUTSCH 15
durch für ihre Sicherheit verantwortliche
Personen entsprechend eingewiesen.
• Reparieren oder ersetzen Sie keine Teile
der Abzugshaube, wenn dies nicht
ausdrücklich im Benutzerhandbuch
empfohlen wird. Alle anderen
Wartungsarbeiten müssen durch einen
Fachmann durchgeführt werden.
• Kinder sind zu überwachen, um
sicherzustellen, dass sie nicht mit dem
Gerät spielen.
• Beim Bohren durch die Wand darauf
achten, keine elektrischen Verbindungen
und/oder Leitungen zu beschädigen.
• Luftauslässe müssen stets nach außen
geführt werden.
• Der Hersteller übernimmt keine
Verantwortung für Schäden aufgrund
von unsachgemäßer Verwendung oder
falscher Einstellungen.
• Konstante und sachgemäße Pege und
Reinigung gewährleisten den
einwandfreien Betrieb und die
Leistungstüchtigkeit Ihrer Abzugshaube.
Säubern Sie regelmäßig alle
verschmutzten Flächen Ihrer
Abzugshaube, um zu verhindern, dass
sich eine Fettschicht darauf bildet. Sie
sollten den Filter regelmäßig entfernen
und reinigen oder ersetzen.
Bereiten Sie keine ambierten Gerichte
unter der Abzugshaube zu. Bei offenen
Flammen besteht Brandgefahr.
• Das Nichtbeachten der
Reinigungsvorschriften für die
Dunstabzugshaube sowie für das
Auswechseln und Reinigen der Filter
führt zu Brandgefahr.
• Die angesaugte Luft darf nicht in ein
Abluftrohr geleitet werden, in das die
Abluft von mit Gas oder anderen
Brennstoffen betriebenen Geräten
abgeleitet wird, sondern muss einen
separaten Abzug haben. Dabei sind alle
nationalen Vorschriften zur
Abluftableitung einzuhalten.
• Wird die Dunstabzugshaube zusammen
mit anderen Geräten betrieben, die mit
Gas oder anderen Brennstoffen
angetrieben werden, darf der negative
Druck im Raum einen Wert von 4Pa (4 x
10-5 bar) nicht überschreiten. Daher
muss für eine ausreichende Belüftung
des Raums gesorgt werden.
• Lassen Sie beim Frittieren keine Pfannen
unbeaufsichtigt, da das erhitzte Fett
Feuer fangen könnte.
• Stellen Sie vor dem Anfassen der
Lampen sicher, dass diese abgekühlt
sind.
• Benutzen Sie die Haube nicht ohne die
korrekt montierte Halogenlampe, da
sonst Stromschlaggefahr besteht.
• Die Abzugshaube ist keine Arbeitsplatte,
stellen Sie daher keine Gegenstände
darauf ab und belasten Sie sie nicht.
• Tragen Sie bei allen Installations- und
Wartungsarbeiten stets
Schutzhandschuhe.
• Dieses Gerät eignet sich nicht für den
Gebrauch im Freien.
ACHTUNG: Während des Betriebs des
Kochfelds können die erreichbaren
Teile der Dunstabzugshaube heiß werden.
AufstellungundAnschluss
Kontrollieren Sie das Gerät nach dem
Auspacken auf eventuelle Transportschäden.
Bei auftretenden Problemen wenden Sie
sich bitte an die nächste Kundendienststelle.
Um eventuellen Schäden vorzubeugen,
sollten Sie das Gerät erst unmittelbar vor
der Installation von der Polystyrolunterlage
nehmen.
VorbereitungdesEinbaus
WARNUNG: Zum Transport und zur
Installation der Haube sind zwei oder
mehrere Personen erforderlich.
Der Mindestabstand zwischen dem
Kochfeld und dem unteren Teil der
Abzugshaube darf bei Gas-Kochfeldern
nicht unter 65 cm liegen, und bei Elektro-

DEUTSCH 16
Kochfeldern nicht unter 50 cm.
Überprüfen Sie vor der Installation auch die
im Handbuch des Kochfeldes angegebenen
Mindestabstände.
Schreiben die Installationsanweisungen des
Kochfelds einen größeren Abstand vor, ist
dieser natürlich zu beachten.
AnschlussandasStromnetz
Die Spannung auf dem Typenschild des
Gerätes muss der Spannung des
Stromnetzes entsprechen.
Diese Information nden Sie im Inneren der
Abzugshaube unter dem Fettlter.
Das Netzkabel (Typ H05 VV-F) darf nur
durch Fachpersonal ersetzt werden.
Wenden Sie sich an eine autorisierte
Kundendienststelle.
Der Stecker der Dunstabzugshaube (falls
vorhanden) muss an eine normgerechte und
gut zugängliche Steckdose angeschlossen
werden. Sollte das Gerät nicht mit Stecker
versehen, sondern direkt mit dem Stromnetz
verbunden und die Steckdose unzugänglich
sein, müssen Sie einen normgerechten
zweipoligen Schalter verwenden, der eine
totale Isolierung vom Stromnetz im Falle von
gemäß Klasse 3 auftretenden
Überspannungen gewährleistet und
normgerecht verdrahtet ist.
Gebrauch
Die Abzugshaube kann entweder für den
“Absaugbetrieb”, oder den “Umluftbetrieb”
installiert werden.
ModellmitAbsaugbetrieb(siehedas
SymbolinderInstallationsanweisung)
Die Schwaden werden angesaugt und über
das am Dampfauslass der Abzugshaube
befestigte Abluftrohr (nicht mitgeliefert)
nach außen befördert.
Stellen Sie sicher, dass das Abluftrohr
korrekt mit dem Luftauslass verbunden ist,
indem Sie für eine geeignete Verbindung
sorgen.
Wichtig: Entfernen Sie die eventuell bereits
installierten Kohlelter.
ModellmitUmluftbetrieb(siehedas
SymbolinderInstallationsanweisung)
Die Luft wird durch einen oder mehrere
Kohlelter angesaugt und geltert und
danach wieder in den Raum entlassen.
Wichtig: Sorgen Sie für ausreichende
Frischluftzufuhr zur Abzugshaube.
Wichtig: Hat die Abzugshaube keine
Kohlelter, sind diese zu bestellen und vor
dem Gebrauch zu montieren.
Die Abzugshaube ist fern von stark
verschmutzten Bereichen, Fenstern, Türen
und Wärmequellen zu installieren.
Im Lieferumfang der Dunstabzugshaube
sind sämtliche erforderlichen Materialien für
die Installation an den meisten Wänden/
Decken enthalten. Sie sollten aber trotzdem
einen qualizierten Techniker zu Rate
ziehen, um sicherzustellen, dass die
Materialien für die spezische Wand-/
Deckenausführung geeignet sind.
Heben Sie diese Anleitung zum späteren
Nachschlagen gut auf.

DEUTSCH 17
Produktbeschreibung
1
Bedienfeld
2
Fettlter.
3
Beleuchtung
4
Kamin
4
1
Bedienfeld
A
EIN/AUS-Schalter für Beleuchtung
B
EIN/AUS-Schalter und Aktivieren von
Absaugstufe 1
C
Wahlschalter für Absaugstufe 2
D
Wahlschalter für Absaugstufe 3
33
2
A B C D
ACHTUNG- Verwenden Sie keine
Wasserdampfreinigungsgeräte.
Trennen Sie die Abzugshaube vom
Stromnetz.
– Verwenden Sie Schutzhandschuhe.
WICHTIG: Verwenden Sie keine aggressiven
Reinigungs- oder Scheuermittel. Falls
ein solches Mittel doch mit dem Gerät in
Kontakt kommt, reinigen Sie es sofort mit
einem feuchten Tuch.
• Reinigen Sie die Flächen mit einem
feuchten Tuch. Entfernen Sie starke
Verschmutzungen mit Wasser und ein
paar Tropfen Geschirrspülmittel. Reiben
Sie mit einem trockenen Tuch nach.
WICHTIG: Vermeiden Sie den Gebrauch
von Scheuerschwämmen, Topfkratzern
und Metallschabern. Diese können die
Oberächen mit der Zeit beschädigen.
• Verwenden Sie zur Reinigung spezielle
Reinigungsmittel und beachten Sie die
Herstelleranweisungen.
WICHTIG: Reinigen Sie die Filter mindestens
einmal monatlich und entfernen Sie alle Öl-
und Fettrückstände.
ReinigungundPege

DEUTSCH 18
Fettlter
Der Fettlter besteht aus Metall und ist
unbegrenzt haltbar. Sie sollten den Fettlter
einmal pro Monat reinigen, entweder
von Hand oder im Geschirrspüler (bei
Niedrigtemperatur und im Schnellspülgang).
Wird er im Geschirrspüler gespült, wird
sein Aussehen matt. Dies beeinträchtigt die
Leistung jedoch in keiner Weise.
Den Filter zum Ausbau am Griff
herausziehen. Nach dem Spülen und
Trocknen setzen Sie den Filter wieder ein.
EinbauoderAustauschdes
Aktivkohlelters
Der Aktivkohlelter kann weder gewaschen
noch regeniert werden.
Er sollte alle 4 Monate ersetzt werden.
1. Trennen Sie die Abzugshaube vom
Stromnetz.
2. Entfernen Sie die Fettlter.
3. Wenn die Aktivkohlelter bereits
vorhanden sind (zwei Filter montiert,
sie decken die Schutzgitter über dem
Motorantrieb) und ersetzt werden
müssen, drehen Sie den mittleren Griff
zur Entriegelung der Filter nach links.
AustauschderLampen
1. Trennen Sie die Abzugshaube vom
Stromnetz.
2.
Führen Sie einen kleinen
Flachschraubenzieher an der mit drei
Punkten markierten Stelle ein und lösen Sie
mit leichtem Druck die Lampenabdeckung.
3. Ziehen Sie die defekte Lampe heraus
und setzen Sie eine neue ein.
4 Bringen Sie die Abdeckung wieder an
(Schnappverschluss).
Wichtig: Verwenden Sie ausschließlich
Halogenlampen mit max. 20 W - G4.

DEUTSCH 19
Störung MöglicheUrsache Abhilfe
Das Gerät funktioniert nicht Kein Strom Überprüfen Sie das
Hausstromnetz.
Schalten Sie das Gerät
aus und wieder ein, um
festzustellen, ob die Störung
erneut auftritt.
Das Gerät ist nicht
ans Stromnetz
angeschlossen
Prüfen Sie, ob das Gerät ans
Stromnetz angeschlossen ist.
Schalten Sie das Gerät
aus und wieder ein, um
festzustellen, ob die Störung
erneut auftritt.
Schwache Absaugleistung Niedrige
Absauggeschwindigkeit
Kontrollieren Sie die
Absauggeschwindigkeit und
stellen Sie sie ggf. ein.
Die Metalllter sind
verschmutzt
Prüfen Sie, ob die Filter
sauber sind
Waschen Sie verschmutzte
Filter im Geschirrspüler.
Die Abluftöffnungen
sind verstopft
Beseitigen Sie eventuelle
Verstopfungen in den
Abluftöffnungen.
Die Lampe funktioniert nicht Die Glühlampe ist
defekt
Prüfen und ersetzen Sie ggf.
die Glühlampe.
Die Glühlampe ist falsch
montiert
Prüfen Sie die korrekte
Montage der Glühlampe.
Montieren Sie ggf. die
Glühlampe korrekt.
Wastun,wenn...
BevorSiedenKundendienstrufen:
Schalten Sie das Gerät nochmals ein, um zu
prüfen, ob die Störung immer noch vorliegt.
Haben Sie keinen Erfolg, so schalten Sie das
Gerät aus und wiederholen Sie den Versuch
nach einer Stunde.
Arbeitet das Gerät trotz vorgenannter
Kontrollen und nach dem Neueinschalten
des Gerätes weiterhin nicht korrekt, setzen
Sie sich bitte mit dem Kundendienst in
Verbindung. Erklären Sie die Art der
Betriebsstörung und geben Sie folgendes
an:
• die Art des Fehlers;
• das Modell;
• Gerätetyp und Modellnummer (stehen auf
dem Typenschild);
• die Service-Nummer (die Nummer hinter
dem Wort SERVICE) auf dem Typenschild im
Inneren des Gerätes).

DEUTSCH 20
TechnischeDaten
Einbaumaße (mm) Breite 598
Höhe min. 700 - max. 1030
Tiefe 440
Max. Luftdurchsatz - Absaugbetrieb
(m
3
/h)
395
Max. Geräuschpegel - Absaugbetrieb
(dBa)
61
Max. Luftdurchsatz - Umluftbetrieb (m
3
/h) 246
Max. Geräuschpegel - Umluftbetrieb
(dBa)
67
Gesamtleistung (W) 200
Lampen 2 x 20
Mindestabstände bei der Installation (cm) Gas- oder
kombinierte
Kochfelder
65
elektrische
Kochfelder
50
Die technischen Daten können dem
Typenschild im Gerät und dem Energie-
Etikett entnommen werden.
La pagina si sta caricando...
La pagina si sta caricando...
La pagina si sta caricando...
La pagina si sta caricando...
La pagina si sta caricando...
La pagina si sta caricando...
La pagina si sta caricando...
La pagina si sta caricando...
La pagina si sta caricando...
La pagina si sta caricando...
La pagina si sta caricando...
La pagina si sta caricando...
La pagina si sta caricando...
La pagina si sta caricando...
La pagina si sta caricando...
La pagina si sta caricando...
La pagina si sta caricando...
La pagina si sta caricando...
La pagina si sta caricando...
La pagina si sta caricando...
La pagina si sta caricando...
La pagina si sta caricando...
La pagina si sta caricando...
La pagina si sta caricando...
La pagina si sta caricando...
La pagina si sta caricando...
La pagina si sta caricando...
La pagina si sta caricando...
La pagina si sta caricando...
La pagina si sta caricando...
La pagina si sta caricando...
La pagina si sta caricando...
-
 1
1
-
 2
2
-
 3
3
-
 4
4
-
 5
5
-
 6
6
-
 7
7
-
 8
8
-
 9
9
-
 10
10
-
 11
11
-
 12
12
-
 13
13
-
 14
14
-
 15
15
-
 16
16
-
 17
17
-
 18
18
-
 19
19
-
 20
20
-
 21
21
-
 22
22
-
 23
23
-
 24
24
-
 25
25
-
 26
26
-
 27
27
-
 28
28
-
 29
29
-
 30
30
-
 31
31
-
 32
32
-
 33
33
-
 34
34
-
 35
35
-
 36
36
-
 37
37
-
 38
38
-
 39
39
-
 40
40
-
 41
41
-
 42
42
-
 43
43
-
 44
44
-
 45
45
-
 46
46
-
 47
47
-
 48
48
-
 49
49
-
 50
50
-
 51
51
-
 52
52


IKEA HDF CW00 S Guida utente
- Tipo
- Guida utente
- Questo manuale è adatto anche per
in altre lingue
- English: IKEA HDF CW00 S User guide
- français: IKEA HDF CW00 S Mode d'emploi
- Deutsch: IKEA HDF CW00 S Benutzerhandbuch