B&W VM1 Manuale del proprietario
- Categoria
- Altoparlanti
- Tipo
- Manuale del proprietario

VM1
Owner’s Manual
and Warranty

>0.5m
>0.5m
>1.5m
≈≈
≈
Figure 1
Figure 2
Figure 3
Figure 4
Figure 5 Figure 6

Polski
Gwarancja .................16
Instrukcja
uÃytkownika ...............16
Русский
Ограниченная
гарантия....................17
Руководство по
эксплуатации ............18
Slovenska navodila
Omejena garancija ....19
Navodila za uporabo .19
Dansk
Begrænset garanti......20
Brugervejledning.........21
Suomi
Takuuehdot.................22
Omistajan kasikirja......22
Svenska
Begränsad garanti ......23
Bruksanvisning ...........23
Magyar
Korlátozott garancia ..24
Használati útmutató ...25
.......................26
.....................26
.......................27
....................28
Contents
English
Limited Warranty...........1
Owner’s Manual............1
Français
Garantie limitée.............2
Manuel d’utilisation.......2
Deutsch
Garantie .......................4
Bedienungsanleitung.....4
Español
Garantía limitada...........5
Manual de
instrucciones................6
Português
Garantia limitada...........7
Manual do utilizador .....7
Italiano
Garanzia limitata...........9
Manuale di istruzioni.....9
Nederlands
Beperkte garantie.......10
Handleiding ................11
Ελληνικά
Περιρισµένη
εγγύηση....................12
δηγίες ρήσεως ....12
"esky
Záruka .......................14
Návod k pouãití..........14

English
Limited Warranty
Dear customer,
Welcome to B&W.
This product has been designed and
manufactured to the highest quality
standards. However, if something does go
wrong with this product, B&W
Loudspeakers and its national distributors
warrant free of charge labour (exclusion
may apply) and replacement parts in any
country served by an official B&W
distributor.
This limited warranty is valid for a period of
five years from the date of purchase or two
years for electronics including amplified
loudspeakers.
Terms and Conditions
1 The warranty is limited to the repair of
the equipment. Neither transportation,
nor any other costs, nor any risk for
removal, transportation and installation
of products is covered by this warranty.
2 This warranty is only valid for the
original owner. It is not transferable.
3 This warranty will not be applicable in
cases other than defects in materials
and/or workmanship at the time of
purchase and will not be applicable:
a. for damages caused by incorrect
installation, connection or packing,
b. for damages caused by any use other
than correct use described in the user
manual, negligence, modifications, or
use of parts that are not made or
authorised by B&W,
c. for damages caused by faulty or
unsuitable ancillary equipment,
d. for damages caused by accidents,
lightning, water, fire heat, war, public
disturbances or any other cause
beyond the reasonable control of B&W
and its appointed distributors,
e. for products whose serial number has
been altered, deleted, removed or
made illegible,
f. if repairs or modifications have been
executed by an unauthorised person.
4 This guarantee complements any
national/regional law obligations of
dealers or national distributors and
does not affect your statutory rights as
a customer.
How to claim repairs under
warranty
Should service be required, please follow
the following procedure:
1 If the equipment is being used in the
country of purchase, you should
contact the B&W authorised dealer
from whom the equipment was
purchased.
2 If the equipment is being used outside
the country of purchase, you should
contact B&W national distributor in the
country of residence who will advise
where the equipment can be serviced.
You can call B&W in the UK or visit our
web site to get the contact details of
your local distributor.
To validate your warranty, you will need to
produce this warranty booklet completed
and stamped by your dealer on the date of
purchase. Alternatively, you will need the
original sales invoice or other proof of
ownership and date of purchase.
Owner’s manual
Introduction
Thank you for choosing Bowers and
Wilkins. Please read this manual fully before
unpacking and installing the product. It will
help you to optimise its performance.
B&W maintains a network of dedicated
distributors in over 60 countries who will be
able to help you should you have any
problems your dealer cannot resolve.
Unpacking (figure 1)
• Fold the carton flaps right back and
invert the carton and contents. Lift the
carton clear of the contents. Remove
the inner packing from the product.
• Check in the carton for:
1 Bookshelf stand
1 Wall bracket
We suggest you retain the packaging for
future use.
Positioning
The speaker may be used in either vertical
or horizontal orientation. It can be mounted
on the stand, bracket or placed on its side.
NOTE: The badge on the grille can be
rotated through 90 degrees to suit the
orientation of the speaker and is held in
with a spring. To rotate gently pull the
badge away from grille set the orientation
and reposition in the grille.
Home Theatre
As a front centre speaker position it directly
above or below the screen, whichever is
closest to ear level. Align the front of the
speaker approximately level with the
screen.
As a front left and right speaker:
Make the height of the centre of the
speaker approximately the same as the TV
or the centre speaker.
Space the speaker between 0.5m and 1m
from the side of the screen.
As a surround speaker:
There are two ways of presenting surround
information. You can either attempt to get
good imaging in all directions or go for a
more diffuse ambient effect.
In both cases position the speakers to the
sides and behind the listeners. For a more
diffuse effect, mount the speakers higher
and point them along either the rear or side
wall.
2-Channel Audio (figure 2)
Mount the speakers so that the centre of
each speaker is approximately at ear level.
As an initial guide:
• Position the speakers and the centre of
the listening area approximately at the
corners of an equilateral triangle.
• Keep the speakers at least 1.5m apart
to maintain left right separation.
Keep the speaker baffles at least 0.5m
clear of walls.
If the central image is poor, try moving the
speakers closer together and adjusting the
degree of toe-in.
Stray magnetic fields
The speaker drive units are magnetically
shielded such that the stray magnetic field
outside the boundaries of the cabinet,
except the front, is too low to cause
distortion of the television picture in the
vast majority of cases.
There are, however, some extremely
sensitive televisions – some that even have
to be adjusted according to their alignment
with the earth’s magnetic field. If you have
a problem, first degauss the television set
with the speaker in place. Some have a
button especially for this purpose. If not,
switch off the set at the mains for
15 minutes and switch on again. Merely
putting the set into standby mode is not
sufficient. If you still have a problem, try
moving the speaker either forwards or
backwards a little to get a more favourable
juxtaposition, or space the speaker further
from the television until the distortion
disappears.
Because of the higher stray magnetic field
in front of the speaker, we recommend you
keep magnetically sensitive articles
(computer discs, audio and video tapes,
swipe cards and the like) at least 0.2m from
the speaker.
Mounting
Assembling and Fixing the Bracket and
bookshelf Stand.
Stand (figures 3 & 4)
The stand can be fitted so the speaker can
be positioned either horizontally or
vertically, using either of the mounting slots
on the rear of the speaker. Determine your
choice of orientation and then slide the
speaker onto the stand. An Allen key is
located in the bottom of the stand, remove
the Allen Key to tighten the bolt at the rear
of the stand once in position to secure the
speaker. Return the Allen key to its position
in the base of the stand for future use.
Bracket (figure 5)
Using the bracket, mark the four screw
positions on the mounting surface carefully.
Offer the bracket to the wall, screw in the
two screws used for the top two holes,
leaving approximately 5mm (0.2in) of the
screw protruding from the wall, screw in
the two remaining screws at the bottom of
the mounting base, finally tighten the
screws. Again the speaker can be fitted so
the orientation is either horizontal or
vertical, using either of the mounting slots
1

fitted onto the rear of the speaker.
Determine your choice of orientation and
then slide the speaker onto the bracket.
Take the Allen key from the bottom of the
bookshelf stand. The bracket allows the
speaker to swivel left and right. This is then
locked in place by tightening the bolt that is
located at the swivel joint at the top of the
bracket. Return the Allen key to its position
in the base of the stand for future use.
WARNING: YOU SHOULD USE
SUFFICIENT QUALITY, SIZE AND NUMBER
OF CORROSION PROOF FIXINGS TO AN
AREA OF WALL OF SUFFICIENT
STRENGTH TO ENSURE THAT THE
SPEAKER IS SAFELY SUPPORTED.
Connections (figure 6)
All connections should be made with the
equipment switched off.
Ensure the positive terminal on the speaker
(marked + and coloured red) is connected
to the positive output terminal of the
amplifier and negative (marked – and
coloured black) to negative. Incorrect
connection can result in poor imaging and
loss of bass.
Ask your dealer for advice when choosing
cable. Keep the total impedance below
maximum recommended in the
specification and use a low inductance
cable to avoid attenuation of the highest
frequencies.
Home Theatre
Refer to your decoder manual and set the
levels and delay times for all speakers.
Check the settings to obtain the best
average result at all probable listen
positions. Except for special effects, the
general level of the surround field should
not be too obvious.
Adjust the spacing of the front left and right
speakers so that the size of the acoustic
image matches the size of the screen.
Adjust the toe-in of the front left and right
speakers to get a smooth transition of
sounds that pan from one side to the other.
Adjust the angle of the surround speakers
to give the best results with a variety of
material. Use both movies and music
videos.
After care
The cabinet surface usually only requires
dusting. If you wish to use an aerosol
cleaner, spray onto the cleaning cloth, not
the cabinet.
Do not attempt to remove the grille, as
damage will result.
Français
Garantie limitée
Cher Client,
Bienvenue à B&W.
Ce produit a été conçu et fabriqué en vertu
des normes de qualité les plus rigoureuses.
Toutefois, en cas de problème, B&W
Loudspeakers et ses distributeurs
nationaux garantissent une main d’œuvre
(exclusions possibles) et des pièces de
rechange gratuites dans tout pays desservi
par un distributeur agréé de B&W.
Cette garantie limitée est valide pour une
période de cinq ans à compter de la date
d’achat ou une période de deux ans pour
les composants électroniques, y compris
les haut-parleurs amplifiés.
Conditions
1 La garantie est limitée à la réparation
de l’équipement. Les frais de transport
ou autres, les risques associés à
l’enlèvement, au transport et à
l’installation des produits ne sont pas
couverts par cette garantie.
2 La garantie est exclusivement réservée
au propriétaire d’origine et ne peut pas
être transférée.
3 Cette garantie ne s’applique qu’aux
produits faisant l’objet de vices de
matériaux et/ou de construction au
moment de l’achat et ne sera pas
applicable dans les cas suivants :
a. détériorations entraînées par une
installation, connexion ou un emballage
incorrect,
b. détériorations entraînées par un usage
autre que l’usage correct décrit dans le
manuel de l’utilisateur, la négligence,
des modifications ou l’usage de pièces
qui ne sont pas fabriquées ou agréées
par B&W,
c. détériorations entraînées par un
équipement auxiliaire défectueux ou
qui ne convient pas,
d. détériorations résultant de : accidents,
foudre, eau, chaleur, guerre, troubles
de l’ordre public ou autre cause ne
relevant pas du contrôle raisonnable de
B&W ou de ses distributeurs agréés,
e. les produits dont le numéro de série a
été modifié, effacé, éliminé ou rendu
illisible,
f. les produits qui ont été réparés ou
modifiés par une personne non
autorisée.
4 Cette garantie vient en complément à
toute obligation juridique nationale /
régionale des revendeurs ou
distributeurs nationaux et n’affecte pas
vos droits statutaires en tant que
client.
Comment faire une réclamation
en vertu de la garantie
Veuillez respecter la procédure ci-dessous,
si vous souhaitez faire une réclamation
sous garantie :
1 Si l’équipement est utilisé dans le pays
d’achat, veuillez contacter le
distributeur agréé de B&W qui a vendu
l’équipement.
2 Si l’équipement est utilisé dans un
pays autre que le pays d’achat, veuillez
contacter le distributeur national B&W
du pays de résidence, qui vous
indiquera où vous pouvez faire réparer
l’équipement. Vous pouvez appeler
B&W au Royaume-Uni ou consulter
notre site Web pour obtenir les
coordonnées de votre distributeur local.
Afin de valider votre garantie, vous devrez
présenter ce livret de garantie qui aura été
rempli et tamponné par votre revendeur le
jour de l’achat. En l’absence de ce livret,
vous devrez présenter l’original de la
facture commerciale ou une autre preuve
d’achat et de la date d’achat.
Manuel d’utilisation
Introduction
Nous vous remercions d’avoir choisi
Bowers & Wilkins. Nous vous
recommandons de lire l’intégralité de ce
manuel avant de déballer et d’installer le
matériel. Cela vous aidera à en optimiser
les performances.
B&W dispose d’un réseau de distributeurs
répartis sur plus de 60 pays. Ils n’hésiteront
pas à vous aider au cas où vous
rencontreriez une difficulté que votre
revendeur ne saurait résoudre.
Deballage (figure 1)
• Repliez les rabats du carton vers
l’extérieur et retournez l’ensemble.
Soulevez le carton pour le vider de son
contenu. Retirez les éléments
d’emballage intérieurs.
• Contrôlez que le carton contient :
1 pied support
1 fixation murale
Nous vous suggérons de conserver
l’emballage complet en cas d’usage
ultérieur.
Mise en place
Ces enceintes peuvent être utilisées
indifféremment en position horizontale et
verticale. Elles peuvent être installée sur le
pied, fixées contre un mur ou posées sur le
côté.
NOTE : Le sigle de la grille peut s’orienter
de 90° pour s’adapter à la position de
l’enceinte. Il est maintenu en place par un
ressort. Pour le faire tourner, tirez
légèrement sur le sigle, réglez l’orientation
et repoussez-le contre la grille.
Home cinema
Si vous choisissez l’une de ces enceintes
pour reproduire la voie centrale, placez-la
directement au-dessus ou en-dessous de
l’écran, là où elle sera au plus près de la
hauteur des oreilles. Alignez sa façade
approximativement sur le plan de l’écran.
2

Si vous les utilisez pour les voies
principales avant, gauche et droite, il
est conseillé d’élever leur centre à hauteur
du centre de l’écran ou dans l’alignement
de l’enceinte centrale.
Ecartez-les de 0,5 à 1 mètre des bords de
l’écran.
Vous pouvez, également, employer ces
enceintes pour la reproduction des
voies dites « surround ». Dans ce cas,
vous pouvez choisir entre deux options :
obtenir une image sonore précise en
provenance de tous les canaux ou opter
pour une reproduction diffuse très aérienne
et aussi peu localisable que possible des
ambiances sonores.
Quelque soit votre choix, vous placerez les
enceintes sur les côtés et en arrière de
toutes les places d’écoute. Si vous avez
adopté le principe de la reproduction
diffuse des effets, placez les enceintes en
hauteur et orientez-les vers le mur arrière
ou latéral.
Stéréophonie à 2 canaux (figure 2)
Élevez les enceintes pour que leur centre
se trouve à hauteur de vos oreilles.
• Vous pouvez adopter, comme principe
de base, une disposition permettant
aux deux enceintes et à l’auditeur de
se retrouver aux trois sommets d’un
triangle équilatéral.
• Séparez les deux enceintes d’au moins
1,5 mètre pour maintenir une
séparation stéréophonique suffisante.
Ne les placez pas à moins de 0,5 mètre
d’un mur.
Si vous manquez de densité sonore au
centre des deux enceintes, rapprochez-les
l’une de l’autre et/ou orientez-les afin
d’ajuster l’angle de diffusion vers le point
d’écoute.
Champs magnétiques
Ces enceintes sont blindées pour éviter
qu’un champ magnétique trop intense ne
vienne perturber votre téléviseur. A
l’exception de la face avant, les fuites
magnétiques décelées à proximité sont si
faibles qu’elles ne causeront aucune
distorsion d’image dans la grande majorité
des cas.
Il existe pourtant certains modèles de
téléviseurs beaucoup plus sensibles que
d’autres, réglés en fonction de leur
alignement sur le champ magnétique
terrestre. Si vous possédez ce type
d’appareil et que vous rencontrez un
problème, commencez par démagnétiser le
téléviseur. Certains d’entre eux disposent
d’un bouton réservé à cet usage. Si le votre
n’en possède pas, éteignez-le pendant une
quinzaine de minutes puis remettez-le en
fonction. Attention ! le simple fait de mettre
le téléviseur en veille ne suffit pas. Si le
problème persiste, vous devrez déplacer
vos enceintes en les reculant ou en les
avançant un peu ou en les éloignant
davantage jusqu’à complète disparition du
phénomène.
Vous veillerez, également, à tenir les objets
sensibles tels que les cartes magnétiques,
disquettes informatiques ou bandes
magnétiques etc à une distance d’au moins
0,2 mètre de la face avant de l’enceinte,
cette dernière présentant des fuites plus
importantes que les autres faces.
Montage
Assemblage et fixation du support mural et
du pied.
Le pied (figure 3 & 4)
Le pied s’adapte à l’enceinte en autorisant
son utilisation en position horizontale ou
verticale. Pour cela, il suffit de choisir l’une
ou l’autre des moulures que vous trouverez
à l’arrière. Déterminez le mode d’utilisation
puis glissez simplement le pied dans la
moulure correspondante. Une clé Allen est
dissimulée sous la base du pied. Utilisez-la
pour serrer le verrou de sécurité. Replacez-
la dans la base du pied pour un usage
ultérieur.
Fixation murale (figure 5)
Positionnez, en premier lieu, la surface de
montage contre le mur afin de marquer
l’emplacement des quatre trous. Lors du
montage définitif, vous visserez d’abord les
deux vis correspondant aux trous
supérieurs, en prenant soin de les laisser
dépasser d’environ 5mm du mur. Vissez,
ensuite, les deux vis inférieures puis serrez
le tout. L’enceinte peut être installée
verticalement ou horizontalement sur ce
support. Choisissez la moulure, située au
dos, correspondant à la position choisie
puis glissez l’enceinte sur le support mural.
Utilisez la clé Allen que vous trouverez sous
la base du pied (voir paragraphe précédent)
pour serrer le système de sécurité
traversant le support. Ce support autorise
l’orientation de l’enceinte vers la droite ou
la gauche. Une fois déterminé l’angle
d’orientation, vous pourrez le verrouiller en
serrant, cette fois, la vis de blocage qui se
trouve sur le dessus de l’axe de rotation.
N’oubliez pas de ranger la clé sous la base
du pied, afin de la retrouver pour un usage
ultérieur.
ATTENTION ! VOUS DEVEZ UTILISER DES
ACCESSOIRES DE MONTAGE DE
QUALITE, RESISTANT A LA CORROSION
ET SUFFISAMMENT SOLIDES POUR ETRE
SUR QUE VOTRE ENCEINTE EST
INSTALLEE EN TOUTE SECURITE.
Connexions (figure 6)
Avant de procéder au raccordement,
contrôlez que tous les appareils sont
éteints.
Assurez-vous que vous reliez la borne
positive de l’enceinte (marquée + et de
couleur rouge) à la borne positive de
l’amplificateur ainsi que la borne négative
(marquée – et de couleur noire) à la borne
négative de l’amplificateur. Une connexion
incorrecte conduira à l’obtention d’une
mauvaise image sonore ainsi qu’à une
perte importante des basses.
Demandez l’avis de votre revendeur quant
au choix des câbles de liaisons. Assurez-
vous que leur impédance totale reste
toujours inférieure à la valeur maximale
recommandée dans les spécifications
techniques. Choisissez un câble à faible
inductance, faute de quoi, vous pourriez
obtenir une atténuation des aigus.
Home cinema
Reportez-vous au mode d’emploi de votre
décodeur pour le réglage du niveau et du
retard des différents canaux. Contrôlez que
vos réglages conviennent à l’ensemble des
places d’écoute. A l’exception de la
reproduction de certains effets spéciaux, il
n’est pas souhaitable d’entendre les voies
d’ambiance de façon trop manifeste.
Ajustez l’écartement entre les enceintes
avant gauche et droite de façon à obtenir
une image sonore dont les dimensions
s’accordent à l’image vue à l’écran.
Réglez l’orientation de ces enceintes afin
d’obtenir une transition douce et régulière
des sons panoramiques passant d’un canal
à l’autre.
Faites de même avec les enceintes
« surround » jusqu’à obtenir les meilleurs
résultats à partir d’une large variété
d’éléments sonores. N’hésitez pas à
alterner musique et films !
Entretien
Le coffret se contente, généralement, d’un
simple dépoussiérage. Si vous souhaitez
employer un produit de type aérosol,
vaporisez-le sur un chiffon doux, jamais
directement sur l’enceinte.
Ne tentez pas d’enlever la grille, vous
risquez d’endommager l’appareil.
3

Deutsch
Garantie
Sehr geehrte Kundin, sehr geehrter Kunde,
willkommen bei B&W.
Dieses Produkt wurde nach den höchsten
Qualitätsstandards entwickelt und
hergestellt. Sollte dennoch der
unwahrscheinliche Fall eintreten, dass Sie
als Kunde Grund zur Reklamation haben,
werden B&W Loudspeakers und seine
nationalen Vertriebsgesellschaften das
fehlerhafte Produkt ohne Berechnung der
Arbeits- und Materialkosten (abgesehen
von einigen Ausnahmen) in jedem Land, in
dem eine offizielle B&W-Vertriebsgesell-
schaft vertreten ist, reparieren.
Die Garantiezeit beträgt fünf Jahre ab
Kaufdatum bzw. zwei Jahre auf
Aktivlautsprecher und elektronische
Bauteile.
Garantiebedingungen
1. Die Garantie ist auf die Reparatur der
Geräte beschränkt. Weder der
Transport noch sonstige Kosten, noch
das Risiko des Ausbaus, des
Transports und der Installation der
Produkte wird von dieser Garantie
abgedeckt.
2. Diese Garantie gilt nur für den
Originalbesitzer. Sie ist nicht
übertragbar.
3. Diese Garantie ist nur dann gültig,
wenn zum Zeitpunkt des Kaufs
Fabrikations- und/oder Materialfehler
vorliegen und nicht:
a. bei Schäden durch unfachmännische
Installation, falsches Anschließen oder
unsachgemäßes Verpacken,
b. bei Schäden, die auf einen nicht in der
Bedienungsanleitung genannten
Einsatzzweck, auf Fahrlässigkeit,
Modifikationen oder die Verwendung
von Teilen zurückzuführen sind, die
nicht von B&W hergestellt bzw.
zugelassen wurden,
c. bei Schäden durch defekte oder
ungeeignete Zusatzgeräte,
d. bei Schäden durch Unfälle, Blitzschlag,
Wasser, Feuer, Hitze, Krieg, öffentliche
Unruhen oder sonstige Ereignisse, die
nicht der Kontrolle von B&W und
seinen Vertriebsgesellschaften
unterliegen,
e. für Produkte, deren Seriennummern
geändert, gelöscht, entfernt oder
unleserlich gemacht wurden,
f. wenn Reparaturen oder Modifikationen
von einem Nichtfachmann durchgeführt
wurden.
4. Diese Garantie ergänzt die
nationalen/regionalen gesetzlichen
Verpflichtungen der Händler bzw. der
nationalen Vertriebsgesellschaften und
schränkt in keiner Weise die
gesetzlichen Rechte, die Sie als Kunde
haben, ein.
Inanspruchnahme von
Garantieleistungen
Sollten Sie unseren Service in Anspruch
nehmen müssen, gehen Sie bitte
folgendermaßen vor:
1 Befindet sich das Gerät in dem Land,
in dem Sie es gekauft haben, setzen
Sie sich mit Ihrem autorisierten B&W-
Fachhändler in Verbindung.
2. Befindet sich das Gerät außerhalb des
Landes, in dem Sie es gekauft haben,
wenden Sie sich bitte an die nationale
B&W-Vertriebsgesellschaft des Landes,
in dem Sie leben. Diese wird Ihnen
Auskunft darüber geben, wo Sie das
Gerät reparieren lassen können. Die
Adresse der für das jeweilige Land
zuständigen Vertriebsgesellschaft
erhalten Sie bei B&W in Großbritannien
oder über unsere Website.
Garantieleistungen werden nur nach
Vorlage dieses Garantie-Booklets
(vollständig ausgefüllt und mit dem
Händlerstempel und dem Kaufdatum
versehen) erbracht. Alternativ können Sie
die Originalrechnung oder einen anderen,
mit Kaufdatum versehenen Beleg
einreichen, der Sie als Eigentümer des
Gerätes ausweist.
Bedienungsanleitung
Einleitung
Vielen Dank, dass Sie sich für Bowers und
Wilkins entschieden haben. Bitte lesen Sie
sich diese Bedienungsanleitung vor dem
Auspacken und der Installation des
Lautsprechers genau durch. Sie wird Ihnen
bei der optimalen Nutzung Ihres Systems
helfen.
B&W unterhält in mehr als 60 Ländern ein
Netz erfahrener Distributoren, die Ihnen
zusammen mit dem autorisierten
Fachhändler jederzeit weiterhelfen, um
Ihnen den Musikgenuss zu Hause zu
ermöglichen.
Auspacken (Abbildung 1)
• Klappen Sie die Laschen des Kartons
nach hinten und drehen Sie Karton
samt Inhalt um. Heben Sie den Karton
vom Inhalt ab. Entfernen Sie die
Innenverpackung vom Lautsprecher.
• Im Versandkarton sind enthalten:
1 Fuß
1 Wandhalterung
Wir empfehlen, die Verpackung für einen
eventuellen späteren Transport
aufzubewahren.
Positionierung
Der Lautsprecher kann sowohl senkrecht
als auch waagerecht ausgerichtet werden.
Platzieren Sie ihn auf der Seite oder
befestigen Sie ihn auf dem Fuß oder an der
Wandhalterung.
HINWEIS: Das Markenzeichen auf der
Abdeckung kann um 90 Grad gedreht
werden und wird mit einer Feder an den
Stoff gedrückt. Auf diese Weise kann es
entsprechend dem Lautsprecher
ausgerichtet werden. Möchten Sie es
drehen, ziehen Sie es vorsichtig von der
Abdeckung ab, drehen es in die
gewünschte Position und setzen es wieder
auf die Abdeckung.
HiFi-Cinema
Einsatz als Centerlautsprecher
Der Lautsprecher ist direkt unter bzw. auf
dem Bildschirm zu positionieren und zwar
so, dass er sich möglichst in Ohrhöhe
befindet. Richten Sie die Vorderseite des
Lautsprechers entsprechend der
Bildschirmfläche aus.
Einsatz als linker und rechter
Frontlautsprecher
Platzieren Sie den Lautsprecher so, dass
sich sein Mittelpunkt etwa in Höhe des
Fernsehers oder des Centerlautsprechers
befindet. Stellen Sie sicher, dass der
Abstand zwischen Lautsprechern und
Bildschirm an den Seiten jeweils 0,5 bis
1,0 m beträgt.
Einsatz als Surroundlautsprecher
Es gibt zwei Arten, Surroundinformationen
zu präsentieren. Sie können versuchen, in
allen Richtungen ein gutes Klangbild oder
aber einen diffusen Umgebungseffekt zu
erzeugen.
In beiden Fällen positionieren Sie die
Lautsprecher an den Seiten hinter den
Hörern. Zur Erzielung eines diffuseren
Effektes montieren Sie die Lautsprecher
höher und platzieren sie seitlich oder an der
Rückwand.
2-Kanal-Audio (Abbildung 2)
Bringen Sie die Lautsprecher so an, dass
sich der Mittelpunkt des Lautsprechers
ungefähr in Ohrhöhe befindet.
Grundsätzlich gilt:
• Die Lautsprecher und der Mittelpunkt
des Hörbereichs sollten ein
gleichseitiges Dreieck bilden.
• Der Abstand zwischen den
Lautsprechern sollte zur
Gewährleistung einer exakten
Stereokanaltrennung mindestens 1,5 m
betragen.
Stellen Sie sicher, dass der Abstand
zwischen Wand und Schallwänden der
Lautsprecher mindestens 0,5 m beträgt.
Ist das Klangbild in der Mitte schlecht,
stellen Sie die Lautsprecher näher
zusammen und schräg so auf, dass sie in
Richtung Hörbereich zeigen.
Magnetische Streufelder
Die Lautsprechersysteme sind magnetisch
abgeschirmt, so dass magnetische
Streufelder außerhalb der Gehäusegrenzen
in den meisten Fällen so gering sind, dass
sie keine Störung der Fernsehbilder
hervorrufen (dies gilt nicht für die Frontseite
des Lautsprechers).
Jedoch gibt es extrem empfindliche
Fernsehgeräte, von denen einige sogar
abhängig von ihrer Ausrichtung in bezug
auf das Erdmagnetfeld eingestellt werden
müssen. Treten Bildstörungen auf, sollten
Sie Ihr Fernsehgerät zunächst
entmagnetisieren. Lassen Sie den
4

Lautsprecher dabei an der Stelle stehen,
die Sie vorher für ihn ausgewählt haben.
Einige Geräte haben für diesen Zweck
einen speziellen Entmagnetisierungsknopf,
andere werden beim Einschalten
entmagnetisiert. Schalten Sie das Gerät in
diesem Fall aus, indem Sie es vollständig
von der Stromversorgung trennen (das
Gerät in den Standby-Modus zu schalten
reicht hierbei nicht aus). Nach 15 Minuten
können Sie dann wieder einschalten.
Sollten danach immer noch Probleme
auftreten, verschieben Sie den
Lautsprecher zur günstigeren Ausrichtung
etwas nach vorne bzw. nach hinten oder
schaffen mehr Raum zwischen
Lautsprecher und Fernsehgerät, bis die
Störung beseitigt ist.
Aufgrund des an der Lautsprecherfont
höheren magnetischen Streufeldes
empfehlen wir, bei magnetisch
empfindlichen Artikeln (Disketten, Audio-
und Videobändern, Computerkarten usw.)
einen Mindestabstand von 0,2 m zum
Lautsprecher zu bewahren.
Montage
Zusammenbau und Anbringen von Fuß und
Wandhalterung.
Fuß (Abbildungen 3 & 4)
An der Lautsprecherrückseite befinden sich
Nuten zur Aufnahme des Fußes. Sie haben
die Möglichkeit, den Lautsprecher
senkrecht oder waagerecht auf dem Fuß zu
montieren. Treffen Sie Ihre Entscheidung
und setzen Sie den Lautsprecher
entsprechend auf den Fuß. An der
Fußunterseite befindet sich ein
Innensechskantschlüssel. Nehmen Sie ihn
heraus und befestigen damit den
Lautsprecher am Fuß. Bringen Sie den
Innensechskantschlüssel für
eine spätere Verwendung wieder an der
Fußunterseite an.
Wandhalterung (Abbildung 5)
Legen Sie die Wandhalterung auf die
Montagefläche und markieren Sie exakt die
vier Schraubenpositionen. Entfernen Sie die
Halterung und bohren Sie nun an den
markierten Stellen Löcher in die Wand.
Setzen Sie (bei Steinwänden) Dübel ein.
Schrauben Sie anschließend die ersten
beiden Schrauben in die oberen Löcher, bis
ca. noch 5 mm der Schrauben aus der
Wand heraus zeigen. Drehen Sie die beiden
anderen Schrauben in die unteren
Schraubenlöcher. Drehen Sie die
Schrauben nun fest. Auch bei
Wandmontage haben Sie die Möglichkeit,
den Lautsprecher waagerecht oder
senkrecht anzubringen. Wählen Sie die
entsprechende Nut an der
Lautsprecherrückseite und setzen Sie den
Lautsprecher auf die Halterung. Verwenden
Sie den am Boden des beiliegenden Fußes
sitzenden Innensechskantschlüssel, um den
Lautsprecher an der Halterung zu
befestigen. Die Halterung ermöglicht es,
den Lautsprecher nach links oder rechts zu
drehen. Nun können Sie ihn am Drehgelenk
im oberen Bereich der Wandhalterung
fixieren. Bringen Sie den
Innensechskantschlüssel für eine spätere
Verwendung wieder an der Fußunterseite
an.
WARNUNG: SORGEN SIE FÜR EINE
SICHERE BEFESTIGUNG DES
LAUTSPRECHERS. VERWENDEN SIE
AUSSCHLIESSLICH HOCHWERTIGE
BEFESTIGUNGSELEMENTE
AUSREICHENDER GRÖSSE UND ANZAHL.
DIESE SOLLTEN
KORROSIONSBESTÄNDIG SEIN UND AN
EINER WAND AUSREICHENDER STÄRKE
BEFESTIGT WERDEN.
Anschliessen der Lautsprecher
(Abbildung 6)
Während des Anschließens sollten alle
Geräte abgeschaltet sein.
Schließen Sie die rote und mit + markierte
positive Lautsprecheranschlussklemme an
die positive Anschlussklemme des
Verstärkers an und verbinden Sie die
negative (-, schwarze) Anschlussklemme
mit der negativen Anschlussklemme des
Verstärkers. Die falsche Polarität kann zu
einem schlechten Klang und Bassverlusten
führen.
Lassen Sie sich bei der Auswahl der Kabel
von Ihrem autorisierten Fachhändler
beraten. Die Gesamtimpedanz sollte
unterhalb der in den Technischen Daten
angegebenen maximalen Kabelimpedanz
liegen. Das Kabel sollte eine geringe
Induktivität besitzen, da sehr hohe Töne
sonst gedämpft werden.
HiFi-Cinema
Ihrem Decoder-Handbuch können Sie
detaillierte Informationen zum Einpegeln
und Einstellen der Verzögerungszeiten für
Ihre Lautsprecher entnehmen. Setzen Sie
sich in alle möglichen Hörpositionen, um
ein optimales Einpegeln zu gewährleisten.
Der Pegel der Surroundlautsprecher sollte
so eingestellt werden, dass die
Aufmerksamkeit des Zuhörers (mit
Ausnahme von Spezialeffekten) nicht auf sie
gerichtet wird.
Zur Gewährleistung einer größtmöglichen
Realitätsnähe in einem Home-HiFi-Cinema-
System ist es wichtig, die Lautsprecher gut
auszurichten und das Klangbild auf die
Bildschirmgröße abzustimmen. Bei
kleineren Bildschirmen sollten linker und
rechter Lautsprecher näher
zusammengestellt werden als es in reinen
Audio-Anwendungen üblich ist.
Richten Sie den Winkel der
Surroundlautsprecher so aus, dass mit
verschiedenen Quellen beste Ergebnisse
erzielt werden. Verwenden Sie sowohl Filme
als auch Musikvideos.
Pflege
Die Gehäuseoberfläche muss in der Regel
nur abgestaubt werden. Bei Verwendung
eines Aerosol-Reinigers sprühen Sie den
Reiniger auf ein Tuch, niemals direkt auf
das Gehäuse.
Versuchen Sie nicht, die Abdeckung zu
entfernen, da dies zu Beschädigungen
führen kann.
Español
Garantía limitada
Estimado cliente:
Bienvenido a B&W.
Este producto ha sido diseñado y fabricado
de acuerdo con las más altas normas de
calidad. No obstante, si hallara algún
desperfecto B&W Loudspeakers y sus
distribuidores nacionales garantizan, sin
coste alguno para usted, la mano de obra
(es posible que haya excepciones) y la
reposición de piezas en cualquier país
donde se cuente con un distribuidor B&W
autorizado.
Esta garantía limitada es válida por un
período de cinco años desde la fecha de
compra y de dos años para las partes
electrónicas, incluyendo sistemas de
altavoces amplificados.
Términos y condiciones
1 Esta garantía está limitada a la
reparación del equipo. La garantía no
cubre ni el transporte, ni otros costes,
ni ningún riesgo por traslado,
transporte e instalación de los
productos.
2 La garantía será aplicable
exclusivamente para el propietario
original. No es transferible.
3 Esta garantía tendrá validez solamente
si se trata de materiales defectuosos
y/o de fabricación existentes en el
momento de la compra, y no será
válida en los siguientes casos:
a. daños causados por instalación,
conexión o embalaje inapropiados,
b. daños causados por uso inapropiado
que no se corresponda con el uso
correcto tal como se describe en el
manual del usuario, negligencia,
modificaciones o la utilización de
piezas no originales de fábrica o no
autorizadas por B&W,
c. daños causados por equipos auxiliares
defectuosos o inapropiados,
d. daños causados por accidentes,
relámpagos, agua, incendios, calor,
guerra, disturbios sociales u otra causa
ajena al control razonable de B&W y
de sus distribuidores autorizados,
e. productos cuyo número de serie haya
sido modificado, borrado, retirado o
convertido en ilegible,
f. si una persona no autorizada ha
efectuado alguna reparación o
modificación en el producto.
4 Esta garantía complementa cualquier
obligación legal a nivel
nacional/regional de concesionarios o
distribuidores nacionales y, como
cliente, no afecta a sus derechos
estatutarios.
5

Cómo solicitar reparaciones bajo
garantía
En caso de ser necesaria alguna revisión,
siga el siguiente procedimiento:
1 Si está usando el equipo en el país en
que fue adquirido, debería contactar
con el concesionario autorizado de
B&W en donde lo adquirió.
2 Si el equipo está siendo utilizado fuera
del país en que fue adquirido, debería
contactar con el distribuidor nacional
de B&W correspondiente al país donde
reside, que le asesorará sobre el lugar
al que enviarlo para que pueda ser
revisado. Para obtener información
sobre cómo contactar con su
distribuidor local, puede llamar a B&W
en el Reino Unido o visitar nuestro sitio
web.
Para validar su garantía, debe mostrar este
folleto de garantía debidamente rellenado y
con la fecha de compra estampada por su
concesionario. De lo contrario, tendrá que
mostrar la factura de venta original u otro
comprobante que demuestre su propiedad
y la autenticidad de su fecha de compra.
Manual de
instrucciones
Introducción
Gracias por elegir Bowers & Wilkins.
Le rogamos que lea cuidadosamente este
manual antes de desembalar e instalar el
producto ya que de este modo le será más
fácil optimizar las prestaciones de este
último.
B&W mantiene una red de distribuidores
altamente comprometidos en más de
60 países que están capacitados para
ayudarle a solucionar cualquier problema
que su detallista sea incapaz de resolver.
Desembalaje (figura 1)
• Doble hacia atrás las aletas de la caja
del embalaje e invierta esta última y su
contenido. Levante la caja para que su
contenido quede al descubierto. Quite
el embalaje interno del producto.
• Verifique que la caja contiene:
1 Soporte para estantería
1 Abrazadera para montaje en pared
Le recomendamos que conserve el
embalaje para el caso de que necesite
utilizarlo en el futuro.
Colocación
La caja acústica puede ser utilizada tanto
en orientación vertical como horizontal.
Puede montarse en un soporte, adosada a
una pared o sobre su cara lateral.
NOTA: La insignia de la rejilla protectora
puede girarse hasta 90° para que coincida
con la orientación de la caja,
manteniéndose en su lugar gracias a la
acción de un resorte. Para girar la insignia,
estírela suavemente hacia fuera, cambie la
orientación de la misma y vuélvala a colorar
en el lugar correcto.
Cine en casa
Si va a utilizar la VM1 como caja acústica
frontal central, colóquela directamente
encima o debajo de la pantalla
independientemente de cual sea la posición
más cercana al nivel del oído. Alinee la
parte frontal de la caja para que esté
aproximadamente nivelada con la pantalla.
Si va a utilizar la VM1 como caja
acústica frontal izquierda y derecha,
asegúrese de que la altura del centro de la
caja sea la misma que la del televisor o la
caja acústica central.
Separe la caja acústica entre 0’5 m y 1 m
de los paneles laterales del televisor.
Si va a utilizar la VM1 como caja
acústica de efectos, tenga en cuenta
antes que nada que hay dos maneras de
presentar la información de sonido
envolvente ya que a usted le puede
interesar o bien tener una buena imagen
sonora en todas las direcciones o bien
buscar un efecto ambiental más difuso.
En ambos casos, coloque las cajas en los
lados y detrás de los oyentes. Para
conseguir un efecto ambiental más difuso,
monte las cajas en una altura superior y
oriéntelas a lo largo de la pared posterior o
lateral.
Audio estereofónico de 2 canales
(figura 2)
Monte las cajas acústicas de manera que
el centro de las mismas coincida
aproximadamente con el nivel del oído.
A modo de guía inicial:
• Coloque las cajas acústicas y el centro
del área de escucha de manera que
coincidan aproximadamente con los
vértices de un triángulo equilátero.
• Separe las cajas acústicas un mínimo
de 1’5 metros para mantener la
separación izquierda/derecha.
Mantenga alejados los paneles de las cajas
un mínimo de 0’5 metros de las paredes
circundantes.
Si la imagen sonora central es pobre,
pruebe acercando las cajas entre sí y
ajustando el grado de inclinación de las
mismas con respecto al punto de escucha.
Campos magnéticos parasitos
Los altavoces contenidos en la caja
acústica están apantallados
magnéticamente, lo que significa que el
campo magnético parásito presente más
allá de las fronteras de aquélla
es -excepto en el panel frontal-
generalmente demasiado bajo para que
provoque distorsiones en la imagen del
televisor.
Hay, no obstante, algunos televisores
extremadamente sensibles que en los
casos más críticos deben ajustarse
teniendo en cuenta su alineación con el
campo magnético terrestre. Si tiene algún
problema en este sentido, desmagnetice
primero el televisor con la caja acústica
situada en su posición definitiva. Algunos
televisores incluyen un botón diseñado
especialmente para este propósito. En
caso de que ello no sea posible,
desconecte el aparato de la red eléctrica
durante 15 minutos y vuelva a conectarlo
de nuevo. Le recordamos al respecto que
la mera activación de la posición de espera
del televisor no es suficiente. Si continúa
teniendo problemas, pruebe desplazando la
caja acústica ligeramente hacia delante o
detrás para encontrar una combinación
más favorable o aumente la separación
entre aquélla y el televisor hasta que la
distorsión desaparezca.
Como consecuencia del superior campo
magnético parásito presente en la parte
frontal de la caja acústica, le
recomendamos que mantenga los objetos
magnéticamente sensibles (disquetes de
ordenador, cintas de audio y vídeo, tarjetas
con banda magnética y cosas por el estilo)
alejados un mínimo de 0’2 metros de la
misma.
Montaje
Monte y fije el soporte para pared y
estantería.
Soporte de pie (figuras 3 y 4)
El soporte de pie puede ajustarse utilizando
cualquiera de las ranuras de montaje
situadas en la parte posterior de la caja de
tal forma que esta última pueda ser
colocada horizontal o verticalmente.
Determine la orientación que más le
convenga y a continuación deslice la caja
en el soporte. Hay una llave Allen oculta en
la parte inferior del soporte; utilícela para,
una vez que la caja acústica esté en su
posición definitiva, fijar la tuerca que figura
en la zona posterior del soporte. Coloque
de nuevo la llave Allen en su lugar para el
caso de que vuelva a necesitarla en el
futuro.
Abrazadera para montaje en pared
(figura 5)
Utilizando la abrazadera, marque
cuidadosamente en la superficie de
montaje la posición de los cuatro tornillos
de fijación. Oriente la abrazadera hacia la
pared, coloque los dos tornillos
correspondientes a los dos agujeros
superiores dejando que aproximadamente
5 mm de cada tornillo sobresalgan de la
pared, coloque los dos tornillos restantes
en la parte inferior de la base de montaje y
finalmente fije los cuatro tornillos. De
nuevo, la caja puede ajustarse de manera
que su orientación sea vertical u horizontal
con ayuda de las ranuras de montaje
situadas en su parte posterior. Determine la
orientación que más le convenga y a
continuación deslice la caja en el soporte
de estantería. Coja la llave Allen que hay en
la parte inferior del soporte de estantería.
Fije la tuerca que va a través de la
abrazadera para asegurar esta última a la
caja. La abrazadera permite que la caja
pueda girar hacia la derecha o hacia la
izquierda. La fijación definitiva se consigue
actuando sobre la tuerca que figura en la
junta de rotación ubicada en la parte
superior de la abrazadera. Coloque de
nuevo la llave Allen en su lugar para el caso
de que vuelva a necesitarla en el futuro.
6

ADVERTENCIA: DEBERIA COLOCAR
VARIAS FIJACIONES ANTICORROSION DE
ALTA CALIDAD Y TAMAÑO ADECUADO EN
UN AREA SUFICIENTEMENTE
RESISTENTE DE LA PARED PARA
ASEGURAR QUE LA CAJA ACUSTICA
PUEDA SER SOPORTADA SIN
PROBLEMAS.
Conexiones (figura 6)
Todas las conexiones deberían realizarse
con el equipo desconectado.
Asegúrese de que el terminal positivo de la
caja acústica (designado por + y de color
rojo) sea conectado al terminal de salida
positivo del amplificador y que el terminal
negativo de la caja (designado por – y de
color negro) sea conectado al terminal
negativo del amplificador. Una conexión
incorrecta puede provocar una imagen
sonora pobre y una pérdida de graves.
Consulte a su detallista para que le
aconseje sobre el cable de conexión.
Mantenga la impedancia total por debajo
del máximo recomendado en las
especificaciones de la caja y utilice un
cable de baja inductancia para evitar que
se produzcan atenuaciones en las
frecuencias más altas.
Cine en casa
Consulte el manual de su decodificador de
sonido envolvente y ajuste los niveles y
tiempos de retardo correspondientes a
todas las cajas acústicas del equipo.
Verifique los ajustes realizados para
conseguir el mejor resultado posible en
todas las posiciones de escucha
probables. Excepto en el caso de los
efectos especiales, el nivel general del
campo sonoro envolvente no debería ser
demasiado obvio.
Ajuste la distancia entre las cajas acústicas
frontales izquierda y derecha para que el
tamaño de la imagen acústica coincida con
el de la pantalla de visualización.
Ajuste la inclinación de las cajas acústicas
principales izquierda y derecha para
conseguir una transición suave de los
sonidos que viajan de un lado a otro de la
pantalla de visualización.
Ajuste el ángulo de las cajas acústicas de
efectos para obtener los mejores resultados
posibles con una extensa variedad de
programas. Utilice tanto vídeos musicales
como películas.
Cuidado y mantenimiento
Por lo general, la superficie del recinto sólo
requiere que de cuando en cuando se le
quite el polvo. Si desea utilizar un limpiador
de tipo aerosol, rocíe la gamuza de
limpieza, nunca el recinto.
No intente quitar la rejilla protectora ya que
podrían producirse daños en los altavoces.
Português
Garantia limitada
Estimado Cliente,
Bem-vindo à B&W.
Este produto foi concebido e fabricado de
acordo com os mais elevados padrões de
qualidade. No entanto, se houver qualquer
problema com este produto, os Agentes
B&W e os seus distribuidores nacionais
garantem serviço de mão-de-obra
(podendo aplicar-se exclusões) e de
substituição de peças gratuitos em
qualquer país servido por um distribuidor
oficial de B&W.
Esta garantia limitada é válida por um
período de cinco anos a partir da data de
compra ou dois anos pela parte electrónica
incluindo altifalantes amplificados.
Termos e condições
1 Esta garantia limita-se à reparação do
equipamento. Nem transporte, nem
quaisquer outros custos, nem qualquer
risco de remoção, transporte e
instalação de produtos estão cobertos
por esta garantia.
2 A garantia só é válida para o
proprietário original. Não é transferível.
3 Esta garantia não será aplicável nos
casos em que os defeitos não sejam
atribuíveis a materiais e/ou mão-de-
obra na altura da compra e não será
aplicável a:
a. danos causados pela instalação,
ligação ou embalamento incorrectos,
b. danos causados por qualquer
utilização que não seja a correcta
conforme descrita no manual do
utilizador, negligência, modificações ou
utilização de peças que não sejam
fabricadas ou autorizadas pela B&W,
c. danos causados por equipamento
auxiliar inadequado ou defeituoso,
d. danos causados por acidentes,
relâmpagos, água, incêndio, calor,
guerra, distúrbios públicos ou qualquer
outra causa para além do controlo
razoável da B&W e dos seus
distribuidores nomeados,
e. produtos cujo número de série tenha
sido alterado, apagado, removido ou
que tenha sido tornado ilegível,
f. reparações ou modificações que
tenham sido efectuadas por pessoa
não autorizada.
4 Esta garantia complementa quaisquer
obrigações legais nacionais e regionais
de revendedores ou distribuidores
nacionais e não afecta os seus direitos
estatuários como cliente.
Como reivindicar reparações sob
garantia
Caso seja necessário assistência técnica,
queira seguir o procedimento seguinte:
1 Se o equipamento está a ser utilizado
no país de compra, deverá contactar o
distribuidor autorizado da B&W de
onde o equipamento foi comprado.
2 Se o equipamento está a ser utilizado
fora do país de compra, deverá
contactar o distribuidor nacional da
B&W do país de residência que o
aconselhará onde o equipamento pode
ser reparado. Pode telefonar para a
B&W no Reino Unido ou visitar a nossa
página na internet para obter os
pormenores de contacto do seu
distribuidor local.
Para validar a sua garantia, precisará de
produzir este livrete de garantia preenchido
e carimbado pelo seu distribuidor na data
da compra. Em alternativa, precisará da
factura original de venda ou outra prova de
propriedade e data de compra.
Manual do utilizador
Introdução
Gratos por ter escolhido Bowers & Wilkins.
Leia por favor a totalidade deste manual
antes de desembalar e instalar o produto.
Ele constitui uma ajuda na optimização do
desempenho.
A B&W mantém uma rede de distribuidores
próprios em mais de 60 países, que
poderão ajudá-lo no caso do aparecimento
de qualquer problema que não possa ser
solucionado pelo seu revendedor.
Desembalagem (figura 1)
• Abra as abas da caixa e inverta-a
juntamente com o seu conteúdo. Puxe
a caixa para isolá-la do conteúdo.
Retire todo o embalamento interior do
produto.
• Confira se na caixa existe:
1 suporte de prateleira
1 suporte de parede
Sugerimos que guarde toda a embalagem
para uso futuro.
Posicionamento
A coluna pode ser usada tanto na vertical
como na horizontal. Pode ser colocada
numa prateleira, montada num suporte de
parede ou sobre si mesma.
NOTA: O símbolo na grelha pode ser girado
90 graus para seguir a orientação da coluna.
Para girar puxe o símbolo suavemente para
fora, gire para a direcção desejada e volte a
empurrar para perto da coluna.
Cinema em casa
Como uma coluna central está
directamente em cima ou em baixo do
ecrã, coloque-a numa posição mais
próximo do nível do ouvido. Alinhe a frente
da coluna com a do ecrã.
Como uma coluna frontal esquerda ou
direita:
Alinhe aproximadamente o meio da coluna
com a altura do televirsor ou da coluna
central.
7

Distancie a coluna entre 0,5m e 1m de
cada lado do ecrã.
Como uma coluna traseira:
Há duas maneiras de apresentar a
informação surround. Pode tentar obter
uma boa imagem acústica em todas as
direcções ou optar por um efeito mais
difuso.
Em ambos os casos posicione as colunas
em cada lado e atrás da posição de
audição. Para um efeito mais difuso,
coloque as colunas numa posição mais
elevada e aponte-as ao correr da parede
traseira ou das paredes laterais.
2 Canais audio (figura 2)
Monte as colunas de forma que o centro
da coluna está aproximadamente ao nível
de orelha.
Como um guia inicial:
• Posicione as colunas e o centro de
audição aproximadamente nos cantos
de um triângulo equilatero. Mantenha
as colunas pelo menos 1,5m
separadas uma da outra para manter a
separação dos canais direito e
esquerdo.
• Mantenha os paineis frontais das
colunas pelo menos 0,5m afastados
das paredes. Se a imagem central é
pobre, tente aproximar as colunas e
ajustar o ângulo das mesmas.
Campos magnéticos
Os altifalantes das colunas são
magneticamente blindados, de tal forma
que que o campo magnético criado fora
dos limites da caixa, excluindo a frente, é
na maior parte dos casos demasiado baixo
para causar qualquer distorção no televisor.
Porém, há alguns televisores extremamente
sensíveis – alguns têm mesmo que ser
ajustados de acordo com o alinhamento
dos mesmos com o campo magnético da
terra. Se tiver problemas, primeiro,
desmagnetize o televisor com as colunas já
posicionadas. Alguns têm um botão
especialmente para esse propósito. Se
não, desligue o televisor no botão e da
ficha de corrente durante 15 minutos e
volte a ligar. Apenas colocar o televisor em
modo standby não é suficiente. Se
continua com o problema, tente mover a
coluna para a frente ou para trás até obter
uma posição favorável, ou afaste a coluna
do televisor até a distorção desaparecer.
Devido ao campo magnético ser mais forte
em frente da coluna, nós recomendamos
que matenha aparelhos magneticamente
sensíveis (disquetes, fitas audios e vídeo,
cartões magnéticos) a pelo menos 0,2m da
coluna.
Instalação
Montar e Fixar o Suporte de prateleira e
parede.
Suporte (figura 3 & 4)
O suporte pode ser encaixado de forma
que a coluna possa ser posicionada na
horizontal ou na vertical usando qualquer
uma das aberturas na traseira. Faça a sua
escolha de orientação e deslize-a sobre o
suporte. Poderá encontrar uma chave Allen
na base do suporte, retire-a para apertar o
parafuso à traseira do suporte quando a
coluna estiver em posição. Recoloque a
chave Allen na sua posição na base do
suporte para uso futuro.
Suporte de parede (figura 5)
Se usar o suporte de parede, marque
cuidadosamente as quatro posições de
parafuso na superfície de montagem.
Encoste o suporte à parede, fixe os dois
parafusos para os dois buracos superiores
deixando aproximadamente 5mm do
parafuso saída da parede, fixe os dois
parafusos restantes à base de montagem,
finalmente aperte os parafusos. Mais uma
vez a coluna pode ser orientada tanto na
posição horizontal como vertical, usando
qualquer um das aberturas de montagem
na traseira da coluna. Faça sua escolha de
orientação e deslize a coluna sobre o
suporte.
Pegue na chave Allen na base do suporte
de prateleira. Aperte o parafuso que passa
pelo suporte para o segurar à coluna. O
suporte permite à coluna rodar para a
esquerda e para a direita. A posição é
então fixa apertando o parafuso localizado
na articulação do topo do suporte.
recoloque a chave Allen na sua posição
para uso futuro.
AVISO: DEVE USAR A QUALIDADE,
TAMANHO E QUANTIDADE SUFICIENTE
DE PARAFUSOS À PROVA DE CORROSÃO
NUMA ÁREA DE PAREDE COM RIGIDEZ
SUFICIENTE PARA ASSEGURAR QUE A
COLUNA ESTÁ APOIADA COM
SEGURANÇA.
Ligações (Figura 6)
Todas as ligações devem ser feitas com o
sistema desligado.
Certifique-se que o terminal positivo da
coluna (marcado + e a vermelho) está
ligado ao terminal positivo de saída do
amplificador e o negativo (marcado – e a
preto) ao negativo. Uma ligação incorreta
pode resultar numa imagem pobre ou
numa perca de graves.
Peça conselho ao seu revendedor na
escolha do cabo. Mantenha a impedância
total abaixo do máximo recomendado nas
especificações e use um cabo de baixa
indutância para evitar atenuação das altas
frequências.
Cinema em casa
Consulte o manual do seu decodificador e
fixe os níveis e tempos de atraso para
todos as colunas. Confira o definições para
obter o melhor resultado geral em todas as
possíveis posições de audição, com
exceção dos efeitos especiais, o nível geral
do campo surround não deve ser assim tão
óbvio.
Ajuste o espaçamento das colunas frontais
esquerda e direita de forma a que o
tamanho da imagem acústica seja
equivalente ao tamanho do ecrã.
Ajuste o ângulo das colunas frontais
esquerda e dianteira para conseguir uma
correcta transição de sons de um lado para
o outro.
Ajuste o ângulo das colunas surround para
obter os melhores resultados com uma
grande variedade de material. Use filmes e
espectáculos musicais.
Cuidados de manutenção
A superfície da caixa normalmente só
requer uma limpeza de pó. Se deseja usar
um produto de limpeza aerosol, aplique-o
sobre o pano de limpeza, não na caixa.
Não tente retirar a grelha, resultará em
dano.
8

Italiano
Garanzia limitata
Egregio cliente
Un benvenuto da parte della B&W.
Questo prodotto è stato progettato e
fabbricato secondo i più alti standard
qualitativi. Tuttavia, nell’improbabile caso di
un guasto o malfunzionamento, B&W
Loudspeakers e i suoi distributori nazionali
garantiscono parti sostitutive e mano
d’opera gratuite (alcune eccezioni sono
possibili) nei paesi in cui è presente un
distributore ufficiale B&W.
Questa garanzia limitata è valida per un
periodo di cinque anni dalla data di
acquisto o di due anni per i componenti
elettronici, altoparlanti inclusi.
Termini e condizioni
1 La garanzia è limitata alla sola
riparazione delle apparecchiature. La
garanzia non copre i costi di trasporto
o nessun altro tipo di costo, né i rischi
derivanti dalla rimozione, il trasporto e
l’installazione dei prodotti.
2 La garanzia è valida solo per
l’acquirente originario e non è
trasferibile.
3 Questa garanzia è applicabile solo in
caso di materiali e/o fabbricazione
difettosi al momento dell’acquisto e
non è applicabile nei seguenti casi:
a. danni causati da installazione,
connessione o imballaggio incorretti,
b. danni causati da un uso inadeguato del
prodotto, diverso dall’uso specificato
nel manuale dell’utente, negligenza,
modifiche o impiego di componenti
non fabbricati o autorizzati da B&W,
c. danni causati da apparecchiature
ausiliarie difettose o inadatte,
d. danni causati da incidenti, fulmini,
acqua, fiamme, calore, guerra,
disordini pubblici o altra causa al di
fuori del ragionevole controllo di B&W e
i suoi ufficiali distributori,
e. quando il numero di serie del prodotto
è stato alterato, cancellato, rimosso o
reso illeggibile,
f. se riparazioni o modifiche sono state
effettuate da persone non autorizzate.
4 Questa garanzia completa le
obbligazioni di legge regionali e
nazionali dei rivenditori o distributori
nazionali e non incide sui diritti del
consumatore stabiliti per legge.
Riparazioni sotto garanzia
Se sono necessarie delle riparazioni,
seguire le procedure delineate qui di
seguito:
1 Se le apparecchiature sono utilizzate
nel paese in cui sono state acquistate,
contattare il rivenditore autorizzato
B&W da cui sono state acquistate.
2 Se le apparecchiature non sono
utilizzate nel paese in cui sono state
acquistate, contattare il distributore
nazionale B&W nel paese di residenza,
che sarà jn grado di fornire i dettagli
della ditta incaricata delle riparazioni.
Contattare B&W nel Regno Unito o
visitare il sito web per i dettagli dei vari
distributori di zona.
Per ricevere assistenza in garanzia,
bisognerà esibire, compilata e timbrata dal
rivenditore il giorno dell’acquisto, il
tagliando di garanzia e lo scontrino
d’acquisto originale o altro tipo di prova
d’acquisto con data d’acquisto.
Manuale di istruzioni
Introduzione
Grazie per aver scelto Bowers and Wilkins.
Vi preghiamo di leggere questo manuale
prima di estrarre il prodotto dal suo imballo
e installarlo. Vi aiuterà a ottimizzare la sua
resa.
B&W vanta una rete di distributori
specializzati in più di 60 paesi che saranno
in grado di intervenire nel caso aveste dei
problemi che il vostro rivenditore non può
risolvere.
Sballaggio (figura 1)
• Ripiegate completamente all’indietro i
lembi della confezione e ribaltate il
cartone e il suo contenuto. Sollevate la
scatola vuota. Togliete l’imballaggio
interno del prodotto.
• Verificate che nella a scatola ci siano:
1 stand da scaffale
1 staffa da parete
Vi consigliamo di conservare l’imballaggio
per un uso futuro.
Posizionamento
Il diffusore può essere utilizzato sia in
posizione verticale sia in posizione
orizzontale. Può essere montato su uno
stand, una staffa o adagiato sul lato.
NOTA: Lo stemma sulla griglia può venir
ruotato di 90 gradi per adattarsi
all’orientamento del diffusore e viene
trattenuto da una molla. Per ruotarlo
togliete delicatamente lo stemma dalla
griglia definite l’orientamento e
riposizionatelo nella griglia.
Home theatre
Come diffusore centrale anteriore:
collocatelo direttamente sopra o sotto lo
schermo, in modo che sia il più vicino
possibile all’altezza dell’orecchio. Allineate
la parte anteriore del diffusore a livello circa
con lo schermo.
Come diffusore anteriore destro e
sinistro:
fate in modo che l’altezza del centro del
diffusore sia circa la stessa di quella del
televisore o del diffusore centrale.
Collocate il diffusore fra 50cm e 1m dallo
schermo.
Come diffusore surround:
Ci sono due modi di presentare
l’informazione surround. O cercate di
ottenere una buona immagine da tutte le
direzioni oppure cercate un effetto di
ambienza più diffuso.
In entrambi i casi posizionate i diffusori ai
lati e dietro gli spettatori. Per un effetto più
diffuso, montate i diffusori più in alto e
rivolgeteli o verso il muro posteriore o
quello laterale.
Audio 2 – Canali (figura 2)
Montate i diffusori in modo che il centro del
diffusore sia circa ad altezza dell’orecchio.
Come guida iniziale:
• Posizionate i diffusori e il centro della
zona di ascolto circa agli angoli di un
triangolo equilatero.
• Mantenete i diffusori almeno a 1,5 m
l’uno dall’altro per mantenere una
corretta separazione.
Mantenete il retro del diffusore ad almeno
0,5 m dalle pareti.
Se l’immagine centrale è scadente, cercate
di avvicinare i diffusori e regolate la loro
direzione verso l’interno verso l’interno.
Campi magnetici dispersi
Le unità del diffusore sono magneticamente
schermate in modo che il campo
magnetico disperso esterno ai limiti del
cabinet, ad eccezione di quello anteriore,
sia troppo basso per generare distorsione
dell’immagine televisiva nella maggior parte
dei casi.
Tuttavia, ci sono alcuni televisori
particolarmente sensibili – alcuni che
devono addirittura essere nuovamente
regolati a seconda della loro angolazione
con il campo magnetico della terra. Se
avete qualche problema, prima
smagnetizzate il televisore con il diffusore
posizionato in luogo. Alcuni sono provvisti
di un pulsante apposito. In caso contrario
disattivate i diffusori spegnendo l’impianto
per 15 minuti e poi riattivateli. Non è
sufficiente porre l’impianto semplicemente
in modalità di standby. Se avete ancora un
problema provate a spostare il diffusore o
in avanti o all’indietro per ottenere una
posizione più corretta , oppure distanziate il
diffusore più lontano dal televisore fino a
che la distorsione scompare.
A causa del campo magnetico più elevato
davanti al diffusore, vi raccomandiamo di
conservare i supporti magneticamente
sensibili (computer disc, nastri audio e
video e altro) ad almeno 2 metri dal
diffusore.
Montaggio
Assemblaggio e fissaggio della staffa e
dello stand da scaffale.
Stand (figura 3 & 4)
Lo stand può essere fissato in modo che il
diffusore possa essere posizionato sia in
modo orizzontale sia verticale, utilizzando
uno delle fessure sul retro del diffusore.
Definite la vostra scelta di orientamento e
poi fate scivolare il diffusore sullo stand.
Una chiave esagonale si trova alla base
dello stand,toglietela per serrare il dado sul
retro dello stand una volta in posizione per
fissare il diffusore. Riponete la chiave di
9

Allen nel suo alloggiamento alla base dello
stand per un uso futuro.
Staffa (figura 5)
Usando la staffa segnate le posizioni delle
quattro viti sulla superficie della montatura
con attenzione. Appoggiate la staffa alla
parete, avvitate le due viti utilizzate per i
due fori superiori, lasciando circa 5mm
della vite fuori dalla parete, avvitate le due
viti rimanenti alla base della montatura,
infine stringete le viti. Anche in questo caso
il diffusore può essere sistemato in modo
che l’orientamento possa essere sia
verticale sia orizzontale, utilizzando una
delle fessure collocate sul retro del
diffusore. Determinate la vostra scelta
dell’orientamento e poi fate scivolare il
diffusore nella staffa.
Togliete la chiave inglese dalla base dello
stand a scaffale. Serrate il dado che passa
attraverso la staffa per assicurarlo al
diffusore. La staffa permette al diffusore di
oscillare a destra e a sinistra. Questo viene
poi fissato in posizione serrando il dado
che è collocato alla giuntura superiore della
staffa. Riportate la chiave di Allen nella sua
posizione alla base dello stand per un
futuro utilizzo.
AVVERTENZA: DOVRESTE UTILIZZARE
TASSELLI DI QUALITA’ E INOSSIDABILI SU
UNA ZONA DELLA PARETE
SUFFICIENTEMENTE ROBUSTA TALE DA
GARANTIRE CHE IL DIFFUSORE SIA
SALDAMENTE SOSTENUTO.
Collegamenti (figura 6)
Tutti i collegamenti dovrebbero essere
effettuati con gli apparecchi disattivati.
Assicuratevi che il terminale positivo sul
diffusore (contrassegnato con + e di colore
rosso) sia collegato al terminale dell’uscita
positiva dell’amplificatore e il negativo
(contrassegnato con – e di colore nero) al
negativo. Un collegamento errato potrebbe
dare luogo ad un’immagine scadente e una
perdita alle basse frequenze. Chiedete
consiglio al vostro rivenditore nella scelta
dei cavi. Mantenete l’impedenza totale al di
sotto del massimo raccomandato nelle
caratteristiche e utilizzate un cavo a bassa
induttanza per evitare l’attenuazione delle
frequenze più alte.
Home theatre
Fate riferimento al manuale del vostro
decoder e fissate i livelli e i tempi di ritardo
per tutti i diffusori. Verificate le regolazioni
per ottenere i l miglior risultato a tutte le
possibili posizioni di ascolto. Ad eccezione
che per gli effetti speciali, il livello generale
del campo surround non dovrebbe essere
troppo evidente.
Regolate la distanza dei diffusori anteriori
destro e sinistro in modo che l’immagine
acustica si adatti alla dimensione dello
schermo.
Regolate la convergenza dei diffusori
anteriori destro e sinistro per ottenere una
lineare transizione di suoni che si
omogeneizzi da un lato all’altro.
Regolate l’angolazione dei diffusori
surround per dare i risultati migliori con una
varietà di materiale. Utilizzate sia video
musicali sia film.
Manutenzione
La superficie del cabinet in genere ha
bisogno solo di essere spolverata. Se
desiderate utilizzare un detergente spray,
spruzzatelo sul panno non sul cabinet.
Non cercate di togliere la griglia in quanto
potreste danneggiarla.
Nederlands
Beperkte garantie
Geachte cliënt,
Welkom bij B&W.
Dit product is volgens de hoogste
kwaliteitsnormen ontworpen en
vervaardigd. Mocht er toch iets defect zijn
aan dit product dan kunt u aanspraak
maken op gratis vervanging van onderdelen
via de nationale distributeur van B&W
Loudspeakers (er zijn uitzonderingen) in elk
land waar een officiële B&W distributeur
gevestigd is.
Deze beperkte garantie is geldig voor een
periode van vijf jaar vanaf de
aankoopdatum en twee jaar voor de
elektronica, waaronder actieve luidsprekers.
Voorwaarden
1. De garantie is beperkt tot de reparatie
van de apparatuur. Transport- en
andere kosten, eventueel risico voor
het verwijderen, vervoeren en
installeren van producten vallen niet
onder deze garantie.
2. De garantie geldt alleen voor de eerste
eigenaar en is niet overdraagbaar.
3. Deze garantie is niet van toepassing in
andere gevallen dan defecten van
materialen en/of fabricage ten tijde van
aankoop en is niet van toepassing:
a. voor schade die veroorzaakt is door
onjuiste installatie, aansluiting of
verpakking;
b. voor schade die veroorzaakt is door
onjuist gebruik, anders dan beschreven
in de handleiding, nalatigheid,
modificatie, of gebruik van onderdelen
die niet door B&W goedgekeurd of
gemaakt zijn;
c. voor schade veroorzaakt door defecte
of ongeschikte aanvullende apparatuur;
d. voor schade veroorzaakt door ongeval,
onweer, water, brand, hitte, oorlog,
openbaar geweld of een andere
oorzaak buiten controle van B&W en
haar distributeurs;
e. voor producten waarvan het
serienummer gewijzigd, verwijderd,
gewist of onleesbaar gemaakt is;
f. indien reparaties of modificaties
uitgevoerd zijn door een onbevoegd
persoon.
4. Deze garantie vult eventuele nationale/
regionale wettelijke verplichtingen voor
dealers of nationale distributeurs aan
en heeft geen invloed op uw wettelijke
rechten als consument.
Garantieclaims
Wanneer u aanspraak wilt maken op
garantie handel dan als volgt:
1 Indien de apparatuur gebruikt wordt in
het land van aankoop, neem dan
contact op met de erkende B&W
dealer waar de apparatuur gekocht is.
2. Indien de apparatuur niet het land van
aankoop wordt gebruikt, neem dan
10

contact op met de nationale
distributeur van B&W in het land waar
u verblijft. Deze zal u informeren hoe te
handelen. U kunt contact opnemen
met B&W in Groot-Brittannië of onze
website bezoeken voor het adres van
uw plaatselijke distributeur.
Om uw garantie geldig te maken, dient u
dit ingevulde garantiebewijs, op de datum
van aankoop afgestempeld door uw
leverancier, kunnen tonen. De tweede
mogelijkheid is het tonen van het
oorspronkelijke aankoopbewijs of ander
bewijs van eigendom met aankoopdatum.
Handleiding
Inleiding
Dank u voor de aanschaf van Bowers &
Wilkins luidsprekers. Wij raden u aan deze
handleiding in zijn geheel door te lezen
voordat u het product in gebruik neemt,
zodat u er optimaal van kunt genieten.
B&W heeft een netwerk van toegewijde
distributeurs in 60 landen over de gehele
wereld, die u zullen bijstaan in geval van
problemen die uw leverancier niet kan
oplossen.
Uitpakken (afb. 1)
• Vouw de kartonnen flaps terug en keer
de doos met inhoud om. Licht dan de
doos van de inhoud en verwijder
vervolgens de verpakkingsdelen van
het product.
• Controleer dan of de volgende items
aanwezig zijn:
1 Boekenplank stand
1 Muurbeugel
Wij raden u aan de verpakking voor later
gebruik te bewaren.
Opstelling
De luidspreker kan zowel horizontaal als
verticaal worden gebruikt; hij kan op een
stand, op een beugel of op de zijkant
worden gezet.
OPMERKING: het naamplaatje op de grill
kan 90 graden worden gedraaid, afhankelijk
van de opstelling die is gekozen. Om het
plaatje te draaien trekt u het voorzichtig iets
van de grill, draait het in de gewenste
positie en u laat het weer los.
Home Theater
Bij gebruik als front centrum luidspreker
plaatst u de luidspreker direct boven of
onder het beeld; u kiest de positie die het
dichtst bij oorhoogte ligt. Zorg dat de
voorzijde van de luidspreker in lijn ligt met
het beeld.
Bij gebruik als front links en rechts
luidspreker zet u de het hart van de
luidspreker ongeveer op TV hoogte, of even
hoog als de centrum luidspreker.
Plaats de luidsprekers ongeveer 0,5 tot 1
meter ter weerszijden van het beeld.
Bij gebruik als surround luidsprekers zijn
er twee manieren om de surround
informatie te presenteren. U kunt proberen
in alle richtingen een goed beeld te krijgen,
of u kiest voor een diffuser ruimtebeeld.
Voor een diffuser effect plaatst u de
luidsprekers hoger en u richt ze op de
achter- of zijwanden.
Tweekanaals Stereo (afb. 2)
Monteer de luidsprekers zo dat het hart van
de luidspreker zich ongeveer op oorhoogte
bevindt.
Uitgangspunten
• Plaats de luidsprekers in het centrum
van de luisterruimte, ongeveer in een
gelijkzijdige driehoek met de
luisterpositie.
• Houd de luidsprekers daarbij minimaal
1,5 meter uit elkaar om voldoende
scheiding te houden en zorg dat er
minimaal 0,5 meter afstand tussen de
achterliggende muur en de voorzijde
van de luidsprekers blijft.
Wanneer er een gat in het midden ontstaat,
probeer dan de luidsprekers dichter bij
elkaar te plaatsen en draai ze zonodig iets
naar binnen.
Magnetisch Strooiveld
De luidsprekereenheden zijn magnetisch
afgeschermd, zodanig dat het magnetische
veld buiten de kast – uitgezonderd de
voorzijde – doorgaans te zwak is om
vervorming van het TV-beeld te
veroorzaken.
Er zijn echter sommige extreem gevoelige
televisies – die zelfs wel eens gecorrigeerd
dienen te worden voor het magnetisch veld
van de aarde. Heeft u zo’n probleem,
demagnetiseer de TV dan voordat u de
luidsprekers opstelt; sommige toestellen
hebben daarvoor een speciale toets. Zo
niet, schakel de TV dan geheel uit met de
hoofdschakelaar – standby is niet
voldoende – wacht 15 minuten en schakel
weer in. Blijft het probleem nog bestaan,
probeer dan of het verplaatsen van de
luidspreker – iets naar voren, iets naar
achter – soelaas biedt, of plaats de
luidspreker verder van de televisie tot de
vervorming verdwijnt.
Vanwege het sterkere strooiveld voor de
luidspreker raden we u aan magnetisch
gevoelige zaken – computer diskettes,
audio en video cassettes, enzovoort – op
een afstand van minimaal 20cm van de
luidspreker te houden.
Montage
Monteren en bevestigen muurbeugel en
boekenplank stand.
Stand (afb. 3 & 4)
De stand kan zodanig worden bevestigd
dat de luidspreker zowel horizontaal als
verticaal kan worden opgesteld, afhankelijk
van welke bevestigingspunten op de
achterzijde van de luidspreker worden
gebruikt. Bepaal uw keus en monteer de
luidspreker op de stand. In de bodem van
de stand is aan inbussleuteltje bevestigd,
wat u kunt gebruiken om de schroef in de
achterzijde van de stand vast te draaien,
zodra deze in de gewenste positie is.
Bevestig het inbussleuteltje weer in de voet
voor later gebruik.
Muurbeugel (afb. 5)
Gebruik de muurbeugel als mal voor het
boren van de vier gaten op de juiste plaats.
Zet dan de beugel tegen de wand en
schroef de beide bovenste schroeven in tot
ze nog ongeveer 5mm uit de muur steken.
Draai nu de beide onderste schroeven in en
draai tenslotte alle schroeven gelijkmatig
vast. Ook nu kan de luidspreker zowel
horizontaal als verticaal worden
gemonteerd, afhankelijk van de
bevestigingspunten die u gebruikt. Bepaal
uw keus en monteer de luidspreker op de
stand.
Neem dan het inbussleuteltje uit de stand
en draai de schroef vast die door de beugel
gaat om de luidspreker vast te zetten. De
beugel laat de luidspreker ruimte om naar
links en rechts te kantelen. U zet de
luidspreker vast door de schroef die op de
bevestiging bovenop de beugel zit aan te
draaien. Bevestig het inbussleuteltje weer in
de voet voor later gebruik.
Waarschuwing: gebruik altijd het juiste
aantal schroeven van goede kwaliteit, die
bestand zijn tegen corrosie om de
luidsprekers vast te zetten, zodat deze ook
na jaren nog veilig hangt.
Aansluitingen
(afb. 6)
Schakel voordat u iets aansluit of verandert
altijd eerst alle apparatuur uit. Verbind de
rode aansluiting (+) van de luidspreker met
de positieve aansluiting van de versterker
en de negatieve aansluiting (–) van de
luidspreker met de negatieve van de
versterker. Foutieve aansluiting leidt tot
fasedraaiing en aantasting van het
stereobeeld en het laag. Vraag zonodig uw
leverancier om advies omtrent het gebruik
van kabel met geringe inductie om
benadrukking van hoge frequenties te
voorkomen.
Home Theater
Raadpleeg eventueel de handleiding van
uw decoder en stel het niveau en de
vertraging voor alle luidsprekers in.
Controleer deze instellingen voor een
optimaal resultaat in alle relevante
luisterposities. Uitgezonderd speciale
effecten, dient het algemene geluidsniveau
niet al te hoog gekozen te worden.
Corrigeer de afstand tot de front links en
rechts luidsprekers zodat de grootte van
het akoestische beeld past bij de grootte
van het beeldscherm.
Verander eventueel de hoek waaronder de
front links en rechts luidsprekers staan om
een rustige overgang van het afgestraalde
geluid van de luidsprekers te krijgen.
Verander tenslotte de opstelling van de
surround luidsprekers voor een optimaal
resultaat met uiteenlopend
programmamateriaal. Gebruik daarbij zowel
films als muziekvideo’s.
11

Onderhoud
Van de buitenzijde hoeft u alleen maar stof
af te nemen. Wilt u daarbij een reiniger in
een spuitbus gebruiken, spuit dan nooit op
de kast, maar alleen op de doek.
Probeer nooit de grill te verwijderen, daar
deze dan wordt beschadigd.
Ελληνικά
Περιρισµένη
εγγύηση
Αιτιµε Πελάτη
Καλωσρίσατε στην B&W.
Τ παρν πρϊν έει σεδιαστεί και
κατασκευαστεί σύµωνα µε τις
υψηλτερες πρδιαγραές πιτητας.
Πάντως, εάν κάπι πρληµα ντως
παρατηρηθεί µε τ πρϊν αυτ, η B&W
Loudspeakers και ι εθνικί της
αντιπρσωπι, εγγυώνται τι θα
παρέυν ωρίς ρέωση εργασία
(µπρεί να ισύσυν περιρισµί) και
εαρτήµατα σε κάθε ώρα πυ
υπάρει ευσιδτηµένς
αντιπρσωπς της B&W.
Η περιρισµένη αυτή εγγύηση ισύει
για µια περίδ δύ ετών απ την
ηµερµηνία αγράς και δύ ετών για
τα ηλεκτρνικά συµπεριλαµανµένων
και των ενεργών ηείων.
ρι και πρϋπθέσεις
1 Η εγγύηση καλύπτει µν την
επισκευή τυ επλισµύ. Η
εγγύηση δεν καλύπτει τα έδα
µεταράς, ή πιαδήπτε άλλα
έδα, ύτε άλλυς κινδύνυς για
τη µετακίνηση, µεταρά και
εγκατάσταση των πρϊντων.
2 Η εγγύηση ισύει µν για τν
αρικ αγραστή. ∆εν
µεταιάεται.
3 Η εγγύηση δεν θα ισύει σε
περιπτώσεις πυ δεν σετίνται
µε αστία υλικών και/ή εργασία
συναρµλγησης κατά τν ρν
αγράς και δεν θα ισύει:
α. για ηµιές πυ πρκλήθηκαν απ
λανθασµένη εγκατάσταση,
σύνδεση ή συσκευασία,
. για ηµιές πυ πρκλήθηκαν απ
πιαδήπτε άλλη απ τη σωστή
ρήση πως περιγράεται στ
εγειρίδι ρήστη, απ αµέλεια,
απ µετατρπές ή απ ρήση
εαρτηµάτων πυ δεν
κατασκευάνται ύτε έυν
εγκριθεί απ την B&W,
γ. για ηµιές πυ πρκλήθηκαν απ
ελαττωµατικ ή ακατάλληλ
ηθητικ επλισµ,
δ. για ηµιές πυ πρκλήθηκαν απ
ατυήµατα, αστραπές, νερ, ωτιά,
θερµτητα, πλεµ, λαϊκές
εεγέρσεις ή πιαδήπτε άλλη
αιτία υπεράνω τυ εύλγυ
ελέγυ της B&W και των
ευσιδτηµένων αντιπρσώπων
της,
ε. για πρϊντα των πίων αριθµς
σειράς έει µεταληθεί, διαγραεί,
ααιρεθεί ή έει καταστεί
δυσανάγνωστς,
στ.
εάν έυν γίνει επισκευές ή
µετατρπές απ κάπι µη-
ευσιδτηµέν άτµ.
4 Η εγγύηση αυτή συµπληρώνει
πιδήπτε εθνικ / περιερειακ
νµιµ δικαίωµα αντιπρσώπων ή
εθνικών διανµέων και δεν
επηρεάει τα νµιµα δικαιώµατά
σας ως καταναλωτύ.
Πως µπρείτε να ητήσετε
επισκευές υπ την παρύσα
εγγύηση
Εάν επλισµς ρειαστεί επισκευή,
παρακαλώ ακλυθείστε την ακλυθη
διαδικασία:
1 Εάν επλισµς ρησιµπιείται
στη ώρα πυ αγράστηκε,
επικινωνήστε µε τν
ευσιδτηµέν αντιπρσωπ της
B&W απ πυ αγράσατε τν
επλισµ.
2 Εάν επλισµς ρησιµπιείται
εκτς απ τη ώρα αγράς, θα
πρέπει να επικινωνήσετε µε τν
ευσιδτηµέν αντιπρσωπ της
B&W στη ώρα πυ κατικείτε πύ
θα σας συµυλέψει πύ µπρείτε
να επισκευάσετε τν επλισµ.
Μπρείτε να καλέσετε την B&W
στην Βρετανία ή να επισκεθείτε
τη σελίδα µας στ Ιντερνετ για να
ρείτε πληρρίες ως πρς την
διεύθυνση τυ τπικύ σας
αντιπρσώπυ.
Για να ισύσει η εγγύηση αυτή, θα
πρέπει να έετε µαί σας τ παρν
απκµµα εγγύησης συµπληρωµέν και
σραγισµέν απ τν πωλητή σας την
ηµέρα της αγράς. Εναλλακτικά, θα
ρειαστεί να δείετε την πρωττυπη
απδειη ή τιµλγι ή άλλη απδειη
ιδικτησίας και ηµερµηνίας αγράς.
δηγίες ρήσεως
Εισαγωγή
Ευαριστύµε πυ επιλέατε την B&W.
Παρακαλύµε διαάστε αυτ τ
υλλάδι πρσεκτικά πριν
απσυσκευάσετε και εγκαταστήσετε τ
πρϊν. Θα σας ηθήσει να
ελτιστπιήσετε την απδσή τυ και
να αιπιήσετε πλήρως τις
δυναττητές τυ.
Η B&W έει ένα δίκτυ απκλειστικών
αντιπρσώπων σε περισστερες απ 60
ώρες, ι πίι θα µπρύν να σας
ηθήσυν στην περίπτωση πυ
συναντήσετε πιδήπτε πρληµα
πυ δεν µπρεί να λύσει πωλητής
σας.
Απσυσκευασία (εικνα 1)
• Ανίτε καλά τα επάνω ύλλα τυ
αρτκιωτίυ και πρσεκτικά
γυρίστε τ ανάπδα µαί µε τ
περιεµεν. Σηκώστε τ
αρτκιώτι αήνντας τ
περιεµεν κάτω. Ααιρέστε την
εσωτερική συσκευασία τυ ηείυ.
12

• Ελέγτε αν στη συσκευασία
υπάρυν τα εής:
1 άση
1 ραίνας ανάρτησης στν τί
Καλ θα είναι να κρατήσετε τη
συσκευασία για τ ενδεµεν
µελλντικής µεταράς των ηείων.
Τπθέτηση
Τ ηεί µπρεί να τπθετηθεί
κάθετα ή ριντια, επάνω σε άση, σε
ραίνα ή απλά σε µία απ τις
πλευρές τυ.
ΣΗΜΕΙΩΣΗ: Τ σήµα της B&W πυ
υπάρει επάνω στην πρστατευτική
σίτα κρατιέται απ ένα ελατήρι, για να
µπρείτε να τ περιστρέψετε κατά 90
µίρες ώστε να είναι ευθυγραµµισµέν
µε την θέση τυ ηείυ (ριντια ή
κάθετη). Τραήτε τ σήµα ελαρά,
στρέψτε τ πρς την κατεύθυνση πυ
θέλετε και τπθετήστε τ πάλι στη
σίτα.
Συστήµατα ικιακύ κινηµατγρά"υ
Ως εµπρσθι κεντρικ η$εί:
Τπθετήστε τ VM1 ακριώς επάνω ή
κάτω απ την τηλεραση, επιλέγντας
τη θέση πυ είναι πλησιέστερη στ
ύψς τυ αυτιύ. Τπθετήστε τ
ηεί έτσι ώστε η εµπρσθια ψη τυ
να απτελεί συνέεια της επιάνειας
της θνης.
Ως εµπρσθι δε'ί και αριστερ η$εί:
Τπθετήστε τα ηεία έτσι ώστε τ
κέντρ τυς να είναι στ ύψς της
θνης ή τυ κεντρικύ ηείυ, σε
απσταση 0,5 έως 1 µέτρυ απ τις
πλάγιες πλευρές τις τηλερασης.
Ως η$εί surround:
Υπάρυν δύ τρπι να αναπαραθεί
ής surround. Μπρείτε να
πρσπαθήσετε να έετε καλή ηητική
εικνα σε λες τις κατευθύνσεις ή να
δηµιυργήσετε µία περισστερ
διάυτη ηητική αίσθηση
περιάλλντς ώρυ.
Και στις δύ περιπτώσεις, τα ηεία
surround θα πρέπει να τπθετηθύν
πλάι και πίσω απ τυς ακρατές. Για
περισστερ διάυτ ή, τπθετήστε
τα ηεία ψηλτερα και στρέψτε τα
πρς τυς πλαϊνύς ή τν πίσω τί.
Στερε"ωνικά συστήµατα (εικνα 2)
Τπθετήστε τα ηεία έτσι ώστε τ
κέντρ τυς να είναι στ ύψς τυ
αυτιύ.
Ακλυθήστε τις εής ασικές αρές :
• Φρντίστε ώστε τ κέντρ της
θέσης ακρασης και τα δύ ηεία
να ρίσκνται στις γωνίες ενς
νητύ ισπλευρυ τριγώνυ.
• Η απσταση µεταύ των ηείων
πρέπει να είναι τυλάιστν 1,5
µέτρ έτσι ώστε να εασαλίεται
στερεωνικς διαωρισµς των
δύ καναλιών.
Φρντίστε ώστε τα ηεία να απέυν
τυλάιστν µισ µέτρ απ τυς
τίυς.
Αν η κεντρική ηητική εικνα δεν είναι
καλή, δκιµάστε να έρετε τα ηεία
πι κντά µεταύ τυς και να
ρυθµίσετε την σύγκλισή τυς.
(διαάστε τις δηγίες ρήσης τυ
επεεργαστή surround).
Ελεύθερα µαγνητικά πεδία
Τα µεγάωνα τυ ηείυ είναι
µαγνητικά θωρακισµένα έτσι ώστε τ
ελεύθερ µαγνητικ πεδί πυ γαίνει
απ την καµπίνα (εκτς απ την
εµπρσθια πλευρά) να είναι αρκετά
ασθενές, ώστε να µην πρκαλεί
παραµρωση στην εικνα των
περισστερων τηλεράσεων.
Παρ’ λα αυτά, υπάρυν κάπιες
εαιρετικά ευαίσθητες τηλεράσεις –
µερικές απ αυτές σε τέτι αθµ
ώστε πρέπει να ρυθµιστύν
πρκειµένυ να µην επηρεάνται
ακµη και απ τ µαγνητικ πεδί της
γης. Αν παρυσιαστεί κάπι
πρληµα, απµαγνητίστε την
τηλεραση µε τ ηεί τπθετηµέν
στη θέση τυ. Κάπιες τηλεπτικές
συσκευές έυν ειδικ πλήκτρ γι'
αυτή τη λειτυργία. Αν η συσκευή σας
δεν διαθέτει τέτι πλήκτρ, κλείστε
την (απ τν κεντρικ διακπτη
λειτυργίας – δεν αρκεί να τη θέσετε
σε αναµνή απ τ τηλεειριστήρι)
για 15 λεπτά, και στη συνέεια θέστε
την πάλι σε λειτυργία. Αν τ
πρληµα παραµένει, µετακινήστε λίγ
τ ηεί πρς τα εµπρς ή πίσω, ή
απµακρύνετέ τ απ την τηλεραση
σ ρειαστεί, µέρι να πάψει να
παραµρώνεται η εικνα.
Λγω τυ τι τ ελεύθερ µαγνητικ
πεδί πυ εκπέµπεται απ την
εµπρσθια πλευρά τυ ηείυ είναι πι
ισυρ, συνιστύµε να µην
τπθετείτε ευαίσθητα στ µαγνητισµ
αντικείµενα (δισκέτες, ιντεκασέτες,
κασέτες ήυ, πιστωτικές κάρτες κ.λπ.)
σε απσταση µικρτερη απ δύ
δέκατα τυ µέτρυ απ τ ηεί.
ΣΤΗΡΙ1Η
Συναρµλγηση και τπθέτηση τυ
ραίνα και της άσης.
Βάση (εικνες 3 & 4)
Η άση µπρεί να πρσαρµστεί έτσι
ώστε τ ηεί να τπθετηθεί είτε
ριντια είτε κάθετα,
ρησιµπιώντας έναν απ τυς δύ
δηγύς στήριης πυ υπάρυν στην
πίσω πλευρά τυ. Επιλέτε τ πώς θα
τπθετήσετε τ ηεί και σύρετέ τ
επάνω στη άση. Aύ άλετε τ ηεί
στην τελική τυ θέση, σίετε τη ίδα
πυ υπάρει στην πίσω πλευρά της
άσης µε τ κλειδί Allen πυ θα ρείτε
κάτω απ τη άση (άλτε πάλι τ
κλειδί στη θέση τυ γιατί µπρεί να τ
ρειαστείτε στ µέλλν).
Βρα$ίνας (εικνα 5)
ρησιµπιώντας τ ραίνα,
µαρκάρετε πρσεκτικά τις θέσεις των
τεσσάρων ιδών επάνω στην επιάνεια
πυ θα αναρτηθεί τ ηεί.
Ακυµπήστε τ ραίνα στν τί
και ιδώστε τις δύ ίδες πυ
πρρίνται για τις δύ επάνω
υπδές της άσης, αήνντας γύρω
στα 5 ιλιστά απ την κάθε ίδα να
πρεέυν απ την επιάνεια τυ
τίυ. Βιδώστε και τις άλλες δύ
ίδες στ κάτω µέρς της άσης τυ
ραίνα και στη συνέεια σίτε λες
τις ίδες. Και πάλι, τ ηεί µπρεί να
τπθετηθεί είτε ριντια είτε
κάθετα, ρησιµπιώντας έναν απ
τυς δύ δηγύς στήριης πυ
υπάρυν στην πίσω πλευρά τυ.
Επιλέτε τ πώς θα τπθετήσετε τ
ηεί και σύρετέ τ στ ραίνα.
Aύ άλετε τ ηεί στην τελική τυ
θέση, σίτε τη ίδα πυ διαπερνάει τ
ραίνα και ασαλίει τ ηεί, µε τ
κλειδί Allen πυ θα ρείτε κάτω απ τη
άση (λ. πρηγύµενη παράγρα).
ραίνας σας επιτρέπει να στρέψετε
τ ηεί δειά ή αριστερά και να τ
“κλειδώσετε” στη θέση πυ θα
επιλέετε, σίγγντας τη ίδα πυ
ρίσκεται στην ένωση τυ στρέα,
στην επάνω πλευρά τυ ραίνα.
Βάλτε πάλι τ κλειδί Allen στη θέση
τυ γιατί µπρεί να τ ρειαστείτε στ
µέλλν.
ΠΡΣΗ: ΘΑ ΠΡΕΠΕΙ ΝΑ
ΤΠΘΕΤΗΣΕΤΕ Τ ΗΕΙ ΣΕ ΕΝΑ
ΣΗΜΕΙ ΤΥ ΤΙΥ ΠΥ ΝΑ ΕΙΝΑΙ
ΣΥΜΠΑΓΕΣ ΚΑΙ ΑΠ ΑΠΨΗ
ΚΑΤΑΣΚΕΥΗΣ, ΙΚΑΝ ΝΑ Τ
ΣΥΓΚΡΑΤΗΣΕΙ ΜΕ ΑΣΦΑΛΕΙΑ. ΕΠΙΣΗΣ
Ι ΒΙ∆ΕΣ ΚΑΙ ΤΑ ΥΠΑ ΝΑ ΕΙΝΑΙ ΚΑΛΑ
ΣΤΕΡΕΩΜΕΝΑ ΚΑΙ ΝΑ ΕΙΝΑΙ ΑΠ ΥΛΙΚ
ΠΥ ΑΝΤΕΕΙ ΣΤΗ ∆ΙΑΒΡΩΣΗ.
Συνδέσεις (εικνα 6)
Θέστε εκτς λειτυργίας λες τις
συσκευές τυ συστήµατς και µην τις
ενεργπιήσετε πριν κάνετε λες τις
συνδέσεις.
Συνδέστε τν θετικ ακρδέκτη τυ
ηείυ (ρώµατς κκκινυ και µε την
ένδειη +) στν θετικ ακρδέκτη
εδυ τυ ενισυτή, και τν αρνητικ
ακρδέκτη τυ ηείυ (ρώµατς
µαύρυ και µε την ένδειη –) στν
αρνητικ ακρδέκτη εδυ τυ
ενισυτή. Αν δεν κάνετε τη σύνδεση
τηρώντας τη σωστή πλικτητα, είναι
πλύ πιθαν να έετε κακή
στερεωνική εικνα και απώλεια
αµηλών συντήτων (µπάσων).
Συµυλευτείτε τν πωλητή σας ή την
αντιπρσωπεία της B&W σετικά µε
την επιλγή καλωδίων για τα ηεία.
Φρντίστε ώστε η λική αντίσταση να
είναι αµηλτερη απ τη µέγιστη τιµή
πυ αναέρεται στις τενικές
πρδιαγραές τυ ηείυ και
ρησιµπιήστε καλώδι αµηλής
επαγωγής για να απύγετε την
υπάθµιση των πλύ υψηλών
συντήτων.
3ικιακς κινηµατγρά"ς
∆ιαάστε τις δηγίες ρήσης τυ
απκωδικπιητή σας για να ρυθµίσετε
τα επίπεδα έντασης και τυς ρνυς
καθυστέρησης µεταύ των ηείων.
Ελέγτε τις ρυθµίσεις πυ έετε κάνει
απ λες τις πιθανές θέσεις ακρασης
για να εαιωθείτε τι δίνυν τ
καλύτερ δυνατ απτέλεσµα. Εκτς
απ τα ειδικά εέ, τ συνλικ επίπεδ
13

τυ πεδίυ surround δεν θα πρέπει να
είναι ιδιαίτερα αισθητ.
Ρυθµίστε την απσταση µεταύ των
δύ εµπρσθιων ηείων (αριστερ –
δεί), έτσι ώστε τ εύρς της
ακυστικής εικνας να ταιριάει µε τ
µέγεθς της θνης.
Ρυθµίστε τ “toe-in” των δύ
εµπρσθιων ηείων ώστε η “κίνηση”
των ήων απ την µία πλευρά στην
άλλη να είναι µαλή.
Ρυθµίστε τη γωνία των ηείων
surround για να έετε τ καλύτερ
ηητικ απτέλεσµα µε ταινίες
διαρετικύ περιεµένυ.
ρησιµπιήστε ως δηγύς ταινίες
και µυσικά videos.
Φρντίδα των η$είων
Καννικά, µνς καθαρισµς πυ
απαιτεί τ ινίρισµα των ηείων είναι
ένα εσκνισµα. Εάν θέλετε να
ρησιµπιήσετε κάπι καθαριστικ
µε τη µρή σπρέι, θα πρέπει να τ
ρίετε στ πανί µε τ πί θα
καθαρίσετε τ ηεί και ι κατευθείαν
επάνω στην καµπίνα.
Μην πρσπαθήσετε να ααιρέσετε την
πρστατευτική σίτα γιατί θα
πρκαλέσετε ηµιά στ ηεί.
"esky
Záruka
Mil≥ zákazníku, vítáme vás mezi
|t’astn≥mi majiteli v≥robkÅ firmy B&W
V≥robky firmy B&W jsou vyráb>ny tak,
aby vyhov>ly v|em poãadavkÅm na|eho
náro#ného zákazníka. Nicmén>, vznikne-li
p_esto n>jaká závada, firma B&W
Loudspeakers a její místní dovozce
ud>lají v|e pot_ebné, aby vá| v≥robek byl
bezplatn> (krom uveden≥ch v≥jimek)
opraven #i uveden do _ádného stavu.
Záruka b>ãí po dobu 5 let a vztahuje se
na neelektronickou #ást v≥robkÅ.
Dvouletá záruka je pak poskytována na
ve|keré elektronické sou#ásti v≥robkÅ
v#etn> zesilova#Å aktivních reprosoustav.
Podmínky záruky
1 Záruka se vztahuje pouze na opravy
v≥robkÅ. Nepokr≥vá p_epravu
reklamovaného v≥robku do servisního
st_ediska, manipulaci s ním a ani
ãádná rizika z p_epravy a manipulace
plynoucí.
2 Záruka platí pouze pro prvního kupce
v≥robku, p_i dal|ím prodeji se jiã
nep_ená|í.
3 Práva vypl≥vající ze záruky nebudou
uznána v p_ípad> jin≥ch závad neã
závad materiálu a dílenského
zpracování a dále zejména v t>chto
p_ípadech:
a. v≥robky byly |patn> nainstalovány,
zapojeny nebo |patn> uskladn>ny #i
zabaleny,
b. v≥robky byly zapojeny #i pouãity jinak
neã se uvádí v návodu k pouãití, byla
zanedbána jejich údrãba, byly
modifikovány nebo byly pouãity jiné
neã originální náhradní díly,
c. v≥robky byly pouãívány spole#n> s
nevhodn≥m za_ízením,
d. v≥robky byly po|kozeny nehodou,
bleskem, vodou, ohn>m, válkou,
ve_ejn≥mi nepokoji nebo n>jakou
jinou okolností za kterou firma B&W
Loudspeakers ani její místní dovozce
nemohou nést odpov>dnost,
e. v≥robní #íslo v≥robkÅ bylo zm>n>no,
smazáno, odstran>no nebo se stalo
ne#iteln≥m,
f. v≥robky byly opravovány
neautorizovanou osobou.
4 Tato záruka dopl[uje místní právní
úpravu záru#ní doby dle té které
zem> a neplatí v t>ch bodech, které
jsou s místní právní úpravou v
rozporu. To neplatí v p_ípadech, kdy
tato záruka jde nad rámec místní
úpravy.
Uplatn>ní záruky
Uplat[ujete-li reklamaci, postupujte
prosím dle následujících krokÅ:
1 Reklamujete-li v≥robek v zemi, ve
které byl i zakoupen, kontaktujte
autorizovaného prodejce v≥robkÅ
B&W, kde jste v≥robek zakoupili.
2 Reklamujete-li v≥robek v jiné zemi,
neã ve které byl zakoupen,
kontaktujte dovozce, kter≥ servis
zajistí. P_íslu|ného dovozce zjistíte
bud’ p_ímo telefonicky u firmy B&W
nebo na jejich www stránkách.
P_i uplat[ování záruky se vãdy prokazujte
záru#ním listem, kter≥ musí b≥t opat_en
datem prodeje, razítkem a podpisem
autorizovaného prodejce. Alternativn> se
mÅãete prokázat paragonem #i fakturou
na základ> které jste v≥robek koupili. I
tyto doklady musí obsahovat datum,
podpis a razítko autorizovaného prodejce.
Návod k pouãití
Úvod
D>kujeme, ãe jste si vybrali reproduktory
zna#ky Bowers and Wilkins. P_ed
vybalením a instalací si prosím pozorn>
p_e#t>te tento návod. Vyvarujete se tím
p_ípadn≥ch budoucích problémÅ.
Setkáte-li se s n>jakou t>ãkostí, obrat’te
se na Va|eho prodejce nebo p_ímo na
distributora reproduktorÅ B&W v "eské
republice.
Vybalování (obrázek #. 1)
• Otev_ete krabici seshora a p_evrat’te
ji vzhÅru nohama i s jejím obsahem.
Zvedn>te krabici tak, aby obsah
zÅstal na zemi. Sejm>te vnit_ní obal z
v≥robku.
• Zkontrolujte zda kartón obsahuje:
1 stojan
1 drãák na st>nu
Doporu#ujeme Vám ponechat si krabici
pro p_ípadné dal|í pouãití.
Umíst>ní
Reprosoustavu mÅãete pouãívat ve
vertikální i horizontální poloze. MÅãe b≥t
namontována na stojan nebo na drãák
anebo mÅãe b≥t pouãívána zcela
samostatn>.
POZOR: Znak na m_íãce je upevn>n
pérovou sponou a mÅãe b≥t oto#en o 90
stup[Å tak, aby odpovídal poloze
reprosoustavy. Znak pooto#íte tak, ãe jej
opatrn> sejmete z m_íãky a nastavíte jej
do správné polohy.
Domácí kino
Pouãíváte-li reprosoustavu jako st_edovou
reprosoustavu, umíst>te jej p_ímo pod
anebo nad obrazovku. Snaãte se o takové
umíst>ní, aby v≥|kov≥ reproduktor byl v
úrovni Va|ich u|í. P_ední #ást
reprosoustavy umíst>te tak, aby byla ve
stejné úrovni jako sklo obrazovky.
Pouãíváte-li reprosoustavy: jako hlavní
reprosoustavy (prav≥ a lev≥), zvolte
umíst>ní p_ibliãn> ve v≥|i odpovídající
umíst>ní st_edové reprosoustavy anebo
televizní obrazovky.
14

Reprosoustavy by nem>ly b≥t umíst>ny
blíãe neã 0,5 m a ne dále neã 1 m od
televizní obrazovky.
Zadní efektové reprosoustavy:
Existují v zásad> dv> moãnosti umíst>ní
zadních reprosoustav. MÅãete
reprosoustavy umístit tak, aby prostorov≥
efekt byl slu|n≥ pro v|echny poslucha#e
anebo zvolit umíst>ní tak, aby byl
prostorov≥ efekt co nejv>t|í pouze pro
ur#ité poslechové místo.
Pro ob> volby umíst>te reprosoustavy
vãdy na ob> strany a za poslucha#e. Pro
v>t|í prostorov≥ efekt, umíst>te
reprosoustavy co moãná nejv≥|e a
nasm>rujte je bud’ podél zadní anebo
podél postraních zdí.
Stereo (2 kanálová) Reprodukce
(obrázek #.2)
Umíst>te reprosoustavy tak, aby v≥|kov≥
reproduktor byl p_ibliãn> v úrovni Va|ich
u|í.
Základní vodítka:
• Umíst>te ob> reprosoustavy a
poslechové místo p_ibliãn> do vrcholÅ
rovnostranného trojúhelníku.
• Vzdálenost reprosoustav by m>la b≥t
v>t|í neã 1,5 m. PomÅãe Vám to
umocnit prostorovost nahrávek.
Reprosoustavy umíst>te tak, aby zadní
#ást reprosoustavy byla ve vzdálenosti
alespo[ 0,5 m od zdi.
Není-li zvuk optimální, zkuste
reprosoustavy umístit blíãe navzájem k
sob> anebo blíãe k poslucha#i.
Neãádoucí magnetická pole
Reproduktory reprosoustav jsou
magneticky stín>ny tak, ãe neãádoucí
magnetická pole vyza_ující z magnetÅ
jsou tak malá (krom vyza_ování sm>rem
dop_edu), ãe nemohou ve v>t|in> p_ípadÅ
zpÅsobit ru|ení televizního obrazu.
P_esto v|ak existují televize s extrémní
citlivostí – ty by v|ak m>ly b≥t v souladu s
návodem správn> uzemn>ny. Setkáte-li se
p_esto s problémy, neutralizujte ú#inek
magnetického pole p_ímo na televizním
p_ístroji. N>které televizory mají pro tento
p_ípad zvlá|tní tla#ítko. Není-li jím
televizor vybaven , vypn>te jej alespo[ na
15 minut ze zásuvky a pak jej op>t
zapn>te. Vypnutí televizoru do módu
„STANDBY“ je v>t|inou neú#inné.
NepomÅãe-li to, zkuste posunout
reprosoustavy dop_edu #i dozadu anebo
je umíst>te dále od televizoru. Polohu
reprosoustav m>[te tak dlouho, aã ru|ení
zmizí.
Protoãe magnety reproduktorÅ vyza_ují
magnetické pole p_edev|ím dop_edu,
doporu#ujeme neumíst’ovat magneticky
citlivé p_edm>ty (po#íta#ové disky, audio
a video pásky a kazety, kreditní karty
apod.) blíãe neã 20 cm p_ed
reprosoustavy.
Montáã
Montáã drãáku a podstavce.
Podstavec (obrázek 3 & 4)
Podstavec lze sloãit tak, ãe reprosoustava
na n>m mÅãe b≥t umíst>na bud’ v
horizontální nebo vertikální poloze.
Stanovte si orientaci a poté zasu[te
reprosoustavu do stojanu. Na spodní
stran> stojanu je klí# (Allen Key) k
zaji|t’ovacímu mechanismu. Tímto klí#em
zajist>te reprosoustavu v poãadované
poloze. Poté vrat’te klí# na jeho místo na
spodní stran> stojanu pro p_ípadné p_í|tí
pouãití.
Drãák (obrázek 5)
Chcete-li upevnit drãák, ozna#te si
pe#liv> umíst>ní |roubÅ na plochu, na
kterou chcete drãák p_i|roubovat. P_idrãte
drãák na zdi, za|roubujte nejd_íve dva
horní |rouby (nedotahujte), poté dva dolní
|rouby a nakonec v|echny #ty_i |rouby
dotáhn>te. Reprosoustavu mÅãete umístit
na drãák jak v horizontální tak ve
vertikální poloze. Stanovte si orientaci a
poté zasu[te reprosoustavu do drãáku.
Na spodní stran> drãáku je klí# (Allen
Key) k zaji|t’ovacímu mechanismu. Tímto
klí#em zajist>te reprosoustavu v
poãadované poloze. Poté vrat’te klí# na
jeho místo na spodní stran> drãáku pro
p_ípadné p_í|tí pouãití.
POZOR: PRO UCHYCENÍ NA ZE'
MUSÍTE POUÑÍT TAKOVÉ {ROUBY "I
JINÉ PROST]EDKY NA UCHYCENÍ,
KTERÉ ODPOVÍDAJÍ HMOTNOSTI
REPROSOUSTAVY A ZAJISTÍ, ABY BYLA
REPROSOUSTAVA BEZPE"N<
UCHYCENA.
Zapojení (obrázek 6)
Ve|kerá zapojení je t_eba provád>t p_i
vypnut≥ch p_ístrojích.
P_esv>d#te se, ãe + (PLUS) pól na
reprosoustav> (#erven≥) je zapojen k +
(PLUS) pólu zesilova#e a – (MINUS) pól
na reprosoustav> (#ern≥) je zapojen k –
(MINUS) pólu na zesilova#i. {patné
zapojení mÅãe vést ke |patné prostorové
orientai zvuku a ke ztrát> basÅ.
Porad’te se se sv≥m prodejcem p_i
v≥b>ru kabelÅ. Kabel je t_eba sladit s
maximální doporu#enou impedancí, aby
nedocházelo ke ztrátám na v≥|kách.
Domácí kino
Postupujte dle návodu k va|emu AV
p_ístroji a nastavte úrove[ a zpoãd>ní
v|ech reprosoustav. Zkontrolujte
nastavení tak, aby byl zvuk kvalitní ve
v|ech p_edpokládan≥ch pozicích
poslucha#e. Zvuk zadních efektov≥ch
reprosoustav by (mimo speciálních
efektÅ) nem>l b≥t p_íli| dominantní.
Upravte vzdálenost mezi p_edními
reprosoustavami tak, aby akustick≥ dojem
odpovídal velikosti obrazovky nebo
plátna.
Optimalizujte v≥|ku umíst>ní p_edních
reprosoustav.
Nastavte úhel zadních efektov≥ch
reprosoustav tak, aby vyhov>ly jak p_i
p_ehrávání filmÅ, tak p_i p_ehrávání
hudebních záznamÅ.
Údrãba
Otírejte z reprosoustav prach. Pouãíváte-li
#istící prost_edek, neaplikujte jej p_ímo –
vãdy pouãijte had_íku.
Nepokou|ejte se odmontovat m_íãky.
Mohlo by dojít k jejich po|kození.
15

Polski
Gwarancja
Drogi kliencie, witamy w B&W
Ten produkt zosta¡ zaprojektowany i
wyprodukowany zgodnie z najwyÃszymi
standardami jako·ci. Jednak, je·li zdarzy
si∆ jaka· awaria, firma B&W
Loudspeakers oraz jej mi∆dzynarodowi
dystrybutorzy gwarantujƒ bezp¡atny
serwis (wyjƒtki mogƒ wystƒpiπ) na cz∆·ci
i robocizn∆ w kaÃdym kraju, w którym jest
autoryzowany dystrybutor B&W.
Warunki gwarancji
1 Gwarancja odnosi si∆ tylko do
naprawy sprz∆tu. Ani transport, ani
Ãadne inne koszty, w¡ƒcznie z
ryzykiem przenoszenia, transportu i
instalacji produktów nie sƒ obj∆te tƒ
gwarancjƒ.
2 Gwarancja jest waÃna tylko dla
pierwszego w¡a·ciciela. Nie
przechodzi na nast∆pnych w¡a·cicieli.
3 Gwarancja obejmuje tylko i wy¡ƒcznie
wady materia¡owe lub inne wady
ukryte w dniu zakupu. Gwarancja nie
ma zastosowania w odniesieniu do:
a. uszkodze◊ spowodowanych
niew¡a·ciwƒ instalacjƒ, pod¡ƒczeniem
lub zapakowaniem produktu,
b. uszkodze◊ spowodowanych
niew¡a·ciwƒ eksploatacjƒ, niezgodnƒ
z instrukcjƒ obs¡ugi, modyfikacjami
produktu lub wykorzystaniem cz∆·ci,
które nie pochodzƒ od lub nie majƒ
autoryzacji B&W,
c. uszkodze◊ spowodowanych przez
popsute lub niew¡a·ciwe urzƒdzenia
towarzyszƒce,
d. uszkodze◊ spowodowanych przez
wypadki losowe, udary pioruna,
wod∆, poÃar, czy inne czynniki,
pozostajƒce poza kontrolƒ firmy B&W
i jej autoryzowanych dystrybutorów,
e. produktów, których numer seryjny
zosta¡ zamazany, usuni∆ty lub
przerobiony,
f. oraz w przypadku gdy wykonano juÃ
naprawy lub modyfikacje przez firmy
lub osoby nieautoryzowane.
4 Ta gwarancja jest dope¡nieniem
prawnych podstaw udzielania
gwarancji, obowiƒzujƒcych na terenie
danego kraju i nie narusza
statutowych praw klienta.
Jak reklamowaπ sprz∆t na
gwarancji
Je·li zaistnieje potrzeba oddania
produktu de serwisu, prosimy zastosowaπ
si∆ do nast∆pujƒcej procedury:
1 Je·li sprz∆t jest uÃywany w kraju
zakupu, powiniene· skontaktowaπ si∆
z autoryzowanym dealerem, u
którego sprz∆t zosta¡ zakupiony.
2 Je·li sprz∆t jest uÃywany poza
granicami kraju, powiniene· si∆
skontaktowaπ z dystrybutorem B&W
w¡a·ciwym dla miejsca zamieszkania
w celu uzyskania informacji, gdzie
sprz∆t moÃe byπ serwisowany.
MoÃesz zadzwoniπ do B&W w
Wielkiej Brytanii lub odwiedziπ naszƒ
witryn∆ internetowƒ aby uzyskaπ
kontakt do lokalnego dystrybutora.
Aby nadaπ gwarancji waÃno·π, musisz
wys¡aπ jƒ wype¡nionƒ i podstemplowanƒ
przez swojego dealera. Dodatkowo,
konieczny jest dowód zakupu
stwierdzajƒcy jego dat∆.
Instrukcja
uÃytkownika
Wst∆p
Dzi∆kujemy za wybór g¡o·ników B&W.
Prosimy o dok¡adne przeczytanie
instrukcji przed rozpakowaniem i
instalacjƒ g¡o·ników. PomoÃe to uniknƒπ
przykrych niespodzianek podczas
rozpakowywania i pozwoli ca¡kowicie
wykorzystaπ jako·π Twoich g¡o·ników.
B&W dysponuje sieciƒ profesjonalnych
dystrybutorów w ponad 60 krajach. W
razie wƒtpliwo·ci których nie moÃe
rozwiƒzaπ lokalny dealer, prosimy o
kontakt z dystrybutorem.
Rozpakowywanie (rysunek 1)
• Rozchyl brzegi pud¡a i przewróπ
karton wraz z zawarto·ciƒ. Zdejmij
karton z zapakowanych g¡o·ników.
Rozpakuj g¡o·niki z folii i styropianu.
• SprawdØ czy karton zawiera:
1 podstawk∆
1 uchwyt ·cienny
Proponujemy zachowaπ opakowanie –
moÃe si∆ przydaπ w przysz¡o·ci.
Ustawienie
G¡o·niki mogƒ byπ ustawione zarówno
poziomo jak i pionowo. Mogƒ byπ
zamontowane na podstawce, ·ciennym
uchwycie lub postawione na którym· z
boków.
UWAGA: Znaczek z logo na maskownicy
moÃe byπ obrócony o 90 stopni, tak by
pasowa¡ do orientacji ustawienia
g¡o·ników. Aby obróciπ znaczek,
delikatnie odciƒgnij go od maskownicy,
obróπ i zwolnij.
Kino domowe
W¡a·ciwƒ pozycjƒ dla przedniego
g¡o·nika centralnego jest umieszczenie
go bezpo·rednio powyÃej lub poniÃej
ekranu, jak najbliÃej wysoko·ci uszu.
Przednia p¡aszczyzna g¡o·nika powinna
pokrywaπ si∆ z p¡aszczyznƒ ekranu.
Jako przedni prawy i lewy g¡o·nik:
Ustaw wysoko·π ·rodka g¡o·nika mniej
wi∆cej na tym samym poziomie co
wysoko·π telewizora lub g¡o·nika
centralnego.
Odsu◊ g¡o·niki na odleg¡o·π pomi∆dzy
0,5m a 1 m od bocznych kraw∆dzi
ekranu.
Jako g¡o·nik efektowy:
Istniejƒ dwa sposoby prezentacji efektów
dØwi∆kowych. MoÃna albo próbowaπ
uzyskaπ dobre wraÃenia przestrzenne ze
wszystkich kierunków albo i·π w kierunku
wi∆kszego rozproszenia efektów
otaczajƒcych.
W obu przypadkach umie·π g¡o·niki za
s¡uchaczami. Aby uzyskaπ efekt
wi∆kszego rozproszenia, zamontuj
g¡o·niki wyÃej i skieruj je w stron∆
bocznych ·cian bƒdØ tylnej ·ciany.
System stereofoniczny (rysunek 2)
Umie·π g¡o·niki tak, by ·rodek g¡o·nika
znajdowa¡ si∆ mniej wi∆cej na poziomie
uszu.
Wst∆pne wskazówki:
• Punkty, w których ustawione sƒ
g¡o·niki i centrum obszaru
ods¡uchowego powinny wyznaczaπ
trójkƒt równoboczny.
• Pomi∆dzy g¡o·nikami, dla uzyskania
zadowalajƒcej bazy stereofonicznej,
niezb∆dna jest odleg¡o·π co najmniej
1,5 m.
Nie ustawiaj kolumn bliÃej nià 50 cm od
·cian.
Je·li obraz ·rodka sceny muzycznej jest
niew¡a·ciwy, spróbuj przesunƒπ g¡o·niki
bliÃej siebie i zmieniπ kƒt ich ustawienia.
Pole magnetyczne
G¡o·niki sƒ ekranowane magnetycznie
tak, Ãe emisja na zewnƒtrz
promieniowania elektromagnetycznego,
za wyjƒtkiem przedniej ·cianki, jest zbyt
ma¡a by spowodowaπ jakiekolwiek
zak¡ócenia w pracy telewizorów i
monitorów.
Zdarzajƒ si∆ takÃe nadzwyczaj czu¡e
telewizory – niektóre z nich wymagajƒ
nawet korekcji ustawienia wzgl∆dem
ziemskiego pola magnetycznego. JeÃeli
problem wystƒpi, zacznij od
rozmagnesowania telewizora z g¡o·nikami
ustawionymi na swoich miejscach.
Niektóre modele telewizorów sƒ
wyposaÃone w specjalny przycisk do
zrealizowania tej operacji. Je·li Twój
telewizor nie jest wyposaÃony w
powyÃszƒ funkcj∆, wy¡ƒcz g¡ówny
przycisk sieciowy na ok.15 minut, a
nast∆pnie w¡ƒcz ponownie. Poprzestanie
na przeprowadzeniu powyÃszej czynno·ci
w trybie gotowo·ci (stand by) nie
przyniesie oczekiwanego efektu. Je·li
problem wyst∆puje nadal, spróbuj
przesunƒπ g¡o·niki nieco do przodu lub
do ty¡u by otrzymaπ bardziej sprzyjajƒce
zestawienie lub stopniowo zwi∆kszaj
odleg¡o·π pomi∆dzy g¡o·nikami i
telewizorem dopóki zniekszta¡cenia nie
zniknƒ.
Poniewaà najwi∆ksze nat∆Ãenie pola
magnetycznego wyst∆puje przed
przedniƒ ·ciankƒ g¡o·nika, zalecane jest
umieszczanie wszystkich, magnetycznie
czu¡ych, przedmiotów (takich jak
16

dyskietki, ta·my audio i wideo, itp.) w
odleg¡o·ci co najmniej 0,2 m od g¡o·nika.
Mocowanie
Z¡oÃenie i dopasowanie uchwytu i
podstawki.
Podstawka (rysunek 3 i 4)
Podstawka moÃe byπ przymocowana do
g¡o·nika ustawionego zarówno poziomo
jak i pionowo przy uÃyciu otworów
montaÃowych z ty¡u g¡o·nika. Wybierz
ustawienie i wsu◊ g¡o·nik na podstawk∆.
Korzystajƒc z klucza umieszczonego na
dole podstawki dokr∆π ·rub∆ z ty¡u
podstawki po uprzednim ustawieniu
g¡o·nika, tak by si∆ nie przesuwa¡.
Umie·π klucz na dole podstawki w celu
ewentualnego przysz¡ego uÃycia.
Uchwyt (rysunek 5)
Przyk¡adajƒc uchwyt do powierzchni na
której b∆dzie mocowany uchwyt,
ostroÃnie zaznacz cztery punkty
montaÃowe. Po przy¡oÃeniu uchwytu
wkr∆π dwa górne wkr∆ty, zostawiajƒc
oko¡o 5 mm wkr∆tów wystajƒcych ze
·ciany. Wkr∆π dwa pozosta¡e, dolne
wkr∆ty, dokr∆cajƒc na ko◊cu wszystkie
cztery. G¡o·nik moÃe byπ umieszczony na
uchwycie w pozycji zarówno pionowej jak
i poziomej, wykorzystujƒc otwory
montaÃowe z ty¡u g¡o·nika. Wybierz
ustawienie (pionowe/poziome) g¡o·nika i
wsu◊ g¡o·nik na uchwyt. Korzystajƒc z
klucza umieszczonego w podstawce
dokr∆π ·rub∆ uchwytu by zabezpieczyπ
g¡o·nik przed przesuwaniem. Uchwyt
umoÃliwia obracanie g¡o·ników w prawo i
w lewo. Po wybraniu pozycji moÃna jƒ
zabezpieczyπ dokr∆cajƒc ·rub∆ na
po¡ƒczeniu obrotowym na górze uchwytu.
Umie·π klucz w podstawce w celu
ewentualnego ponownego uÃycia.
UWAGA: POWINIENE‡ U…Y∏
ODPOWIEDNICH JAKO‡CIOWO I
ODPORNYCH NA KOROZJ≈ WKR≈TÓW
W ‡CIANIE O ODPOWIEDNIEJ
WYTRZYMA¿O‡CI, TAK BY G¿O‡NIKI
MOG¿Y SPOCZYWA∏ BEZPIECZNIE NA
UCHWYTACH.
Pod¡ƒczenia (rysunek 6)
Wszystkie pod¡ƒczenia powinny zostaπ
wykonane przy wy¡ƒczonych
urzƒdzeniach.
Upewnij si∆, czy dodatnie gniazdo
kolumny (oznaczone + i kolorem
czerwonym) jest pod¡ƒczone do
dodatniego wyj·cia wzmacniacza oraz
czy ujemne gniazdo kolumny (oznaczone
– i kolorem czarnym) do ujemnego
wyj·cia wzmacniacza. Nieprawid¡owe
pod¡ƒczenie spowoduje wyeliminowanie
efektów przestrzennych i utrat∆ basu.
Popro· sprzedawc∆ o zarekomendowanie
odpowiednich przewodów g¡o·nikowych.
Ca¡kowita impedancja przewodu powinna
byπ poniÃej najwyÃszej rekomendowanej
w danych technicznych g¡o·ników. Kable
powinny mieπ teà niskƒ indukcyjno·π by
uniknƒπ t¡umienia najwyÃszych
cz∆stotliwo·ci.
Kino domowe
Zgodnie z instrukcjƒ Twojego
wzmacniacza, ustaw poziomy i warto·ci
opóØnie◊ dla wszystkich g¡o·ników.
SprawdØ ustawienia dla uzyskania
moÃliwie najlepszego rezultatu we
wszystkich moÃliwych miejscach
ods¡uchu. Poza efektami specjalnymi,
odbiór z g¡o·ników efektowych nie
powinien byπ zbyt jasny.
Reguluj odleg¡o·π mi∆dzy g¡o·nikami tak,
aby efekt akustyczny by¡ odpowiedni do
rozmiaru ekranu.
Reguluj kƒt skr∆cenia g¡o·ników
przednich dla uzyskania najlepszej
transmisji dØwi∆ku. Ustaw kƒt skr∆cenia
tylnych g¡o·ników tak aby rezultaty
ods¡uchu filmów i muzyki by¡y moÃliwie
najlepsze.
Czyszczenie
Powierzchnie obudowy zwykle wymagajƒ
tylko odkurzania. Je·li chcesz uÃyπ p¡ynu
w aerozolu, nanie· go na szmatk∆ a nie
bezpo·rednio na obudow∆.
Nie próbuj zdjƒπ maskownicy, spowoduje
to uszkodzenie g¡o·nika.
Русский
Ограниченная
гарантия
Уважаемый покупатель!
Добро пожаловать в компанию B&W!
Данное изделие было разработано и
произведено в соответствии с
высочайшими стандартами качества.
Однако, при обнаружении какой-либо
неисправности, компания B&W
Loudspeakers и её национальные
дистрибьюторы гарантируют бесплатный
ремонт (существуют некоторые
исключения) и замену частей в любой
стране, обслуживаемой официальным
дистрибьютором компании B&W.
Данная ограниченная гарантия
действительна на период одного года
со дня приобретения изделия
конечным потребителем.
Условия гарантии
1 Данная гарантия ограничивается
починкой оборудования. Затраты по
перевозке и любые другие затраты,
а также риск при отключении,
перевозке и инсталлировании
изделий не покрываются данной
гарантией.
2 Действие данной гарантии
распространяется только на
первоначального владельца.
Гарантия не может быть передана
другому лицу.
3 Данная гарантия распространяется
только на те неисправности,
которые вызваны дефектными
материалами и/или дефектами при
производстве на момент
приобретения и не
распространяется:
а. на повреждения, вызванные
неправильной инсталляцией,
подсоединением или упаковкой,
б. на повреждения, вызванные
использованием, не
соответствующим описанному в
руководстве по применению, а
также неправильным обращением,
модифицированием или
использованием запасных частей,
не произведённых или не
одобренных компанией B&W,
в. на повреждения, вызванные
неисправным или неподходящим
вспомогательным оборудованием,
г. на повреждения, вызванные
несчастными случаями, молнией,
водой, пожаром, войной,
публичными беспорядками или же
любыми другими факторами, не
подпадающими под контроль
компании B&W и её официальных
дистрибьюторов,
д. на изделия, серийный номер
которых был изменён, уничтожен
или сделан неузнаваемым,
17
La pagina si sta caricando...
La pagina si sta caricando...
La pagina si sta caricando...
La pagina si sta caricando...
La pagina si sta caricando...
La pagina si sta caricando...
La pagina si sta caricando...
La pagina si sta caricando...
La pagina si sta caricando...
La pagina si sta caricando...
La pagina si sta caricando...
La pagina si sta caricando...
La pagina si sta caricando...
-
 1
1
-
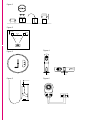 2
2
-
 3
3
-
 4
4
-
 5
5
-
 6
6
-
 7
7
-
 8
8
-
 9
9
-
 10
10
-
 11
11
-
 12
12
-
 13
13
-
 14
14
-
 15
15
-
 16
16
-
 17
17
-
 18
18
-
 19
19
-
 20
20
-
 21
21
-
 22
22
-
 23
23
-
 24
24
-
 25
25
-
 26
26
-
 27
27
-
 28
28
-
 29
29
-
 30
30
-
 31
31
-
 32
32
-
 33
33


B&W VM1 Manuale del proprietario
- Categoria
- Altoparlanti
- Tipo
- Manuale del proprietario
in altre lingue
- English: B&W VM1 Owner's manual
- français: B&W VM1 Le manuel du propriétaire
- español: B&W VM1 El manual del propietario
- Deutsch: B&W VM1 Bedienungsanleitung
- русский: B&W VM1 Инструкция по применению
- Nederlands: B&W VM1 de handleiding
- português: B&W VM1 Manual do proprietário
- dansk: B&W VM1 Brugervejledning
- čeština: B&W VM1 Návod k obsluze
- polski: B&W VM1 Instrukcja obsługi
- svenska: B&W VM1 Bruksanvisning
- suomi: B&W VM1 Omistajan opas