Hoover HOD 7 ALU-S Manuale utente
- Categoria
- Lavastoviglie
- Tipo
- Manuale utente
Questo manuale è adatto anche per

Guida pratica all’uso
User instructions
Mode d’emploi
Bedienungsanleitung
Instruções de utilização
Instrucciones para el uso
LAVASTOVIGLIE
DISHWASHER
LAVE-VAISSELLE
GESCHIRRSPÜLER
MÁQUINA DE LAVAR LOIÇA
LAVAVAJILLAS
IT
EN
FR
DE
PT
ES
®
HOD 7
HOD 7 ALU

3
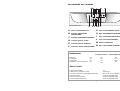
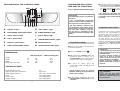
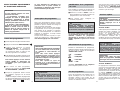
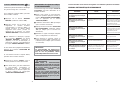
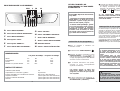
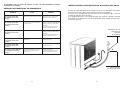
DESCRIZIONE DEI COMANDI
Coperti (EN 50242)
Capacità con pentole e piatti
Pressione ammessa nell'impianto idraulico
Ampere fusibile
Potenza max assorbita
Tensione d’alimentazione
15
9 persone
Min. 0,08 - Max 0,8 MPa
(vedere targhetta dati)
(vedere targhetta dati)
(vedere targhetta dati)
A Tasto "AVVIO/ARRESTO"
B Pulsante “SELEZIONE
PROGRAMMA”
C Pulsante "PARTENZA DIFFERITA"
D Pulsante opzione "5 IN 1"
E Pulsante opzione "ENERGY"
F Pulsante "AVVIO PROGRAMMA"
G Spia "ESAURIMENTO SALE"
H
Spia "ESAURIMENTO BRILLANTANTE"
I Spia “PARTENZA DIFFERITA”
L Spie "FASI PROGRAMMA"
M DISPLAY DIGITALE
N Spie "SELEZIONE OPZIONE"
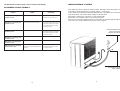
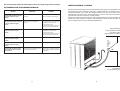
Altezza
Profondità
Larghezza
Ingombro con porta aperta
cm
cm
cm
cm
con piano lavoro
85
60
60
120
DATI TECNICI:
senza piano lavoro
82
57,3
59,8
117
DIMENSIONI:
ABCD EF
M N
L
HI G

5
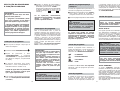
Modifica di un programma in
corso
Se si vuole cambiare o annullare un pro-
gramma già in corso, procedere nel
seguente modo:
■ Tenere premuto per almeno 5 secondi il
pulsante "START" (il programma in
corso verrà annullato).
■ A questo punto sarà possibile impostare
un nuovo programma.
ATTENZIONE!
Prima di far partire un nuovo pro-
gramma, è bene accertarsi che non
sia già stato asportato il detersivo; se lo
fosse, ripristinare la dose nel contenitore.
Nel caso d’interruzione di corrente, la
lavastoviglie conserverà in memoria il
programma in fase di svolgimento che
verrà ripreso, dal punto in cui era stato
interrotto, non appena sarà ripristinata
l’alimentazione elettrica.
Svolgimento del programma
Durante lo svolgimento del programma, nel
display viene visualizzato il tempo rima-
nente a fine ciclo e le 4 spie di visualizza-
zione “FASI PROGRAMMA”:
= “LAVAGGIO”
= “RISCIACQUO”
= “ASCIUGATURA”
STOP = “FINE”
si illumineranno singolarmente e sequen-
zialmente per indicare la fase in corso.
Fine del programma
La fine del programma verrà indicata tramite
un segnale acustico (se non disattivato) della
durata di 5 secondi, ripetuto per 3 volte ad
intervalli di 30 secondi. La spia di fine pro-
gramma si illuminerà ed il display si spegnerà.
Sarà quindi possibile prelevare le stoviglie
appena lavate e spegnere la lavastoviglie
premendo il tasto "AVVIO/ARRESTO",
oppure effettuare un nuovo carico per un
altro ciclo di lavaggio.
Pulsanti opzione
IMPORTANTE
Le opzioni eventualmente scelte
DEVONO essere attivate o disattivate,
PRIMAdi premere il pulsante “START”.
Pulsante "5 IN 1"
Questa opzione permette l'utilizzo ottimale
dei detersivi combinati ("3 in 1"/"4 in 1"/
"5 in 1"). Premendo questo pulsante, il pro-
gramma di lavaggio impostato viene modi-
ficato in modo da ottenere la migliore pre-
stazione dai detersivi combinati; inoltre, ven-
gono disattivati gli indicatori di mancanza sale
e brillantante.
ATTENZIONE!
Una volta selezionata, l’opzione resta
attiva (spia corrispondente accesa)
anche per successivi programmi di
lavaggio e potrà essere disattivata
(spia corrispondente spenta) solo pre-
mendo nuovamente il relativo pulsante.
IMPORTANTE
Con questa opzione attivata, la durata
del programma "RAPIDO" viene
prolungata di circa 10 minuti.
Pulsante "ENERGY"
Premendo questo pulsante si aumenta
l’intensità del ciclo scelto, aggiungendo un
risciacquo e, dove previsto, aumentando la
temperatura e la pressione dell’acqua nella
fase di lavaggio.
Il pulsante "ENERGY" permette di aggre-
dire con maggior forza gli sporchi difficili,
garantendo sempre i migliori risultati.
E’ consigliato per stoviglie molto sporche o
quando, non effettuando subito il lavaggio,
lo sporco è diventato secco.
4
SCELTA DEL PROGRAMMA
E FUNZIONI PARTICOLARI
IMPORTANTE
La lavastoviglie dispone di due utilis-
sime funzioni:
- il programma "consigliato" (preim-
postato dalla fabbrica ed ideale per
l'uso quotidiano a pieno carico) per
una selezione più rapida e sicura;
- la funzione "auto-apprendimento",
grazie alla quale viene memorizzato
il programma utilizzato per almeno 3
volte consecutive, consentendo a chi
utilizza sempre lo stesso ciclo di
lavaggio, di non dover ripetere ogni
volta la programmazione e quindi, di
risparmiare tempo.
Impostazione dei programmi
■ Aprire lo sportello ed introdurre le stovi-
glie da lavare.
■ Premere il tasto "AVVIO/ARRESTO" .
■ Dopo aver premuto il tasto
"AVVIO/ARRESTO", nel display verrà
visualizzato il programma "consigliato"
oppure quello che è stato utilizzato per
almeno 3 volte consecutive.
■ Se si desidera selezionare un’opzione,
premere il pulsante corrispondente
(la spia si illuminerà).
I tasti opzione vanno premuti PRIMA
della partenza del programma, affin-
ché l’opzione sia accettata.
■ Se si desidera scegliere un altro
programma, è necessario premere il
pulsante "SELEZIONE PROGRAMMA"
("PROGR.").
■ Quando sul display compare il programma
desiderato, premere il pulsante "START".
Il display visualizzerà il tempo di durata
del programma, alternando l'indicazione
delle ore a quella dei minuti [Es: 1 h (1
ora) / 25 (25 minuti)].
Se le operazioni precedentemente
descritte sono state fatte a sportello
aperto, il programma non partirà, fino
alla chiusura dello sportello.
Interruzione di un programma
Sconsigliamo l’apertura dello sportello
durante lo svolgimento del programma, in
particolare durante la fase centrale del
lavaggio e del risciacquo finale caldo.
Tuttavia, se a programma avviato si apre lo
sportello (per esempio perché si vogliono
aggiungere delle stoviglie) la macchina si
ferma automaticamente e sul display viene
visualizzato lampeggiante il tempo rima-
nente alla fine del ciclo.
Richiudendo lo sportello, senza premere
alcun pulsante, il ciclo ripartirà dal punto
in cui era stato interrotto.
IMPORTANTE
E’ possibile interrompere il program-
ma in corso anche senza aprire lo
sportello, portando la lavastoviglie in
pausa.
Per fare ciò, è necessario tenere pre-
muto per almeno 3 secondi il pulsan-
te "START", rilasciandolo nel
momento in cui il display indicherà
lampeggiante il programma in corso.
Affinché il ciclo riparta dal punto in
cui era stato interrotto, è sufficiente
premere nuovamente il pulsante
"START".
ATTENZIONE!
Se si apre lo sportello mentre la lava-
stoviglie è nella fase di asciugatura,
viene attivato un segnale acustico
per avvisare che il ciclo non è ancora
terminato.

SEGNALAZIONE AUTOMATICA DI ANOMALIE
7
Spegnere la lavastoviglie, aprire il
rubinetto e reimpostare il ciclo.
Verificare se il tubo di scarico è pie-
gato o il sifone otturato e se i filtri
sono intasati.
Se il difetto permane, rivolgersi al
Servizio Assistenza Tecnica.
Verificare se il tubo di scarico è pie-
gato o il sifone otturato e se i filtri
sono intasati.
Se il difetto permane, rivolgersi al
Servizio Assistenza Tecnica.
E' necessario rivolgersi al Servizio
Assistenza Tecnica.
E' necessario rivolgersi al Servizio
Assistenza Tecnica.
Pulire piastra filtro.
Se il difetto permane, rivolgersi al
Servizio Assistenza Tecnica.
ANOMALIA CAUSA RIMEDIO
Sul display compare E2
accompagnato da un breve
segnale acustico.
Sul display compare
E3
accompagnato da un breve
segnale acustico.
Sul display compare
E4
accompagnato da un breve
segnale acustico.
Sul display compare
E5
accompagnato da un breve
segnale acustico.
Sul display compare
E6
accompagnato da un breve
segnale acustico.
Sul display compare
E8 o Ei
accompagnati da un breve
segnale acustico.
Mancanza acqua (rubinetto dell'ac-
qua chiuso).
La macchina non riesce a scaricare
l'acqua dalla vasca.
Perdita di acqua
Guasto al controllo elettronico della
temperatura.
Guasto al controllo elettronico.
L'elemento riscaldante dell'acqua
non funziona correttamente o piastra
filtro intasata.
La lavastoviglie è in grado di segnalare una serie di anomalie visualizzate sul display
6
Pulsante
"PARTENZA DIFFERITA"
Questo pulsante permette di programmare
l'avvio del ciclo di lavaggio, con un ritardo
compreso tra 1 e 23 ore.
Per impostare la partenza ritardata proce-
dere nel seguente modo:
■ Premere il pulsante "PARTENZA DIF-
FERITA" (sul display verrà visualizzata
la scritta"00").
■ Premere nuovamente il pulsante per
incrementare il ritardo in ore (ad ogni
pressione il ritardo viene incrementato di
1 ora, fino ad un massimo di 23). La spia
“PARTENZA DIFFERITA” s’illuminerà.
■ Per avviare il conteggio, premere il pul-
sante "START" (la spia “PARTENZA
DIFFERITA” inizierà a lampeggiare).
Alla fine del conteggio, il programma
partirà automaticamente (la spia
“PARTENZA DIFFERITA” si spegnerà).
Se si desidera vedere il programma impo-
stato, premere il pulsante "SELEZIONE
PROGRAMMA".
Se si desidera annullare la partenza ritar-
data procedere nel seguente modo:
■ Tenere premuto per almeno 5 secondi il
pulsante "START".
■ A questo punto, se si desidera far partire
la lavastoviglie, sarà necessario impo-
stare nuovamente il programma deside-
rato ed eventualmente selezionare i pul-
santi opzione, come indicato nel paragrafo
"IMPOSTAZIONE DEI PROGRAMMI".
Esclusione segnalazione
acustica di FINE PROGRAMMA
La segnalazione acustica di fine program-
ma può essere disattivata nel seguente
modo:
■ A lavastoviglie spenta, mantenere pre-
muto per qualche istante il pulsante
"SELEZIONE PROGRAMMA" e con-
temporaneamente premere il tasto
"AVVIO/ARRESTO".
■ Sul display apparirà la scritta "b1" che sta
ad indicare che la suoneria è attivata.
■ Premere nuovamente il pulsante
"SELEZIONE PROGRAMMA" (apparirà
la scritta "b0" che sta ad indicare che la
suoneria è disattivata).
■ Attendere il segnale acustico che indi-
cherà che l'impostazione è stata memo-
rizzata.
■ Per riattivare la suoneria, seguire la
stessa procedura (la scritta "b1" mostra-
ta sul display, starà ad indicare che la
suoneria è stata attivata).
IMPORTANTE
Questa lavastoviglie è dotata di un
dispositivo di sicurezza antitrabocco
che, in caso di anomalia, interviene
scaricando l’acqua in eccesso.
ATTENZIONE!
Per evitare l'intervento intempestivo del
dispositivo di sicurezza antitrabocco, si
raccomanda di non muovere o inclina-
re la lavastoviglie durante il funziona-
mento. Nel caso sia necessario muove-
re o inclinare la lavastoviglie, assicurar-
si prima che abbia completato il ciclo di
lavaggio e che non ci sia acqua nella
vasca.

9
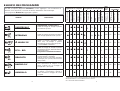
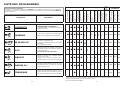
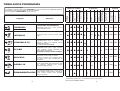
Operazioni da compiere Svolgimento del Programma
Durata
media in
Minuti
Funzioni
Facoltative
Detersivo prelavaggio
Detersivo lavaggio
Pulizia filtro e piastra
Controllo scorta
brillantante
Controllo scorta sale
Prelavaggio caldo
Prelavaggio freddo
Lavaggio
Primo risciacquo
freddo
Secondo
risciacquo freddo
Risciacquo caldo con
brillantante
Con acqua fredda
(15°C)*
-Tolleranza ± 10%-
Pulsante
“PARTENZADIFFERITA”
Pulsante “5 IN 1”
Pulsante “ENERGY”
SISI
65°C
95
••••
120
SI
••••
SI
SI
SI
••••
59
70°C
•••••
SI140
45°C
•••••
29
SI5
•
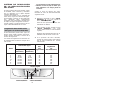
* CON ACQUA CALDA IL TEMPO RESIDUO AL TERMINE DEL PROGRAMMA SI AGGIORNAAUTOMATICA-
MENTE DURANTE LO SVOLGIMENTO DELLO STESSO.
N.D.= OPZIONE NON DISPONIBILE
••
SI
SI
SI
SI SI
SI SI
N.D.
SI
•
••••
75°C
45°C
80
50°C
8
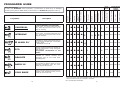
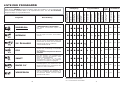
Simbolo Descrizione
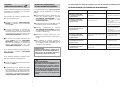
ELENCO DEI PROGRAMMI
(PROGRAMMA “CONSIGLIATO”)
Adatto al lavaggio di stoviglie e pentole
normalmente sporche.
Adatto al lavaggio di pentole e di tutte le
altre stoviglie particolarmente sporche.
Adatto al lavaggio quotidiano, subito
dopo l’uso, di stoviglie e pentole
normalmente sporche (MAX 8 coperti).
- CLASSE
A DI LAVAGGIO -
Adatto al lavaggio di stoviglie e pentole
normalmente sporche, utilizzando detersivi
contenenti enzimi.
Programma normalizzato EN 50242.
Adatto al lavaggio di stoviglie delicate e
con decorazioni e cristalleria.
Indicato anche per il lavaggio quotidiano
di stoviglie poco sporche, ad esclusione
delle pentole.
Ciclo superveloce da eseguire a fine
pasto, indicato per un lavaggio di
stoviglie fino a 4/6 coperti.
Breve prelavaggio per le stoviglie usate
al mattino o mezzogiorno, quando si
vuole rimandare il lavaggio del carico
completo.
UNIVERSALE
INTENSIVO
A WASH 59’
ECO - BIO
DELICATO
RAPIDO 29’
AMMOLLO
Lavaggio con prelavaggio
Nel caso si imposti il programma INTENSIVO, occorre aggiungere una seconda dose di
detersivo, circa 20 grammi (1 cucchiaio da tavola) direttamente nella lavastoviglie.
Per il programma
A WASH 59', aggiungere 5 grammi.
SI
SI
N.D.

*
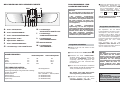
La regolazione è stata impostata dalla
fabbrica al livello 4 (d4) in quanto questo
soddisfa la maggior parte dell'utenza.
Aseconda del livello di appartenenza della
vostra acqua impostare il valore di decal-
cificazione nel seguente modo:
1. Mantenere premuto il pulsante
“PARTENZA/DIFFERITA” e con-
temporaneamente inserire il tasto
“AVVIO/ARRESTO” .
Sul display apparirà il valore di riferi-
mento "d4" impostato dalla fabbrica.
2. Per cambiare l'impostazione, premere
il pulsante “PARTENZA/DIFFERITA”
(con ogni pressione sul pulsante il
valore aumenta di un grado).
Dopo aver raggiunto il valore "d7", l'in-
dicatore salta di nuovo al valore "d1".
3. Alla comparsa del valore desiderato
attendere il segnale acustico; a questo
punto il valore impostato è stato
memorizzato.
11
IMPIANTO DI DECALCIFICA-
ZIONE
L'acqua contiene in misura variabile, a
seconda delle località, sali calcarei e
minerali che si possono depositare sulle
stoviglie lasciando macchie e depositi
biancastri.
Più elevato è il contenuto di questi sali,
maggiore è la durezza dell'acqua.
La lavastoviglie è corredata di un decalcifi-
catore che, utilizzando del sale rigenerante
specifico per lavastoviglie, fornisce acqua
priva di calcare (addolcita) per il lavaggio
delle stoviglie.
Potete richiedere il grado di durezza della
vostra acqua all'Ente erogatore di zona.
Regolazione del decalcificatore
con programmatore elettronico
Il decalcificatore può trattare acqua con
durezza fino a 90°fH (gradi francesi),
50°dH (gradi tedeschi) tramite 8 livelli di
regolazione.
I livelli di regolazione vengono riportati
nella tabella seguente con la relativa
acqua di rete da trattare.
Livello
0
1
2
3
*4
5
6
7
0-5
6-10
11-20
21-30
31-40
41-50
51-60
61-90
0-3
4-6
7-11
12-16
17-22
23-27
28-33
34-50
NO
SI
SI
SI
SI
SI
SI
SI
d1
d1
d2
d3
d4
d5
d6
d7
°fH (gradi
francesi)
Durezzadell'acqua
°dH (gradi
tedeschi)
Uso
sale
rigenerante
Regolazione
di decalci-
ficazione
10
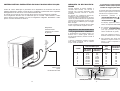
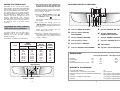
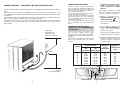
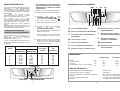
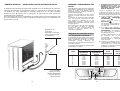
Il tubo di carico dell’acqua è provvisto di un dispositivo di sicurezza che blocca
l’afflusso dell’acqua qualora il tubo di carico si deteriori. Questo fatto viene segnalato
dall’apparizione di una tacca rossa nella finestrella «A».
In questo caso il tubo di carico acqua dovrà essere necessariamente sostituito.
Se la lunghezza del tubo non è sufficiente per un corretto allacciamento, il tubo
stesso dovrà essere sostituito con uno di lunghezza adeguata. Richiedere il tubo
presso il Centro Assistenza Tecnica.
WATERCONTROL-DISPOSITIVO DI BLOCCAGGIO DELL’ACQUA
Tasto rosso
(spia)
di valvola bloccata
Dispositivo
antisvitamento
(premere per svitare
la ghiera)
A
Pulsante
“PARTENZA DIFFERITA”
Tasto
“AVVIO/ARRESTO”
Display digitale

12
EN 50242 place load
Capacity with pans and dishes
Water supply pressure
Fuse
Power input
Supply voltage
15
9 persons
Min. 0,08 - Max 0,8 MPa
(see rating plate)
(see rating plate)
(see rating plate)
TECHNICAL DATA:
DIMENSIONS:
Height
Depth
Width
Depth with door open
cm
cm
cm
cm
with working top
85
60
60
120
without working top
82
57,3
59,8
117
A "ON/OFF" button
B "PROGRAMME SELECTION” button
C "DELAY START" button
D "5 IN 1" option button
E "ENERGY" option button
F "START PROGRAMME" button
G "SALT EMPTY" light
H "RINSE AID EMPTY" light
I "DELAY START” light
L "PROGRAMME STATUS" lights
M DIGITAL DISPLAY
N "OPTION SELECTION" lights
DESCRIPTION OF THE CONTROL PANEL
13
PROGRAMME SELECTION
AND SPECIAL FUNCTIONS
(Use in conjunction with programme guide)
IMPORTANT
The dishwasher has two very practical
functions:
- the "recommended" programme
(which is ideal for full load daily use)
for quick and accurate selection;
- the "Auto’ Memory", function saves
any programme used at least 3 times
consecutively, so that if you regularly
use the same washing cycle you
do not have to continually set the
programme thereby saving time and
effort.
Programme settings
■ Open the door and place the dirty dishes
inside the appliance.
■ Press the "ON/OFF" button .
■ After pressing the "ON/OFF" button, the
programme which is factory set at
"recommended” or the "Auto’ Memory"
programme will appear on the display.
■ To select an option, press the
corresponding button (the indicator light
will turn on).
Option buttons must be pressed
BEFORE starting the programme for
them to be accepted.
■ To set another programme, press the
"PROGRAMME SELECTION" button
("PROGR.").
■ When the required programme is shown
in the display, press the "START" button.
The length of the program will be shown on
the display alternating hours with minutes
[I.e.: 1 h (1 hour) / 25 (25 minutes)].
If the previously described operations
were performed with the door open, the
programme will not start until the door
is closed.
Programme interruption
Opening the door when a programme is
running is not recommended especially
during the main wash and final hot rinse
phases. However, if the door is opened
while a programme is running (for example,
to add dishes) the machine stops
automatically and the display will flash the
remaining time before the end of the cycle.
Close the door, without pressing any
buttons. The cycle will start from where it
left off.
IMPORTANT
A running program can be interrupted
without opening the door by pausing
the dishwasher.
To pause, hold the "START" button
down for at least 3 seconds and
release when the running program
starts blinking on the display.
Simply press the "START" button
again to restart the cycle from where
it left off.
WARNING!
If you open the door during the
drying cycle, an audible audio signal
advises you that the drying cycle has
not yet finished.
ABCD EF
M N
L
HI G

14
Changing a running programme
Proceed as follows to change or cancel a
running programme:
■ Hold the "START" button down for at
least 5 seconds (the running programme
will be cancelled).
■ At this point a new programme can be set.
WARNING!
Before starting a new programme,
you should check that there is still
detergent in the dispenser.
If necessary, top up the dispenser.
If there is any break in the power supply
while the dishwasher is operating, a
special memory stores the selected
programme and, when the power is
restored, it continues where it left off.
Programme operations
When a programme is running, the time
until the end of the cycle will be displayed
and the 4 “PROGRAM STATUS” indicator
lights:
= "WASH"
= "RINSE"
= "DRY"
STOP = "END"
will light singularly and in sequence to
indicate the current phase
Programme end
A5 second alarm will sound (if not muted)
3 times at 30 second intervals to signal that
the programme has ended. The programme
end indicator light will light up and the
display will go blank.
Dishes can now be removed and the
dishwasher turned off by pressing the
"ON/OFF" button or dishes can be loaded
for a new cycle.
Option buttons
IMPORTANT
All options MUST be turned on or off,
BEFORE pressing “START” button.
“5 IN 1” button
This option optimises the use of “3 in 1”/
“4 in 1”/“5 in 1” combined detergents. By
pressing this button, the selected washing
programme is modified to get the best
performance from combined detergents;
furthermore, the salt and rinse aid shortage
lights are de-activated.
WARNING!
Once selected, this option keeps
being on (light on) also for next
washing cycles and it can be de-activate
(light off) only by pressing the button
once again.
IMPORTANT
When this option is selected, the
"RAPID" cycle is 10 minutes longer.
"ENERGY" button
The "ENERGY" button provides over 20%
time and energy savings by reducing the
final water heating and drying times during
the last rinse cycle.
This option is recommended for light soil
washes, and for when the dishes are not
required perfectly dry straight away.
If you want to get better drying, we advise
to leave the dishwasher door slightly ajar at
the end of the cycle, to allow for a natural
circulation of air inside the dishwasher.
15
"DELAY START" button
Dishwasher start time can be set with this
button, delaying start from 1 to 23 hours.
Proceed as follows to set a delayed start:
■ Press the "DELAY START" button ("00"
will appear on the display).
■ Press the button again to increase the
delay in hours (each time the button is
pressed the delay is increased by 1 hour
to a maximum of 23). The “DELAY
START” indicator light will turn on.
■ To start the countdown press the
"START" button (the “DELAY START”
indicator light will start to flash). At the
end of the countdown, the programme
will automatically start (the “DELAY
START” indicator light will turn off).
If you wish to see which programme has
been selected, press the "PROGRAMME
SELECTION" button.
Proceed as follows to cancel a delayed
start:
■ Hold the "START" button down for at
least 5 seconds.
■ At this point, a new programme and
option buttons must be set to start a
new programme as indicated in the
"PROGRAMME SETTINGS" section.
Alarm mute for the PROGRAMME
END
The alarm for the programme end may be
muted as follows:
■ With the dishwasher off, hold down the
"PROGRAMME SELECTION" button
for few seconds while simultaneously
pushing the "ON/OFF" button.
■ "b1" will appear on the display to indicate
that the alarm is on.
■ Press the "PROGRAMME SELECTION"
button again ("b0" will appear on the
display to indicate that the alarm is off).
■ Wait for the alarm to sound to indicate
that the settings were saved.
■ To turn the alarm on again, follow the
same procedure ("b1" will appear on the
display to indicate that the alarm is on).
IMPORTANT
This dishwasher is equipped with an
anti-overflow safety device which will
automatically discharge any excess
water should a problem occur.
WARNING!
To ensure the correct operation of
the anti-overflow safety device, we
recommend that the dishwasher is
not moved or tilted during operation.
If however it is necessary to tilt or
move the dishwasher, please ensure
that the washing cycle is complete
and that there is no remaining water
inside the dishwasher.

AUTOMATIC FAULT SIGNALS
16
Turn off the dishwasher, open the
inlet hose and reset the cycle.
Check if the drain tube is bent or if
the siphon or filters are clogged.
If the problem persists, contact
Customer Service.
Check if the drain tube is bent or if
the siphon or filters are clogged.
If the problem persists, contact
Customer Service.
Contact Customer Service.
Contact Customer Service.
Clean the filter plate.
If the problem persists, contact
Customer Service.
FAULTS CAUSE SOLUTION
E2 appears on the display and
the alarm sounds.
E3 appears on the display and
the alarm sounds.
E4 appears on the display and
the alarm sounds.
E5 appears on the display and
the alarm sounds.
E6 appears on the display and
the alarm sounds.
E8 or Ei appear on the display
and the alarm sounds.
No water (inlet hose closed).
The machine cannot drain water.
Water leak
Electronic temperature control fault.
Electronic control fault.
The water heating element is not
working correctly or the filter plate is
clogged.
The dishwasher is able to signal a series of faults in the display.
17
The water-stop device protects against water damages caused by leaks on the fill
hose which could develop due to natural ageing of the hose.
In the water-stop system the leaking water fills the corrugated hose and activates a
stop valve which cuts off the water supply to the machine.
This fault is shown by a red sector on the window «A».
Would this occur, please refer to your Service Agent.
If the hose is not long enough for correct connection, it must be replaced with a longer
one. The hose can be obtained from your Service Agent.
WATERCONTROL-SYSTEM
Red button blocked
valve indicator
Safety antitwist device
(press and twist to
remove the washer)
A

19
65°C
95
••••
120
YES
••••
59
70°C
•••••
140
45°C
•••••
YES
29
5
•
* WITH HOT WATER THE TIME REMAINING UNTIL THE END OF THE PROGRAMME IS AUTOMATICALLY
DISPLAYED WHILE THE PROGRAMME IS RUNNING.
N/A = OPTION NOT AVAILABLE
••
18
Programme Description
PROGRAMME GUIDE
(“RECOMMENDED” PROGRAMME)
Once a day - for normal soiled pans and
any other items that have been left all
day for washing.
Once a day - for heavily soiled pans and
any other items that have been left all
day for washing.
Suitable for heavily soiled items that are
to be washed straight after a meal (Max
8 place load).
- WASHING CLASS A-
Energy Saving Programme suitable for
normal soiled items. Using detergents
with enzyme.
Programme standardised to EN
50242.
Suitable for delicate crockery and
glassware. Also for less soiled items
excluding pans.
Quick wash for dishes which are to be
washed immediately after the meal.
Wash load of 4/6 persons.
Short cold pre-wash for items that are
stored in the dishwasher until you are
ready to wash a full load.
YES
N/A
N/A
•
••••
75°C
50°C
UNIVERSAL
INTENSIVE
DELICATE
A WASH 59’
ECO
RAPID 29’
COLD RINSE
Wash with prewash
If setting the INTENSIVE wash programme, a second dose of about 20 g of detergent
(1 table-spoon) must be added directly in the machine. For AWASH 59' programme add 5 g.
YES
YES
YES
YES
YES
YES
Check list
Avarage
duration in
minutes
Special function
buttons
available
Detergent for soaking
(Prewash)
Detergent for washing
Clean filter
Check rinse aid
dispenser
Check salt container
Hot pre-wash
Cold pre-wash
Main wash
First cold rinse
Second cold rinse
Hot rinse with rinse aid
With cold water (15°C)*
-Tolerance ± 10%-
"DELAY START" button
"5 IN 1" button
"ENERGY" button
Programme contents
YES
••••
45°C
80
YES
YES
YES
YES
YES
YES
YES
YES

*The softener unit is set in the factory
at level 4 (d4) as this satisfies the
requirements of the majority of users.
Regulate the setting of your water softener
unit according to the degree of hardness
of your water as follows:
1. Keep the "DELAY START" button
pressed in and at the same time press
the "ON/OFF" button .
The factory setting "d4" will appear on
the display.
2. To change the setting, press the
"DELAY START" button. Each time you
press that button the setting will increase
by one level.
When you have reached "d7", the
display will go back to "d1".
3. When the required setting appears on
the display, wait for an audible signal to
confirm that the new setting has been
stored in memory.
20
WATER SOFTENER UNIT
Depending on the source of the supply,
water contains varying amounts of limestone
and minerals which are deposited on the
dishes leaving whitish stains and marks.
The higher the level of these minerals
present in the water, the harder the water is.
The dishwasher is fitted with a water
softener unit which, through the use of
special regenerating salt, supplies
softened water for washing the dishes.
The degree of hardness of your water can
be obtained from your water supply
company.
Regulating the water softener
with electronic programmer
The water softener can treat water with a
hardness level of up to 90°fH (French
grading) or 50°dH (German grading)
through 8 settings.
The settings are listed in the table below:
Level
0
1
2
3
*4
5
6
7
°fH
(French)
0-5
6-10
11-20
21-30
31-40
41-50
51-60
61-90
Water
hardness
°dH
(German)
0-3
4-6
7-11
12-16
17-22
23-27
28-33
34-50
Use of
regenerating
salt
NO
YES
YES
YES
YES
YES
YES
YES
Water
softener
setting
d1
d1
d2
d3
d4
d5
d6
d7
“DELAY START”
button
“ON/OFF”
button
Digital display
21
Couvert (EN 50242)
Capacité avec casseroles et assiettes
Pression admise pour l'installation hydraulique
Fusible
Puissance maximum absorbée
Tension
15
9 personnes
Min. 0,08 - Max 0,8 MPa
(voir plaque signalétique)
(voir plaque signalétique)
(voir plaque signalétique)
DESCRIPTION DE LA MACHINE
DONNÉES TECHNIQUES:
DIMENSIONS:
Hauteur
Profondeur
Largeur
Encombrement porte ouverte
cm
cm
cm
cm
avec plan de travail
85
60
60
120
sans plan de travail
82
57,3
59,8
117
A Touche "MARCHE/ARRÊT"
B Touche "SELECTION DE
PROGRAMME"
C Touche "DEPART DIFFERE"
D Touche option "5 IN 1"
E Touche option "ENERGY"
F Touche "DEPART PROGRAMME"
G Voyant "MANQUE DE SEL"
H Voyant "MANQUE DE
PRODUIT DE RINÇAGE"
I Voyant "DEPART DIFFERE"
L Voyants "PHASES DU CYCLE"
M AFFICHEUR
N Voyants "SELECTION D’OPTION"
ABCD EF
M N
L
HI G

22
SELECTION DES PROGRAMMES
ET FONCTIONS SPÉCIALES
IMPORTANT
Le lave-vaisselle dispose de deux
fonctions très utiles:
- le programme "conseillé" (pré-
configuré en usine et parfait pour
l’utilisation quotidienne à pleine
charge) permettant d’effectuer une
sélection plus rapide et sûre ;
- la fonction "auto-apprentissage"
permet de proposer le programme
utilisé au moins 3 fois de suite et
procure ainsi un gain de temps en
évitant de répéter chaque fois la
même programmation.
Choix des programmes
■ Ouvrez la porte et rangez la vaisselle à laver.
■ Appuyez sur la touche "MARCHE/ARRÊT"
■ Lorsque vous enfoncez la touche
"MARCHE/ARRÊT", le programme
"conseillé" ou celui correspondant à
un programme utilisé au moins 3 fois
de suite, apparaîtra sur l'afficheur.
■ Pour sélectionner une option, appuyez sur la
touche correspondante (le voyant s’éclaire).
Vous devez appuyer sur les touches
Option AVANT le démarrage du
programme pour que l’option soit
acceptée.
■ Pour choisir un autre programme,
appuyez sur la touche de "SELECTION
DE PROGRAMME" ("PROGR.").
■ Lorsque le programme désiré s'inscrit
sur l'afficheur, appuyez sur la touche
"START".
L’afficheur indique la durée du programme
en alternant l’indication des heures et des
minutes [Ex. : 1 h (1 heure)/ 25 (25 minutes)].
Si vous effectuez les opérations qui
précèdent avec la porte ouverte, le
programme ne démarrera pas tant que
vous ne fermerez pas la porte.
Interruption du programme
Nous vous déconseillons d’ouvrir la porte
pendant l’exécution du programme, surtout
pendant la phase centrale du lavage et
celle du rinçage chaud final.
Cependant, si vous ouvrez la porte lorsque
le programme est en cours (par exemple
pour ajouter de la vaisselle), la machine
s’arrête automatiquement et l’afficheur
indiquera en clignotant le temps restant
avant la fin du cycle.
Lorsque vous refermez la porte, le cycle
repart de l’endroit où il s’était interrompu
sans devoir appuyer sur une touche.
IMPORTANT
Vous pouvez interrompre le programme
en cours même sans ouvrir la porte,
en mettant le lave-vaisselle en
Pause.
Pour cela, vous devez appuyer
pendant au moins 3 secondes sur la
touche "START" et la libérer lorsque
l'afficheur indiquera en clignotant le
programme en cours.
Pour faire repartir le cycle de
l’endroit où il a été interrompu, il
vous suffit d’appuyer à nouveau sur
la touche "START".
ATTENTION!
Si vous ouvrez la porte pendant que
le lave-vaisselle effectue son cycle
de séchage, un signal sonore vous
alerte que le cycle n’est pas achevé.
.
23
Modification d’un programme
en cours
Pour modifier ou annuler un programme en
cours, procédez de la manière suivante :
■ Enfoncez la touche "START" sans la
lâcher pendant au moins 5 secondes (le
programme en cours est annulé).
■ Vous pouvez alors configurer un
nouveau programme.
ATTENTION!
Avant de démarrer un nouveau
programme, veuillez contrôler la
présence de lessive dans le compartiment.
Si nécessaire, remplir le compartiment.
En cas de coupure de courant pendant
un programme de lavage, une mémoire
spéciale restaure le programme
sélectionné et, lorsque le courant est
rétabli, reprend le cycle là où il s'est
arrêté.
Déroulement du programme
Pendant le déroulement du programme,
l’afficheur montre le temps restant avant la fin
du cycle et les 4 voyants de visualisation
"PHASES DU CYCLE":
= "LAVAGE"
= "RINÇAGE"
= "SÉCAGE"
STOP = "FIN"
s’éclairent séparément et en séquence
pour indiquer la phase en cours.
Fin du programme
La fin du programme est signalée par un
signal acoustique (s’il est activé) de 5
secondes, répété 3 fois toutes les 30
secondes. Le voyant de fin de programme
s’éclaire et l’afficheur s’éteint.
Vous pouvez alors sortir la vaisselle propre
et éteindre le lave-vaisselle en appuyant
sur la touche "MARCHE/ARRÊT" ou
effectuer un nouveau chargement pour un
nouveau cycle de lavage.
Touches option
IMPORTANT
Les options éventuellement choisies
DOIVENT être activées ou désactivées
AVANT d’appuyer sur la touche
"START".
Touche "5 IN 1"
Cette option permet l'utilisation optimale de
produits de lavage combinés ("3 en 1"/
"4 en 1"/"5 en 1"). En appuyant sur cette
touche, le programme de lavage
sélectionné est modifié, de façon à obtenir
les meilleurs résultats des produits
combinés; de plus, les indicateurs de manque
sel et produit de rinçage sont désactivés.
ATTENTION!
Une fois sélectionnée, l'option reste
active (voyant correspondant allumé) pour
programmes de lavage suivants et pourra
être désactivée (voyant correspondant
éteint) simplement en appuyant de
nouveau sur la touche appropriée.
IMPORTANT
Quand cette option est activée, la
durée du programme "RAPIDE" est
prolongée d'environ 10 minutes.
Touche "ENERGY"
En appuyant sur cette touche, l'intensité du
cycle choisi est augmentée par l’ajout d’un
rinçage et, lorsque cela est prévu, par
l’augmentation de la température et de la
pression de l'eau en phase de lavage.
La touche "ENERGY" permet d'agresser
plus énergiquement la saleté résistante et
de garantir toujours d'excellents résultats.
Nous conseillons cette option si la vaisselle
est très sale ou si la vaisselle n'a pas été
lavée immédiatement et que la saleté s'est
incrustée.

24
Touche "DEPART DIFFERE"
Cette touche permet de retarder le démarrage
du cycle de lavage de 1 à 23 heures.
Pour configurer le départ différé, procédez
de la mantère suivante:
■ Appuyez sur la touche "DEPART
DIFFERE" (l’afficheur montre "00").
■ Appuyez encore sur la touche pour
augmenter le nombre d’heures
correspondant au départ différé (à
chaque pression le départ différé
augmente d’une heure, jusqu’à un
maximum de 23 heures). Le voyant
“DEPART DIFFERE” s’éclaire fixement.
■ Pour démarrer le décompte, appuyez
sur la touche "DEPART" (le voyant
“DEPART DIFFERE” commence à
clignoter). A la fin du décompte, le
programme démarre automatiquement
(le voyant “DEPART DIFFERE” s’éteint).
Si vous voulez voir le programme sélectionné,
appuyez sur la touche "SELECTION DE
PROGRAMME".
Si vous désirez annuler le départ différé,
procédez de la manière suivante:
■ Enfoncez la touche "START" sans la
lâcher pendant au moins 5 secondes.
■ Vous devez alors, pour faire redémarrer
le lave-vaisselle, reconfigurer le
programme voulu et sélectionner,
éventuellement, les touches Option, de
la façon indiquée au paragraphe
"CHOIX DES PROGRAMMES".
Désactivation du signal acoustique
de FIN PROGRAMME
La fonction du signal acoustique à la fin du
programme peut être désactivée de la
manière suivante:
■ Après avoir éteint le lave-vaisselle,
enfoncez pendant quelques instants la
t
ouche "SELECTION DE PROGRAMME"
tout en appuyant sur la touche
"MARCHE/ARRÊT".
■ L’afficheur montre alors "b1" qui indique
que la sonnerie est activée.
■ Appuyez encore sur la touche "SELECTION
DE PROGRAMME" (l’afficheur montre
"b0" qui indique que la sonnerie est
désactivée).
■ Attendez le signal acoustique indiquant
que la configuration est mémorisée.
■ Pour réactiver la sonnerie, suivez la
même procédure ("b1" réapparaît sur
l’afficheur pour indiquer que la sonnerie
est réactivée).
IMPORTANT
Ce lave-vaisselle est équipé d’un
système de sécurité anti-débordement
qui, en cas de problème, videra
automatiquement tout excès d’eau.
ATTENTION!
Pour éviter le déclenchement
intempestif du dispositif de sécurité
anti-débordement, il est recommandé
de ne pas remuer ou incliner le
lave-vaisselle pendant son
fonctionnement.
Au cas où il serait nécessaire de
remuer ou d’incliner le lave-vaisselle,
s’assurer d’abord que le cycle de
lavage est terminé et qu’il n’y a plus
d’eau dans la cuve.
25
SIGNAL AUTOMATIQUE D’ANOMALIE
Eteignez le lave-vaisselle, ouvrez le
robinet et reconfigurez le cycle.
Vérifiez si le tuyau de vidange n’est pas
plié, si le siphon n’est pas bouché et si
les filtres ne sont pas colmatés.
Si le problème persiste,
adressez-vous au Service après-vente.
Vérifiez si le tuyau de vidange n’est
pas plié, si le siphon n’est pas bouché
et si les filtres ne sont pas colmatés.
Si le problème persiste,
adressez-vous au Service après-vente.
Vous devez vous adresser au
Service Après-Vente.
Vous devez vous adresser au
Service Après-Vente.
Nettoyez la plaque du filtre.
Si le problème persiste,
adressez-vous au Service Après-Vente.
ANOMALIE CAUSE SOLUTION
E2 apparaît sur l’afficheur,
accompagné par un bref signal
acoustique.
E3 apparaît sur l’afficheur,
accompagné par un bref signal
acoustique.
E4 apparaît sur l’afficheur,
accompagné par un bref signal
acoustique.
E5 apparaît sur l’afficheur,
accompagné par un bref signal
acoustique.
E6 apparaît sur l’afficheur,
accompagné par un bref signal
acoustique.
E8 ou Ei apparaît sur l’afficheur,
accompagné par un bref signal
acoustique.
Manque d’eau (robinet d’eau fermé).
L’appareil n’arrive pas à vider l’eau
de la cuve.
Fuite d’eau.
Panne du contrôle électronique de la
température.
Panne du contrôle électronique.
L’élément de chauffage de l’eau ne
fonctionne pas correctement ou la
plaque du filtre est colmatée.
Le lave-vaisselle est en mesure de signaler sur l’afficheur plusieurs anomalies.

27
OUIOUI
65°C
95
••••
120
OUI
••••
OUI
OUI
OUI
••••
59
70°C
•••••
OUI140
45°C
•••••
29
OUI5
•
*AVEC DE L'EAU CHAUDE LE TEMPS RESTANT AVANT LA FIN DU PROGAMME DE LAVAGE EST
AUTOMATIQUEMENT AFFICHÉ EN COURS DE CYCLE.
N/A = OPTION NON DISPONIBLE
••
OUI
OUI
OUI
OUI OUI
OUI OUI
N/A
OUI
•
••••
75°C
45°C
80
50°C
26
(PROGRAMME “CONSEILLÉ”)
Destiné au lavage de la vaisselle et casseroles
normalement sale.
Conçu pour le lavage des casseroles et de
toute autre vaisselle particulièrement sale.
Destiné au lavage quotidien de la vaisselle et
casseroles normalement sale.
A utiliser immédiatement après le repas (Max
8 couverts)
- CLASSE A DE LAVAGE -
Adapté au lavage de vaisselle et casseroles
normalement sales, avec utilisation de lessive
à base d’enzyme.
Programme normalisé EN 50242.
Adapté au lavage de la vaisselle délicate
décorée et en cristal.
Indiqué pour le lavage quotidien de la
vaisselle peu sale, à l'exclusion des casseroles.
Cycle très rapide à effectuer à la fin du repas.
Recommandé pour un lavage de vaisselle
jusqu'à 4/6 personnes.
Pour la vaisselle utilisée le matin ou à midi,
entreposée dans le lave-vaisselle jusqu'à ce
que vous soyez prêt à laver une charge pleine.
UNIVERSEL
INTENSIF
A WASH 59’
ECO
DELICAT
RAPIDE 29’
TREMPAGE
OUI
OUI
N/A
Lavage précédé d'un prélavage
Dans le cas où l'on utilise le programme INTENSIF il faut également mettre une dose de détergent,
20 grammes (1 cuillère à soupe) directement dans le lave-vaisselle. Pour le programme A WASH 59’
ajouter 5 grammes.
LISTE DES PROGRAMMES
Programme
Description
Opérations à accomplir Déroulement du programme
Durée
moyenne
en
minutes
Fonctions
facultatives
Lessive prélavage
Lessive lavage
Nettoyage plaque,
filtre
Contrôle provision
du produit de rinçage
Contrôle provision
Sel
Prélavage chaud
Prélavage froid
Lavage
Premier rinçage
à
froid
Second rinçage
à
froid
Rinçage chaud avec-
produit de rinçage
Avec eau froide (15°C)*
(Tolerance ±10%)
Touche
"DEPART DIFFERE"
Touche "5 IN 1"
Touche "ENERGY"

Le tuyau d’alimentation, doublé d’une gaine, est équipé d’un dispositif de blocage de
l’eau.
Dans le cas où le tuyau se détériorerait (usure naturelle ou surpression), l’eau
s’écoulerait dans la gaine et actionnerait le dispositif de blocage de l’eau directement
au robinet.
Cet incident serait alors signalé par un témoin rouge situé dans la petite fenêtre “A”.
Dans ce cas, fermez le robinet d’eau et changez le tuyau.
Si le tuyau n’est pas assez long pour permettre un branchement correct, il doit être
remplacé par un tuyau plus long. Le tuyau peut être fourni par votre service
après-vente.
WATERCONTROL - DISPOSITIF DE BLOCAGE DE L’EAU
Témoin
de valve bloquée
Dispositif
antidévissage
(appuyer pour
devisser l’embout)
A
28
* L'adoucisseur d'eau est pré réglé en
usine sur le niveau 4 (d4) car ce
niveau répond à la majorité des
besoins.
Pour régler la position de l'adoucisseur
d'eau en fonction du degré de dureté de
votre eau, procédez comme suit :
1. Enfoncez simultanément la touche
"DEPART DIFFERE" et la touche
"MARCHE/ARRÊT" .
La position de réglage ''d4'' apparaîtra
sur l'afficheur.
2. Pour modifier la position, enfoncez le
bouton "DEPART DIFFERE" (chaque
pression sur la touche augmentera la
position d'un niveau).
Quand vous aurez atteint la position ''d7'',
l'afficheur retournera à la position ''d1''.
3. Lorsque la position désirée apparaît sur
l'afficheur, attendez le signal sonore qui
confirme la bonne mémorisation de la
nouvelle position.
29
ADOUCISSEUR D’EAU
Selon la source d’approvisionnement,
l’eau contient des quantités variables de
calcaire et de minéraux qui se déposent
sur la vaisselle en laissant des taches et
des marques blanchâtres.
Plus la densité de minéraux dans l’eau est
élevée, plus celle-ci est dure.
Le lave vaisselle est équipé d’un dispositif
d’adoucisseur d’eau qui, avec l’utilisation
du sel régénérant, fournit de l’eau douce
pour laver la vaisselle.
Le degré de dureté de votre eau peut vous
être communiqué par votre fournisseur
d’eau.
Réglage de l’adoucisseur
d’eau avec le programmateur
électronique
L'adoucisseur d'eau peut traiter l'eau
dont la dureté s'élève jusqu'à 90°fH
(Graduation française) ou 50°dH (Graduation
germanique) et ce à partir de 8 niveaux de
réglage.
Les positions de réglage de l'adoucisseur
d'eau sont indiquées dans le tableau
suivant.
Niveau
0
1
2
3
*4
5
6
7
°fH
(France)
0-5
6-10
11-20
21-30
31-40
41-50
51-60
61-90
°dH
(Allemagne)
0-3
4-6
7-11
12-16
17-22
23-27
28-33
34-50
Utilisation
de sel
régénérant
NO
OUI
OUI
OUI
OUI
OUI
OUI
OUI
Réglage de
l'adoucisseur
d'eau
d1
d1
d2
d3
d4
d5
d6
d7
Dureté de l'eau
Touche
“DEPART DIFFERE”
Touche
“MARCHE/ARRÊT”
Afficheur

31
PROGRAMMWAHL UND
SONDERFUNKTIONEN
WICHTIG
Ihr Geschirrspüler verfügt über zwei
äußerst nützliche Sonderfunktionen:
- Die Funktion “Empfohlenes
Programm“ (werksseitig voreingestellt
und ideal für den täglichen Gebrauch
bei voller Ladung), um Ihnen eine
leichtere und sicherere Programmwahl
zu ermöglichen;
- Die Funktion „Automatische
Speicherung“, bei der das Programm
gespeichert und wieder empfohlen wird,
das mindestens drei Mal hintereinader
benutzt wurde. Wenn Sie vorwiegend
das selbe Programm verwenden,
müssen Sie es nicht mehr jedes Mal neu
einstellen und sparen dadurch Zeit.
Programm einstellen
■ Öffnen Sie dir Tür und ordnen Sie das
Geschirr ein.
■ Drücken Sie die Taste "START/STOP" .
■ Nachdem die Taste "START/STOP"
gedrückt wurde, wird im Display das
werksseitig "empfohlene" Programm
angezeigt, oder das Programm, das
mindestens drei Mal hintereinander
benutzt wurde.
■ Wenn Sie eine Zusatzoption auswählen
wollen, drücken Sie bitte die entsprechende
Taste (Leuchtanzeige leuchtet auf).
Die Option muss VOR dem Beginn
des Programms gewählt werden.
■ Falls Sie ein anderes Programm wählen
möchten, drücken Sie die Taste
"PROGRAMMWAHL" ("PROGR.").
■ Wenn auf dem Display das Symbol des
gewünschten Programms erscheint,
drücken Sie auf die Taste "START".
Die Programmdauer wird auf dem
Display angezeigt. Dabei blinken
abwechselnd die Stunden und die Minuten
[z.B.: 1 h (1 Stunde) / 25 (25 Minuten)].
Alle beschriebenen Vorgänge funktionieren
nur bei geschlossener Tür.
Programm unterbrechen
Wir empfehlen, die Tür während des
Programmablaufs, besonders in der zentralen
Waschphase und beim letzten warmen
Spülgang, nicht zu öffnen. Sollte das Gerät
nach Programmstart jedoch geöffnet werden
(z.B., um Geschirr hinzuzufügen), wird das
Programm automatisch unterbrochen und im
Display blinkt die noch verbleibende
Restlaufzeit.
Beim Schließen der Tür, und ohne
irgendeine Taste drücken zu müssen,
läuft das Programm weiter ab dem Punkt, an
dem es unterbrochen wurde.
WICHTIG
Das laufende Programm kann auch
ohne Öffnen der Tür unterbrochen
werden. Dazu die Taste "START" so
lange gedrückt halten (mindestens 3
Sekunden) bis die Anzeige des
ausgewählten Programms anfängt zu
blinken. Wenn die Taste "START"
erneut gedrückt wird, fährt das
Programm dort fort, wo es unterbrochen
wurde.
ACHTUNG!
Wenn die Tür während der laufenden
Trocknungsphase geöffnet wird,
ertönt ein akustisches Warnsignal.
30
A Taste "START/STOP"
B Taste “PROGRAMWAHL”
C Taste "STARTVERZÖGERUNG"
D Optionstaste "5 IN 1"
E Optionstaste "ENERGY"
F Taste "PROGRAMMSTART"
G Leuchtanzeige "SALZ EINFÜLLEN"
H Leuchtanzeige
“KLARSPÜLER EINFÜLLEN”
I Leuchtanzeige
"STARTVERZÖGERUNG"
L Leuchtanzeigen
"PROGRAMMPHASEN"
M DIGITALDISPLAY
N Leuchtanzeigen
"OPTIONSWAHL"
BESCHREIBUNG DER BEDIENELEMENTE
Fassungsvermögen (EN 50242)
Fassungsvermögen mit gemischter Ladung
(Töpfe und Teller)
Wasserdruck
Absicherung
Gesamtanschlusswert
Spannung
15 Maßgedecke
für max. 9 Personen
Min. 0,08 MPa – Max 0,8 MPa
(S. Matrikelschild)
(S. Matrikelschild)
(S. Matrikelschild)
Höhe
Tiefe
Breite
Tiefe bei geöffneter Tür
cm
cm
cm
cm
TECHNISCHE DATEN :
ABMESSUNGEN :
mit Arbeitsplatte
85
60
60
120
ohne Arbeitsplatte
82
57,3
59,8
117
ABCD EF
M N
L
HI G

33
Taste "STARTVERZÖGERUNG"
Die Startzeit des gewählten
Reinigungsprogramms kann zwischen
1-23 Stunden verzögert werden.
Hierzu gehen Sie bitte wie folgt vor:
■ Drücken Sie die Taste
"STARTVERZÖGERUNG" (Im Display
erscheint die Anzeige "00").
■ Mit jedem weiteren Drücken der Taste
wird die Startzeit um eine Stunde
nach hinten hinaus verzögert (bis zu
23 Stunden). Die Leuchtanzeige
"STARTVERZÖGERUNG" leuchtet auf.
■ Um den Countdown zu starten, muss
dann nur noch die Taste "START"
gedrückt werden (die Leuchtanzeige
"STARTVERZÖGERUNG" fängt an zu
blinken). Wenn die Zeit abgelaufen ist,
startet das gewählte Programm (die
Leuchtanzeige "STARTVERZÖGERUNG"
erlischt).
Wenn Sie das eingestellte Programm
einsehen möchten, drücken Sie auf die
Taste "PROGRAMMWAHL".
Um die Startzeitvorwahl auszuschalten,
gehen Sie wie folgt vor:
■ Halten Sie die Taste "START" mindestens
fünf Sekunden gedrückt.
■ Um ein Programm erneut auszuwählen
gehen Sie bitte vor, wie im Teil
"PROGRAMM EINSTELLEN" beschrieben.
Akustisches Signal für
PROGRAMMENDE ausschalten
Um das akustische Signal am
Programmende auszuschalten, gehen Sie
wie folgt vor:
■ Bei ausgeschaltetem Gerät gleichzeitig
die Taste "PROGRAMMWAHL" und die
Taste "START/STOP" drücken.
■ Im Display erscheint die Anzeige "b1”
um anzuzeigen, dass das akustische
Signal aktiv ist.
■ Drücken Sie innerhalb der nächsten
fünf Sekunden erneut die Taste
"PROGRAMMWAHL" (Im Display erscheint
die Anzeige "b0" um anzuzeigen, dass
das akustische Signal inaktiv ist).
■ Die Speicherung der Einstellungen wird
mit einem erneuten akustischen Signal
quittiert.
■ Um das akustische Signal erneut zu
aktivieren, gehen Sie wie oben beschrieben
vor (die Anzeige "b1" zeigt an, dass das
akustische Signal wieder aktiv ist).
WICHTIG
Dieser Geschirrspüler ist mit einem
Überlaufschutz ausgestattet. Durch
dieses Sicherheitssystem wird im
Falle eines Defektes das überschüssige
Wasser abgepumpt.
ACHTUNG!
Um ein ungewolltes Auslösen des
Sicherheitsventils zu verhindern,
sollte der Geschirrspüler während
seines Betriebs nicht bewegt oder
geneigt werden.
Falls Sie einmal das Gerät verrücken
müssen, achten Sie darauf, dass es
außer Betrieb ist und in der
Bodenwanne kein Wasser steht.
32
Laufendes Programm ändern
Möchten Sie das laufende Programm
löschen oder ändern, gehen Sie wie folgt vor:
■ Halten Sie die Taste "START"
mindestens fünf Sekunden gedrückt
(das laufende Programm wird gelöscht).
■ Jetzt können Sie ein neues Programm
wählen.
ACHTUNG!
Bevor Sie ein neues Programm
starten, versichern Sie sich, dass das
Spülmittel nicht bereits eingespült
wurde und füllen ggf. neues
Spülmittel ein.
Bei einem eventuellen Stromausfall
behält der Geschirrspüler das laufende
Programm gespeichert und fängt dann
wieder dort an zu arbeiten, wo es
unterbrochen wurde, sobald der Strom
zurückgekehrt ist.
Programmblauf
Während ein Programm läuft wird im
Display die Restlaufzeit angezeigt
und die vier Leuchtanzeigen der
“PROGRAMMPHASEN” :
= “REINIGEN”
= “SPÜLEN”
= “TROCKNEN”
STOP = “ENDE”
leuchten nacheinander in Reihe auf und
geben den aktuellen Programmfortschritt an.
Programmende
Das Display erlischt und die letzte
Leuchtanzeige der “PROGRAMMPHASEN”
leuchtet auf, um das Programmende
anzuzeigen. Ein akustisches Signal ertönt
drei Mal für jeweils fünf Sekunden im 30
Sekunden-Takt (falls nicht ausgestellt).
Sie können nun das saubere Geschirr
aus dem Gerät entnehmen und das Gerät
durch Drücken der Taste "START/STOP"
ausschalten, oder Geschirr einräumen und
ein neues Spülprogramm einstellen.
Options-Tasten
WICHTIG
Alle Optionen müssen vor der
Betätigung der Taste "START" erfolgen.
Taste "5 IN 1"
Diese Option ermöglicht die optimale
Ausnutzung von Kombispülmitteltabs
(“3 in 1”, “4 in 1”, “5 in 1”). Durch Drücken
dieser Taste wird das eingestellte
Spülprogramm so verändert, dass solche
Kombispülmittel ihre Wirkung am besten
entfalten können. Außerdem werden die
Klarspüler- sowie die Salzfüllanzeige
ausgeschaltet.
ACHTUNG!
Einmal eingestellt, bleibt die Option
auch für die nachfolgenden
Programme aktiv (die entsprechende
Leuchtanzeige bleibt an). Um sie
zu deaktivieren (Leuchtanzeige
ausgeschaltet), muss die Taste wieder
gedrückt werden.
WICHTIG
Wenn diese Option eingestellt ist,
dauert das RAPID-Programm ca. 10
Minuten länger.
Taste "ENERGY"
Die Taste "ENERGY" garantiert beste
Reinigungsergebnisse auch bei stark
verschmutztem Geschirr. Der Wasserdruck
und die Spültemperatur werden (wo
vorgesehen) in der Reinigungsphase
erhöht, und ein zusätzlicher Spülgang
durchgeführt.
Die Verwendung dieser Option wird speziell
bei stark verschmutztem und Geschirr mit
angetrockneten Speiseresten empfohlen.

34
AUTOMATISCHE FEHLERMELDUNGEN
Gerät ausschalten, Wasserhahn
öffnen und Zyklus erneut starten.
Bitte Ablaufschlauch auf evtl. Knicke
kontrollieren und Siphon auf
Verstopfungen prüfen.
Sollte das Problem weiter bestehen,
bitte Kundendienst kontaktieren.
Bitte Ablaufschlauch auf evtl. Knicke
kontrollieren und Siphon auf
Verstopfungen prüfen.
Sollte das Problem weiter bestehen,
bitte Kundendienst kontaktieren.
Kundendienst kontaktieren.
Kundendienst kontaktieren.
Filter reinigen. Sollte das Problem
weiter bestehen, bitte Kundendienst
kontaktieren.
FEHLER URSACHE LÖSUNG
Anzeige E2 erscheint im Display
und das akustische Signal
ertönt.
Anzeige
E3 erscheint im Display
und das akustische Signal
ertönt.
Anzeige
E4 erscheint im Display
und das akustische Signal
ertönt.
Anzeige
E5 erscheint im Display
und das akustische Signal
ertönt.
Anzeige
E6
erscheint im Display
und das akustische Signal
ertönt.
Anzeige E8 oder Ei erscheint
im Display und das akustische
Signal ertönt.
Kein Wasser (Zulaufschlauch
blockiert).
Wasser kann nicht abgepumpt
werden.
Wasserleck am Gerät
Elektr. Temperaturkontrolle defekt.
Elektronische Kontrolleinheit defekt.
Das Heizelement arbeitet nicht oder
die Filtereinheit ist blockiert.
Der Geschirrspüler führt eine Selbstdiagnose durch und zeigt einige Fehler im Display.
Der Wasserzulaufschlauch ist mit einem Wasserstop-System ausgestattet. Sollte der
Innenschlauch durch natürliche Alterung schadhaft werden, so blockiert das System
die Wasserzufuhr zum Gerät. Die Störung wird durch das Erscheinen einer roten
Markierung im Fensterchen «A» angezeigt. In diesem Fall muss der Wasserhahn
geschlossen und der Schlauch ersetzt werden.
Sollte die Länge des Schlauches für den korrekten Anschluss nicht ausreichen, muss
dieser mit einem anderen Schlauch mit geeigneter Länge ersetzt werden. Wenden
Sie sich bitte hierfür an Ihren Werkskundendienst.
WATERCONTROL-SYSTEM
Rote Taste
(Signallampe)
bei gesperrtem Ventil
Abschraubsperre
(muss gedrückt werden,
um den Schlauch
abschrauben zu können)
A
35

36
(“EMPFOHLENES” PROGRAMM)
Für normal verschmutzte Töpfe und
Geschirr.
Für alle Töpfe und stark verschmutztes
Geschirr.
Nur für normal verschmutzte Töpfe und
Geschirrteile, die sofort nach der Mahlzeit
gespült werden (Max. 8 Gedecke).
- WASCHWIRKUNG A -
Für normal verschmutzte Töpfe und
Geschirr bei Verwendung von Spülmittel
mit Enzymen.
Das Programm entspricht den Normen
EN 50242.
Für den Abwasch von empfindlichem
Geschirr, Geschirr mit Dekoren, sowie
Gläsern und Kristallgefäßen.
Auch zu empfehlen für nur leicht
verschmutztes Geschirr des täglichen
Gebrauchs. Für Töpfe nicht geeignet.
Schnellprogramm, das direkt nach der
Mahlzeit erfolgen kann. Geeignet für das
Spülen von 4 bis 6 Gedecken.
Kurzer Vorspülgang, für Gedecke, die
nach dem Frühstück oder Mittagessen in
der Maschine bleiben, und erst später
gespült werden sollen.
Spülen mit Vorspülen
Wenn Sie das INTENSIV-Programm einstellen, fügen Sie zusätzlich ca. 20 g (entsprechend
einem Esslöffel) Spülmittel direkt in die Spülmaschine hinzu. Für das 59’
A KLASSE
Programm fügen Sie 5 g Spülmittel hinzu.
Programm
LISTE DER PROGRAMME
Beschreibung
UNIVERSAL
INTENSIV
59’
A KLASSE
ECO
SANFT
RAPID 29’
VORSPÜLEN
37
JAJA
65°C
95
••••
120
JA
••••
JA
JA
JA
••••
59
70°C
•••••
JA140
45°C
•••••
29
JA5
•
* BEI WARMWASSERANSCHLUSS KORRIGIERT SICH DIE RESTZEIT ZUM PROGRAMMENDE AUTOMATISCH
IM LAUFE DES PROGRAMMES.
N.V. = OPTION NICHT VERFÜGBAR
••
JA
JA
JA
JA JA
JA JA
•
••••
75°C
45°C
80
50°C
Arbeitsgänge
Durchschnitt-
liche Pro-
grammdauer
in Minu
ten
Zusatzfunktionen
Reinigungsmittel für
Vorspülprogramm
Spülmittel
Filter-und Filter-
plattenreinigung
Kontrolle des
Klarspülervorrats
Kontrolle des
Salzvorrats
Vorspülen (warm)
Vorspülen (kalt)
Hauptspülgang
Erstes Kaltspülen
Zweites Kaltspülen
Nachspülen (warm)
mit Klarspüler
Kaltwasseranschluss (15°C) *
(Toleranz ±10%)
Taste
"STARTVERZÖGERUNG"
Taste "5 IN 1"
Taste "ENERGY”
Programmabläufe
JA
JA
JA
N.V.
N.V.

39
Capacidade seg-norma EN 50242
Capacidade c/ tachos e pratos
Pressão admitida na instalação hidráulica
Fusível
Potência máxima absorvida
Tensão
15 pessoas
9 pessoas
Min. 0,08 - Max 0,8 MPa
(ver placa de características)
(ver placa de características)
(ver placa de características)
A Tecla “LIGAR/DESLIGAR”
B Tecla de “SELECÇÃO DO PROGRAMA”
C Tecla “INÍCIO DE FUNCIONAMENTO
RETARDADO”
D Tecla de opção “5 IN 1”
E Tecla de opção “ENERGY”
F Tecla de “INÍCIO DO PROGRAMA”
G Indicador luminoso “FALTA DE SAL”
H Indicador luminoso “FALTA DE
ABRILHANTADOR"
I Indicador luminoso “INÍCIO
DE FUNCIONAMENTO RETARDADO”
L Indicadores luminosos
“FASES DO PROGRAMA”
M DISPLAY DIGITAL
N Indicadores luminosos “OPÇÃO
SELECCIONADA”
Altura
Profundidade
Largura
Profundidade com a porta aberta
cm
cm
cm
cm
com bancada
85
60
60
120
DESCRIÇÃO DOS COMANDOS
DADOS TÉCNICOS :
sem bancada
82
57,3
59,8
117
DIMENSÕES :
Stufe
0
1
2
3
*4
5
6
7
0-5
6-10
11-20
21-30
31-40
41-50
51-60
61-90
0-3
4-6
7-11
12-16
17-22
23-27
28-33
34-50
NEIN
JA
JA
JA
JA
JA
JA
JA
d1
d1
d2
d3
d4
d5
d6
d7
°fH (franz.
Härtegrade)
Wasserhärte
°dH (deutsche
Härtegrade)
Verwendung
von regen.
Salzen
Einstellung
des
Enthärters
*
Der Enthärter ist werksseitig auf der
Stufe 4 eingestellt (d4) und damit den
Bedürfnissen der meisten Haushalte
entsprechend.
Regulieren Sie den Wasserenthärter je
nach Härtestufe Ihres Wassers wie folgt:
1. Drücken Sie die Taste
"STARTVERZÖGERUNG" und
gleichzeitig die Taste "START/STOP" .
Auf dem Display erscheint der
werksseitig eingestellte Wert "d4".
2. Um die Einstellung zu verändern,
drücken Sie die Taste
"STARTVERZÖGERUNG".
Bei jedem Tastendruck erhöht sich der
Wert um eine Stufe.
Nach dem Wert "d7" erscheint wieder
"d1" und die Skala fängt von vorne an.
3. Wird die gewünschte Stufe angezeigt,
warten Sie, bis ein akustisches Signal
ertönt. Es zeigt an, dass der gewählte
Wert gespeichert wurde.
38
WASSERENTHÄRTER
Das Wasser enthält kalkhaltige Salze und
Mineralien in je nach Wohngebieten
unterschiedlich hoher Menge. Diese
Substanzen setzen sich auf dem Geschirr
ab und hinterlassen Flecken und weißliche
Ablagerungen.
Je höher der Anteil dieser
Salzverbindungen im Wasser ist, desto
höher ist der Härtegrad des Wassers.
Ihr Gerät ist mit einer
Wasserenthärtungsanlage ausgestattet,
die unter Einsatz spezieller regenerierender
Spülmaschinensalze “weiches”, d.h.
kalkfreies Wasser für jeden Spülgang
liefert.
Auskunft über die Wasserhärte Ihres
Wohngebietes erhalten Sie jederzeit bei
Ihrem zuständigem Wasserwerk.
Enthärtereinstellung mit
elektronischem Programmierer
Der Enthärter kann das Wasser in 8
Stufen bis zu 90°fH (französische
Härtegrade) bzw. 50°dH (deutsche
Härtegrade) aufbereiten.
In der nachfolgenden Tabelle finden Sie
die entsprechenden Einstellungen je nach
Härtegrad.
Taste
"STARTVERZÖGERUNG"
Taste
"START/STOP"
Digitaldisplay
ABCD EF
M N
L
HI G
La pagina sta caricando ...
La pagina sta caricando ...
La pagina sta caricando ...
La pagina sta caricando ...
La pagina sta caricando ...
La pagina sta caricando ...
La pagina sta caricando ...
La pagina sta caricando ...
La pagina sta caricando ...
La pagina sta caricando ...
La pagina sta caricando ...
La pagina sta caricando ...
La pagina sta caricando ...
-
 1
1
-
 2
2
-
 3
3
-
 4
4
-
 5
5
-
 6
6
-
 7
7
-
 8
8
-
 9
9
-
 10
10
-
 11
11
-
 12
12
-
 13
13
-
 14
14
-
 15
15
-
 16
16
-
 17
17
-
 18
18
-
 19
19
-
 20
20
-
 21
21
-
 22
22
-
 23
23
-
 24
24
-
 25
25
-
 26
26
-
 27
27
-
 28
28
-
 29
29
-
 30
30
-
 31
31
-
 32
32
-
 33
33


Hoover HOD 7 ALU-S Manuale utente
- Categoria
- Lavastoviglie
- Tipo
- Manuale utente
- Questo manuale è adatto anche per
in altre lingue
- português: Hoover HOD 7 ALU-S Manual do usuário