
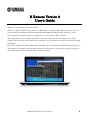
R Remote Version 2 User’s Guide 1
R Remote Version 2
User’s Guide
Thank you for choosing a Yamaha product.
This user’s guide explains setup and use of "R Remote," a Windows/Mac application that lets you
make parameter settings for the Rio3224-D/Rio1608-D/Ri8-D (subsequently "R series") units.
One computer can make parameter settings for up to twenty four R series units.
This application lets you edit the parameters of up to twenty four R series units from a single
computer. Even if the R series unit is not connected, you can mount it virtually and edit its settings
beforehand.
Up to two computers in which R Remote is installed can be connected to compatible R series units.
This means, for example, that the main operator could operate a console such as the CL while two
assistants make detailed adjustments at another location.

R Remote Version 2 User’s Guide 2
■ NOTICE
・ Yamaha Corporation owns exclusive copyrights for the R Remote, and the user’s guide.
・ It is prohibited to duplicate or modify the firmware, software or manuals, in part or in their
entirety, without permission from the copyright owner.
・ The screen shots in this guide are for use with this update procedure only and may be different
from the actual screen shots.
・ This software was not produced with the intention to support touch-panel operation in Windows 8
/ Windows 8.1, so we cannot guarantee operation if a touch-panel is used.
・ Dante and Dante Controller are a registered trademark of Audinate.
・ Windows is a registered trademark of Microsoft ® Corporation in the United States and other
countries.
・ Mac and Macintosh are trademarks of Apple Inc., registered in the U.S. and other countries.
・ The company names and product names in this document are the trademarks or registered
trademarks of their respective companies.
・ This guide predominantly uses screenshots of Windows. However, Mac screenshots are used when
instructions of the function apply only to the Mac.
・ Software may be revised and updated without prior notice.

R Remote Version 2 User’s Guide 3
Contents
■ Using the PDF manual ............................................................................................................................. 4
■ System Requirements .............................................................................................................................. 4
Operation .................................................................................................................................................... 4
■ Setup .......................................................................................................................................................... 5
Installing the R Remote ............................................................................................................................. 5
Settings on the R series units .................................................................................................................... 6
Connect the computer and R series units ................................................................................................. 7
Power-on the R series units ....................................................................................................................... 7
Specify the computer's IP address ............................................................................................................. 8
For Windows ............................................................................................................................................ 8
For Mac .................................................................................................................................................. 10
Use Dante Controller or the CL/QL series console to specify the routing ........................................... 10
■Operating R Remote ................................................................................................................................. 11
Menu bar ................................................................................................................................................... 11
Areas of the screen ................................................................................................................................... 12
Device Selection Area ............................................................................................................................... 13
Information Display Area ........................................................................................................................ 13
Main Area .................................................................................................................................................. 14
For Rio3224-D / Rio1608-D / Ri8-D ..................................................................................................... 14
For Ro8-D .............................................................................................................................................. 18
“Network Setup” dialog box ..................................................................................................................... 19
“Device Information” dialog box .............................................................................................................. 20
“IP Address” dialog box ......................................................................................................................... 21
“Properties” dialog box ............................................................................................................................. 22
■Uninstalling the software(Removing the application) ........................................................................... 23
■Troubleshooting ........................................................................................................................................ 24
Decimal/hexadecimal conversion table ................................................................................................... 26

R Remote Version 2 User’s Guide 4
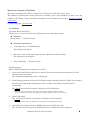
■ Using the PDF manual
・You can move to the corresponding page by clicking on links in the table of contents or in the text.
・If you want to find information on a specific topic, function or feature, select “Find” or “Search” from
the Adobe Reader “Edit” menu and enter a key word to locate the related information anywhere in the
document.
・You can also click on desired items and topics you want to refer to in the “Bookmarks” index to the
left of the main display window, and jump to the corresponding page. (Click the “Bookmarks” tab to
open the index if it is not displayed.)
■ System Requirements
In order to use R Remote, you'll need the following items.
● A computer equipped with the following conditions:
OS
Windows 7 SP1 Home Premium or later, Windows 8, Windows 8.1
(R Remote supports both 32-bit and 64-bit Windows.)
Mac OS X 10.9.5, 10.10.x
CPU
Intel Core i3/i5 or higher
HDD
120MB or more
Connector
An Ethernet connector (1000BASE-T or higher recommended)
Others Dante Controller must be installed. (
*)
(*)You can download R Remote from the download page of the following website.
http://www.yamahaproaudio.com/
● Ethernet cable (CAT5e or better)
● Network switch (with gigabit Ethernet support)
● R series units ( up to twenty four units) with firmware V3.00 or later
Operation
Keyboard Shortcuts
<Windows modifier key> ( <Mac modifier key>) + <key> or click shows the shortcut keys. For example,
<Ctrl> (<command>) +click means “press <Ctrl> under Windows or <command> under Mac, then
click.”
Right Click
On Mac click while holding down the <control> key.

R Remote Version 2 User’s Guide 5
■ Setup
The setup workflow is shown below.
Install the R Remote
↓
Set on the R series units
↓
Connect the computer and R series units
↓
Power-on the R series units
↓
Specify the computer's IP address
↓
Use Dante Controller or the CL/QL series console to specify
the routing
For details on connections and settings for the R series units, refer also to the owner's manual of your
R series units.
Install the R Remote
The installation procedure is as follows.
1. Logon to Windows or Login to Mac with administer account.
2. After decompressing the downloaded file, double-click “setup.exe”(Windows) or “Install R Remote
Vxxx.pkg”(Mac)(xxx is version) in the decompressed file location.
The R Remote setup wizard will appear.
・ Under Windows, the “User Account Control” dialog box may appear. Click [Continue] or [Yes].
3. Proceed with the installation as directed by the instructions in the screen.
If you're using a Mac, perform the following steps as well. If these steps are not performed, R Remote
will not function as well, and in some cases communication with the R series unit may be
disconnected.
4. In [Go] → [Applications], choose [R Remote].
5. In [File] → [Get Info], open "R Remote Info."
6. In [General], select the [Prevent App Nap] check box and then close the window.

R Remote Version 2 User’s Guide 6
Set on the R series units
When using R Remote to operate an R series unit, set the DIP switches and [UNIT ID] rotary switch of
the unit, taking note of the following settings.
・ Set the UNIT ID in the range of 1 to 24 (hexadecimal 18). R Remote will not detect units with a
setting of 0 or 25 or higher. (For details on converting between decimal and hexadecimal, refer to
"Decimal/hexadecimal conversion table.")
・ Set the DIP switches to the following combinations. Put DIP switches 5 and 6 in the upward
position.
・UNIT ID
Settings
Switch
UNIT ID ranging from 0 to F
(1 up)
UNIT ID ranging from 10 to 1F
(1 down)
・IP address
Specify the IP address that R Remote uses for control. This is the setting for control; it is different
than the IP address of the Dante network, so it will be different than the IP address specified on
the Dante Controller.
The first time that you connect an R series unit to your computer after purchasing it, set this to
something other than STATIC IP (MANUAL). If you want to use the STATIC IP (MANUAL)
setting, first specify the IP address from R Remote and then switch to STATIC IP (MANUAL).
Settings Switch
AUTO IP
(The Dante network automatically sets the IP
address to 169.254.xx.xx)
(2 and 3 up)
DHCP
(The IP address assigned by the DHCP server
will be used.)
(2 down, 3 up)
STATIC IP(AUTO)
(The IP address will be set to 192.168.0.xx (xx=
UNIT ID).)
(2 up, 3 down)
STATIC IP(MANUAL)
(Set the IP address to the value specified by R
Remote)
(2 and 3 down)
If the network consists only of Dante devices and R Remote, we recommend that you use the AUTO IP setting.
If you are connecting to an existing network, select DHCP as needed.

R Remote Version 2 User’s Guide 7
If you want to use zoning to set the IP address, or want to connect to an existing network but use a static IP
address, choose STATIC IP (MANUAL) and use R Remote to set the IP address.
・SECONDARY PORT
Settings
Switch
DAISY CHAIN
(4 up)
REDUNDANT
(4 down)
・START UP MODE
Settings
Switch
REFRESH
(The unit starts up with part of the internal
memory initialized.
Initialization creates the following settings.
・HA GAIN (-6 dB)
・+48V (OFF)
・HPF (OFF)
・HPF FREQ (80Hz)
・Gain Compensation (OFF))
(7 and 8 up)
RESUME
(The unit starts up using the settings assigned
prior to the most recent power off.)
(7 down, 8 up)
If a CL/QL series unit is not connected, we recommend that you set START UP MODE to RESUME. If this is set to
REFRESH, settings must be transmitted from R Remote each time the R series unit is restarted.
Connect the computer and R series units
Use an Ethernet cable to connect the computer and the R series units.
If you selected DAISY CHAIN in “SECONDARY PORT” on the above, connect the Dante connectors of
the R series units in a daisy chain to the computer.
If you selected REDUNDANT in “SECONDARY PORT” on the above, connect the computer to the
network switch that is connected to the Dante [PRIMARY] connector.
Power-on the R series units
Power-on the R series units. If you power-on before making
“Settings on the R series units,” the
settings will not be applied.

R Remote Version 2 User’s Guide 8
Specify the computer's IP address
Specify the computer's IP address so that it can communicate with the R series units.
The method of making this setting depends on whether you're using Windows or Mac. Also, the
computer's IP address setting will differ depending on the IP address specified in
"Settings on the R
series units."
If you're using Mac,
click the link.
For Windows
Accessing the Control Panel
The way to access the Control Panel will depend on your operating system.
Windows 7
Select [Start] → [Control Panel].
Windows 8 / Windows 8.1
1. In the Start screen, click [Desktop].
The desktop will appear.
2. Move the cursor to the upper right or lower right corner of the desktop.
The Charms bar will appear.
3. Select [Settings] → [Control Panel].
TCP/IP Settings
Make TCP/IP settings for the computer as follows.
1. Access the Control Panel, then click or double-click [Network and Sharing Center] or [View
network status and tasks].
The “Network and Sharing Center” is displayed.
2. Click [Manage network connection] or [Change adapter settings] from the “Tasks” list located in
the left side of “Network and Shearing Center” window, then double-click [Local Area
Connection].
The “Local Area Connection Status” dialog box will be displayed.
・The “User Account Control” dialog box may appear. Click [Continue] or [Yes].
・If the “Local Area Connection properties” dialog box appears, skip ahead to step 4.
3. Click [Properties].
The “Local Area Connection properties” dialog box will be displayed.
The “User Account Control” dialog box may appear. Click [Continue] or [Yes].
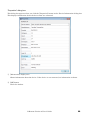
4. Select [Internet Protocol Version 4(TCP/IPv4)], then click [Properties].
The “Internet Protocol Version 4(TCP/IPv4) Protocol” dialog box will be displayed.

R Remote Version 2 User’s Guide 9
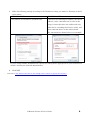
5. Make the following settings according to the IP address setting you made in "Settings on the R
series units."
AUTO IP or DHCP STATIC IP (AUTO)
Click [Obtain an IP address automatically].
Click [Use the following IP address:]. As the IP
address, enter "192.168.0.xxx (a value in the
range 1 to 254 that does not conflict with any
other device, including the R series units), and
enter "255.255.255.0" as the subnet mask.
The 192.168.0.101 shown below is an example.
If you're using STATIC IP (MANUAL), specify the setting that's appropriate for your network. For
details, consult your network administrator.
6. Click [OK].
Proceed to "Use Dante Controller or the CL/QL series console to specify the routing."

R Remote Version 2 User’s Guide 10
For Mac
Make TCP/IP settings for the computer as follows.
1. Click [System Preferences]→[Network].
The “Network” dialog box will be displayed.
2. Click the service that you want to connect to the R series unit.
If you're using the Ethernet port that's built into the Mac, click [Ethernet].
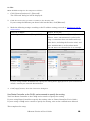
3. Make the following settings according to the IP address setting you made in "Settings on the R
series units."
AUTO IP or DHCP STATIC IP (AUTO)
In "Configure IPv4," choose [Using DHCP].
In “Configure IPv4,” choose [Manually]. As the IP
address, enter "192.168.0.xxx (a value in the
range 1 to 254 that does not conflict with any
other device, including the R series units), and
enter "255.255.255.0" as the subnet mask.
The 192.168.0.101 shown below is an example.
If you're using STATIC IP (MANUAL), specify the setting that's appropriate for your network. For
details, consult your network administrator.
4. Click [Apply] button, then close “Network” dialog box.
Use Dante Controller or the CL/QL series console to specify the routing
You'll use Dante Controller or the CL/QL series console to specify the routing.
If you're using Dante Controller to specify the routing, refer to "Dante Controller User’s Guide."
If you're using a CL/QL series console to specify the routing, refer to the each Reference Manual.
This completes the setup.

R Remote Version 2 User’s Guide 11
■Operating R Remote
Start R Remote.
Windows 7 users: click [Start]→[All Programs]→[Yamaha R Remote]→[R Remote]
Windows 8/8.1 users: in the "Start screen," double-click the [R Remote] tile.
Mac users: click [Go]→[Applications]→ double-click [R Remote].
・ When you start R Remote, the "Network Setup" dialog box may appear, allowing you to select the computer's
network card that will be used for communication with the R series units. If this appears, click the network card
that is connected to the R series unit, and then click the [Apply] button.
・ For R Remote for Windows 8 / Windows 8.1, depending upon user access privileges, the software's "Tile(icon)" may
not appear on the "Start screen". In such cases, you can find the software icon in "Apps" by the following steps:
1. Right-click anywhere on Start screen.
2.
Click "All apps" button at the bottom right side of Start screen.
Menu bar
The commands that can be executed by R Remote can be found here, grouped by category.
Click here to see a list of commands.
Menu
Command
Summary
Dialog box that appears
[File] [Open] Opens a previously-saved file (rrmt
format or rrm format).
If you open the file when R series units are
connected, the settings will be applied to the
R series units. Be aware that if a CL/QL
series console is also connected, its settings
will be overwritten.
“Open File” dialog box
[Save As]
Saves the file. It will have a file name
extension of rrmt, and will be usable
only by R Remote.
“Save File” dialog box
[Network Setup] Selects the computer’s network
adapter that will be used to
communicate with the R series.
"Network Setup" dialog
box
[Device Information]
Displays information about the R
series units that are connected.
"Device Information"
dialog box
[Quit] Quits R Remote. ---
[About]
[About R Remote]
Displays details such as the software
version of R Remote.
“About R Remote”
dialog box

R Remote Version 2 User’s Guide 12
Areas of the screen
The R Remote screen is broadly divided into three areas: the Device Selection Area, the Information
Display Area, and the Main Area.

R Remote Version 2 User’s Guide 13
Device Selection Area
When you click a display switching button, the corresponding R series unit is shown
in the information display area and in the main area.
With a display switching button selected, pressing the left button makes all
indicators of the corresponding R series unit blink, allowing you to identify the
corresponding unit.
When you right-click a display switching button, the following context menu
appears.
Command
Summary
[Mount]
Opens the "Mount" window. Select the device that you want to mount.
[Connect]
Synchronizes with the selected device.
[Disconnect]
Disconnects from the selected device.
[Properties] Open the “Properties” dialog box.
The connection status is shown below each display switching button.
Indication
Status
VIRTUAL
The device is mounted without the existence of the actual device.
CONNECTING
Currently synchronizing with the device.
CONNECTED
Currently synchronized with the device.
DISCONNECTED
Synchronization with the device is possible, but is currently disconnected by the
[Disconnect] command. Alternatively, communication has been interrupted, or
connection failed.
DUPLICATED
More than one device of the same UNIT ID exists. Eliminate any UNIT ID
conflict between devices.
The VIRTUAL indication is also shown if the device is in any of the following states.
・Device is not powered-on.
・Not connected to the computer.
・Communication is impossible due to incorrect settings.
Information Display Area
This area shows the UNIT ID and name of the selected device.
To check the firmware version or IP address, choose [File] menu -> [Device Information] to open the
"Device Information" dialog box.

R Remote Version 2 User’s Guide 14
Main Area
This area shows the state of the selected R series unit and allows basic parameter editing. The display
depends on the model.
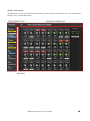
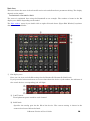
For Rio3224-D / Rio1608-D / Ri8-D
The screen is explained here using the Rio3224-D as an example. The number of items in the HA
display area differs depending on the model.
The
Edit window opens if you double-click or right-click and choose [Open Edit Window] anywhere
other than on a controller.
① HA display area
Here you can view and edit HA settings for the Rio3224-D / Rio1608-D / Ri8-D unit.
If you press the left mouse button on an area that shows the device's jack number, the indicator of
the actual device's corresponding jack will light.
ⓐ [+48V] button
Turns phantom power on/off for each channel.
ⓑ GAIN knob
Specifies the analog gain for the HA of the device. The current setting is shown in the
numeric box located below the knob.

R Remote Version 2 User’s Guide 15
You can double-click a numeric value box and enter a value directly from the keyboard.
The level meter located at the immediate right of the knob indicates the input level of the
corresponding port.
On the knobs, you can use the following shortcuts and context menu.
Action
Operation
<Ctrl> (<command>) + click
Sets analog gain to the default value (-6 dB).
<Ctrl> (<command>) + <Shift> +
click
Sets the analog gain to 0 dB.
Right click
Displays the following context menu.
[All Default]
Sets the analog gain of all
channels to the default value (-6
dB).
[All 0dB]
Sets the analog gain of all
channels to 0 dB.
ⓒ [HPF] button
This is an on/off switch for the high-pass filter that is built into the HA of the device. To
specify the cutoff frequency, make settings in the
Edit window.
② [+48V MASTER] indicator
Indicates the master phantom power on/off status for the device (the on/off setting is switched on
the device itself).
③ [SYSTEM] indicator / [SYNC] indicator
Indicates the status of the device or the Dante status. When you move the mouse cursor to this
area, the display content appears as a popup.
④ [PEAK HOLD] button
If this button is on, the peaks of each level meter are held. When you turn this off, the peaks that
had been held are cancelled.

R Remote Version 2 User’s Guide 16
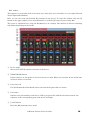
Edit window
This appears if you double-click in the main area other than on a controller, or if you right-click and
choose [Open Edit Window].
Here you can view and edit detailed HA settings for the device. To close the window, click the [x]
button in the upper right if you're using Windows, or click the [x] button if you're using Mac.
The screen is explained here using the Rio3224-D as an example. The number of channel switching
tabs differs depending on the model.
① Device name
Shows the UNIT ID number and name of the device.
② [PEAK HOLD] button
If this button is on, the peaks of each level meter are held. When you turn this off, the peaks that
had been held are cancelled.
③ Port select tab
For the Rio3224-D or Rio1608-D, these tabs switch the ports that are shown.
④ Port index
Indicates the port number of the device. When you press this with the left mouse button, the
indicator of the corresponding port of the device will light.
⑤ [+48V] button
Turns the HA phantom power on/off.

R Remote Version 2 User’s Guide 17
⑥ [A.GAIN] knob
Specifies the analog gain for the HA of the device. The current setting is shown in the numeric box
located below the knob.
You can double-click a numeric value box and enter a value directly from the keyboard.
The level meter located at the immediate right of the knob indicates the input level of the
corresponding port.
On the knobs, you can use the following shortcuts and context menu.
Action
Operation
<Ctrl> (<command>) + click
Sets analog gain to the default value (-6 dB).
<Ctrl> (<command>) + <Shift> +
click
Sets analog gain to 0 dB.
Right click
Displays the following context menu.
[All Default]
Sets the analog gain of all
channels to the default value (-6
dB).
[All 0dB]
Sets the analog gain of all
channels to 0 dB.
⑦ [GC] button
Switches on/off the gain compensation that regularizes the signal level on the audio network. If
this is on, the gain value fixed by gain compensation is displayed, and subsequent changes to
analog gain is compensated by the compensation gain within the device; audio is transmitted to
the Dante network at the gain value that was fixed immediately before this was enabled.
There are limits to the amount of gain compensation. The maximum compensation is 24 dB when turning the knob
toward the left, and 48 dB when turning the knob toward the right. For example if you apply gain compensation at
30 dB, compensation is maintained until you set the analog gain to 6 dB, but if you set the analog gain to 4 dB, the
gain value that is output will be 28 dB. If in this state you return the setting to 6 dB or higher, compensation
maintains the level at 30 dB.
⑧ [FREQ] knob / [HPF] button
Switches on/off the high-pass filter that is built into the HA of the device, and adjusts the cutoff
frequency. The current setting is shown in the numeric box located below the knob.
If you <ctrl> (<command>) + click above the [FREQ] knob, the cutoff frequency is set to the default
value (80 Hz).

R Remote Version 2 User’s Guide 18
For Ro8-D
The Ro8-D has no settings that can be operated, so only the [SYSTEM] indicator and [SYNC] indicator
are shown.
① [SYSTEM] indicator / [SYNC] indicator
Indicates the status of the device or the Dante status. When you move the mouse cursor to this
area, the display content appears as a popup.

R Remote Version 2 User’s Guide 19
“Network Setup” dialog box
This appears when you choose [File] menu -> [Network Setup].
Here you can select the network interface card of the computer that will be used to communicate with
the R series (subsequently called “the network card”).
NOTICE
The various settings are initialized if you change network cards. Before changing the network card, be
sure to save the settings in a file.
① Network card list
Select the network card that will be used to communicate with R series. When you double-click a
network card, the network card you double-clicked is selected and the dialog box closes.
If you only want to make settings without connecting an R series unit, select [Offline]. If you select
a network card, a load is placed on the connected network.
② [OK] button
Update the settings and closes the dialog box.
③ [Cancel] button
Close the dialog box without updating the settings.

R Remote Version 2 User’s Guide 20
“Device Information” dialog box
This appears when you choose [File] menu -> [Device Information].
This lists information about the R series devices that are connected.
① Device list
By right-clicking the name of an item such as Unit ID, you can select the items that are shown.
・ Unit ID
Shows the UNIT ID of the device.
・ Product
Shows the model name of the device.
・ Name
Shows the device name. This name can be edited in Dante Controller.
・ Mode
Shows the START UP MODE of the device.
・ IP Address
Shows the IP address that is specified for the device.
・ Port No.
Shows the communication port number of the device.
・ Firmware
Shows the main firmware version of the device.
② [Set IP Address] button
When you click this button, the
“IP Address” dialog box will appear.
③ [Properties] button
When you click this button, the
“Properties” dialog box will appear.
④ [OK] button
Closes the dialog box.
La pagina si sta caricando...
La pagina si sta caricando...
La pagina si sta caricando...
La pagina si sta caricando...
La pagina si sta caricando...
La pagina si sta caricando...
-
 1
1
-
 2
2
-
 3
3
-
 4
4
-
 5
5
-
 6
6
-
 7
7
-
 8
8
-
 9
9
-
 10
10
-
 11
11
-
 12
12
-
 13
13
-
 14
14
-
 15
15
-
 16
16
-
 17
17
-
 18
18
-
 19
19
-
 20
20
-
 21
21
-
 22
22
-
 23
23
-
 24
24
-
 25
25
-
 26
26


in altre lingue
- English: Yamaha V2 User guide
- français: Yamaha V2 Mode d'emploi
- español: Yamaha V2 Guía del usuario
- Deutsch: Yamaha V2 Benutzerhandbuch
- русский: Yamaha V2 Руководство пользователя
- Nederlands: Yamaha V2 Gebruikershandleiding
- português: Yamaha V2 Guia de usuario
- dansk: Yamaha V2 Brugervejledning
- čeština: Yamaha V2 Uživatelská příručka
- polski: Yamaha V2 instrukcja
- svenska: Yamaha V2 Användarguide
- Türkçe: Yamaha V2 Kullanici rehberi
- suomi: Yamaha V2 Käyttöohjeet
- română: Yamaha V2 Manualul utilizatorului