Kawai AnyTime ATX2-p Manuale del proprietario
- Tipo
- Manuale del proprietario

Important Information Preparation AppendixAdjustments & SettingsBasic Operation
DIGITAL PIANO
CA501
Owner’s Manual

2
Important Safety Instructions
Important Information
Important Safety Instructions
Be sure to read these Safety Precautions carefully before using this instrument to ensure correct use.
When using this electronic musical instrument, please observe the following precautions for safety.
When this instrument is used by small children, please ensure safe use under the supervision of a parent.
▋Warnings, cautions, and symbols have the following meanings.
denotes that care (precaution) should be taken.
denotes a prohibited operation (an operation
that must not be done).
denotes an instruction (an operation that should
be carried out) or indicative notice.
WARNING
Describes a potential hazard that could result in death or serious injury if the indication
is ignored and this instrument is handled incorrectly.
Doing so may cause a electric shock, re, injury fall, damage, or breakdown .
The product should be connected to an
AC outlet of the specied voltage.
The included power cord and AC adap-
tor are only for use with this instrument.
Do not forcibly bend, place a heavy ob-
ject on, bring a high-temperature object
close to, or damage the power cord and
AC adapter cord.
Do not bring the AC adaptor close to a
hightemperature object or use in a man-
ner that heat accumulates.
If dust accumulates on the power plug,
wipe it clean with a cloth.
When any of the following cases occur,
this instrument may have broken down.
In such a case, do not use this instru-
ment, keep the power cord disconnect-
ed from the outlet, and contact the shop
from which the product was purchased.
1. Foreign objects fell into the instrument.
2. Water was spilled into the instrument.
3. Some parts of the instrument or accessory be-
came abnormally hot.
4. Unusual smell or smoke occurred.
Do not
disassemble
Do not disassemble, repair, or modify
this instrument.
When disconnecting the power cord
plug, always hold the plug and pull out.
Disconnect the power cord during light-
ning storms or when this instrument is
unused for long periods of time.
Should an abnormality occur in this in-
strument, immediately turn the power
o and disconnect the power plug from
the outlet.
No wet hands
Do not insert or pull out the power plug
with wet hands.
No water
Do not get this instrument wet.

3
Important Information
Important Safety Instructions
CAUTION
Describes a potential hazard that could result in injury or damage to property if the indi-
cation is ignored and this instrument is handled incorrectly.
Doing so may cause a fall, damage, breakdown, injury, Health damage.
Keep the power cord plug in a state
where it can be disconnected from the
outlet easily.
This instrument is not completely shut-
o from the power supply even when
the power switch is turned o.
To shut-o completely, disconnect the
power plug from the outlet.
Do not put any part of your body under
the keyboard cover, music stand, or ped-
als.
Do not stand on, hang down from, or
push this instrument.
When moving this instrument, always
lift in a horizontal direction by two or
more people.
Piano should be placed in a location
such that its position does not aect its
own ventilation. Keep a minimum dis-
tance of 5 cm around the instrument for
sucient ventilation.
Do not run around this instrument.
Do not drop this instrument or apply a
large impact.
When using the headphones, do not lis-
ten for long periods of time at high vol-
ume levels.
Do not use this instrument in the follow-
ing areas.
1. Areas where the oor is unstable and the instru-
ment becomes wobbly.
2. Areas that become wet.
3. Extremely hot or cold areas.
4. Extremely humid or dry areas.
5. Areas where the instrument is exposed to direct
sunlight, such as those near a window.
6. Areas where a large amount of sand or dust is
present.
7. Areas where the instrument is exposed to exces-
sive vibrations.
Do not play with or stand on the bench,
or allow two or more persons to sit on
the bench. (only if included the Bench)
When assembling this instrument or
bench (if included), read the assembly
instructions in advance.
Regularly inspect assembling screws of
this instrument and the bench (if includ-
ed) for looseness and retighten if neces-
sary.
The height adjustment of the bench
should be performed when no one is sit-
ting on it. (only if included the Bench)

4
Important Safety Instructions
Important Information
Règles de sécurité (Supplémentairespour le Canada)
Exemples de symboles graphiques
Indique que des précautions doivent être prises.
Indique une manipulation interdite.
Indique qu’une manipulation doit être eectuée.
AVERTISSEMENT
Indique un risque potentiel qui peut entraîner la mort, ou de graves lé-
sions, si l’appareil n’est pas manipulé correctement.
Doing so may cause a electric shock, re, injury fall, damage, or breakdown .
Faite attention de ne pas introduire un
produit étranger à l’intérieur de l’appa-
reil.
Ne jamais placer sur le produit des ob-
jets contenant des liquides, tels que des
vases ou autres recipients..
Ce produit n’est pas totalement décon-
necté du circuit électrique lorsqu’il est
mis hors tension par le bouton d’arrêt.
Si l’appareil ne doit pas être utilisé pen-
dant une longue période, débranchez le
câble d’alimentation de la prise secteur.
Il est recommandé de placer l’instrument
à proximité de la prise de courant et de
positionner le câble d’alimentation sec-
teur de sorte qu’il puisse être débranché
rapidement en cas d’urgence, le courant
électrique étant toujours présent tant
que la prise est branchée même si le
bouton de mise en marche est en posi-
tion Arrêt.
PRECAUTION
Indique un risque potentiel qui peut entraîner la détérioration, ou des dommages, pour
l’appareil ou ses propriétés, si celui-ci n’est pas manipulé correctement.
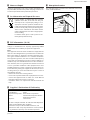
Description de la l’emplacement de la reference
(Le cas échéant):
Anglais phrase: The nameplate label is located
on the underside of the instruments, as indicated
below.
Français phrase: La reference commerciale est
inscrite sur une etiquette en dessous de votre
instrument, conformement a l’indication ci-des-
sous.
Votre piano doit être placé à un endroit tel que
sa position n’altère pas sa propre ventilation.
Gardez une distance minimum de 5 cm autour de
l’instrument pour une aération susante.

5
Important Information
Important Safety Instructions
▋Notes on Repair
Should an abnormality occur in the product, immediately turn
the power OFF, disconnect the power cord plug, and then con-
tact the shop from which the product was purchased.
▋An information on Disposal for users
If your product is marked with this recycling
symbol it means that, at the end of its life, you
must dispose of it separately by taking it to an
appropriate collection point.You should not mix
it with general household waste. Disposing of this
product correctly will prevent potential negative
eects on the environment and human health
which could otherwise arise due to inappropriate
waste handling.
For further details, please contact your local au-
thority. (European Union only)
▋FCC Information (U.S.A)
Caution :
Changes or modications not expressly approved by KAWAI
could void the user’s authority to operate the equipment.
Note :
This equipment has been tested and found to comply with the
limits for a Class B digital device, pursuant to Part 15 of the FCC
Rules. These limits are designed to provide reasonable protec-
tion against harmful interference in a residential installation.
This equipment generates, uses and can radiate radio frequency
energy and, if not installed and used in accordance with the in-
structions, may cause harmful interference to radio communica-
tions. However, there is no guarantee that interference will not
occur in a particular installation. If this equipment does cause
harmful interference to radio or television reception, which can
be determined by turning the equipment o and on, the user is
encouraged to try to correct the interference by one or more of
the following measures:
• Reorient or relocate the receiving antenna.
• Increase the separation between the equipment and receiver.
• Connect the equipment into an outlet on a circuit dierent
from that to which the receiver is connected.
• Consult the dealer or an experienced radio/TV technician for
help.
▋Supplier’s Declaration of Conformity
Products : Electronic Piano
Model Number : CA501
Responsible Party Name : Kawai America Corporation
Address : 2055 East University Drive Rancho
Dominguez, CA 90220
Telephone : 310-631-1771
This device complies with Part 15 of the FCC Rules. Operation
is subject to the following two conditions:
(1) this device may not cause harmful interference, and
(2) this device must accept any interference received, includ-
ing interference that may cause undesired operation.
This applies only to products distributed by Kawai America Cor-
poration.
▋Nameplate location
The nameplate label is located on the underside of the instru-
ment, as indicated below.
Nameplate

6
Important Information
Introduction
Introduction
Thank you for purchasing this Kawai digital piano.
Please read this owner’s manual carefully and keep the manual in a safe place to make full use of this product and maximise its prod-
uct life.
▋About this owner’s manual
This owner’s manual contains quick references for basic play-
back features and operation details for various functions.
▋Nameplate
The information, including model name and serial number, is
specied on the nameplate located on the underside of the in-
strument.
▋Intellectual property rights
• The Bluetooth® word mark and logos are registered trade-
marks owned by the Bluetooth SIG, Inc. and any use of such
marks by Kawai Musical Instruments Mfg. Co., Ltd. is under li-
cense.
• “Windows” is a registered trademark of Microsoft Corporation.
• “Mac” is a registered trademark of Apple Inc.
• Some samples © PREMIER Engineering Inc.
▋Cleaning
• Use a dry soft cloth to wipe the main body.
• Avoid using alcohol, benzene, thinner, or chlorine bleach. Do-
ing so may result in discoloration or deformation of the keys,
exterior, or panels.
• Depending on the material of the cloth used, wiping the prod-
uct repeatedly may result in discoloration or deformation.
• If the surface of the pedals become dirty, clean the pedals us-
ing a dry dish-washing sponge. Wiping the gold-plated pedals
with a cloth may cause the surface to appear dull.
• If the pedals become dirty, do not attempt to clean them with
rust-removing solvents, abrasives, or les.
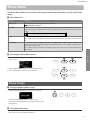
▋Symbols
[ ] The characters enclosed in brackets [ ] indicate
the names of sliders, buttons, ports or jacks.
This symbol shows the location of the button to
be operated, and the number in this symbol indi-
cates the order of operation.
The value in this symbol corresponds to the num-
ber describing the operating instructions.
The pointer nger symbol indicates key opera-
tion, and the value in this symbol corresponds to
the number assigned to the corresponding oper-
ation.
This symbol indicates operating precautions.
This symbol describes terminology and provides
additional information if the screen display is dif-
ferent from the name.
P This symbol indicates the page to be referenced.
▋About tuning
This piano is a digital instrument and does not require tuning.
If any aspect of this instrument does not function or perform as
expected, please contact the store from where the instrument
was purchased to seek assistance.


8
Important Information
Table of Contents
Table of Contents
Important Information
Important Safety Instructions �������2
Introduction ��������������6
Table of Contents ������������8
Preparation
Part Names and Functions ������� 10
Opening/Closing the Key Cover ����� 12
Music Rest �������������� 12
Pedal support bolt ����������� 12
Power ���������������� 13
Home screen ������������� 13
Volume and headphones �������� 14
Basic Operation
Sounds���������������� 15
Pedals ���������������� 15
Metronome �������������� 16
Recorder ��������������� 17
Recording to internal memory
and playing back …………………………… 18
Recording to a USB memory device
and playing back …………………………… 21
Reverb ���������������� 26
Eects ���������������� 27
Dual ����������������� 29
Dual Settings ………………………………… 30
Split ����������������� 31
Split Settings ………………………………… 32
4 Hands ��������������� 33
Four Hands Settings ………………………… 34
Music Menu �������������� 35
Demo Songs ………………………………… 35
Piano Music ………………………………… 36
Lesson ……………………………………… 36
Practicing �������������� 37
Concert Magic ……………………………… 40
Playing a Concert Magic song ������ 40
Listening to a Concert Magic song ���� 40
Concert Magic song settings ������ 41
Registration Memories ��������� 42
Panel Lock �������������� 45
Adjustments & Settings
Settings Menu ������������ 46
Basic Settings………………………………… 46
1 Key Transpose ����������� 47
2 Song Transpose ���������� 47
3 Tone Control ����������� 48
4 Speaker Volume ���������� 49
5 Low Volume Balance �������� 49
6 Tuning ������������� 49
7 Damper Hold ����������� 49
10 Startup Settings ��������� 50
11 Factory Reset ���������� 50
12 Auto Display O ��������� 50
13 Auto Power O ���������� 50
Virtual Technician …………………………… 51
Smart Mode ������������� 51
Advanced Mode ����������� 52
Phones Settings ……………………………… 62
1 Spatial Headphone Sound ������ 62
2 Phones Type ����������� 63
3 Phones Volume ���������� 63
USB Menu …………………………………… 63
1 Load Song ������������ 66
2 Load Registration All �������� 67
3 Load Registration Single ������� 68
4 Load Startup Setting �������� 69
5 Save Internal Song ��������� 70
6 Save SMF Song ���������� 71
7 Save Registration All �������� 72
8 Save Registration Single ������� 73
9 Save Startup Setting �������� 74
10 Rename File ����������� 75
11 Delete File ������������ 76
12 Format USB ����������� 76
Bluetooth Settings ………………………… 77
1 Bluetooth ������������ 78
2 Bluetooth Audio Volume ������ 78

9
Important Information
Table of Contents
Appendix
Troubleshooting ������������ 79
Internal Songs List ����������� 81
Drum Rhythm List ����������� 83
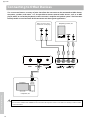
Connecting to Other Devices ������ 84
Assembly Instructions ��������� 86
Information about Adaptor Specications � 90
EU Declaration of Conformity ������ 91
Specications ������������� 92
For more information on MIDI and its operation details, please download the supplementary web manual:
https://www2.kawai.co.jp/emi-web/piano-docs/

10
Preparation
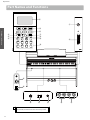
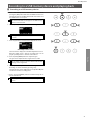
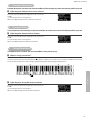
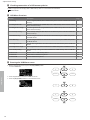
Part Names and Functions
Part Names and Functions
⑱
EFFECTS REVERB
1234
5678
E.PIANO ORGAN
STRINGS
PADHARPSI BASS
PIANO1 PIANO2
⑥
⑧
③
④
⑤
⑦
⑩
⑪
⑫
⑨
②
①
⑬
⑭
⑲
⑰⑯⑮
In market locations where Bluetooth functionality is
not available, the Bluetooth mark will not be printed.

11
Preparation
Part Names and Functions
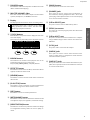
① [POWER] button
This button is used to turn the power on/o. Be sure to turn
o the instrument after playing.
② [MASTER VOLUME] slider
This slider controls the volume output from the built-in
speakers, headphones, or LINE OUT connectors.
③ Display
The display shows the function names and setting values.
A protective plastic lm is attached to the display
during production. Please remove this lm before
attempting to play the instrument.
④ [1][2][3] buttons
These buttons correspond to items displayed at the bot-
tom of the display.
Their purposes vary depending on the displayed contents.
⑤ ARROW buttons
These buttons are used for various purposes such as dis-
playing the previous screen or next screen.
They are [UP], [DOWN], [RIGHT], and [LEFT] buttons.
⑥ [EFFECTS] button
This button is used to select the eect, set how the eect is
applied, and turn the eect on/o.
⑦ [REVERB] button
This button is used to select the reverb eect and turn the
eect on/o.
⑧ [PLAY/STOP] button
This button is used to play/stop recorded performances
and Internal Songs such as those stored in Lesson.
⑨ [REC] button
This button is used to record the performance.
⑩ [METRONOME] button
This button is used to turn the metronome function on/o
and adjust its tempo, time signature, and volume settings.
⑪ [REGISTRATION] button
This button is used to store preferred sounds and settings
to a Registration memory, where the can be quickly re-
called.
⑫ SOUND buttons
These buttons are used to select the sound.
⑬ [PHONES] jacks
These jacks are used to connect stereo headphones to
the instrument, allowing headphones with a stereo mini
phone plug and headphones with a stereo standard plug
to be connected at the same time.
⑭ [USB to DEVICE] port
This port is used to connect a USB memory device.
⑮ [PEDAL] connector
This connector is used to plug the pedal cable attached to
the pedal unit.
⑯ [USB to HOST] port
This port is used to connect the instrument to a computer
using a USB “B to A” type cable in order to send and receive
MIDI data.
⑰ [DC IN] jack
This jack is used to connect the AC adaptor.
⑱ [LINE IN] jacks
These jacks are used to connect other electronic instru-
ments or audio devices to output their sounds from the
instrument’s built-in speakers.
⑲ [LINE OUT] jacks
These jacks are used to connect other external devices (am-
plier, stereo system) to listen to the instrument’s sound, or
to record to audio devices.

12
Preparation
Opening/Closing the Key Cover
Opening/Closing the Key Cover
▋Opening the key cover
Gently lift the key cover with both hands, then slowly push it
back into the instrument’s body.
• Do not leave any object on the key cover when
opening the key cover. Doing so could cause the
objects to fall inside the instrument, leading to
electric shock, short-circuit, ignition, or failure.
• Be careful not to have hands and ngers caught
between the key cover and the main body.
▋Closing the key cover
Slowly pull the key cover with both hands, then gently lower it
downward.
Music Rest
1. Lift the music rest.
2. Set the metal prop on the rear side of the music rest to a de-
sired position in the recessed holder on the top surface of the
main body.
(The angle is adjustable in three stages.)
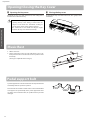
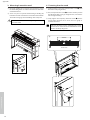
Pedal support bolt
A pedal support bolt is attached at the base of the pedal board to
aid stability when the pedals are pushed.
Turn the bolt anti-clockwise until it makes contact with the oor
and supports the pedals rmly. If the pedal support bolt does
not make contact with the oor, the pedal board may become
damaged.

13
Preparation
Power
Power
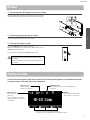
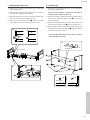
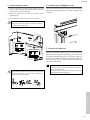
1. Connecting the AC adaptor to the main body
Plug the supplied AC adaptor into the power cord and insert it
into the [DC IN] jack located on the underside of the main body.
2. Connecting the plug into an outlet
Connect the AC power adaptor to an AC outlet.
3. Turning the power on/o
Press the [POWER] button to turn the power on.
When the instrument has started up, the LED indicator of the
[POWER] button will turn on.
To turn the power o, press the [POWER] button again.
Do not turn o the power until the startup process is
completed.
Do not unplug the power cord until the display has
turned o.
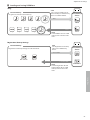
The rst screen that appears when the instrument has started up after power-on is called the Home screen.
The Home screen is the initial menu of the operation.
Bluetooth icon
This icon appears when Bluetooth is
turned on.
The icon will be reversed when
a Bluetooth device is connected
successfully.
Transpose icon
This icon appears when Key
Transpose is turned on.
Headphone icon
This icon appears when a pair of headphones are
connected.
USB icon
This icon appears when a USB
memory device is connected.
These correspond to [1], [2], and [3] buttons.
Their purposes vary depending on the displayed contents.
Home screen

14
Preparation
Volume and headphones
Volume and headphones
▋Adjusting the volume
Use the [MASTER VOLUME] slider located on the right side of the
main body to adjust the volume.
Move the slider up to increase the volume and down to decrease
the volume.
Adjust the volume while listening to the sound by striking the
keys.
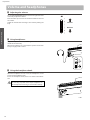
▋Using headphones
Plug the headphones into the [PHONES] jack located on the un-
derside of the main body.
When the headphones are connected, the speakers on the main
body no longer produce sound.
▋Using the headphone hook
When the headphones are not in use, the headphones can be
placed on the headphone hook.
To use the headphone hook, attach it as shown in the illustra-
tion.
Do not hang any other items except headphones on
the headphone hook. Doing so could result in damage.
Increase
Decrease

15
Basic Operation
Sounds
Sounds
This instrument features a selection of 45 realistic instrument sounds. Sounds are arranged into eight cat-
egories, with several sounds assigned to each SOUND button. “SK-EX Competition Grand Piano | Concert”
is selected as the default setting. The sounds are displayed on the Home screen.
P81 Sound/Demo Songs List
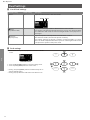
▋Selecting a sound
1. On the Home screen, press the [UP]/[DOWN] button to select
a category.
Or, press the SOUND button to select the category.
The LED indicator for the selected SOUND button will turn
on and the name of the selected sound will be shown in the
LCD display.
The display may show shortened sound names.
2. Press the [LEFT]/[RIGHT] button to select a sound variation.
Or, press the same SOUND button to select the variation.
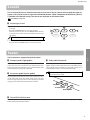
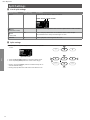
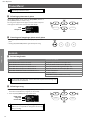
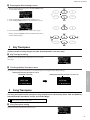
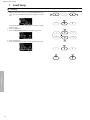
This instrument is equipped with three pedals.
Damper pedal (right pedal)
Depressing this pedal while playing the piano will sustain the
sound even after one’s hands have been lifted from the key-
board. The length of reverberation can be controlled by the level
of pedal depression. (Half-pedal supported)
▋Sostenuto pedal (centre pedal)
Depressing this pedal after pressing any key and before releas-
ing the key(s) will sustain the sound of only those notes that
have been played. Any keys that are subsequently pressed after
stepping on the sustenuto pedal will not be sustained.
▋Soft pedal (left pedal)
Depressing this pedal softens the sound, reducing its volume
slightly. The eect of the soft pedal can be controlled by the de-
pressed depth of the pedal. Rotary speed (Slow or Fast) can be
controlled when Rotary is selected as the Eect Type.
The eect of pressing each pedal may not be noticeable
depending on the sound.
Soft pedal
Sostenuto pedal
Damper pedal
▋Grand Feel Pedal System
This instrument features the Grand Feel Pedal System, which replicates the sustain, soft, and sostenuto pedal weighting of a Shigeru
Kawai SK-EX Competition Grand piano.
Pedals
1
1
2 2
EFFECTS
REVERB

16
Basic Operation
Metronome
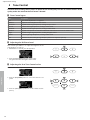
Metronome
The Metronome function provides a steady beat to aid practicing the piano.
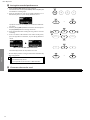
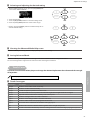
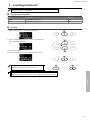
Turning the Metronome on/o
• Press the [METRONOME] button.
The LED for the [METRONOME] button turns on and the met-
ronome sound begins.
• Pressing the [METRONOME] button again will stop the met-
ronome and turn o the LED indicator for the [METRONOME]
button.
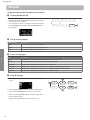
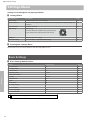
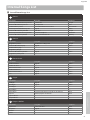
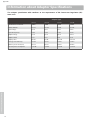
▋Metronome settings
Item Description
Tempo The value can be specied in the range from = 10 to 400.
The default setting is = 120.
Beat/Rhythm The beat setting is available from the following: 1/4, 2/4, 3/4, 4/4, 5/4, 3/8, 6/8, 7/8, 9/8, 12/8.
When the setting 1/4 is selected, it produces only the click sounds
without an accent beat.
The default setting is 4/4.
100 rhythm types are available.
P83 Drum Rhythm List
Volume The metronome volume can be specied in the range from 1 to 10.
The default setting is 5.
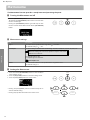
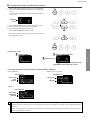
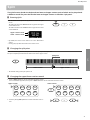
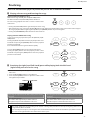
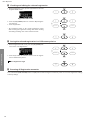
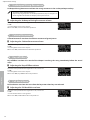
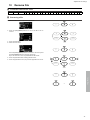
▋Setting the Metronome
1. Press the hold the [METRONOME] button to enter the Metro-
nome settings screen.
2. Press the [UP]/[DOWN] button to select the settings menu.
3. Press the [LEFT]/[RIGHT] button to set the value.
• Pressing the [LEFT]/[RIGHT] buttons simultaneously will re-
store the default setting.
• Pressing the [3] button will return to the Home screen.
hold
1
2
2
33
EFFECTS
REVERB

17
Basic Operation
Recorder
Recorder
This instrument allows songs to be recorded and played back. This instrument is equipped with an Inter-
nal Recorder to record/playback songs to/from internal memory, and a USB Recorder to record/playback
songs to/from USB memory device.
Recording format
Internal memory
• Internal format
USB memory device
• MP3 format
Bitrate: 256 kbit/s xed, Sampling frequency: 44.1 kHz, Stereo
• WAV format
Sampling frequency: 44.1 kHz, 16 bit, Stereo
Internal Recorder
• This instrument allows up to 10 songs to be recorded, stored in internal memory.
Each song consists of two separate parts.
This allows the right hand and left hand to be recorded into separate parts and played back separately for practicing one hand.
These parts can also be played back together.
• When a song is recorded to the song memory containing performance data, the existing performance data will be overwritten by
the new performance data.
• When recording into part 2 without playing back part 1 which is already recorded, set part 2 to be played back in song recorder
mode.
• The total recording capacity of this instrument is approximately 90,000 notes.
The LED indicators for the [PLAY/STOP] button and [REC] button turn o and recording stops if the memory becomes full while
recording.
Performances are recorded until immediately before the recorder stops.
Rough guide for the total recording capacity:
For example, if the total recording capacity is 5,000 notes, Beethoven’s Für Elise can be recorded three to four times, or
recording of 10 to 15 minutes is possible.
However, the recording time varies depending on the number of notes in the piece and tempo of the piece.
The recording time is also aected by the number of times the pedal is depressed because the recorder records pedal
operations, too.
• The recorded contents are not erased by turning this instrument o.
▋Recording to a USB memory device
• This instrument is capable of recording performances directly to a USB memory device in audio format.
• The USB Recorder will also capture Bluetooth audio sound, allowing the performances played with backing music to be recorded.
Sound from the LINE IN connectors will not be captured
by the USB Recorder.
Panel operations while recording with the Internal Recorder
• The sound selected before recording, and sounds selected during recording will be stored.
• Changes to the eect settings will not be stored.
• The tempo setting will not be stored.
▋Files that can be played back
This instrument can play back the following data:
• Songs that are recorded to store in internal memory.
• SMF les stored in a USB memory device (Format 0, Format 1)
• KSO les stored in a USB memory device (internal song format les)
• MP3 les stored in a USB memory device (Bitrate: 8~320 kbps, Sampling frequency: 44.1 kHz, 48 kHz, or 32 kHz, Stereo)
• WAV les stored in a USB memory device (Sampling frequency: 44.1 kHz, 16 bit, Stereo)

18
Recorder
Basic Operation
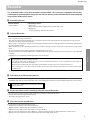
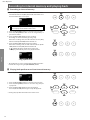
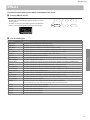
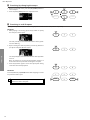
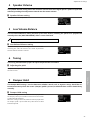
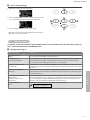
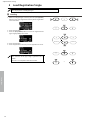
Recording to internal memory and playing back
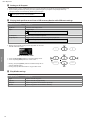
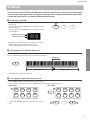
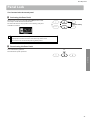
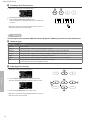
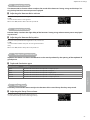
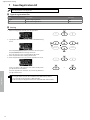
Recording to internal memory
1. Press the [REC] button to enter the Internal Recorder screen.
The LED indicator for the [REC] button will start to ash once
the Internal Recorder screen opens.
If a USB memory device is connected, press the [1] but-
ton to display the Internal Recorder screen.
2. Press the [UP]/[DOWN] button to select the “Song” or “Part”.
3. Press the [LEFT]/[RIGHT] button to set the song memory or
part to be recorded.
4. Press the [PLAY/STOP] button to start recording.
Recording can also be started by pressing a key.
When the recording starts, the LED indicators for the [REC]
button and the [PLAY/STOP] button will turn on.
5. Press the [PLAY/STOP] button to nish recording.
When the recording ends, the LED indicators for the [PLAY/
STOP] button and the [REC] button will turn o.
A “ ” symbol will appear beside the recorder song.
The display automatically enters song playback mode.
Song playback mode
• The performances can be recorded with the Metronome func-
tion turned on by pressing the [METRONOME] button.
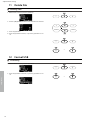
▋Playing back performances from internal memory
1. Press the [PLAY/STOP] button to enter song playback mode.
2. Press the [UP]/[DOWN] button to select the “Song” or “Part”.
3. Press the [LEFT]/[RIGHT] button to select the song and part
to play back.
4. Press the [PLAY/STOP] button to start the playback.
Press the [PLAY/STOP] button again to stop the playback.
• Pressing the [3] button will return to the Home screen.
2
2
3 3
EFFECTS
REVERB
1
4
5
2
2
33
EFFECTS
REVERB
4
1

19
Basic Operation
Recorder
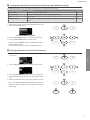
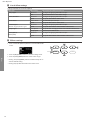
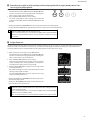
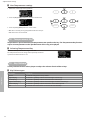
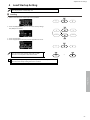
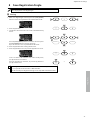
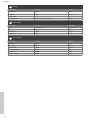
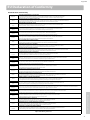
▋Playing back performances from internal memory with dierent settings
The following settings can be changed for the performances recorded in internal memory.
Internal Recorder function Description Page
Key Transpose Transpose the pitch of the keyboard. P47
Song Transpose Transpose the pitch of the recorded song to be played back. P47
Erase Erase a song. P19
Convert to Audio Convert the recorded song into an MP3 le or a WAV le and store it in a USB memory
device.
P20
1. On the song recorder mode, press the [2] button to enter the
Internal Recorder Edit screen.
Internal Recorder Edit screen
2. Press the [UP]/[DOWN] button to select the settings menu.
3. Press the [LEFT]/[RIGHT] button to set the value.
• Pressing the [LEFT]/[RIGHT] buttons simultaneously will re-
store the default setting.
• Pressing the [3] button will return to song playback mode.
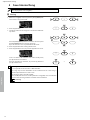
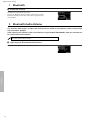
▋Erasing performances from internal memory
1. With “Erase” selected, press the [2] button to enter the Erase
Song screen.
2. Press the [UP]/[DOWN] button to select the “Song” or “Part”.
3. Press the [LEFT]/[RIGHT] button to select the song and part.
4. A conrmation message appears when pressing the [2] but-
ton.
5. Press the [1] button to erase, or press the [3] button to cancel.
• Press and hold [PLAY/STOP] and [REC] buttons while the in-
strument is turned o, and turn on the power to erase all re-
corded songs.
2
2
33
EFFECTS
REVERB
1
1
4
or
55
2
2
33
EFFECTS
REVERB

20
Recorder
Basic Operation
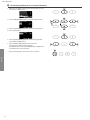
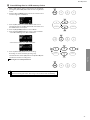
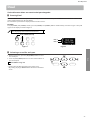
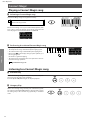
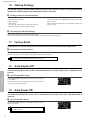
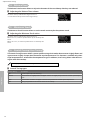
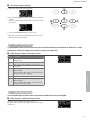
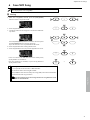
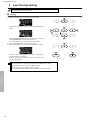
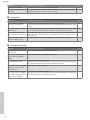
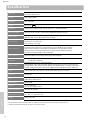
▋Converting performances in internal memory
1. With “Conv. to Audio” selected, press the [2] button to enter
the Convert to Audio screen.
2. Press the [UP]/[DOWN] button to select the “Song” or “Part”.
3. Press the [LEFT]/[RIGHT] button to select the song and part.
4. Press the [2] button.
5. Press the [LEFT]/[RIGHT] button to select the target format.
Select “MP3” or “WAV” format.
6. Press the [PLAY/STOP] button to start conversion.
Pressing any key will also start conversion.
The LED indicators for the [PLAY/STOP] button and [REC] will
turn o when the conversion starts.
• Keys pressed during the conversion are also recorded.
2
2
33
EFFECTS
REVERB
1
4
5 5
6
La pagina si sta caricando...
La pagina si sta caricando...
La pagina si sta caricando...
La pagina si sta caricando...
La pagina si sta caricando...
La pagina si sta caricando...
La pagina si sta caricando...
La pagina si sta caricando...
La pagina si sta caricando...
La pagina si sta caricando...
La pagina si sta caricando...
La pagina si sta caricando...
La pagina si sta caricando...
La pagina si sta caricando...
La pagina si sta caricando...
La pagina si sta caricando...
La pagina si sta caricando...
La pagina si sta caricando...
La pagina si sta caricando...
La pagina si sta caricando...
La pagina si sta caricando...
La pagina si sta caricando...
La pagina si sta caricando...
La pagina si sta caricando...
La pagina si sta caricando...
La pagina si sta caricando...
La pagina si sta caricando...
La pagina si sta caricando...
La pagina si sta caricando...
La pagina si sta caricando...
La pagina si sta caricando...
La pagina si sta caricando...
La pagina si sta caricando...
La pagina si sta caricando...
La pagina si sta caricando...
La pagina si sta caricando...
La pagina si sta caricando...
La pagina si sta caricando...
La pagina si sta caricando...
La pagina si sta caricando...
La pagina si sta caricando...
La pagina si sta caricando...
La pagina si sta caricando...
La pagina si sta caricando...
La pagina si sta caricando...
La pagina si sta caricando...
La pagina si sta caricando...
La pagina si sta caricando...
La pagina si sta caricando...
La pagina si sta caricando...
La pagina si sta caricando...
La pagina si sta caricando...
La pagina si sta caricando...
La pagina si sta caricando...
La pagina si sta caricando...
La pagina si sta caricando...
La pagina si sta caricando...
La pagina si sta caricando...
La pagina si sta caricando...
La pagina si sta caricando...
La pagina si sta caricando...
La pagina si sta caricando...
La pagina si sta caricando...
La pagina si sta caricando...
La pagina si sta caricando...
La pagina si sta caricando...
La pagina si sta caricando...
La pagina si sta caricando...
La pagina si sta caricando...
La pagina si sta caricando...
La pagina si sta caricando...
La pagina si sta caricando...
La pagina si sta caricando...
La pagina si sta caricando...
La pagina si sta caricando...
La pagina si sta caricando...
-
 1
1
-
 2
2
-
 3
3
-
 4
4
-
 5
5
-
 6
6
-
 7
7
-
 8
8
-
 9
9
-
 10
10
-
 11
11
-
 12
12
-
 13
13
-
 14
14
-
 15
15
-
 16
16
-
 17
17
-
 18
18
-
 19
19
-
 20
20
-
 21
21
-
 22
22
-
 23
23
-
 24
24
-
 25
25
-
 26
26
-
 27
27
-
 28
28
-
 29
29
-
 30
30
-
 31
31
-
 32
32
-
 33
33
-
 34
34
-
 35
35
-
 36
36
-
 37
37
-
 38
38
-
 39
39
-
 40
40
-
 41
41
-
 42
42
-
 43
43
-
 44
44
-
 45
45
-
 46
46
-
 47
47
-
 48
48
-
 49
49
-
 50
50
-
 51
51
-
 52
52
-
 53
53
-
 54
54
-
 55
55
-
 56
56
-
 57
57
-
 58
58
-
 59
59
-
 60
60
-
 61
61
-
 62
62
-
 63
63
-
 64
64
-
 65
65
-
 66
66
-
 67
67
-
 68
68
-
 69
69
-
 70
70
-
 71
71
-
 72
72
-
 73
73
-
 74
74
-
 75
75
-
 76
76
-
 77
77
-
 78
78
-
 79
79
-
 80
80
-
 81
81
-
 82
82
-
 83
83
-
 84
84
-
 85
85
-
 86
86
-
 87
87
-
 88
88
-
 89
89
-
 90
90
-
 91
91
-
 92
92
-
 93
93
-
 94
94
-
 95
95
-
 96
96


Kawai AnyTime ATX2-p Manuale del proprietario
- Tipo
- Manuale del proprietario
in altre lingue
- English: Kawai AnyTime ATX2-p Owner's manual