Rowlett DE205 Manuale del proprietario
- Categoria
- Macchine da caffè
- Tipo
- Manuale del proprietario

Model • Model • Modèle • Modell • Modello • Modelo:
DE205
Coffee pod
machine
Instruction manual
EN Coffee pod machine
Instruction manual
2DE Kaffeepad-Maschine
Bedienungsanleitung
23
NL Koffiepadmachine
Gebruikshandleiding
9IT Macchina da caffè a capsule
Manuale di istruzioni
30
FR Machine à café à capsules
Mode d’emploi
16 ES Cafetera de cápsulas
Manual de instrucciones
37

2
EN
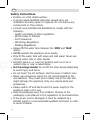
Safety Instructions
• Position on a flat, stable surface.
• A service agent/qualified technician should carry out
installation and any repairs if required. Do not remove any
components on this product.
• Consult Local and National Standards to comply with the
following:
- Health and Safety at Work Legislation
- BS EN Codes of Practice
- Fire Precautions
- IEE Wiring Regulations
- Building Regulations
• Always fill the water tank between the ‘MIN’ and ‘MAX’
marks.
• NEVER operate the appliance when empty.
• Only fill the water tank with clean and cold water. Never use
mineral water, milk or other liquids.
• DO NOT place on or near hot surfaces such as a hob or
radiant rings or near a naked flame.
• Hot beverage inside! Do not lift the lever during dispensing
to avoid injury and burns.
• Do not touch the hot surfaces. Use the lever or buttons only.
• Never use accessories which are not recommended by the
manufacturer. They could pose a safety risk to the user and
might damage the appliance. Only use original parts and
accessories.
• Always switch off and disconnect the power supply to the
appliance when not in use.
• Keep all packaging away from children. Dispose of the
packaging in accordance to the regulations of local authorities.
• If the power cord is damaged, it must be replaced by a
Rowlett agent or a recommended qualified technician in order
to avoid a hazard.

3
EN
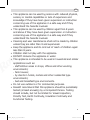
• This appliance can be used by persons with reduced physical,
sensory or mental capabilities or lack of experience and
knowledge if they have been given supervision or instruction
concerning use of the appliance in a safe way and if they
understand the hazards involved.
• This appliance can be used by children aged from 8 years
and above if they have been given supervision or instruction
concerning use of the appliance in a safe way and if they
understand the hazards involved.
• Cleaning and user maintenance shall not be made by children
unless they are older than 8 and supervised.
• Keep the appliance and its cord out of reach of children aged
less than 8 years.
• Children shall not play with the appliance.
• DO NOT immerse the appliance in water.
• This appliance is intended to be used in household and similar
applications such as:
- staff kitchen areas in shops, offices and other working
environments;
- farm houses;
- by clients in hotels, motels and other residential type
environments;
- bed and breakfast type environments.
• Do not use outdoors or for commercial purposes.
• Rowlett recommend that this appliance should be periodically
tested (at least annually) by a Competent Person. Testing
should include, but not be limited to: Visual Inspection,
Polarity Test, Earth Continuity, Insulation Continuity and
Functional Testing.

4
EN
• Rowlett recommend that this product is connected to a circuit
protected by an appropriate RCD (Residual Current Device).
Introduction
Please take a few moments to carefully read through this manual. Correct maintenance and operation of
this machine will provide the best possible performance from your Rowlett product.
Pack Contents
The following is included:
• Coffee pod machine
• Instruction manual
Rowlett prides itself on quality and service, ensuring that at the time of packaging the contents are
supplied fully functional and free of damage.
Should you find any damage as a result of transit, please contact your Rowlett dealer immediately.
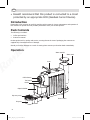
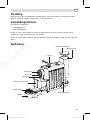
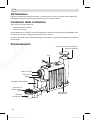
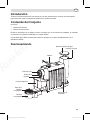
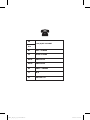
Operation
Water tank
Power switch
Drip tray
Drip tray cover
Capsule basket
Coffee button
Tea button
Nozzle
Lever
Water tank lid

5
EN
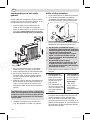
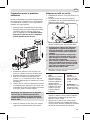
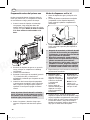
Preparation before first use
Rowlett recommend that the appliance is cleaned
out before using for the first time, or if the
appliance has been sat unused for an extended
period of time.
1. Insert the Capsule Basket into the Drip Tray,
then push the drip tray into the appliance.
Remove the water tank from its base and fill
with water. Never overfill or fill the tank
while seated on the base.
2. Put the water tank back into position. Then
place a container on the drip tray.
3. Connect to the mains power supply.
4. Turn the power switch On (“I” position).
Both coffee button and tea button will flash,
indicating the appliance is warming up.
5. Once the 2 buttons stop flashing and remain
on, press the coffee button and wait for the
water to dispense. Repeat 5 times to rinse the
internal system.
Note: While pressing the Coffee button or
Tea button, the appliance may produce a
pumping sound, this is normal indicating
water is pumped for brewing coffee.
6. Remove the container and discard the water
inside. The appliance is now ready for use.
Dispensing coffee or tea
1. Fill the water tank then locate it on the base.
2. Lift the lever and insert a Capsule (compatible
with Nespresso Capsules). Then push the Lever
down fully.
3. Put a cup on the drip tray. Then turn on the
appliance to start brewing.
• After turned on, if the Coffee button and
Tea button take turns to flash quickly,
the appliance has a lack of water and
needs to be refilled.
• During brewing, you can press the coffee
or tea button to halt the process; press
again to continue.
• To ensure the best taste and no flavour
transfer, always ensure to dispense
hot water to rinse the system when
switching between coffee and tea.
4. Wait until the 2 buttons light up and remain
on.
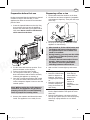
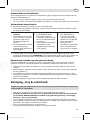
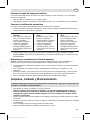
5. To dispense coffee:
• Press the Coffee button
ONCE to dispense an
Espresso, the button
will light up and remain
on.
• Press the Coffee button
TWICE to dispense a
Lungo, the button will
flash slowly.
5. To dispense tea:
• Press the tea
button ONCE to
dispense tea.
• Note: Tea
extracts at
a higher
temperature than
coffee.
6. After use, lift the lever to expel the capsule
into the capsule basket. Then push the Lever
down fully.
7. Press the coffee button. Hot water will flush
through the system then flow into the drip tray.
Switch off, unplug and allow to cool before
cleaning.

6
EN
Automatic standby function
In case of inactivity within 10 minutes, the appliance will enter standby mode and the 2 indicator lights
will turn off.
• To restart brewing, just press any button.
• To turn off, turn the power switch off (“O” position) and disconnect from the power supply.
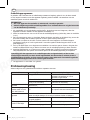
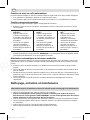
Automatic dose function
Auto-dose function ensures drink consistency.
1. Lift the lever and insert a capsule. Then push the Lever down fully. Place a cup on the Drip Tray.
2. Setting Espresso dose:
• Press the Coffee Button
ONCE and hold for 5
seconds, then release.
The appliance will start
dispensing.
• When desired amount is
dispensed, press the Coffee
Button again to stop.
2. Setting lungo dose:
• Press the Coffee Button
TWICE and hold for 5
seconds, then release.
The appliance will start
dispensing.
• When desired amount is
dispensed, press the Coffee
Button again to stop.
2. Setting tea dose:
• Press the Tea button ONCE
and hold for 5 seconds,
then release. The appliance
will start dispensing.
• When desired amount is
dispensed, press the Tea
Button again to stop.
3. You have now finished programmed the auto-dose Memory for the desired quantity of beverage.
NOTE: Program will be saved even if the appliance is unplugged or cut off power accidentally.
Automatic dispensing of desired beverage
While the appliance is warming up, you can pre-select your desired beverage. Once warming up is
completed, the appliance will automatically dispense the selected beverage (Coffee or Tea).
1. Lift the Lever and insert the capsule. Then close the Lever. Place a cup on the Drip Tray.
2. After turned on, both Coffee and Tea buttons will flash to indicate that the appliance is warming up.
3. While warming up, press the Coffee Button once/twice for Espresso/Lungo, or press the Tea Button
once for tea. The selected button will flash and the other button will cease to illuminate.
4. After warmed up, the appliance will automatically dispense the selected beverage.
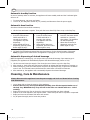
Cleaning, Care & Maintenance
Always disconnect the appliance from the power supply and let it cool down before cleaning
and maintenance.
• Use a damp cloth to clean the exterior of the appliance.
• Remove the Drip Tray and Capsule Basket assembly, then lift the Capsule Basket out of
the Drip Tray. WARNING: Drip Tray will still be hot after use. Handle with care - risk of
scalding.
• Empty and rinse the Drip Tray in the sink to remove any liquid that may have collected.
• Dispose of the used capsules in the capsule basket - check if the pods can be recycled or composted.
• Empty and rinse out the Water Tank after each session.
• Dry all parts thoroughly and re-locate into position.

7
EN
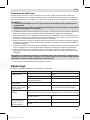
Descaling program
In hard water areas limescale can build up within the appliance after prolonged use. For best taste and
extended appliance life, descale it regularly. Installation of a water filtration system is also recommended.
IMPORTANT:
• Failure to descale or maintain will invalidate your guarantee.
• Always use a suitable descaler for coffee machines and follow the manufacturer’s
instructions on the container.
1. Immediately after turned on, if both coffee and tea buttons flash quickly, the appliance needs to
descale. Turn the appliance off immediately.
2. Remove the water tank and fill with descaling solution (water and descaler ratio: 4:1).
3. Put the water tank back into position. Then place a container on the drip tray. Ensure the Lever is
pushed down fully and no capsule is present.
4. Turn on and wait for the coffee and tea buttons to stop flashing. Press both buttons firmly at the
same time and hold for 5 seconds. Both Buttons will now quickly flash.
5. Press the Coffee Button to start descaling. Your machine will dispense. This will continue until the
Water Tank is empty. Wait 10 minutes for the Descaling Solution to take effect.
6. Rinse the Water Tank and fill with fresh water. Repeat step 5 (Dispense) and flush at least two full
tanks of water through the system to remove any traces of the Descaling Solution.
Note: If turned off in descaling mode, the appliance will stay in this mode when switched
back on. To exit the mode, press both Coffee and Tea Buttons at the same time and hold for
5 seconds. Both lights will go back to solid illumination.
7. The appliance is now ready for use again.
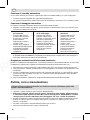
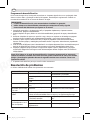
Troubleshooting
A qualified technician must carry out repairs if required.
Fault Probable Cause Solution
The unit is not working The unit is not switched on Check the unit is plugged in correctly and
switched on
Plug or lead is damaged Replace plug or lead
Fuse in the plug has blown Replace the plug fuse
Mains Power supply fault Check Mains Power supply
Loud noise emitted No water in water tank Turn Off and refill
Indicator lights come on
but no coffee/tea out Capsule inserted may be faulty Wait a few seconds, then try again with a
new capsule
Water beneath the unit There will be a small amount of condensation underneath the machine after
making numerous beverages. This is safe and does not mean any leakage
Water tank may not be seated
correctly Check and locate in place
Capsule fails to go
into capsule holder or
capsule basket
Capsule basket is full Empty the basket
Lever not lifted fully Lift the lever fully

8
EN
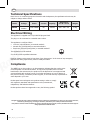
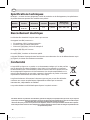
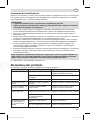
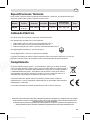
Technical Specifications
Note: Due to our continuing program of research and development, the specifications herein may be
subject to change without notice.
Model Voltage Power Current Capacity Dimensions
H x W x D mm Weight
DE205 220-240V~,
50-60Hz 1140-1365W 6A 0.65ml 250 x 109 x 370 3.3kg
Electrical Wiring
This appliance is supplied with a 3 pin BS1363 plug and lead.
The plug is to be connected to a suitable mains socket.
This appliance is wired as follows:
• Live wire (coloured brown) to terminal marked L
• Neutral wire (coloured blue) to terminal marked N
• Earth wire (coloured green/yellow) to terminal marked E
This appliance must be earthed.
If in doubt consult a qualified electrician.
Electrical isolation points must be kept clear of any obstructions. In the event of any emergency
disconnection being required they must be readily accessible.
Compliance
The WEEE logo on this product or its documentation indicates that the product must
not be disposed of as household waste. To help prevent possible harm to human
health and/or the environment, the product must be disposed of in an approved and
environmentally safe recycling process. For further information on how to dispose of
this product correctly, contact the product supplier, or the local authority responsible for
waste disposal in your area.
Rowlett parts have undergone strict product testing in order to comply
with regulatory standards and specifications set by international,
independent, and federal authorities.
Rowlett products have been approved to carry the following symbol:
All rights reserved. No part of these instructions may be produced or transmitted in any form or by any means, electronic,
mechanical, photocopying, recording or otherwise, without the prior written permission of Rowlett.
Every effort is made to ensure all details are correct at the time of going to press, however, Rowlett reserves the right to
change specifications without notice.

9
NL
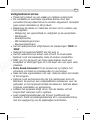
Veiligheidsinstructies
• Plaats het product op een vlakke en stabiele ondergrond.
• De installatie en eventuele reparaties dienen door een
servicetechnicus/vaktechnicus te worden uitgevoerd. Verwijder
geen enkel onderdeel op dit product.
• Raadpleeg de lokale en nationale normen om te voldoen aan
het volgende:
- Wetgeving van gezondheid en veiligheid op de werkplaats
- Werkregels
- Brandpreventie
- IEE bekabelingsnormen
- Bouwverordeningen
• Vul het waterreservoir altijd tussen de markeringen ‘MIN’ en
‘MAX’.
• Gebruik het apparaat NOOIT als het leeg is.
• Vul het waterreservoir alleen met schoon en koud water.
Gebruik nooit mineraalwater, melk of andere vloeistoffen.
• NIET op of in de buurt van hete oppervlakken zoals een
kookplaat of stralingsringen of in de buurt van een open vlam
plaatsen.
• Hete drank binnenin! Til de hendel niet op tijdens het
schenken om letsel en brandwonden te voorkomen.
• Raak de hete oppervlakken niet aan. Gebruik alleen de hendel
of de knoppen.
• Gebruik nooit accessoires die niet zijn aanbevolen door de
fabrikant. Ze kunnen een veiligheidsrisico betekenen voor de
gebruiker en het apparaat schade berokkenen. Gebruik alleen
originele onderdelen en accessoires.
• Schakel het apparaat altijd uit en trek de stekker uit het
stopcontact wanneer niet in gebruik.
• Laat verpakkingsmateriaal niet binnen handbereik van
kinderen. Dank verpakkingsmateriaal af in overeenstemming
met de regelgeving van de plaatselijke autoriteiten.

10
NL
• Indien de stroomkabel beschadigd is geraakt, dient men deze
door een Rowlett-technicus of een aanbevolen vaktechnicus te
laten vervangen om gevaarlijke situaties te vermijden.
• Dit apparaat kan worden gebruikt door personen met
verminderde lichamelijke, zintuiglijke of geestelijke vermogens
of met gebrek aan ervaring en kennis, indien zij onder toezicht
staan of instructies hebben gekregen voor een veilig gebruik
van het apparaat en indien zij de gevaren ervan begrijpen.
• Dit apparaat kan door kinderen vanaf 8 jaar worden gebruikt,
indien zij onder toezicht staan of instructies hebben gekregen
over het veilige gebruik van het apparaat en de gevaren ervan
begrijpen.
• Reiniging en gebruikersonderhoud mogen niet worden
uitgevoerd door kinderen tenzij ze ouder zijn dan 8 jaar en
onder toezicht staan.
• Houd het apparaat en het snoer buiten het bereik van
kinderen jonger dan 8 jaar.
• Laat kinderen het apparaat niet als speelgoed gebruiken.
• Dompel het apparaat NIET onder in water.
• Dit apparaat is bedoeld voor gebruik in huishoudelijke en
soortgelijke toepassingen, zoals:
- personeelskeukens in winkels, kantoren en andere
werkomgevingen;
- boerderijen;
- door klanten in hotels, motels, bed & breakfast en andere
woonomgevingen;
- omgevingen van het type bed & breakfast.
• Niet buitenshuis of voor commerciële doeleinden gebruiken.
• Rowlett beveelt aan dat dit apparaat periodiek (minstens
jaarlijks) door een bevoegd persoon wordt getest. Testen
moeten omvatten, maar zijn niet beperkt tot: Visuele inspectie,
polariteittest, continuïteit van aarding, continuïteit van isolatie
en functionele test.

11
NL
Inleiding
Neem de tijd en lees deze handleiding aandachtig door. Een correct gebruik en onderhoud van deze
machine waarborgt de beste prestaties voor uw Rowlett-product.
Verpakkingsinhoud
Het volgende is inbegrepen:
• Koffiepadmachine
• Gebruikshandleiding
Rowlett is trots op haar kwaliteit en service en garandeert dat de inhoud, op het ogenblik van de
verpakking, volledig functioneel en vrij van schade is.
Mocht uw product tijdens transport zijn beschadigd, neem dan onmiddellijk contact op met uw Rowlett-
dealer.
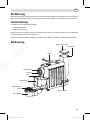
Bediening
Waterreservoir
Stroomschakelaar
Lekbak
Deksel lekbak
Bakje voor koffiecups
Koffie-toets
Thee-toets
Mondstuk
Hendel
Waterreservoirdeksel

12
NL
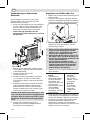
Voorbereiding voor het eerste
gebruik
Rowlett raadt aan het apparaat schoon te maken
voordat u het voor de eerste keer gebruikt, of als
het apparaat langere tijd niet is gebruikt.
1. Plaats het bakje voor de koffiecups in de
lekbak en duw de lekbak in het apparaat.
Neem het waterreservoir uit de basis en vul het
met water. Vul de tank nooit te vol of vul
de tank nooit terwijl deze op de basis zit.
2. Zet het waterreservoir weer op zijn plaats.
Plaats vervolgens een bakje op de lekbak.
3. Sluit het apparaat aan op het elektriciteitsnet.
4. Zet de aan/uit-schakelaar aan (stand "I").
Zowel de koffie- als de theetoets knipperen
om aan te geven dat het apparaat aan het
opwarmen is.
5. Zodra de 2 toetsen stoppen met knipperen en
blijven branden, drukt u op de koffietoets en
wacht u tot het water uit de machine komt.
Herhaal dit 5 maal om het interne systeem te
spoelen.
Opmerking: Als u op de koffie- of theetoets
drukt, kan het apparaat een pompend geluid
produceren. Dit is normaal en geeft aan dat
er water wordt opgepompt voor het zetten
van de koffie.
6. Verwijder het bakje en gooi het water erin
weg. Het apparaat is nu klaar voor gebruik.
Koffie of thee schenken
1. Vul het waterreservoir en plaats het op de basis.
2. Til de hendel op en plaats een koffiecup
(compatibel met Nespresso-koffiecups). Duw
de hendel vervolgens volledig naar beneden.
3. Zet een kopje op de lekbak en zet vervolgens het
apparaat aan om te beginnen met brouwen.
• Als de koffie- en theetoets na het
inschakelen afwisselend snel knipperen,
heeft het apparaat een tekort aan water
en moet het worden bijgevuld.
• Tijdens het koffiezetten kunt u op de
koffie- of theetoets drukken om het
proces te stoppen. Druk nogmaals om
verder te gaan.
• Om de beste smaak en geen
smaakoverdracht te garanderen, dient
u altijd heet water te laten lopen om
het systeem te spoelen bij het wisselen
tussen koffie en thee.
4. Wacht tot de 2 toetsen oplichten en blijven
branden.
5. Koffie schenken:
• Druk EENMAAL op de
Koffie-toets om een
Espresso te schenken.
De toets licht op en
blijft branden.
• Druk TWEEMAAL op
de Koffie-toets om een
Lungo te schenken. De
toets gaat langzaam
knipperen.
5. Thee schenken:
• Druk EENMAAL op
de thee-toets om
thee te schenken.
• Opmerking:
Thee wordt
bij een hogere
temperatuur
geëxtraheerd dan
koffie.
6. Til na gebruik de hendel op om de koffiecup uit
te werpen naar het bakje voor cups. Duw de
hendel vervolgens volledig naar beneden.
7. Druk op de koffie-toets. Heet water spoelt
door het systeem en stroomt vervolgens in de
lekbak. Zet het apparaat uit, trek de stekker uit
het stopcontact en laat het apparaat afkoelen
alvorens het te reinigen.

13
NL
Automatische stand-byfunctie
Als het apparaat binnen 10 minuten niet wordt gebruikt, gaat het apparaat naar de stand-bymodus en
gaan de 2 indicatielampjes uit.
• Om het brouwen opnieuw te starten, drukt u gewoon op een willekeurige toets.
• Om uit te zetten, zet u de aan/uit-schakelaar uit (stand "O") en haalt u de stekker uit het stopcontact.
Automatische doseerfunctie
De automatische doseerfunctie zorgt voor een consistente drank.
1. Til de hendel op en plaats een koffiecup. Duw de hendel vervolgens volledig naar beneden. Plaats
een kopje op het lekbakje.
2. Espresso-dosering
instellen:
• Druk EENMAAL op de Koffie-
toets, houd deze 5 seconden
ingedrukt en laat dan los.
Het apparaat begint met
doseren.
• Als de gewenste hoeveelheid
is geschonken, drukt u
nogmaals op de Koffie-toets
om te stoppen.
2. Lungo-dosering instellen:
• Druk TWEEMAAL op de
Koffie-toets, houd deze
5 seconden ingedrukt en laat
dan los. Het apparaat begint
met doseren.
• Als de gewenste hoeveelheid
is geschonken, drukt u
nogmaals op de Koffie-toets
om te stoppen.
2. Theedosering instellen:
• Druk EENMAAL op de
Thee-toets, houd deze
5 seconden ingedrukt en
laat dan los. Het apparaat
begint met doseren.
• Als de gewenste
hoeveelheid is geschonken,
drukt u nogmaals op de
Thee-toets om te stoppen.
3. U bent nu klaar met het programmeren van het geheugen voor automatische dosering van de
gewenste hoeveelheid drank. OPMERKING: Het programma blijft bewaard, zelfs als de stekker van
het apparaat uit het stopcontact wordt gehaald of de stroom per ongeluk wordt onderbroken.
Automatisch schenken van de gewenste drank
Terwijl het apparaat aan het opwarmen is, kunt u uw gewenste drank vooraf selecteren. Zodra het
opwarmen is afgerond, schenkt het apparaat automatisch de geselecteerde drank (koffie of thee).
1. Til de hendel op en plaats de koffiecup erin. Sluit vervolgens de hendel. Plaats een kopje op het
lekbakje.
2. Na het aanzetten, knipperen zowel de Koffie- als de Thee-toets om aan te geven dat het apparaat
aan het opwarmen is.
3. Druk tijdens het opwarmen eenmaal/tweemaal op de Koffie-toets voor Espresso/Lungo, of druk
eenmaal op de Thee-toets voor thee. De geselecteerde knop gaat knipperen en de andere toets zal
ophouden met branden.
4. Nadat het apparaat is opgewarmd, zal het automatisch de gekozen drank schenken.
Reiniging, zorg & onderhoud
Koppel het apparaat altijd los van de stroomvoorziening en laat het afkoelen voordat u het
schoonmaakt en onderhoudt.
• Gebruik een vochtige doek om de buitenkant van het apparaat schoon te maken.
• Verwijder de lekbak en het bakje voor de koffiecups en til het bakje voor de koffiecups
uit de lekbak. WAARSCHUWING: De lekbak zal na gebruik nog heet zijn. Voorzichtig
hanteren - risico op verbranding.
• Leeg de lekbak en spoel deze in de gootsteen om eventueel opgevangen vloeistof te verwijderen.
• Gooi de gebruikte koffiecups weg in het bakje daarvoor. Controleer of de koffiecups kunnen worden
gerecycled of tot compost verwerkt kunnen worden.
• Leeg en spoel het waterreservoir na elke sessie uit.
• Droog alle onderdelen grondig af en plaats ze terug op hun plaats.

14
NL
Ontkalkingsprogramma
In gebieden met hard water kan er kalkafzetting ontstaan na langdurig gebruik. Voor de beste smaak
en een langere levensduur moet het apparaat regelmatig worden ontkalkt. Het installeren van een
waterfiltersysteem wordt ook aanbevolen.
BELANGRIJK:
• Als u het apparaat niet ontkalkt of onderhoudt, vervalt uw garantie.
• Gebruik altijd een geschikt ontkalkingsmiddel voor koffiemachines en volg de instructies
van de fabrikant op het bakje.
1. Als onmiddellijk na het inschakelen zowel de koffie- als de thee-toets snel knipperen, dient het
apparaat te worden ontkalkt. Zet het apparaat onmiddellijk uit.
2. Neem het waterreservoir eruit en vul het met de ontkalkingsoplossing (verhouding water en ontkalker
is 4:1).
3. Zet het waterreservoir weer op zijn plaats. Plaats vervolgens een bakje op de lekbak. Zorg ervoor dat
de hendel volledig naar beneden is gedrukt en dat er geen koffiecup aanwezig is.
4. Zet het aan en wacht tot de koffie- en thee-toetsen niet meer knipperen. Druk beide knoppen
tegelijkertijd stevig in en houd ze gedurende 5 seconden ingedrukt. Beide knoppen zullen nu snel
gaan knipperen.
5. Druk op de Koffie-toets om te beginnen met ontkalken. Uw machine gaat nu doseren. Dit gaat door
totdat het waterreservoir leeg is. Wacht 10 minuten om de ontkalkingsoplossing te laten inwerken.
6. Spoel het waterreservoir en vul het met vers water. Herhaal stap 5 (Doseren) en spoel ten minste twee
volle watertanks door het systeem om eventuele sporen van de ontkalkingsoplossing te verwijderen.
Opmerking: Als het apparaat in de ontkalkingsmodus is uitgeschakeld, zal het in deze
modus blijven wanneer het weer wordt ingeschakeld. Om de modus te verlaten, drukt u
tegelijkertijd op de koffie- en thee-toets en houdt u deze gedurende 5 seconden ingedrukt.
Beide indicatielampjes zullen weer continu gaan branden.
7. Het apparaat is nu weer klaar voor gebruik.
Probleemoplossing
Indien nodig moet een gekwalificeerde technicus reparaties uitvoeren.
Probleem Mogelijke oorzaak Oplossing
De eenheid werkt niet Het apparaat staat uit Controleer of de stroomkabel van het
apparaat is aangesloten en of het
apparaat is ingeschakeld
Stekker of kabel is beschadigd Vervang de stekker of kabel
Storing in de netvoeding Controleer de netvoeding
Hard geluid komt uit het
apparaat Er is geen water in het
waterreservoir Uitzetten en bijvullen
Indicatielampjes gaan
branden maar er komt
geen koffie/thee uit
Geplaatste koffiecup kan defect
zijn Wacht een paar seconden en probeer het
dan opnieuw met een nieuwe koffiecup.
Water onder het
apparaat Er zal zich een kleine hoeveelheid condensatie onder de machine bevinden na het
maken van talrijke drankjes. Dit is veilig en betekent niet dat er lekkage is.
Het waterreservoir is misschien
niet goed geplaatst Controleer en zet het goed op zijn plaats
Koffiecup gaat niet in de
houder of het bakje Bakje voor koffiecups is vol Maak het bakje leeg
Hendel niet volledig opgetild Til de hendel volledig op

15
NL
Technische specificaties
Opmerking: Als gevolg van ons voortdurende programma van onderzoek en ontwikkeling, kunnen de
specificaties hierin zonder voorafgaande kennisgeving worden gewijzigd.
Model Spanning Vermogen Stroom Capaciteit Afmetingen
h x b x d mm Gewicht
DE205 220-240V~,
50-60Hz 1140-1365W 6A 0,65 ml 250 x 109 x 370 3,3 kg
Elektrische bedrading
Men dient de stekker op een geschikt stopcontact aan te sluiten.
De bedrading van dit apparaat is als volgt:
• Stroomkabel (bruin) naar de aansluitklem gemarkeerd met L
• Neutraalkabel (blauw) naar de aansluitklem gemarkeerd met N
• Aardekabel (groen/geel) naar de aansluitklem gemarkeerd met E
Dit apparaat moet worden geaard.
Bij twijfels raadpleeg een vakkundige elektricien.
De elektrische isolatiepunten mogen niet worden geblokkeerd. In geval van een nooduitschakeling
moeten de isolatiepunten direct toegankelijk zijn.
Productconformiteit
Het WEEE-logo op dit product of in de bijbehorende documentatie geeft aan dat het
product niet onder huisvuil valt en als zodanig ook niet mag worden verwerkt. Ter
preventie van mogelijke gevaren voor de gezondheid van personen en/of voor het milieu,
dient men dit product in overeenstemming met het voorgeschreven en milieuveilige
recyclingproces als afval te verwerken. Raadpleeg uw productleverancier of uw plaatselijk
afvalverwerkingsbedrijf voor meer informatie over de juiste afvalverwerking van dit
product.
De onderdelen van Rowlett-producten hebben strenge producttesten ondergaan om te
voldoen aan wettelijke regels en specificaties die door internationale, onafhankelijke en
landelijke overheden worden voorgeschreven.
Rowlett-producten werden goedgekeurd om het volgende symbool te dragen:
Alle rechten voorbehouden. Het is verboden om deze handleiding, hetzij volledig of gedeeltelijk, elektronisch of mechanisch
te reproduceren, kopiëren, op opslagmedia op te slaan of op enigerlei wijze over te dragen, zonder voorafgaande
goedkeuring van Rowlett.
Wij hebben er alles aan gedaan om er zeker van te zijn dat op publicatiedatum van de handleiding alle details correct zijn,
desondanks, behoudt Rowlett het recht voor om specificaties zonder aankondiging te wijzigen.

16
FR
Consignes de sécurité
• Placez l’appareil sur une surface plane, stable.
• L’installation et les éventuelles réparations doivent être
confiées à un dépanneur/technicien qualifié. Ne retirez aucun
élément de ce produit.
• Consultez les normes locales et nationales pour vous
conformer à ce qui suit :
- lois sur l’hygiène et la sécurité au travail ;
- codes de bonnes pratiques BS EN ;
- précautions contre le risque d’incendie ;
- réglementations sur les branchements électriques IEE ;
- règlements sur la construction.
• Remplissez le réservoir d’eau entre les repères « MIN » et
« MAX ».
• NE faites JAMAIS fonctionner la machine quand le réservoir
est vide.
• Utilisez uniquement de l’eau propre et froide pour remplir le
réservoir. N’utilisez jamais d’eau minérale, de lait ou d’autres
liquides.
• NE la placez PAS au-dessus ou à proximité de surfaces
chaudes telles que des plaques de cuisson ou des anneaux
radiants ou à proximité d’une flamme nue.
• Contient des boissons brûlantes ! Ne soulevez pas le levier
quand la boisson est versée coule pour éviter les blessures et
les brûlures.
• Ne touchez pas les surfaces chaudes. Utilisez uniquement le
levier ou les boutons.
• N'utilisez jamais d'accessoires non recommandés par le
fabricant. Ils pourraient constituer un risque pour la sécurité
de l'utilisateur et endommager l'appareil. N'utilisez que des
pièces et accessoires d'origine.
• Éteignez et débranchez toujours l’appareil lorsqu’il n’est pas
utilisé.
• Gardez les emballages hors de portée des enfants.
Débarrassez-vous des emballages conformément aux
réglementations des autorités locales.

17
FR
• Un cordon d’alimentation endommagé doit être remplacé par
un agent Rowlett ou un technicien qualifié recommandé, pour
éviter tout danger.
• Cet appareil peut être utilisé par des personnes dont les
capacités physiques, sensorielles ou mentales sont réduites ou
qui manquent d’expérience et de connaissances, à condition
qu’elles aient bénéficié d’une surveillance ou d’instructions
concernant l’utilisation de la machine en toute sécurité et
qu’elles comprennent les risques encourus.
• Cette machine peut être utilisée par des enfants âgés
de 8 ans et plus s’ils ont reçu une surveillance ou des
instructions concernant son utilisation en toute sécurité et s’ils
comprennent les risques encourus.
• Le nettoyage et l’entretien par l’utilisateur ne doivent pas être
effectués par des enfants, sauf s’ils ont plus de 8 ans et sont
supervisés.
• Gardez la machine et son cordon hors de portée des enfants
de moins de 8 ans.
• Les enfants ne doivent pas jouer avec l’appareil.
• NE plongez PAS l’appareil dans l’eau.
• Cette machine est destinée à être utilisée dans des
applications domestiques et autres applications similaires telles
que :
- les cuisines du personnel dans les magasins, les bureaux et
autres environnements de travail ;
- les fermes ;
- par les clients dans les hôtels, les motels et d’autres
environnements de type résidentiel ;
- des environnements de type « bed and breakfast ».
• N’utilisez pas la machine en extérieur ou à des fins
commerciales.
• Rowlett recommande de faire tester régulièrement cet appareil
(une fois par an au minimum) par une personne compétente.
Les tests doivent inclure, sans s’y limiter, les éléments
suivants : inspection visuelle, test de polarité, continuité de la
terre, continuité de l’isolation et test fonctionnel.

18
FR
Introduction
Nous vous invitons à consacrer quelques instants à lire attentivement de ce mode d’emploi. L’entretien et
l’utilisation appropriés de cette machine vous permettront de tirer le meilleur de votre produit Rowlett.
Contenu de l’emballage
Les éléments suivants sont inclus :
• Machine à café à capsules
• Mode d’emploi
Rowlett attache une grande importance à la qualité et au service et veille à fournir des produits
entièrement fonctionnels parfaitement intacts au moment de l’emballage.
Nous vous prions de contacter votre revendeur Rowlett immédiatement si vous constatez un dommage
quelconque survenu pendant le transport du produit.
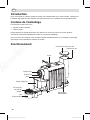
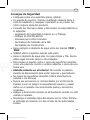
Fonctionnement
Réservoir à eau
Interrupteur
d’alimentation
Bac
d’égouttement
Couvercle du
bac récolte
gouttes
Panier à capsules
Bouton Café
Bouton Thé
Buse
Levier
Couvercle du réservoir à eau

19
FR
Préparation avant la première
utilisation
Rowlett recommande de nettoyer l’appareil avant
de l’utiliser pour la première fois. Il est également
recommandé de le nettoyer s’il est resté inutilisé
pendant une longue période.
1. Insérez le panier à capsules dans le bac récolte
gouttes puis poussez le bac récolte gouttes dans
la machine. Retirez le réservoir à eau de sa
base et remplissez-le d’eau. Ne faites jamais
déborder le réservoir et ne le remplissez
jamais quand il est sur sa base.
2. Remettez le réservoir à eau en place, puis
placez un récipient sur le bac récolte gouttes.
3. Branchez l’appareil sur le réseau électrique.
4. Appuyez sur le bouton marche/arrêt (en
position « I »). Les boutons Café et Thé vont
clignoter, indiquant que la machine est en train
de chauffer.
5. Une fois que les 2 boutons arrêtent de clignoter
et restent allumés, appuyez sur le bouton Café
et attendez que l’eau coule. Répétez l’opération
5 fois pour rincer le système interne.
Remarque : En appuyant sur les boutons
Café ou Thé, la machine peut produire
un son de pompage, ce qui est normal et
indique que l’eau est pompée pour passer
dans le café.
6. Retirez le récipient et jetez l’eau qu’il contient.
L’appareil est maintenant prêt à être utilisé.
Préparer un café ou un thé
1. Remplissez le réservoir à eau puis placez-le sur
la base.
2. Soulevez le levier et insérez une capsule
(compatible avec les capsules Nespresso), puis
abaissez le levier à fond.
3. Placez une tasse sur le bac récolte gouttes, puis
allumez la machine pour lancer la percolation.
• Si les boutons Café et Thé clignotent
rapidement l’un après l’autre après
avoir été actionnés, c’est le signe que
la machine manque d’eau et doit être
remplie.
• Pendant la percolation, vous pouvez
appuyer sur les boutons Café ou Thé
pour stopper le processus ; appuyez à
nouveau pour reprendre.
• Pour assurer le goût le plus parfait et
éviter les transferts de saveurs, veillez
à toujours faire couler de l’eau chaude
pour rincer le système quand vous
alternez entre thé et café.
4. Attendez jusqu’à ce que les deux boutons
s’allument et restent allumés.
5. Pour faire couler un
café :
• Appuyez sur le bouton
Café UNE FOIS pour
préparer un Espresso,
le bouton s’allume et
demeure allumé.
• Appuyez deux fois sur
le bouton Café pour
préparer un Lungo,
le bouton clignote
lentement.
5. Pour faire couler
un thé :
• Appuyez sur le
bouton Thé UNE
FOIS pour préparer
un thé.
• Remarque : Le
thé est versé à une
température plus
élevée que le café.
6. Après utilisation, soulevez le levier pour
expulser la capsule vers le panier à capsules,
puis abaissez complètement le levier. puis
abaissez le levier à fond.
7. Appuyez sur le bouton Café. L’eau chaude
rincera le système puis tombera dans le bac
récolte gouttes. Éteignez, débranchez et laissez
refroidir la machine avant de la nettoyer.

20
FR
Fonction de mise en veille automatique
En cas d’inactivité pendant 10 minutes, la machine passe en mode veille et les deux voyants s’éteignent.
• Pour redémarrer la percolation, appuyez sur n’importe quel bouton.
• Pour l’éteindre, appuyez sur le bouton marche/arrêt (en position « O ») et débranchez la machine.
Fonction dosage automatique
La fonction de dosage automatique assure l’homogénéité de la boisson.
1. Soulevez le levier et insérez une capsule. puis abaissez le levier à fond. Placez une tasse sur le bac
récolte gouttes.
2. Réglage du dosage
espresso :
• Appuyez UNE FOIS sur
le bouton Café pendant
5 secondes, puis relâchez-le.
La machine commencera la
percolation.
• Une fois que la quantité
souhaitée est atteinte,
appuyez à nouveau sur le
bouton Café pour arrêter la
percolation.
2. Réglage du dosage
lungo :
• Appuyez DEUX FOIS sur
le bouton Café pendant
5 secondes, puis relâchez-le.
La machine commencera la
percolation.
• Une fois que la quantité
souhaitée est atteinte,
appuyez à nouveau sur le
bouton Café pour arrêter la
percolation.
2. Réglage du dosage du
thé :
• Appuyez UNE FOIS sur
le bouton Thé pendant
5 secondes, puis
relâchez-le. La machine
commencera la percolation.
• Une fois que la quantité
souhaitée est atteinte,
appuyez à nouveau sur le
bouton Thé pour arrêter la
percolation.
3. Vous avez maintenant terminé la programmation de la mémoire des dosages automatiques selon la
quantité souhaitée pour chaque boisson. REMARQUE : Les programmes seront sauvegardés même
si la machine est débranchée ou en cas de panne de courant.
Distribution automatique de la boisson souhaitée
Pendant que la machine chauffe, vous pouvez présélectionner la boisson que vous désirez. Une fois que
la période de chauffe est terminée, la machine distribue automatiquement la boisson sélectionnée (café
ou thé).
1. Soulevez le levier et insérez la capsule, puis abaissez le levier. Placez une tasse sur le bac récolte
gouttes.
2. Une fois la machine allumée, les boutons Café et Thé clignotent pour indiquer que la machine est en
train de chauffer.
3. Pendant la période de chauffe, appuyez une/deux fois sur le bouton Café pour un espresso/lungo ou
appuyez une fois sur le bouton Thé pour faire couler un thé. Le bouton sélectionné clignotera et l’autre
bouton s’éteindra.
4. Une fois la période de chauffe terminée, la machine distribuera automatiquement la boisson
sélectionnée.
Nettoyage, entretien et maintenance
Débranchez toujours la machine et laissez-la refroidir avant le nettoyage et la maintenance.
• Utilisez un chiffon humide pour nettoyer l’extérieur de la machine.
• Retirez l’ensemble bac récolte gouttes et panier à capsules, puis séparez le panier à
bascule du bac récolte gouttes. AVERTISSEMENT : Le bac récolte gouttes peut être encore
chaud, manipulez-le avec précaution. Risque de brûlure.
• Videz et rincez le bac récolte gouttes dans l’évier pour éliminer tout liquide éventuellement récupéré.
• Jetez les capsules usagées dans le panier à capsules. Vérifiez si les capsules peuvent être recyclées
ou compostées.
• Videz et rincez le réservoir à eau après chaque période d’utilisation.
• Séchez soigneusement tous les éléments puis remettez-les en place.
La pagina si sta caricando...
La pagina si sta caricando...
La pagina si sta caricando...
La pagina si sta caricando...
La pagina si sta caricando...
La pagina si sta caricando...
La pagina si sta caricando...
La pagina si sta caricando...
La pagina si sta caricando...
La pagina si sta caricando...
La pagina si sta caricando...
La pagina si sta caricando...
La pagina si sta caricando...
La pagina si sta caricando...
La pagina si sta caricando...
La pagina si sta caricando...
La pagina si sta caricando...
La pagina si sta caricando...
La pagina si sta caricando...
La pagina si sta caricando...
La pagina si sta caricando...
La pagina si sta caricando...
La pagina si sta caricando...
La pagina si sta caricando...
La pagina si sta caricando...
La pagina si sta caricando...
La pagina si sta caricando...
La pagina si sta caricando...
-
 1
1
-
 2
2
-
 3
3
-
 4
4
-
 5
5
-
 6
6
-
 7
7
-
 8
8
-
 9
9
-
 10
10
-
 11
11
-
 12
12
-
 13
13
-
 14
14
-
 15
15
-
 16
16
-
 17
17
-
 18
18
-
 19
19
-
 20
20
-
 21
21
-
 22
22
-
 23
23
-
 24
24
-
 25
25
-
 26
26
-
 27
27
-
 28
28
-
 29
29
-
 30
30
-
 31
31
-
 32
32
-
 33
33
-
 34
34
-
 35
35
-
 36
36
-
 37
37
-
 38
38
-
 39
39
-
 40
40
-
 41
41
-
 42
42
-
 43
43
-
 44
44
-
 45
45
-
 46
46
-
 47
47
-
 48
48


Rowlett DE205 Manuale del proprietario
- Categoria
- Macchine da caffè
- Tipo
- Manuale del proprietario
in altre lingue
- français: Rowlett DE205 Le manuel du propriétaire
- español: Rowlett DE205 El manual del propietario
- Deutsch: Rowlett DE205 Bedienungsanleitung
- Nederlands: Rowlett DE205 de handleiding
Altri documenti
-
Caffitaly System S05 Manuale del proprietario
-
-
Caffitaly System S06HS Scheda dati
-
-
-
-
-
-
-