
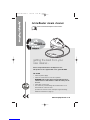
GrimeBuster steam cleaner
Please read and keep these instructions
www.morphyrichards.co.uk
getting the best from your
new cleaner...
No steam
•Check the power supply.
•Check the steam switch is set to the on position.
WARNING: If the cleaner has been boiled dry it must be
switched off for a few minutes to allow the safety cut-out
to reset.
•Check water is in the tank.
•The cleaner may need descaling. We recommend the use of
filtered water to reduce the scale.
(In hard water areas the cleaner will require regular descaling.
Follow the instructions on page 8.)
Please study all instructions carefully before use.
This product is also supplied with a user guide CD ROM.
70515+70516 Rev 1 19/5/04 3:59 PM Page 1

Important safety
instructions
The use of any electrical appliance
requires the following common sense safety
rules.
Primarily there is danger of injury or
death and secondly the danger of damage
to the appliance. These are indicated in the
text by the following two conventions:
WARNING: Danger to the person!
IMPORTANT: Damage to the appliance!
In addition we offer the following safety
advice.
Location
•Do not use or keep this product outside
when it is raining.
•Do not store the appliance near hot
ovens or heating appliances.
Children
•Never allow children to use this
appliance.
Personal safety
•WARNING: The filling cap must not
be opened during use.
•Let the cleaner cool for a few minutes
before re-filling.
•To protect against fire, electric shock
and personal injury do not immerse cord,
plug or cleaner in water or other liquid.
•The plug should be removed from the
wall socket after use, before cleaning,
filling or changing the accessories.
•The accessories get very hot. Allow to
cool before changing.
•Make certain the steam has stopped
before changing the accessories or
putting the hose aside.
•WARNING: Do not discharge the
steam towards people. Danger of
scalding.
•WARNING: Never touch the plug or
cable with wet hands.
•Steam must not be directed towards
equipment containing electrical
components, such as the interior of
ovens.
Other safety considerations
•Do not use any chemical detergents,
perfumes, alcohol etc in water.
•Repairs to electrical appliances are only
to be undertaken by trained personnel.
Unprofessional repairs can be dangerous
for users.
•Use only genuine Morphy Richards spare
parts and accessories.
•If the electrical cable becomes damaged
the complete cable assembly must be
replaced. Do not attempt this task
yourself, contact Morphy Richards using
the replacement parts number on the
front of this leaflet.
•The appliance must never be left running
when unsupervised.
•This steam cleaner is intended for
domestic use only. Misuse or use for
commercial or any other purpose will
render the guarantee invalid.
Product safety
•Never modify the cleaner in any way.
•When using the cleaner always keep it
horizontal.
Electrical requirements
Check that the voltage on the rating
plate of your appliance corresponds with
your house electricity which must be A.C.
(alternating current).
If the socket outlets in your home are
not suitable for the plug supplied with this
appliance the plug should be removed and
the appropriate one fitted.
WARNING: The plug removed from
the mains lead, if severed, must be
destroyed as a plug with a bared
flexible cord is hazardous if engaged
into a live socket outlet.
WARNING: This appliance must be
earthed.
Should the fuse in the 13 amp plug
require changing a 13 amp BS1362 fuse
must be fitted.
2
70515+70516 Rev 1 19/5/04 3:59 PM Page 2

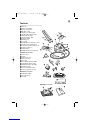
Features
⁄ Filler cap
¤ Heater on/off button
‹ Steam on/off button
› Machine socket
fi ‘Heater on’ indicator light
fl ‘Steam ready’ indicator light
‡ ‘Refill’ indicator light
· ‘Steam indicator’ light
‚ Carrying handle
„ Flexible hose
‰ Hose plug
 Handle with remote steam control
Ê Handle control steam switch
Á Locking mechanism (safety lock)
Ë Extension tubes x 2
È Release button
Í Variable steam knob (optional)
Standard accessories
Î Cotton towel
Ï Funnel
Ì Large floor brush
Ó Brush connector
Ô Jet nozzle
Round bristle brush (metallic)
Ò Round bristle brush (nylon)
Ú Integrated window squeegee
Û Triangular nozzle
Ù Sock for triangular nozzle
ı Accessory bag (not shown)
Optional accessories
ˆ Wall paper stripper
˜ Professional iron
¯ Iron pad
3
A
›
fl
„
‰
fi
‚
⁄
¤
Ë
È
Í
Î
‹
‡·
Â
ÁÊ
Ï
Ì
Ó
Ô
Ò
Ú
Û
Ù
ˆ
˜
¯
Optional accessories
70515+70516 Rev 1 19/5/04 3:59 PM Page 3

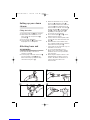
Setting up your steam
cleaner
Filling the boiler
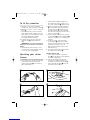
1Unscrew the filler cap ⁄anti-clockwise.
2Fill the boiler with a maximum of 1.8
litres of water by using the funnel Ï
provided. A
3Do not use any detergents.
4Screw the filler cap ⁄clockwise until
finger tight. Do not overtighten.
Attaching hose and
accessories
1Pull down the flap on the front of
machine socket. B
2Insert the plug on the end of the hose ‰
into the machine socket ›with the
button side facing up, and push firmly
until it clicks into place. B
3Attach the desired accessory, ie. large
floor brush Ì, triangular nozzle Û,
these need to be attached to the brush
connector Óbefore attaching it to the
extension tube or handle. Jet nozzle Ô,
window squeegee Úto the extension
tube Ëor directly to the handle Â,
depending on the application. The
accessories vary per machine.
4The round brush(es) and Òcan be
attached to the jet nozzle.
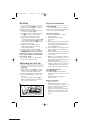
5Join the extension tubes together, slide
one tube into the other until it locks into
place C.
6Attach the tubes to the handle of the
hose. Slide the handle into the extension
tube until it locks into place D.
•Some tasks may be easier with only one
tube fitted or none at all.
7To connect the desired accessory
directly to the steam handle, slide the
handle into the accessory head until it
locks into place.
8When using the large floor brush or the
triangular brush, the brush connector
needs to be fitted to the brush first, in
order to attach the same to the
extension tube.
4
A
BD
C
70515+70516 Rev 1 19/5/04 3:59 PM Page 4

5
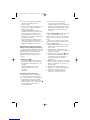
To fit the connector
1Push the connector end, holding it
upside down, fully into the brush inlet E.
2Twist the connector 1/2a turn, until it is in
place. F
•The fit between the connector and the
tubes and/or handle is tight to ensure no
steam leaks. It is recommended to keep
both parts lubricated to facilitate
connecting and disconnecting.
3To detach the accessories, press the
release button Èand pull the items
apart.
WARNING: Accessory heads may be
hot. Please be careful not to trap your
fingers.
•The triangular nozzle also has a cotton
sock which fits over the bristles. Ideal for
use on upholstery and bedding.
Operating your steam
cleaner
1Connect the unit to the mains and switch
on the boiler heater by pressing the
heater on/off button ¤. The ‘heater on
light’ is illuminated.
•Steam will be available in approx 10
mins. When the steam is ready for use
the ‘steam ready’ light flwill turn green.
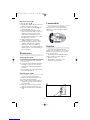
2Make sure that the locking mechanism
Áon the handle has been released. If
you push the lock Átowards the rear,
the steam switch cannot be operated.
Push the lock forward so that the steam
switch is released. G
3To make steam ready, press the ‘steam
on/off’ button ‹and the orange light ·
will come on. Steam is now ready to be
released.
4To release steam, press the handle
control switch Ê. At the start, always
point the steam handle at a cloth until a
steady flow of steam comes out.
•During steam release the green heater
light will turn off.
5To stop releasing steam, simply release
the handle control switch Ê.
Certain models only
•If your cleaner features a vari-steam
knob Íthe steam flow can be adjusted
to specific requirements.
6Turn the vari-steam knob fully anti-
clockwise for maximum steam and
clockwise for minimum steam flow H.
•If the ‘refill’ indicator light ‡turns red,
the boiler must be refilled.
E
F
G
H
Â
Ê
Á
Í
70515+70516 Rev 1 19/5/04 3:59 PM Page 5

6
Re-filling
When the ‘refill’ light ‡turns red, there
should be no steam available for release.
The boiler needs to be refilled.
1Switch off the boiler heater by pressing
the heater on/off button ¤.
2If there is pressure in the boiler, the filler
cap ⁄will revolve, a safety feature
prevents it from being unscrewed.
3Release any steam pressure in the
system using the steam on/off switch ‹
on the machine and handle Ê. Switch
off the steam release button ‹. The cap
can then be unscrewed.
4Unplug the mains cable. Leave the
product with the filler cap off for 10
minutes before refilling.
5Refill the boiler using the funnel A.
6Use warm water to reduce heat-up time.
WARNING: Do not pour cold water
into a very hot boiler as steam and hot
water may be blown out of the filling
hole and can scald.
7Screw the cap back on. Start operation
again. (See operation section).
Switching the unit off
1Switch the unit off by means of switches
¤and ‹.
2Remove the hose plug ‰from the unit
by pressing the release button, holding
down the socket flap simultaneously.
3Remove the plug from the mains socket.
4Any remaining water can be left inside
the unit.
•To avoid deforming the brushes and
Òensure that the brushes are allowed
to cool down before storing.
Use of accessories
Steam handle Â
To avoid spurting of heavy and moist
steam it is recommended always to attach
an accessory to the steam handle.
Large floor brush Ì
Recommended applications include:
-carpets and rugs
-sealed timber and parquetry
-ceramic tiles
-vinyl
1The large floor brush can be attached to
the extension tubes or directly to the
steam handle, provided that the brush
connector Óis fitted.
2Stretch the cotton cloth lightly over the
bristles using the clips provided on the
brush head I.
3Switch on the steam and move the cloth
covered brush gently over the surfaces
to be cleaned.
•Replace the cloth regularly so that more
dirt can be collected and to avoid too
much moisture being applied to the floor
and leaving it very wet.
•Heavily soiled areas will require more
attention to allow steam more time to act
on dirt while lightly soiled and smooth
surfaces will only require a quick wipe.
Jet nozzle Ôand round
brush and Ò
Recommended applications include
-Hard to reach surfaces such as corners
and joints.
-Toilets and sanitary installations
- Venetian blinds
Without round brush
-Defrosting freezers
-Eliminating odours and creases in
clothing. Firstly place the garment on to
a clothes hanger and spray steam at a
distance of around 10-15cm.
-Removing dust from plants. Maintain a
distance of around 30-40cm to avoid
burning leaves by direct contact with
steam.
I
70515+70516 Rev 1 19/5/04 3:59 PM Page 6

1The jet nozzle can be attached either
directly to the handle or via the
extension tubes.
•The closer you hold the jet nozzle to the
object to be cleaned, the better the
cleaning results will be.
•The round bristle brushes can be
snapped onto the end of the jet nozzle.
•The nylon brush is suitable for most
cleaning applications such as, grout,
tapware, toilets, bathrooms, fridge seals
and sliding door runners.
•The metallic brush is suitable for more
stubborn dirt where a more abrasive
action will not affect the surface, such as
BBQ plates and lime scale in toilets.
Sanitising and removing dust mites,
allergies from bedding and upholstery
Fit the triangular nozzle with cotton cloth
fitted and pass the steam slowly and evenly
over the surface ensuring all areas are
treated. Repeat the process. Leave the
mattresses to dry thoroughly before
covering.
Triangular brush Û
Recommended applications include:
-bedding for removal of dustmites and
their allegens. Allow mattresses to dry
naturally.
-smaller washable areas, such as:
kitchen and bathroom surfaces
-car interiors
- upholstery
Integrated window cleaner Ú
1Fit the window cleaner to the handle
(attach extension tubes if required).
2To ‘steam clean’ the surface, place the
thick rubber of the accessory head
against the glass, whilst releasing the
steam. Keep the steam control switch Ê
pressed until the entire surface is
covered with steam.
3To remove excess water turn the
accessory head around with the
squeegee against the surface. Move the
squeegee in straight passes from top to
bottom. Wipe the rubber blade and the
bottom edge of the window dry after
each pass.
Professional iron ˜(certain models only)*
The high steam professional iron
produces up to 6 times more steam than a
normal domestic iron and is up to 4 times
faster.
Note: Do not stand the iron on its end,
always place it with the soleplate down on
the iron pad ¯supplied.
1Firmly insert the plug of the iron into the
machine socket of the cleaner until it
locks in place.
2The temperature setting on the iron
needs to be set to the correct setting for
the fabric concerned.
3Press the steam on/off button ‹on the
machine. Both orange lights will come
on. The light on the iron will turn off
when it has reached the desired
temperature.
4When the steam is ready for use and the
iron is hot, place your thumb on the large
switch located at the top of the iron, to
release steam.
5Release some steam away from the
fabric before commencing ironing until a
steady flow of steam comes out.
6The iron can be used vertically to
‘steam-iron’ curtains, dresses etc.
7
70515+70516 Rev 1 19/5/04 3:59 PM Page 7

Wall paper stripper ˆ *
(certain models only) J
1Fit wallpaper stripper directly to the hose
handle, locking into place. J
2Press the steam on/off button ‹. The
orange light will come on.
3Place the wallpaper stripper with its
entire surface on the edge of a sheet of
wallpaper. Press the handle control
steam switch and allow the steam to
penetrate until the wallpaper is soaked
through (approx. 10 sec.).
4Without switching it off, move the
wallpaper stripper to a new location.
5Use a putty knife to lift the loosened
wallpaper, and pull it off completely.
*These accessories are available as
optional extras, if not supplied with your
machine, please contact our helpline for
more information.
Maintenance
Cleaning the boiler
1Disconnect from the mains and make
sure it is cold.
2To clean the boiler, fill boiler with water
and shake it vigorously to loosen any
scale that has settled at the bottom of
the boiler.
3Pour the water out of the boiler and the
scale will be flushed out.
Descaling the boiler
In order to keep the heat-up time
constant it is recommended to de-scale
your cleaner at regular intervals.
1Mix one litre of water with 0.25 litres of
vinegar and pour into a boiler with the
funnel provided.
2Shake the cleaner and then allow the
mixture to work for at least one hour.
3Empty and rinse the boiler until water is
clear.
Consumables
If you experience any difficulty in
obtaining service or spare parts, please
telephone our customer helpline (during
office hours)
Helpline
If you have any difficulty with your
appliance do not hesitate to call us. We are
likely to be more help than the store from
where it was bought.
Please have the following information
ready to enable our staff to help you.
•Name of product
•Model number as shown on the
underside of the appliance.
8
J
70515+70516 Rev 1 19/5/04 3:59 PM Page 8

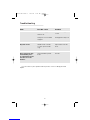
Troubleshooting
Fault
No steam
Very little steam
Very long heat up time.
Loud whistling noise
accompanied by steam
from the rear of the
machine.
Possible cause
No electrical supply.
Switches off.
Safety lock on hose handle
engaged.
Variable steam controller
not open. (Some models
only)
Limescale build-up inside
boiler.
Solution
Check the fuse, plug and
socket.
Disengage the safety lock.
Adjust steam controller
knob.
Descale.
If you encounter any other problems with the product, contact our Morphy Richards
helpline.
9
70515+70516 Rev 1 19/5/04 3:59 PM Page 9

Two year guarantee
It is important to retain the retailers
receipt as proof of purchase. Staple your
receipt to this back cover for future
reference.
Please quote the following information if
the product develops a fault. These numbers
can be found on the base of the product.
Model no. Serial no.
All Morphy Richards products are
individually tested before leaving the factory.
In the unlikely event of any appliance proving
to be faulty within 28 days of purchase it
should be returned to the place of purchase
for it to be replaced.
If the fault develops after 28 days and
within 24 months of original purchase, you
should contact the Helpline number quoting
Model number and Serial number on the
product, or write to Morphy Richards at the
address shown. You will be asked to return
the product (in secure, adequate packaging)
to the address below along with a copy of
proof of purchase. Subject to the exclusions
set out below (1-5) the faulty appliance will
then be repaired or replaced and dispatched
usually within 7 working days of receipt.
If for any reason this item is replaced
during the 2 year guarantee period, the
guarantee on the new item will be calculated
from original purchase date. Therefore it is
vital to retain your original till receipt or
invoice to indicate the date of initial
purchase.
To qualify for the 2 year guarantee the
appliance must have been used according to
the manufacturers instructions. For example,
the product must have been regularly
descaled, as instructed.
EXCLUSIONS
Morphy Richards shall not be liable to
replace or repair the goods under the terms
of the guarantee where:
1The fault has been caused or is
attributable to accidental use, misuse,
negligent use or used contrary to the
manufacturers recommendations or where
the fault has been caused by power
surges or damage caused in transit.
2The appliance has been used on a voltage
supply other than that stamped on the
products.
3Repairs have been attempted by persons
other than our service staff (or authorised
dealer).
4Where the appliance has been used for
hire purposes or non domestic use.
5The guarantee excludes consumables
such as the cotton cloths.
This guarantee does not confer any rights
other than those expressly set out above and
does not cover any claims for consequential
loss or damage. This guarantee is offered as
an additional benefit and does not affect your
statutory rights as a consumer.
•This guarantee is valid in the UK and
Ireland only.
Morphy Richards products are intended for
household use only.
Morphy Richards has a policy of continuous
improvement in product quality and design.
The company, therefore reserves the right
to change the specification of its models at
any time.
The After Sales Division
Registered address
Morphy Richards Ltd, Mexborough
South Yorkshire, England, S64 8AJ
Helpline (office hours)
UK 0870 060 2604
Republic of Ireland 1800 409119
VC70516M UK Rev 1 0504
70515+70516 Rev 1 19/5/04 3:59 PM Page 10
-
 1
1
-
 2
2
-
 3
3
-
 4
4
-
 5
5
-
 6
6
-
 7
7
-
 8
8
-
 9
9
-
 10
10


Morphy Richards GrimeBuster steam cleaner Manuale utente
- Tipo
- Manuale utente
- Questo manuale è adatto anche per
in altre lingue
Documenti correlati
-
Morphy Richards ESSENTIALS PRECISE STEAM CLEANER - REV 1 Instructions Manual
-
-
-
-
-
-
-
-
