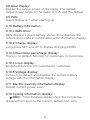
YOSE POWER C500-LCD Istruzioni per l'uso
- Tipo
- Istruzioni per l'uso

C500-LCD Instructions
V1.0

German
English
French
Spanish
1
12
23
34
Italian 45

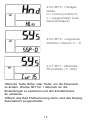
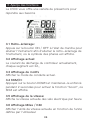
ECO
NORMAL
POWER
6KM
SET
SET
PAS M I
K M
BMSError
ODO
TIMEto GO
TRIP
KM/H
MPH
V
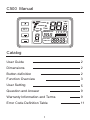
C500 Manual
Catalog
User Guide
Dimensions
Button definition
Function Overview
User Setting
Question and Answer
Warranty Information and Terms
Error Code Definition Table
2
2
2
3
5
9
9
11
1

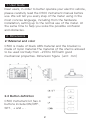
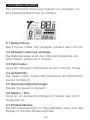
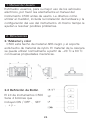
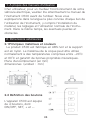
1. User Guide
2. Dimensions
Dear users, in order to better operate your electric vehicle,
please carefully read the C500 instrument manual before
use. We will tell you every step of the meter using in the
most concise language, including from the hardware
installation, setting up to the normal use of the meter. At
the same time to help you solve the possible confusion
and obstacles.
C500 is made of black ABS material and the bracket is
made of nylon material.The material of the shell is allowed
to be used normally from -20℃to 60℃with good
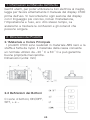
mechanical properties. Dimension figure(unit:mm)
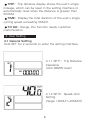
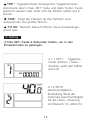
C500 Instrument kit has 4
buttons include ON/OFF、
SET、+ and - .
2.1Material and color
2.2 Button definition
2

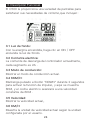
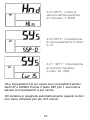
3. Function Overview
The C500 provides you with a variety of displays to
meet your cycling needs.including:
3.1 Backlight:
With the power on, click the ON/OFF turn on the.
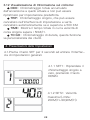
3.2 Current display:
The discharging current of the controller currently, each
segment is 2A.backlight.
3.3 Riding mode display:
Show current riding mode.
3.4 6KM/H:
Hold the DOWN for 2 seconds to get in 6km work.
3.5 Speed display:
Display the speed at present.
3.6 Miles /KM display:
Display the current speed unit according to the unit set
by the user.
3.7 SET display:
The SET icon will blink at 1Hz when the user enters the
setting interface. 3

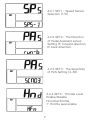
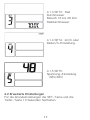
3.8 Gear display:
Display the output power of the meter. The default
output power range of the meter is 0-5, and the default.
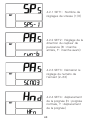
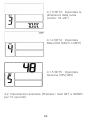
3.9 PAS:
Assist display.is 1 when starting up.
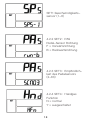
3.10.1 BMS Error:
BMS displays current battery status. Error displays the
current error code in combination with information display.
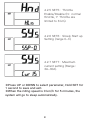
3.10.2 Charge display:
Long press SET and UP to display charging ICONS.
3.10.3 Electricity percentage display:
There is no default function for customers to customize.
3.10.4 Loop display:
No default function for customersto customize.
3.10.5 Voltage display:
Turns on by default and displays the current battery
voltage with the information display.
3.11 Electric quantity information display:
Display current power level.
3.12 Cycling information display:
ODO:Total distance display show the cumulative
distance from boot to the current, default non-zero.
3.10 Battery Information
4

4. User Setting
4.1 General Setting
Hold SET for 2 seconds to enter the setting interface.
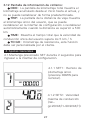
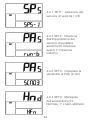
4.1.1 SET1:Trip Distance
Clearance
(click DOWN reset)
TRIP:Trip distance display shows the user's single
mileage, which can be reset in the setting interface or
automatically reset when the distance is greater than
500KM.
TIME:Display the total duration of the user's single
cycling speed exceeding 5KM/H.
TO GO:Range, this function needs customer
customization.
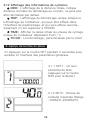
4.1.2 SET2:Speed-limit
Setting
(range: 10KM/H-40KM/H)
5

4.1.3 SET3:Wheel
Diameter Setting
(range:16-28 inch)
4.1.4 SET4:KM/H &MPH.
4.2 Advanced Setting
On the General Setting interface, hold SET and DOWN for
10 seconds to enter the setting interface.
4.1.5 SET5:Voltage
setting (36 V/48V)
6

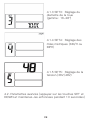
4.2.1 SET1:Speed Sensor
Selection (1/6)
4.2.3 SET3:The Sensitivity
of PAS Setting (2-63).
4.2.2 SET2:The Direction
of Pedal Assistant sensor
Setting (F: forward direction,
B: back direction).
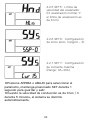
4.2.4 SET4:Throttle Level
Enable/Disable
N:normal throttle,
Y: throttle level enable.
7

4.2.1 SET1:Speed Sensor
Selection (1/6)
4.2.5 SET5:Throttle
Enable/Disable (N:normal
throttle, Y: Throttle are
limited to 6 km).
4.2.7 SET7:Maximum
current setting (Range:
3A-30A).
4.2.6 SET6:Slowly Start up
Setting (range 0-3).
※Press UP or DOWN to select parameter, Hold SET for
1 second to save and exit.
※When the riding speed is 0 km/h for 5 minutes, the
system will go to sleep automatically.
8

4. User Setting
6. Question And Answer
Q:Why can't you turn it on?
A:Check whether the contact between instrument
harness and controller connector is reliable.
Q:What should be done with the failure code displayed
on the meter?
A:First according to the error code displayed to find
out the corresponding problem, if you can not solve it
yourself should be timely to the electric vehicle repair
point repair.
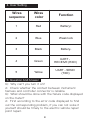
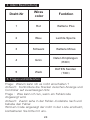
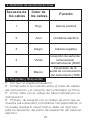
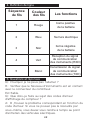
Wires
sequence
1 Red Battery+
Weak lock
Battery-
UART -
RECEIVE (RXD)
UART - SEND
(TXD)
Blue
Black
Green
Yellow
2
3
4
5
Wires
color Function
9

7. Warranty Information And Terms
7.1Warranty information
7.1.1 The company will provide limited warranty during
the warranty period for any fault caused by product
quality problems under normal use.
7.1.2 The warranty period of the product shall be
calculated within 12 months after the customer
purchases the instrument of our company.
7.2Warranty (the following conditions are not covered
by the warranty)
7.2.1 Unauthorized dismantling, modification.
7.2.2 Failure or damage caused by misuse or incorrect
installation and debugging by users or third parties.
7.2.3 After the instrument leaves the factory, the shell is
scratched or damaged.
7.2.4 A cut or broken instrument line.
7.2.5 Failure or damage caused by natural disasters
such as fire, earthquake, lightning strike, etc.
7.2.6 Product out of warranty.
10

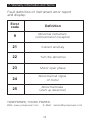
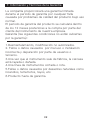
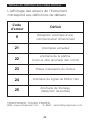
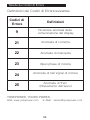
Fault definition of instrument error report
and display:
YOSEPOWER, YOURS POWER.
Web: www.yosepower.com E-Mail:[email protected]
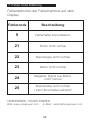
Error
code
9
21
22
23
24
25
Definition
Abnormal instrument
communication reception
Current anomaly
Turn the abnormal
Motor open phase
Abnormal hall signal
of motor
Abnormal brake
(start up detection)
7. Warranty Information And Terms
11

12
ECO
NORMAL
POWER
6KM
SET
SET
PAS M I
K M
BMSError
ODO
TIMEto GO
TRIP
KM/H
MPH
V
C500 Handbuch
Kataloge
Bedienungsanleitung
Abmessung
Tasten Beschreibung
Funktions Übersicht
Setting
Fragen und Antworten
Garantie Information
Fehler Code Erklärung
13
13
13
14
16
20
21
22

1. Bedienungsanleitung
2. Abmessung
Sehr geehrte Benutzer, um Ihr E-Fahrrad besser bedienen
zu können, lesen Sie bitte vor dem Gebrauch die C500
Anleitung sorgfältig durch. Wir werden Ihnen jeden Schritt
einschließlich der Hardware-Installation erklären, die
Einstellung bis zur normalen Verwendung des
Steuergerätes. Gleichzeitig hilft es mögliche Verwirrungen
und Hindernisse aufzulösen.
Das C500 Steuergerät ist aus schwarzen stoßfestem ABS
Kunststoff. Das Material ist für einen Temperaturbereich
von -20°C bis +60°C geeignet.
Abmessungen (in mm)
C500 Instrument hat 4
Tasten : Ein/Aus(on/off),
SET, +(up) und -(down)
2.1Material und Farbe
2.2 Drucktaste
13

3. Funktions Übersicht
Das C500 bietet Ihnen eine Vielzahl von Anzeigen, um
ihre Radsportbedürfnisse zu erfüllen:
3.1 Beleuchtung:
Den Ein/Aus Taster kurz antippen schaltet das Licht ein.
3.2 Aktuelle Leistungs-Anzeige:
Die Balkenanzeige stellt die Unterstützungsstufe dar,
jeder Balken entspricht 2 Ampere.
3.3 Fahrmodus:
Zeigt den aktuellen Fahrmodus an Eco, Normal, Power.
3.4 Anfahrhilfe:
Die Tiefer-Taste 2 Sekunden festhalten, die Anfahrhilfe
startet mit 6km/h.
3.5 Geschwindigkeitsanzeige:
Display the speed at present.
3.6 Meilen / Km:
Zeigt an, ob die Geschwindigkeit in Meilen oder km/h
Eingestellt ist.
3.7 Einstell Modus:
Die SET-Anzeige blinkt im Sekundentakt, wenn sich das
Display im Einstell-Modus befindet.
14

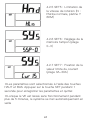
3.8 Unterstützungsstufe:
Zeit die Unterstützungsstufe an. Der Bereich ist 0 bis 5,
Nach dem Start ist immer Stufe 1 voreingestellt.
3.9 PAS:
Pedal-Assistent-Sensor Zeigt an, den Pedalsensor an.
3.10.1 BMS Error:
BMS zeigt den aktuellen Batteriestatus Aktueller
Fehlercode in Kombination mit den Anzeigen.
3.10.2 Lade-Anzeige:
Lange die SET-Taste und die Größer-Taste drücken Zeigt
die Ladesymbole.
3.10.3 Prozentsatz anzeigen keine Funktion für den
Kunden
3.10.4 Regelung:
keine Funktion für den Kunden.
3.10.5 Spannungsanzeige:
Zeigt beim Einschalten die Batteriespannung an mit dem V
Zeichen an.
3.11 Akku Ladezustand:
Zeigt den aktuellen Ladezustand mit 5 Balken an.
3.12 Kilometeranzeige:
ODO:Gesamt gefahrene Kilometer, wird nie
gelöscht.
3.10 Batterie Information
15

4. Setting
TRIP:Tageskilometer Anzeige Der Tageskilometer-
stand kann über 2 Sek-SET Taste und dann Tiefer-Taste
gelöscht werden oder stellt sich bei 500km selbst auf 0
zurück.
TIME:Zeigt die Fahrzeit an Die Fahrzeit wird
aufsummiert, bei größer 5km/h.
TO GO:Bereich Diese Funktion muss Kundenange-
passt sein.
4.1Die SET-Taste 2 Sekunden halten, um in den
Einstellmodus zu gelangen.
4.1.1 SET1: Tageskilo-
meter löschen(Taste -
drücken, setzt den Zähler
auf null)
4.1.2 SET2:
Geschwindigkeits-
Einstellung Stellt die
maximale Geschwindigkeit
für die Unter- Stützung
ein (Bereich 10-40km/h)
16

4. Setting
4.2 Erweiterte Einstellungen
Für die Grundeinstellungen die SET-Taste und die
Tiefer-Taste 10 Sekunden festhalten.
4.1.3 SET3:Rad
Durchmesser
Bereich 16 bis 28 Zoll
Raddurchmesser.
4.1.4 SET4:km/h oder
Meilen/h-Einstellung.
4.1.5 SET5:
Spannung-Einstellung
(36V/48V)
17

4. Setting
SET1:Geschwindigkeits-
sensor (1-6)
4.2.2 SET2:PAS
Pedal-Sensor Richtung
F = Vorwärtsrichtung
B = Rückwärtsrichtung
4.2.3 SET3:Empfindlich-
keit des Pedalsensors
(2-63)
4.2.4 SET4:Handgas
Funktion
N = normal
Y = ausgeschaltet
18
La pagina si sta caricando...
La pagina si sta caricando...
La pagina si sta caricando...
La pagina si sta caricando...
La pagina si sta caricando...
La pagina si sta caricando...
La pagina si sta caricando...
La pagina si sta caricando...
La pagina si sta caricando...
La pagina si sta caricando...
La pagina si sta caricando...
La pagina si sta caricando...
La pagina si sta caricando...
La pagina si sta caricando...
La pagina si sta caricando...
La pagina si sta caricando...
La pagina si sta caricando...
La pagina si sta caricando...
La pagina si sta caricando...
La pagina si sta caricando...
La pagina si sta caricando...
La pagina si sta caricando...
La pagina si sta caricando...
La pagina si sta caricando...
La pagina si sta caricando...
La pagina si sta caricando...
La pagina si sta caricando...
La pagina si sta caricando...
La pagina si sta caricando...
La pagina si sta caricando...
La pagina si sta caricando...
La pagina si sta caricando...
La pagina si sta caricando...
La pagina si sta caricando...
La pagina si sta caricando...
La pagina si sta caricando...
La pagina si sta caricando...
-
 1
1
-
 2
2
-
 3
3
-
 4
4
-
 5
5
-
 6
6
-
 7
7
-
 8
8
-
 9
9
-
 10
10
-
 11
11
-
 12
12
-
 13
13
-
 14
14
-
 15
15
-
 16
16
-
 17
17
-
 18
18
-
 19
19
-
 20
20
-
 21
21
-
 22
22
-
 23
23
-
 24
24
-
 25
25
-
 26
26
-
 27
27
-
 28
28
-
 29
29
-
 30
30
-
 31
31
-
 32
32
-
 33
33
-
 34
34
-
 35
35
-
 36
36
-
 37
37
-
 38
38
-
 39
39
-
 40
40
-
 41
41
-
 42
42
-
 43
43
-
 44
44
-
 45
45
-
 46
46
-
 47
47
-
 48
48
-
 49
49
-
 50
50
-
 51
51
-
 52
52
-
 53
53
-
 54
54
-
 55
55
-
 56
56
-
 57
57


YOSE POWER C500-LCD Istruzioni per l'uso
- Tipo
- Istruzioni per l'uso
in altre lingue
- English: YOSE POWER C500-LCD Operating instructions
- français: YOSE POWER C500-LCD Mode d'emploi
- español: YOSE POWER C500-LCD Instrucciones de operación
- Deutsch: YOSE POWER C500-LCD Bedienungsanleitung
Altri documenti
-
DAB E.SWIM / E.PRO Istruzioni per l'uso
-
-
-
-
Yamaha CS6R Scheda dati
-
Yamaha S80 Scheda dati
-
Yamaha S30 Scheda dati
-
AEG BE7714000M Manuale utente
-
-
Aeg-Electrolux BE7304071M Manuale utente