Swann QC9101SWIFI-CAMWSOLSTD-GL Manuale del proprietario
- Tipo
- Manuale del proprietario

1
EN
Security Tracker Camera
Cámara Rastreadora de Seguridad
Caméra de Suivi de Sécurité
Telecamera Tracker di Sicurezza
Sicherheits-Tracker-Kamera
EN Quck Start Gude ES Guía de Inco Rápdo FR Gude de Démarrage Rapde
IT Guda Rapda DE Schnellstartanletung
SWIFI-TRACKERCAM

2
EN
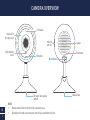
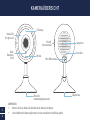
CAMERA OVERVIEW
Night detection
sensor
MicroSD
card slot
Infrared LEDs
(for night vision)
Microphone
Magnetic base
LED indicator
Speaker
Reset button
Micro USB port
NOTES
• Remove protective film from the front of the camera before use.
• Depending on the model, your camera may come with a pre-installed microSD card.
QR Code for device pairing
(bottom)

3
EN
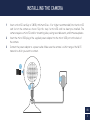
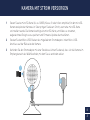
INSTALLING THE CAMERA
1 Insert a microSD card (up to 128GB, minimum Class 10 or higher recommended) into the microSD
card slot on the camera as shown. Skip this step if a microSD card has been pre-installed. The
camera requires a microSD card for streaming video, saving recorded events, and firmware updates.
2 Insert the micro USB plug of the supplied power adapter into the micro USB port on the back of
the camera.
3 Connect the power adapter to a power outlet. Make sure the camera is within range of the Wi-Fi
network to which you want to connect.
1
2
3

4
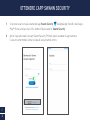
EN
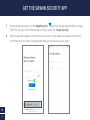
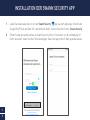
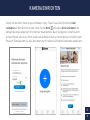
GET THE SWANN SECURITY APP
1 Download the latest version of the Swann Security app from the Apple App Store® or Google
Play™ Store on your iOS or Android device. Simply search for "Swann Security".
2 Open the app and create your Swann Security account. You will need to activate your account by
confirming the email sent to the registered email account before you can sign in.

5
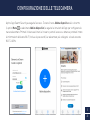
EN
Launch the Swann Security app and sign in. Tap the Pair Device button on the screen (or open Menu
and select Pair Device) and follow the in-app instructions to set up your new camera. Before you begin,
be close to your router or access point and have your Wi-Fi network information (including password)
handy. Please note that the camera can connect to a 2.4GHz Wi-Fi network only.
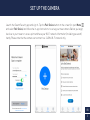
SET UP THE CAMERA

6
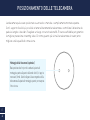
EN
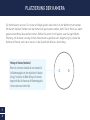
The camera can be placed on a table or shelf, or easily mounted on the wall using the included wall
mounting plate. With its flexible stand, you can freely swivel the camera around and monitor your home
from any angle that you need. Pick a location with good, reliable Wi-Fi reception to ensure best video
streaming performance. As a general rule, the nearer your camera is to your router, the better the
wireless connection quality.
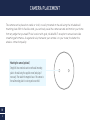
CAMERA PLACEMENT
Mounting the camera (optional)
Simply drill two screw holes and screw the wall mounting
plate to the wall using the supplied screws (and plugs if
necessary). Then attach the magnetic base of the camera to
the wall mounting plate for a strong and secure hold.

7
EN
TIPS
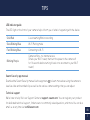
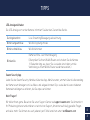
LED indicator guide
The LED light on the front of your camera helps inform you of what is happening with the device.
Solid Red Live streaming/Motion recording
Slow Blinking Blue Wi-Fi Pairing mode
Fast Blinking Blue Connecting to Wi-Fi
Blinking Purple
Camera offline - no internet access
(Check your Wi-Fi router, then turn the power to the camera off
for 10 seconds before turning it back on to reconnect to your Wi-Fi
router)
Technical support
We’re here to help! Visit our Support Center at support.swann.com. You can register your product
for dedicated technical support, find answers to commonly asked questions, and more. You can also
email us at any time via: tech@swann.com
Swann Security app manual
Download the Swann Security manual via the app menu to learn more about using the camera to
view live video and recorded clips as well as the various camera settings that you can adjust.

8
ES
DESCRIPCIÓN DE LA CÁMARA
Sensor de
detección
nocturna
Ranura de la
tarjeta microSD
(debajo)
LED infrarrojos
(para visión
nocturna)
Micrófono
Base magnética
Indicador LED
Altavoz
Botón de reinicio
Puerto micro USB
NOTAS
• Recuerde retirar la película de protección de frente de la cámara antes de usar.
• Dependiendo del modelo, su cámara puede venir con una tarjeta microSD preinstalada.
Código QR para emparejamiento
de dispositivos (inferior)

9
ES
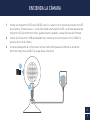
ENCIENDA LA CÁMARA
1 Inserte una tarjeta microSD (hasta 128 GB, clase 10 o superior) en la ranura para tarjeta microSD
de la cámara. Omita este paso si se ha preinstalado una tarjeta microSD. La cámara requiere una
tarjeta microSD para transmitir video, guardar eventos grabados y actualizaciones de firmware.
2 Inserte el enchufe micro USB del adaptador de corriente provisto en el puerto micro USB en la
parte posterior de la cámara.
3 Conecte el adaptador de corriente a un tomacorriente. Verifique que la cámara se encuentre
dentro del rango de la red Wi-Fi a la que desea conectarla.
1
2
3

10
ES
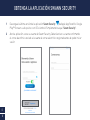
OBTENGA LA APLICACIÓN SWANN SECURITY
1 Descargue la última versión de la aplicación Swann Security de Apple App Store® o Google
Play™ Store en su dispositivo con iOS o Android. Simplemente busque "Swann Security".
2 Abra la aplicación e cree su cuenta de Swann Security. Deberá activar su cuenta confirmando
el correo electrónico enviado a la cuenta de correo electrónico registrada antes de poder iniciar
sesión.

11
ES
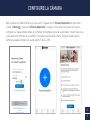
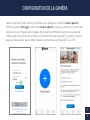
CONFIGURE LA CÁMARA
Abra la aplicación Swann Security e inicie sesión. Toque el botón Vincular dispositivo en la pantalla
(o abra el Menú y seleccione Vincular dispositivo) y siga las instrucciones en la aplicación para
configurar su nueva cámara. Antes de comenzar, manténgase cerca de su enrutador o punto de acceso
y conserve la información de su red Wi-Fi (incluida la contraseña) a mano. Tenga en cuenta que la
cámara se puede conectar solo a una red Wi-Fi de 2,4GHz.

12
ES
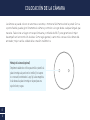
La cámara se puede colocar en una mesa o estante, o montarse fácilmente sobre la pared. Con su
soporte flexible, puede girar libremente la cámara y controlar su hogar desde cualquier ángulo que
necesite. Seleccione un lugar con recepción buena y confiable de Wi-Fi para garantizar el mejor
desempeño en la transmisión de video. Como regla general, cuanto más cerca está la cámara del
enrutador, mejor será la calidad de la conexión inalámbrica.
COLOCACIÓN DE LA CÁMARA
Montaje de la cámara (opcional)
Simplemente taladre dos orificios para tornillos y atornille la
placa de montaje a la pared con los tornillos (y los tapones
si es necesario) suministrados. Luego fije la base magnética
de la cámara a la placa de montaje en la pared para una
sujeción fuerte y segura.

13
ES
¿Alguna pregunta?
¡Estamos aquí para ayudarlo! Visite nuestro Centro de Asistencia en support.swann.com.
Puede registrar su producto para obtener asistencia técnica dedicada, encontrar respuestas a
preguntas frecuentes y más. También puede enviarnos un correo electrónico en cualquier momento a:
SUGERENCIAS
Guía del Indicador LED
La luz LED en el frente de su cámara ayuda a informarle lo que sucede con el dispositivo.
Rojo permanente Transmisión en vivo/Grabación por movimiento
Azul de destello lento Modo de vinculación de Wi-Fi
Azul de destello rápido Conectando a Wi-Fi
Púrpura intermitente
Cámara sin conexión: sin acceso a Internet
(Verifique su enrutador de Internet, luego apague la cámara
durante 10 segundos antes de volver a encenderla para volver a
conectarla)
Aplicación Swann Security
Descargue el manual de Swann Security a través del menú de la aplicación para obtener más
información sobre el uso de la cámara para ver videos en vivo y clips grabados, así como las diversas
configuraciones de la cámara que puede ajustar.

14
FR
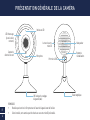
PRÉSENTATION GÉNÉRALE DE LA CAMÉRA
Capteur de
détection de nuit
Lecteur de carte
microSD
LED infrarouges
(pour la vision
nocturne)
Microphone
Base magnétique
Indicateur LED
Haut-parleur
Bouton de
réinitialisation
Port micro USB
REMARQUES
• N'oubliez pas de retirer le film protecteur de l'avant de l'appareil avant de l'utiliser.
• Selon le modèle, votre caméra peut être fourni avec une carte microSD préinstallée.
QR Code pour le couplage
d'appareils (bas)

15
FR
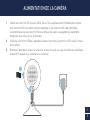
ALIMENTATION DE LA CAMÉRA
1 Insérez une carte microSD (jusqu'à 128 Go, classe 10 ou supérieure recommandée) dans la fente
pour carte microSD e la caméra. Ignorez cette étape si une carte microSD a été préinstallée.
La caméra nécessite une carte microSD pour diffuser des vidéos, sauvegarder les événements
enregistrés et les mises à jour du firmware.
2 Insérez la fiche micro USB de l'adaptateur secteur fourni dans le port micro USB situé à l'arrière
de la caméra.
3 Branchez l'adaptateur secteur sur une prise secteur. Assurez-vous que la caméra est à portée du
réseau Wi-Fi auquel vous souhaitez vous connecter.
1
2
3

16
FR
OBTENIR L'APPLICATION SWANN SECURITY
1 Téléchargez la dernière version de Swann Security depuis l'Apple App Store® ou le Google
Play™ Store sur votre appareil iOS ou Android. Il suffit de rechercher " Swann Security ".
2 Ouvrez l'application et créez votre compte Swann Security. Vous devrez activer votre compte en
confirmant l'e-mail envoyé au compte de messagerie enregistré avant de pouvoir vous connecter.

17
FR
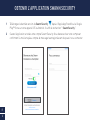
CONFIGURATION DE LA CAMÉRA
Lancez l’application Swann Security et connectez-vous. Appuyez sur le bouton Coupler appareil à
l’écran (ou ouvrez le Menu et sélectionnez Coupler appareil) et suivez les instructions fournies avec
l'application pour configurer votre nouvelle caméra. Avant de commencer, approchez-vous de votre
routeur ou de votre point d'accès et notez les informations de votre réseau Wi-Fi (y compris votre mot
de passe). Veuillez noter que la caméra ne peut se connecter qu’à un réseau Wi-Fi à 2,4 GHz.

18
FR
La caméra peut être placée sur une table ou une étagère, ou facilement au mur. Avec son support
flexible, vous pouvez faire pivoter librement la caméra et surveiller votre maison sous tous les angles.
Choisissez un emplacement avec une bonne réception Wi-Fi fiable pour assurer les meilleures
performances de streaming vidéo. En règle générale, plus votre caméra est proche de votre routeur,
meilleure est la qualité de la connexion sans fil.
EMPLACEMENT DE LA CAMÉRA
Fixation de la caméra (optionnelle)
Il suffit de percer deux trous de vis et visser la plaque de
montage du mur au mur en utilisant les vis (et les bouchons
si nécessaire) fournis. Puis attachez la base magnétique de
la caméra à la plaque de montage du mur pour une prise
forte et sécurisée.

19
FR
Des questions ?
Nous sommes là pour vous aider! Visitez notre Centre de Support à l'adresse support.swann.com.
Vous pouvez enregistrer votre produit pour un support technique dédié, trouver des réponses aux
questions fréquemment posées, etc. Vous pouvez également nous envoyer un email à tout moment via:
ASTUCES
Guide de l'indicateur LED
La lumière LED située à l'avant de votre caméra vous informe de ce qui se passe avec l'appareil.
Rouge fixe Diffusion en direct/Enregistrement de mouvements
Bleu clignotant lent Mode de liaison Wi-Fi
Bleu clignotant rapide Connexion au Wi-Fi
Violet clignotant
Caméra hors ligne - pas d'accès Internet
(Vérifiez votre routeur Internet, puis éteignez la caméra pendant
10 secondes avant de la rallumer pour vous reconnecter à votre
routeur)
Application Swann Security
Téléchargez le manuel de Swann Security via le menu de l'application pour en savoir plus sur
l'utilisation de la caméra pour visionner des vidéos en direct et des clips enregistrés ainsi que sur les
différents paramètres de la caméra que vous pouvez régler.

20
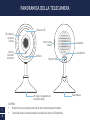
IT
PANORAMICA DELLA TELECAMERA
Sensore di
rilevamento
del notturno
Slot per scheda
microSD
LED a infrarossi
(per visione
notturna)
Microfono
Base magnetica
Indicatore a LED
Altoparlante
Tasto Ripristino
Porta micro USB
GLI APPUNTI
• Ricordarsi di rimuovere la pellicola protettiva dal lato anteriore della telecamera prima dell’uso.
• A seconda del modello, la telecamera potrebbe essere dotata di una scheda microSD preinstallata.
QR Code per l'accoppiamento del
dispositivo (in basso)
La pagina si sta caricando...
La pagina si sta caricando...
La pagina si sta caricando...
La pagina si sta caricando...
La pagina si sta caricando...
La pagina si sta caricando...
La pagina si sta caricando...
La pagina si sta caricando...
La pagina si sta caricando...
La pagina si sta caricando...
La pagina si sta caricando...
La pagina si sta caricando...
-
 1
1
-
 2
2
-
 3
3
-
 4
4
-
 5
5
-
 6
6
-
 7
7
-
 8
8
-
 9
9
-
 10
10
-
 11
11
-
 12
12
-
 13
13
-
 14
14
-
 15
15
-
 16
16
-
 17
17
-
 18
18
-
 19
19
-
 20
20
-
 21
21
-
 22
22
-
 23
23
-
 24
24
-
 25
25
-
 26
26
-
 27
27
-
 28
28
-
 29
29
-
 30
30
-
 31
31
-
 32
32


