AKASO Brave 4 Guida utente
- Categoria
- Fotocamere per sport d'azione
- Tipo
- Guida utente

USER
MANUAL
Brave 4 Action Camera


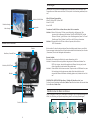
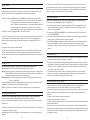
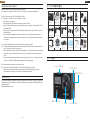
YOUR BRAVE 4
1
2
3
5
14
4
6
7
9
11
10
8
1412
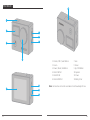
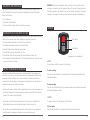
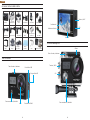
1. Shutter / WiFi / Select Button
2. Screen
3. Power / Mode / Exit Button
4. Micro USB Port
5. MicroSD Slot
6. Micro HDMI Port
7. Lens
8. Screen
9. Up / WiFi Button
10. Speaker
11. Down
12. Battery Door
Note: Camera does not record sound when it is in the waterproof case.
01 02

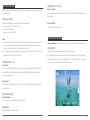
GETTING STARTED
Welcome to your AKASO Brave 4. To capture video and photos, you need a micro SD card
(sold separately).
MICRO SD CARDS
Use brand name memory cards that meet these requirements:
• micro SD, micro SDHC, or micro SDXC
• Class 10 or UHS-I rating
• Capacity up to 64GB (FAT32)
Note:
1. Please format the micro SD card first in this camera before using. To keep your micro SD
card in good condition, reformat it on a regular basis. Reformatting erases all of your
content, so be sure to offload your photos and videos first.
2. FAT32 format Micro SD card stops recording when the storage of each file is over 4 GB
and starts to record again on a new file.
POWERING ON + OFF
To Power On:
Press and hold the Mode button for three seconds. The camera beeps while the camera
status light is on. When information appears on the LCD display or the camera status
screen, your camera is on.
To Power Off:
Press and hold the Mode button for three seconds. The camera beeps while the camera
status light is off.
SWITCHING MODE
To Switch Mode:
Turn on camera, press Mode button to switch mode.
To Exit Mode:
Press the Mode button to exit mode.
TURNING ON / OFF Wi-Fi
To turn on Wi-Fi
Turn on camera, press Up button to turn on Wi-Fi. You can also enter Camera Setting to
turn on Wi-Fi.
To turn off Wi-Fi
Press Up button to turn off Wi-Fi.
There are 4 modes: There are 4 modes: Video, Photo, Playback and Camera Setting.
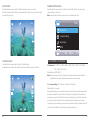
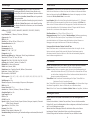
OVERVIEW OF MODES
VIDEO MODE
Video Mode is the default mode when you turn on the camera.
In Video Mode, press Shutter button, the camera starts recording video. Press Shutter
button to stop recording video. Press Mode Button to take a still photo when recording
video. Press Up or Down button to adjust the zoom level.
03 04
EV
0.0
2018/09/29 16:03:13
00:00:00
VGAP240
A
WDR

20M
N
A
EV
0.0
ISO
AUTO
00000
PHOTO MODE
Press Mode button once to switch to Photo Mode after you turn on camera.
In Photo Mode, press Shutter button, the camera takes a photo. Press Up or Down button
to adjust the zoom level.
PLAYBACK MODE
Press Mode button several times to switch to Playback Mode.
In Playback Mode, press the Up/ Down button to scroll through video or photo files.
CAMERA SETTING MODE
Press Mode button several times to switch to Camera Setting Mode. You can change
camera settings in this mode.
Note: Camera does not record sound when it is in the waterproof case.
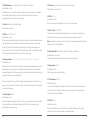
CUSTOMIZING YOUR BRAVE 4
1. Resolution: 4K / 24FPS, 2K / 30FPS, 1080P / 60FPS, 1080P / 30FPS, 720P / 120FPS,
720P / 60FPS, 720P / 30FPS
Default setting is 1080P 60FPS.
Note: When capturing video at high resolutions or high frame rates in warm ambient
temperatures, the camera may become warm and use more power.
2. 2. Loop recording: Off / 3 Minutes / 5 Minutes / 10 Minutes
Default setting is 3 minutes.
Using Loop Recording, you can continuously record video, but save only the moments that
you want. For example, if you select a 5-minute interval, only the previous 5 minutes are
saved when you press the Shutter button to stop recording. If you record for 5 minutes and
do not press the Shutter button to stop recording and save, the camera records a new
5-minute interval by recording over your previous 5 minutes of footage. When the micro SD
card is full, the new files will cover the old one if loop recording is on.
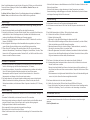
SIZE
WDR
WDR
Resolution
Looprecording
Gyroscope
Setup
1/9
Mode
A
EV
0.0
05 06

3. Gyroscope: Off / On
Default setting is off.
This setting adjusts the footage to offset for motion during capture. The result is smoother
footage, especially in activities with relatively small but fast motion including cycling,
motorcycling, and handheld uses.
4. WDR: Off / On
Default setting is on.
Wide Dynamic Range (WDR) retains a greater level of detail in the dark and bright areas of
an image. The result is a photo that is properly exposed for both of these extremes. This
setting is especially useful for scenes that are backlist or that have large bright regions and
a dark foreground. WDR is available in Video mode only.
5. Time-lapse Record: Off / 100ms / 200ms / 500ms / 1 Sec / 5 Seconds
Default setting is off.
Time Lapse Video creates video from frames captured at specific intervals. This option lets
you capture a time lapse event and immediately view or share it as a video. Time Lapse
Video is captured without audio.
6. Motion Detection: Off / On
Default setting is off.
Motion detection is the process of detecting a change in the position of an object relative
to its surroundings or a change in the surroundings relative to an object.
Turn on Motion Detection and camera, the camera records video automatically when it
detects a change in the position of an object relative to its surroundings.
7. Record Audio: Off / On
Default setting is on.
Turn off Record Audio, the camera does not record audio when you record video.
Note: Press Down button, the camera does not record sound when you record video.
8. Date Stamp: Off / On
Default setting is on.
Turn on Date Stamp, this camera adds date stamp to the videos and photos you take.
9. Angle: 170°, 140°, 110°, 70°
Default setting is 170°.
The angle refers to how much of the scene (measured in degrees) can be captured
through the camera lens. 170°angle captures the largest amount of the scene, while
70°angle captures the least.
10. Diving mode: Off / On
Default setting is off.
Turn on Diving Mode, it can compensate for the lack of red light in underwater scenes.
Diving Mode is designed to be used in tropical and blue water, optimized for use between
10 and 80 feet.
11. Special Effects: Off / Night Scene / Portrait / Lightpainting
Default setting is off.
12. Self Timer: Single / 2S Timer/ 5S Timer/ 10S Timer
Default setting is single.
A Self Timer gives a delay between pressing the shutter release and the shutter's firing. It is
most commonly used to let photographers to take a photo of themselves (often with family).
13. Image Size: 20M / 16M / 12M / 10M / 8M / 5M / 3M / VGA 640x480
Default setting is 20M.
14. Burst: Off / Burst3 / Burst5 / Burst10
Default setting is off.
Burst captures up to 10 photos in 1 second, so it is perfect for capturing fast-moving activities.
15. Quality: Fine / Normal / Economy
Default setting is Normal.
16. Sharpness: High / Normal / Medium
Default setting is Normal.
Sharpness controls the quality of details captured in your video footage or photos. When
you change this setting, the touch display immediately shows you the effect on your image.
07 08

17. White Balance: Auto / Daylight / Cloudy / Tungsten / Fluorescent
Default setting is Auto.
White Balance lets you adjust the color temperature of videos and photos to optimize for
cool or warm lighting conditions. When you change this setting, the LCD display
immediately shows you the effect on your image.
18. Color: Natural / Black & White / Sepia
Default setting is natural.
19. ISO: Auto/ 100/ 200/ 400
Default setting is Auto.
ISO determines the camera’s sensitivity to light, and creates a trade-off between brightness
and resulting image noise. Image noise refers to the degree of graininess in the image.
In low light, higher ISO values result in brighter images, but with greater image noise.
Lower values result in lower image noise, but darker images. When you change this setting,
the LCD display immediately shows you the effect on your image.
20. Exposure Value: +2.0, +1.7, +1.3, +0.7, +0.3, 0, -0.3, -0.7, -1.0, -1.3, -1.7, -2.0
Default setting is 0.
By default, your camera uses the entire image to determine the appropriate exposure level.
However, Exposure lets you select an area that you want the camera to prioritize when
determining exposure. This setting is particularly useful in shots where an important region
might otherwise be over- or underexposed.
When you change this setting, the LCD display immediately shows you the effect on your
image. If you change modes, the camera returns to using the entire scene to determine the
correct level of exposure.
21. Anti-Shaking: Off/ On
Default setting is On.
This setting adjusts the footage to offset for motion during capture. The result is smoother
footage, especially in activities with relatively small but fast motion including cycling,
motorcycling, and handheld uses.
22. Protect: Lock Current, Unlock Current, Lock All, Unlock All
Default setting is Lock Current.
23. WiFi: Off / On
Default setting is Off.
Note: You can also press Up button to turn on Wi-Fi in Video mode.
24. Date / Time: YY / MM / DD
The date and time are automatically updated when you connect your camera to the
AKASO DV app. However, you can manually change these settings, if needed.
Note: If the battery is removed from the camera for an extended period of time, the date
and time will be reset automatically.
25. Auto Power Off: Off / 1Minute / 3Minutes / 5Minutes / 10Minutes
Default setting is 3 minutes.
Powers off your Brave 4 after a period of inactivity to save battery life.
26. Beep Sound: Off / On
Default setting is On.
Sets the volume of your Brave 4's alerts.
27. Voice Prompt: Off / On
Default setting is on.
Turn on Voice Prompt, the camera will say ‘Video Start’ when you start recording video.
The camera will say ‘Video Stop’ when you stop recording video. The camera will say
‘Photograph’ when you take photo.
28. OSD: Off/ On
Default setting is On.
OSD (On Screen Display) is a feature of action cameras that displays video or photo
resolution, date, time and setting data on the camera screen.
09 10

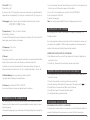
CONNECTING TO THE CAMKING APP
PLAYING BACK YOUR CONTENT
29. Car ACC: Off / On
Default setting is Off.
If you turn on Car ACC ( Driving Mode ) and connect camera with car cigarette lighter, the
camera will turn on automatically if you start your car and will turn off if you stop your car.
30. Language: English / Français / Deutsch / Español / Italiano/ Português / Pyckий /
Polski
31. Screen Save: Off / 30 Sec / 1 Minute / 3 Minutes
Default setting is 1 Minute.
Turns off the LCD display after a period of inactivity to save battery life. To turn on the LCD
display again, press any button on the camera.
32. Frequency: 50 Hz / 60 Hz
Default setting is 50 Hz.
33. Format
To keep your micro SD card in good condition, reformat it on a regular basis. Reformatting
erases all of your content, so be sure to offload your photos and videos first.
To reformat your card, press the mode button to enter camera setting, then press Up
button several times to enter Format > SD Card > All data will be deleted > Cancel / OK.
34. Default Setting: Return menu setting to defaults Cancel OK
This option resets all settings to their default values.
35. Version: Brave 4 Version: IPS7789-V3 20180702
You can check the model, version and updated time of your Brave 4.
The Camking app lets you control your camera remotely using a smartphone or tablet.
Features include full camera control, live preview, playback, download, sharing of content
and setting camera.
1. Download Camking app to your mobile device from the Apple App Store or Google Play.
2. Turn on the camera, then enter Camera Setting to turn on Wi-Fi. You can also press Up
button to turn on Wi-Fi when the camera is in Video Mode.
3. Turn on Wi-Fi of your mobile device, connect to the Wi-Fi SSID ‘AKASO’.
4. Enter the password: 1234567890.
5. Open the Camking app.
Note: You can also download AKASO DV app if Camking app does not work.
You can play back your content on the camera’s LCD display, your computer, TV, or
smartphone / tablet.
You can also play back content by inserting the micro SD card directly into a device, such
as a computer or compatible TV. With this method, playback resolution depends on the
resolution of the device and its ability to play back that resolution.
VIEWING VIDEOS AND PHOTOS ON YOUR BRAVE 4
1. Enter Playback mode. If your micro SD card contains a lot of content, it might take a
minute for it to load.
2. Press the Up / Down button to scroll through the video or photo files.
1. Enter Playback mode. If your micro SD card contains a lot of content, it might take a
minute for it to load.
2. Press Up / Down button to scroll through the video or photo files.
3. Press and hold Up or Down button for three seconds. The screen shows the icon.
4. Press OK button. The screen shows ‘Delete Current / Delete All’.
5. Press OK button again. The selected file will be deleted.
6. To exit Playback mode, press Mode button.
DELETING VIDEOS AND PHOTOS ON YOUR BRAVE 4
OFFLOADING YOUR CONTENT TO A COMPUTER
To play back your video and photos on a computer, you must first transfer these files to a
computer. Transferring also frees up space on your micro SD card for new content.
OFFLOADING YOUR CONTENT
11 12

To offload files to a computer using a card reader (sold separately) and your computer’s
file explorer, connect the card reader to the computer, then insert the micro SD card. You
can then transfer files to your computer or delete selected files on your card. Note that
you must use a card reader to offload photos or audio files.
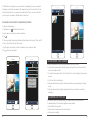
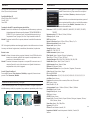
OFFLOADING YOUR CONTENT TO SMARTPHONE OR TABLET
1. Open the Camking app.
2. Tap Folders icon at the bottom of the screen.
3. Tap the photo or video file you want to download.
4. Tap .
5. The screen shows ‘Downloading the selected files, please don’t interrupt’. Then tap ‘OK’.
6. Turn on the switch at the top of the screen.
7. Tap the photo or video file you want to download to your phone or tablet.
8. Tap , then tap ‘Save Image’.
MAINTENANCE YOUR CAMERA
Follow these guidelines to get the best performance from your camera:
1. For best audio performance, shake the camera or blow on the mic to remove debris
from the microphone holes.
2. To clean the lens, wipe it with a soft, lint-free cloth. Do not insert foreign objects around
the lens.
3. Don’t touch the lens with fingers.
4. Keep the camera away from drops and bumps, which may cause damage to the parts
inside.
5. Keep the camera away from high temperature and strong sunshine to avoid being
damaged.
MAXIMIZING BATTERY LIFE
If the battery reaches 0% while recording, the camera saves the file and powers off.
To maximize battery life, follow these guidelines when possible:
• Turn off Wireless Connections
• Capture video at lower frame rates and resolutions
• Use Screen Saver setting.
13 14
FHD P60(1920x1080) EV 0.0
CmaKing
11/20/2018 19:18:58
11/20/2018 19:18:58
1/1
PHOTO VIDEO
2018_1126193222_003.JPG
2018/11/26 19:32:22 4.4M
100%
2018_1126193119_002.JPG
2018/11/26 19:31:19 4.4M
0%
2018_1126192653_001.JPG
2018/11/26 19:26:53 4.4M
0%
Title
Downloading the selected file, Please
don’t interrupt!
OKCancel
SD Files
PHOTO VIDEO
Saved Files
2018/11/28 18:28:16

ADJUSTING THE ZOOM LEVEL
The Zoom function lets you adjust how close or far away the subject appears in your
photo. The default is no zoom. Zoom function is available in Video and Photo Mode.
Brave 4 can 5X zoom.
1. Turn on Brave 4.
2. Enter Video or Photo Mode.
3. Press and hold Up or Down button to adjust the zoom level.
BATTERY STORAGE AND HANDLING
The camera contains sensitive components, including the battery. Avoid exposing your
camera to very cold or very hot temperatures. Low or high temperature conditions may
temporarily shorten the battery life or cause the camera to temporarily stop working
properly. Avoid dramatic changes in temperature or humidity when using the camera, as
condensation may form on or within the camera.
• Do not dry the camera or battery with an external heat source such as a microwave oven
or hair dryer. Damage to the camera or battery caused by contact with liquid inside the
camera is not covered under the warranty.
• Do not store your battery with metal objects, such as coins, keys or necklaces. If the
battery terminals come in contact with metal objects, this may cause a fire.
• Do not make any unauthorized alterations to the camera. Doing so may compromise
safety, regulatory compliance, performance, and may void the warranty.
REFORMATTING YOUR MICRO SD CARD
To keep your micro SD card in good condition, reformat it on a regular basis. Reformatting
erases all of your content, so be sure to offload your photos and videos first.
1. Press and hold Mode button for 3 seconds to turn on Brave 4.
2. Press Mode button three times to enter Camera Setting.
3. Press UP / Down button to find the ‘Format’ option.
4. Press Shutter button, the screen shows ‘SD Card.’
5. Press Shutter button, the screen shows ‘All data will be deleted Cancel / OK’
6. Press Down button then Shutter button. The screen shows ‘Please wait’. Then you format
your micro SD card successfully.
15 16
VIDEO
To record Video, verify the camera is in Video mode.
To start recording:
Press the Grey Video Button. The camera will emit one beep and the camera light will
flash while recording.
To stop recording:
Press the Grey Video Button again. The camera will emit one beep and the camera light
will stop flashing while recording.
REMOTE
Photo Button
Video Button
Splashproof only, not waterproof
PHOTO
To capture a photo, verify the camera is in Photo mode.
To take a photo:
Press the Red Photo Button. The camera will emit a camera shutter sound.
WARNING: Do not drop, disassemble, open, crush, bend, deform, puncture, shred,
microwave, incinerate or paint the camera or battery. Do not insert foreign objects into
the battery opening on the camera. Do not use the camera or the battery if it has been
damaged - for example, if cracked, punctured or harmed by water. Disassembling or
REFORMATTING YOUR MICRO SD CARD

CR2032 BATTERY REPLACEMENT FOR BRAVE 4 REMOTE
1. Use a 1.8mm Phillips tip screwdriver to remove the 4 screws on the back cover of the
remote, allowing you to open it.
2. Remove another 4 screws on PCB board.
3. Lift the PCB board and slide out the battery, as shown in the picture.
Note: Do NOT rotate the PCB board to avoid reversing the camera and video button
functions.
4. Install the new battery, keeping the “+” pole facing up.
5. Install all 4 screws back onto the PCB board.
6. Install all 4 screws back into the cover.
17 18
Attach your camera to helmets, gear and equipment.
MOUNTING YOUR CAMERA

CONTACT US
For any inquiries, issues or comments concerining our products, please send E-mail to the
address below or call us. We will respond as soon as possible.
E-mail: [email protected]
US customer service line: (301)670-7335
19 20

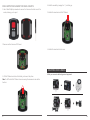
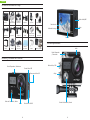
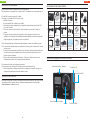
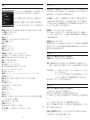
Tasten & Funktionen
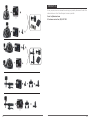
In der Schachtel enthaltenes Zubehör
21
Wasserfestes
Gehäuse
Lenker /
Masthalterung Halterung 1
Brave 4
Halterung 4
Klemme 1 Klemme 2 Helm -
Halterungen
Linsenreini-
gungstuch Halteseil
Halterung 5 Halterung 6 Schützende
Hintertür USB Kabel
Halterung 2 Halterung 3
Bandagen
MikroSD Anschluss
Mikro USB Anschluss
Mikro HDMI Anschluss
Ein-Aus / Modus-Taste Linse
Verschluss / Auswahl-Taste
Batterie &
Ladegerät
Deutsch

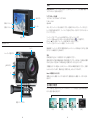
22
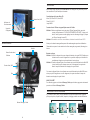
Wasserfestes Gehäuse
Betriebs-Anzeige
Lade-Anzeige
Bildschirm
Drücker
Aufwärts / WLAN-Taste
Aufwärts / WLAN-Taste
Lautsprecher
Abwärts
Ein-Aus / Modus-Taste
Verschluss / Auswahl-Taste
Es gibt 4 Hauptmodi: Video, Foto, Wiedergabe, Einstellungen. Um die Kameraeinstellungen für
Video, Foto, Belichtung und Sprache anzupassen, gehen Sie zu Settings (Einstellungen).
Anleitungen
Überblick über die Basis-Funktionen
Willkommen beim Gebrauch Ihrer AKASO Brave 4 Aktions-Kamera. Zum Aufnehmen oder
Fotografieren von Bildern muss eine Mikro-SD-Karte (nicht im Lieferumfang enthalten) hinein
sein.
Mikro SD-Karten-Eigenschaften:
MikroSD / Mikro SDHC / Mikro SDXC
Klasse 10 / UHS-I
bis zu 64 GB
Formatieren Sie die SD-Karte in dieser Kamera, bevor Sie sie verwenden.
Methode 1. Setzen Sie Ihre micro SD-Karte zuerst vollständig in die Kamera ein. Bitte
ignorieren Sie die Warnung im Bildschirm "Bitte SD-KARTE EINLEGEN", einfach
klicken auf "Modus", gehen Sie dann in den Einstellungsmodus, finden Sie "Format"
Einstellung auf Seite 9, klicken Sie auf OK um die SD-Karte zu formatieren.
Methode 2. Formatieren Sie die SD-Karte in Ihrem Computer, wählen Sie den
FAT32-Formatmodus.
Bitte beachten Sie, dass die aufgezeichneten Daten beschädigt werden können, wenn Sie die
Stromversorgung unterbrechen oder die Speicherkarte während der Aufnahme, beim Löschen
(Formatieren) oder bei der Wiedergabe herausnehmen.
Batterie Aufladen
Bitte stellen Sie sicher,dass der Akku bei der ersten Verwendung voll ist.
Methode 1Verwenden Sie das mitgelieferte Ladegerät,um die Batterien aufzuladen. Das
ROTE Licht zeigt an, dass der Akku geladen wird. Blaues Licht zeigt an, dass der
Akku voll geladen ist oder dass kein Akku geladen wird.
Methode 2: Oder schließen Sie die Kamera an einen Computer oder ein USB-Netzteil an, wenn
Sie das Ladegerät nicht mitgenommen haben. Beim Laden bleibt das Licht
eingeschaltet. Wenn die Batterien vollständig geladen sind, schaltet sich das Licht
aus.
EINSCHALTEN/ AUSSCHALTEN Ihres Brave 4. Schalten Sie Ihren Brave 4 ein / aus
Drücken Sie zum Einschalten den Ein-Aus / Modus-Taste. Zum Ausschalten drücken und halten
Sie den Ein-Aus / Modus-Taste.
Wiedergabe EinstellungenVideo Foto
23
Auflösung
Loop-Aufnahme
Gyroscope
WDR

In den Einstellungen / gibt es 9 Seiten mit 36 spezifischen
Einstellungsmöglichkeiten. Drücken Sie dem Aufwärts- oder
Abwärts-Taste, um durch die verschiedenen Optionen zu blättern.
Drücken Sie den Verschluss / Auswah-Taste, um die gewünschte
Option auszuwählen.
Wenn Sie mit der spezifischen Einstellung fertig sind, drücken Sie
den Ein-Aus- / Modus-Taste einmal, um die aktuelle Einstellung
zu verlassen. Drücken Sie die Taste erneut, um in den Videomodus
zu wechseln.
Einstellungen
Auflösung: 4K 24FPS / 2K 30FPS / 1080 60FPS / 1080 30FPS / 720 120FPS / 720 60FPS /
720 30FPS
Loop-Aufnahme: Aus / 3 Minuten / 5 Minuten / 10 Minuten
Gyroscope: Aus / Ein
WDR: Aus / Ein
Zeitraffer: Aus / 100 ms / 200 ms / 500 ms / ls / 5s
MovementDetection: Aus / Ein
Rekordaudio: Aus / Ein
Datumsanzeige: Aus / Ein
Winkel: 170 ° / 140 ° / 110 ° / 70 °
Divingmode: Aus / Ein
Besonders gute Wirkung: Aus / Nachtszene / Porträt / lange Verschlusszeit
Timer: Einzel / 2S Timer / 5S Timer / 10S Timer
Bildgröße: 20M / 16M / 12M / 10M / 8M / 5M / 3M / VGA
Auslösung: Aus / Auslöser 3 / Auslöser 5 / Auslöser 10
Bildqualität: Fein / Normal / Sparmodus
Schärfe: Hoch / Normal / Mittel
Weissbalance: Auto / Tageslicht / Bewölkt / Wolfram / Fluoreszierend
Farbe: Natur / Schwarz / Weiß / Sepia
ISO: Automatisch / 100/200/400
Belichtungswert: + 2,0 / + 1,7 / + 1,3 / + 1,0 / + 0,7 / + 0,3 / 0 / -0,3 / -0,7 / -1,0 / -1,3 / -1,7 /
- 2,0
Stabillisierung: Aus / Ein
Schutz: Strom sperren / Strom entriegeln / Alle sperren / Alle entsperren
WLAN: Aus / Ein
Datum / Uhreit: MM / TT / JJ
Auto Aus: Aus / 1 Minute / 3 Minuten / 5 Minuten / 10 Minuten
Akustisches Signal: Aus / Ein
Voice Prompt: aus / ein
OSD: Aus / Ein
CAR ACC: Aus / Ein
Sprache: Englisch / Francais / Deutsch / Espanol / Italiano / Portugues / Japanisch / Chinesisch
/ Polski / Russky / Koreanisch
Screen Save: Aus / 30s / 1 Min / 3 Min
Frequenz: 50 Hz / 60 Hz
Format: SD-Karte gelöscht / Abbrechen / OK
Standardeinstellung: Menüeinstellung auf Standardeinstellungen zurücksetzen/Abbrechen/OK
Version
24
Video Modus: Der Videomodus ist der Standardmodus nach dem Einschalten der Kamera.
Stellen Sie zum Aufzeichnen von Video sicher, dass sich die Kamera im Videomodus befindet.
Wenn das Videosymbol auf dem LCD-Bildschirm Ihrer Kamera nicht angezeigt wird, drücken
Sie wiederholt Ein-Aus / Modus-Taste, bis es erscheint.
Loop-Aufnahme: Wählen Sie im Menü Settings Mode die Aufnahmezeit (3 / 5 / 10 Minuten).
Wenn die Zeit auf 3 Minuten eingestellt ist, drücken Sie zum Aufnehmen die OK-Taste. Das
Video wird nach 3 Minuten automatisch als Datei gespeichert. Dann fährt die Kamera mit der
nächsten Videoaufnahme fort. Die Aufnahmezeit auf dem LCD beginnt bei Null. Wenn der
Speicher voll ist, wird das erste Video abgedeckt und so weiter.
Zeitrafferaufnahme: Aus / 100 ms / 200 ms / 500 ms / ls / 5s
Bewegungserkennung: Stellen Sie im Modus "Menüeinstellungen" die Bewegungserkennung
auf "EIN" (stellen Sie sicher, dass die Option "Loop-Aufnahme" und "Automatisches
Ausschalten" deaktiviert ist). Die Kamera startet die Aufnahme nach dem Erkennen von
Bewegungen und stoppt die Aufnahme nach 10 Sekunden ohne Bewegung.
So stoppen Sie die Aufnahme: Drücken Sie die OK-Taste.
Wenn die Aufnahme startet, ist das Wechseln zwischen den Modi nicht möglich. Um den
Modus zu wechseln, stoppen Sie bitte zuerst die Aufnahme. Diese Kamera stoppt die
Aufnahme automatisch, wenn der Akku leer ist. Dein Video wird automatisch gespeichert,
bevor die Kamera ausgeschaltet wird.
Video Modus
Wiedergabe Modus
Drücken Sie den Ein-Aus-/Modus-Taste wiederholt, um in den Wiedergabemodus zu
wechseln
Drücken Sie den Aufwärts- / Abwärts-Taste, um Videos / Fotos zur Ansicht auszuwählen.
Drücken Sie OK, um mit der Wiedergabe des Videos zu beginnen, und drücken Sie noch einmal
auf OK, um die Wiedergabe zu stoppen.
Während der Video-Wiedergabe, drücken Sie den Aufwärts-Taste, um das Video zu
beschleunigen. Drücken Sie den Abwärts-Taste, um das Video zurückzuspulen.
Drücken Sie lange auf den Verschluss- und Auswah-Taste, um alle Bilder zu sehen.
25
Drücken Sie wiederholt den Ein-Aus / Modus-Taste, um in den Fotomodus zu wechseln
Fotoaufnahme: Drücken Sie im Fotomodus die OK-Taste, um Fotos aufzunehmen.
Auslöser: Um diese Funktion zu verwenden, gehen Sie zuerst in den Einstellungsmodus und
stellen Sie die Auslöser-Zeiten ein (3/5/10). Drücken Sie im Fotomodus den OK-Taste,
um den Auslöser zu betätigen. Wenn Sie den Auslöser ausschalten, befindet sich die
Kamera im normalen Aufnahmemodus.
Schöne Bilder: Stellen Sie im Modus "Menüeinstellungen" die Option "Schöne Bilder" ein
(Nachtszene / Porträt / lange Verschlusszeit).
Wenn "Schöne Bilder" aktiviert ist, funktioniert der Serien-Auslöser nicht. (Hinweis: Wenn "lange
Verschlusszeit" ausgewählt ist, dauert es 10 Sekunden, um ein Bild aufzunehmen).
Zoom: Drücken Sie im Fotomodus den Aufwärts-/ Abwärts-Taste zum Vergrößern / Verkleinern.
Foto Modus
Auflösung
Loop-Aufnahme
Gyroscope
WDR

Kamera App
Bevor Sie die WLAN-Funktion nutzen, installieren Sie zuerst die App CamKing auf Ihrem
mobilen Gerät.
1. Laden Sie die App CamKing von Google Play oder Apple Store herunter.
2. Schalten Sie die Kamera ein, drücken Sie den Aufwärts-Taste, um das WLAN zu öffnen (oder
stellen Sie Win im Menü-Einstellungsmodus ein). Nachdem das WLAN aktiviert wurde,
werden auf dem Bildschirm WLAN-Name und -Passwort angezeigt.
3. Suchen Sie auf den Mobilgeräten das WLAN namens "AKASO". Verbinden Sie es mit dem
Passwort: 1234567890
4. Nach erfolgreicher Verbindung wird der Kamerabildschirm ausgeschaltet, um Strom zu
sparen. Drücken Sie einen beliebigen taste, um den Bildschirm einzuschalten.
5. Öffnen Sie die APP CamKing auf den mobilen Geräten. Die APP zeigt, was die Kamera
aufnimmt. Videoaufnahme / Fotoaufnahme / Wiedergabe / Herunterladen / Löschen / Teilen
können in der APP vorgenommen werden. Drücken Sie OK, um WLAN zu schließen und die
Kamera von mobilen Geräten zu trennen.
Mit dem PC verbinden
1. Schalten Sie die Kamera ein und verbinden Sie die Kamera über ein USB-Kabel mit dem PC.
Nach der Verbindung zeigt der Bildschirm Massenspeicher / PC-Kamera;
2. Drücken Sie den Aufwärts- / Abwärts-Taste, um Massenspeicher zu wählen und bestätigen
Sie mit OK. Nach erfolgreicher Verbindung erscheint ein neuer Treiber namens
Massenspeicher auf dem Computer. Fotos und Videos befinden sich in "Novatek" im
Massenspeicher und können auf den Computer kopiert werden.
3. Die Kamera kann auch als Computer-Kamera verwendet werden, wenn sie benötigt wird.
Wählen Sie während der Verbindung die Kamera aus. Stellen Sie sicher, dass Sie eine
Software herunterladen, um die Kamera auf Ihrem Computer zu betreiben (z. B. PC-Camera_
amcap)
26
Kamera Wartung
- Wenn die Kamera nicht verwendet wird, bewahren Sie sie an einem trockenen, schattigen Ort
auf.
- Verwenden Sie Schutzhüllen, um Kratzer auf Linse und LCD zu vermeiden.
- Wenn Linse gereinigt werden muss, blasen Sie zuerst den Staub von der Oberfläche ab und
reinigen Sie dann mit einem Tuch oder Papier, das für optische Geräte geeignet ist.
Reinigungsmittel kann bei Bedarf verwendet werden.
- Bitte verwenden Sie kein organisches Lösungsmittel zum Reinigen.
- Bitte berühren Sie die Linse nicht mit den Fingern.
- Stellen Sie die Kamera nicht an einen feuchten oder staubigen Ort. Stromaustritt kann Feuer
verursachen.
Problemlösung
F: Videodateien konnten nicht auf Computern wiedergegeben werden
A: Die Software unterstützt keinen H.264-Code. Oder der Computer unterstützt keine 4K-
Anzeige
F: Das WLAN-Netzwerk kann im Telefon / Tablet nicht gefunden werden
A: 1. Schalten Sie das Telefon / Tablet über das WLAN aus.
2. Schalten Sie die Kamera EIN.
3. Aktivieren Sie in den WLAN-Einstellungen der Kamera das WLAN.
4. Öffnen Sie die WLAN-Einstellungen auf Ihrem Gerät und versuchen Sie, mit dem Telefon /
Tablet eine Verbindung zum WLAN-Netzwerk herzustellen.
5. Wenn das Netzwerk nicht in der Liste des Telefons / Tablets enthalten ist, versuchen Sie,
falls möglich, ein anderes Telefon / ein anderes Tablet.
6. Wenn alle obgenannten Schritte nicht funktionieren, kontaktieren Sie bitte den Verkäufer -
Support mit einer detaillierten Beschreibung des Problems. Man wird sich freuen, alle Ihre
Fragen zu beantworten und Ihnen helfen, weiterzukommen.
F: Die Kamera - Aufnahmen sind verzerrt oder weisen eine schlechte Qualität auf
A: 1. Kameragehäuse kann Kondensation haben. Versuchen Sie, die Kamera für ein oder zwei
Stunden an die Sonne zu stellen.
2. Kamera-Linse kann fehlerhaft sein. Kamera-Linse kann Kratzer oder Risse aufweisen, die
dazu führen, dass Videos und Fotos verzerrt erscheinen. Überprüfen Sie die Linse auf Risse
und Kratzer.
3. Der Kamerasensor ist möglicherweise fehlerhaft. Wenn Fotos und Videos beschädigt oder
verzerrt sind, ist der Sensor Ihrer Kamera möglicherweise defekt.
F: Die Kamera funktioniert nicht mit meiner Speicherkarte.
A: 1. Stellen Sie sicher, dass Ihre SD-Karte Klasse 10 max 64GB Micro SD-Karte ist.
2. Legen Sie die Karte in Ihre Kamera und machen Sie die Kamera in den Einstellungsmodus,
finden Sie die Einstellung "Format", um die Karte vor der Verwendung zu formatieren.
27
Wenn Sie im Wiedergabemodus sind, drücken Sie lange den OK-Taste, um zur Übersicht aller
Fotos und Videos zu gelangen. Drücken Sie den Aufwärts- / Abwärts-Taste, um das
gewünschte anzuzeigen.
So löschen Sie Fotos / Videos: Drücken Sie im Wiedergabemodus lange den Aufwärts- /
Abwärts-Taste, um das Delete-Fenster zu öffnen. Wählen Sie das gewünschte.
- Schützen Sie die Kamera vor dem Fallenlassen und vor Stößen. Dies kann zu Schäden an den
Teilen im Inneren führen.
- Schützen Sie die Kamera vor langer Aussetzung in hohen Temperaturen und starker
Sonneneinstrahlung, um Beschädigungen zu vermeiden. Bitte beachten Sie, dass die Kamera
nach längerer Benutzung heiß wird. Dies ist normal.
Deutsch
Kontaktieren Sie Uns
Bei Fragen, Problemen oder Kommentaren zu unseren Produkten senden Sie bitte ein E-Mail
an die untenstehende Adresse oder rufen Sie uns an. Wir werden so schnell wie möglich
antworten.
E-Mail: [email protected]

Botones y funciones de la cámara
Accesorios incluidos en la caja
28 29
Carcasa Impermeable
Indicador de
Indicador de carga
Pantalla
Latch
Botón Arriba/WiFi
Botón Arriba / WiFi
Abajo
Abajo
Carcasa
impermeable
Handle Bar/
Pole Mount Soporte 1
Brave 4
Soporte 4
Pinza 1 Pinza 2 Soportes
para casco
Gamuza
para lentes Bridas
Soporte 5 Soporte 6 Puerta trasera
de protección Cable USB
Soporte 2 Soporte 3
Cintas
Batería y cargador
Botón de Encendido / Modo
Botón Disparador
/ Seleccionar
Ranura para Micro SD
Puerto Micro USB
Puerto Micro HDMI
Botón de Encendido / Modo Lente
Botón Disparador / Seleccionar
Español

En ajustes hay 9 páginas con 36 opciones de ajuste específicas.
Presione el botón de arriba o abajo para moverse por las distintas
opciones.
Presione el botón Disparador / Seleccionar para seleccionar la
opción deseada.
Cuando termine de seleccionar un determinado ajuste, presione
el botón Encendido / Modo una vez, así saldrá del ajuste actual.
Entonces presione el botón Encendido / Modo otra vez y
cambiará al modo de vídeo.
Ajustes
Resolución: 4K 24FPS / 2K 30FPS / 1080P 60FPS / 1080P 30FPS / 720P 120FPS / 720P 60FPS /
720P 30FPS
Grabación en bucle: Apagado / 3 minutos / 5 minutos / 10 minutos
Giroscopio: Encendido / Apagado
WDR: Encendido / Apagado
Grabación en Time Lapse: Apagado / 100 ms / 200 ms / 500 ms / 1s / 5s
Detección de movimiento: Encendido / Apagado
Grabación de audio: Encendido / Apagado
Código de tiempo: Encendido / Apagado
Ángulo: 170 o / 140 o / 110 o / 70 o
Modo de conducción: Encendido / Apagado
Efectos especiales: Apagado / Escena nocturna / Retrato / Lightpainting
Temporizador: Solo / temporizador 2s / temporizador 5s / temporizador 10s
Tamaño de la imagen: 20M / 16M / 12M / 10M / 8M / 5M / 3M / VGA
Ráfaga: Apagado / ráfaga 3 / ráfaga 5 / ráfaga 10
Calidad de la imagen: Excelente / Normal / Economía
Nitidez: Alta / Normal / Media
Balance de blanco: Automática / Luz diurna / Nuboso / Tungsteno / Fluorescente
Color: Natural / Blanco y negro / Sepia
ISO: Automático / 100 / 200 / 400
Valor de la exposición: +2.0/+1.7/+1.3/+1.0/+0.7/+0.3/0/-0.3/-0.7/-1.0/-1.3/-1.7/-2.0
Anti sacudidas: Encendido / Apagado
Proteger: Bloquear actual / Desbloquear actual / Bloquearlas todas / Desbloquearlas todas
WiFi: Encendido / Apagado
Fecha/Hora: DD / MM / AA
Apagado automático: Apagado / 3 minutos / 5 minutos / 10 minutos
Pitido: Encendido / Apagado
Indicación de voz: Encendido / Apagado
OSD: Encendido / Apagado
CAR ACC: Encendido / Apagado
Idioma: Inglés / francés / alemán / español / italiano / portugués / japonés / chino / polaco
/ ruso / coreano
Salvapantallas: Apagado / 30s / 1 Min / 3 Min
Frecuencia: 50 Hz / 60 Hz
Formato: Tarjeta SD borrada / Cancelar/OK
Ajuste por defecto: Restaurar los ajustes de menú a los valores por defecto/Cancelar/OK
Versión
Existen 4 modos: Vídeo, Foto, Reproducción, Ajustes. Para ajustar las especificaciones de la
cámara para video, foto, exposición e idioma, vaya a Ajustes para configurarlas.
Instrucciones
Resumen de las funciones básicas
Bienvenido a su cámara para deportes de acción AKASO Brave 4. La tarjeta Micro SD (no
incluida) es imprescindible para grabar o hacer fotos.
Especificaciones de la tarjeta Micro SD:
MicroSD/Micro SDHC/Micro SDXC
Clase 10/UHS-I
Hasta 64GB
Formatee la tarjeta SD en esta cámara antes de usarla.
Método 1. Inserte su tarjeta micro SD totalmente en la cámara primero, independientemente
de la advertencia en la pantalla "INSERTAR TARJETA SD", haga clic en el botón
"modo", vaya al modo de configuración, encuentre la configuración "formato" en la
página 9, haga clic en Aceptar para formatear la tarjeta sd.
Método 2. formatee la tarjeta sd en su computadora, elija el modo de formato FAT32.
copia de seguridad de todos los archivos que haya en la tarjeta.
Por favor, tenga en cuenta que los datos guardados se pueden dañar cuando usted desconecte
la fuente de alimentación o saque la tarjeta de memoria mientras está grabando, borrando
(formateando) o reproduciendo.
Batería Cargando
Método 1: Use el cargador incluido para cargar las baterías. La luz ROJA muestra que la batería
se está cargando. La luz azul muestra que la batería está completamente cargada o
que no hay batería cargándose.
Método 1: Conecte la cámara a un ordenador o fuente de alimentación USB si no lleva el
cargador consigo. Cuando se esté cargando la luz permanece encendida. Cuando
esté cargada del todo la luz se apagará.
Encender / Apagar su Brave 4
Para encender, presione el botón Encendido/Modo; para apagar, mantenga apretado el botón
Encendido/Modo.
Reproducción AjustesVídeo Foto
30 31
Resolución
Grabación en bucle
Giroscopio
WDR
Resolución
Grabación en bucle
Giroscopio
WDR

El Modo Vídeo es el modo por defecto al encender la cámara. Para grabar vídeo, verifique que
la cámara está en el Modo Video. Si no aparece el icono de vídeo en la pantalla LCD de su
cámara, presione el botón Encendido/Modo varias veces hasta que aparezca.
Grabación en bucle: En el modo de menú de ajustes, elija el tiempo de grabación (3/5/10
mins). Si el tiempo establecido es de 3 minutos, presione OK para grabar,
el video se guardará automáticamente como archivo después de 3
minutos. Después la cámara continua con la siguiente grabación de vídeo.
La hora de grabación en la pantalla IPS comenzará en cero. Cuando la
memoria esté llena, el primer vídeo quedaría cubierto y así sucesivamente.
Grabación en Time Lapse: Apagado/100 ms/200 ms/500 ms/ls/5s
Detección de movimiento En el modo de menú de ajustes, ponga la detección de movimiento
en «ON» (asegúrese de desactivar tanto la grabación en bucle como el auto apagado). La
cámara comienza a grabar después de detectar movimientos y parara después de 10s sin
movimiento.
Para dejar de grabar: Presione el botón de OK.
Cuando comience la grabación, el cambio de modos no será posible Para cambiar de modo,
por favor, deje de grabar primero. Esta cámara deja de grabar automáticamente cuando l
batería se quede sin energía. Su vídeo se guardara automáticamente antes de que la cámara
se apague.
Modo vídeo
Modo de reproducción
Presione el botón Encendido/Modo varias veces para cambiar al Modo Reproducción
Presione las teclas Arriba y Abajo para elegir los vídeos/fotos que desee ver.
Presione OK para comenzar a reproducir el vídeo y presione OK una vez más para detener la
reproducción.
Cuando esté reproduciendo el vídeo, presione la tecla Arriba para acelerar el vídeo. Presione la
tecla Abajo para rebobinar el vídeo.
Mantenga apretado el botón Disparador y Seleccionar para hacer un recorrido por todas las
imágenes.
Cuando esté en el modo Reproducción, mantenga apretado el botón OK para ir a la vista
general de todas las fotos y vídeos. Presione el botón Arriba y Abajo para ver la que desee.
Para borrar fotos / vídeos: En el modo Reproducción, mantenga apretado el botón Arriba o
Abajo, la ventana de retraso saldrá. Elija la que usted desee.
32
Presione el botón Encendido / Modo varias veces para cambiar al Modo Foto
Hacer una foto: En el modo Foto, presione el botón OK para sacar fotos.
Ráfaga: Para usar esta función, vaya primero al modo de ajustes, seleccione los tiempos de las
ráfagas (3/5/10) Después en el modo foto, presione OK para desactivar las ráfagas, la
cámara estará entonces en el modo de disparo normal.
Bellas Imágenes: En el modo de ajustes de menu, active Bellas Imágenes (Escena nocturna /
Retrato / Lightpainting).
Cuando Bellas Imágenes esté activado, las ráfagas no funcionan. Nota: Si está seleccionado el
Lightpainting, se necesitan 10s para fotografiar una imagen).
Zoom: En el modo foto, presione la tecla Arriba / Abajo para acercar o alejar la imagen.
Modo Foto
App de la cámara
Antes de usar la función WiFi, por favor, instale la App CamKing en su dispositivo móvil.
1. Descargue la app CamKing de Google Play o Apple Store.
2. Encienda la cámara, presione la tecla Arriba para abrir el WiFi (o establecer el WiFi en el
menú del Modo Ajustes) Después de que el Wi Fi esté conectada, la pantalla muestra el
nombre y la contraseña Wifi.
3. Encuentre la red WiFi llamada «AKASO» entre los dispositivos móviles. Conéctelo con la
contraseña: 1234567890
4. Después de haberse conectado con éxito, la pantalla de la cámara se apagará para ahorrar
energía. Presione cualquier tecla para encender la pantalla.
5. Abra la APP CamKing en dispositivos móviles. La app muestra lo que la cámara captura. Se
podrá realizar Grabación de vídeo / Disparo fotos / Reproducir / Descargar / Borrar /
Compartir en la APP. Presione OK para cerrar el WiFi y desconecte la cámara con dispositivos
móviles.
Conectarse al PC
1. Encienda la cámara, conecte la cámara de PC a un estadio con USB Después de la conexión,
la pantalla muestra almacenamiento masivo / cámara PC;
2. Presione la tecla Arriba/Abajo para elegir almacenaje masivo y presione OK para confirmar.
Tras haberse conectado exitosamente, aparecerá una nueva unidad en el ordenador llamada
almacenaje masivo. Se pueden encontrar fotos y vídeos en «Novatek» en el almacenaje
masivo que se copíó en el ordenador.
3. La cámara también se puede usar como una cámara de ordenador, cuando se necesite.
Mientras se conecta, elija un programa Asegúrese de descargar un software para dirigir la
cámara en su ordenador,(por ejemplo,PC Camera_amcap)
33
Mantenimiento de la cámara
- Cuando la cámara no esté en uso, por favor guárdela en un lugar seco ya la sombra.
- Utilice fundas de protección para evitar arañazos a la lente ya la pantalla IPS.
- Si es necesario limpiar la lente, sople primero el polvo de la superficie, luego use una gamuza
o papel apropiado para limpiar dispositivos ópticos. Se podría usar detergente si fuese
necesario.
- Por favor no use disolventes orgánicos para limpiar.
- Por favor, no toque la lente con los dedos.
- Por favor, no ponga la cámara en lugares húmedos o polvorientos Los escapes de electricidad
pueden causar incendios.
- Intente que la cámara no sufra caídas o golpes. Pueden causar daños en las partes internas.
- No exponga a la cámara a largas periodos a altas temperaturas o radiación solar intensa para
evitar que se dañe. Por favor, tenga en cuenta que la cámara se calentará después de un uso
prolongado. Es normal.

Resolución de problemas
P: Los archivos de vídeo no se pueden ver en los ordenadores.
R: El software no es compatible con el código H.264. O el ordenador no es compatible con 4K.
P: La red WiFi no aparece en el móvil / tablet.
R: 1. Apague / encienda el WiFi del móvil / tablet.
2. Encienda la cámara.
3. En los ajustes WiFi de la cámara, active el WiFi.
4. Abra los ajustes de red inalámbrica de su dispositivo e intente conectarse a la red WiFi
con el móvil / tablet.
5. Si la red no existe en la lista del móvil / tablet, inténtelo con otro móvil / tablet si es
posible.
6. Si ninguno de los pasos anteriores funciona, por favor, póngase en contacto con el
vendedor con una descripción detallada del problema. Estarán encantados de responder
cualquier pregunta y de ayudarle a resolver su problema.
P: Los vídeos grabados por la cámara están distorsionados o tienen una calidad muy pobre.
R: 1. La carcasa de la cámara puede tener condensación. Intente poner la cámara al sol durante
una hora o dos.
2. La lente de la cámara puede ser defectuosa. La lente de la cámara puede tener arañazos o
roturas lo que hace que se distorsionen los vídeos y las fotos. Inspeccione la lente en
busca de roturas y arañazos.
3. El sensor de la cámara puede ser defectuoso. Si las fotos y vídeos están corruptos o
distorsionados el sensor de su cámara puede ser defectuoso.
P: La cámara no funciona con mi tarjeta de memoria.
R: 1. Asegúrese de que su tarjeta SD sea tarjeta micro sd clase 10 max 64 gb.
2. Inserte la tarjeta en su cámara, vaya al modo de configuración, busque el "formato" de
configuración para formatear la tarjeta antes de usarla.
34
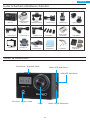
Boutons de l’Appareil Photo & Fonctions
Accessoires Inclus dans la Boite
35
Boitier étanche Poignée /
Support de tige Support 1
Brave 4
Support 4
Accroche 1 Accroche 2 Supports de tête
Tissu pour
nettoyage de
la lentille Filins
Support 5 Support 6 Ouverture arrière
protectrice Câble USB
Support 2 Support 3
Attaches
Encoche MicroSD
Port Micro USB
Port Micro HDMI
Bouton Alimentation / Mode Lentille
Bouton Enclencheur / Sélection
Batterie &
Chargeur
Español Français
Contacte con Nosotros
Para cualquier pregunta, incidencia o comentario sobre nuestros productos, por favor, envíe un
correoelectrónico a la siguiente dirección o llámenos. Responderemos lo antes posible.
Correo electrónico: [email protected]
La pagina si sta caricando...
La pagina si sta caricando...
La pagina si sta caricando...
La pagina si sta caricando...
La pagina si sta caricando...
La pagina si sta caricando...
La pagina si sta caricando...
La pagina si sta caricando...
La pagina si sta caricando...
La pagina si sta caricando...
-
 1
1
-
 2
2
-
 3
3
-
 4
4
-
 5
5
-
 6
6
-
 7
7
-
 8
8
-
 9
9
-
 10
10
-
 11
11
-
 12
12
-
 13
13
-
 14
14
-
 15
15
-
 16
16
-
 17
17
-
 18
18
-
 19
19
-
 20
20
-
 21
21
-
 22
22
-
 23
23
-
 24
24
-
 25
25
-
 26
26
-
 27
27
-
 28
28
-
 29
29
-
 30
30


AKASO Brave 4 Guida utente
- Categoria
- Fotocamere per sport d'azione
- Tipo
- Guida utente
in altre lingue
- English: AKASO Brave 4 User guide
- français: AKASO Brave 4 Mode d'emploi
- español: AKASO Brave 4 Guía del usuario
- Deutsch: AKASO Brave 4 Benutzerhandbuch
- 日本語: AKASO Brave 4 ユーザーガイド