Toro PowerPlex 40V MAX Axial Blower Manuale utente
- Categoria
- Aeratori / essiccatori
- Tipo
- Manuale utente

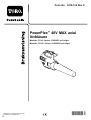
FormNo.3418-140RevC
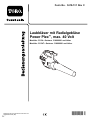
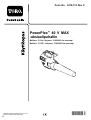
PowerPlex™40VMAXAxialBlower
51134,51134T
AxiálnídmychadloPowerPlex™,40VMAX.
51134,51134T
LaubbläsermitRadialgebläsePowerPlex™,
max.40Volt
51134,51134T
SopladoraxialPowerPlex™40VMAX
51134,51134T
PowerPlex™40VMAX-aksiaalipuhallin
51134,51134T
SoufeuraxialPowerPlex™40VMAX
51134,51134T
SofatoreassialePowerPlex™40VMAX
51134,51134T
PowerPlex™40VMAXbladblazer
51134,51134T
PowerPlex™40VMAX-løvblåser
51134,51134T
DmuchawaosiowaPowerPlex™40VMAX
51134,51134T
PowerPlex™40VMAXaxiallövblåsare
51134,51134T
www.Toro.com.
*3418-140*C


Introduction
Thisblowerisintendedtobeusedbyresidential
homeownerstomoveleaf-likedebrisasneeded.It
isdesignedtouseonlybatterypackModels88525
(providedwithModel51134)or88526.
Readthisinformationcarefullytolearnhowtooperate
andmaintainyourproductproperlyandtoavoid
injuryandproductdamage.Youareresponsiblefor
operatingtheproductproperlyandsafely.
YoumaycontactT orodirectlyatwww.Toro.comfor
productandaccessoryinformation,helpndinga
dealer,completewarrantydetails,ortoregisteryour
product.
Model51134Tdoesnotincludeabatteryora
charger.
Safety
WARNING:Whenusingelectricgardeningappliances,
alwaysfollowbasicsafetyprecautionstoreduce
theriskofre,electricshock,andpersonalinjury,
includingthefollowing:
WARNING
Failuretofollowallwarningsandinstructions
mayresultinelectricshock,reand/or
seriouspersonalinjury.
Readallsafetywarningsandallinstructions.
Saveallwarningsandinstructionsforfuture
reference.
Theterm“powertool”inallthewarningsrefers
toyourmains-operated(corded)powertoolor
battery-operated(cordless)powertool.
1.Workareasafety
A.Keeptheworkareacleanandwelllit.
Clutteredordarkareasinviteaccidents.
B.Donotoperatepowertoolsinexplosive
atmospheres,suchasinthepresence
ofammableliquids,gasses,ordust.
Powertoolscreatesparkswhichmayignite
thedustorfumes.
C.Keepchildrenandbystandersaway
whileoperatingapowertool.Distractions
cancauseyoutolosecontrol.
2.Personalsafety
A.Stayalert;watchwhatyouaredoing
andusecommonsensewhenoperating
apowertool.Donotuseapowertool
whileyouaretiredorundertheinuence
ofdrugs,alcohol,ormedication.A
momentofinattentionwhileoperatingpower
toolsmayresultinseriouspersonalinjury.
B.Usepersonalprotectiveequipment.
Alwaysweareyeprotection.Protective
equipmentsuchasadustmask,non-skid
safetyshoes,ahardhat,orhearing
protectionusedforappropriateconditions
willreducepersonalinjuries.
C.Preventunintentionalstarting.Ensure
thattheswitchisintheOFFposition
beforeconnectingtoapowersource
and/orbatterypackandpickingupor
carryingthetool.Carryingpowertools
withyourngerontheswitchorenergizing
powertoolsthathavetheswitchoninvites
accidents.
D.Donotoverreach.Keepproper
footingandbalanceatalltimes.This
©2018—TheToro®Company
8111LyndaleAvenueSouth
Bloomington,MN55420
2
Contactusatwww.Toro.com.
PrintedinChina
AllRightsReserved

enablesbettercontrolofthepowertoolin
unexpectedsituations.
E.Dressproperly.Donotwearloose
clothingorjewelry.Keepyourhairtied
backandkeepyourhair,clothing,and
glovesawayfrommovingparts.Loose
clothes,jewelry,orlonghaircanbecaught
inmovingparts.
F.Keepyourhandsandfeetawayfromthe
cuttingarea.
3.Powertooluseandcare
A.Donotforcethepowertool.Usethe
correctpowertoolforyourapplication.
Thecorrectpowertoolwilldothejob
betterandsaferattherateforwhichitwas
designed.
B.Donotusethepowertooliftheswitch
doesnotturnitonandoff.Anypowertool
thatcannotbecontrolledwiththeswitchis
dangerousandmustberepaired.
C.Removethebatterypackfromthepower
toolbeforemakinganyadjustments,
changingaccessories,orstoringpower
tools.Suchpreventivesafetymeasures
reducetheriskofstartingthepowertool
accidentally.
D.Storeidlepowertoolsoutofthereach
ofchildrenanddonotallowpersons
unfamiliarwiththepowertoolorthese
instructionstooperatethepowertool.
Powertoolsaredangerousinthehandsof
untrainedusers.
E.Storeidleappliancesindoors.Whennot
inuse,appliancesshouldbestoredindoors
inadryandhighorlocked-upplace,outof
thereachofchildren.
F.Maintainpowertools.Checkfor
misalignmentorbindingofmoving
parts,breakageofpartsandanyother
conditionthatmayaffectthepowertools
operation.Ifdamaged,havethepower
toolrepairedbeforeuse.Manyaccidents
arecausedbypoorlymaintainedpower
tools.
G.Keepcuttingtoolssharpandclean.
Properlymaintainedcuttingtoolswithsharp
cuttingedgesarelesslikelytobindandare
easiertocontrol.
H.Usethepowertoolinaccordancewith
theseinstructionsandinthemanner
intendedfortheparticulartypeofpower
tool,takingintoaccounttheworking
conditionsandtheworktobeperformed.
Usingthepowertoolforoperationsdifferent
fromthoseintendedcouldresultina
hazardoussituation.
I.Keepguardsinplaceandinworking
order.
4.Service
Haveyourpowertoolservicedbya
qualiedrepairpersonusingonlyidentical
replacementparts.Thiswillensurethatthe
safetyofthepowertoolismaintained.
5.BatterySafety
A.Donotchargeapplianceinrain,orinwet
locations.
B.Donotusebattery-operatedappliancein
therain.
C.Useonlythefollowingtypeandsize
battery(ies):TorobatteryModel88525or
88526.
D.Removeordisconnectthebatterybefore
servicing,cleaning,orremovingmaterial
fromthegardeningappliance.
E.Donotdisposeofthebattery(ies)ina
re.Thecellmayexplode.Checkwith
localcodesforpossiblespecialdisposal
instructions.
F.Donotopenormutilatethebattery(ies).
Releasedelectrolyteiscorrosiveandmay
causedamagetotheeyesorskin.Itmay
betoxicifswallowed.
G.Exercisecareinhandlingbatteriesinorder
nottoshortthebatterywithconducting
materialssuchasrings,bracelets,andkeys.
Thebatteryorconductormayoverheatand
causeburns.
SAVETHESEINSTRUCTIONS
3

SoundPressure
Thisunithasasoundpressurelevelattheoperator’s
earof81.3dBA,withanUncertaintyValue(K)of3
dBA.
Thesoundpressurelevelwasdeterminedaccording
totheproceduresoutlinedinENISO11201.
SoundPower
Thisunithasaguaranteedsoundpowerlevelof96
dBA,whichincludesanUncertaintyValue(K)of3
dBA.
Thesoundpowerlevelwasdeterminedaccordingto
theproceduresoutlinedinENISO11094.
Hand/ArmVibration
Measuredvibrationlevelforrighthand=3.28m/s
2
Measuredvibrationlevelforlefthand=1.8m/s
2
UncertaintyValue(K)=1.5m/s
2
Themeasuredvaluesweredeterminedaccordingto
theproceduresoutlinedinENISO20643.
Important:Thevibrationemissionduringactual
useofthepowertoolcandifferfromthedeclared
totalvaluedependingonthewaythetoolis
used.Theoperatorshouldtakesafetymeasures
basedonanestimationofexposureintheactual
conditionsofuse.
4

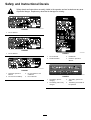
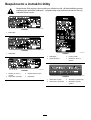
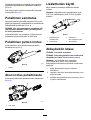
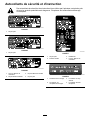
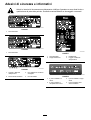
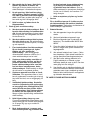
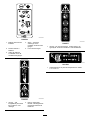
SafetyandInstructionalDecals
Safetydecalsandinstructionsareeasilyvisibletotheoperatorandarelocatednearanyarea
ofpotentialdanger.Replaceanydecalthatisdamagedormissing.
decal136-2493
136-2493
1.Donotdiscard.
decal136-2494
136-2494
1.Donotdiscard.
decal136-2499
136-2499
1.ReadtheOperator’s
Manual.
3.Donotoperateinwet
conditions.
2.Donotburnthebattery.4.Donotdiscard.
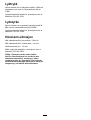
decal136-2501
136-2501
1.Donotdiscard.3.Residential
2.Doubleinsulated
4.ReadtheOperator’s
Manual.
decal136-2504
136-2504
1.Thebatterypackis
charging.
3.Thebatterypackistoo
warm.
2.Thebatterypackisfully
charged.
4.Thebatterypackneedsto
bereplaced.
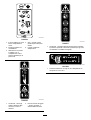
5

decal136-2534
136-2534
1.Thebatterydoesnot
comeoutoftheboxfully
charged.
4.Stop—followthese
instructionsbeforerst
use.
2.Placethebatteryinthe
batterycharger.
5.ReadtheOperator’s
Manual.
3.Waituntilthebatteryis
fullychargedbeforethe
rstuse.
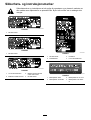
decal136-2536
136-2536
1.Warning—keep
bystandersawayfromthe
machineinalldirections.
2.Thrownobject
hazard—keepbystanders
awayfromthemachine.
decal136-2537
136-2537
1.Warning—readtheOperator’sManual;wearhearing
protection;weareyeprotection;donotoperateinwet
conditions.
decal136-2539
136–2539
1.Chargethebatterywherethetemperatureisbetween0°C
and40°C(32°Fand104°F).
6

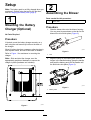
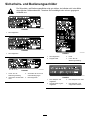
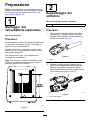
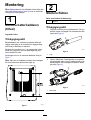
Setup
Note:Thebatterypackisnotfullychargedwhenyou
purchaseit.Beforeusingthetoolforthersttime,
refertoChargingtheBatteryPack(page9).
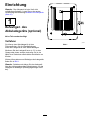
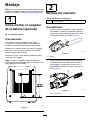
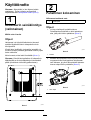
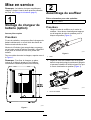
1
MountingtheBattery
Charger(Optional)
NoPartsRequired
Procedure
Ifdesired,mountthebatterychargersecurelyona
wallusingthewall-mountkeyholesonthebackof
thecharger.
Mountitindoors(suchasagarageorotherdryplace),
nearapoweroutlet,andoutofthereachofchildren.
RefertoFigure1forassistanceinmountingthe
charger.
Note:Slideandtwistthechargeroverthe
appropriatelypositionedhardwaretosecurethe
chargerinplace(hardwarenotincluded).
g194202
Figure1
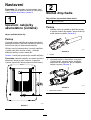
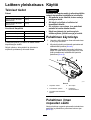
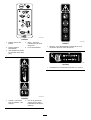
2
AssemblingtheBlower
Partsneededforthisprocedure:
1Blowertube
Procedure
1.Slidetheblowertubeontotheblowerhousing.
Youmayneedtopressdownonthetabforthe
blowertubetolockintoplace(Figure2).
g190102
Figure2
1.Tab
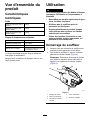
2.Alignthecavityonthebatterypackwiththe
tongueinthehandlehousing,graspthehandle,
andpushthebatterypackintothehandleuntil
thelatchlocksintoplace(Figure3).
g194149
Figure3
1.Batterylatch
7

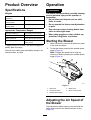
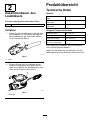
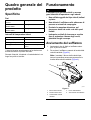
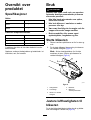
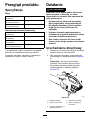
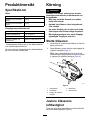
ProductOverview
Specications
Weights
Massofthemachinewithout
thebattery
2.8kg(6.2lb)
Massofthemachinewith
battery88525
3.8kg(8.4lb)
Massofthemachinewith
battery88526
4.4kg(9.7lb)
AppropriateTemperatureRanges
Chargethebatteryat0°C(32°F)to40°C(104°F)*
Useproductsat
-15°C(5°F)to60°C(140°F)
Storeproductsat-15°C(5°F)to60°C(140°F)
UnplugthechargerifBelow0°C(32°F)orabove
40°C(104°F)
*Chargingtimewillincreaseifyoudonotchargethe
batterywithinthisrange.
Storethetool,batterypackandbatterychargerinan
enclosedclean,dryarea.
Operation
WARNING
Theblowercanthrowdebris,possiblycausing
seriouspersonalinjurytotheoperatoror
bystanders.
•Donotblowhardobjectssuchasnails,
bolts,orrocks.
•Donotoperatetheblowernearbystanders
orpets.
•Useextracarewhencleaningdebrisfrom
stairsorothertightareas.
•Wearsafetygogglesorothersuitableeye
protection,longpants,andshoes.
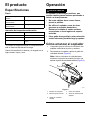
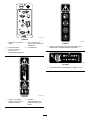
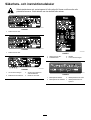
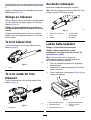
StartingtheBlower
1.Makesurethattheventsontheblowerareclear
ofanydustanddebris.
2.Tostarttheblower,squeezethevariable-speed
trigger(Figure4).
Note:Engagethespeedlocktokeepthe
machineonwithoutpressingthevariable-speed
trigger(Figure4).
g194437
Figure4
1.Speedlock
4.Batterylatch
2.Turboboostbutton5.Blowerventingareas
3.Variable-speedtrigger
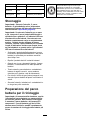
AdjustingtheAirSpeedof
theBlower
Toacceleratetheblowerspeed,pressandholdthe
turboboostbuttonforthedesiredamountoftime
(Figure4).
8

Toadjusttheairspeedasyoublow,usethe
variable-speedtrigger(Figure4).
Tomaintainthecurrentairspeed,engagethespeed
lock(Figure4).
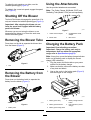
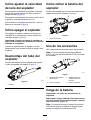
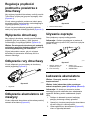
ShuttingOfftheBlower
Toshutofftheblower,disengagethespeedlock(ifin
use)andreleasethevariable-speedtrigger(Figure4).
Important:Afterstoppingtheblower,donot
leavethespeedlockengagedwiththebattery
packintheblower.
Wheneveryouarenotusingtheblowerorare
transportingtheblowertoorfromtheworkarea,
removethebatterypack.
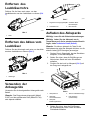
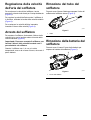
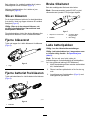
RemovingtheBlowerTube
Pressdownonthetabtoseparatetheblowertube
fromtheblower(Figure5).
g228499
Figure5
1.Tab
RemovingtheBatteryfrom
theBlower
Pressdownonthebatterylatchtoseparatethe
batteryfromtheblower(Figure6).
g194150
Figure6
1.Batterylatch
UsingtheAttachments
Usetheprovidedattachmentsasneeded.
Note:TheGutterCleanerKit(Model51667)and
OscillatingTube(Model51764)aresoldseparately.
g244381
Figure7
1.Guttercleaneradaptor3.Oscillator/MPHinsert
adapter
2.Blowertube4.MPHinsert
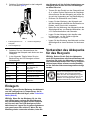
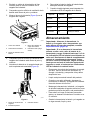
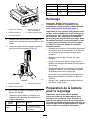
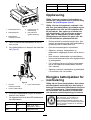
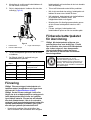
ChargingtheBatteryPack
Important:Readallsafetyprecautions.
Important:Chargethebatterypackonlyin
temperaturesthatarewithintheappropriate
range;refertoSpecications(page8).
Note:Atanytime,pressthebattery-charge-indicator
buttononthebatterypacktodisplaythecurrent
charge(LEDindicators).
1.Plugthepowercordthatmatchesyourpower
outletsintothebatterycharger.
2.Makesurethattheventsonthebatteryareclear
ofanydustanddebris.
3.Lineupthecavityinthebatterypack(Figure8)
withthetongueonthecharger.
g244370
Figure8
1.Batterypackcavity4.Battery-charge-indicator
button
2.Batterypackterminals
5.LEDindicators(current
charge)
3.Batterypackventingareas
9

4.Makesurethattheventsonthebatterycharger
areclearofanydustanddebris.
5.Slidethebatterypackintothechargeruntilitis
fullyseated(Figure9).
g194423
Figure9
1.Chargerventingareas
3.Rightindicatorlight
2.Leftindicatorlight
6.Toremovethebatterypack,slidethebattery
backwardoutofthecharger.
7.RefertothefollowingtabletointerprettheLED
indicatorsonthebatterycharger.
LeftLight
RightLight
Indicates:
Off
Red
Chargerison;nobattery
packinserted
RedRedBatterypackischarging
Green
RedBatterypackischarged
Orange
RedBatterypackistoowarm
RedBlinkingRedReplacethebatterypack
Storage
Important:Storethetool,batterypack,and
chargeronlyintemperaturesthatarewithinthe
appropriaterange;refertoSpecications(page8).
Important:Ifyouarestoringthetoolforayear
orlonger,removethebatterypackfromthetool
andchargethebatterypackuntil2or3LED
indicatorsturnblueonthebattery.Donotstorea
fullychargedorfullydepletedbattery.Whenyou
arereadytousethetoolagain,chargethebattery
packuntiltheleftindicatorlightturnsgreenon
thechargerorall4LEDindicatorsturnblueon
thebattery.
•Disconnecttheproductfromthepowersupply
(i.e.,removetheplugfromthepowersupplyorthe
batterypack)andcheckfordamageafteruse.
•Cleanallforeignmaterialfromtheproduct.
•Whennotinuse,storethetool,batterypack,and
batterychargeroutofthereachofchildren.
•Keepthetool,batterypack,andbatterycharger
awayfromcorrosiveagents,suchasgarden
chemicalsandde-icingsalts.
•T oreducetheriskofseriouspersonalinjury,do
notstorethebatterypackoutsideorinvehicles.
•Storethetool,batterypack,andbatterychargerin
aenclosedclean,dryarea.
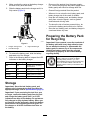
PreparingtheBatteryPack
forRecycling
Important:Uponremoval,covertheterminalsof
thebatterypackwithheavy-dutyadhesivetape.
Donotattempttodestroyordisassemblethe
batterypackorremoveanyofitscomponents.
Lithium-ionbatterypacksmustberecycled
ordisposedofproperlyatthenearestbattery
recyclingfacility.
Formoreinformationonrecyclinglithium-ion
batterypacksandtolocatethebattery
recyclingfacilityclosesttoyou,visit
www.Call2Recycle.org(USandCanadaonly).
IfyouarelocatedoutsideoftheUSand
Canada,pleasecontactyourauthorizedT oro
distributor.
10

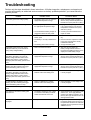
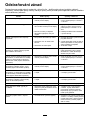
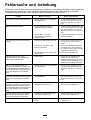
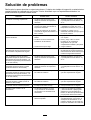
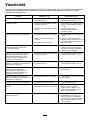
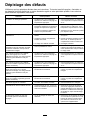
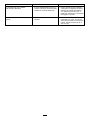
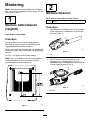
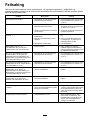
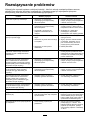
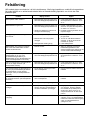
Troubleshooting
Performonlythestepsdescribedintheseinstructions.Allfurtherinspection,maintenance,andrepairwork
mustbeperformedbyanauthorizedservicecenterorasimilarlyqualiedspecialistifyoucannotsolvethe
problemyourself.
Problem
PossibleCauseCorrectiveAction
Thebatterypackloseschargequickly.1.Thebatterypackisoverorunderthe
appropriatetemperaturerange.
1.Movethebatterypacktoaplace
whereitisdryandthetemperatureis
between0°C(32°F)and40°C(104°F).
1.Thebatterychargerisoverorunder
theappropriatetemperaturerange.
1.Unplugthebatterychargerandmove
ittoaplacewhereitisdryandthe
temperatureisbetween0°C(32°F)
and40°C(104°F).
Thebatterychargerisnotworking.
2.Theoutletthatthebatterychargeris
pluggedintodoesnothavepower.
2.Contactyourlicensedelectricianto
repairtheoutlet.
1.Thereismoistureontheleadsofthe
batterypack.
1.Allowthebatterypacktodryorwipeit
dry.
2.Thebatteryisnotfullyinstalledinthe
tool.
2.Removeandthenreplacethebattery
inthetool,ensuringthatitisfully
installedandlatched.
Thetooldoesnotrunorruncontinuously.
3.Thebatterypackislowoncharge.
3.Chargethebatterypack.
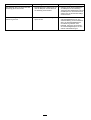
Thebatterypackshowsonly3LED
indicatorsafteronlyafewsecondsof
usingafullychargedbattery.
1.Thisisanormaloccurrence.
1.Stopthetoolandpressthe
battery-charge-indicatorbuttonor
theremovethebatteryfromthetoolto
displaytheactualbatterycharge.
All4LEDindicatorsareblinkingon
thebatterypackafteryoupressthe
battery-charge-indicatorbuttononthe
batterypackandthecurrentcharge
displays(whenthebatterypackisnotin
use).
1.Thebatterypackisoverorunderthe
appropriatetemperaturerange.
1.Movethebatterypacktoaplace
whereitisdryandthetemperatureis
between0°C(32°F)and40°C(104°F).
All4LEDindicatorsareblinkingonthe
batterypackafterreleasingthetrigger
(whenthebatterypackisinuse).
1.Thebatterypackisoverorunderthe
appropriatetemperaturerange.
1.Movethebatterypacktoaplace
whereitisdryandthetemperatureis
between0°C(32°F)and40°C(104°F).
2LEDindicatorsareblinkingon
thebatterypackafteryoupressthe
battery-charge-indicatorbuttononthe
batterypackandthecurrentcharge
displays(whenthebatterypackisnotin
use).
1.Thereisadifferenceinvoltage
betweencellsinthebatterypack.
1.Placethebatteryonthechargeruntil
itisfullycharged.
2LEDindicatorsareblinkingonthe
batterypackafterreleasingthetrigger
(whenthebatterypackisinuse).
1.Thereisadifferenceinvoltage
betweencellsinthebatterypack.
1.Placethebatteryonthechargeruntil
itisfullycharged.
1LEDindicatorisblinkingonthebattery
pack.
1.Thebatterypackvoltageislow.1.Placethebatterypackonthecharger.
Itisdifculttoremovethebatterypack
fromthetool.
1.Thebatterypack/toolisneworthere
iscorrosioninthebatteryterminals
and/ortheterminalsonthetool.
1.Cleantheterminalsonthebatterypack
andthetool.Thenapplydielectric
greasetothebatteryterminals;donot
useanyothertypeoflubricantasitcan
damagetheterminals.
Thespeedlockdoesnotholdwhen
engaged.
1.Thespeedlockscrewisloose.1.Tightenthespeedlockscrewby
turningthespeedlockscrew¼turn.If
thespeedlockstilldoesnotholdwhen
engaged,turnthespeedlockscrewan
additional¼turn.
11

EuropeanPrivacyNotice
TheInformationToroCollects
ToroWarrantyCompany(T oro)respectsyourprivacy.Inordertoprocessyourwarrantyclaimandcontactyouintheeventofaproductrecall,weaskyou
tosharecertainpersonalinformationwithus,eitherdirectlyorthroughyourlocalTorocompanyordealer.
TheT orowarrantysystemishostedonserverslocatedwithintheUnitedStateswhereprivacylawmaynotprovidethesameprotectionasapplies
inyourcountry.
BYSHARINGYOURPERSONALINFORMATIONWITHUS,YOUARECONSENTINGTOTHEPROCESSINGOFYOURPERSONALINFORMATION
ASDESCRIBEDINTHISPRIVACYNOTICE.
TheWayT oroUsesInformation
Toromayuseyourpersonalinformationtoprocesswarrantyclaims,tocontactyouintheeventofaproductrecallandforanyotherpurposewhichwetell
youabout.T oromayshareyourinformationwithToro'safliates,dealersorotherbusinesspartnersinconnectionwithanyoftheseactivities.Wewillnot
sellyourpersonalinformationtoanyothercompany.Wereservetherighttodisclosepersonalinformationinordertocomplywithapplicablelawsand
withrequestsbytheappropriateauthorities,tooperateoursystemsproperlyorforourownprotectionorthatofotherusers.
RetentionofyourPersonalInformation
Wewillkeepyourpersonalinformationaslongasweneeditforthepurposesforwhichitwasoriginallycollectedorforotherlegitimatepurposes
(suchasregulatorycompliance),orasrequiredbyapplicablelaw.
Toro'sCommitmenttoSecurityofY ourPersonalInformation
Wetakereasonableprecautionsinordertoprotectthesecurityofyourpersonalinformation.Wealsotakestepstomaintaintheaccuracyandcurrent
statusofpersonalinformation.
AccessandCorrectionofyourPersonalInformation
Ifyouwouldliketorevieworcorrectyourpersonalinformation,pleasecontactusbyemailat[email protected].
AustralianConsumerLaw
AustraliancustomerswillnddetailsrelatingtotheAustralianConsumerLaweitherinsidetheboxoratyourlocalToroDealer.
374-0282RevC


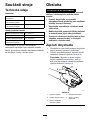
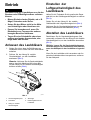
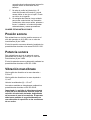
Úvod
Totodmychadlojeurčenoprosoukromémajitele
pozemků,kteříchtějípodlepotřebyodstraňovat
nečistotyjakolistíapod.Jenapájenopouzemodely
akumulátoru88525(dodávanýsmodelem51134)
nebo88526.
Pečlivěsitutopříručkuprostudujte,abystesenaučili
strojsprávněobsluhovataudržovat,apředešlitak
zraněníapoškozenístroje.Zařádnouabezpečnou
obsluhuvýrobkuneseteodpovědnostvy.
SpolečnostToromůžetekontaktovatpřímonaadrese
www.Toro.com.Zdenajdeteinformaceovýrobcích
apříslušenství,můžetevyhledatprodejce,získat
úplnéinformaceozárucenebozaregistrovatsvůj
výrobek.
Model51134Tnezahrnujeakumulátorani
nabíječkuakumulátoru.
Bezpečnost
VÝSTRAHA:Připoužíváníelektrickýchzařízení
prozahradnicképrácevždydodržujtezákladní
bezpečnostníopatření,abystesnížilirizikopožáru,
úrazuelektrickýmproudemaporaněníosob,včetně
následujícíchopatření:
DŮLEŽITÉUPOZORNĚNÍ
Nedodržovánívšechbezpečnostníchpokynů
avýstrahmůžemítzanásledekúraz
elektrickýmproudem,požára/nebovážné
poraněníosob.
Přečtětesivšechnybezpečnostnívýstrahy
aveškerépokyny.
Uložtevšechnavarováníabezpečnostnípokyny
probudoucípoužití.
Pojem„elektrickénářadí“sevevšechpokynech
avýstraháchtýkáelektrickéhonářadínapájeného
zesítě(pomocíkabelu)neboelektrickéhonářadí
napájenéhozakumulátoru(bezkabelu).
1.Bezpečnostpracovníhoprostoru
A.Udržujtepracovníprostorčistýadobře
osvětlený.Nepořádekvpracovním
prostorunebonedostatekosvětlenímůže
véstkúrazům.
B.Nepracujteselektrickýmnářadím
vevýbušnémprostředí,například
vpřítomnostihořlavýchkapalin,plynů
neboprachu.Elektrickénářadíjezdrojem
jiskření,kterémůžezpůsobitvznícení
prachunebovýparů.
C.Připráciselektrickýmnářadímudržujte
dětiakolemjdoucíosobyvbezpečné
vzdálenosti.Odvedenípozornostimůže
způsobit,žeztratítekontrolunadstrojem.
2.Bezpečnostosob
A.Připráciselektrickýmnářadímbuďte
neustálevpohotovosti,sledujte,co
děláte,ařiďtesezdravýmrozumem.
Elektrickénářadínepoužívejte,pokud
jsteunaveninebopodvlivemdrog,
alkoholučiléků.Chvilkanepozornostipři
práciselektrickýmnářadímmůževéstk
vážnémuzranění.
B.Používejteosobníochrannépomůcky.
Vždypoužívejteochrannébrýle.
Ochrannéprostředkyjakomaskaproti
prachu,neklouzavábezpečnostníobuv,
ochrannápřilbanebochráničesluchu
snižujírizikoporaněníosob,pokudjsou
používányvpříslušnýchpodmínkách.
©2018—TheToro®Company
8111LyndaleAvenueSouth
Bloomington,MN55420
2
Navštivtenásnaadresewww.Toro.com.
VytištěnovČíně
Všechnaprávavyhrazena

C.Zabraňtenáhodnémuspuštěnízařízení.
Ujistětese,žepředpřipojenímkezdroji
napětía/neboakumulátoruapřed
zvednutímnebopřenášenímnářadíje
spínačveVYPNUTÉpoloze.Přenášení
nářadísprstemnahlavnímspínačinebo
připojenínapájecíhokabeluknářadí,která
majíspínačvpolozezapnuto,můževést
knehodám.
D.Nenatahujtese.Vždydbejtenasprávný
postojarovnováhu.Toumožňuje
lepšíkontrolunadelektrickýmnářadímv
neočekávanýchsituacích.
E.Pracujtevevhodnémoblečení.Nenoste
volnýoděvašperky.Mějtevlasystažené
vzaduaudržujteje,stejnějakooděv
arukavice,vdostatečnévzdálenosti
odpohybujícíchsečástístroje.Volný
oděv,šperkynebodlouhévlasymohoubýt
zachycenypohybujícímisečástmistroje.
F.Mějteruceanohyvdostatečné
vzdálenostiodmístasekání.
3.Použitíapéčeoelektrickénářadí
A.Naelektrickénářadínetlačtesilou.
Zvoltesprávnýtypelektrickéhonářadí
provašepoužití.Správnéelektrické
nářadíbudepracovatlépeabezpečnějipři
rychlosti,prokteroubylonavrženo.
B.Nepoužívejteelektrickénářadí,pokud
spínačnebudenářadízapínata
vypínat.Jakékolivelektrickénářadí,které
nelzekontrolovatpomocívypínače,je
nebezpečnéamusíbýtopraveno.
C.Předjakýmkolivseřizováním,výměnou
příslušenstvínebopředuskladněním
elektrickéhonářadíznějvyjměte
akumulátor.Tatopreventivníbezpečnostní
opatřenísnižujírizikonáhodnéhospuštění
nářadí.
D.Uložteelektrickénářadímimodosah
dětíanedovolteostatnímosobám,které
nejsouseznámenyelektrickýmnářadím
nebostímtonávodem,abysnářadím
pracovaly.Elektrickénářadíjenebezpečné
vrukounekvalikovanýchosob.
E.Pokudnářadínepoužíváte,skladujte
jejvbudově.Pokudspotřebičenejsou
používány,mělybybýtskladoványvbudově
nasuchémachráněnémnebouzamčeném
místěmimodosahdětí.
F.Údržbaelektrickéhonářadí.Zkontrolujte
nesprávnévyrovnánínebozadření
pohybujícíchsečástístroje,poškození
jednotlivýchdílůajinéokolnosti,které
mohouovlivnitchodelektrickéhonářadí.
Je-lipoškozeno,nechejteelektrické
nářadípředpoužitímopravit.Mnoho
nehodjezpůsobenonedostatečnou
údržbouelektrickéhonářadí.
G.Řeznénástrojeudržujteostréačisté.
Řádněudržovanéřeznénástrojesostrými
řeznýmibřityjsouméněnáchylnékuvíznutí
způsobenémunečistotamialépese
ovládají.
H.Používejteelektrickénářadívsouladu
stěmitopokynyazpůsobemurčeným
prokonkrétnítypelektrickéhonářadí.
Vždypřitombertevúvahupracovní
podmínkyaúčelpráce.Použití
elektrickéhonářadíkjinéčinnosti,než
kjakéjeurčeno,můževéstknebezpečným
situacím.
I.Udržujtekrytynamístěavprovozus-
chopnémstavu.
4.Servis
Servistohotoelektrickéhonářadímusí
provádětkvalikovanáosobazapoužití
pouzeoriginálníchnáhradníchdílů.Tímbude
zajištěnabezpečnostelektrickéhonářadí.
5.Bezpečnostakumulátorů
A.Nepoužívejtenabíječkuakumulátoruvdešti
nebovevlhkémprostředí.
B.Nepoužívejtezařízenínapájenáz
akumulátoruvdešti.
C.Používejtepouzenásledněuvedenétypy
avelikostiakumulátorů:akumulátorToro,
model88525nebo88526.
D.Předprováděnímservisu,čištěnímnebo
odstraňovánímmateriáluzezahradnického
nářadívyjměteneboodpojteakumulátor.
E.Akumulátorynelikvidujtevohni.
Akumulátorovýčlánekmůžeexplodovat.
Informujteseomístníchvyhláškácha
předpisechsespeciálnímipokynypro
likvidacibaterií.
F.Akumulátoryneotevírejteaninepoškozujte.
Uvolněnýelektrolytježíravinaamůže
způsobitpoškozeníočínebokůže.
Elektrolytmůžebýtpřipožitítoxický.
G.Buďteopatrnípřimanipulacisbaterií.
Zameztezkratováníbaterievodivými
materiály,jakojsouprsteny,náramkya
klíče.Baterienebovodičsemohoupřehřát
azpůsobitpopáleniny.
USCHOVEJTETYTOPOKYNY
3

Akustickýtlak
Hladinaakustickéhotlakuutohotozařízenívblízkosti
uchaobsluhyčiní81,3dBAsodchylkou(K)3dBA.
Hladinaakustickéhotlakubylaurčenapodlepostupů
stanovenýchnormouENISO11201.
Akustickývýkon
Zařízenígarantujehladinuakustickéhovýkonu96
dBA,kterázahrnujeihodnotunejistoty(K)3dBA.
Hladinaakustickéhovýkonubylaurčenapodle
postupůstanovenýchnormouENISO11094.
Vibracerukou/paží
Naměřenáúroveňvibracípropravouruku=3,28m/s
2
Naměřenáúroveňvibracíprolevouruku=1,8m/s
2
Hodnotanejistoty(K)=1.5m/s
2
Naměřenéhodnotybylyzískányvsouladuspostupy
uvedenýmivnorměENISO20643.
Důležité:Úroveňvibracípřikonkrétnímpoužití
elektrickéhonářadísemůželišitoddeklarované
celkovéhodnotyvzávislostinazpůsobu,jakýmje
nářadípoužíváno.Provozovatelbymělpřijmout
bezpečnostníopatřenínazákladěodhadu
expoziceveskutečnýchpodmínkáchpoužití.
4

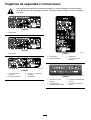
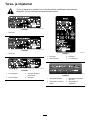
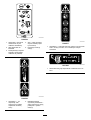
Bezpečnostníainstrukčníštítky
Bezpečnostníštítkyapokynyjsouumístěnynaviditelnémmístěvblízkostikaždéhoprostoru
představujícíhopotenciálnínebezpečí.Vpřípaděztrátynebopoškozenípůvodníhoštítkujej
nahraďteštítkemnovým.
decal136-2493
136-2493
1.Nelikvidujte.
decal136-2494
136-2494
1.Nelikvidujte.
decal136-2499
136-2499
1.PřečtětesiNávodk
obsluze.
3.Nepoužívejtezamokra.
2.Akumulátornespalujte.4.Nelikvidujte.
decal136-2501
136-2501
1.Nelikvidujte.3.Domácípoužití
2.Dvojitěizolováno4.PřečtětesiNávodk
obsluze.
decal136-2504
136-2504
1.Akumulátorsenabíjí.3.Akumulátorjepřílišhorký.
2.Akumulátorjeplněnabit.4.Akumulátorjetřeba
vyměnit.
5

decal136-2534
136-2534
1.Akumulátornenípo
vyjmutízobaluzcela
nabitý.
4.Stop–předprvním
použitímseřiďtetěmito
pokyny.
2.Umístěteakumulátordo
nabíječky.
5.PřečtětesiNávodk
obsluze.
3.Předprvnímpoužitím
počkejte,dokudse
akumulátorzcelanenabije.
decal136-2536
136-2536
1.Výstraha–okolostojící
osobymusíbýt
vdostatečnévzdálenosti
odstrojevevšech
směrech.
2.Nebezpečíodmrštění
předmětů–okolostojící
osobymusíbýtvždy
vbezpečnévzdálenostiod
stroje.
decal136-2537
136-2537
1.Výstraha–přečtětesiprovoznípříručku;používejte
chráničesluchu,nosteochrannébrýleanepracujteza
mokra.
decal136-2539
136–2539
1.Akumulátornabíjejtepřiteplotnímrozmezí0°Caž40°C.
6

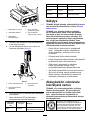
Nastavení
Poznámka:Přizakoupeníneníakumulátorzcela
nabitý.Předprvnímpoužitímnářadíseřiďtepokyny
včástiNabíjeníakumulátoru(strana9).
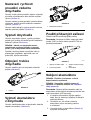
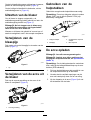
1
Upevněnínabíječky
akumulátoru(volitelné)
Nejsoupotřebažádnédíly
Postup
Vpřípaděpotřebynabíječkuakumulátorubezpečně
připevnětekestěněspoužitímmontážníchotvorůve
tvaruklíčovédírkynazadnístraněnabíječky.
Zařízenímusíbýtnamontovánovbudově(například
vgarážinebojinémsuchémmístě),vblízkosti
elektrickézásuvkyamimodosahdětí.
Obrázek1sloužíjakopomůckapřimontážinabíječky.
Poznámka:Nasuňtenabíječkunavhodněumístěné
upevňovacíšroubyajejímotočenímjiupevněte
vpoloze(upevňovacíšroubynejsousoučástíbalení).
g194202
Obrázek1
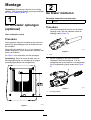
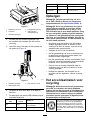
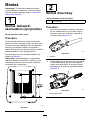
2
Montáždmychadla
Dílypotřebnékprovedenítohotokroku:
1Trubicedmychadla
Postup
1.Nasuňtetrubicidmychadlanaplášťdmychadla.
Kzajištěnítrubicedmychadlavpolozemůžebýt
nutnéstisknoutpojistku(Obrázek2).
g190102
Obrázek2
1.Pojistka
2.Vyrovnejtedutinuvakumulátorusjazykem
vpláštirukojeti,uchopterukojeťazatlačte
akumulátordorukojetitak,abysezápadka
zajistilavpoloze(Obrázek3)
g194149
Obrázek3
1.Západkaakumulátoru
7
La pagina si sta caricando...
La pagina si sta caricando...
La pagina si sta caricando...
La pagina si sta caricando...
La pagina si sta caricando...
La pagina si sta caricando...
La pagina si sta caricando...
La pagina si sta caricando...
La pagina si sta caricando...
La pagina si sta caricando...
La pagina si sta caricando...
La pagina si sta caricando...
La pagina si sta caricando...
La pagina si sta caricando...
La pagina si sta caricando...
La pagina si sta caricando...
La pagina si sta caricando...
La pagina si sta caricando...
La pagina si sta caricando...
La pagina si sta caricando...
La pagina si sta caricando...
La pagina si sta caricando...
La pagina si sta caricando...
La pagina si sta caricando...
La pagina si sta caricando...
La pagina si sta caricando...
La pagina si sta caricando...
La pagina si sta caricando...
La pagina si sta caricando...
La pagina si sta caricando...
La pagina si sta caricando...
La pagina si sta caricando...
La pagina si sta caricando...
La pagina si sta caricando...
La pagina si sta caricando...
La pagina si sta caricando...
La pagina si sta caricando...
La pagina si sta caricando...
La pagina si sta caricando...
La pagina si sta caricando...
La pagina si sta caricando...
La pagina si sta caricando...
La pagina si sta caricando...
La pagina si sta caricando...
La pagina si sta caricando...
La pagina si sta caricando...
La pagina si sta caricando...
La pagina si sta caricando...
La pagina si sta caricando...
La pagina si sta caricando...
La pagina si sta caricando...
La pagina si sta caricando...
La pagina si sta caricando...
La pagina si sta caricando...
La pagina si sta caricando...
La pagina si sta caricando...
La pagina si sta caricando...
La pagina si sta caricando...
La pagina si sta caricando...
La pagina si sta caricando...
La pagina si sta caricando...
La pagina si sta caricando...
La pagina si sta caricando...
La pagina si sta caricando...
La pagina si sta caricando...
La pagina si sta caricando...
La pagina si sta caricando...
La pagina si sta caricando...
La pagina si sta caricando...
La pagina si sta caricando...
La pagina si sta caricando...
La pagina si sta caricando...
La pagina si sta caricando...
La pagina si sta caricando...
La pagina si sta caricando...
La pagina si sta caricando...
La pagina si sta caricando...
La pagina si sta caricando...
La pagina si sta caricando...
La pagina si sta caricando...
La pagina si sta caricando...
La pagina si sta caricando...
La pagina si sta caricando...
La pagina si sta caricando...
La pagina si sta caricando...
La pagina si sta caricando...
La pagina si sta caricando...
La pagina si sta caricando...
La pagina si sta caricando...
La pagina si sta caricando...
La pagina si sta caricando...
La pagina si sta caricando...
La pagina si sta caricando...
La pagina si sta caricando...
La pagina si sta caricando...
La pagina si sta caricando...
La pagina si sta caricando...
La pagina si sta caricando...
La pagina si sta caricando...
La pagina si sta caricando...
La pagina si sta caricando...
La pagina si sta caricando...
La pagina si sta caricando...
La pagina si sta caricando...
La pagina si sta caricando...
La pagina si sta caricando...
La pagina si sta caricando...
La pagina si sta caricando...
La pagina si sta caricando...
La pagina si sta caricando...
La pagina si sta caricando...
La pagina si sta caricando...
La pagina si sta caricando...
La pagina si sta caricando...
La pagina si sta caricando...
La pagina si sta caricando...
La pagina si sta caricando...
La pagina si sta caricando...
La pagina si sta caricando...
La pagina si sta caricando...
-
 1
1
-
 2
2
-
 3
3
-
 4
4
-
 5
5
-
 6
6
-
 7
7
-
 8
8
-
 9
9
-
 10
10
-
 11
11
-
 12
12
-
 13
13
-
 14
14
-
 15
15
-
 16
16
-
 17
17
-
 18
18
-
 19
19
-
 20
20
-
 21
21
-
 22
22
-
 23
23
-
 24
24
-
 25
25
-
 26
26
-
 27
27
-
 28
28
-
 29
29
-
 30
30
-
 31
31
-
 32
32
-
 33
33
-
 34
34
-
 35
35
-
 36
36
-
 37
37
-
 38
38
-
 39
39
-
 40
40
-
 41
41
-
 42
42
-
 43
43
-
 44
44
-
 45
45
-
 46
46
-
 47
47
-
 48
48
-
 49
49
-
 50
50
-
 51
51
-
 52
52
-
 53
53
-
 54
54
-
 55
55
-
 56
56
-
 57
57
-
 58
58
-
 59
59
-
 60
60
-
 61
61
-
 62
62
-
 63
63
-
 64
64
-
 65
65
-
 66
66
-
 67
67
-
 68
68
-
 69
69
-
 70
70
-
 71
71
-
 72
72
-
 73
73
-
 74
74
-
 75
75
-
 76
76
-
 77
77
-
 78
78
-
 79
79
-
 80
80
-
 81
81
-
 82
82
-
 83
83
-
 84
84
-
 85
85
-
 86
86
-
 87
87
-
 88
88
-
 89
89
-
 90
90
-
 91
91
-
 92
92
-
 93
93
-
 94
94
-
 95
95
-
 96
96
-
 97
97
-
 98
98
-
 99
99
-
 100
100
-
 101
101
-
 102
102
-
 103
103
-
 104
104
-
 105
105
-
 106
106
-
 107
107
-
 108
108
-
 109
109
-
 110
110
-
 111
111
-
 112
112
-
 113
113
-
 114
114
-
 115
115
-
 116
116
-
 117
117
-
 118
118
-
 119
119
-
 120
120
-
 121
121
-
 122
122
-
 123
123
-
 124
124
-
 125
125
-
 126
126
-
 127
127
-
 128
128
-
 129
129
-
 130
130
-
 131
131
-
 132
132
-
 133
133
-
 134
134
-
 135
135
-
 136
136
-
 137
137
-
 138
138
-
 139
139
-
 140
140


Toro PowerPlex 40V MAX Axial Blower Manuale utente
- Categoria
- Aeratori / essiccatori
- Tipo
- Manuale utente
in altre lingue
- français: Toro PowerPlex 40V MAX Axial Blower Manuel utilisateur
- Deutsch: Toro PowerPlex 40V MAX Axial Blower Benutzerhandbuch
- Nederlands: Toro PowerPlex 40V MAX Axial Blower Handleiding
- dansk: Toro PowerPlex 40V MAX Axial Blower Brugermanual
- polski: Toro PowerPlex 40V MAX Axial Blower Instrukcja obsługi
- svenska: Toro PowerPlex 40V MAX Axial Blower Användarmanual
Documenti correlati
-
Toro PowerPlex 40V MAX Axial Blower Manuale utente
-
Toro PowerPlex 40V Max Standard 90 WH Battery Pack Manuale utente
-
-
-
-
Toro Flex-Force Power System Manuale utente
-
-
Toro PowerPlex 61cm 40V MAX Hedge Trimmer Manuale utente
-
-
Toro PowerPlex 35cm 40V MAX Chainsaw Manuale utente