Toro 53 cm Recycler Petrol Lawn Mower Manuale utente
- Categoria
- Tosa erba
- Tipo
- Manuale utente
Questo manuale è adatto anche per

FormNo.3436-135RevA
53cmMulching/RearBagging/SideDischargingLawnMower
21750,21751
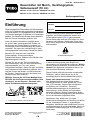
RasenmähermitMulch-,Heckfangsystem,Seitenauswurf(53cm)
21750,21751
Cortacéspeddemulching/ensacadotrasero/descargalateralde
53cm
21750,21751
Tondeusemulching/àbacarrière/éjectionlatéralede53cm
21750,21751
Tosaerbaconpiattoda53cmeopzionemulching/raccolta
posteriore/scaricolaterale
21750,21751
Gazonmaaiervan53cmmetmulchfunctie/zijafvoer/achtervanger
21750,21751
Kosiarka53cmzmulczerem/tylnymkoszem/wyrzutembocznym
21750,21751
www.T oro.com.
*3436-135*A


FormNo.3436-125RevA
53cmMulching/RearBagging/SideDischarging
LawnMower
ModelNo.21750—SerialNo.400000000andUp
ModelNo.21751—SerialNo.400000000andUp
Operator'sManual
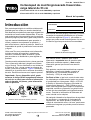
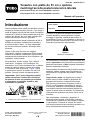
Introduction
Thisrotary-blade,walk-behindlawnmowerisintended
tobeusedbyresidentialhomeowners.Itisdesigned
primarilyforcuttinggrassonwell-maintainedlawnson
residentialproperties.Usingthisproductforpurposes
otherthanitsintendedusecouldprovedangerousto
youandbystanders.
Readthisinformationcarefullytolearnhowtooperate
andmaintainyourproductproperlyandtoavoid
injuryandproductdamage.Youareresponsiblefor
operatingtheproductproperlyandsafely.
Visitwww.Toro.comformoreinformation,including
safetytips,trainingmaterials,accessoryinformation,
helpndingadealer,ortoregisteryourproduct.
Wheneveryouneedservice,genuineToroparts,or
additionalinformation,contactanAuthorizedService
DealerorToroCustomerServiceandhavethemodel
andserialnumbersofyourproductready.Figure1
identiesthelocationofthemodelandserialnumbers
ontheproduct.Writethenumbersinthespace
provided.
Important:Withyourmobiledevice,youcan
scantheQRcodeontheserialnumberdecal(if
equipped)toaccesswarranty,parts,andother
productinformation
g305877
Figure1
1.Modelandserialnumberlocation
ModelNo.
SerialNo.
Thismanualidentiespotentialhazardsandhas
safetymessagesidentiedbythesafety-alertsymbol
(Figure2),whichsignalsahazardthatmaycause
seriousinjuryordeathifyoudonotfollowthe
recommendedprecautions.
g000502
Figure2
Safety-alertsymbol
Thismanualuses2wordstohighlightinformation.
Importantcallsattentiontospecialmechanical
informationandNoteemphasizesgeneralinformation
worthyofspecialattention.
ThisproductcomplieswithallrelevantEuropean
directives;fordetails,pleaseseetheseparateproduct
specicDeclarationofConformity(DOC)sheet.
GrossorNetTorque:Thegrossornettorque
ofthisenginewaslaboratoryratedbytheengine
manufacturerinaccordancewiththeSocietyof
AutomotiveEngineers(SAE)J1940orJ2723.As
conguredtomeetsafety,emission,andoperating
requirements,theactualenginetorqueonthisclass
ofmowerwillbesignicantlylower.Pleasereferto
theenginemanufacturer’sinformationincludedwith
themachine.
Donottamperwithordisablesafetydevicesonthe
machine,andchecktheirproperoperationregularly.
Donotattempttoadjustortamperwiththeengine
speedcontrol;doingsomaycreateanunsafe
operatingcondition,resultinginpersonalinjury.
©2019—TheToro®Company
8111LyndaleAvenueSouth
Bloomington,MN55420
Registeratwww.T oro.com.
OriginalInstructions(EN)
PrintedinMexico
AllRightsReserved
*3436-125*A

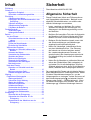
Contents
Introduction...............................................................1
Safety.......................................................................2
GeneralSafety...................................................2
SafetyandInstructionalDecals..........................3
Setup........................................................................4
1InstallingtheHandle........................................4
2InstallingtheRecoil-StarterRopeinthe
RopeGuide.....................................................4
3AddingOiltotheEngine...................................5
4AssemblingtheGrassBag...............................5
5ChargingtheBattery........................................6
ProductOverview.....................................................7
Specications....................................................7
Attachments/Accessories...................................7
Operation..................................................................8
BeforeOperation...................................................8
BeforeOperationSafety.....................................8
FillingtheFuelT ank............................................8
CheckingtheEngine-OilLevel............................9
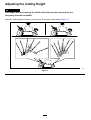
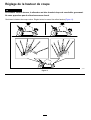
AdjustingtheCuttingHeight.............................10
DuringOperation..................................................11
DuringOperationSafety....................................11
StartingtheEngine...........................................12
UsingtheSelf-PropelDrive...............................12
ShuttingOfftheEngine.....................................12
MulchingtheClippings......................................12
BaggingtheClippings.......................................13
Side-DischargingtheClippings.........................14
OperatingTips.................................................14
AfterOperation....................................................15
AfterOperationSafety......................................15
CleaningundertheMachine.............................15
FoldingtheHandle...........................................15
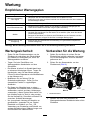
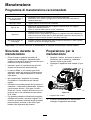
Maintenance...........................................................16
RecommendedMaintenanceSchedule(s)...........16
MaintenanceSafety..........................................16
PreparingforMaintenance...............................16
ServicingtheAirFilter.......................................17
ChangingtheEngineOil...................................17
ChargingtheBattery.........................................18
ReplacingtheFuse...........................................19
ReplacingtheBlade..........................................19
AdjustingtheSelf-PropelDrive.........................20
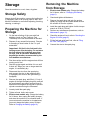
Storage...................................................................21
StorageSafety..................................................21
PreparingtheMachineforStorage...................21
RemovingtheMachinefromStorage................21
Safety
Thismachinehasbeendesignedinaccordancewith
ENISO5395.
GeneralSafety
Thisproductiscapableofamputatinghandsand
feetandofthrowingobjects.Alwaysfollowallsafety
instructionstoavoidseriouspersonalinjury.
•Read,understand,andfollowtheinstructions
andwarningsinthisOperator’sManualandon
themachineandattachmentsbeforestartingthe
engine.
•Donotputyourhandsorfeetnearmovingpartsor
underthemachine.Keepclearofanydischarge
opening.
•Donotoperatethemachinewithoutallguards
andothersafetyprotectivedevicesinplaceand
functioningproperlyonthemachine.
•Keepbystandersandchildrenoutoftheoperating
area.Donotallowchildrentooperatethemachine.
Allowonlypeoplewhoareresponsible,trained,
familiarwiththeinstructions,andphysically
capabletooperatethemachine.
•Stopthemachine,shutofftheengine,remove
theignitionkey(ifequipped),andwaitforall
movingpartstostopbeforeservicing,fueling,or
uncloggingthemachine.
Improperlyusingormaintainingthismachinecan
resultininjury.T oreducethepotentialforinjury,
complywiththesesafetyinstructionsandalways
payattentiontothesafety-alertsymbol,which
meansCaution,Warning,orDanger—personalsafety
instruction.Failuretocomplywiththeseinstructions
mayresultinpersonalinjuryordeath.
2

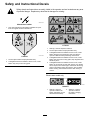
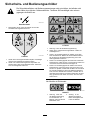
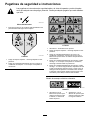
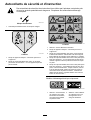
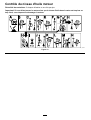
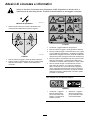
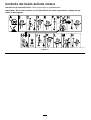
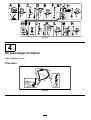
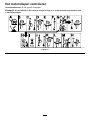
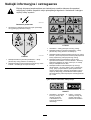
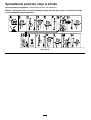
SafetyandInstructionalDecals
Safetydecalsandinstructionsareeasilyvisibletotheoperatorandarelocatednearanyarea
ofpotentialdanger.Replaceanydecalthatisdamagedormissing.
decaloemmarkt
Manufacturer'sMark
1.Thismarkindicatesthatthebladeisidentiedasapart
fromtheoriginalmachinemanufacturer.
decal112-8760
112-8760
1.Thrownobjecthazard—keepbystandersaway.
2.Cutting/dismembermenthazardofhandorfoot,mower
blade—stayawayfrommovingparts.
decal117-4143
117-4143
1.Warning—readtheOperator'sManual.
2.Thrownobjecthazard—keepbystandersaway.
3.Cutting/dismembermenthazardofhandorfoot,mower
blade—disconnectthespark-plugwireandreadthe
Operator'sManualbeforeperformingmaintenance.
4.Cutting/dismembermenthazardofhandorfoot,mower
blade—stayawayfrommovingparts;keepallguardsand
shieldsinplace.
5.Cutting/dismembermenthazardofhandorfoot,mower
blade—donotoperateupanddownslopes;onlyoperate
acrossslopes;shutofftheengineandwaitforallmoving
partstostopbeforeleavingthemachine;pickupdebris
beforemowing;lookbehindanddownwhenmovingin
reverse.
Electric-startmodelonly
decal140-4357
140-4357
1.Warning—readthe
Operator’sManualfor
batteryinformation;donot
discardtheleadbattery.
2.Attention—readthe
Operator’sManual
forbatterycharging
information.
3

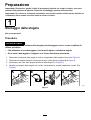
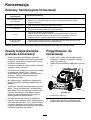
Setup
Important:Removeanddiscardtheprotectiveplasticsheetthatcoverstheengineandanyother
plasticorwrappingonthemachine.
Important:Topreventaccidentalstarting,donotinsertthekeyintotheelectric-startignition(if
equipped)untilyouarereadytostarttheengine.
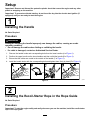
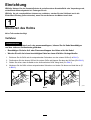
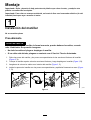
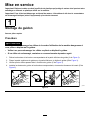
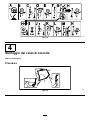
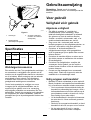
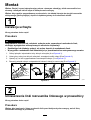
1
InstallingtheHandle
NoPartsRequired
Procedure
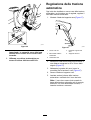
WARNING
Foldingorunfoldingthehandleimproperlycandamagethecables,causinganunsafe
operatingcondition.
•Donotdamagethecableswhenfoldingorunfoldingthehandle.
•Ifacableisdamaged,contactanAuthorizedServiceDealer.
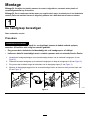
1.Removethehandleknobsandcorrespondingboltsfromthelowerhandles(AofFigure3).
2.Positiontheupperhandleonthelowerhandlesandthenunfoldthehandle(BofFigure3).
3.Ensurethatthecablesareroutedtotheoutsideofthehandle(CofFigure3).
4.Installthehandleknobswiththecorrespondingboltsandtightenthemrmlybyhand(DofFigure3).
g305902
Figure3
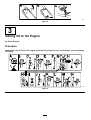
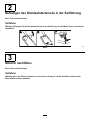
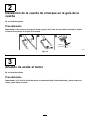
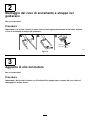
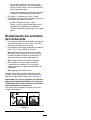
2
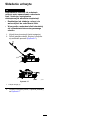
InstallingtheRecoil-StarterRopeintheRopeGuide
NoPartsRequired
Procedure
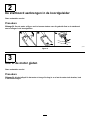
Important:Tostarttheenginesafelyandeasilywheneveryouusethemachine,installtherecoil-starter
ropeintheropeguide.
4

g228152
Figure4
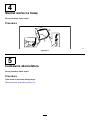
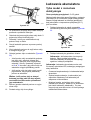
3
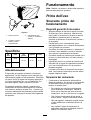
AddingOiltotheEngine
NoPartsRequired
Procedure
Important:Iftheoillevelintheengineistoolowortoohighandyouruntheengine,youmaydamage
theengine.
g222533
Figure5
5


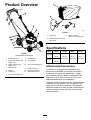
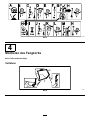
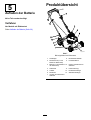
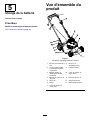
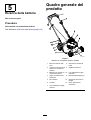
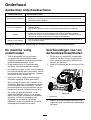
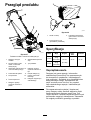
ProductOverview
g197495
Figure7
Electric-startmodelshown
1.Blade-controlbar
8.Oilll/dipstick
2.Ignitionkey(electric-start
modelonly)
9.Reardeector
3.Battery(electric-start
modelonly)
10.Rearcutting-heightlever
4.Fuel-tankcap
11.Handleknob(2)
5.Airlter
12.Recoil-starthandle
6.Sparkplug13.Self-propeldrivebar
7.Frontcutting-heightlever
g197496
Figure8
1.Grassbag
3.Batterycharger
(electric-startmodelonly)
2.Side-dischargechute(sold
separately)
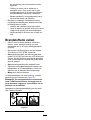
Specications
ModelWeightLengthWidthHeight
30kg
21750
(67lb)145cm56cm97cm
34kg
21751
(76lb)
(57inches)(22inches)(38inches)
Attachments/Accessories
AselectionofToroapprovedattachmentsand
accessoriesisavailableforusewiththemachine
toenhanceandexpanditscapabilities.Contact
yourAuthorizedServiceDealerorauthorizedToro
distributororgotowww.T oro.comforalistofall
approvedattachmentsandaccessories.
Toensureoptimumperformanceandcontinuedsafety
certicationofthemachine,useonlygenuineToro
replacementpartsandaccessories.Replacement
partsandaccessoriesmadebyothermanufacturers
couldbedangerous,andsuchusecouldvoidthe
productwarranty.
7

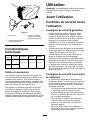
Operation
Note:Determinetheleftandrightsidesofthe
machinefromthenormaloperatingposition.
BeforeOperation
BeforeOperationSafety
GeneralSafety
•Alwaysshutoffthemachine,removetheignition
key(ifequipped),waitforallmovingpartstostop,
andallowthemachinetocoolbeforeadjusting,
servicing,cleaning,orstoringit.
•Becomefamiliarwiththesafeoperationofthe
equipment,operatorcontrols,andsafetysigns.
•Checkthatallguardsandsafetydevices,suchas
deectorsand/orgrasscatcher,areinplaceand
functioningproperly.
•Alwaysinspectthemachinetoensurethatthe
bladesandbladeboltsarenotwornordamaged.
•Inspecttheareawhereyouwillusethemachine,
andremoveallobjectsthatcouldinterferewith
theoperationofthemachineorthatthemachine
couldthrow.
•Contactwiththemovingbladewillcauseserious
injury.Donotputyourngersunderthehousing
whenadjustingthecuttingheight.
FuelSafety
•Fuelisextremelyammableandhighlyexplosive.
Areorexplosionfromfuelcanburnyouand
othersandcandamageproperty.
–Topreventastaticchargefromignitingthefuel,
placethecontainerand/ormachinedirectlyon
thegroundbeforelling,notinavehicleoron
anobject.
–Fillthefueltankoutdoors,inanopenarea,
whentheengineiscold.Wipeupanyfuelthat
spills.
–Donothandlefuelwhensmokingoraroundan
openameorsparks.
–Donotremovethefuelcaporaddfueltothe
tankwhiletheengineisrunningorhot.
–Ifyouspillfuel,donotattempttostartthe
engine.Avoidcreatingasourceofignitionuntil
thefuelvaporshavedissipated.
–Storefuelinanapprovedcontainerandkeep
itoutofthereachofchildren.
•Fuelisharmfulorfatalifswallowed.Long-term
exposuretovaporscancauseseriousinjuryand
illness.
–Avoidprolongedbreathingofvapors.
–Keepyourhandsandfaceawayfromthe
nozzleandthefuel-tankopening.
–Keepfuelawayfromyoureyesandskin.
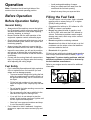
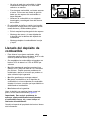
FillingtheFuelTank
•Forbestresults,useonlyclean,fresh,unleaded
gasolinewithanoctaneratingof87orhigher
((R+M)/2ratingmethod).
•Oxygenatedfuelwithupto10%ethanolor15%
MTBEbyvolumeisacceptable.
•Donotuseethanolblendsofgasoline,such
asE15orE85,withmorethan10%ethanolby
volume.Performanceproblemsand/orengine
damagemayresult,whichmaynotbecovered
underwarranty.
•Donotusegasolinecontainingmethanol.
•Donotstorefueleitherinthefueltankorinfuel
containersoverthewinterunlessfuelstabilizer
hasbeenaddedtothefuel.
•Donotaddoiltogasoline.
Fillthefueltankwithfreshunleadedregulargasoline
fromamajorname-brandservicestation(Figure9).
Important:Toreducestartingproblems,addfuel
stabilizer/conditionertofreshfuelasdirectedby
thefuel-stabilizermanufacturer.
Refertoyourengineowner’smanualforadditional
information.
g230458
Figure9
8

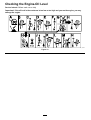
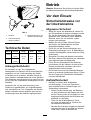
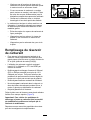
CheckingtheEngine-OilLevel
ServiceInterval:Beforeeachuseordaily
Important:Iftheoillevelinthecrankcaseistoolowortoohighandyouruntheengine,youmay
damagetheengine.
g222533
Figure10
9


DuringOperation
DuringOperationSafety
GeneralSafety
•Wearappropriateclothing,includingeye
protection;longpants;substantial,slip-resistant
footwear;andhearingprotection.Tiebacklong
hairanddonotwearlooseclothingorloose
jewelry.
•Useyourfullattentionwhileoperatingthe
machine.Donotengageinanyactivitythat
causesdistractions;otherwise,injuryorproperty
damagemayoccur.
•Donotoperatethemachinewhileill,tired,or
undertheinuenceofalcoholordrugs.
•Thebladeissharp;contactingthebladecanresult
inseriouspersonalinjury.Shutofftheengine,
removetheignitionkey(electric-startmodelonly),
andwaitforallmovingpartstostopbeforeleaving
theoperatingposition.
•Whenyoureleasetheblade-controlbar,the
engineshouldshutoffandthebladeshouldstop
within3seconds.Ifnot,stopusingyourmachine
immediatelyandcontactanAuthorizedService
Dealer.
•Keepbystandersoutoftheoperatingarea.Keep
smallchildrenoutoftheoperatingareaandunder
thewatchfulcareofaresponsibleadultwhois
notoperatingthemachine.Stopthemachineif
anyoneentersthearea.
•Alwayslookdownandbehindyoubeforemoving
themachineinreverse.
•Operatethemachineonlyingoodvisibilityand
appropriateweatherconditions.Donotoperate
themachinewhenthereistheriskoflightning.
•Wetgrassorleavescancauseseriousinjuryif
youslipandcontacttheblade.Avoidmowingin
wetconditions.
•Useextremecarewhenapproachingblind
corners,shrubs,trees,orotherobjectsthatmay
blockyourview.
•Donotdirectthedischargematerialtoward
anyone.Avoiddischargingmaterialagainstawall
orobstruction;materialmayricochettowardyou.
Stoptheblade(s)whencrossinggravelsurfaces.
•Watchforholes,ruts,bumps,rocks,orother
hiddenobjects.Uneventerraincouldcauseyou
toloseyourbalanceorfooting.
•Ifthemachinestrikesanobjectorstartstovibrate,
immediatelyshutofftheengine,removethe
ignitionkey(ifequipped),waitforallmovingparts
tostop,anddisconnectthewirefromthespark
plugbeforeexaminingthemachinefordamage.
Makeallnecessaryrepairsbeforeresuming
operation.
•Beforeleavingtheoperatingposition,shutoff
theengine,removetheignitionkey(electric-start
modelonly),andwaitforallmovingpartstostop.
•Iftheenginehasbeenrunning,itwillbehotand
canseverelyburnyou.Keepawayfromthehot
engine.
•Operatetheengineonlyinwell-ventilatedareas.
Exhaustgasescontaincarbonmonoxide,which
islethalifinhaled.
•Checkthegrasscatchercomponentsandthe
dischargechutefrequentlyforanywearor
deteriorationandreplacethemwithgenuineT oro
partswhennecessary.
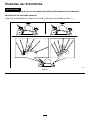
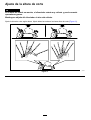
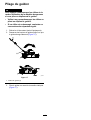
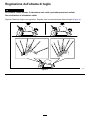
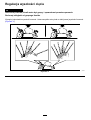
SlopeSafety
•Mowacrossthefaceofslopes;neverupand
down.Useextremecautionwhenchanging
directiononslopes.
•Donotmowonexcessivelysteepslopes.Poor
footingcouldcauseaslip-and-fallaccident.
•Mowwithcautionneardrop-offs,ditches,or
embankments.
11

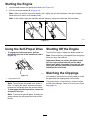
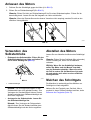
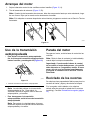
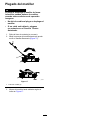
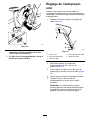
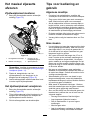
StartingtheEngine
1.Holdtheblade-controlbaragainstthehandle(AofFigure12).
2.Pulltherecoil-starthandle(BofFigure12).
Note:Whenyoupulltherecoil-starthandle,pullitlightlyuntilyoufeelresistance,thenpullitsharply.
Allowtheropetoreturntothehandleslowly.
Note:Ifthemachinedoesnotstartafterseveralattempts,contactanAuthorizedServiceDealer.
g230255
Figure12
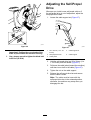
UsingtheSelf-PropelDrive
•Toengagetheself-propeldrive,pullthe
self-propel-drivebartothehandleandholdit
(Figure13).
g240765
Figure13
1.Self-propel-drivebar
Note:Themaximumself-propel-drivespeedis
xed.T oreducethespeed,increasethespace
betweentheself-propel-drivebarandthehandle.
•Todisengagetheself-propel-drive,releasethe
self-propeldrivebar.
Note:T oreducethegroundspeed,increasethe
spacebetweentheself-propeldrivebarandthe
handle.
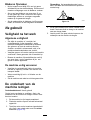
ShuttingOfftheEngine
Toshutofftheengine,releasetheblade-controlbar.
Note:Removethekey(ifequipped)fromtheignition
whenyouleavethemachine.
Important:Whenyoureleasetheblade-control
bar,theengineshouldshutoffandtheblade
shouldstopwithin3seconds.Iftheydonot,stop
usingyourmachineimmediatelyandcontactan
AuthorizedServiceDealer.
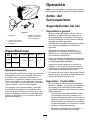
MulchingtheClippings
Yourmachinecomesfromthefactoryreadytomulch
thegrassandleafclippingsbackintothelawn.
Ifthegrassbagisonthemachine,removeitbefore
mulchingtheclippings.RefertoRemovingtheGrass
Bag(page13).
12

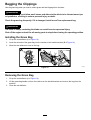
BaggingtheClippings
Usethegrassbagwhenyouwanttocollectgrassandleafclippingsfromthelawn.
WARNING
Aworngrassbagcouldallowsmallstonesandothersimilardebristobethrowntowardyou
orbystanders,resultinginseriouspersonalinjuryordeath.
Checkthegrassbagfrequently.Ifitisdamaged,installanewTororeplacementbag.
WARNING
Thebladeissharp;contactingthebladecanresultinseriouspersonalinjury.
Shutofftheengineandwaitforallmovingpartstostopbeforeleavingtheoperatingposition.
InstallingtheGrassBag
1.Liftupthereardeector(AofFigure14).
2.Inserttherodendsofthegrassbagintothenotchesinthehandlebrackets(BofFigure14).
3.Allowthereardeectortorestonthebag.
g240796
Figure14
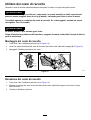
RemovingtheGrassBag
1.Liftupthereardeector(AofFigure14).
2.Liftthegrass-baghandleoutfromthenotchesonthehandlebracketsandremovethebagfromthe
machine.
3.Closethereardeector.
13

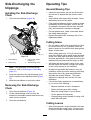
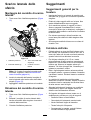
Side-Dischargingthe
Clippings
InstallingtheSide-Discharge
Chute
1.Liftupthereardeector(Figure15).
g032024
Figure15
1.Reardeector
3.Notchinthehandle
bracket(2)
2.Rodend(2)4.Side-dischargechute
Note:Ifthegrassbagisonthemachine,
removeit;refertoRemovingtheGrassBag
(page13).
2.Inserttherodendsoftheside-dischargechute
intothenotchesonthehandlebrackets(Figure
15).
3.Allowthereardeectortorestonthechute.
RemovingtheSide-Discharge
Chute
1.Liftupthereardeector(Figure15).
2.Lifttheside-dischargechuteoutformthe
notchesonthehandlebracketsandremovethe
chutefromthemachine.
3.Closethereardeector.
OperatingTips
GeneralMowingTips
•Inspecttheareawhereyouwillusethemachine
andremoveallobjectsthatthemachinecould
throw.
•Avoidstrikingsolidobjectswiththeblade.Never
deliberatelymowoveranyobject.
•Ifthemachinestrikesanobjectorstartstovibrate,
immediatelyshutofftheengine,removethekey
(ifequipped),disconnectthewirefromthespark
plug,andexaminethemachinefordamage.
•Forbestperformance,installanewbladebefore
thecuttingseasonbegins.
•ReplacethebladewhennecessarywithaT oro
replacementblade.
CuttingGrass
•Cutonlyaboutathirdofthegrassbladeatatime.
Donotcutbelow51mm(2inches)unlessthe
grassissparseoritislatefallwhengrassgrowth
beginstoslowdown.
•Whencuttinggrassover15cm(6inches)tall,
mowatthehighestcuttingheightsettingandwalk
slower;thenmowagainatalowersettingforthe
bestlawnappearance.Ifthegrassistoolong,the
machinemayplugandcausetheenginetostall.
•Wetgrassandleavestendtoclumpontheyard
andcancausethemachinetoplugortheengine
tostall.Avoidmowinginwetconditions.
•Beawareofapotentialrehazardinverydry
conditions,followalllocalrewarnings,andkeep
themachinefreeofdrygrassandleafdebris.
•Alternatethemowingdirection.Thishelps
dispersetheclippingsoverthelawnforeven
fertilization.
•Ifthenishedlawnappearanceisunsatisfactory,
try1ormoreofthefollowing:
–Replacethebladeorhaveitsharpened.
–Walkataslowerpacewhilemowing.
–Raisethecuttingheightonyourmachine.
–Cutthegrassmorefrequently.
–Overlapcuttingswathsinsteadofcuttingafull
swathwitheachpass.
CuttingLeaves
•Aftercuttingthelawn,ensurethathalfofthelawn
showsthroughthecutleafcover.Youmayneed
tomakemorethanasinglepassovertheleaves.
14

•Iftherearemorethan13cm(5inches)ofleaves
onthelawn,mowatahighercuttingheightand
thenagainatthedesiredcuttingheight.
•Slowdownyourmowingspeedifthemachine
doesnotcuttheleavesnelyenough.
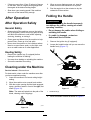
AfterOperation
AfterOperationSafety
GeneralSafety
•Alwaysshutoffthemachine,removetheignition
key(ifequipped),waitforallmovingpartstostop,
andallowthemachinetocoolbeforeadjusting,
servicing,cleaning,orstoringit.
•Cleangrassanddebrisfromthemachinetohelp
preventres.Cleanupoilorfuelspills.
•Neverstorethemachineorfuelcontainerwhere
thereisanopename,spark,orpilotlight,such
asonawaterheateroronotherappliances.
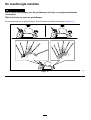
HaulingSafety
•Removetheignitionkey(ifequipped)before
loadingthemachineforhauling.
•Usecarewhenloadingorunloadingthemachine.
•Securethemachinefromrolling.
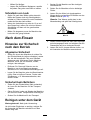
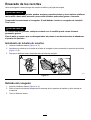
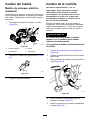
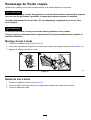
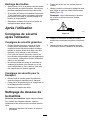
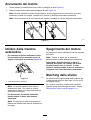
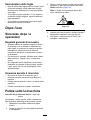
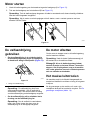
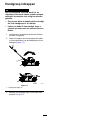
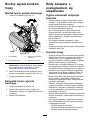
CleaningundertheMachine
ServiceInterval:Aftereachuse
Forbestresults,cleanunderthemachinesoonafter
youhavecompletedmowing.
1.Lowerthemachinetoitslowestcutting-height
setting.
2.Movethemachineontoapavedlevelsurface.
3.Withtheenginerunningandthebladeengaged,
sprayastreamofwaterinfrontoftheright,rear
wheel(Figure16).
Note:Thewaterwillsplashintothepathofthe
blade,cleaningouttheclippings.
g002600
Figure16
4.Whennomoreclippingscomeout,stopthe
waterandmovethemachinetoadryarea.
5.Runtheengineforafewminutestodrythe
undersideofthemachine.
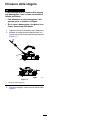
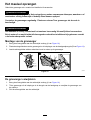
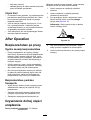
FoldingtheHandle
WARNING
Foldingorunfoldingthehandleimproperly
candamagethecables,causinganunsafe
operatingcondition.
•Donotdamagethecableswhenfoldingor
unfoldingthehandle.
•Ifacableisdamaged,contactan
AuthorizedServiceDealer.
1.Removetheignitionkey(ifequipped).
2.Loosenthehandleknobsuntilyoucanmovethe
handlefreely(Figure17).
g032022
Figure17
1.Handleknob(2)
3.MovethehandleforwardasshowninFigure17.
15

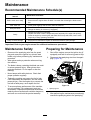
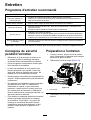
Maintenance
RecommendedMaintenanceSchedule(s)
MaintenanceService
Interval
MaintenanceProcedure
Beforeeachuseordaily
•Checktheengine-oillevelandaddoilasneeded.
•Ensurethattheengineshutsoffwithin3secondsafterreleasingtheblade-control
bar.
Aftereachuse
•Cleangrassclippingsanddirtfromunderthemachine.
Every25hours
•Servicetheairlter;serviceitmorefrequentlyindustyoperatingconditions.
•Chargethebatteryfor24hours(ifequipped).
Yearly
•Changetheengineoil(ifdesired).
•Replacethebladeorhaveitsharpened(morefrequentlyiftheedgedullsquickly).
•Cleantheenginebyremovingdirtanddebrisfromitstopandsides;cleanitmore
frequentlyindustyoperatingconditions.
Yearlyorbeforestorage
•Emptythefueltankbeforerepairsasdirectedandbeforeyearlystorage.
Important:Refertoyourenginemanualforadditionalmaintenanceprocedures.
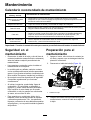
MaintenanceSafety
•Disconnectthespark-plugwirefromthespark
plugandremovetheignitionkey(electric-start
modelonly)beforeperforminganymaintenance
procedure.
•Wearglovesandeyeprotectionwhenservicing
themachine.
•Thebladeissharp;contactingthebladecanresult
inseriouspersonalinjury.Weargloveswhen
servicingtheblade.Donotrepairoralterthe
blade(s).
•Nevertamperwithsafetydevices.Checktheir
properoperationregularly.
•Tippingthemachinemaycausethefueltoleak.
Fuelisammableandexplosive,andcancause
personalinjury.Runtheenginedryorremovethe
fuelwithahandpump;neversiphonthefuel.
•Toensureoptimumperformanceofthemachine,
useonlygenuineT ororeplacementpartsand
accessories.Replacementpartsandaccessories
madebyothermanufacturerscouldbedangerous,
andsuchusecouldvoidtheproductwarranty.
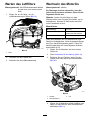
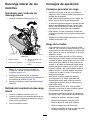
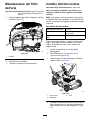
PreparingforMaintenance
1.Shutofftheengine,removetheignitionkey(if
equipped),andwaitforallmovingpartstostop.
2.Disconnectthespark-plugwirefromthespark
plug(Figure18).
g032025
Figure18
1.Spark-plugwire
3.Afterperformingthemaintenanceprocedure(s),
connectthespark-plugwiretothesparkplug.
16

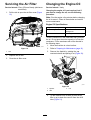
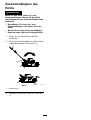
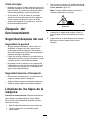
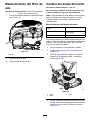
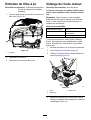
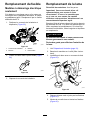
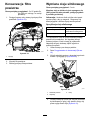
ServicingtheAirFilter
ServiceInterval:Every25hours/Yearly(whichever
comesrst)
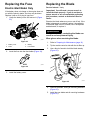
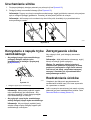
1.Pullthetabtoopentheair-ltercover(Figure
19).
g032020
Figure19
1.Tab
2.Replacetheairlter.
3.Closetheair-ltercover.
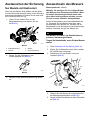
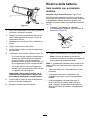
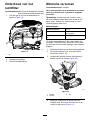
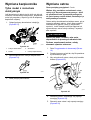
ChangingtheEngineOil
ServiceInterval:Yearly
Changingtheengineoilisnotrequired,butif
youwanttochangetheoil,usethefollowing
procedure.
Note:Runtheengineafewminutesbeforechanging
theoiltowarmit.Warmoilowsbetterandcarries
morecontaminants.
EngineOilSpecications
Engineoilcapacity
0.44L(15oz)*
OilviscositySAE30orSAE10W-30
detergentoil
APIserviceclassicationSJorhigher
*Thereisresidualoilinthecrankcaseafteryoudrain
theoil.Donotpourtheentirecapacityofoilintothe
crankcase.Fillthecrankcasewithoilasdirectedin
thefollowingsteps.
1.Movethemachinetoalevelsurface.
2.RefertoPreparingforMaintenance(page16).
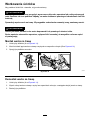
3.Removethedipstickbyrotatingthecap
counterclockwiseandpullingitout(Figure20).
g033377
Figure20
1.Dipstick3.Full
2.Add
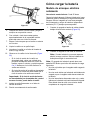
4.Tipthemachineontoitsside(sothattheair
lterisup)todraintheusedoilfromtheoil-ll
tube(Figure21).
17

g020050
Figure21
5.Afterdrainingtheusedoil,returnthemachineto
theoperatingposition.
6.Carefullypourabout3/4oftheenginecapacity
ofoilintotheoil-lltube.
7.Wait3minutesfortheoiltosettleintheengine.
8.Wipethedipstickcleanwithacleancloth.
9.Insertthedipstickintotheoil-lltube,then
removethedipstick.
10.Readtheoillevelonthedipstick(Figure20).
•Iftheoillevelonthedipstickistoolow,
carefullypourasmallamountofoilintothe
oil-lltube,wait3minutes,andrepeatsteps
8through10untiltheoillevelonthedipstick
iscorrect.
•Iftheoillevelonthedipstickistoohigh,
draintheexcessoiluntiltheoillevelonthe
dipstickiscorrect.
Important:Iftheoillevelintheengineistoo
lowortoohighandyouruntheengine,you
maydamagetheengine.
11.Installthedipstickintotheoil-lltubesecurely.
12.Recycletheusedoilproperly.
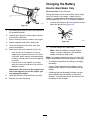
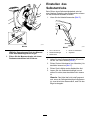
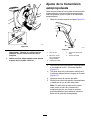
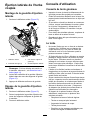
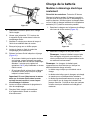
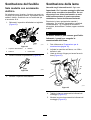
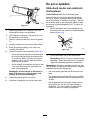
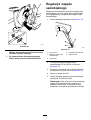
ChargingtheBattery
Electric-StartModelOnly
ServiceInterval:Every25hours
Chargethebatteryfor24hoursinitially,thenmonthly
(every25starts)orasneeded.Alwaysusethe
chargerinashelteredareaandchargethebatteryat
roomtemperature(22°Cor70°F)wheneverpossible.
1.Connectthechargertothewireharnesslocated
belowtheignitionkey(Figure22).
g002889
Figure22
2.Plugthechargerintoawalloutlet.
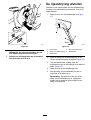
Note:Whenthebatterynolongerholdsa
charge,recycleordisposeofthelead-acid
batteryaccordingtolocalcodes.
Note:Yourbatterychargermayhavea2-colorLED
displaythatindicatesthefollowingstatesofcharging:
•Aredlightindicatesthatthechargerischarging
thebattery.
•Agreenlightindicatesthatthechargerisfully
chargedorthechargerisdisconnectedfromthe
battery.
•Aashinglightthatalternatesbetweenredand
greenindicatesthatthebatteryisnearlyfully
charged.Thisstatelastsonlyafewminutesuntil
thebatteryisfullycharged.
18
La pagina sta caricando ...
La pagina sta caricando ...
La pagina sta caricando ...
La pagina sta caricando ...
La pagina sta caricando ...
La pagina sta caricando ...
La pagina sta caricando ...
La pagina sta caricando ...
La pagina sta caricando ...
La pagina sta caricando ...
La pagina sta caricando ...
La pagina sta caricando ...
La pagina sta caricando ...
La pagina sta caricando ...
La pagina sta caricando ...
La pagina sta caricando ...
La pagina sta caricando ...
La pagina sta caricando ...
La pagina sta caricando ...
La pagina sta caricando ...
La pagina sta caricando ...
La pagina sta caricando ...
La pagina sta caricando ...
La pagina sta caricando ...
La pagina sta caricando ...
La pagina sta caricando ...
La pagina sta caricando ...
La pagina sta caricando ...
La pagina sta caricando ...
La pagina sta caricando ...
La pagina sta caricando ...
La pagina sta caricando ...
La pagina sta caricando ...
La pagina sta caricando ...
La pagina sta caricando ...
La pagina sta caricando ...
La pagina sta caricando ...
La pagina sta caricando ...
La pagina sta caricando ...
La pagina sta caricando ...
La pagina sta caricando ...
La pagina sta caricando ...
La pagina sta caricando ...
La pagina sta caricando ...
La pagina sta caricando ...
La pagina sta caricando ...
La pagina sta caricando ...
La pagina sta caricando ...
La pagina sta caricando ...
La pagina sta caricando ...
La pagina sta caricando ...
La pagina sta caricando ...
La pagina sta caricando ...
La pagina sta caricando ...
La pagina sta caricando ...
La pagina sta caricando ...
La pagina sta caricando ...
La pagina sta caricando ...
La pagina sta caricando ...
La pagina sta caricando ...
La pagina sta caricando ...
La pagina sta caricando ...
La pagina sta caricando ...
La pagina sta caricando ...
La pagina sta caricando ...
La pagina sta caricando ...
La pagina sta caricando ...
La pagina sta caricando ...
La pagina sta caricando ...
La pagina sta caricando ...
La pagina sta caricando ...
La pagina sta caricando ...
La pagina sta caricando ...
La pagina sta caricando ...
La pagina sta caricando ...
La pagina sta caricando ...
La pagina sta caricando ...
La pagina sta caricando ...
La pagina sta caricando ...
La pagina sta caricando ...
La pagina sta caricando ...
La pagina sta caricando ...
La pagina sta caricando ...
La pagina sta caricando ...
La pagina sta caricando ...
La pagina sta caricando ...
La pagina sta caricando ...
La pagina sta caricando ...
La pagina sta caricando ...
La pagina sta caricando ...
La pagina sta caricando ...
La pagina sta caricando ...
La pagina sta caricando ...
La pagina sta caricando ...
La pagina sta caricando ...
La pagina sta caricando ...
La pagina sta caricando ...
La pagina sta caricando ...
La pagina sta caricando ...
La pagina sta caricando ...
La pagina sta caricando ...
La pagina sta caricando ...
La pagina sta caricando ...
La pagina sta caricando ...
La pagina sta caricando ...
La pagina sta caricando ...
La pagina sta caricando ...
La pagina sta caricando ...
La pagina sta caricando ...
La pagina sta caricando ...
La pagina sta caricando ...
La pagina sta caricando ...
La pagina sta caricando ...
La pagina sta caricando ...
La pagina sta caricando ...
La pagina sta caricando ...
La pagina sta caricando ...
La pagina sta caricando ...
La pagina sta caricando ...
La pagina sta caricando ...
La pagina sta caricando ...
La pagina sta caricando ...
La pagina sta caricando ...
La pagina sta caricando ...
La pagina sta caricando ...
La pagina sta caricando ...
La pagina sta caricando ...
La pagina sta caricando ...
La pagina sta caricando ...
La pagina sta caricando ...
La pagina sta caricando ...
La pagina sta caricando ...
La pagina sta caricando ...
La pagina sta caricando ...
La pagina sta caricando ...
La pagina sta caricando ...
La pagina sta caricando ...
La pagina sta caricando ...
La pagina sta caricando ...
La pagina sta caricando ...
La pagina sta caricando ...
La pagina sta caricando ...
La pagina sta caricando ...
La pagina sta caricando ...
La pagina sta caricando ...
La pagina sta caricando ...
La pagina sta caricando ...
La pagina sta caricando ...
La pagina sta caricando ...
La pagina sta caricando ...
La pagina sta caricando ...
La pagina sta caricando ...
La pagina sta caricando ...
La pagina sta caricando ...
La pagina sta caricando ...
La pagina sta caricando ...
La pagina sta caricando ...
La pagina sta caricando ...
La pagina sta caricando ...
La pagina sta caricando ...
La pagina sta caricando ...
La pagina sta caricando ...
La pagina sta caricando ...
La pagina sta caricando ...
-
 1
1
-
 2
2
-
 3
3
-
 4
4
-
 5
5
-
 6
6
-
 7
7
-
 8
8
-
 9
9
-
 10
10
-
 11
11
-
 12
12
-
 13
13
-
 14
14
-
 15
15
-
 16
16
-
 17
17
-
 18
18
-
 19
19
-
 20
20
-
 21
21
-
 22
22
-
 23
23
-
 24
24
-
 25
25
-
 26
26
-
 27
27
-
 28
28
-
 29
29
-
 30
30
-
 31
31
-
 32
32
-
 33
33
-
 34
34
-
 35
35
-
 36
36
-
 37
37
-
 38
38
-
 39
39
-
 40
40
-
 41
41
-
 42
42
-
 43
43
-
 44
44
-
 45
45
-
 46
46
-
 47
47
-
 48
48
-
 49
49
-
 50
50
-
 51
51
-
 52
52
-
 53
53
-
 54
54
-
 55
55
-
 56
56
-
 57
57
-
 58
58
-
 59
59
-
 60
60
-
 61
61
-
 62
62
-
 63
63
-
 64
64
-
 65
65
-
 66
66
-
 67
67
-
 68
68
-
 69
69
-
 70
70
-
 71
71
-
 72
72
-
 73
73
-
 74
74
-
 75
75
-
 76
76
-
 77
77
-
 78
78
-
 79
79
-
 80
80
-
 81
81
-
 82
82
-
 83
83
-
 84
84
-
 85
85
-
 86
86
-
 87
87
-
 88
88
-
 89
89
-
 90
90
-
 91
91
-
 92
92
-
 93
93
-
 94
94
-
 95
95
-
 96
96
-
 97
97
-
 98
98
-
 99
99
-
 100
100
-
 101
101
-
 102
102
-
 103
103
-
 104
104
-
 105
105
-
 106
106
-
 107
107
-
 108
108
-
 109
109
-
 110
110
-
 111
111
-
 112
112
-
 113
113
-
 114
114
-
 115
115
-
 116
116
-
 117
117
-
 118
118
-
 119
119
-
 120
120
-
 121
121
-
 122
122
-
 123
123
-
 124
124
-
 125
125
-
 126
126
-
 127
127
-
 128
128
-
 129
129
-
 130
130
-
 131
131
-
 132
132
-
 133
133
-
 134
134
-
 135
135
-
 136
136
-
 137
137
-
 138
138
-
 139
139
-
 140
140
-
 141
141
-
 142
142
-
 143
143
-
 144
144
-
 145
145
-
 146
146
-
 147
147
-
 148
148
-
 149
149
-
 150
150
-
 151
151
-
 152
152
-
 153
153
-
 154
154
-
 155
155
-
 156
156
-
 157
157
-
 158
158
-
 159
159
-
 160
160
-
 161
161
-
 162
162
-
 163
163
-
 164
164
-
 165
165
-
 166
166
-
 167
167
-
 168
168
-
 169
169
-
 170
170
-
 171
171
-
 172
172
-
 173
173
-
 174
174
-
 175
175
-
 176
176
-
 177
177
-
 178
178
-
 179
179
-
 180
180
-
 181
181
-
 182
182
-
 183
183
-
 184
184


Toro 53 cm Recycler Petrol Lawn Mower Manuale utente
- Categoria
- Tosa erba
- Tipo
- Manuale utente
- Questo manuale è adatto anche per
in altre lingue
- français: Toro 53 cm Recycler Petrol Lawn Mower Manuel utilisateur
- español: Toro 53 cm Recycler Petrol Lawn Mower Manual de usuario
- Deutsch: Toro 53 cm Recycler Petrol Lawn Mower Benutzerhandbuch
- Nederlands: Toro 53 cm Recycler Petrol Lawn Mower Handleiding
- polski: Toro 53 cm Recycler Petrol Lawn Mower Instrukcja obsługi
Documenti correlati
-
Toro 53cm Mulching/Rear Bagging/Side Discharging Lawn Mower Manuale utente
-
Toro 53cm Recycler Lawn Mower Manuale utente
-
Toro 55cm Recycler SmartStow Lawn Mower Manuale utente
-
Toro 55cm Recycler Lawn Mower Manuale utente
-
-
-
-
-
-