Dell H825cdw Cloud MFP Laser Printer Guida Rapida
- Categoria
- Stampanti laser / LED
- Tipo
- Guida Rapida

Dell™ Color Cloud Multifunction Printer | H625cdw
Dell™ Color Cloud Multifunction Printer | H825cdw
Dell™ Color Smart Multifunction Printer | S2825cdn
Setup Guide
Guide d'installation
Guida di configurazione
Konfigurationshandbuch
Guía de configuración
La pagina sta caricando ...

3
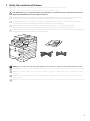
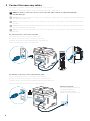
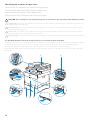
1 Verify the contents of the box
Vérifiez le contenu de l'emballage | Controllare il contenuto della confezione
Überprüfen des Lieferumfangs | Compruebe el contenido de la caja
CAUTION: Before you set up and operate your Dell printer, read and follow the safety instructions in the
Important Information that comes with your printer.
ATTENTION : Avant de configurer et d'utiliser votre imprimante Dell, lisez et respectez les consignes de
sécurité reprises dans le document Informations importantes fourni avec votre imprimante.
ATTENZIONE: Prima di configurare e utilizzare la stampante Dell, leggere e attenersi alle istruzioni di
sicurezza presenti in Informazioni importanti in dotazione con la stampante.
ACHTUNG: Bevor Sie den Dell-Drucker einrichten und bedienen, lesen und befolgen Sie die
Sicherheitshinweise in der Anleitung Wichtige Informationen im Lieferumfang des Druckers.
PRECAUCIÓN: Antes de configurar y utilizar su impresora Dell, lea y siga las instrucciones de seguridad en
la Información importante incluida con la impresora.
NOTE: The contents of the box vary depending on the country or region you purchased the printer from.
REMARQUE : Le contenu de l'emballage varie selon le pays ou la région où votre imprimante a été achetée.
NOTA: Il contenuto della confezione varia in funzione del paese o della regione dove la stampante è stata
acquistata.
HINWEIS: Der Inhalt des Kartons variiert abhängig von dem Land oder der Region, in der Sie den Drucker
gekauft haben.
NOTA: El contenido de la caja puede variar en función del país o de la región en la que compre la impresora.
La pagina sta caricando ...
La pagina sta caricando ...
La pagina sta caricando ...

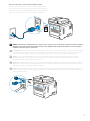
7
For Fax connection, connect the telephone cable
Pour la connexion Fax, raccordez le câble téléphonique
Nel caso di connessione Fax, connettere il cavo telefonico
Schließen Sie bei einer Faxverbindung das Telefonkabel an.
Para la conexión de Fax, conecte el cable de teléfono
NOTE: If the phone communication is serial in your country (such as Germany, Sweden, Denmark, Austria,
Belgium, Italy, France and Switzerland), and you are supplied with a yellow terminator, insert the yellow
terminator into the phone connector.
REMARQUE : Si la communication téléphonique est de type série dans votre pays (c'est le cas en Allemagne,
en Suède, au Danemark, en Autriche, en Belgique, en Italie, en France et en Suisse) et que vous disposez
d'une terminaison jaune, insérez la terminaison jaune dans le connecteur de ligne téléphonique.
NOTA: Se nel paese di utilizzo è presente una comunicazione seriale (ad esempio Germania, Svezia,
Danimarca, Austria, Belgio, Italia, Francia e Svizzera), e si dispone di un terminatore giallo, inserire il
terminatore giallo nel connettore telefonico.
HINWEIS: Verwendet Ihr Land serielle Telefonkommunikation (wie in Deutschland, Schweden, Dänemark,
Österreich, Belgien, Italien, Frankreich und in der Schweiz), und haben Sie einen gelben Stecker erhalten,
verbinden Sie diesen mit dem Telefonanschluss.
NOTA: Si la comunicación telefónica es de tipo en serie en su país (como Alemania, Suecia, Dinamarca,
Austria, Bélgica, Italia, Francia y Suiza), y posee un terminador amarillo, inserte el terminador amarillo en el
conector del teléfono.

8
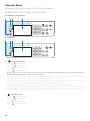
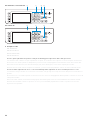
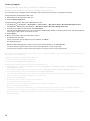
5 Connect the power cord and turn on the printer
Branchez le cordon d'alimentation et allumez l'imprimante
Connettere il cavo di alimentazione e accendere la stampante
Anschließen des Netzkabels und Einschalten des Druckers
Conecte el cable de alimentación y encienda la impresora
The following illustration uses Dell H825cdw as an example.
L'illustration suivante utilise l'appareil Dell H825cdw en exemple.
La seguente illustrazione utilizza Dell H825cdw come esempio.
Die folgende Abbildung verwendet Dell H825cdw als Beispiel.
En la siguiente ilustración se utiliza Dell H825cdw como ejemplo.
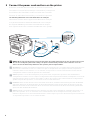
NOTE: When you turn the printer on for the first time, the initial setup appears on the operator panel. If you
do not start configuring the initial settings, the printer automatically restarts in three minutes. You can
choose to run the initial setup wizard on the operator panel if required later.
REMARQUE : Lorsque vous allumez l'imprimante pour la première fois, la configuration initiale apparaît sur le
panneau de commande. Si vous ne commencez pas la configuration des réglages initiaux, l'imprimante
redémarre dans les trois minutes. Le cas échéant, vous pouvez ré-exécuter ultérieurement l'assistant de
configuration initiale à l'aide du panneau de commande.
NOTA: Quando si accende la stampante per la prima volta, sul pannello operatore sarà visualizzata la
configurazione iniziale. Se non si avvia la configurazione delle impostazioni iniziali, la stampante si riaccende
automaticamente dopo tre minuti. È possibile scegliere di eseguire la procedura iniziale di configurazione
guidata sul pannello operatore, se necessario in un secondo momento.
HINWEIS: Wenn Sie den Drucker zum ersten Mal einschalten, wird die Ersteinrichtung auf dem Bedienfeld
angezeigt. Wenn Sie die Konfiguration der Grundeinstellungen nicht starten, führt der Drucker nach drei
Minuten automatisch einen Neustart durch. Sie können den Assistenten für die Ersteinrichtung bei Bedarf
später auf dem Bedienfeld ausführen.
NOTA: Cuando encienda la impresora por primera vez, aparecerá la pantalla de configuración inicial en el
panel del operador. Si no se comienza con el establecimiento de la configuración inicial, pasados tres
minutos la impresora se reinicia automáticamente. Puede elegir la ejecución del asistente para la instalación
en el panel del operador si se necesita más tarde.

9
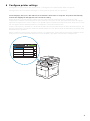
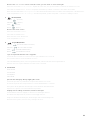
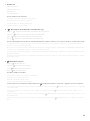
6 Configure printer settings
Configurez les paramètres de l'imprimante | Configurare le impostazioni della stampante
Konfigurieren der Druckereinstellungen | Configure los ajustes de la impresora
Set the language, time zone, date and time, then follow the instructions to setup fax. The printer automatically
restarts after tapping
OK
that appears at the end of the setting.
Réglez la langue, le fuseau horaire, la date et l'heure, puis suivez les instructions pour configurer le fax.
L'imprimante redémarre automatiquement après avoir tapé sur la touche
OK
, qui apparaît au terme du réglage.
Impostare la lingua, il fuso orario, la data e l'ora, quindi seguire le istruzioni per impostare il fax. Dopo aver toccato
OK
che appare alla fine dell'impostazione, la stampante si avvia automaticamente.
Legen Sie die Sprache, die Zeitzone, das Datum und die Uhrzeit fest und befolgen Sie dann die Anweisungen, um
das Fax einzurichten. Der Drucker wird nach dem Berühren von
OK
, das am Ende der Einstellung angezeigt wird,
automatisch neu gestartet.
Ajuste el idioma, la zona horaria, la fecha y la hora y, a continuación, siga las instrucciones para configurar el fax.
La impresora se reinicia automáticamente tras tocar
Aceptar
, que aparece al final de la configuración.
Next
English
Français
Italiano
Deutsch
Español
Dansk
Nederlands
Norsk
Select Your Language Next
La pagina sta caricando ...
La pagina sta caricando ...

12
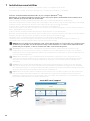
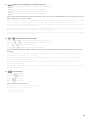
2 After the printer is found, click
Install
. Follow the on-screen instructions to complete the setup.
Une fois l'imprimante trouvée, cliquez sur Installer. Suivez les instructions à l'écran pour terminer la
configuration.
Una volta trovata la stampante, fare clic su Installa. Seguire le istruzioni visualizzate sullo schermo per
completare l'impostazione.
Nachdem der Drucker gefunden wurde, klicken Sie auf Installieren. Befolgen Sie die Anweisungen auf dem
Bildschirm, um die Einrichtung abzuschließen.
Cuando se haya encontrado la impresora, haga clic en Instalar. Siga las instrucciones en pantalla para
completar la configuración.
La pagina sta caricando ...

14
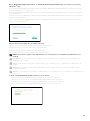
USB Printer
Imprimante USB | Stampante USB
USB-Drucker | Impresora USB
1 Wait for
Dell Printer Easy Install
wizard to find and install your printer.
Attendez que l'assistant Dell Printer Easy Install détecte et installe votre imprimante.
Attendere che la procedura guidata Dell Printer Easy Install trovi e installi la stampante.
Warten Sie, bis der Dell Printer Easy Install-Assistent den Drucker gefunden und installiert hat.
Espere a que el asistente de Dell Printer Easy Install encuentre e instale la impresora.
La pagina sta caricando ...

16
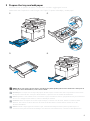
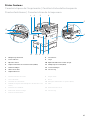
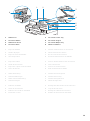
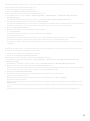
1 Prolunga cassetto di uscita 8 Coperchio anteriore
2 Porta USB anteriore 9 Cassetto 1
3 Pannello operatore 10 Alimentatore da 550 fogli opzionale (Cassetto 2)
4 Alimentatore automatico di documenti fronte/retro
(Duplex Automatic Document Feeder, DADF)
11 Alimentatore multifunzione (Multipurpose Feeder,
MPF)
5 Cartucce tamburo 12 Cartucce toner
6 Contenitore toner di scarto 13 Service Tag
7 Coperchio laterale destro
1 Ausgabefachverlängerung 8 Vordere Abdeckung
2 Vorderer USB-Anschluss 9 Fach 1
3 Bedienerkonsole 10 Optionale 550-Blatt-Zufuhr (Fach 2)
4 Duplex Automatischer Dokumenteneinzug (DADF) 11 Universalzuführung (MPF)
5 Trommeleinheiten 12 Tonerkassetten
6 Tonersammelbehälter 13 Service Tag
7 Rechte Seitenabdeckung
1 Extensión de la bandeja de salida 8 Cubierta frontal
2 Puerto USB frontal 9 Bandeja 1
3 Panel del operador 10 Alimentador de 550 hojas opcional (Bandeja 2)
4 Alimentador automático de documentos dúplex
(DADF)
11 Alimentador multifunción (MPF)
5 Cartuchos de tambor 12 Cartuchos de tóner
6 Caja de tóner residual 13 Service Tag
7 Cubierta lateral derecha

17
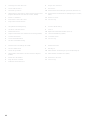
1 Phone Connector 6 "Blue" Plug
2 Wall Jack Connector 7 Duplex Unit
3 Ethernet Port 8 Fusing Unit
4 USB Port 9 Rear Cover
5 Power Connector
1 Connecteur de ligne téléphonique 6 Prise "bleue"
2 Connecteur de prise murale 7 Unité recto verso
3 Port Ethernet 8 Module de fusion
4 Port USB 9 Capot arrière
5 Connecteur d'alimentation
1 Connettore telefonico 6 Spinotto "blu"
2 Connettore per presa a muro 7 Unità duplex
3 Porta Ethernet 8 Fusore
4 Porta USB 9 Coperchio posteriore
5 Connettore di alimentazione
1 Telefonanschluss 6 "Blauer" Stopfen
2 Netzanschluss 7 Duplex-Einheit
3 Ethernet-Anschluss 8 Fixieranlage
4 USB-Anschluss 9 Hintere Abdeckung
5 Netzanschluss
2
3
5
1
4
8
6
7
9
La pagina sta caricando ...

19
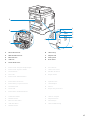
1 DADF Cover 5 Document Feeder Tray
2 Document Guides 6 Document Stopper
3 DADF Chute Cover 7 Document Output Tray
4 Document Glass 8 DADF Feed Rollers
1 Capot du CADRV 5 Plateau d'alimentation en documents
2 Guides du papier 6 Guide d'arrêt de document
3 Capot de chute du CADRV 7 Bac de sortie de documents
4 Vitre d'exposition 8 Rouleaux d'alimentation du CADRV
1 Coperchio DADF 5 Vassoio di alimentazione dei documenti
2 Guide dei documenti 6 Ferma documenti
3 Coperchio a piano inclinato DADF 7 Vassoio uscita documenti
4 Vetro documenti 8 Rulli di alimentazione DADF
1 DADF-Abdeckung 5 Dokumenteneinzugsfach
2 Dokumentführungen 6 Dokumentanschlag
3 DADF-Schachtabdeckung 7 Dokumentausgabefach
4 Dokumentenglas 8 DADF-Einzugsrollen
1 Cubierta del DADF 5 Bandeja del alimentador de documentos
2 Guías de documentos 6 Tope de documentos
3 Cubierta del conducto del DADF 7 Bandeja de salida de documentos
4 Cristal del escáner 8 Rodillos de alimentación del DADF
1
2
3
4
5
6
7
8

20
Operator Panel
Panneau de commande | Pannello operatore
Bedienerkonsole | Panel del operador
1 (Information) button
Bouton (Information)
Pulsante (Informazioni)
Taste (Information)
Botón (Información)
Moves to the
Information
screen. You can access various information and settings menu, check consumable levels and
network status, and print various types of reports and lists.
Renvoie à l'écran d'
Information
. Permet d'accéder à diverses informations et menu de réglage, de vérifier les niveaux
des consommables et l'état du réseau, et d'imprimer plusieurs types de rapports et de listes.
Passa alla schermata
Informazioni
. È possibile accedere a vari menu impostazioni e informazioni, controllare i livelli dei
materiali di consumo e lo stato della rete e stampare vari tipi di rapporti ed elenchi.
Wechselt zum Bildschirm
Information
. Sie können auf verschiedene Informationen und Menüs zugreifen,
Verbrauchsstände und den Netzwerkstatus überprüfen und verschiedene Arten von Berichten und Listen ausdrucken.
Lleva a la pantalla
Información
. Puede acceder a diversos menús de configuración e información, comprobar el nivel de
los consumibles y el estado de la red e imprimir varios tipos de informes y listas.
2 (Job Status) button
Bouton (État du travail)
Pulsante (Stato lavori)
Taste (Auftragsstatus)
Botón (Estado de trabajo)
23451
Dell H625cdw / Dell H825cdw
23451
Dell S2825cdn
La pagina sta caricando ...
La pagina sta caricando ...

23
7Number Pad
Pavé numérique
Tastierino numerico
Ziffernblock
Teclado numérico
Enters numbers and characters.
Permet de saisir des caractères et des chiffres.
Consente di inserire caratteri e numeri.
Für die Eingabe von Ziffern und Zeichen.
Introduce números y caracteres.
8 (Wi-Fi) button (Dell H625cdw / Dell H825cdw only)
Bouton (Wi-Fi) (Dell H625cdw / Dell H825cdw uniquement)
Pulsante (Wi-Fi) (solo Dell H625cdw / Dell H825cdw)
Taste (Wi-Fi) (nur Dell H625cdw / Dell H825cdw)
Botón (Wi-Fi) (solo Dell H625cdw / Dell H825cdw)
Shows a white light when the Wi-Fi is activated and blinks in certain conditions. For more information, see the User's Guide.
Une lumière blanche s'allume lorsque le Wi-Fi est activé et clignote sous certaines conditions. Pour plus d'informations,
reportez-vous au Guide de l'utilisateur.
Mostra una luce bianca quando è attivo Wi-Fi Mostra una luce bianca quando si attiva il Wi-Fi e lampeggia in determinate
condizioni. Per maggiori informazioni, vedere la Guida per l'utente.
Leuchtet weiß, wenn Wi-Fi aktiviert ist und blinkt unter bestimmten Bedingungen. Weitere Informationen finden Sie in der
Benutzerhandbuch.
Muestra una luz blanca cuando se activa Wi-Fi y parpadea en ciertas condiciones. Para obtener más información, consulte
la Guia del usuario.
9 (Redial/Pause) button
Bouton (Compo/Pause)
Pulsante (Ricomposizione/Pausa)
Taste (Wahlwiederholung/Pause)
Botón (Rellamada/Pausa)
Re-dials a telephone number.
Permet de recomposer un numéro de téléphone.
Ricompone un numero telefonico.
Wählt eine Telefonnummer erneut.
Vuelve a marcar un número de teléfono.
Inserts a pause into a telephone number. When the (Redial/Pause) button is pressed, "-" appears on the touch panel.
Permet d'insérer une pause dans un numéro de téléphone. Lorsque le bouton
(Compo/Pause) est enfoncé, "-" apparaît
sur l'écran tactile.
Inserisce una pausa in un numero telefonico. Quando si preme il pulsante
(Ricomposizione/Pausa) , appare "-" sul
touch panel.
Fügt eine Pause in eine Telefonnummer ein. Wenn die Taste
(Wahlwiederholung/Pause) gedrückt wird, erscheint "-" auf
dem Bedienfeld.
Introduce una pausa en un número de teléfono. Cuando se pulsa el botón
(Rellamada/Pausa), "-" aparece en el panel
táctil.

24
10 (Copy) button
Bouton (Copie)
Pulsante (Copia)
Taste (Kopieren)
Botón (Copiar)
Starts copying the document. Effective only from the
Home
screen while you are logged in to the printer.
Permet de démarrer la copie du document. Effectif uniquement à partir de l'écran d'
Accueil
lorsque vous êtes connecté
à l'imprimante.
Avvia la copia di un documento. È attivo solo dalla schermata
Home
e se l'utente ha effettuato l'accesso alla stampante.
Start das Kopieren des Dokuments. Diese Taste ist nur über den
Home
-Bildschirm effektiv, während Sie beim Drucker
angemeldet sind.
Inicia la copia del documento. Solamente resulta efectivo en la pantalla de
Inicio
mientras se encuentra conectado a la
impresora.
11 (Power) button
Bouton (Alimentation)
Pulsante (Alimentazione)
Taste (Ein-/Ausschalten)
Botón (Alimentación)
Turns on/off the printer or switches the printer between two modes: standby and power saver. For more information, see
the User's Guide.
Met sous/hors tension l'imprimante ou la fait basculer entre deux modes : veille et économie d'énergie. Pour plus
d'informations, reportez-vous au Guide de l'utilisateur.
Accende/spegne la stampante oppure passa la stampante dalla modalità standby a quella di risparmio energetico e
viceversa. Per maggiori informazioni, vedere la Guida per l'utente.
Schaltet den Drucker ein/aus oder wechselt zwischen dem Standby-Modus und Energiesparmodus. Weitere Informationen
finden Sie in der Benutzerhandbuch.
Apaga/enciende la impresora o alterna la impresora entre dos modos: en espera y ahorro de energía. Para obtener más
información, consulte la Guia del usuario.
14 1213
10
11
Dell H625cdw / Dell H825cdw
14
13
10
11
Dell S2825cdn

25
12 (NFC) reader (Dell H625cdw / Dell H825cdw only)
Lecteur (NFC) (Dell H625cdw / Dell H825cdw uniquement)
(NFC) lettore (solo Dell H625cdw / Dell H825cdw)
(NFC) Lesegerät (nur Dell H625cdw / Dell H825cdw)
Lector (NFC) (solo Dell H625cdw / Dell H825cdw)
Starts communication between the printer and an NFC card or a mobile device with the NFC function when the card or the
device is tapped to or wave the reader.
Démarre la communication entre l'imprimante et la carte NFC ou un périphérique mobile doté de la fonction NFC lorsque
vous placez la carte ou le périphérique contre le lecteur ou passez la carte ou le périphérique devant le lecteur.
Avvia la comunicazione tra la stampante e una scheda NFC o un dispositivo portatile con la funzione NFC quando si tocca
o si passa sul lettore la scheda o il dispositivo.
Startet die Kommunikation zwischen dem Drucker und einer NFC-Karte oder einem Mobilgerät mit NFC-Funktion, wenn
die Karte oder das Gerät das Lesegerät berührt oder darüber gehalten wird.
Inicia la comunicación entre la impresora y una tarjeta NFC o un dispositivo móvil con la función NFC cuando se puntea o
se agita la tarjeta o el dispositivo en el lector.
13 / (Speed Dial 1/Speed Dial 2) button
Bouton / (Numérotation rapide 1/Numérotation rapide 2)
Pulsante / (Composizione rapida 1/Composizione rapida 2)
Taste / (Kurzwahl 1/Kurzwahl 2)
Botón / (Marcado rápido 1/Marcado rápido 2)
Dials the number registered as "001" or "002" respectively of the FAX Speed Dial. Effective only when the
Home
screen is
displayed.
Compose le numéro enregistré sous les numéros "001" et "002" respectifs de la Numérotation rapide FAX. Effectif
uniquement lorsque l'écran
Accueil
est affiché.
Compone il numero registrato come "001" o "002" rispettivamente della Composizione veloce FAX. È attivo soltanto
quando viene visualizzata la schermata
Home
.
Wählt die als "001" oder "002" registrierte Nummer der FAX-Kurzwahl. Diese Funktion ist nur effektiv, wenn der
Home
-
Bildschirm angezeigt wird.
Marca el número registrado como "001" o "002" respectivamente del Marcado rápido de FAX. Eficaz únicamente cuando se
visualiza la pantalla de
Inicio
.
14 (Delete) button
Bouton (Supprimer)
Pulsante (Elimina)
Taste (Löschen)
Botón (Eliminar)
Deletes numbers and characters.
Permet de supprimer des caractères et des numéros.
Consente di cancellare caratteri e numeri.
Löscht Ziffern und Zeichen.
Elimina números y caracteres.

26
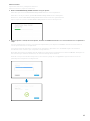
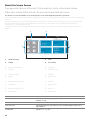
About the Home Screen
À propos de l'écran d'Accueil | Informazioni sulla schermata Home
Über den Home-Bildschirm | Acerca de la pantalla de inicio
The Home screen is the default screen of the printer. See the following table for basic operations.
L'écran d'Accueil est l'écran par défaut de l'imprimante. Reportez-vous au tableau suivant pour connaître les opérations
de base.
La schermata Home è la schermata predefinita della stampante. Vedere la tabella seguente per le operazioni di base.
Der Home-Bildschirm ist der Standardbildschirm des Druckers. Informationen zur grundlegenden Bedienung
entnehmen Sie der folgenden Tabelle.
La pantalla de inicio es la pantalla predeterminada de la impresora. Consulte la siguiente tabla para las operaciones
básicas.
1 Notification Bar 3 Tiles
2 Handle 4 Dock Menu
1 Barre de notification 3 Mosaïque
2 Poignée 4 Menu du Dock
1 Barra di notifica 3 Riquadri
2 Handle 4 Menu dock
1 Benachrichtigungsleiste 3 Kacheln
2 Ziehpunkt 4 Menü "Dock"
1 Barra de notificaciones 3 Mosaicos
2 Controlador 4 Menú Dock
To select a tile Tap the tile.
To scroll the screen Swipe the screen by dragging your finger on the screen. To scroll faster,
flick the screen.
To display the status of the printer Drag down the handle of the Notification Bar.
To move a tile Tap and hold the tile you want to move, and then drag the tile to the
desired place.
To add a tile Tap the Add App tile.
1 2
43
Home
Guest

27
To delete a tile Tap and hold the tile you want to delete until appears, and then
drag the tile to . Tap OK to delete the tile.
Sélectionner une mosaïque Tapez sur la mosaïque.
Faire défiler l'écran Faites défiler l'écran en faisant glisser le doigt sur l'écran. Pour accélérer
le défilement, donnez un petit coup à l'écran.
Afficher l'état de l'imprimante Faites glisser la poignée de la barre de notification vers le bas.
Pour déplacer une mosaïque Tapez et restez appuyé sur la mosaïque que vous souhaitez déplacer,
puis faites-la glisser vers l'emplacement désiré.
Pour ajouter une mosaïque Tapez sur la mosaïque Ajout App.
Supprimer une mosaïque Tapez et restez appuyé sur la mosaïque que vous souhaitez supprimer
jusqu'à ce que apparaisse, puis faites-la glisser vers . Tapez sur
OK pour effacer le pavé.
Per selezionare un riquadro Toccare il riquadro.
Per scorrere la schermata Scorrere lo schermo trascinandolo con un dito. Per scorrere più
rapidamente, toccare velocemente lo schermo.
Per visualizzare lo stato della stampante. Trascinare verso il basso l'handle della barra di notifica.
Per spostare un riquadro Toccare e tenere premuto il riquadro da spostare e trascinarlo nel punto
desiderato.
Per aggiungere un riquadro Toccare il riquadro Aggiungi app.
Per eliminare un riquadro Toccare il riquadro da eliminare per qualche secondo finché non appare
, quindi trascinarlo a . Toccare OK per eliminare il riquadro.
Zur Auswahl einer Kachel Tippen Sie auf die Kachel.
Zum Blättern im Bildschirm Blättern Sie die Seiten, indem Sie den Finger über den Bildschirm ziehen.
Um schneller zu blätter, wischen Sie schnell über den Bildschirm.
Zum Anzeigen des Druckerstatus Ziehen Sie den Ziehpunkt der Benachrichtigungsleiste nach unten.
Zum Verschieben einer Kachel Tippen Sie die Kachel, die Sie verschieben möchten, an und halten Sie sie
fest und ziehen Sie sie an die gewünschte Position.
Zum Hinzufügen einer Kachel Tippen Sie auf die Kachel App hinzufügen.
Zum Löschen einer Kachel Tippen Sie auf die Kachel, die Sie löschen möchten, und halten Sie sie
fest, bis angezeigt wird. Ziehen Sie die Kachel dann auf . Tippen
Sie auf OK, um die Kachel zu löschen.
Para seleccionar un mosaico Toque el mosaico.
Para desplazar la pantalla Arrastre el dedo por la pantalla para pasar la pantalla. Para desplazarse
más rápidamente, dé un toque rápido a la pantalla.
Para mostrar el estado de la impresora Arrastre hacia abajo el controlador de la barra de notificaciones.
Para mover un mosaico Mantenga tocado el mosaico que desee mover y, a continuación,
arrástrelo hasta el lugar que desee.
Para añadir un mosaico Toque el mosaico Agregar aplicación.
Para eliminar un mosaico Toque y mantenga pulsado el mosaico que desee eliminar hasta que
aparezca y después arrastre el mosaico a . Toque Aceptar para
eliminar el mosaico.

28
Dell Printer Hub (Dell H625cdw / Dell H825cdw only)
Dell Printer Hub (Dell H625cdw / Dell H825cdw uniquement)
Dell Printer Hub (solo Dell H625cdw / Dell H825cdw)
Dell Printer Hub (nur Dell H625cdw / Dell H825cdw)
Dell Printer Hub (solo Dell H625cdw / Dell H825cdw)
Manage your printer and imaging needs with ease. The Dell Printer Hub consolidates printer management and
monitoring tools, advanced scan features, cloud connectivity and more, into an easy-to-use console for a simplified
user experience and improved workflow.
With the Dell Printer Hub, you can easily access the Dell Document Hub for document sharing and storage in supported
cloud services.
For more information about using the Dell Printer Hub, see the FAQ on the Dell Printer Hub or visit Dell.com/printerhub.
Gérez facilement vos besoins en impression et numérisation. Dell Printer Hub consolide les outils de surveillance et de
gestion de l'imprimante, les fonctions de numérisation avancées, la connectivité en nuage et bien davantage, dans une
console facile d'emploi qui simplifie l'expérience utilisateur et améliore le flux de travail.
Avec Dell Printer Hub, vous pouvez accéder facilement aux services Dell Document Hub pour partager et stocker vos
documents sur le cloud.
Pour en savoir plus sur l'utilisation de Dell Printer Hub, consultez la FAQ de Dell Printer Hub ou consultez la page
Dell.com/printerhub.
Gestione semplificata di stampante e immagini. Il Dell Printer Hub consolida gli strumenti di gestione e monitoraggio
della stampante, le funzioni di scansione avanzate, la connettività cloud e altro ancora, in una console di facile utilizzo
per un'esperienza semplificata da parte dell'utente e un flusso di lavoro migliore.
Grazie a Dell Printer Hub, è possibile accedere facilmente a Dell Document Hub per la condivisione e l'archiviazione dei
documenti nei servizi cloud supportati.
Per ulteriori informazioni sull'uso di Dell Printer Hub, vedere le domande frequenti in Dell Printer Hub o visitare il sito
Dell.com/printerhub.
Verwalten Sie ganz einfach Ihren Drucker, und nutzen Sie die benutzerfreundlichen Bildverarbeitungsfunktionen. Das
Dell Printer Hub stellt Druckerverwaltungs- und Überprüfungstools, erweiterte Scanfunktionen, Cloud-Konnektivität
und vieles mehr in einer einfach zu bedienenden Konsole bereit. Dies ermöglicht eine vereinfachte Nutzung und bessere
Arbeitsabläufe.
Dell Printer Hub bietet Ihnen folgende Möglichkeiten rufen Sie ganz einfach Dell Document Hub auf, und teilen und
speichern Sie Dokumente bei unterstützten Cloud-Diensten.
Weitere Informationen zur Verwendung von Dell Printer Hub finden Sie in den FAQs zum Dell Printer Hub oder
besuchen Sie Dell.com/printerhub.
Administre su impresora y sus necesidades de imagen de una forma sencilla. Dell Printer Hub combina herramientas de
gestión y de supervisión de la impresora, características avanzadas de escaneado, conectividad a la nube y mucho más,
en una consola fácil de usar que proporciona al usuario una experiencia simplificada y un flujo de trabajo mejorado.
Con la aplicación Dell Printer Hub, se puede acceder fácilmente a Dell Document Hub para compartir y almacenar
documentos en servicios en la nube compatibles.
Para obtener más información acerca del uso de Dell Printer Hub, consulte las preguntas frecuentes en Dell Printer Hub
o bien visite Dell.com/printerhub.

29
Dell Printer Management Tool (Dell S2825cdn only)
Dell Printer Management Tool (Dell S2825cdn uniquement)
Dell Printer Management Tool (solo Dell S2825cdn)
Dell Printer Management Tool (nur Dell S2825cdn)
Dell Printer Management Tool (solo Dell S2825cdn)
Manage your printer and imaging needs with ease. The Dell Printer Management Tool consolidates printer management
and monitoring tools, into an easy-to-use console for a simplified user experience and improved workflow.
For more information about using the Dell Printer Management Tool, see the FAQ on the Dell Printer Management Tool.
Gérez facilement vos besoins en impression et numérisation. Dell Printer Management Tool consolide les outils de
surveillance et de gestion de l'imprimante dans une console facile d'emploi qui simplifie l'expérience utilisateur et
améliore le flux de travail.
Pour en savoir plus sur l'utilisation de Dell Printer Management Tool, consultez la FAQ de Dell Printer Management Tool.
Gestione semplificata di stampante e immagini. Dell Printer Management Tool consolida gli strumenti di gestione e
monitoraggio della stampante, in una console di facile utilizzo per un'esperienza dell'utente semplice e un flusso di
lavoro migliore.
Per ulteriori informazioni sull'uso di Dell Printer Management Tool, vedere le Domande frequenti su Dell Printer
Management Tool.
Verwalten Sie ganz einfach Ihren Drucker, und nutzen Sie die benutzerfreundlichen Bildverarbeitungsfunktionen. Das
Dell Printer Management Tool enthält Druckerverwaltungs- und Überwachungstools in einer benutzerfreundlichen
Konsole für ein einfaches Benutzererlebnis und einen verbesserten Workflow.
Weitere Informationen zur Verwendung des Dell Printer Management Tool finden Sie in den FAQ im Dell Printer
Management Tool.
Administre su impresora y sus necesidades de imagen de una forma sencilla. Dell Printer Management Tool consolida las
herramientas de administración y supervisión en una consola de fácil uso para simplificar la experiencia de uso y mejorar
el flujo de trabajo.
Para obtener más información sobre el uso de Dell Printer Management Tool, consulte las preguntas más frecuentes en
Dell Printer Management Tool.

30
Dell Document Hub (Dell H625cdw / Dell H825cdw only)
Dell Document Hub (Dell H625cdw / Dell H825cdw uniquement)
Dell Document Hub (solo Dell H625cdw / Dell H825cdw)
Dell Document Hub (nur Dell H625cdw / Dell H825cdw)
Dell Document Hub (solo Dell H625cdw / Dell H825cdw)
Easily access and share documents, images and digital content with the Dell Document Hub. This innovative cloud
collaboration solution connects your printer and devices to popular cloud services, providing a flexible and secure way
to collaborate from virtually anywhere.
For more information about using Dell Document Hub, see the FAQ on the Dell Document Hub or visit
Dell.com/documenthub.
Accédez aux documents, images et contenus numériques et partagez-les facilement avec Dell Document Hub. Cette
solution innovante de collaboration en nuage connecte votre imprimante et vos périphériques à des services en nuage
populaires, fournissant ainsi un moyen flexible et sécurisé de collaborer de pratiquement n'importe où.
Pour en savoir plus sur l'utilisation de Dell Document Hub, consultez la FAQ de Dell Document Hub ou consultez la page
Dell.com/documenthub.
Accedere e condividere i documenti con facilità, le immagini e il contenuto digitale con Dell Document Hub. Questa
innovativa soluzione di collaborazione cloud connette la stampante e i dispositivi ai noti servizi cloud, offrendo un modo
flessibile e sicuro per collaborare virtualmente da qualsiasi luogo.
Per ulteriori informazioni sull'uso di Dell Document Hub, vedere le domande frequenti in Dell Document Hub o visitare il
sito Dell.com/documenthub.
Greifen Sie mit Dell Document Hub einfach auf Dokumente, Bilder und digitale Inhalte zu und teilen Sie diese. Diese
innovative Cloud-Zusammenarbeitslösung verbindet Ihren Drucker und Ihre Geräte mit beliebten Cloud-Diensten und
bietet eine flexible und sichere Möglichkeit zur Zusammenarbeit und das von fast überall.
Weitere Informationen zur Verwendung von Dell Document Hub finden Sie in den FAQs zum Dell Document Hub oder
besuchen Sie Dell.com/documenthub.
Acceda a documentos, imágenes y contenido digital, y compártalos con facilidad, con Dell Document Hub. Este servicio
innovador de colaboración en la nube conecta su impresora y sus dispositivos a servicios en la nube populares, lo que
proporciona una forma segura y flexible de colaborar desde prácticamente cualquier lugar.
Para obtener más información acerca del uso de Dell Document Hub, consulte las preguntas frecuentes en
Dell Document Hub o bien visite Dell.com/documenthub.
La pagina sta caricando ...

32
Problema Operazioni da effettuare
Impossibile impostare la connessione
wireless.
Assicurarsi che il cavo Ethernet sia scollegato dalla stampante.
Assicurarsi che Wi-Fi sia attivato. Per maggiori informazioni, vedere la Guida per
l'utente.
Il firewall del computer potrebbe bloccare la comunicazione con la stampante.
Disabilitare il firewall del computer.
Assicurarsi che la rete wireless locale sia supportata su 802.11b/g/n a 2,4 GHz.
Impossibile impostare la connessione
wireless utilizzando WPS (Wi-Fi
Protected Setup).
Verificare che l'impostazione di protezione del punto di accesso LAN o del router
sia WPA o WPA2. WEP non è supportato da WPS.
Impossibile impostare la connessione
wireless utilizzando WPS-PBC (Wi-Fi
Protected Setup-Push Button
Configuration).
Premere il pulsante WPS sul punto di accesso LAN wireless o sul router entro due
minuti dall'avvio dell'operazione WPS sulla stampante. Per ulteriori informazioni
sul punto di accesso LAN wireless o sul router, consultare la documentazione
fornita con il punto di accesso LAN wireless o con il router.
Impossibile impostare la connessione
wireless utilizzando WPS-PIN (Wi-Fi
Protected Setup-Personal
Identification Number).
Verificare che il PIN inserito nel computer sia corretto.
Problem Maßnahme
Die Wireless-Verbindung kann nicht
eingerichtet werden.
Stellen Sie sicher, dass das Ethernet-Kabel vom Drucker getrennt ist.
Stellen Sie sicher, dass Wi-Fi auf Ein gesetzt ist. Weitere Informationen finden Sie
in der Benutzerhandbuch.
Die Firewall des Computers blockiert möglicherweise die Kommunikation mit
dem Drucker. Deaktivieren Sie die Firewall des Computers.
Stellen Sie sicher, dass Ihr lokales Netzwerk 802.11b/g/n bei 2,4 GHz verwendet.
Die Wireless-Verbindung kann nicht
mit WPS (Wi-Fi Protected Setup)
eingerichtet werden.
Stellen Sie sicher, dass die Sicherheitseinstellung des WLAN-Access Points oder
Routers auf WPA oder WPA2 eingestellt ist. WEP wird bei WPS nicht unterstützt.
Die Wireless-Verbindung kann nicht
mit WPS-PBC (Wi-Fi Protected Setup-
Push Button Configuration)
eingerichtet werden.
Drücken Sie die WPS-Taste am WLAN-Access Point oder Router innerhalb von
zwei Minuten, nachdem Sie den WPS-Vorgang beim Drucker gestartet haben.
Ausführliche Informationen zum WLAN-Access Point oder Router finden Sie in
der Bedienungsanleitung im Lieferumfang des WLAN-Access Points oder
Routers.
Die Wireless-Verbindung kann nicht
mit WPS-PIN (Wi-Fi Protected Setup-
Personal Identification Number)
eingerichtet werden.
Überprüfen Sie, ob die beim Computer eingegebene PIN korrekt ist.
La pagina sta caricando ...
La pagina sta caricando ...
La pagina sta caricando ...
La pagina sta caricando ...
La pagina sta caricando ...
La pagina sta caricando ...
La pagina sta caricando ...
La pagina sta caricando ...
-
 1
1
-
 2
2
-
 3
3
-
 4
4
-
 5
5
-
 6
6
-
 7
7
-
 8
8
-
 9
9
-
 10
10
-
 11
11
-
 12
12
-
 13
13
-
 14
14
-
 15
15
-
 16
16
-
 17
17
-
 18
18
-
 19
19
-
 20
20
-
 21
21
-
 22
22
-
 23
23
-
 24
24
-
 25
25
-
 26
26
-
 27
27
-
 28
28
-
 29
29
-
 30
30
-
 31
31
-
 32
32
-
 33
33
-
 34
34
-
 35
35
-
 36
36
-
 37
37
-
 38
38
-
 39
39
-
 40
40


Dell H825cdw Cloud MFP Laser Printer Guida Rapida
- Categoria
- Stampanti laser / LED
- Tipo
- Guida Rapida
in altre lingue
Documenti correlati
-
Dell S2815dn Smart MFP printer Guida Rapida
-
Dell H815dw Cloud MFP Printer Guida Rapida
-
-
-
Dell S2825cdn Smart MFP Laser Printer Guida utente
-
-