
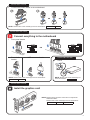
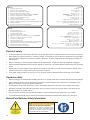
The items labeled below correspond to the installation steps, for steps
and more information on the steps, please refer to the rest
of the guide.
More info
H610M-F D4 R2.0
CPU_12V
PCIEX16(G4)
PCIEX1(G3)
SPEAKER
128Mb
BIOS
CLRTC
F_PANEL
USB_78COM_DEBUG
U5G_12
F_AUDIO
ATX_PWR
CPU_FAN
BATTERY
CHA_FAN
Super
I/O
DDR4 DIMM_A (64bit, 288-pin module)
2280 2260 2242
DDR4 DIMM_B (64bit, 288-pin module)
AUDIO
LAN_USB_56
U5G_34
USB_914
HDMI
SATA6G_1 SATA6G_2
Intel®
H610
M.2(SOCKET3)
M.2(SOCKET3)
DIGI+
VRM
LGA1700
Ethernet
PCIE SATA
3.0 X4 X
Audio
Codec
USB 5Gbps
USB 2.0
Chassis Fan
Front Panel
Front Audio

2
Install key components
Prepare the components
• Install the CPU
NOTE: The components listed above are recommendations, please prepare components according to your needs.
NOTE: Do not remove the PnP cap before the CPU is properly installed.
Chassis
CPU Memory M.2 SSD
SATA device
Power supply unit Graphics card
CPU Cooler
• Install the Memory
DIMM_A
DIMM_B
DIMM_B DIMM_A
Thermal paste
OROR
NOTE: Please refer to the manual(s) for more information:
Please refer to the manual(s) for more information: Motherboard
Motherboard
CPU installation
Q22812 / First Edition / November 2023

3
Install the cooling system
• Air Cooler
• AIO Cooler
AIO_PUMP / W_PUMP
(connect to pump)
CPU_FAN / CPU_OPT
(connect to radiator)
CPU_FAN / CPU_OPT
OR
NOTE: Please refer to these manual(s) for more information: Cooler Chassis
• Install the M.2 SSD
Remove
Install the bundled
rubber for M.2 when
installing a single
sided M.2 module.
OPTIONAL
NOTE: Please refer to the manual(s) for more information: Motherboard
Remember to rotate the M.2 Q-latch, secure the
screw properly, or insert the pin of the M.2 Anchor
into the hole.

4
Connect cables from Chassis
Install the motherboard into the chassis
For non pre-mounted I/O
shield models only.
Connect to chassis fan headers
Install and connect the power supply unit (PSU)
Make sure the PSU is secured to
the chassis using screws, and that
the chassis has proper airflow.
NOTE: Please refer to the manual(s) for more information:
NOTE: Please refer to the manual(s) for more information: Motherboard Chassis Fan
Chassis PSU
Motherboard Chassis
NOTE: Please refer to the manual(s) for more information:
Chassis fan

5
NOTE: Please note that power connection is required for
selected models.
Connect everything to the motherboard
• Connect the power cables to the motherboard
OROR
Power Power
PLED
HDD_LED
PWRSW
RESET
PIN 1
PLED
PLED
SPEAKER
CHASSIS
HDD_LED
PWRSW
RESET
PIN 1
• Front panel header
• SATA
• USB connector/header
OR
Install the graphics card
Connect cables from PSU
Connect cables from PSU
NOTE: Please refer to the manual(s) for more information: NOTE: Please refer to the manual(s) for
more information:
Please refer to the manual(s) for more information:
Motherboard Chassis Graphics Card
Motherboard
Motherboard Chassis
Motherboard PSU
NOTE: Please refer to the manual(s) for more information:
Connect cables from Chassis
Connect cables from PSU
• Front Audio
header

6
Connect peripherals (monitor, keyboard, mouse, etc.)
Connect to the Internet via Ethernet
Turn on the PSU and your PC
NOTE: Please check the Q-LEDs or Q-LED core on selected motherboards when powering on your PC for system
status. If an error occurs, check if your CPU Fan header is properly connected; you can also scan the code
or refer to the manual(s) for more information:
Motherboard
NOTE: Please refer to the manual(s) for more information:
FAQ
Motherboard

7
Install the operating
system and drivers
Driver and Utilities installation
1. Préparez les composants
2. Installez les composants essentiels
3. Installez le système de refroidissement
4. Installez la carte mère dans le châssis
5. Branchez le ventilateur du châssis et les connecteurs ARGB/RGB
6. Installez et connectez le bloc d'alimentation
7. Connectez tous les éléments à la carte mère
8. Installez la carte graphique
9. Connectez-vous à Internet via Ethernet / antenne Wi-Fi
10. Connectez les périphériques (écran, clavier, souris, etc.)
11. Allumez le bloc d'alimentation et votre ordinateur
12. Installez le système d'exploitation et les pilotes
Étapes :
1. Bereiten Sie die Komponenten vor
2. Installieren Sie die Schlüsselkomponenten
3. Installieren Sie das Kühlsystem
4. Installieren Sie das Motherboard im Gehäuse
5. Stellen Sie eine Verbindung mit dem Gehäuselüfter und den
ARGB/RGB-Headern her
6. Installieren Sie das Netzteil (PSU) und schließen Sie es an
7. Verbinden Sie alle Kabel mit dem Motherboard
8. Installieren Sie die Grafikkarte
9. Stellen Sie über Ethernet/WLAN-Antenne eine Verbindung mit
dem Internet her
10.
Schließen Sie Peripheriegeräte an (Monitor, Tastatur, Maus, etc.)
11. Schalten Sie das Netzteil und Ihren PC ein
12. Installieren Sie das Betriebssystem und die Treiber
Schritte:
1. Pripremite komponente
2. Ugradite komponente
3. Ugradite sustav za hlađenje
4. Ugradite matičnu ploču u kućište
5. Spojite na ventilator kućišta in a konektore ARGB/RGB
6. Ugradite i spojite jedinicu za električno napajanje (PSU)
7. Spojite sve na matičnu ploču
8. Ugradite matičnu ploču
9. Spojite se na internet preko Ehterneta7Wi-Fi antene
10. Spojite vanjske uređaje (monitor, tipkovnica itd.)
11. Uključite PSU i računalo
12. Ugradite operacijski sustav i upravljačke programe
Koraci:
1. Bereid de onderdelen voor
2. Installeer belangrijke onderdelen
3. Installeer het koelsysteem
4. Installeer het moederbord in de behuizing
5. Sluit aan op de behuizingsventilator en de ARGB/RGB-koppen
6. Installeer en sluit de voeding (PSU) aan
7. Sluit alles aan op het moederbord
8. Installeer de grafische kaart
9. Maak verbinding met internet via ethernet/wifi-antenne
10. Sluit randapparatuur aan (monitor, toetsenbord, muis enz.)
11. Schakel de voeding en uw pc in
12. Installeer het besturingssysteem en stuurprogramma’s
Stappen:
1. Подгответе компонентите
2. Инсталирайте ключови компоненти
3. Инсталирайте охлаждащата система
4. Install the motherboard into the chassis
5. Инсталирайте дънната платка в корпуса
6. Монтирате и свържете захранващия блок (PSU)
7. Свържете всичко към дънната платка
8. Свържете всичко към дънната платка
9. Свържете към Интернет чрез Ethernet/Wi-Fi антена
10. Свържете периферни устройства (монитор, клавиатура, мишка
и др.)
11. Включете PSU и Вашия компютър
12. Инсталирайте операционната система и драйверите
Стъпки:
1. Připravte komponenty
2. Nainstalujte klíčové komponenty
3. Nainstalujte systém chlazení
4. Nainstalujte základní desku do skříně
5. Připojte ventilátor skříně a konektory ARGB/RGB
6. Nainstalujte a připojte zdroj napájení (PSU)
7. Připojte vše k základní desce
8. Nainstalujte grafickou kartu
9. Připojte se k internetu před ethernetovou/Wi-Fi anténu
10. Připojte periférie (monitor, klávesnici, myš atd.)
11. Zapněte PSU a váš počítač
12. Nainstalujte operační systém a ovladače
Kroky:
1. Valmistage komponendid ette
2. Installige põhikomponendid
3. Paigaldage jahutussüsteem
4. Paigaldage emaplaat šassiile
5. Ühendage šassiiventilaatori ja ARGB/RGB päistega
6. Paigaldage ja ühendage toiteallikas (PSU)
7. Ühendage kõik emaplaadiga
8. Paigaldage graafikakaart
9. Interneti-ühenduse loomine Etherneti/Wi-Fi antenni kaudu
10. Ühendage välisseadmed (monitor, klaviatuur, hiir jne)
11. Lülitage PSU ja arvuti sisse
12. Installige operatsioonisüsteem ja draiverid
Sammud:
1. Valmistele osat
2. Asenna tärkeimmät osat
3. Asenna jäähdytysjärjestelmä
4. Asenna emolevy runkoon
5. Liitä runkoon tuuletin ja ARGB/RGB-kokoojat
6. Asenna ja liitä power supply unit (PSU)
7. Liitä kaikki emolevyyn
8. Asenna näytönohjain
9. Muodosta internet-yhteys Ethernet/Wi-Fi-antennilla
10. Liitä oheislaitteet (monitori, näppäimistö, hiiri jne.)
11. Kytke PSU ja PC-tietokone päälle
12. Asenna käyttöjärjestelmä ja ohjaimet
Vaiheet:
1. Forbered delene
2. Installer nøglekomponenterne
3. Installer kølesystemet
4. Installer bundkortet i kabinettet
5. Tilslut kabinettets ventilator og ARGB/RGB-header-stikkene
6. Installer og tilslut strømforsyningsenheden (PSU)
7. Tilslut det hele til bundkortet
8. Installer grafikkortet
9. Opret forbindelse til internettet via Ethernet/Wi-Fi-antenne
10. Tilslut eksterne enheder (skærm, tastatur, mus osv.)
11. Tænd PSU-enheden og din pc
12. Installer operativsystemet og driverne
Trin:

8
1. Siapkan komponen
2. Pasang komponen inti
3. Pasang sistem pendingin
4. Pasang motherboard ke dalam sasis
5. Sambungkan kipas sasis dan header ARGB/RGB
6. Pasang dan sambungkan unit catu daya (PSU)
7. Sambungkan semuanya ke motherboard
8. Pasang kartu grafis
9. Sambungkan ke Internet melalui antena Ethernet/Wi-Fi
10. Sambungkan periferal (monitor, keyboard, mouse, dll.)
11. Hidupkan PSU dan PC Anda
12. Instal sistem operasi dan driver
Langkah-langkah:
1. Paruoškite komponentus
2. Sumontuokite pagrindinius komponentus
3. Sumontuokite aušinimo sistemą
4. Įmontuokite į bloką pagrindinę plokštę
5. Prijunkite prie bloko ventiliatoriaus ir ARGB / RGB jungčių
6. Sumontuokite ir prijunkite maitinimo bloką (PSU)
7. Viską prijunkite prie pagrindinės plokštės
8. Sumontuokite vaizdo plokštę
9. Prisijunkite prie interneto, naudodami eterneto / „Wi-Fi“ anteną
10. Prijunkite išorinius įrenginius (monitorių, klaviatūrą, pelę ir kt.)
11. Įjunkite PSU ir kompiuterį
12. Įdiekite operacinę sistemą ir tvarkykles
Veiksmai:
1. Sagatavojiet elementus
2. Uzstādiet elementus
3. Uzstādiet dzesēšanas sistēmu
4. Iebūvējiet mātesplati šasijā
5. Savienojiet ar šasijas ventilatoru un ARGB/RGB sadalītājiem
6. Uzstādiet un pievienojiet barošanas bloku (PSU)
7. Savienojiet visu ar mātesplati
8. Instalējiet grafisko karti
9. Izveidojiet savienojumu ar internetu, izmantojot Ethernet/Wi-Fi
antenu
10. Pievienojiet perifērijas ierīces (monitoru, tastatūru, peli utt.)
11. Ieslēdziet barošanas bloku (PSU) un datoru
12. Instalējiet operētājsistēmu un draiverus
Darbības:
1. Προετοιμάστε τα εξαρτήματα
2. Εγκαταστήστε τα βασικά εξαρτήματα
3. Εγκαταστήστε το σύστημα ψύξης
4. Εγκαταστήστε τη μητρική πλακέτα στο πλαίσιο
5. Συνδέστε με τον ανεμιστήρα τους πλαισίου και τις φίσες ARGB/RGB
6. Εγκαταστήστε και συνδέστε τη μονάδα τροφοδοσίας (PSU)
7. Συνδέστε τα πάντα στη μητρική πλακέτα
8. Εγκαταστήστε την κάρτα γραφικών
9. Συνδεθείτε στο διαδίκτυο μέσω Ethernet/Κεραίας Wi-Fi
10. Συνδέστε τα περιφερειακά (οθόνη, πληκτρολόγιο, ποντίκι κ.λπ.)
11. Ενεργοποιήστε την PSU και τον υπολογιστή σας
12. Εγκαταστήστε το λειτουργικό σύστημα και τα προγράμματα
οδήγησης
Βήματα:
1. Készítse elő a részegységeket
2. Szerelje be a kulcsfontosságú részegységeket
3. Szerelje be a hűtőrendszert
4. Szerelje be az alaplapot a házba
5. Csatlakoztassa a ház ventilátorához és az ARGB/RGB-csatlakozókhoz
6. Szerelje be és csatlakoztassa a tápegységet (PSU)
7. Csatlakoztasson mindent az alaplaphoz
8. Szerelje be a videokártyát
9. Csatlakozzon az internethez Ethernet/Wi-Fi-antennán keresztül.
10. Csatlakoztassa a perifériákat (monitor, billentyűzet, egér stb.)
11. Kapcsolja be a tápegységet és a számítógépet
12. Telepítse az operációs rendszert és az illesztőprogramokat
Lépések:
1. 구성요소를준비합니다
2. 주요구성요소를설치합니다
3. 냉각시스템을설치합니다
4. 메인보드를섀시에설치합니다
5. 섀시팬과ARGB/RGB헤더에연결합니다
6. 전원공급장치(PSU)를설치하고연결합니다
7. 모든것을메인보드에연결합니다
8. 그래픽카드를설치합니다
9. 이더넷/Wi-Fi안테나를통해인터넷에연결합니다anténu
10. 주변장치(모니터,키보드,마우스등)를연결합니다
11. PSU와PC를켭니다
12. 운영체제와드라이버를설치합니다
단계:
5.
10.
1. Gjør klar delene
2. Installer hoveddeler
3. Installer kjølesystemet
4. Installer hovedkortet i kabinettet
5. Koble til kabinettviften og ARGB-/RGB-hoder
6. Installer og koble til strømforsyningsenheten (PSU)
7. Koble alt til hovedkortet
8. Installer grafikkortet
9. Koble til Internett via Ethernet/Wi-Fi-antenne
10. Koble til utstyr (skjerm, tastatur, mus osv.)
11. Slå på strømforsyningen og PC-en
12. Installer operativsystem og drivere
Trinn:
1. Prepare os componentes
2. Instale os componentes principais
3. Instale o sistema de refrigeração
4. Instale a placa principal no chassis
5. Ligue ao ventilador do chassis e aos conectores ARGB/RGB
6. Instale e ligue a fonte de alimentação (PSU)
7. Ligue tudo à placa principal
8. Instale a placa gráfica
9. Ligue à Internet através de antena Ethernet/Wi-Fi
10. Ligue os periféricos (monitor, teclado, rato, etc.)
11. Ligue a PSU e o seu PC
12. Instale o sistema operativo e os controladores
Passos:
1. Preparare i componenti
2. Installare i componenti principali
3. Installare il sistema di raffreddamento
4. Installare la scheda madre nello chassis
5. Collegare alla ventola dello chassis e ai connettori ARGB/RGB
6. Installare e collegare l’alimentatore (PSU)
7. Collegare tutto alla scheda madre
8. Installare la scheda grafica
9. Connettersi a Internet tramite antenna Ethernet/Wi-Fi
10. Collegare le periferiche (monitor, tastiera, mouse, ecc.)
11. Accendere la PSU e il PC
12. Installare il sistema operativo e i driver
Fasi:

9
1. Przygotuj podzespoły
2. Zainstaluj główne podzespoły
3. Zainstaluj układ chłodzenia
4. Zainstaluj płytę główną w obudowie
5. Podłącz do wentylatora i złączy header ARGB/RGB w obudowie
6. Zainstaluj i podłącz zasilacz (PSU)
7. Podłącz wszystko do płyty głównej
8. Zainstaluj kartę graficzną
9. Nawiąż połączenie z Internetem za pomocą anteny Ethernet/Wi-Fi
10. Podłącz urządzenia peryferyjne (monitor, klawiatura, mysz itp.)
11. Włącz zasilacz i komputer
12. Zainstaluj system operacyjny i sterowniki
Kroki:
1. Pregătiți componentele
2. Instalarea componentelor cheie
3. Instalarea sistemului de răcire
4. Instalați placa de bază în carcasă
5. Conectați ventilatorul carcasei și capetele ARGB/RGB
6. Instalați și conectați unitatea de alimentare (PSU)
7. Conectați toate elementele la placa de bază
8. Instalați placa grafică
9. Conectați-vă la internet prin intermediul antenei Ethernet/Wi-Fi
10. Conectați perifericele (monitor, tastatură, mouse etc.)
11. Porniți PSU și PC-ul dvs.
12. Instalați sistemul de operare și driverele
Pași:
1. Pripraviť všetky súčasti
2. Nainštalovať hlavné súčasti
3. Nainštalovať chladiaci systém
4. Nainštalovať základnú dosku na rám
5. Pripojiť ventilátor na rám a hlavičku ARGB/RGB
6. Nainštalovať a pripojiť napájací zdroj (PSU)
7. Všetko zapojiť do základnej dosky
8. Nainštalovať grafickú kartu
9. Pripojiť k internetu prostredníctvom antény Ethernet/Wi-Fi
10. Pripojiť periférne zariadenia (monitor, klávesnica, myš, atď.)
11. Zapnúť PSU a počítač
12. Nainštalovať operačný systém a ovládače
Kroky:
1. Bileşenleri hazırlayın
2. Temel bileşenleri kurun
3. Soğutma sistemini kurun
4. Anakartı kasaya takın
5. Kasa fanına ve ARGB/RGB başlıklarına bağlayın
6. Güç kaynağı ünitesini (PSU) takın ve bağlayın
7. Her şeyi ana karta bağlayın
8. Grafik kartını takın
9. Ethernet/Wi-Fi anteni ile internete bağlanın
10. Çevre birimlerini bağlayın (monitör, klavye, fare vb.)
11. PSU'yu ve bilgisayarınızı açın
12. İşletim sistemini ve sürücüleri kurun
Adımlar:
1. Pripremite komponente
2. Instalirajte ključne komponente
3. Instalirajte sistem za hlađenje
4. Instalirajte matičnu ploču u kućište
5. Povežite za ventilator kućišta i ARGB/RGB zaglavlja
6. Instalirajte i povežite jedinicu za napajanje (PSU)
7. Povežite sve za matičnu ploču
8. Instalirajte grafičku karticu
9. Povežite se na internet preko Ethernet/Wi-Fi antene
10. Povežite periferne uređaje (monitor, tastaturu, miša, itd.)
11. Uključite PSU i svoj PC
12. Instalirajte operativni sistem i drajveree
Koraci:
1. Preparar los componentes
2. Instalar componentes clave
3. Instalar el sistema de refrigeración
4. Instalar la placa base en el chasis
5. Conectarse al ventilador del chasis y a las bases de conexiones
ARGB/RGB
6. I
nstalar la unidad de fuente de alimentación (PSU) y conectarse a ella
7. Conectar todo a la placa base
8. Instalar la tarjeta gráfica
9. Conectarse a Internet a través de una antena Ethernet/Wi-Fi
10. Conectar los periféricos (monitor, teclado, ratón, etc.)
11. Encienda la fuente de alimentación y su PC
12. Instalar el sistema operativo y los controladores
Pasos:
1. เตรียมส่วนประกอบ
2. ติดตั้งส่วนประกอบหลัก
3. ติดตั้งระบบทำ�คว�มเย็น
4. ติดตั้งเมนบอร์ดเข้�กับโครงเครื่อง
5. เชื่อมต่อกับพัดลมโครงเครื่องและส่วนหัวARGB/RGB
6. ติดตั้งและเชื่อมต่อชุดจ่�ยไฟ(PSU)
7. เชื่อมต่อทุกอย่�งเข้�กับเมนบอร์ด
8. ติดตั้งกร�ฟิกก�ร์ด
9. เชื่อมต่ออินเทอร์เน็ตผ่�นเส�อ�ก�ศEthernet/Wi-Fi
10. เชื่อมต่ออุปกรณ์ต่อพ่วง(หน้�จอแป้นพิมพ์เม�ส์ฯลฯ)
11. เปิดPSUและPCของคุณ
12. ติดตั้งระบบปฏิบัติก�รและไดรเวอร์์
ขั้นตอน:
1. Подготовка компонентов
2. Установка ключевых компонентов
3. Установка системы охлаждения
4. Установка материнской платы в корпус
5. Подключение корпусного вентилятора и разъемов ARGB/RGB
6. Установка и подключение блока питания (БП)
7. Подключение кабелей к материнской плате
8. Установка видеокарты
9. Подключение кабеля Ethernet/антенны Wi-Fi
10. Подключение периферийных устройств (монитор, клавиатура,
мышь и т. п.)
11. Включение тумблера на блоке питания и компьютера
12. Установка операционной системы и драйверов
Инструкции:
1. Förbered komponenterna.
2. Installera viktiga komponenter
3. Installera kylsysemet
4. Installera moderkortet i chassiet
5. Anslut till chassifläkten och ARGB/RGB-huvuden
6. Installera och anslut strömförsörjningsenheten (PSU)
7. Anslut allt till moderkortet
8. Installera grafikkortet
9. Anslut till Internet via Ethernet/Wi-Fi-antennen
10. Anslut kringutrustningen (bildskärm, tangentbord, mus osv.)
11. Starta PSU-enheten och datorn
12. Installera operativsystemet och drivrutinerna
Steg:
1. Chuẩn bị các linh kiện
2. Lắp đặt các linh kiện chính
3. Lắp đặt hệ thống làm mát
4. Lắp đặt bo mạch chủ vào thùng máy
5. Kết nối với quạt thùng máy và đầu cắm ARGB/RGB
6. Lắp đặt và kết nối bộ nguồn (PSU)
7. Kết nối mọi thứ với bo mạch chủ
8. Lắp đặt card đồ họa
9. Kết nối internet qua ăng-ten Ethernet/Wi-Fi
10. Kết nối các thiết bị ngoại vi (màn hình, bàn phím, chuột, v.v…)
11. Bật PSU và máy tính
12. Cài đặt hệ điều hành và các driver
Các bước:

10
1. Pripravite komponente
2. Namestite ključne komponente
3. Namestite hladilni sistem
4. Namestite matično ploščo v ohišje
5. Vzpostavite povezavo z ventilatorjem ohišja in vodili ARGB/RGB
6. Namestite in priklopite napajalno enoto (PSU)
7. Povežite vse z matično ploščo
8. Namestite grafično kartico
9. Vzpostavite povezavo z internetom prek antene za ethernet/Wi-Fi
10. Priklopite zunanje naprave (monitor, tipkovnico, miško itd.)
11. Vklopite napajalnik PSU in računalnik
12. Namestite operacijski sistem in gonilnike
Koraki:
1. Підготуйте компоненти
2. Встановіть ключові компоненти
3. Встановіть охолоджувальну систему
4. Встановіть материнську плату в корпус
5. Підключіть до корпусу вентилятор і з’єднувачі ARGB/RGB
6. Встановіть і підключіть блок живлення (БЖ)
7. Підключіть все до материнської плати
8. Встановіть графічну карту
9. Підключіться до Інтернету по антені Ethernet/Wi-Fi
10.
Підключіть периферійні пристрої (монітор, клавіатура, миша тощо)
11. ZУвімкніть БЖ і ПК
12. Встановіть операційну систему і драйвери
Кроки:
1
2
3
4
5
6
7
8
9
10
11
12
1
2
3
4
5
6
7
8
9
10
.11
12
Electrical safety
• To prevent electrical shock hazard, disconnect the power cable from the electrical outlet before relocating the system.
• When adding or removing devices to or from the system, ensure that the power cables for the devices are unplugged
before the signal cables are connected. If possible, disconnect all power cables from the existing system before you
add a device.
• Before connecting or removing signal cables from the motherboard, ensure that all power cables are unplugged.
• Seek professional assistance before using an adapter or extension cord. These devices could interrupt the grounding
circuit.
• Ensure that your power supply is set to the correct voltage in your area. If you are not sure about the voltage of the
electrical outlet you are using, contact your local power company.
• If the power supply is broken, do not try to fix it by yourself. Contact a qualified service technician or your retailer.
Operation safety
• Before installing the motherboard and adding devices on it, carefully read all the manuals that came with the package.
• Before using the product, ensure all cables are correctly connected and the power cables are not damaged. If you
detect any damage, contact your dealer immediately.
• To avoid short circuits, keep paper clips, screws, and staples away from connectors, slots, sockets and circuitry.
• Avoid dust, humidity, and temperature extremes. Do not place the product in any area where it may become wet.
• Place the product on a stable surface.
• If you encounter technical problems with the product, contact a qualified service technician or your retailer.
• Your motherboard should only be used in environments with ambient temperatures between 10°C and 35°C.
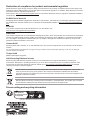
Button/Coin Batteries Safety Information
WARNING
KEEP OUT OF REACH OF CHILDREN
Swallowing can lead to chemical burns,
perforation of soft tissue, and death. Severe
burns can occur within 2 hours of ingestion.
Seek medical attention immediately.

11
General Notices
FCC Compliance Information
Responsible Party: Asus Computer International
Address: 48720 Kato Rd., Fremont, CA 94538, USA
Phone / Fax No: (510)739-3777 / (510)608-4555
This device complies with part 15 of the FCC Rules. Operation is subject to the following two conditions: (1) This device
may not cause harmful interference, and (2) this device must accept any interference received, including interference that
may cause undesired operation.
This equipment has been tested and found to comply with the limits for a Class B digital device, pursuant to part 15 of
the FCC Rules. These limits are designed to provide reasonable protection against harmful interference in a residential
installation. This equipment generates, uses and can radiate radio frequency energy and, if not installed and used
in accordance with the instructions, may cause harmful interference to radio communications. However, there is no
guarantee that interference will not occur in a particular installation. If this equipment does cause harmful interference to
radio or television reception, which can be determined by turning the equipment off and on, the user is encouraged to try
to correct the interference by one or more of the following measures:
- Reorient or relocate the receiving antenna.
- Increase the separation between the equipment and receiver.
- Connect the equipment into an outlet on a circuit different from that to which the receiver is connected.
- Consult the dealer or an experienced radio/TV technician for help.
HDMI Trademark Notice
The terms HDMI, HDMI High-Definition Multimedia Interface, HDMI Trade dress, and the HDMI Logo are trademarks or
registered trademarks of HDMI Licensing Administrator, Inc.
Safety Precautions
Accessories that came with this product have been designed and verified for the use in connection with this product.
Never use accessories for other products to prevent the risk of electric shock or fire.
安全上のご注意
付属品は当該専用品です。他の機器には使用しないでください。機器の破損もしくは、火災や感電の原因となることがあります。
VCCI: Japan Compliance Statement
Class B ITE
Japan JATE
本製品は電気通信事業者(移動通信会社、固定通信会社、インターネットプロバイダ等)の通信回線(公衆無線LANを含む)に直
接接続することができません。本製品をインターネットに接続する場合は、必ずルーター等を経由し接続してください。

12
Declaration of compliance for product environmental regulation
ASUS follows the green design concept to design and manufacture our products, and makes sure that each stage of the
product life cycle of ASUS product is in line with global environmental regulations. In addition, ASUS disclose the relevant
information based on regulation requirements.
Please refer to http://csr.asus.com/Compliance.htm for information disclosure based on regulation requirements ASUS is
complied with:
EU REACH and Article 33
Complying with the REACH (Registration, Evaluation, Authorisation, and Restriction of Chemicals) regulatory framework,
we published the chemical substances in our products at ASUS REACH website at http://csr.asus.com/english/REACH.
htm.
EU RoHS
This product complies with the EU RoHS Directive. For more details, see
http://csr.asus.com/english/article.aspx?id=35
India RoHS
This product complies with the “India E-Waste (Management) Rules, 2016” and prohibits use of lead, mercury, hexavalent
chromium, polybrominated biphenyls (PBBs) and polybrominated diphenyl ethers (PBDEs) in concentrations exceeding
0.1% by weight in homogenous materials and 0.01% by weight in homogenous materials for cadmium, except for the
exemptions listed in Schedule II of the Rule.
Vietnam RoHS
ASUS products sold in Vietnam, on or after September 23, 2011,meet the requirements of the Vietnam Circular 30/2011/
TT-BCT.
Các sản phẩm ASUS bán tại Việt Nam, vào ngày 23 tháng 9 năm2011 trở về sau, đều phải đáp ứng các yêu cầu của Thông tư
30/2011/TT-BCT của Việt Nam.
Türkiye RoHS
AEEE Yönetmeliğine Uygundur
ASUS Recycling/Takeback Services
ASUS recycling and takeback programs come from our commitment to the highest standards for protecting our
environment. We believe in providing solutions for you to be able to responsibly recycle our products, batteries, other
components as well as the packaging materials. Please go to http://csr.asus.com/english/Takeback.htm for detailed
recycling information in different regions.
DO NOT throw the motherboard in municipal waste. This product has been designed to enable proper
reuse of parts and recycling. This symbol of the crossed out wheeled bin indicates that the product
(electrical and electronic equipment) should not be placed in municipal waste. Check local regulations for
disposal of electronic products.
DO NOT throw the mercury-containing button cell battery in municipal waste. This symbol of the crossed
out wheeled bin indicates that the battery should not be placed in municipal waste.
France sorting and recycling information
Points de collecte sur www.quefairedemesdechets.fr
Privilégiez la répara�on ou le don de votre appareil !
À DÉPOSER
EN MAGASIN À DÉPOSER
EN DÉCHÈTERIE
OU
FR
Cet appareil
et ses accessoires
se recyclent

13
Compliance Statement of Innovation, Science and Economic Development
Canada (ISED)
This device complies with Innovation, Science and Economic Development Canada licence exempt RSS standard(s).
Operation is subject to the following two conditions: (1) this device may not cause interference, and (2) this device must
accept any interference, including interference that may cause undesired operation of the device.
CAN ICES-003(B)/NMB-003(B)
KC: Korea Warning Statement
English ASUSTeK Computer Inc. hereby declares that this device is in compliance with
the essential requirements and other relevant provisions of related Directives. Full text
of EU declaration of conformity is available at: www.asus.com/support
Français AsusTek Computer Inc. déclare par la présente que cet appareil est conforme
aux critères essentiels et autres clauses pertinentes des directives concernées. La
déclaration de conformité de l’UE peut être téléchargée à partir du site Internet suivant :
www.asus.com/support
Deutsch ASUSTeK Computer Inc. erklärt hiermit, dass dieses Gerät mit den
wesentlichen Anforderungen und anderen relevanten Bestimmungen der zugehörigen
Richtlinien übereinstimmt. Der gesamte Text der EU-Konformitätserklärung ist
verfügbar unter: www.asus.com/support
Italiano ASUSTeK Computer Inc. con la presente dichiara che questo dispositivo
è conforme ai requisiti essenziali e alle altre disposizioni pertinenti con le direttive
correlate. Il testo completo della dichiarazione di conformità UE è disponibile
all’indirizzo: www.asus.com/support
Русский Компания ASUS заявляет, что это устройство соответствует основным
требованиям и другим соответствующим условиям соответствующих директив.
Подробную информацию, пожалуйста, смотрите на www.asus.com/support
Български С настоящото ASUSTeK Computer Inc. декларира, че това устройство е
в съответствие със съществените изисквания и другите приложими постановления
на свързаните директиви. Пълният текст на декларацията за съответствие на ЕС е
достъпна на адрес: www.asus.com/support
Hrvatski ASUSTeK Computer Inc. ovim izjavljuje da je ovaj uređaj sukladan s bitnim
zahtjevima i ostalim odgovarajućim odredbama vezanih direktiva. Cijeli tekst EU izjave o
sukladnosti dostupan je na: www.asus.com/support
Čeština Společnost ASUSTeK Computer Inc. tímto prohlašuje, že toto zařízení splňuje
základní požadavky a další příslušná ustanovení souvisejících směrnic. Plné znění
prohlášení o shodě EU je k dispozici na adrese: www.asus.com/support
Dansk ASUSTeK Computer Inc. erklærer hermed, at denne enhed er i
overensstemmelse med hovedkravene og andre relevante bestemmelser i de relaterede
direktiver. Hele EU-overensstemmelseserklæringen kan findes på:
www.asus.com/support
Nederlands ASUSTeK Computer Inc. verklaart hierbij dat dit apparaat voldoet aan de
essentiële vereisten en andere relevante bepalingen van de verwante richtlijnen. De
volledige tekst van de EU-verklaring van conformiteit is beschikbaar op:
www.asus.com/support
Eesti Käesolevaga kinnitab ASUSTeK Computer Inc, et see seade vastab
asjakohaste direktiivide oluliste nõuetele ja teistele asjassepuutuvatele sätetele. EL
vastavusdeklaratsiooni täielik tekst on saadaval järgmisel aadressil:
www.asus.com/support
Suomi ASUSTeK Computer Inc. ilmoittaa täten, että tämä laite on asiaankuuluvien
direktiivien olennaisten vaatimusten ja muiden tätä koskevien säädösten mukainen.
EU-yhdenmukaisuusilmoituksen koko teksti on luettavissa osoitteessa:
www.asus.com/support
ASUSTeK Computer Inc. hereby declares that this device is in compliance with the essential requirements and other relevant provisions of related UKCA Directives. Full text of UKCA
declaration of conformity is available at: www.asus.com/support
Simplified UKCA Declaration of Conformity
Simplified EU Declaration of Conformity
Ελληνικά Με το παρόν, η AsusTek Computer Inc. δηλώνει ότι αυτή η συσκευή
συμμορφώνεται με τις θεμελιώδεις απαιτήσεις και άλλες σχετικές διατάξεις των Οδηγιών
της ΕΕ. Το πλήρες κείμενο της δήλωσης συμβατότητας είναι διαθέσιμο στη διεύθυνση:
www.asus.com/support
Magyar Az ASUSTeK Computer Inc. ezennel kijelenti, hogy ez az eszköz megfelel
a kapcsolódó Irányelvek lényeges követelményeinek és egyéb vonatkozó
rendelkezéseinek. Az EU megfelelőségi nyilatkozat teljes szövege innen letölthető:
www.asus.com/support
Latviski ASUSTeK Computer Inc. ar šo paziņo, ka šī ierīce atbilst saistīto Direktīvu
būtiskajām prasībām un citiem citiem saistošajiem nosacījumiem. Pilns ES atbilstības
paziņojuma teksts pieejams šeit: www.asus.com/support
Lietuvių „ASUSTeK Computer Inc.“ šiuo tvirtina, kad šis įrenginys atitinka pagrindinius
reikalavimus ir kitas svarbias susijusių direktyvų nuostatas. Visą ES atitikties deklaracijos
tekstą galima rasti: www.asus.com/support
Norsk ASUSTeK Computer Inc. erklærer herved at denne enheten er i samsvar med
hovedsaklige krav og andre relevante forskrifter i relaterte direktiver. Fullstendig tekst
for EU-samsvarserklæringen finnes på: www.asus.com/support
Polski Firma ASUSTeK Computer Inc. niniejszym oświadcza, że urządzenie to jest
zgodne z zasadniczymi wymogami i innymi właściwymi postanowieniami powiązanych
dyrektyw. Pełny tekst deklaracji zgodności UE jest dostępny pod adresem:
www.asus.com/support
Português A ASUSTeK Computer Inc. declara que este dispositivo está em
conformidade com os requisitos essenciais e outras disposições relevantes das Diretivas
relacionadas. Texto integral da declaração da UE disponível em: www.asus.com/support
Română ASUSTeK Computer Inc. declară că acest dispozitiv se conformează cerinţelor
esenţiale şi altor prevederi relevante ale directivelor conexe. Textul complet al
declaraţiei de conformitate a Uniunii Europene se găseşte la: www.asus.com/support
Srpski ASUSTeK Computer Inc. ovim izjavljuje da je ovaj uređaj u saglasnosti sa
osnovnim zahtevima i drugim relevantnim odredbama povezanih Direktiva. Pun tekst
EU deklaracije o usaglašenosti je dostupan da adresi: www.asus.com/support
Slovensky Spoločnosť ASUSTeK Computer Inc. týmto vyhlasuje, že toto zariadenie
vyhovuje základným požiadavkám a ostatým príslušným ustanoveniam príslušných
smerníc. Celý text vyhlásenia o zhode pre štáty EÚ je dostupný na adrese:
www.asus.com/support
Slovenščina ASUSTeK Computer Inc. izjavlja, da je ta naprava skladna z bistvenimi
zahtevami in drugimi ustreznimi določbami povezanih direktiv. Celotno besedilo EU-
izjave o skladnosti je na voljo na spletnem mestu: www.asus.com/support
Español Por la presente, ASUSTeK Computer Inc. declara que este dispositivo cumple
los requisitos básicos y otras disposiciones pertinentes de las directivas relacionadas. El
texto completo de la declaración de la UE de conformidad está disponible en:
www.asus.com/support
Déclaration de conformité de Innovation, Sciences et Développement
économique Canada (ISED)
Le présent appareil est conforme aux CNR d’Innovation, Sciences et Développement économique Canada applicables
aux appareils radio exempts de licence. L’exploitation est autorisée aux deux conditions suivantes : (1) l’appareil ne doit
pas produire de brouillage, et (2) l’utilisateur de l’appareil doit accepter tout brouillage radioélectrique subi, même si le
brouillage est susceptible d’en compromettre le fonctionnement.
CAN ICES-003(B)/NMB-003(B)

14
Svenska ASUSTeK Computer Inc. förklarar härmed att denna enhet överensstämmer
med de grundläggande kraven och andra relevanta föreskrifter i relaterade direktiv.
Fulltext av EU-försäkran om överensstämmelse finns på: www.asus.com/support
Українська ASUSTeK Computer Inc. заявляє, що цей пристрій відповідає основним
вимогам та іншим відповідним положенням відповідних Директив. Повний текст
декларації відповідності стандартам ЄС доступний на: www.asus.com/support
Türkçe AsusTek Computer Inc., bu aygıtın temel gereksinimlerle ve ilişkili Yönergelerin
diğer ilgili koşullarıyla uyumlu olduğunu beyan eder. AB uygunluk bildiriminin tam
metni şu adreste bulunabilir: www.asus.com/support
Bosanski ASUSTeK Computer Inc. ovim izjavljuje da je ovaj uređaj usklađen sa bitnim
zahtjevima i ostalim odgovarajućim odredbama vezanih direktiva. Cijeli tekst EU izjave o
usklađenosti dostupan je na: www.asus.com/support

15
Warranty
EN: ASUS Guarantee Information
• ASUS offers a voluntary manufacturer’s Commercial Guarantee.
• ASUS reserves the right to interpret the provisions of the ASUS Commercial
Guarantee.
• This ASUS Commercial Guarantee is provided independently and in addition
to the statutory Legal Guarantee and in no way affects or limits the rights
under the Legal Guarantee.
For all the guarantee information, please visit
https://www.asus.com/support.
CZ: Informace o záruce společnosti ASUS
• Společnost ASUS nabízí dobrovolnou komerční záruku výrobce.
• Společnost ASUS si vyhrazuje právo vykládat ustanovení komerční záruky
společnosti ASUS.
• Tato komerční záruka společnosti ASUS je poskytována nezávisle a jako
doplněk zákonné záruky a žádným způsobem neovlivňuje ani neomezuje
práva vyplývající ze zákonné záruky.
Všechny informace o záruce najdete na adrese
https://www.asus.com/cz/support/.
CR: Informacije o ASUS jamstvu
• ASUS dragovoljno nudi komercijalno proizvođačko jamstvo.
• ASUS zadržava prava na tumačenje odredbi ASUS komercijalnog jamstva.
• Ovo ASUS komercijalno jamstvo daje se neovisno i kao dodatak zakonskom
jamstvu i ni na koji način ne ograničuje prava iz okvira zakonskog jamstva.
Sve informacije o jamstvu potražite na https://www.asus.com/support.
DU: ASUS-garantie-informatie
• SUS biedt een vrijwillige commerciële garantie van de fabrikant.
• ASUS behoudt zich het recht voor om de bepalingen van de commerciële
garantie van ASUS uit te leggen.
• Deze commerciële garantie van ASUS wordt onafhankelijk en als aanvulling
op de statutaire Wettelijke garantie geboden en beïnvloedt of beperkt in geen
geval de rechten onder de wettelijke garantie.
Voor alle informatie over de garantie, gaat u naar
https://www.asus.com/nl/support/.
I: Informativa sulla Garanzia ASUS
• ASUS offre una Garanzia Commerciale volontaria del produttore.
• ASUS si riserva il diritto di interpretare le disposizioni della Garanzia
Commerciale ASUS.
• La presente Garanzia Commerciale ASUS viene fornita in modo indipendente
e in aggiunta alla Garanzia Legale prevista per legge e non pregiudica o limita
in alcun modo i diritti previsti dalla Garanzia Legale.
Per tutte le informazioni sulla garanzia, visitare https://www.asus.com/it/support.
EE: Teave ASUS-e garantii kohta
• ASUS pakub vabatahtlikku tasulist tootjagarantiid.
• ASUS jätab endale õiguse tõlgendada ASUS-e tasulise garantii tingimusi.
• See ASUS-e tasuline garantii on sõltumatu lisagarantii seadusega kehtestatud
garantiile ega mõjuta mingil määral seadusega kehtestatud garantiid ning
seadusega kehtestatud garantii piiranguid.
Vaadake garantiiga seotud teavet veebisaidilt https://www.asus.com/ee/.
GK: Πληροφορίες εγγύησης ASUS
• Η ASUS προσφέρει μια εθελοντική Εμπορική εγγύηση κατασκευαστή.
• Η ASUS διατηρεί το δικαίωμα ερμηνείας των διατάξεων της Εμπορικής εγγύησης
ASUS.
• Αυτή η Εμπορική εγγύηση ASUS παρέχεται ανεξάρτητα και επιπροσθέτως της
θεσμικής Νομικής εγγύησης και σε καμία περίπτωση δεν επηρεάζει ή περιορίζει τα
δικαιώματα βάσει της Νομικής εγγύησης.
Για όλες τις πληροφορίες εγγύησης, επισκεφθείτε τη διεύθυνση
https://www.asus.com/gr-el/.
DA: ASUS garantioplysninger
• ASUS tilbyder en valgfri handelsmæssig garanti.
• ASUS forbeholder sig retten til at fortolke bestemmelserne i ASUS’
handelsmæssige garanti.
• Denne handelsmæssige garanti fra ASUS tilbydes uafhængigt, som en
tilføjelse til den lovbestemte juridiske garanti og den påvirker eller begrænser
på ingen måde rettighederne i den juridiske garanti.
Alle garantioplysningerne kan findes på https://www.asus.com/dk/support/.
HUG: ASUS garanciális információk
• Az ASUS önkéntes gyártói kereskedelmi garanciát kínál.
• Az ASUS fenntartja magának a jogot, hogy értelmezze az ASUS kereskedelmi
garanciára vonatkozó rendelkezéseket.
• Ezt a kereskedelmi garanciát az ASUS függetlenül és a törvényes garancia
mellett nyújtja és semmilyen módon nem befolyásolja, vagy korlátozza a jogi
garancia nyújtotta jogokat.
A garanciára vonatkozó teljes körű információkért látogasson el a
https://www.asus.com/hu/support/ oldalra.
BG: Информация за гаранцията от ASUS
• ASUS предлага доброволна търговска гаранция от производителя.
• ASUS си запазва правото да тълкува условията на търговската гаранция на
ASUS.
• Тази търговска гаранция на ASUS се предлага независимо от и в допълнение
на законовата гаранция. Тя по никакъв начин не оказва влияние върху правата
на потребителя в законовата гаранция и по никакъв начин не ги ограничава.
За цялостна информация относно гаранцията, моля, посетете
https://www.asus.com/support.
LV: ASUS garantijas informācija
• ASUS piedāvā brīvprātīgu ražotāja komerciālo garantiju.
• ASUS patur tiesības interpretēt ASUS komerciālās garantijas noteikumus.
• Šī ASUS komerciālā garantija tiek piedāvāta neatkarīgi un papildus likumā
noteiktajai juridiskajai garantijai, un tā nekādi neietekmē vai neierobežo
juridiskajā garantijā noteiktās tiesības.
Lai iegūtu informāciju par garantiju, apmeklējiet vietni https://www.asus.com/lv/.
F: Garantie ASUS
• ASUS fournit une garantie commerciale en tant que garantie volontaire du
fabricant.
• ASUS se réserve le droit d'interpréter et de clarifier les informations relatives
à la garantie commerciale ASUS.
• Cette garantie commerciale ASUS est fournie indépendamment et
parallèlement à la garantie légale, elle n'affecte ou ne limite d'aucune façon
les droits acquis par la garantie légale.
Pour plus d'informations sur la garantie, consultez le site
https://www.asus.com/fr/support/.
G: ASUS Garantieinformationen
• ASUS bietet eine freiwillige Warengarantie des Herstellers an.
• ASUS behält sich das Recht zur Auslegung der Bestimmungen in der ASUS
Warengarantie vor.
• Diese ASUS Warengarantie wird unabhängig und zusätzlich zur rechtmäßigen
gesetzlichen Garantie gewährt und beeinträchtigt oder beschränkt in keiner
Weise die Rechte aus der gesetzlichen Garantie.
Die vollständigen Garantieinformationen finden Sie unter
https://www.asus.com/de/support/.
R: Информация о гарантии ASUS
• ASUS предлагает добровольную гарантию от производителя.
• ASUS оставляет за собой право интерпретирование положений гарантии ASUS.
• Настоящая гарантия ASUS никоим образом не ограничивает Ваши права,
предусмотренные локальным законодательством.
Для получения полной информации о гарантии посетите
https://www.asus.com/ru/support/. LT: Informacija apie ASUS garantiją
• ASUS siūlo savanorišką komercinę gamintojo garantiją.
• ASUS pasilieka teisę savo nuožiūra aiškinti šios komercinės ASUS garantijos
nuostatas.
• Ši komercinė ASUS garantija suteikiama nepriklausoma, be įstatyminės
teisinės garantijos, ir jokiu būdu nepaveikia ar neapriboja teisinės garantijos
suteikiamų teisių.
Norėdami gauti visą informaciją apie garantiją, apsilankykite
https://www.asus.com/lt/.
PL: Informacje o gwarancji firmy ASUS
• Firma ASUS oferuje dobrowolną gwarancję handlową producenta.
• Firma ASUS zastrzega sobie prawo do interpretacji warunków gwarancji
handlowej firmy ASUS.
• Niniejsza gwarancja handlowa firmy ASUS jest udzielana niezależnie, jako
dodatek do wymaganej ustawowo gwarancji prawnej i w żaden sposób
nie wpływa na prawa przysługujące na mocy gwarancji prawnej ani ich nie
ogranicza.
Wszelkie informacje na temat gwarancji można znaleźć na stronie
https://www.asus.com/pl/support.
PG: Informações de Garantia ASUS
• A ASUS oferece uma Garantia Comercial voluntária do fabricante.
• A ASUS reserva o direito de interpretar as disposições da Garantia Comercial
da ASUS.
• Esta Garantia Comercial da ASUS é fornecida de forma independente além
da Garantia Legal estatutária e não afeta nem limita de qualquer forma os
direitos estabelecidos na Garantia Legal.
Para consultar todas as informações sobre a garantia, visite
https://www.asus.com/pt/support/.
RO: Informații despre garanția ASUS
• ASUS oferă o garanție comercială voluntară a producătorului.
• ASUS își rezervă dreptul de a interpreta prevederile garanției comerciale ASUS.
• Această garanție comercială ASUS este oferită independent și în plus față de
garanția obligatorie legal și nu afectează sau limitează în niciun fel drepturile
acordate conform garanției legale.
Pentru toate informațiile legate de garanție, vizitați
https://www.asus.com/ro/support.

16
TR: ASUS Garanti Bilgileri
• ASUS, gönüllü olarak üretici Ticari Garantisi sunar.
• ASUS, ASUS Ticari Garantisinin hükümlerini yorumlama hakkını saklı tutar.
• Bu ASUS Ticari Garantisi, bağımsız olarak ve hukuki Yasal Garanti’ye ek
olarak sağlanır ve hiçbir şekilde Yasal Garanti kapsamındaki hakları etkilemez
veya sınırlandırmaz.
Tüm garanti bilgileri için lütfen https://www.asus.com/tr/support adresini ziyaret
edin.
MX: Garantía y Soporte
Esta Garantía aplica en el país de compra. Usted acepta que en esta garantía:
• Los procedimientos de servicio pueden variar en función del país.
• Algunos servicios y/o piezas de reemplazo pudieran no estar disponibles en
todos los países.
• Algunos países pueden tener tarifas y restricciones que se apliquen en el
momento de realizar el servicio, visite el sitio de soporte de ASUS en
https://www.asus.com/mx/support/ para ver más detalles.
• Si tiene alguna queja o necesidad de un centro de reparación local o el
periodo de garantía del producto ASUS, por favor visite el sitio de Soporte de
ASUS en https://www.asus.com/mx/support/ para mayores detalles.
Información de contacto ASUS
Esta garantía está respaldada por:
ASUSTeK Computer Inc.
Centro de Atención ASUS +52 (55) 1946-3663
SL: Informacije o garanciji ASUS
• ASUS ponuja prostovoljno tržno garancijo proizvajalca.
• ASUS si pridržuje pravico do razlage določb tržne garancije družbe ASUS.
• Ta tržna garancija družbe ASUS je na voljo neodvisno in kot dodatek
zakonsko predpisani pravni garanciji ter na noben način ne vpliva na pravice,
ki jih zagotavlja pravna garancija, oziroma jih omejuje.
Vse informacije o garanciji najdete na spletnem mestu
https://www.asus.com/support.
SK: Informácie o záruke ASUS
• ASUS ponúka dobrovoľnú obchodnú záruku výrobcu.
• ASUS si vyhradzuje právo interpretovať ustanovenia obchodnej záruky ASUS.
• Táto obchodná záruka ASUS je poskytnutá nezávisle a navyše k zákonnej
záruke a v žiadnom prípade neovplyvňuje ani neobmedzuje tieto práva podľa
tejto zákonnej záruky.
Všetky ďalšie informácie o záruke nájdete na https://www.asus.com/sk/support.
ES: Información de garantía de ASUS
• ASUS ofrece una garantía comercial voluntaria del fabricante.
• ASUS se reserva el derecho de interpretar las disposiciones de esta garantía
comercial de ASUS.
• Esta garantía comercial de ASUS se proporciona de forma independiente y
adicional a la garantía estatutaria y de ninguna manera afecta a los derechos
bajo la garantía legal ni los limita.
Para obtener toda la información sobre la garantía, visite
https://www.asus.com/ES/support/.
FI: ASUS-takuutiedot
• ASUS tarjoaa vapaaehtoisen valmistajan kaupallisen takuun.
• ASUS pidättää oikeuden tulkita ASUS-kaupallisen takuun ehdot.
• Tämä ASUS-kaupallinen takuu tarjotaan itsenäisesti lakisääteisen
oikeudellisen takuun lisäksi eikä se vaikuta millään tavoin laillisen takuun
oikeuksiin tai rajoita niitä.
Saadaksesi kaikki takuutiedot, siirry osoitteeseen https://www.asus.com/fi/support.
NW: Informasjon om ASUS-garanti
• ASUS tilbyr som produsent en frivillig kommersiell garanti.
• ASUS forbeholder seg retten til å tolke bestemmelsene i ASUS sin
kommersielle garanti.
• ASUS sin kommersielle garanti gis uavhengig og i tillegg til den lovbestemte
juridiske garantien, og verken påvirker eller begrenser rettighetene under den
juridiske garantien på noen måte.
Du finner fullstendig informasjon om garanti på https://www.asus.com/no/support/.
SB: Informacije o ASUS garanciji
• ASUS nudi dobrovoljnu proizvođačku komercijalnu garanciju.
• ASUS zadržava pravo da tumači odredbe svoje ASUS komercijalne garancije.
• Ova ASUS komercijalna garancija daje se nezavisno, kao dodatak zakonskoj
pravnoj garanciji, i ni ka koji način ne utiče na i ne ograničava prava data
pravnom garancijom.
Za sve informacije o garanciji, posetite https://www.asus.com/support/.
SW: ASUS garantiinformation
• ASUS erbjuder en frivillig kommersiell tillverkningsgaranti.
• ASUS förbehåller sig rätten att tolka bestämmelserna i ASUS kommersiella
garanti.
• Denna kommersiella garanti från ASUS tillhandahålles separat och som tillägg
till den lagstadgade garantin, och påverkar eller begränsar på intet sätts
rättigheterna under den lagstadgade garantin.
För all garantiinformation, besök https://www.asus.com/se/support/.
UA: Інформація про Гарантію ASUS
• ASUS пропонує добровільну Комерційну Гарантію виробника.
• ASUS застерігає за собою право тлумачити положення Комерційної Гарантії
ASUS
• Цю Комерційну Гарантію надано незалежно і на додаток до обов’язкової
Законної Гарантії; вона жодним чином не впливає на права за Законною
Гарантією і не обмежує їх.
Всю інформацію про гарантію подано тут: https://www.asus.com/ua/support.
BP: Informações de garantia ASUS
Esta garantia aplica-se ao período definido pela garantia legal (90 dias) mais o
período de garantia comercial oferecido pela ASUS. Por exemplo: 12M significa
12 meses de garantia no total (3 meses de garantia legal mais 9 meses de
garantia contratual), 24 meses significa 24 meses de garantia no total (3 meses
de garantia legal mais 21 meses de garantia contratual) e 36 meses significa 36
meses de garantia no total (3 meses de garantia legal e 33 de garantia contratual)
a contar da data da garantia declarada (Data de Início da Garantia).
Para todas as informações de garantia, visite https://www.asus.com/br/support/.
ID: Informasi Garansi ASUS
Garansi ini berlaku di negara tempat pembelian.
Periode Garansi tertera pada kemasan/kotak dari Produk dan Masa Garansi
dimulai sejak tanggal pembelian Produk ASUS dengan kondisi baru.
Silahkan pindai Kode di bagian bawah halaman terakhir untuk Kartu Garansi versi
Web dalam format PDF untuk lebih informasi jelas mengenai jaminan garansi
Produk ASUS.
• Informasi Dukungan ASUS, silakan kunjungi https://www.asus.com/id/support.
• Informasi Lokasi Layanan, silakan kunjungi
https://www.asus.com/id/support/Service-Center/Indonesia.
• Layanan Call Center: 1500128
VI: Thông tin đảm bảo của ASUS
• ASUS cung cấp Bảo hành thương mại tự nguyện của nhà sản xuất.
• ASUS bảo lưu quyền giải thích các điều khoản của Bảo hành thương mại của ASUS.
• Bảo hành thương mại này của ASUS được cung cấp độc lập và ngoài Bảo đảm pháp
lý theo luật định và không có cách nào ảnh hưởng đến hoặc giới hạn các quyền
theo Bảo lãnh pháp lý. Để biết tất cả các thông tin bảo hành, vui lòng truy cập
https://www.asus.com/vn/support

17
ASUS contact information
ASUSTeK COMPUTER INC.
Address: 1F., No. 15, Lide Rd., Beitou Dist., Taipei City 112
ASUS COMPUTER INTERNATIONAL (America)
Address: 48720 Kato Rd., Fremont, CA 94538, USA
ASUS COMPUTER GmbH (Germany and Austria)
Address: Harkortstrasse 21-23, 40880 Ratingen, Germany
ASUSTeK (UK) LIMITED
Address: 1st Floor, Sackville House, 143-149 Fenchurch Street, London, EC3M 6BL, England, United Kingdom
Service and Support
Visit our multi-language website at https://www.asus.com/support.
Product Register
Log in and register your device for better product support.

18

19

15060-20PR0000
-
 1
1
-
 2
2
-
 3
3
-
 4
4
-
 5
5
-
 6
6
-
 7
7
-
 8
8
-
 9
9
-
 10
10
-
 11
11
-
 12
12
-
 13
13
-
 14
14
-
 15
15
-
 16
16
-
 17
17
-
 18
18
-
 19
19
-
 20
20


