FLOS Glo-Ball Wall Guida d'installazione
- Tipo
- Guida d'installazione

Glo-Ball C/W
Design Jasper Morrison, 1999

2 3
IT
ISTRUZIONI DI INSTALLAZIONE ED IMPIEGO
ATTENZIONE!
La sicurezza dell’apparecchio é garantita solo
rispettando queste istruzioni sia in fase di installazione
che di impiego; é pertanto necessario conservarle.
AVVERTENZE:
• All’atto dell’installazione ed ogni volta che si
interviene sull’apparecchio, assicurarsi che sia stata
tolta la tensione di alimentazione.
• L’apparecchio non può essere in alcun modo
modificato o manomesso, ogni modifica ne può
compromettere la sicurezza rendendo lo stesso
pericoloso. FLOS declina ogni responsabilità per i
prodotti modificati.
• Per un funzionamento sicuro e corretto é necessario
che questo apparecchio sia collegato ad un
efficiente impianto di messa a terra.
• Il simbolo riportato sull’apparecchio indica la
necessità di utilizzare lampade di tipo autoprotetto.
• Il simbolo riportato sull’apparecchio indica che il
prodotto deve essere smaltito in modo differenziato
dai rifiuti urbani.
ISTRUZIONI PER LA PULIZIA DELL’APPARECCHIO
• Per la pulizia dell’apparecchio utilizzare
esclusivamente un panno morbido eventualmente
inumidito con acqua e sapone.
• Attenzione: non utilizzare alcool o solventi.
EN
INSTRUCTION FOR CORRECT INSTALLATION AND USE
WARNING!
The safety of this fitting can only be guaranteed if these
instructions are observed, during both installation and
use. Please retain these instructions safety.
REMARKS:
• When installing and whenever acting on the
appliance, ensure that the power supply has been
switched off.
• The appliance may in no way be modified or
tampered with, any modification may compromise
safety causing the appliance to become dangerous.
FLOS declines all responsibility for products that are
modified.
• This appliance must be connected to an efficient
grounding system in order to work safely and
correctly.
• The symbol marked on the appliance indicates
the need to use self-protected bulbs.
• The symbol shown on the device indicates
that the product must be thrown out in a different
manner than with the urban trashes.
CLEANING INSTRUCTIONS
• Use only a soft cloth to clean the appliance,
dampened with water and soap or mild cleanser if
needed for resistant dirt.
• Warning: do not use alcohol or other solvents.
DE
INSTALLATION - UND GEBRAUCHSANWEISUNGEN
ACHTUNG!
Wir garantieren nur dann für die Sicherheit der
Leuchte, wenn diese Anweisungen sowohl bei der
Installation als auch beim Gebrauch genau beachtet
werden. Es ist daher ratsam, sie aufzubewahren.
BEMERKUNGEN:
• Bei der Installation und bei Eingriffen an der
Leuchte ist sicherzustellen, daß die Anlage vom Netz
abgeschaltet ist.
• Der Apparat darf auf keinen Fall veraendert oder
unerlaubt geoeffnet werden, jede Veraenderung
desselben kann die Sicherheit in Frage stellen
und somit gefaehrlich werden. FLOS lehnt jede
Verantwortung fuer unsachgemaess behandelte
Produkte ab.
• Für eine sichere und ordnungsgemäße
Funktionsweise ist diese Leuchte an eine effiziente
Erdungsanlage anzuschließen.
• Das auf der Leuchte wiedergegebene Symbol
zeigt an, dass Glühbirnen des selbstschützenden
Typs zu benutzen sind.
• Das auf dem Gerät wiedergegebene Symbol
zeigt an, dass das Produkt getrennt vom Stadtmüll
entsorgt werden muss.
REINIGUNGSVORSCHRIFTEN
• Bei der Reinigung der Leuchte darf man
ausschließlich weiche Tücher verwenden. Eventuell
kann man diese mit Wasser und Seife oder mit
einem neutralen Reinigungsmittel anfeuchten.
• Achtung: Weder Alkohol noch Lösungsmittel
verwenden.
FR
INSTRUCTIONS D’INSTALLATION ET D’EMPLOI
ATTENTION!
La sûreté de cet appareil est garantie uniquement si l’on
respecte ces instructions soit en phase d’installation
soit pendant l’utilisation; il faut donc les conserver.
NOTICES:
• Au moment de l’installation et chaque fois que l’on
intervient sur l’appareil, s’assurer que la tension
d’alimentation ait été coupée.
• L’appareil ne peut être modifié ou altéré de quelque
manière que ce soit, toute modification peut
compromettre la sécurité de celui-ci en le rendant
dangereux. FLOS décline toute responsabilité pour
les produits modifiés.
• Pour un fonctionnement sûr et correct, il est
nécessaire que l’appareil soit relié à une installation
efficace de mise à la terre.
• Le symbole reporté sur l’appareil indique la
nécessité d’utiliser des ampoules de type “auto-
protégé”.
• Le symbole montré sur l’appareil indique que le
produit doit être éliminé d’une autre façon que celle
avec les déchets urbains.
INSTRUCTIONS POUR LE NETTOYAGE
• Pour le nettoyage de l’appareil utiliser exclusivement
un chiffon doux, humecté si nécessaire, avec de
l’eau et du savon ou avec un détergent neutre pour
les salissures les plus tenaces.
• Attention: ne pas utiliser d’alcool ou solvents.

4 5
ES
INSTRUCCIONES DE INSTALACIÓN Y DE USO
¡ATENCIÓN!
La seguridad del aparato sólo puede garantizarse
con la condición de que se respeten las siguientes
instrucciones, tanto en la fase de instalación como de
uso, por lo cual se recomienda conservarlas.
ADVERTENCIA:
• Para efectuar la instalación, y toda vez que se
efectúe alguna operación en el aparato, asegurarse
de haber cortado la corriente eléctrica.
• El aparato no puede ser en ningùn caso modificado
o forzado, cualquier modificaciòn puede
comprometer la seguridad haciéndolo peligroso.
FLOS declina cualquier responsabilidad por los
productos modificados.
• Para obtener un funcionamiento seguro y correcto
es necesario que esto aparato sea conectado a un
eficiente sistema de tierra.
• El símbolo marcado en el aparato indica
la necesidad de utilizar bombillas de tipo
autoprotegido.
• El símbolo que aparece en el aparato indica
que el producto debe ser eliminado en modo
diferenciado del resto de los desechos urbanos.
INSTRUCCIONES PARA LIMPIAR EL APARATO
• Para la limpieza del aparato, utilizar exclusivamente
un paño suave. En caso de suciedad más resistente,
humedecer el paño con agua y jabón o un
detergente neutro.
• Advertencia: no emplear alcohol ni disolventes.
PT
INSTRUÇÕES INSTALAÇÃO E USO
ATENÇÃO!
A segurança do aparelho é garantida somente se
respeitarmos as instruções tanto na fase de instalação
como na de uso; portanto é necessário conservar tais
instruções.
ADVERTÊNCIA:
• Quando se instala e cada vez que se mexe no
aparelho, ter a certeza que foi desligado da tensão
de alimentação.
• De forma alguma o aparelho deve ser modificado
ou alterado, toda e qualquer modificação
pode comprometer a segurança tornando o
aparelho perigoso. FLOS declina toda e qualquer
responsabilidade pelos produtos modificados.
• Para um funcionamento seguro e correcto é
necessário que este aparelho esteja ligado a uma
eficiente instalação de ligação a terra.
• O símbolo indicado no aparelho indica a
necessidade de utilizar lâmpadas com blindagem
externa.
• O símbolo indicado no aparelho indica que o
produto deve ser eliminado de forma diferenciada
em relação ao lixo urbano.
INSTRUÇÕES PARA A LIMPEZA DO APARELHO
• Para limpeza do aparelho utilizar exclusivamente
um tecido macio eventualmente úmido com água
e sabão ou detergente neutro para a sujeira mais
difícil.
• Atenção: não utilizar álcool ou solventes.
RUS
ИНСТРУКЦИИ ПО МОНТАЖУ И ПРИМЕНЕНИЮ
ВНИМАНИЕ!
Надёжность устройства гарантируется только
при соблюдении данных инструкций, как в
фазе монтажа, так и при применении, поэтому
необходимо обеспечить их сохранность.
ПРЕДУПРЕЖДЕНИЯ:
• В момент установки и каждый раз при
проведении работ с устройством, убедиться в
снятии напряжения питания.
• Устройство не может изменяться или
разбираться, любые изменения могут нарушить
надёжность, делая его опасным. FLOS не несёт
ответственность за измененную продукцию.
• Для надежного и правильного
функционирования данного устройства
необходимо обеспечить его подсоединение к
эффективной системе заземления.
• Обозначение приведённое на устройстве,
указывает на необходимость использования
самозащищаемых лампочек.
• Символ приведённый на устройстве,
указывает на то, что данная продукция должна
быть переработана отдельно от городских
отходов.
ИНСТРУКЦИИ ПО ОЧИСТКЕ УСТРОЙСТВА
• Для очистки устройства использовать только
мягкую тряпку, смоченную водой с мылом или
нейтральным моющим средством для наиболее
стойких загрязнений.
• Внимание: Не использовать спирт или другие
растворители.
J

6 7
CN
SA
•
•
•
•
•
•
•
KC
•
•
•
•
•
•
•

8 9
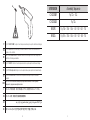
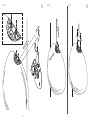
VERSION Assembly Sequence
C1-C2 EUR Fig.1Ce - 2Ce.
C1-C2 USA Fig.1Cu.
W EUR Fig.1We - 2We - 3We - 4W - 5W - 6W - 7W.
W USA Fig.1Wu - 2Wu - 3Wu - 4W - 5W - 6W - 7W.
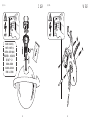
IT Fig.1Ce/1We NOTA BENE: Scegliere i tasselli ad espansione idonei per la superficie destinata al montaggio.
EN Pic.1Ce/1We NOTE: Select and employ screw anchors which are suited to the surface where the
appliance is to be installed.
DE Abb.1Ce/1We BEACHTEN SIE! Die dehnbaren Einsatzstücke sind angemessen für die vorgesehene
Oberfläche zur Montage auszuwählen.
FR Fig.1Ce/1We NOTE: Choisir les chevilles à expansion correctes pour la superficie destinée au montage.
ES Fig.1Ce/1We Nota importante: Elegir los tacos de expansión idoneos para la superficie destinada al montaje.
PT Fig.1Ce/1We Observar bem: escolher as buchas de expansão idóneas para a superfície destinada a
montagem.
RUS
1Ce/1We
J
1Ce/1We
CN 1Ce/1We
SA
KC 1Ce/1We

10 11
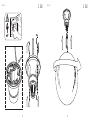
Fig. 2Ce C EUR
Fig. 1Ce C EUR

12 13
Fig. 1We W EUR
Fig. 1Cu C USA
BLACK to BLACK (L)
WHITE to WHITE (N)
GREEN to EARTH (GND)
NEGRO a NEGRO
BLANCO a BLANCO
VERDE a la TIERRA

14 15
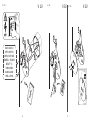
W EUR W USA
Fig. 2We Fig. 2Wu
Fig. 1Wu W USA
BLACK to BLACK (L)
WHITE to WHITE (N)
GREEN to EARTH (GND)
NEGRO a NEGRO
BLANCO a BLANCO
VERDE a la TIERRA

16 17
Fig. 4W W
1
23
W EUR W USA
Fig. 3We Fig. 3Wu

Fig. 5W W
18 19
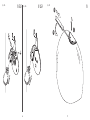
Fig. 7WFig. 6W W

20 21
ES DATOS TECNICOS
VERSIÓN
GLO-BALL C1-C2 EUR Bombilla de incandescencia alógena max 150W conexión E27 tipo HSGS
GLO-BALL W EUR Bombilla de incandescencia alógena max 100W conexión E27 tipo HSGS
Bombilla de incandescencia max 100W conexión E27 tipo IAA/W
GLO-BALL C1-C2 USA Bombilla de incandescencia alógena max 150W conexión E26 tipo T
GLO-BALL W USA Bombilla de incandescencia max 100W conexión E26 tipo A o T
FR DONNEES TECHNIQUES
VERSION
GLO-BALL C1-C2 EUR Ampoule incandescente à halogènes MAX 150W, douille E27, type HSGS
GLO-BALL W EUR Ampoule incandescente à halogènes MAX 100W, douille E27, type HSGS
Ampoule incandescente MAX 100W, douille E27, type IAA/W
GLO-BALL C1-C2 USA Ampoule incandescente à halogènes MAX 150W, douille E26, type T
GLO-BALL W USA Ampoule incandescente MAX 100W, douille E26, type A ou T
IT DATI TECNICI
VERSIONE
GLO-BALL C1-C2 EUR Lampada incandescente ad alogeni MAX 150W attacco E27 tipo HSGS
GLO-BALL W EUR Lampada incandescente ad alogeni MAX 100W attacco E27 tipo HSGS
Lampada ad incandescenza MAX 100W attacco E27 tipo IAA/W
DE TECHNISCHE DATEN
AUSFÜHRUNG
GLO-BALL C1-C2 EUR Halogen-Glühlampe MAX 150W, Anschluss E27, typ HSGS
GLO-BALL W EUR Halogen-Glühlampe MAX 100W, Anschluss E27, typ HSGS
Glühlampe max 100W Anschluss E27 typ IAA/W
EN TECHNICAL DATA
VERSION
GLO-BALL C1-C2 EUR Incandescent halogen bulb MAX 150W , E27 attachment type HSGS
GLO-BALL W EUR Incandescent halogen bulb MAX 100W , E27 attachment type HSGS
Incandescent light bulb MAX 100W , E27 attachment, type IAA/W
GLO-BALL C1-C2 USA Incandescent halogen bulb MAX 150W , E26 attachment type T
GLO-BALL W USA Incandescent light bulb MAX 100W , E26 attachment, type A or T
PT DADOS TÉCNICOS
VERSÃO
GLO-BALL C1-C2 EUR Lâmpada incandescente alógena MAX 150W ligação E27 tipo HSGS
GLO-BALL W EUR Lâmpada incandescente alógena MAX 100W ligação E27 tipo HSGS
Lâmpada incandescente max 100W ligação E27 tipo IAA/W

22 23
34293 - 31/05/2022
SA
GLO-BALL C1-C2 (HSGS)
GLO-BALL W (HSGS)
(IAA/W)
CN
GLO-BALL C1-C2
GLO-BALL W
RUS
ТЕХНИЧЕСКИЕ ДАННЫЕ
ВЕРСИЯ
GLO-BALL C1-C2 EUR
GLO-BALL W EUR
J
GLO-BALL C1-C2 USA
GLO-BALL W USA
KC
GLO-BALL C1-C2 EUR
GLO-BALL W EUR

flos.com
-
 1
1
-
 2
2
-
 3
3
-
 4
4
-
 5
5
-
 6
6
-
 7
7
-
 8
8
-
 9
9
-
 10
10
-
 11
11
-
 12
12
-
 13
13


FLOS Glo-Ball Wall Guida d'installazione
- Tipo
- Guida d'installazione
in altre lingue
- English: FLOS Glo-Ball Wall Installation guide
- français: FLOS Glo-Ball Wall Guide d'installation
- español: FLOS Glo-Ball Wall Guía de instalación
- Deutsch: FLOS Glo-Ball Wall Installationsanleitung
- русский: FLOS Glo-Ball Wall Инструкция по установке
- português: FLOS Glo-Ball Wall Guia de instalação
- 日本語: FLOS Glo-Ball Wall インストールガイド
Documenti correlati
-
 FLOS Zeppelin 1 Guida d'installazione
-
 FLOS Mini Button Guida d'installazione
-
 FLOS Splügen Bräu Guida d'installazione
-
 FLOS ARIETTE 2 Guida d'installazione
-
 FLOS Arco K Guida d'installazione
-
 FLOS Smithfield Suspension Pro Guida d'installazione
-
 FLOS Smithfield Ceiling Pro Guida d'installazione
-
 FLOS Chiara Floor Guida d'installazione
-
 FLOS IC Lights Table 2 Guida d'installazione
-
 FLOS Arco K Manuale utente


