
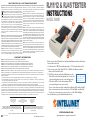
RJ11/12 & RJ45 TESTER
INSTRUCTIONS
MODEL 780087
WASTE ELECTRICAL & ELECTRONIC EQUIPMENT
Disposal of Electric and Electronic Equipment (applicable in the European Union and other European countries with separate collection systems)
Important: Read before use. • Importante: Leer antes de usar.
intellinetnetwork.com
© IC Intracom. All rights reserved. Intellinet is a trademark of IC Intracom, registered in the U.S. and other countries.
WARRANTY INFORMATION
North & South America
IC Intracom Americas
550 Commerce Blvd.
Oldsmar, FL 34677
USA
Asia & Africa
IC Intracom Asia
4-F, No. 77, Sec. 1, Xintai 5th Rd.
Xizhi Dist., New Taipei City 221
Tai wan
Europe
IC Intracom Europe
Löhbacher Str. 7
D-58553 Halver
Germany
INT-780087-UM-ML1-0315-01
Printed on recycled paper.
All trademarks and trade names are the property of their respective owners.
Alle Marken und Markennamen sind Eigentum Ihrer jeweiligen Inhaber.
Toutes les marques et noms commerciaux sont la propriété de leurs propriétaires
respectifs.
Todas las marcas y nombres comerciales son propiedad de sus respectivos dueños.
Wszystkie znaki towarowe i nazwy handlowe należą do ich właścicieli.
Tutti i marchi registrati e le dominazioni commerciali sono di proprietà dei loro
rispettivi proprietari.
English: For warranty information, go to intellinetnetwork.com/warranty.
Deutsch: Garantieinformationen finden Sie unter intellinetnetwork.com/warranty.
Español: Si desea obtener información sobre la garantía, visite intellinetnetwork.com/warranty.
Français: Pour consulter les informations sur la garantie, visitez intellinetnetwork.com/warranty.
Polski: Informacje dotyczące gwarancji znajdują się na stronie intellinetnetwork.com/warranty.
Italiano: Per informazioni sulla garanzia, accedere a intellinetnetwork.com/warranty.
En México: Póliza de Garantía Intellinet — Datos del importador y responsable ante el consumidor IC Intracom México, S.A.P.I. de C.V. •
Av. Interceptor Poniente # 73, Col. Parque Industrial La Joya, Cuautitlán Izcalli, Estado de México, C.P. 54730, México. • Tel. (55)1500-4500
La presente garantía cubre este producto por 3 años contra cualquier defecto de fabricación en sus materiales y mano de obra, bajo las
siguientes condiciones:
1. Todos los productos a que se refiere esta garantía, ampara su cambio físico, sin ningún cargo para el consumidor.
2. El comercializador no tiene talleres de servicio, debido a que los productos que se garantizan no cuentan con reparaciones, ni
refacciones, ya que su garantía es de cambio físico.
3. La garantía cubre exclusivamente aquellas partes, equipos o sub-ensambles que hayan sido instaladas de fábrica y no incluye
en ningún caso el equipo adicional o cualesquiera que hayan sido adicionados al mismo por el usuario o distribuidor.
Para hacer efectiva esta garantía bastará con presentar el producto al distribuidor en el domicilio donde fue adquirido o en el domicilio de
IC Intracom México, S.A.P.I. de C.V., junto con los accesorios contenidos en su empaque, acompañado de su póliza debidamente llenada
y sellada por la casa vendedora (indispensable el sello y fecha de compra) donde lo adquirió, o bien, la factura o ticket de compra origi-
nal donde se mencione claramente el modelo, número de serie (cuando aplique) y fecha de adquisición. Esta garantía no es válida en los
siguientes casos: Si el producto se hubiese utilizado en condiciones distintas a las normales; si el producto no ha sido operado conforme a
los instructivos de uso; o si el producto ha sido alterado o tratado de ser reparado por el consumidor o terceras personas.
English This symbol on the product or its packaging indicates that
this product shall not be treated as household waste. Instead, it
should be taken to an applicable collection point for the re-
cycling of electrical and electronic equipment. By ensuring
this product is disposed of correctly, you will help prevent
potential negative consequences to the environment and
human health, which could otherwise be caused by inappropriate
waste handling of this product. If your equipment contains easily
removable batteries or accumulators, dispose of these separately ac-
cording to your local requirements. The recycling of materials will
help to conserve natural resources. For more detailed information
about recycling of this product, contact your local city office, your
household waste disposal service or the shop where you purchased
this product. In countries outside of the EU: If you wish to discard this
product, contact your local authorities and ask for the correct man-
ner of disposal.
Deutsch Dieses auf dem Produkt oder der Verpackung angebrachte
Symbol zeigt an, dass dieses Produkt nicht mit dem Hausmüll ents-
orgtwerden darf. In Über-einstimmung mit der Richtlinie 2012/19/EG
des Europäischen Parlaments und des Rates über Elektro- und Elek-
tronik-Altgeräte (WEEE) darf dieses Elektrogerät nicht im normalen
Hausmüll oder dem Gelben Sack entsorgt werden. Wenn Sie dieses
Produkt entsorgen möchten, bringen Sie es bitte zur Verkaufsstelle
zurück oder zum Recycling-Sammelpunkt Ihrer Gemeinde.
Español Este símbolo en el producto o su embalaje indica que el
producto no debe tratarse como residuo doméstico. De conformi-
dad con la Directiva 2012/19/CE de la UE sobre residuos de aparatos
eléctricos y electrónicos (RAEE), este producto eléctrico no puede
desecharse se con el resto de residuos no clasificados. Deshágase
de este producto devolviéndolo a su punto de venta o a un punto de
recolección municipal para su reciclaje.
Français Ce symbole sur Ie produit ou son emballage signifie que
ce produit ne doit pas être traité comme un déchet ménager. Con-
formément à la Directive 2012/19/EC sur les déchets d’équipements
électriques et électroniques (DEEE), ce produit électrique ne doit en
aucun cas être mis au rebut sous forme de déchet municipal non trié.
Veuillez vous débarrasser de ce produit en Ie renvoyant à son point
de vente ou au point de ramassage local dans votre municipalité, à
des fins de recyclage.
Polski Jeśli na produkcie lub jego opakowaniu umieszczono ten
symbol, wówczas w czasie utylizacji nie wolno wyrzucać tego
produktu wraz z odpadami komunalnymi. Zgodnie z Dyrektywą Nr
2012/19/WE w sprawie zużytego sprzętu elektrycznego i elektronicz-
nego (WEEE), niniejszego produktu elektrycznego nie wolno usuwać
jako nie posortowanego odpadu komunalnego. Prosimy o usuni-
ecie niniejszego produktu poprzez jego zwrot do punktu zakupu lub
oddanie do miejscowego komunalnego punktu zbiórki odpadów
przeznaczonych do recyklingu.
Italiano Questo simbolo sui prodotto o sulla relativa confezione in-
dica che il prodotto non va trattato come un rifiuto domestico. In ot-
temperanza alla Direttiva UE 2012/19/EC sui rifiuti di apparecchiature
elettriche ed elettroniche (RAEE), questa prodotto elettrico non deve
essere smaltito come rifiuto municipale misto. Si prega di smaltire il
prodotto riportandolo al punto vendita o al punto di raccolta munici-
pale locale per un opportuno riciclaggio.
2
2
2
3
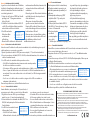
Before use, insert a 9V battery (not included) and make sure the cable being
tested is disconnected.
1 Set the tester to “ON” (for quick scanning) or “S” (slow automatic mode).
2 Connect one end of the cable (RJ11/12 or RJ45) to the Master unit; the
other end to the Remote unit.
3 The LEDs on the two units should light up in order.
• If the LEDs on the Remote light up out of order, the
corresponding wires are not connected properly.
• If the same LED on both units remains off, the
corresponding wire is an open circuit.
• If one or two wires are short circuited, their Remote LEDs will not light. If
three or more wires are short circuited, no LEDs will light on either unit.
• If only one or two wires are connected, none of the LEDs will light.
For specifications, go to intellinetnetwork.com.
1
Main/Master: 1-8+G
Remote / RJ45: 1-8+G
Remote / RJ12: 1-6
Remote / RJ11: 1-4

Deutsch Kabeltester RJ11/12 & RJ45
Español
Probador de cables RJ11/12/45
Français Testeur RJ11/12 et RJ45
Polski
Tester okablowania
Legen Sie vor dem Gebrauch eine 9V-Batterie
(nicht im Lieferumfang) in das Gerät ein und
achten Sie darauf, dass das zu testende Kabel
vom Gerät getrennt ist.
1
Setzen Sie den Tester auf “ON” (zur Schnell-
prüfung) oder “S” (langsamer automa-
tischer Modus).
2 Schließen Sie ein Ende des Kabels (RJ11/
12
oder RJ45) an die Master-Einheit an und das
andere Ende an die Remote-Einheit.
3 Die LEDs an beiden
Einheiten sollten
nacheinander
aufleuchten.
•
Wenn die LEDs der Remote-Einheit nicht
nacheinander aufleuchten, dann sind die
entsprechenden Adern nicht korrekt
verbunden.
•
Wenn die gleiche LED an beiden Einheiten
aus bleibt, dann ist die entsprechende
Ader durchtrennt.
• Wenn eine oder zwei Adern kurz-
geschlossen sind, dann leuchten ihre
Remote-LEDs nicht auf. Wenn drei oder
mehr Adern kurzgeschlossen sind, dann
leuchten keine LEDs auf.
• Wenn nur eine oder zwei Adern verbun-
den sind, dann leuchten keine LEDs auf.
Die Spezifikationen finden Sie auf
intellinetnetwork.com.
Avant utilisation, insérez une pile 9 V (non incluse) et
assurez-vous que le câble en cours de test est débranché.
1 Réglez le testeur sur « ON » (pour un balayage
rapide) ou sur « S » (mode automatique lent).
2
Connectez l’une des extrémités du câble (RJ11/12 ou
RJ45) à l’unité principale et l’autre extrémité à
l’unité distante.
3 Les DEL des deux unités doivent
s’allumer dans l’ordre.
• Si les DEL de l’unité distante
s’allument dans le désordre, les fils correspondants
ne sont pas connectés correctement.
• Si la même DEL sur les deux unités reste éteinte,
le fil correspondant est en circuit ouvert.
•
Si un ou deux fils subissent un court-circuit, les
DEL
de l’unité distante ne s’allument pas. Si trois
ou quatre fils subissent un court-circuit, aucune
DEL ne s’allume sur les deux unités.
• Si un ou deux fils seulement sont connectés,
aucune DEL ne s’allume.
Vous trouvez les spécifications sur intellinetnetwork.com.
Antes de usar el Probador de cable, inserte una batería 9v (no incluida) asegúrese que el
cable a probar no se encuentre conectado.
1
Ajuste el probador de cable de “ON” (para escaneo rápido) o “S” (modo lento automático).
2 Conecte un extremo del cable (RJ11/12 o RJ45) en la unidad maestra; el otro extremo del
cable en la unidad remota.
3 Los LEDs en las dos unidades deben prender en orden.
• Si los LEDs en la unidad remota no tienen un orden cuando prenden,
los cables no están bien conectados.
• Si los mismos LEDs no prenden en la unidad remota, el cable es un circuito abierto.
• Si uno o 2 pares del cable están cortos del circuito. Los LEDs de la unidad remota no se
encenderán. Si tres o más cables están cortos del circuito, los LEDs de ninguna unidad
encenderán.
• Si solo uno o dos cables están conectados, ninguno de los LEDs encenderá en
cualquiera de las unidades.
Para más especificaciones, visite intellinetnetwork.com.
Italiano Tester RJ11/12 & RJ45
Przed użyciem włóż do testera baterię
9V (brak w zestawie) i upewnij się, że
kabel który zamierzasz sprawdzić jest
odłączony.
1 Ustaw przełącznik w pozycji “ON”
(szybki test) lub “S” (powolny test
automatyczny).
2 Podłącz jeden koniec kabla (RJ11/12
lub RJ45) do Testera głównego; drugi
koniec do Terminatora.
3 Diody na obydwu
modułach
powinny zapalać
się po kolei.
• Jeśli diody na Terminatorze zapalają
się poza kolejnością, odpowiadające
diodom żyły są błędnie połączone.
• Jeśli odpowiadające diody na
obydwu modułach nie zapalają się,
żyły nie są połączone.
• Jeśli jedna lub dwie żyły mają
zwarcie, odpowiadające im diody na
Terminatorze nie zapalą się. Jeśli trzy
lub więcej żył ma zwarcie, diody na
obydwu modułach nie zapalą się.
• Jeśli połączone są tylko jedna lub
dwie żyły, diody nie zapalą się.
Pełną specyfikację produktu znajdziecie
Państwo na stronie intellinetnetwork.
com.
Prima dell’uso, inserire una batteria da 9V (non inclusa) e assicurarsi che i cavi che
devono essere testati siano disconnessi.
1 Impostare il tester su “ON” (per scansione veloce) o su “S” (modalità automatica
lenta).
2 Connettere un capo del cavo (RJ11/12 o RJ45) all’unità principale; l’altro capo va
collegato all’unità remota.
3 I led delle due unità dovrebbero accendersi secondo quest’ordine.
•
Se il led nell’unità remota si accendo non nell’ordine indicato,
i fili corrispondenti non sono connessi correttamente.
• Se gli stessi led su entrambe le unità rimangono spenti,
il filo corrispondente non è connesso (circuito aperto).
• Se uno o due fili sono in corto circuito, il led corrispondente nella parte remota
rimane spento. Se tre o più fili sono in corto circuito, nessun led si accenderà
in entrambe le unità.
• Se solo uno o due fili sono collegati, nessuno dei led si accenderà.
Per ulteriori specifiche, visita il sito intellinetnetwork.com.
CE COMPLIANCE (RE / EMC / LVD)
English: This device complies with the requirements of directives 2014/53/EU and/or 2004/108/EC &
2006/95/EC. The Declaration of Conformity for this product is available at:
Deutsch: Dieses Gerät enspricht den Direktiven 2014/53/EU und/oder 2004/108/EC & 2006/95/EC.
Die Konformitätserklärung für dieses Produkt finden Sie unter:
Español: Este dispositivo cumple con los requerimientos de las Directivas 2014/53/UE y/o 2004/108/
EC & 2006/95/EC. La declaración de conformidad para este producto esta disponible en:
Français: Cet appareil satisfait aux exigences des directives 2014/53/UE et/ou 2004/108/CE & 2006/
95/CE. La Déclaration de Conformité pour ce produit est disponible à l’adresset :
Polski: Urządzenie spełnia wymagania dyrektyw 2014/53/UE i/lub 2004/108/EC & 2006/95/EC.
Deklaracja zgodności dostępna jest na stronie internetowej producenta:
Italiano: Questo dispositivo è conforme alle direttive 2014/53/UE e/o 2004/108/EC & 2006/95/EC. La
dichiarazione di conformità per questo prodotto è disponibile al:
intellinetnetwork.com
Master: 1-8+G
Remote / RJ45: 1-8+G
Remote / RJ12: 1-6
Remote / RJ11: 1-4
Tester główny: 1-8+G
Terminator / RJ45: 1-8+G
Terminator / RJ12: 1-6
Terminator / RJ11: 1-4
Unità principale : 1-8+G
Unità remota / RJ45: 1-8+G
Unità remota / RJ12: 1-6
Unità remota / RJ11: 1-4
Principale: 1-8+G
Distante / RJ45: 1-8+G
Distante / RJ12: 1-6
Distante / RJ11: 1-4
Principal: 1-8+G
Remota / RJ45: 1-8+G
Remota / RJ12: 1-6
Remota / RJ11: 1-4
-
 1
1
-
 2
2


Intellinet RJ11/12 & RJ45 Tester Quick Installation Guide
- Tipo
- Quick Installation Guide
- Questo manuale è adatto anche per
in altre lingue
- English: Intellinet RJ11/12 & RJ45 Tester
- français: Intellinet RJ11/12 & RJ45 Tester
- español: Intellinet RJ11/12 & RJ45 Tester
- Deutsch: Intellinet RJ11/12 & RJ45 Tester
- polski: Intellinet RJ11/12 & RJ45 Tester
Documenti correlati
-
Intellinet 780070 Manuale utente
-
Intellinet Multifunction Cable Tester Quick Installation Guide
-
-
Intellinet 507950 Quick Instruction Guide
-
Intellinet 506502 Istruzioni per l'uso
-
Intellinet Gigabit Ethernet to SFP Media Converter Quick Installation Guide
-
Intellinet Gigabit Ethernet Media Converter Istruzioni per l'uso
-
Intellinet 502931 Quick Installation Guide
-