
VisionView
®
Operator Interface Panel
Quick Start Guide


Note: For the most up-to-date regulations and conformity information, refer to the Cognex online support
site: www.cognex.com/Support/VisionView.
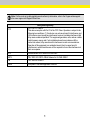
Safety and Regulatory
FCC
FCC Part 15, Class A
This device complies with Part 15 of the FCC Rules. Operation is subject to the
following two conditions: (1) this device may not cause harmful interference; and
(2) this device must accept any interference received, including interference that
may cause undesired operation. This equipment generates, uses, and can radiate
radio frequency energy and, if not installed and used in accordance with the
instruction manual, may cause harmful interference to radio communications.
Operation of this equipment in a residential area is likely to cause harmful
interference in which case the user will be required to correct the interference at
their own expense.
KCC VisionView 900: KCC-REM-IC6-PMX-090T
NRTL TÜV SÜD SCC/NRTL OSHA Scheme for UL/CAN 60950-1
CB TÜV SÜD IEC 60950-1.
RoHS Compliant to the latest applicable Directive.
1

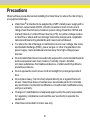
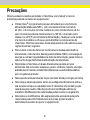
Precautions
Observe these precautions when installing the VisionView to reduce the riskof injury
or equipment damage:
l
VisionView
®
is intended to be supplied by a NRTL listed power supply with a
minimum output rated 24VDC, 2A with a maximum short circuit current
rating of lessthan 8A and a maximum power rating of less than 100VA and
marked Class 2 or Limited Power Source (LPS). Anyother voltage creates
a riskof fire or shock and can damage VisionView components. Applicable
national and local wiring standards and rules must be followed.
l
To reduce the risk of damage or malfunction due to over-voltage, line noise,
electrostatic discharge (ESD), power surges, or other irregularities in the
power supply, route all cablesand wires away from high-voltage power
sources.
l
Do not install VisionView in areas directly exposed to environmental hazards
such as excessive heat, dust, moisture, humidity, impact, vibration,
corrosive substances, flammable substances, or static electricity without a
protective enclosure.
l
Do not expose the touch screen to direct sunlight for prolonged periods of
time.
l
Do not place heavy, hard or sharp objects directly on or against the touch
screen. VisionView does not contain user-serviceable parts. Do not make
any electricalor mechanicalmodifications. Unauthorized modifications may
void your warranty.
l
Changes or modifications not expressly approved by the party responsible
for regulatory compliance could void the user’s authority to operate the
equipment.
l
VisionView is intended for indoor use only.
2

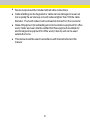
l
Service loops should be included with allcable connections.
l
Cable shielding can be degraded or cables can be damaged or wear out
more quickly if a service loop or bend radiusistighter than 10X the cable
diameter. The bend radius must be at least six inches from the connector.
l
Class A Equipment (broadcasting and communication equipment for office
work): Seller and user shall be notified that thisequipment is suitable for
electromagnetic equipment for office work (Class A) and can be used
outside the home.
l
This device should be used in accordance with the instructions in this
manual.
3

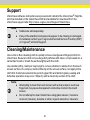
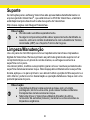
Support
VisionView software instructions are presented in detail in the VisionView
®
Help file,
which isincluded on the VisionView DVD and available for download from the
VisionView support site: http://www.cognex.com/Support/VisionView.
Note:
l
Cablesare sold separately.
l
If any of the standard components appear to be missing or damaged,
immediately contact your Cognex Authorized Service Provider (ASP)
or Cognex Technical Support.
Cleaning/Maintenance
Use a micro-fiber cleaning cloth to quickly remove smudges and fingerprints from
VisionView. Be sure to first remove large dirt particles with clean, compressed air, a
camel hair brush or brush the surface lightly with the cloth.
Use alcohol (ethyl, methylor isopropyl) to remove stubborn residue from the touch
screen surface. Do not pour alcohol directly on the screen surface, but applyto the
cloth first; if alcohol soaks into the joint of upper film and bottom glass, peeling and
defective operation may occur. Wipe dry with a clean/dry section of the cloth.
Note:
l
Attempting to clean the touch screen with a sharp object, such as a
fingernail, may cause transparent conductive cracks in the touch
screen.
l
Do not attempt to clean VisionView using glass cleaner, manicure
remover (toluene), benzine or other organic solvents or cleaners.
4

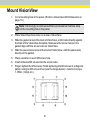
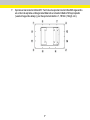
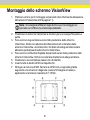
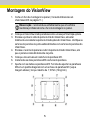
Mount VisionView
1. Cut a mounting hole in the panel. (Refer to VisionView 900 Dimensions on
page10.)
Note: It isstrongly recommended that a professional machine shop
cut the mounting hole in the panel.
2. Place VisionView face-down on a clean, flat surface.
3. Slide the gasket around the backof VisionView, until it rests directly against
the back of the VisionView faceplate. Make sure the screw holes on the
gasket align with the screw holes on VisionView.
4. Slide the panel cutout around the backof VisionView, untilthe panel rests
directly on the gasket.
5. Place a washer on each M3 screw hole.
6. Insert all twelve M3 screws into the screw holes.
7. Finger-tighten the M3 screws. Finish tightening the M3 screws in a diagonal
pattern using an M3 screw driver (see the image below); maximum torque
1.18Nm (12 kgf-cm).
5

6

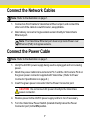
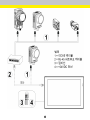
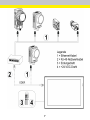
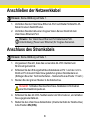
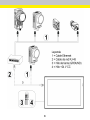
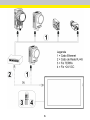
Connect the Network Cables
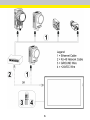
Note: Refer to the illustration on page 1.
1. Connect an RJ-45 cable to VisionView’sEthernet port, and connect the
other end of the cable to a switch/router, as applicable.
2. Alternatively, connect a Cognex vision sensor directly to VisionView's
Ethernet port.
Note: The VisionView Ethernet port does not provide Power over
Ethernet (PoE)to Cognex sensors.
Connect the Power Cable
Note: Refer to the illustration on page 1.
1. Verifythe 24VDC power supplybeing used isunplugged and not receiving
power.
2. Attach the power cable's Ground wire to Pin 1 and the +24V wire to Pin 2 on
the green power connector supplied with VisionView. (Refer to Power
Connector Specifications on page9.)
3. Insert the green power connector into the Power Connector port.
CAUTION: Do not connect AC power directly to the VisionView
power connector.
4. Restore power to the 24VDC power supplyand turn it on if necessary.
5. Turn the VisionView Power Switch (located directly below the Power
Connector port) to the ON position.
7

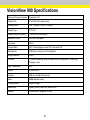
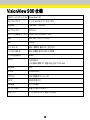
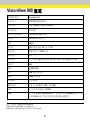
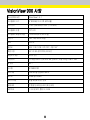
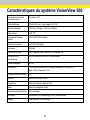
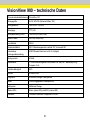
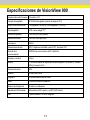
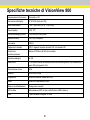
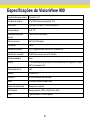
VisionView 900 Specifications
Minimum Firmware Version VisionView 1.6.1
Display Size 9” WSVGA (10:6 aspect ratio)
Viewable Area
7.66" (196.6mm) x 4.45" (114.2mm)
Display Type TFT LCD
Display Resolution (pixels) 1024 x 600 (614,400 pixels)
Number of Colors 262,144 (18 bits/pixel)
Luminance 300 nit
Contrast Ratio 500:1. Viewing angle: vertical 120°, horizontal 140°
Backlight Life 20,000 hours minimum to 5% brightness
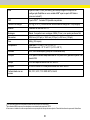
Analog Resistive 4 wire
Life Span >1 Million touches @ Sharp of rubber end: R8, Hardness 60°, Load: 200g,
Frequency: 5Hz
Light Transmission 80%
System 512MB DDR2
Program 2GB non-volatile flash memory
Video 32MB shared memory
Cooling System Fanless Design
Status LEDs Power (top LED) and HDD(bottom LED)
Network 1 Ethernet port, Integrated 10/100M
8

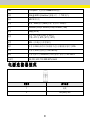
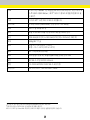
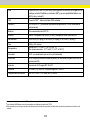
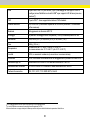
USB 2 Host USB 2.0 (480 Mb/sec.) ports
1
for saving images or DataMan configuration
files to a USB drive
2
and for basic HID support (mouse and keyboard
3
).
PS/2 1 PS/2 port
3
. Standard PS/2 keyboards are supported.
Power Consumption 0.5A @ 24VDC (VisionView has a TVSprotection on power-input).
Material ADC12 Aluminum housing
Mounting Panel. VESA-compatible (75mm) mounting using four M4 screws.
Dimensions 236.6mm (9.31in) x 146.0mm (5.75in) x 35.0mm (1.38in)
Weight 468g (16.5 oz.)
Temperature
Operating: 0°C to 50°C (32°F to 122°F)
Storage: -10°C to 60°C (14°F to 140°F)
Humidity 90%, non-condensing (Operating and Storage)
Protection IP65 when properly panel-mounted in an IP65 rated enclosure or panel.
Shock 30 G Shock per IEC 68-2-27.
Vibration 2 G from 10-2000 Hz. Vibration per IEC 68-2-6.
Regulatory Compliance CE, FCC, KCC, TÜV SÜD NRTL, RoHS
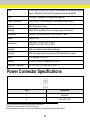
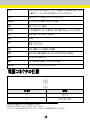
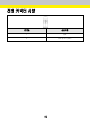
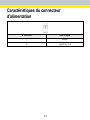
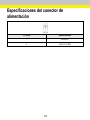
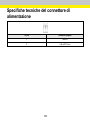
Power Connector Specifications
Pin # Signal Name
1 GROUND
2 +24 (±10%) VDC
1
Do not connectmore than one USBdrive at a time to VisionView.
2
USBdrivesshould be formatted with a FAT32 file system.
3
Mouse/Keyboard are not supported for runtime operation of the VisionView Operator Interface Panel.
9

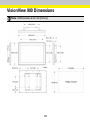
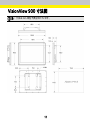
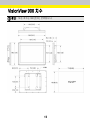
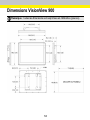
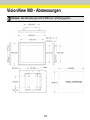
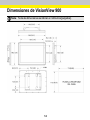
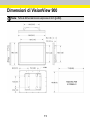
VisionView 900 Dimensions
Note: All dimensions are in mm [inches].
10

注 : 規制および適合性に関する最新情報については、Cognex オンラインサポートサイトにアクセスしてくだ
さい。http://www.cognex.com/Support/VisionView
安全規制
FCC
FCC (アメリカ連邦通信委員会) 規則第 15 章クラス A 準拠
本装置は FCC 規則第 15 章に準拠しており、 次の 2 つの条件を前提として動作し
ます。(1) 本装置が有害な干渉を起こさないこと。(2) 本装置が干渉 (誤動作を引き
起こす恐れのある干渉を含む) を受けても耐えること。装置は高周波を発生・使用・
放射することがあります。取扱説明書の指示にしたがわずに設置・使用した場合、無
線通信に有害な干渉を与える可能性があります。本装置を住宅地で使用すると有害
な電波障害を起こす恐れがあり、この場合、使用者の負担で障害を是正する必要が
あります。
KCC VisionView 900: KCC-REM-IC6-PMX-090T
NRTL TÜV SÜD SCC/NRTL OSHA Scheme for UL/CAN 60950-1
CB TÜV SÜD IEC 60950-1.
RoHS RoHS 6 準拠。
1

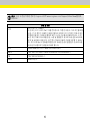
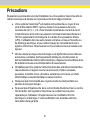
注意事項
人体への障害や機器の損傷を防ぐために、VisionView ビジョンシステムを設置する際
には次の注意事項を厳守してください。
l
VisionView
®
は、NRTL 規格に準拠した 2A 以上の最低定格出力 24VDC、
短絡定格電流最大 8A 以下、電力定格最大 100VA 以下、クラス 2 または
LPS (Limited Power Source) による電源供給を必要とします。異なる電源を
使用すると、火災や感電の危険性が生じ、VisionView のコンポーネントに損
傷を与える原因となります。必要に応じて、国および地域の配線規格および規
則に従ってください。
l
過電圧、回線ノイズ、静電気放電 (ESD)、電力サージ、そのほかの電源異常に
起因した損傷や誤作動を防止するために、ケーブルとワイヤはすべて高電圧電
源を避けて配線してください。
l
過度の熱、ほこり、水分、湿度、衝撃、振動、腐食性物質、可燃性物質、静電気
などの環境下に、保護筐体なしで VisionView を設置しないでください。
l
VisionView を直射日光の当たる場所に設置しないでください。
l
重い物、硬い物、尖った物でタッチスクリーンに触れないでください。
VisionView には、ユーザが修理できる部品はありません。電気的または機械
的な変造を加えないでください。許可なく変造を行った場合は、保証が無効に
なります。
l
各種規格関連団体からの明示的な了承なしに変更、変造を行った場合は、本
機器の使用権限を失う可能性があります。
l
VisionView は屋内設置用として設計されています。
l
サービスループは、すべてのケーブル接続に含まれている必要があります。
l
曲げ半径またはサービスループがケーブル直径の 10 倍より小さい場合、ケー
ブルのシールドの劣化、ケーブルの損傷または磨耗が短期間で生じることがあ
ります。
2

l
クラス A 装置 (商業目的の放送・通信機器)。本機器は、商用の電磁機器 (ク
ラス A) で、家庭用以外で使用可能であることを、販売者あるいは購入者に通
知する必要があります。
l
このデバイスは、本マニュアルの指示通りに使用してください。
3

サポート
VisionView ソフトウェアの使用方法については、『VisionView
®
ヘルプファイル』をご
覧ください。このヘルプは、VisionView DVD に同梱されていますが、以下の
VisionView サポートサイトからも無償でダウンロードできます。
http://www.cognex.com/ckksupport/common/insight.asp
注 :
l
ケーブルは別途ご購入ください。
l
内容物が無い、もしくは損傷している場合、至急、弊社代理店 (ASP) ま
たはテクニカルサポートまでご連絡ください。
クリーニング/メンテナンス
マイクロファイバーの清掃用クロスを使用して、汚れや指紋を拭き取ります。最初に、エア
スプレーまたはやわらかいブラシで大きなほこりを除去してから、クロスで軽く表面を拭
いてください。
タッチスクリーンの表面に付いた頑固な汚れは、アルコール (エチル、メチル、イソプロピ
ル) を使用して取り除きます。スクリーンの表面にアルコールを直接かけず、布にアル
コールを染み込ませてからご使用ください。クロスの清潔で乾いた部分でアルコール分
を拭き取ってください。上部のフィルムと下部のガラスの間の結合部分にアルコールが
染み込むと、剥離や故障が発生する恐れがあります。クロスの清潔で乾いた部分でアル
コール分を拭き取ってください。
4

注 :
l
爪などの尖ったものでタッチスクリーンの汚れを落とそうとすると、タッチ
スクリーンの透明導電膜に亀裂が生じる可能性があります。
l
ガラス専用クリーナや、マニキュア除光液 (トルエン)、ベンジンまたは有
機溶媒やクリーナを使用して、VisionView をクリーニングしないでくださ
い。
5

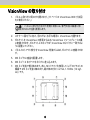
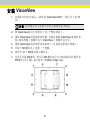
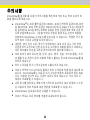
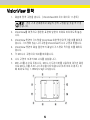
VisionView の取り付け
1. パネルに取り付け用の穴を開けます。(11ページのVisionView 900 寸法図
をご参照ください。)
注 : パネルに取り付け用の穴を開ける際には、専門の加工業者に依
頼されることを強く推奨します。
2. スクリーン面を下に向け、汚れがなく水平な場所に VisionView を置きます。
3. ガスケットを VisionView の背面からはめ、VisionView フェースプレートの裏
に密着させます。ガスケット上のネジ穴が、VisionView のネジ穴と一致するよ
うに配置してください。
4. パネルカットアウト部分を VisionView 背後からはめ、ガスケットに密着させま
す。
5. M3 ネジ穴に座金を配置します。
6. M3 ネジ 12 本すべてをネジ穴に差し込みます。
7. M3 ネジを指で軽く締めます。次に、M3 ドライバを使用して、以下のイラストの
順番で M3 ネジを強く締めます。最大締め付けトルクは、1.18Nm (12 kgf-
cm) です。
6

7

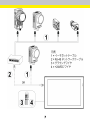
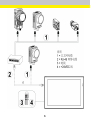
ネットワークケーブルの接続
注 : 1 ページのイラストをご参照ください。
1. RJ-45 ケーブルを VisionView のイーサネットポートに接続し、もう一端を必要
に応じてスイッチ/ルータに接続します。
2. または、Cognex ビジョンセンサを VisionView のイーサネットポートに直接接
続することもできます。
注 : VisionView のイーサネットポートは、Cognex 社製センサにパワー
オーバイーサネット (PoE) 電源を供給しません。
電源ケーブルの接続
注 : 1 ページのイラストをご参照ください。
1. 24VDC 電源のスイッチが OFF になっていることを確認します。
2. VisionView に付属している緑色の電源コネクタの 1 番ピンに電源ケーブル
のグランドワイヤを接続し、2 番ピンに +24V ワイヤを接続します。(10ページ
の電源コネクタの仕様 をご参照ください。)
3. 緑色の電源コネクタを電源コネクタポートに挿入します。
警告 : AC 電源を直接 VisionView 電源コネクタに接続しないでくだ
さい。
4. 24VDC 電源を入れます。必要な場合、電源供給を ON にしてください。
5. 電源コネクタの下にある VisionView 電源スイッチを ON にしてください。
8
La pagina si sta caricando...
La pagina si sta caricando...
La pagina si sta caricando...
La pagina si sta caricando...
La pagina si sta caricando...
La pagina si sta caricando...
La pagina si sta caricando...
La pagina si sta caricando...
La pagina si sta caricando...
La pagina si sta caricando...
La pagina si sta caricando...
La pagina si sta caricando...
La pagina si sta caricando...
La pagina si sta caricando...
La pagina si sta caricando...
La pagina si sta caricando...
La pagina si sta caricando...
La pagina si sta caricando...
La pagina si sta caricando...
La pagina si sta caricando...
La pagina si sta caricando...
La pagina si sta caricando...
La pagina si sta caricando...
La pagina si sta caricando...
La pagina si sta caricando...
La pagina si sta caricando...
La pagina si sta caricando...
La pagina si sta caricando...
La pagina si sta caricando...
La pagina si sta caricando...
La pagina si sta caricando...
La pagina si sta caricando...
La pagina si sta caricando...
La pagina si sta caricando...
La pagina si sta caricando...
La pagina si sta caricando...
La pagina si sta caricando...
La pagina si sta caricando...
La pagina si sta caricando...
La pagina si sta caricando...
La pagina si sta caricando...
La pagina si sta caricando...
La pagina si sta caricando...
La pagina si sta caricando...
La pagina si sta caricando...
La pagina si sta caricando...
La pagina si sta caricando...
La pagina si sta caricando...
La pagina si sta caricando...
La pagina si sta caricando...
La pagina si sta caricando...
La pagina si sta caricando...
La pagina si sta caricando...
La pagina si sta caricando...
La pagina si sta caricando...
La pagina si sta caricando...
La pagina si sta caricando...
La pagina si sta caricando...
La pagina si sta caricando...
La pagina si sta caricando...
La pagina si sta caricando...
La pagina si sta caricando...
La pagina si sta caricando...
La pagina si sta caricando...
La pagina si sta caricando...
La pagina si sta caricando...
La pagina si sta caricando...
La pagina si sta caricando...
La pagina si sta caricando...
La pagina si sta caricando...
La pagina si sta caricando...
La pagina si sta caricando...
La pagina si sta caricando...
La pagina si sta caricando...
La pagina si sta caricando...
La pagina si sta caricando...
La pagina si sta caricando...
La pagina si sta caricando...
La pagina si sta caricando...
La pagina si sta caricando...
La pagina si sta caricando...
La pagina si sta caricando...
La pagina si sta caricando...
La pagina si sta caricando...
La pagina si sta caricando...
La pagina si sta caricando...
-
 1
1
-
 2
2
-
 3
3
-
 4
4
-
 5
5
-
 6
6
-
 7
7
-
 8
8
-
 9
9
-
 10
10
-
 11
11
-
 12
12
-
 13
13
-
 14
14
-
 15
15
-
 16
16
-
 17
17
-
 18
18
-
 19
19
-
 20
20
-
 21
21
-
 22
22
-
 23
23
-
 24
24
-
 25
25
-
 26
26
-
 27
27
-
 28
28
-
 29
29
-
 30
30
-
 31
31
-
 32
32
-
 33
33
-
 34
34
-
 35
35
-
 36
36
-
 37
37
-
 38
38
-
 39
39
-
 40
40
-
 41
41
-
 42
42
-
 43
43
-
 44
44
-
 45
45
-
 46
46
-
 47
47
-
 48
48
-
 49
49
-
 50
50
-
 51
51
-
 52
52
-
 53
53
-
 54
54
-
 55
55
-
 56
56
-
 57
57
-
 58
58
-
 59
59
-
 60
60
-
 61
61
-
 62
62
-
 63
63
-
 64
64
-
 65
65
-
 66
66
-
 67
67
-
 68
68
-
 69
69
-
 70
70
-
 71
71
-
 72
72
-
 73
73
-
 74
74
-
 75
75
-
 76
76
-
 77
77
-
 78
78
-
 79
79
-
 80
80
-
 81
81
-
 82
82
-
 83
83
-
 84
84
-
 85
85
-
 86
86
-
 87
87
-
 88
88
-
 89
89
-
 90
90
-
 91
91
-
 92
92
-
 93
93
-
 94
94
-
 95
95
-
 96
96
-
 97
97
-
 98
98
-
 99
99
-
 100
100
-
 101
101
-
 102
102
-
 103
103
-
 104
104
-
 105
105
-
 106
106


Cognex VisionView Series Guida Rapida
- Tipo
- Guida Rapida
- Questo manuale è adatto anche per
in altre lingue
- English: Cognex VisionView Series Quick start guide
- français: Cognex VisionView Series Guide de démarrage rapide
- español: Cognex VisionView Series Guía de inicio rápido
- Deutsch: Cognex VisionView Series Schnellstartanleitung
- português: Cognex VisionView Series Guia rápido
- 日本語: Cognex VisionView Series クイックスタートガイド
