Hotpoint ITW A 5852 W Manuale del proprietario
- Categoria
- Lavatrici
- Tipo
- Manuale del proprietario
Questo manuale è adatto anche per


a
1
b
c
d
g
e
f
g
A
A
B
A
B
C
D
2 3 4
5
6
7 8 9
11 12
10
14 15
13
16

EN 1
INTENDED USE
This washing machine is exclusively destined to wash
and spin machine washable laundry in quantities
which are usual for private households.
• Observe the instructions given in these Instructions
for Use and the Programme Chart when using the
washing machine
• Keep these Instructions for Use and the
Programme Chart; if you pass on the washing
machine to another person, also give him/her
Instructions for Use and Programme Chart.
SAFETY AND GENERAL RECOMMENDATIONS
1. Safety instructions
• The washing machine is
appropriate for indoor use only.
• Do not store flammable fluids
near the appliance.
• Do not place electrical
appliances on the lid of your
washing machine.
• Children must be supervised to
ensure that they do not play with
the appliance.
• The washing machine can
be operated by children from
the age of 8 years up, as well
as by people with reduced
physical, sensory or mental
capabilities or lack of experience
and knowledge, provided they
are supervised or instructed
regarding the safe use of the
washing machine and they
understand the dangers resulting
from the use. Children must not
play with the washing machine.
Care and maintenance works on
the washing machine must not
be carried out by children without
being supervised.
• Do not attempt to force the lid
open.
• If necessary, the power cable
may be replaced with an
identical one obtained from our
After-Sales Service. The power
cable must only be replaced by a
qualified technician.
• Before any cleaning or carrying
out maintenance switch off the
washing machine and disconnect
it from the mains supply.
2. Packing
• The packaging materials are 100% recyclable
and bear the recycling symbol . Adhere to local
regulations when disposing of packaging material
3. Disposing of packaging and old
washing machines
• This appliance is marked according to the
European directive 2002/96/EC on Waste Electrical
and Electronic Equipment (WEEE). By ensuring
this product is disposed of correctly, you will help
prevent potential negative consquences for the
environment and human health, which could
otherwise be caused by inappropriate waste
handling of this product.
• The symbol on the product, or on the
documents accompanying the product, indicates
that this appliance may not be treated as
household waste. Instead it shall be handed over
to the applicable collection point for the recycling
of electrical and electronic equipment. Disposal
must be carried out in accordance with local
environmental regulations for waste disposal.
For more detailed information about treatment,
recovery and recycling of this product, please
contact your local city office, your household waste
disposal service or the shop where you purchased
the product.
• The washing machine is built from reusable
materials. It must be disposed of in compliance
with current local waste disposal regulations.
• Before scrapping, remove all detergent residues
and cut off the power cable so that the washing
machine is made unusable.
4. General recommendations
• Do not leave the washing machine connected
when not in use. Turn off the tap.
5. EC Declaration of Conformity
• This washing machine has been designed,
constructed and distributed in compliance
with the safety requirements of EC Directives:
2006/95/EC Low Voltage Directive 2004/108/EC
Electromagnetic Compatibility Directive
The Manufacturer is not liable for any damage to
laundry resulting from inadequate or incorrect fabric
care instructions which have been provided with the
garment or article

EN 2
BEFORE USING THE WASHING MACHINE
1. Remove the packaging and check
a. Cut and remove the shrink-wrap.
b. Remove the top protection and the protective
corners.
c. Remove the bottom protection by tilting and
turning the washing machine on one rear
bottom corner. Make sure that the plastic part
of the bottom protection (if available on the
model) remains in the packing and not in the
machine bottom.
This is important, as otherwise the plastic part could
damage the washing machine during operation.
d. Open the lid by pressing it slightly down while
raising the handle. Remove the polystyrene
cushion (depending on model).
e. Remove the blue protective film from the panel
(depending on model).
• After unpacking, make sure that the washing
machine is undamaged. If in doubt, do not use the
washing machine. Contact After-Sales Service or
your local retailer.
• Keep the packaging materials (plastic bags,
polystyrene parts, etc.) out of reach of children;
they are potentially dangerous.
• If the appliance was exposed to the cold prior to
delivery, keep it at room temperature for a few
hours before operating.
2. Remove the transport bracket
• The washing machine is fitted with transport
screws and a transport bracket to prevent damage
during transport. Before using the washing
machine you must remove the transport
bracket (see “Installation”/“Removal of transport
bracket”).
3. Install the washing machine
• Place the washing machine on a flat and stable
floor surface.
• Adjust the feet to ensure that the machine is
stable and level (see “Installation”/“Adjust the
feet”).
• In case of wooden or so-called “floating floors” (for
instance certain parquet or laminate floors), place
the appliance on a sheet of plywood with a size of
at least 40 x 60 cm and thickness of at least 3 cm,
which is screwed to the floor.
• Make sure that the ventilation openings in the
base of your washing machine (if available on your
model) are not obstructed by a carpet or other
material.
4. Water supply
• Connect the water supply inlet hose in accordance
with the regulations of your local water company
(see “Installation”/“Connect the water inlet hose”).
• Water supply: Cold water only
• Tap: 3/4” threaded hose connection
• Pressure: 100-1000 kPa (1-10 bar).
• Only use new hoses for connecting the washing
machine to the water supply. Used hoses must not
be used anymore and should be discarded.
5. Drain hose
• Firmly connect the drain hose to the siphon or
another outlet for drain water. (see “Installation”/
Connect the water drain hose”).
• If the washing machine is connected to a built-in
drainage system, ensure the latter is equipped with
a vent to avoid simultaneous loading and draining
of water (siphoning effect).
6. Electrical connection
• Electrical connections must be carried out by a
qualified technician in compliance with the manu-
facturer’s instructions and the current standard
safety regulations.
• The technical data (voltage, power and fuses) are
given on the rating plate on the rear of the washing
machine.
• Do not use extension leads or multi sockets.
• Access to the mains plug or disconnection from
the mains supply via a double-pole switch must be
ensured at all times after the installation.
• Do not operate the washing machine if it has been
damaged during transport. Inform the After-Sales
Service.
• Mains cable replacement is only to be carried out
by After-Sales Service.
• The washing machine must be connected exclu-
sively by means of a socket with an earth connec-
tion, in compliance with the regulations in force. In
particular, washing machines installed in premises
containing a shower or a bath must be protected
by a differential residual current device of at least
30 mA. Earthing the washing machine is obliga-
tory under the law. The manufacturer declines all
liability for injury to persons or animals or damage
to property deriving either directly or indirectly from
failure to observe the directions in these Instruc-
tions for Use.
• When using a residual current circuit breaker
(RCCB), only use a model marked with .
Approximate dimensions:
Width: 400 mm
Height: 900 mm
Depth: 600 mm

EN 3
DESCRIPTION OF THE WASHING MACHINE (picture 1)
a. Lid
b. Detergent dispenser
c. Drum
d. Pump access behind filter
e. After-Sales Service sticker (behind the filter cover)
f. Mobility lever (depending on model). To move the
washing machine: pull the handle out a little bit by
hand and pull it out to the stop with the foot.
g. Adjustable feet
INSTALLATION
Removal of transport bracket
The washing machine is fitted with a transport bracket
to avoid any possible damage during transport.
IMPORTANT: Before using the washing machine,
the transport bracket at the back MUST be
removed.
1. Unscrew the two screws “A” and the four screws
“B” with a flat screwdriver or a No. 8 hex nut box
spanner (picture 2).
2. Remove the transport bracket (picture 3).
3. Replace the four outer screws “B” on the machine
and tighten them (picture 2).
4. Clip the two covers “C” supplied into the openings
“D” of the washing machine (picture 4).
Note: do not forget to replace and tighten the four
outer screws.
Adjust the feet (picture 5, 6)
Install the washing machine on a level surface, near
to electrical, water and drain connections.
If the floor is uneven, adjust the feet (do not insert
pieces of wood, cardboard etc. under the feet):
1. Screw out the washing machine´s feet by hand
with 2-3 clockwise turns and then slacken the
locknut by wrench.
2. Adjust the height of the feet by hand.
3. Retighten the locknut by turning it anti-clockwise
towards the washing machine’s bottom.
Make sure that the feet are resting correctly on the
floor and that the washing machine is perfectly
level and stable (use a spirit level).
The washing machine can be installed in an area 40
cm wide and 63 cm deep.
Note: if you install the machine on thick carpet, adjust
the feet to ensure that there is sufficient space under
the machine for the air to circulate.
Connect the water inlet hose (picture 7)
1. Carefully screw the water inlet hose to the valve
on the rear side of the washing machine (A); screw
the other end of the hose to the tap by hand.
2. Make sure there are no kinks in the hose.
3. Check water-tightness of tap and washing machine
connections by turning the tap completely on.
• If the hose is too short, replace it with a suitable
length of pressure resistant hose (1000 kPa min,
EN 61770 approved type).
• If you need a longer waterstop hose, contact our
After Sales Service or your dealer.
• Check the inlet hose regularly for brittleness and
cracks and replace if necessary.
• The washing machine can be connected without a
backflow valve.
Water stop anti-flooding system (picture 8)
(if available)
• Screw the hose to the water supply tap. Turn the
tap fully on and check the water-tightness of the
connection.
• The washing machine must not be connected to
the mixing tap of a non-pressurized water heater!
• Do not immerse the water stop device of the hose
into water; otherwise it will loose its protective
function.
• If the flexible hose is damaged, unplug the washing
machine from the mains immediately, turn off the
tap and replace the hose.
• If the flexible hose is too short, replace it with a 3
m Water Stop hose (available from After-Sales
Service or from your dealer).
Connect the water drain hose (picture 9)
Unhook the drain hose from the left clip, see arrow
“A” on picture.
Important:
Do NOT loosen the drain hose from the right con-
nection, see arrow “B” on picture. Otherwise, there
is the risk of leakage and of scalding with hot water.
Firmly connect the drain hose to the siphon or another
outlet for drain water.
If you need to add an extension, use a flexible hose
of the same size and secure the unions with screw-on
hose clips.
Maximum overall drain hose length: 2.50 m.
Maximum drain height: 100 cm.
Minimum drain height: 55 cm.
Important:
Make sure there are no kinks in the drain hose and
take precautions against it falling while the washing
machine is running.

EN 4
Do not use extension leads or multi sockets.
Electrical connections must be made in accordance with local regulations.
1) Warning - this washing machine must be earthed
This washing machine is normally supplied with a mains lead having a plug fitted in the factory which has
been checked for correct earth continuity.
If the fitted plug is not suitable for your socket outlet, or if the machine’s mains lead is not fitted with a plug,
you should fit a suitable new, good quality plug by following the instructions in (2) below.
Any unsuitable plug should be cut off and disposed of in order to avoid a possible shock hazard should it be
inserted into a socket.
2) CONNECTION TO A REWIRABLE PLUG - to be carried out only by a qualified electrician
The wires in the mains lead are coloured in accordance with the following code:
BLUE - “NEUTRAL” (“N”)
BROWN - “LIVE” (“L”)
GREEN AND YELLOW - “EARTH” (“E”)
To fit a new plug, proceed as follows:
2.1)Polarized Plugs (e.g. 3 pin, 13 amp plug conforming to BS
1363A)
a. The GREEN AND YELLOW wire must be connected to the terminal
in the plug which is marked with the letter “E” or by the Earth symbol
or coloured green and yellow.
b. The BLUE wire must be connected to the terminal which is marked
with the letter “N” or coloured blue.
c. The BROWN wire must be connected to the terminal which is
marked with the letter “L” or coloured brown.
2.2) Non-polarized plugs (e.g. 2 pin with side earth contact)
The wire which is coloured GREEN AND YELLOW must be connected to the earth contact. The other two
wires should be connected to the two pins, irrespective of colour.
FUSE REPLACEMENT
If the mains lead of this washing machine is fitted with a BS 1363A 13
amp fused plug, replace the fuse only with an A.S.T.A. approved type con-
forming to BS 1362 and proceed as follows: Remove the fuse cover (A)
and the fuse (B). Fit the replacement 13 A fuse into the fuse cover. Refit
both into the plug. For all other types of plug, the supply socket should be
protected by a 16 A fuse or circuit breaker at the distribution board.
ELECTRICAL CONNECTION

EN 5
BEFORE THE FIRST WASH CYCLE
To remove any residual water used in testing by the
manufacturer, we recommend that you carry out a
short wash cycle without laundry.
1. Open the tap.
2. Close the drum flaps.
3. Add a small amount of detergent (maximum
1/3 of the quantity the detergent manufacturer
recommends for lightly soiled laundry) to the main
wash chamber of the detergent dispenser.
4. Close the lid.
5. Select and start programme “Synthetics” at 60°C
(see separate the programme chart).
PREPARATION OF THE LAUNDRY
Sort the laundry
1. Sort the laundry according to…
• Type of fabric / care label symbol
Cottons, mixed fibres, easy care/synthetics, wool,
handwash items.
• Colour
Separate whites and coloureds. Wash new
coloured items separately.
• Size
Wash items of different sizes in the same load to
improve washing efficiency and distribution in the
drum.
• Fabric delicacy
Wash delicate articles separately: use a special
programme for Pure New Wool , curtains and
other delicates. Always remove curtain glides or
wash curtains with the glides inside a cotton bag.
Use the special programme for handwash fabrics.
Wash stockings, belts and other small items or
articles with hooks (e.g. bras) in special cotton
bags for washing machines or in zipped pillow
cases.
2. Empty pockets
Coins, safety pins and similar items can damage
your laundry as well as the washing machine’s
drum and tub.
3. Fasteners
Close zips and fasten buttons or hooks; loose belts
or ribbons should be tied together.
Stain remwoval
• Blood, milk, egg and other organic substances are
generally removed by the enzyme phase of the
programme.
• To remove red wine, coffee, tea, grass and
fruitstains etc. add a stain remover to the main
wash chamber of the detergent dispenser.
• Particularly stubborn stains should be treated
before the wash.
Dyeing and bleaching
• Only use dyes and bleaches that are suitable
forwashing machines.
• Follow the manufacturer’s instructions.
• Plastic and rubber parts of the machine may be
stained by dyes or bleaches.
Loading the laundry
1. Open the machine lid by pulling it upwards.
2. Open the drum
- by pushing the drum flap release (picture 10,11);
models as shown on picture 10 have a fixed drum
flap release which will not compress when pushed.
- by holding the rear drum flap, sliding back the
slider into arrow direction and pushing the front
flap towards the inside of the drum until the closing
mechanism releases (picture 12).
3. Place the items of laundry into the drum one by
one. Do not exceed the maximum load of the
programmes indicated in the separate programme
chart.
- Overloading the machine will result in
unsatisfactory washing results and creased
laundry.
- Take care that the laundry does not overhang the
drum; if this is the case, push the laundry down
into the drum so that there is enough free space
to close the drum flaps properly.
- Do not use the flaps to push the laundry into the
drum.
4. To close the drum, hold both flaps in the middle
again (picture 13), the rear flap over the front flap.
ATTENTION: make sure that the drum flaps are
properly locked - depending on the model:
- all metal hooks must be properly hooked inside
the rear door flap - see picture 14.
- all metal hooks must be properly hooked inside
the rear door flap, and the button must overlap
the edge of the rear door flap see picture 15.
- the slider of the front flap must slightly overlap
the rear flap - see picture 16.
Check that no laundry gets stuck between the flaps,
or between flaps and drum.

EN 6
DETERGENTS AND ADDITIVES
Keep detergents and additives in a safe, dry
place out of the reach of children.
Do not use any solvents (e.g. turpentine,
benzene); do not machine wash fabrics that
have been treated with solvents or flammable
liquids.
Only use detergents and/or additives that are
specifically produced for domestic washing
machines. Observe the recommendations on the
care labels of your laundry.
The choice of detergent depends on:
• Type of fabric
• Colour
• Recommended wash temperature
• Degree and type of soiling
Laundry type Kind of detergent
White robust laundry
(cold-95°C):
heavy duty detergents with
bleach
White delicate laundry
(cold-40°C):
mild detergents with bleach
and/or optical brighteners
Light /pastel- shaded
colours (cold-60°C):
detergents with bleach and/
or optical brighteners
Intensive colours
(cold-60°C):
colour detergents without
bleach/optical brighteners
Black/dark
colours(cold-60°C):
special detergents for black/
dark laundry
For laundry requiring special treatment (e.g. wool
or microfibers), we recommend to use specialized
detergents, additives or pre-treatment available on the
market. Refer to internet link www.cleanright.eu for
more detailed information.
Do not use liquid detergent for the main wash
when having activated the “Prewash” option.
Do not use liquid detergent when selecting a
later cycle start / cycle end (depending on the
model).
Dosage
Follow the dosage recommendations on the detergent
pack. They depend on:
• degree and type of soiling
• size of wash
- full load: follow the detergent manufacturer’s
instructions;
- half load: 3/4 the amount used for a full load;
- minimum load (about 1 kg): half the amount used
for a full load
If there is no reference to a certain wash load on
the detergent pack: the detergent manufacturers
usually refer their dosing recommendations to 4.5
kg laundry for heavy duty detergent and 2.5 kg
laundry for delicate detergent.
• water hardness in your area (ask for information
from your water company). Soft water requires less
detergent than hard water.
Please note:
Too much detergent can result in excess foam
formation, which reduces washing efficiency. If the
washing machine detects too much foam, it may
prevent spinning, or prolong the programme duration
and increase the water consumption (see also
remarks on foam formation in the “Troubleshooting
Guide”). Insufficient detergent may result in grey
laundry and also calcifies the heating system, drum
and hoses.
Where to put detergents and additives
(picture 17a, 17b - depending on the model)
Prewash chamber
• Detergent for the prewash phase (only if you
have activated “prewash” option)
Main wash chamber
• Detergent for the main wash phase (must be
added for all wash programmes)
• Additive for stain removal (optional)
• Water softener (optional; recommendable for
water hardness class 4 or more)
Softener chamber
• Fabric softener (optional)
• Starch dissolved in water (optional)
Do not exceed the “MAX” level mark when filling in
detergent, additives or softener.
For more information regarding the application of
detergent and fabric softener in the programmes,
have a look at the separate program chart.
Using chlorine bleach
• Wash your laundry in the desired programme
(Cotton, Synthetics), adding an appropriate amount
of chlorine bleach to the SOFTENER chamber
(close the lid carefully).
• Immediately after end of programme, start the
“Rinse and Spin” programme to eliminate any
residual bleach smell; if you want, you can add
softener.
• Never put both chlorine bleach and softener into
the softener chamber at the same time.
Using starch powder
• Wash your laundry in the desired wash programme.
• Prepare the starch solution according to the starch
manufacturer’s instructions.
• Fill the prepared starch solution (maximum 100
ml) into the softener chamber of the detergent
dispenser.
• Close the lid and start programme “Rinse and
Spin”.

EN 7
CARE AND MAINTENANCE
Always unplug the washing machine before doing any maintenance.
Detergent dispenser
Clean the detergent dispenser regularly, at least
three or four times a year, to prevent detergent
build-up:
Detergent dispenser - picture 17a
1. Push in the buttons on each side of the dispenser
(picture 18).
2. Pull the dispenser towards you and remove
it. A small quantity of water can remain in the
dispenser. It is advisable to carry the dispenser in
an upright position.
3. Wash the dispenser using running water. You can
also remove the siphon caps in the dispenser for
cleaning.
4. Replace the siphon caps in the dispenser (if
removed). Make sure that they lock in place
5. Replace the dispenser by locating the bottom tabs
in the lid holes and pivot until both of the upper
buttons lock.
Detergent dispenser - picture 17b
1. Press the button to release the detergent dispenser
and remove it (picture 19). A small quantity of
water can remain in the dispenser, thus you should
carry it in an upright position.
2. Wash the dispenser using running water. You can
also remove the siphon cap on the back of the
dispenser for cleaning (picture 20).
3. Replace the siphon cap in the dispenser (if
removed)
4. Reinstall the dispenser by locating the dispenser’s
bottom tabs into the appropriate openings on the
lid, and by pushing the dispenser against the lid
until it locks into place.
Make sure that the detergent dispenser is
correctly reinstalled.
Water inlet hose filter
Check and clean regularly (at least two or three
times a year).
1. Unplug the washing machine.
2. Turn off the tap.
3. Unscrew the hose from the tap.
4. Carefully clean the filter located at the end of hose,
without disassembling it, for example with a tooth-
brush.
Note: Do not submerge the hose in water.
5. Screw the flexible hose back onto the tap by hand.
Do not use pliers (risk of squashing the joint).
6. Turn on the tap and check that the connections
are water-tight.
7. Plug the washing machine back in.
Water inlet hose
(picture 21, 22 or 23, depending on model)
Check the inlet hose regularly for brittleness and
cracks and replace it if necessary using a new hose of
the same type.
The inlet hose as shown on picture 21 has a safety
valve to prevent the appliance against uncontrolled
water inlet; if the safety valve inspection window (A) is
red, the safety valve has been activated and the hose
must be exchanged. Contact out After-Sales Service
or your specialist dealer to obtain a new inlet hose.
For unscrewing the inlet hose as shown on picture 21,
you must push down the release lever (B) (if available)
while unscrewing it.
If your inlet hose has a transparent hose coating
(picture 22), periodically check the colour of the
transparent coating. If the transparent hose shows a
local dark colour change, this is an indication that the
hose may have a leak and should be replaced.
Contact our After-Sales Service team or specialist
dealer to obtain a replacement hose.
Appliance exterior and control panel
• Clean with a soft damp cloth.
• If necessary, use some soapy water or a mild
neutral detergent (do not use detergents containing
solvents, abrasive detergents, window or general-
purpose cleaners - they may harm the surfaces).
Appliance interior
• After each washing, leave the lid open for some-
time to allow the inside of the appliance to dry.
• If you never or seldom wash your laundry at
95°C, we recommend to occasionally run a 95°C
programme without laundry, adding a small amount
of detergent, to keep the interior of the appliance
clean.
Lid seal
• Check the condition of the lid seal periodically and
clean it from time to time with a damp cloth.
Water inlet hose(s)
• Check the hose regularly for brittleness and cracks.
Replace if necessary.
Filter
• Check and clean the filter regularly, at least 3 or
4 times a year (see “Cleaning the Filter/ Draining
Residual Water”).
Do not use flammable fluids for cleaning the ap-
pliance.

EN 8
Recovering an object that falls between
the drumand the tub
If an object accidentally falls between the drum and
the tub, you can recover it thanks to one of the remov-
able drum blades:
1. Unplug the washing machine.
2. Remove the laundry from the drum.
3. Close the drum flaps and turn the drum a
half-turn (picture 24).
4. Using a screw-driver, press on the plastic end
while sliding the blade from left to right (picture
25, 26).
5. It will fall into the drum.
6. Open the drum: you can recover the object
through the hole in the drum.
7. Refit the blade from inside the drum: Position the
plastic tip above the hole on the right side of the
drum (picture 27).
8. Then slide the plastic blade from right to left until
it clips.
9. Close the drum flaps again, turn the drum through
half a turn and check the positioning of the blade
at all its anchorage points.
10. Plug the washing machine in again.
REMAINING MOISTURE CONTENT OF THE LAUNDRY
AFTER SPINNING
The degree of moisture remaining in the laundry
after spinning mainly depends on the fabric type, the
selected programme and spin speed.
The lowest remaining moisture content can be
achieved using the wash programme referred to
by the Energy Label, with maximum spin speed.
This programme is marked in the separate
programme chart as “Reference programme
for the Energy Label”. Below a survey of the
remaining moisture content (in %) related to
the various spin-drying efficiency classes:
Spin-drying
efficiency class
Remaining moisture
content in %
A (= most efficient) less than 45
B 45 or more, but less than 54
C 54 or more, but less than 63
D 63 or more, but less than 72
E 72 or more, but less than 81
TRANSPORT AND HANDLING (picture 30)
1. Unplug the washing machine.
2. Turn off the tap.
3. Remove the water supply and drain hose.
4. Eliminate all water from the hoses and the washing
machine (see “Cleaning the Filter/ Draining
Residual Water”). Wait for the water to cool so as to
avoid any accidents.
5. To facilitate moving the machine, pull the handle
situated at the bottom front (if available on your
model) out a little by hand and pull it out to the stop
with the foot. Afterwards push the handle back into
the original stable position.
6. Fix the transport bracket again for transportation.
7. Transport the washing machine upright.
IMPORTANT: Do not use the washing machine while
the handle is pulled out.
CLEANING THE FILTER/ DRAINING RESIDUAL WATER
The washing machine is provided with a self-cleaning
pump. The filter keeps objects like buttons, coins,
safetypins etc. which have been left in the laundry.
We recommend to check and clean the filter regularly,
at least two or three times a year.
Especially:
• if the appliance is not draining properly or if it fails
to perform spin cycles.
• if the “Pump” indication lights up.
IMPORTANT: make sure the water has cooled
before draining the appliance.
Residual water must be drained also before transport-
ing the machine.
1. Unplug the washing machine.
2. Open the filter cover with a coin (picture 28).
3. Place a bowl beneath it.
4. Turn the filter slowly anti-clockwise until some
water starts to flow out; do not remove it as yet.
5. Wait until all the water has drained.
6. Now unscrew the filter completely and extract it
(picture 29).
7. Clean the filter and the filter chamber.
8. Make sure the pump impeller (in the housing
behind the filter) is not obstructed.
9. Insert the filter again and screw it in
completely in clockwise direction. Make
sure the filter is screwed in properly, as far
as it will go.
10. Pour approximately one litre of water into the
washing machine via the drum and check that
water does not leak from the filter.
11. Close the filter cover.
12. Reconnect the washing machine.

EN 9
AFTER SALES SERVICE
No one is better placed to care for your Hotpoint appliance during the course of its working
life than us - the manufacturer.
Essential Contact Information
Hotpoint Service
We are the largest service team in Europe offering you access to 400 skilled telephone advisors and 1000
fully qualified engineers on call to ensure you receive fast, reliable, local service.
UK: 08448 224 224
Republic of Ireland: 0818 313 413
www.hotpointservice.co.uk
Please note: Our advisors will require the following information:
Model number:
Serial number:
Parts and Accessories
We supply a full range of genuine replacement parts as well as accessory products that protect and
hygienically clean your appliance to keep it looking good and functioning efficiently throughout its life.
UK: 08448 225 225
Republic of Ireland: 0818 313 413
www.hotpointservice.co.uk
Appliance Registration
We want to give you additional benefits of Hotpoint ownership. To activate your free 5 year parts guarantee you
must register your appliance with us.
UK: 08448 24 24 24
Republic of Ireland: 01 230 0800
www.hotpointservice.co.uk
Indesit Company UK Ltd. Morley Way, Peterborough, PE2 9JB
Indesit Company Unit 49 Airways Industrial Estate,Dublin 17
RECYCLING & DISPOSAL INFORMATION
As part of Hotpoint’s continued commitment to helping the environment, Hotpoint reserves the right to use
quality, recycled components to keep down customer costs and minimise material wastage.
Please dispose of packaging and old appliances carefully. To minimise the risk of injury to children, remove the
door, plug and cut the mains cable off flush with the appliance. Dispose of these parts separately to ensure that
the appliance can no longer be plugged into a mains socket, and the door cannot be locked shut.

EN 10
TROUBLESHOOTING GUIDE
Your washing machine is equipped with automatic safety functions which detect and diagnose faults at an early
stage and allow you to react appropriately. These faults are frequently so minor that they can be removed within
a few minutes.
Problem Causes - Solutions - Tips
Appliance does not start,
no indicator lamps are on
• Plug is not properly inserted in socket.
• Socket or fuse does not function correctly (use a table lamp or similar
appliance to test it).
Appliance does not start
although “Start(Pause)”
has been pressed
• Lid is not properly closed.
• The “Child lock” function has been activated (if available on your
model). To unlock the buttons, push temperature and spin speed button
simultaneously and hold them at least for 3 seconds. The key symbol on
the display disappears and the programme can be started.
Appliance stops during the
programme, and the
“Start(Pause)” light blinks
• “Rinse hold” option is activated (if available on your model) - terminate
“Rinse hold” by pressing “Start(Pause)” or by choosing and starting
“Drain”.
• Programme has been changed - reselect desired programme and press
Start(Pause)”.
• Programme has been interrupted and eventually lid has been opened -
close lid and restart programme by pressing “Start(Pause)”.
• The appliance’s safety system has been activated (see “Description of
failure indicators”).
• Water tap is not opened or water inlet hose is kinked (“Water tap closed”
indicator lights up).
Detergent dispenser
contains residues from
detergent/additives at end
of wash
• Detergent dispenser is not properly installed, or detergent dispenser is
blocked (see “Care and Maintenance”).
• Filter in the water inlet hose is blocked (see “Care and Maintenance”).
Appliance vibrates during
spin cycle
• Washing machine is not level; the feet are not properly adjusted (see
“Installation”).
• The transport bracket has not been removed; before using the washing
machine, the transport bracket must be removed.
Final spin results are poor
• Unbalance during spinning prevented spin phase to protect the washing
machine (see “Unbalance during spinning”).
• Excessive foam formation prevented spinning; select and start “Rinse &
Spin” programme. Avoid excessive detergent dosing (see “Detergents
And Additives”).
• “Spin” button has been set to a low spin speed.
“Unbalance during spinning”
The “Spin/Drain” indicator
in the programme flow bar
blinks, or the spin speed on
the display blinks, or the spin
speed indicator blinks after
the end of the programme
(depending on the model).
The laundry is still very wet.
Unbalance of the laundry load during spinning prevented the spin phase
to avoid damages on the washing machine. This is why the laundry is still
very wet.
Reason for unbalance can be: small laundry loads (consisting of only few
quite big or absorbent items, e.g. towels), or big/heavy laundry items.
• If possible avoid small laundry loads.
• It is highly recommended that you add other laundry items of different
sizes when washing a big or heavy piece of laundry.
If you want to spin the wet laundry, add more laundry items of different
sizes, and subsequently select and start the “Rinse & Spin” programme.
Programme duration is
considerably longer or
shorter as indicated in the
“programme chart” or on
the display (if available)
Normal function of the washing machine to adapt to factors that can have
an effect on the programme duration, like excessive foam formation, load
unbalance due to heavy laundry items, prolonged heating time resulting
from low inlet water temperature etc.. Moreover, the sensing system of the
washing machine adapts the programme duration to the size of the wash
load.
Depending on these factors, the duration is recalculated during the
programme and updated if necessary; during such periods, an animation
appears on the display (if available). For small loads, the programme
time indicated in the “programme chart” may be reduced by up to 50%.

EN 11
Failure indicator
lights up
Indication on display
(if available)
Description - Causes - Solutions
“Service”
“bdd”
(in case your washing
machine has no display:
all lamps of the programme
flow bar light up)
Appliance stops during the programme. “Drum flaps
open” (the drum flaps have not been closed properly).
Push the “Reset” button for at least 3 seconds and wait
until the “Door open” lights up. Open lid and close
drum flaps, then select and start desired programme
again. If fault persists, notify our After-Sales Service.
from “F02” to “F35”
(except “F09”)
“Electrical module fault”.
Select and start “Drain” programme or push “Reset”
button for at least 3 seconds.
“F09”
“Water level too high” (after programme cancellation or
false operating). Switch off appliance and then switch it
on again, select programme “Drain” and start within 15
sec.
“FA”
“Waterstop fault”
Switch off appliance, pull out mains plug and turn water
tap off. Tilt appliance forward carefully to allow collected
water to flow out from the bottom. Then:
• Plug in the appliance again.
• Turn the water tap on (if water immediately flows into
the appliance without the appliance being started,
there is a failure; turn off the tap and notify After-Sales
Service).
• Select and start the desired programme again.
“Fod”
“Overfoaming”
Too much foam interrupted the wash programme.
• Select and start “Rinse & Spin” programme.
• Afterwards select and start desired programme again,
using less detergent.
If faults persist, unplug the appliance, turn off the water
tap and contact our After-Sales Service
“Water tap
closed” −
Appliance has no or insufficient water supply. The “Start
(Pause)” light blinks. Check whether:
• Water tap is fully open and water supply pressure is
sufficient.
• Kinks are present in water inlet hose.
• Mesh filter of water supply hose is blocked (see “Care
and Maintenance”).
• Water hose is frozen up.
• Safety valve inspection window of your water supply
hose is red (provided your appliance has a water
supply hose as shown on picture 21 - see previous
chapter “Care and Maintenance”); replace the hose by
a new one available through our After-Sales Service or
your specialist dealer.
After problem has been removed, restart programme
by pressing “Start (Pause)”. If the fault occurs again,
contact our After-Sales Service.
“Clean pump”
−
Waste water is not pumped out. The appliance stops in
the corresponding programme step; unplug it and check
whether:
• Kinks are present in the drain hose.
• Filter or pump is blocked (see chapter “Cleaning the
Filter/ Draining Residual Water”; make sure the water
has cooled before draining the appliance).
• The drain hose is frozen up.
After problem has been removed, select and start “Drain”
programme or push “Reset” button for at least 3 seconds;
afterwards restart desired programme. If the fault occurs
again, contact our After-Sales-Service.
Description of failure indicators
If your washing machine has no display, check which of the previously described situations could be
the origin of the fault and follow the corresponding instructions.
E-07/2014

GR 1
ΟΡΙΣΜΟΣ ΧΡΗΣΗΣ
Αυτό το πλυντήριο είναι προορισμένο αποκλειστικά
για την πλύση φορτίων από άπλυτα ρούχα σε
ποσότητες που συνηθίζονται στα ιδιωτικά νοικοκυριά.
• Να τηρείτε τις οδηγίες που παρέχονται στις
παρούσες Οδηγίες Χρήσης και τον Πίνακα
Προγραμμάτων όταν χρησιμοποιείτε το πλυντήριο.
• Φυλάξτε αυτές τις Οδηγίες Χρήσης και τον Πίνακα
Προγραμμάτων. Εάν δώσετε το πλυντήριο σε άλλο
πρόσωπο, να του δώσετε και τις Οδηγίες Χρήσης
και τον Πίνακα Προγραμμάτων..
ΠΡΟΦΥΛAΞΕΙΣ ΚΑΙ ΓΕΝΙΚEΣ ΟΔΗΓΙΕΣ
1. Οδηγίες ασφαλείας
• Το πλυντήριο είναι κατάλληλο μόνο
για χρήση σε εσωτερικό χώρο.
• Μην αποθηκεύετε εύφλεκτα
προϊόντα κοντά στη συσκευή.
• Μην τοποθετείτε ηλεκτρικές
συσκευές στο κάλυμμα του
πλυντηρίου σας.
• Τα μικρά παιδιά θα πρέπει να
επιτηρούνται για να εξασφαλίσετε
ότι δεν παίζουν με τη συσκευή.
• Tο πλυντήριο μπορεί να τεθεί σε
λειτουργία από παιδιά ηλικίας
8 ετών και άνω, καθώς και από
άτομα με μειωμένη φυσική,
αισθητηριακή και νοητική
ικανότητα ή έλλειψη εμπειρίας και
γνώσης, υπό την προϋπόθεση
ότι επιβλέπονται ή καθοδηγούνται
σχετικά με την ασφαλή χρήση του
πλυντηρίου και κατανοούν τους
κινδύνους που προκύπτουν από
τη χρήση. Τα παιδιά δεν πρέπει
να παίζουν με το πλυντήριο.
Οι εργασίες φροντίδας και
συντήρησης του πλυντηρίου δεν
πρέπει να πραγματοποιούνται
από παιδιά χωρίς επίβλεψη.
• Μην προσπαθήσετε να ανοίξετε το
καπάκι με τη βία.
• Εάν χρειαστεί, το καλώδιο
τροφοδοσίας μπορεί να
αντικατασταθεί με ένα αυθεντικό
παρόμοιο που θα προμηθευθείτε από
το Σέρβις. Το καλώδιο τροφοδοσίας
πρέπει να αντικατασταθεί μόνο από
έμπειρο τεχνικό.
• Πριν από οποιαδήποτε συντήρηση
του πλυντηρίου, αποσυνδέστε το
από την πρίζα.
2. Συσκευασία
• Το υλικό της συσκευασίας είναι 100%
ανακυκλώσιμο και επισημαίνεται με το σύμβολο
ανακύκλωσης . Συμμορφωθείτε με τους
ισχύοντες τοπικούς κανονισμούς όταν απορρίπτετε
τα υλικά συσκευασίας.
3. Διάθεση της συσκευασίας και παλαιών
συσκευών
• Η συσκευή αυτή φέρει σήμανση σύμφωνα με την
Ευρωπαϊκή Οδηγία 2002/96/EΚ σχετικά με την
απόρριψη ηλεκτρικού και ηλεκτρονικού εξοπλισμού
(ΑΗΗΕ). Εξασφαλίζοντας τη σωστή απόρριψη
αυτού του προϊόντος, θα βοηθήσετε στην
αποτροπή των πιθανά βλαβερών συνεπειών για το
περιβάλλον και την ανθρώπινη υγεία, οι οποίες θα
μπορούσαν διαφορετικά να προκληθούν από τον
ακατάλληλο χειρισμό κατά την απόρριψη αυτού του
προϊόντος.
• Το σύμβολο πάνω στο προϊόν ή στα έγγραφα
που συνοδεύουν το προϊόν υποδεικνύει ότι
η συσκευή δεν πρέπει να υποβάλλεται σε
επεξεργασία όπως τα οικιακά απόβλητα. Αντ’
αυτού θα πρέπει να παραδοθεί στο κατάλληλο
σημείο περισυλλογής για την ανακύκλωση των
ηλεκτρικών και ηλεκτρονικών εξαρτημάτων. Η
απόρριψη πρέπει να πραγματοποιηθεί σύμφωνα
με τους τοπικούς περιβαλλοντικούς κανονισμούς
για απόρριψη αποβλήτων. Για πιο λεπτομερείς
πληροφορίες σχετικά με την επεξεργασία, την
περισυλλογή και την ανακύκλωση αυτού του
προϊόντος, παρακαλούμε επικοινωνήστε με το
αρμόδιο γραφείο της τοπικής σας αυτοδιοίκησης,
την τοπική σας υπηρεσία αποκομιδής οικιακών
απορριμμάτων ή το κατάστημα όπου αγοράσατε
αυτό το προϊόν.
• Tο πλυντήριο είναι φτιαγμένο από ανακυκλώσιμα
υλικά. Πρέπει να απορρίψετε το πλυντήριο
σύμφωνα με τους τοπικούς κανονισμούς
απόρριψης.
• Πριν την απόρριψη, αφαιρέστε τα υπολείμματα
απορρυπαντικού και κόψτε το καλώδιο
τροφοδοσίας έτσι ώστε να μην μπορεί να
χρησιμοποιηθεί το πλυντήριο.
4. Γενικές συστάσεις
• Μην αφήνετε τη συσκευή στην πρίζα όταν δεν τη
χρησιμοποιείτε. Κλείστε τη βρύση.
5. Δήλωση Συμμόρφωσης ΕΕ
• Αυτό το πλυντήριο έχει σχεδιαστεί, κατασκευαστεί
και διανεμηθεί σύμφωνα με τους κανονισμούς
ασφαλείας των οδηγιών της ΕΚ: 2006/95/ΕΚ
Οδηγία Χαμηλής Τάσης 2004/108/ΕΚ Οδηγία
Ηλεκτρομαγνητικής Συμβατότητας.
Ο Κατασκευαστής δεν αναλαμβάνει την ευθύνη για
ζημίες κατά την πλύση που θα προκύψουν από
ανεπαρκείς ή εσφαλμένες οδηγίες πλυσίματος
υφασμάτων που παρασχέθησαν με το ένδυμα ή το
αντικείμενο.

GR 2
ΠΡΙΝ ΧΡΗΣΙΜΟΠΟΙΗΣΕΤΕ ΤΟ ΠΛΥΝΤΗΡΙΟ
1. Αφαίρεση της συσκευασίας και έλεγχος
a. Κόψτε και αφαιρέστε την προστατευτική μεμβράνη.
b. Αφαιρέστε τα επάνω προστατευτικά και τις
προστατευτικές γωνίες.
c. Αφαιρέστε τα κάτω προστατευτικά κουνώντας
και γυρίζοντας τη συσκευή στην πίσω κάτω
γωνία. Βεβαιωθείτε ότι το πλαστικό της
προστασίας του κάτω μέρους (αν διατίθεται
στο μοντέλο) παραμένει στη συσκευασία και
όχι στο κάτω μέρος της συσκευής. Αυτό είναι
σημαντικό, γιατί αλλιώς το πλαστικό θα μπορούσε
να προκαλέσει βλάβη στο πλυντήριο κατά τη
διάρκεια της λειτουργίας.
d. Ανοίξτε το καπάκι πιέζοντάς το ελαφρά προς
τα κάτω ενώ σηκώνετε τη λαβή. Αφαιρέστε το
μαξιλαράκι από φελιζόλ (ανάλογα το μοντέλο).
e. Αφαιρέστε την μπλε προστατευτική ταινία από το
πλαίσιο (ανάλογα το μοντέλο).
• Αφού αφαιρέσετε τη συσκευασία, βεβαιωθείτε
ότι το πλυντήριο δεν έχει καμία βλάβη. Εάν έχετε
την παραμικρή αμφιβολία, μη χρησιμοποιείτε
το πλυντήριο. Απευθυνθείτε στο Σέρβις ή στο
κατάστημα πώλησης.
• Κρατήστε όλα τα υλικά συσκευασίας (πλαστικές
σακούλες, φελιζόλ, κλπ.) μακριά από τα παιδιά
καθώς μπορεί να είναι επικίνδυνα.
• Εάν η συσκευή είχε εκτεθεί στο κρύο πριν από
την παράδοση, διατηρήστε τη σε θερμοκρασία
δωματίου για μερικές ώρες πριν από τη λειτουργία.
2. Αφαίρεση του πλαισίου μεταφοράς
• Το πλυντήριο είναι εφοδιασμένο με μπουλόνια
μεταφοράς και πλαίσιο μεταφοράς για να
αποφευχθούν ζημιές κατά τη μεταφορά. Πριν
χρησιμοποιήσετε τη συσκευή βγάλτε το
πλαίσιο μεταφοράς (δείτε “Εγκατάσταση”/
“Αφαίρεση του πλαισίου μεταφοράς”).
3. Εγκατάσταση του πλυντηρίου
• Τοποθετήστε τη συσκευή πάνω σε επίπεδο και
σταθερό δάπεδο.
• Ρυθμίστε τα πόδια για να βεβαιωθείτε ότι η
συσκευή είναι σταθερή και σε οριζόντια θέση (δείτε
“Εγκατάσταση”/“Ρυθμίστε τα πόδια”).
• Σε περίπτωση που υπάρχει ξύλινο δάπεδο ή
το λεγόμενο “πάτωμα πλωτής τοποθέτησης”
(για παράδειγμα ορισμένα παρκέ ή laminate
πατώματα), τοποθετήστε τη συσκευή σε ένα
φύλλο κόντρα πλακέ με μέγεθος τουλάχιστον 60
x 40 cm και πάχος τουλάχιστον 3 cm το οποίο θα
στερεώσετε στο δάπεδο.
• Βεβαιωθείτε ότι τα ανοίγματα αερισμού στη βάση
του πλυντηρίου σας (εάν υπάρχουν στο μοντέλο)
δεν εμποδίζονται από χαλιά ή άλλα υλικά.
4. Παροχή νερού
• Συνδέστε τον εύκαμπτο σωλήνα παροχής νερού
στην παροχή πόσιμου νερού σύμφωνα με τους
κανονισμούς της τοπικής υπηρεσίας ύδρευσης
(δείτε “Εγκατάσταση”/“Συνδέστε τον ελαστικό
σωλήνα παροχής νερού”).
• Παροχή νερού: Μόνο κρύο νερό
• Βρύση: Σύνδεσμος ελαστικού σωλήνα με ρακόρ
3/4”
• Πίεση νερού: 100-1000 kPa (1-10 bar).
• Χρησιμοποιήστε μόνο καινούριους εύκαμπτους
σωλήνες για τη σύνδεση του πλυντηρίου στην
παροχή νερού. Οι μεταχειρισμένοι εύκαμπτοι
σωλήνες δεν πρέπει να χρησιμοποιούνται ξανά και
πρέπει να απορρίπτονται.
5. ‘Aδειασμα
• • Συνδέστε καλά τον εύκαμπτο σωλήνα
αποστράγγισης στο σιφόνι ή σε άλλη έξοδο για
αποστράγγιση νερού.
• • Εάν το πλυντήριο είναι συνδεδεμένο σε ένα
εντοιχισμένο σύστημα αποχέτευσης, βεβαιωθείτε
ότι το τελευταίο είναι εξοπλισμένο με εξαερισμό
για να αποφεύγεται το ταυτόχρονο γέμισμα και
άδειασμα του νερού (φαινόμενο σιφονισμού).
6. Ηλεκτρική σύνδεση
• Οι ηλεκτρικές συνδέσεις πρέπει να γίνονται μόνο
από πεπειραμένο τεχνικό σε συμφωνία με τις
οδηγίες του κατασκευαστή και τους πρόσφατους
κανονισμούς ασφαλείας.
• Τα τεχνικά στοιχεία (τάση, ισχύς και ασφάλειες)
δίνονται στην πινακίδα τεχνικών χαρακτηριστικών
που βρίσκεται στο πίσω μέρος του πλυντηρίου.
• Δεν πρέπει να χρησιμοποιείτε μπαλαντέζες ή
πολύπριζα.
• Μετά την εγκατάσταση, πρέπει πάντα να υπάρχει
πρόσβαση στο ηλεκτρικό φις ή δυνατότητα
διακοπής της παροχής ρεύματος από τον
ηλεκτρικό πίνακα, με διπολικό διακόπτη.
• Μη θέτετε το πλυντήριο σε λειτουργία εάν έχει
προκληθεί ζημιά κατά τη μεταφορά. Ενημερώστε
το Σέρβις.
• Η αντικατάσταση του ηλεκτρικού καλωδίου πρέπει
να γίνεται μόνο από το Σέρβις.
• Το πλυντήριο πρέπει να συνδέεται αποκλειστικά
με μια αποτελεσματική εγκατάσταση γείωσης,
σύμφωνα με τους ισχύοντες κανονισμούς.
Ειδικά, πλυντήρια που τοποθετούνται σε χώρο
που περιέχει ντους ή μπανιέρα πρέπει να
προστατεύονται από συσκευή παραμένοντος
ρεύματος τουλάχιστον 30 mA. Σύμφωνα με το
νόμο το πλυντήριο θα πρέπει να γειωθεί. Ο
κατασκευαστής δε φέρει καμία ευθύνη για τον
τραυματισμό ατόμων ή ζώων, καθώς και υλικές
ζημιές που μπορεί να προκληθούν άμεσα ή έμμεσα
από την παράβαση των οδηγιών σε αυτές τις
Οδηγίες Χρήσης. • Όταν χρησιμοποιείται αυτόματο
διακόπτη παραμένοντος ρεύματος, χρησιμοποιείτε
μόνο ένα μοντέλο με επισήμανση .
Διαστάσεις κατά προσέγγιση:
Πλάτος: 400 χιλ
‘Yψος: 900 χιλ
Βάθος: 600 χιλ

GR 3
ΠΕΡΙΓΡΑΦΗ ΤΟΥ ΠΛΥΝΤΗΡΙΟΥ (εικόνα 1)
a. Καπάκι
b. Θήκη απορρυπαντικού
c. Κάδος
d. Είσοδος αντλίας πίσω από το φίλτρο
e. Ετικέτα σέρβις (πίσω από το καπάκι του φίλτρου)
f. Μοχλός κίνησης (ανάλογα με το μοντέλο)
Για να μετακινήσετε το πλυντήριο τραβήξτε τη λαβή
λίγο προς τα έξω με το χέρι σας και τραβήξτε τη
μέχρι να σταματήσει με το πόδι.
g. Ρυθμιζόμενα πόδια
ΕΓΚΑΤΑΣΤΑΣΗ
Αφαίρεση του πλαισίου μεταφοράς
Το πλυντήριο είναι εξοπλισμένο με πλαίσιο μεταφοράς
για την αποφυγή πιθανής ζημιάς κατά τη μεταφορά.
ΣΗΜΑΝΤΙΚΟ: Πριν χρησιμοποιήσετε το
πλυντήριο, ΠΡΕΠΕΙ να αφαιρέσετε το πλαίσιο
μεταφοράς στο πίσω μέρος.
1. Ξεβιδώστε τις δύο βίδες “A” και τις τέσσερις βίδες
“B” με ένα πλακέ κατσαβίδι ή με ένα εξαγωνικό
κλειδί Νο 8 (εικόνα 2).
2. Αφαίρεση του πλαισίου μεταφοράς (εικόνα 3).
3. Ξανατοποθετήστε τις τέσσερις εξωτερικές βίδες “B”
στη συσκευή και σφίξτε τις (εικόνα 2).
4. Εφαρμόστε τα δύο καλύμματα “C” που παρέχονται
στα ανοίγματα “D” του πλυντηρίου (εικόνα 4).
Σημείωση: μην ξεχάσετε να αντικαταστήσετε και
να σφίξετε τις τέσσερις εξωτερικές βίδες.
Ρυθμίστε τα πόδια (εικόνα 5, 6)
Εγκαταστήστε το πλυντήριο σε επίπεδη επιφάνεια,
κοντά στις παροχές του ηλεκτρικού ρεύματος, του
νερού και της αποστράγγισης.
Αν το δάπεδο είναι ανισόπεδο, ρυθμίστε κατάλληλα τα
πόδια ευθυγράμμισης (μη βάζετε κομμάτια από ξύλο,
χαρτόνι κλπ.κάτω από τα πόδια):
1. Ξεβιδώστε τα πόδια του πλυντηρίου με το χέρι με
2-3 στρέφοντάς το δεξιόστροφα περιστροφές και
χαλαρώστε το παξιμάδι με κλειδί.
2. Ρυθμίστε το ύψος των ποδιών με το χέρι.
3. Σφίξτε ξανά το παξιμάδι στρέφοντάς το
αριστερόστροφα προς το κάτω μέρος του
πλυντηρίου.
Βεβαιωθείτε ότι τα πόδια είναι σταθερά και πατούν
στο δάπεδο και ότι το πλυντήριο βρίσκεται
σε απόλυτα οριζόντια θέση και είναι σταθερό
(χρησιμοποιήστε αλφάδι).
Το πλυντήριο μπορεί να τοποθετηθεί σε ένα χώρο με
40 εκ. πλάτος και 63 εκ. βάθος.
Σημείωση: Αν τοποθετήσετε τη συσκευή πάνω σε
χοντρή μοκέτα, ρυθμίστε τα πόδια για να διασφαλίσετε
ότι υπάρχει επαρκής χώρος κάτω από τη συσκευή για
να κυκλοφορεί ο αέρας.
Συνδέστε τον ελαστικό σωλήνα παροχής
νερού (εικόνα 7)
1. Βιδώστε με προσοχή το σωλήνα παροχής νερού
στη βαλβίδα στην πίσω πλευρά του πλυντηρίου
(“A”). Βιδώστε το άλλο άκρο του σωλήνα στη βρύση
με το χέρι.
2. Φροντίστε ώστε ο εύκαμπτος σωλήνας να μην κάνει
τσακίσματα.
3. Ελέγξτε τη στεγανότητα σύνδεσης του πλυντηρίου
στη βρύση, ανοίγοντας τελείως τη βρύση.
• Αν το μήκος του εύκαμπτου σωλήνα δεν είναι αρκετό,
αντικαταστήστε τον με ανθεκτικό εύκαμπτο σωλήνα
κατάλληλου μήκους (εγκεκριμένο κατά EN61770,
για αντοχή σε πίεση τουλάχιστον 1000 kPa). Αν
χρειάζεστε πιο μακρύ σωλήνα διακοπής νερού,
καλέστε το Σέρβις ή τον αντιπρόσωπό σας.
• Ελέγχετε τακτικά τον εύκαμπτο σωλήνα παροχής
για σημεία αποσάθρωσης και ρωγμές και
αντικαταστήστε τον, αν χρειαστεί.
• Το πλυντήριο μπορεί να συνδεθεί χωρίς τη βαλβίδα
αντεπιστροφής.
Αντιπλημμυρικό σύστημα Water stop
(εικόνα 8) - ανάλογα με το μοντέλο)
• Βιδώστε τον ελαστικό σωλήνα στη βρύση.
Ανοίξτε τελείως τη βρύση του νερού και ελέγξτε τη
στεγανότητα στο σημείο σύνδεσης.
• Δεν πρέπει να συνδέσετε το πλυντήριο στην
αναμικτική μπαταρία θερμοσίφωνα που δε
βρίσκεται υπό πίεση!
• Μη βυθίζετε τη διάταξη διακοπής νερού του
ελαστικού σωλήνα στο νερό διότι μπορεί να
χαλάσει και να μην παράσχει προστασία.
• Εάν ο εύκαμπτος σωλήνας έχει κάποια βλάβη
βγάλτε το πλυντήριο αμέσως από το ρεύμα και
αντικαταστήστε τον εύκαμπτο σωλήνα.
Αν ο ελαστικός σωλήνας είναι πολύ κοντός,
αντικαταστήστε τον με σωλήνα Water Stop 3 μέτρων
(διατίθεται από το σέρβις ή την αντιπροσωπεία).
Η εργασία αυτή πρέπει να γίνει μόνο από έμπειρο
τεχνικό.
Συνδέστε το σωλήνα αποχέτευσης του
νερού (εικόνα 9)
Ξεκρεμάστε το σωλήνα αποχέτευσης από το αριστερό
κλιπ, δείτε το βέλος “A” στην εικόνα.
Σημαντικό:
ΜΗ ξεβιδώσετε τον ελαστικό σωλήνα
αποχέτευσης από τη δεξιά σύνδεση, δείτε το
βέλος “B” στην εικόνα. Διαφορετικά, υπάρχει
κίνδυνος διαρροής και κίνδυνος να ζεματιστείτε με
καυτό νερό.
Συνδέστε καλά τον εύκαμπτο σωλήνα αποστράγγισης
στο σιφόνι ή σε άλλη έξοδο για αποστράγγιση νερού.
Αν χρειάζεται προέκταση, χρησιμοποιήστε ελαστικό
σωλήνα του ιδίου τύπου και ασφαλίστε τη σύνδεση
με κολάρο. Μέγιστο συνολικό μήκος του σωλήνα
αποχέτευσης: 2,50 μ.
Μέγιστο ύψος αποχέτευσης: 100 εκ.
Ελάχιστο ύψος αποχέτευσης: 55 εκ.
Σημαντικό:
Φροντίστε ώστε ο ελαστικός σωλήνας αποχέτευσης
να μην είναι τσακισμένος και πάρτε τα μέτρα σας για
να μην πέσει, όταν λειτουργεί το πλυντήριο.

GR 4
ΠΡΙΝ ΤΟ ΠΡΩΤΟ ΠΛΥΣΙΜΟ
Για να αφαιρέσετε τα απόνερα που έχουν μείνει στο
πλυντήριο από τις δοκιμές του κατασκευαστή,
συνιστούμε να πραγματοποιήσετε ένα σύντομο κύκλο
πλυσίματος χωρίς ρούχα.
1. Ανοίξτε τις βρύσες.
2. Κλείστε τα πτερύγια του κάδου.
3. Προσθέστε μια μικρή ποσότητα απορρυπαντικού
(το μέγιστο 1/3 της ποσότητας που συνιστά ο
κατασκευαστής του απορρυπαντικού για λίγο
βρόμικα ρούχα) στο θάλαμο κύριας πλύσης
της θήκης του απορρυπαντικού.
4. Κλείστε το καπάκι.
5. Επιλέξτε και ξεκινήστε το πρόγραμμα «Συνθετικά»
στους 60°C (δείτε τον πίνακα προγραμμάτων).
ΠΡΟΕΤΟΙΜΑΣΙΑ ΤΗΣ ΠΛΥΣΗΣ
Ξεχωρίστε τα ρούχα
1. Ξεχωρίστε τα ρούχα ανάλογα με…
• Το είδος του υφάσματος/το σύμβολο στην
ετικέτα των ρούχων
Βαμβακερά, μικτά, συνθετικά, ευαίσθητα, μάλλινα,
για πλύσιμο στο χέρι.
• Χρώματα
Ξεχωρίστε τα χρωματιστά ρούχα από τα λευκά.
Πλύντε χωριστά τα καινούργια χρωματιστά ρούχα.
• Μέγεθος
Πλύνετε διάφορα μεγέθη ρούχων για να έχετε
καλύτερη απόδοση στο πλύσιμο και καλύτερη
κατανομή του φορτίου μέσα στον κάδο.
• Ευαισθησία υφάσματος
Πλύνετε ξεχωριστά τα ευαίσθητα ρούχα:
Επιλέξτε το ειδικό πρόγραμμα για μάλλινα
από αγνό παρθένο μαλλί , κουρτίνες και
άλλα ευαίσθητα ρούχα. Να βγάζετε πάντα τα
πιαστράκια από τις κουρτίνες ή να πλένετε τις
κουρτίνες με τα πιαστράκια μέσα σε βαμβακερή
σακούλα. Χρησιμοποιήστε το ειδικό πρόγραμμα
για ρούχα που πλένονται στο χέρι. Να πλένετε
κάλτσες, ζώνες και άλλα είδη μικρού μεγέθους
ή είδη με πιαστράκια (π.χ. στηθόδεσμους) σε
ειδικές βαμβακερές σακούλες για πλυντήρια ή σε
μαξιλαροθήκες με φερμουάρ.
2. Να αδειάζετε τις τσέπες Νομίσματα, παραμάνες
και άλλα ανάλογα αντικείμενα μπορεί να κάνουν
ζημιά στα ρούχα σας, καθώς και στη λεκάνη και τον
κάδο του πλυντηρίου.
3. Κλεισίματα Κλείστε τα φερμουάρ, τα κουμπιά
και τις κόπιτσες. Δέστε μεταξύ τους ζώνες και
κορδέλες.
Καθαρισμός λεκέδων
• Οι λεκέδες από αίμα, γάλα, αυγό και άλλες
οργανικές ουσίες βγαίνουν συνήθως κατά το
στάδιο δράσης των ενζύμων του προγράμματος.
• Για την αφαίρεση λεκέδων κόκκινου κρασιού, καφέ,
τσαγιού, χορταριού, κηλίδων από φρούτα, κλπ.,
προσθέστε ειδικό καθαριστικό στο θάλαμο κύριας
πλύσης της θήκης του απορρυπαντικού.
• Για τους πολύ επίμονους λεκέδες, καθαρίστε τους
πριν πλύνετε τα ρούχα, αν χρειαστεί.
Βάψιμο και λεύκανση
• Χρησιμοποιείτε μόνο βαφές και λευκαντικά που
είναι κατάλληλα για πλυντήριο.
• Ακολουθήστε τις οδηγίες του κατασκευαστή.
• Μετά τη βαφή, τα πλαστικά και λαστιχένια μέρη του
πλυντηρίου μπορεί να έχουν λερωθεί με βαφή ή
λευκαντικό.
Πώς να βάλετε τα ρούχα
1. Ανοίξτε το καπάκι του πλυντηρίου σπρώχνοντας
προς τα πάνω.
2. Ανοίξτε τον κάδο
- πιέζοντας το κουμπί απελευθέρωσης πτερυγίου
του κάδου(εικόνα 10, 11); για τα μοντέλα και
όπως εμφανίζονται στο εικόνα 10 διαθέτουν
σταθερό κουμπί απελευθέρωσης πτερυγίου του
κάδου το οποίο δεν υμπιέζεται όταν το πιέσετε.
- κρατώντας το πίσω πτερύγιο του κάδου, σύροντας
πίσω το σύρτη προς την κατεύθυνση του βέλους
και πιέζοντας το μπροστινό πτερύγιο προς το
εσωτερικό του κάδου εωσότου ο μηχανισμός
κλεισίματος απελευθερωθεί (εικόνα 12).
3. Τοποθετήστε τα ρούχα στον κάδο ένα προς
ένα. Μην υπερβαίνετε το μέγιστο φορτίο των
προγραμμάτων που υποδεικνύεται στον ξεχωριστό
πίνακα προγραμμάτων.
- Η υπερφόρτωση της συσκευής θα έχει ως
αποτέλεσμα μη ικανοποιητικό πλύσιμο και
τσαλακωμένα ρούχα.
- Προσέχετε ώστε τα ρούχα της πλύσης να
μην προεξέχουν από τον κάδο. Σε αυτήν την
περίπτωση, πιέστε τα ρούχα προς τα κάτω μέσα
στον κάδο ώστε να υπάρχει επαρκής ελεύθερος
χώρος και να κλείσουν τα πτερύγια του κάδου
κανονικά.
- Μη χρησιμοποιείτε τα πτερύγια για να πιέσετε τα
ρούχα μέσα στον κάδο.
4. Για να κλείσετε τον κάδο, κρατήστε και τα δύο
πτερύγια στη μέση ξανά (εικόνα 13), το πίσω
πτερύγιο πάνω από το μπροστινό πτερύγιο
και πιέστε τα ελαφρά προς τα κάτω μέχρι ο
μηχανισμός κλεισίματος να ασφαλίσει στη θέση
του.
ΠΡΟΣΟΧΗ: Σιγουρευτείτε ότι τα πτερύγια του
κάδου έχουν ασφαλίσει - ανάλογα με το μοντέλο:
- Όλα τα μεταλλικά άγκιστρα πρέπει να είναι
σωστά περασμένα μέσα στο πίσω πτερύγιο της
πόρτας - δείτε εικόνα 14.
- Όλα τα μεταλλικά άγκιστρα πρέπει να είναι
σωστά περασμένα μέσα στο πίσω πτερύγιο της
πόρτας και το κουμπί πρέπει να υπερκαλύπτει
το άκρο του πίσω πτερυγίου της πόρτας - δείτε
εικόνα 15.
- Ο σύρτης του μπροστινού πτερυγίου πρέπει να
υπερκαλύπτει ελαφρά το πίσω πτερύγιο - δείτε
εικόνα 16.
Βεβαιωθείτε ότι δεν έχουν εμπλακεί ρούχα ανάμεσα
στα πτερύγια ή ανάμεσα στα πτερύγια και στον κάδο.

GR 5
ΑΠΟΡΡΥΠΑΝΤΙΚΑ ΚΑΙ ΠΡΟΣΘΕΤΙΚΑ
Φυλάξτε τα απορρυπαντικά και τα βελτιωτικά
σε ασφαλές και στεγνό μέρος, μακριά από τα
παιδιά.
Μη χρησιμοποιείτε διαλυτικά (π.χ. νέφτι,
βενζίνη). Μην πλένετε στο πλυντήριο ρούχα
που έχουν καθαριστεί με διαλυτικά ή εύφλεκτα
υγρά.
Χρησιμοποιείτε μόνο απορρυπαντικά και
προσθετικά κατάλληλα για αυτόματα πλυντήρια
οικιακής χρήσης.
Τηρείτε τις υποδείξεις που υπάρχουν στις ετικέτες
φροντίδας των ρούχων σας.
Η επιλογή απορρυπαντικού εξαρτάται από:
• Το είδος του υφάσματος.
• Το χρώμα.
• Τη θερμοκρασία πλυσίματος.
• Το είδος και το βαθμό της βρομιάς.
Πλυντήριο ρούχων
τύπου
Είδος απορρυπαντικό
Πολύ λερωμένα
ασπρόρουχα
(κρύο-95°C):
ισχυρά απορρυπαντικά με
λευκαντικό
Άσπρα ευαίσθητα
(κρύο-40°C):
μέτρια απορρυπαντικά με
λευκαντικό ή/και οπτικά
λευκαντικά
Ελαφρώς χρωματιστά/
απαλές αποχρώσεις
(κρύο-60°C):
απορρυπαντικά με λευκαντικό
ή/και οπτικά λευκαντικά
Έντονα χρώματα (κρύο-
60°C):
απορρυπαντικά για
χρωματιστά με λευκαντικό/
οπτικά λευκαντικά
Μαύρα/σκούρα
χρώματα (κρύο-60°C):
ειδικά απορρυπαντικά για
μαύρα/σκούρα ρούχα
Για ρούχα που χρειάζονται ειδική μεταχείριση (π.χ.
μάλλινα ή ρούχα με μικροΐνες), συνιστάται η χρήση
εξειδικευμένων απορρυπαντικών, πρόσθετων ουσιών
ή προεπεξεργασίας που διατίθενται στην αγορά.
Ανατρέξτε στη διεύθυνση www.cleanright.eu για
περισσότερες λεπτομέρειες.
Μη χρησιμοποιείτε υγρό απορρυπαντικό για την
κύρια πλύση όταν έχετε ενεργοποιήσει την
επιλογή «πρόπλυσης».
Μη χρησιμοποιείτε υγρό απορρυπαντικό όταν
επιλέγετε έναρξη κύκλου / λήξη κύκλου αργότερα
(ανάλογα με το μοντέλο).
Δοσολογία
Ακολουθήστε τις οδηγίες για τη δοσολογία που
υπάρχουν στη συσκευασία του απορρυπαντικού.
Εξαρτώνται από:
• το είδος και το βαθμό της βρομιάς
• την ποσότητα ρούχων
- πλήρες φορτίο: ακολουθήστε τις οδηγίες του
κατασκευαστή του απορρυπαντικού
- μισό φορτίο: το 3/4 της ποσότητας που
χρησιμοποιείται σε πλήρες φορτίο.
- ελάχιστο φορτίο (περίπου 1 kg): το 1/2 της
ποσότητας που χρησιμοποιείται σε πλήρες
φορτίο.
Αν δεν αναφέρεται συγκεκριμένο φορτίο
πλύσης στη συσκευασία του απορρυπαντικού:
οι κατασκευαστές απορρυπαντικών συνήθως
αναγράφουν τις οδηγίες δοσολογίας: 4,5 kg ρούχα
για απορρυπαντικό σκληρών λεκέδων και 2,5 kg
ρούχα για απορρυπαντικό ήπιων λεκέδων.
• τη σκληρότητα του νερού στην περιοχή
σας (ζητήστε πληροφορίες από την εταιρία
ύδρευσης).Το μαλακό νερό χρειάζεται λιγότερο
απορρυπαντικό από το σκληρό
Προσοχή:
Η υπερβολική ποσότητα απορρυπαντικού μπορεί να
δημιουργήσει υπερβολικό αφρό, περιορίζοντας την
αποτελεσματικότητα του πλυντηρίου.
Αν το πλυντήριο εντοπίσει υπερβολικό αφρό,
μπορεί να ματαιώσει το στύψιμο, ή να παρατείνει
τη διάρκεια του προγράμματος και να αυξήσει την
κατανάλωση νερού (δείτε επίσης τα σχόλια σχετικά με
τον σχηματισμό αφρού στον «Οδηγό αντιμετώπισης
προβλημάτων»). Η ανεπαρκής δόση απορρυπαντικού
μπορεί να έχει ως αποτέλεσμα γκρίζα ρούχα,
κατάλοιπα στην αντίσταση.
Πού να τοποθετήσετε τα απορρυπαντικά
και βελτιωτικά (εικόνα 17a, 17b - ανάλογα με το
μοντέλο)
Θάλαμος πρόπλυσης
• Απορρυπαντικό για τη φάση πρόπλυσης
(μόνο εάν έχετε ενεργοποιήσει την επιλογή
“πρόπλυση”).
Θάλαμος κύριας πλύσης
• Απορρυπαντικό για τη φάση κύριας πλύσης
(πρέπει να προστίθεται για όλα τα προγράμματα
πλύσης)
• Πρόσθετη ουσία για αφαίρεση λεκέδων
(προαιρετικά)
• Αποσκληρυντικό νερού (προαιρετικά,
συνιστάται για σκληρότητα νερού κατηγορίας 4
ή μεγαλύτερη)
Θάλαμος μαλακτικού
• Μαλακτικό υφασμάτων (προαιρετικά)
• Υγρό κολλαρίσματος που διαλύεται στο νερό
(προαιρετικά)
Μην υπερβαίνετε την ένδειξη “MAX”(ΜΕΓ.) όταν
βάζετε απορρυπαντικό, πρόσθετες ουσίες ή
μαλακτικό. Για περισσότερες πληροφορίες σχετικά
με την εφαρμογή του απορρυπαντικού και του
μαλακτικού υφασμάτων στα προγράμματα, δείτε το
ξεχωριστό διάγραμμα προγραμμάτων.
Χρήση λευκαντικού χλωρίνης
• Πλύνετε τα ρούχα σας στο επιθυμητό πρόγραμμα
πλύσης (Βαμβακερά, Συνθετικά), προσθέτοντας
την κατάλληλη ποσότητα λευκαντικού χλωρίνης
στο θάλαμο του ΜΑΛΑΚΤΙΚΟΥ (κλείστε προσεκτικά
το καπάκι).
• Αμέσως μετά από το τέλος του προγράμματος,
ξεκινήστε το πρόγραμμα «Ξέβγαλμα και στύψιμο»
για να εξαλείψετε οποιαδήποτε παραμένουσα
μυρωδιά λευκαντικού. Εάν θέλετε, μπορείτε να
προσθέσετε μαλακτικό.
• Ποτέ μη βάλετε ταυτόχρονα λευκαντικό χλωρίνης
και μαλακτικό στο θάλαμο μαλακτικού.
Χρήση κόλλας
• Πλύνετε τα ρούχα σας στο επιθυμητό πρόγραμμα
πλύσης.
• Προετοιμάστε το διάλυμα της κόλλας σύμφωνα με
τις οδηγίες του κατασκευαστή της κόλλας.
• Αδειάστε το έτοιμο διάλυμα κόλλας (μέγιστο
100 ml) στο θάλαμο μαλακτικού της θήκης
απορρυπαντικού.
• Κλείστε το καπάκι και ξεκινήστε το πρόγραμμα
“Ξέπλυμα και στύψιμο”.

GR 6
ΚΑΘΑΡΙΣΜΟΣ ΚΑΙ ΣΥΝΤΗΡΗΣΗ
Αποσυνδέετε πάντα το πλυντήριο ρούχων πριν από οποιαδήποτε εργασία συντήρησης.
Θήκη απορρυπαντικού
Καθαρίζετε τακτικά τη θήκη του απορρυπαντικού,
τουλάχιστον τρεις ή τέσσερις φορές το χρόνο για
να προλάβετε τη συσσώρευση απορρυπαντικού:
Θήκη απορρυπαντικού - εικόνα 17a
1. Πιέστε τα κουμπιά στην κάθε πλευρά της θήκης
του απορρυπαντικού (εικόνα 18).
2. Τραβήξτε τη θήκη προς το μέρος σας και
αφαιρέστε την. Μπορεί μέσα στη θήκη να
παραμένει μια μικρή ποσότητα νερού. Συνιστάται
να μεταφέρετε τη θήκη σε όρθια θέση.
3. Ξεπλύνετε τη θήκη με τρεχούμενο νερό. Μπορείτε
επίσης να αφαιρέστε τα καλύμματα των σιφωνιών
στη θήκη για καθαρισμό.
4. Επανατοποθετήστε τα καλύμματα των σιφωνιών
στη θήκη (αν τα αφαιρέσατε). Σιγουρευτείτε ότι
έχουν ασφαλίσει στη θέση τους.
5. Ξανατοποθετήστε τη θήκη βάζοντας τις κάτω
υποδοχές στις οπές της πόρτας και μετακινήστε
μέχρι να εφαρμόσουν και τα δύο πάνω κουμπιά.
Θήκη απορρυπαντικού - εικόνα 17b
1. Πατήστε το κουμπί για να απελευθερώσετε το
συρτάρι απορρυπαντικού και να το αφαιρέσετε
(εικόνα 19). Μια μικρή ποσότητα νερού μπορεί
να παραμείνει στο συρτάρι γι’αυτό πρέπει να το
μεταφέρετε σε κατακόρυφη θέση.
2. Ξεπλύνετε τη θήκη με τρεχούμενο νερό. Μπορείτε
επίσης να αφαιρέσετε το πώμα του σιφονιού στο
πίσω μέρος του συρταριού για να το καθαρίσετε
(εικόνα 20).
3. Επανατοποθετήστε το πώμα του σιφονιού στο
συρτάρι (εάν είχε αφαιρεθεί).
4. Επανατοποθετήστε το συρτάρι τοποθετώντας τις
κάτω εσοχές του συρταριού στις σωστές οπές στο
καπάκι και σπρώχνοντας το συρτάρι κόντρα στο
καπάκι έως ότου κουμπώσει στη θέση του.
Σημείωση: Βεβαιωθείτε ότι η θήκη του
απορρυπαντικού έχει ξανατοποθετηθεί σωστά.
Φίλτρο ελαστικού σωλήνα παροχής νερού
Ελέγχετε και καθαρίζετε τακτικά (τουλάχιστον δύο
ή τρεις φορές το χρόνο).
1. Βγάλτε το πλυντήριο από την πρίζα.
2. Κλείστε τη βρύση.
3. Ξεβιδώστε το σωλήνα παροχής νερού από τη
βρύση.
4. Καθαρίστε προσεκτικά το φίλτρο που βρίσκεται στο
άκρο του σωλήνα, χωρίς να το αποσυνδέσετε, για
παράδειγμα με μια οδοντόβουρτσα.
Σημείωση: Μη βυθίζετε το σωλήνα σε νερό.
5. Βιδώστε τον ελαστικό σωλήνα παροχής επάνω
στη βρύση με το χέρι. Μη χρησιμοποιείτε πένσα
(υπάρχει κίνδυνος να σπάσετε την ένωση).
6. Ανοίξτε τη βρύση του νερού και βεβαιωθείτε ότι
δεν υπάρχει διαρροή στις συνδέσεις.
7. Ξαναβάλτε το πλυντήριο στη πρίζα
Εύκαμπτοι σωλήνες νερού
(εικόνα 21, 22 ή 23 - ανάλογα με το μοντέλο)
Ελέγχετε τακτικά τον εύκαμπτο σωλήνα εισαγωγής για
αποσάθρωση και ρωγμές και αντικαταστήστε τον, εάν
απαιτείται,με έναν καινούριο εύκαμπτο σωλήνα ίδιου
τύπου.
Ο εύκαμπτος σωλήνας εισαγωγής που φαίνεται στην
εικόνα 21 διαθέτει βαλβίδα ασφαλείας που προστατεύει
τη συσκευή σε περίπτωση μη ελεγχόμενης εισαγωγής
νερού. Εάν το παράθυρο ελέγχου της βαλβίδας
ασφαλείας (A) είναι κόκκινο, η βαλβίδα ασφαλείας έχει
ενεργοποιηθεί και ο εύκαμπτος σωλήνας πρέπει να
αντικατασταθεί. Επικοινωνήστε με το κέντρο σέρβις ή
τον εξειδικευμένο αντιπρόσωπο, για να προμηθευτείτε
ένα νέο εύκαμπτο σωλήνα εισαγωγής. Για να ξεβιδώσετε
τον εσωτερικό εύκαμπτο σωλήνα όπως φαίνεται την
εικόνα 21, πρέπει να σπρώξετε προς τα κάτω τον μοχλό
απελευθέρωσης (B) (εάν υπάρχει) ενώ τον ξεβιδώνετε.
Εάν ο εύκαμπτος σωλήνας εισαγωγής έχει διαφανή
επικάλυψη (εικόνα 22), ελέγχετε τακτικά το χρώμα της.
Εάν το χρώμα του διαφανούς εύκαμπτου σωλήνα γίνει
πιο σκούρο τοπικά, ο εύκαμπτος σωλήνας μπορεί να
παρουσιάζει διαρροή και πρέπει να αντικατασταθεί.
Επικοινωνήστε με το κέντρο σέρβις ή τον εξειδικευμένο
αντιπρόσωπο, για να προμηθευτείτε έναν ανταλλακτικό
εύκαμπτο σωλήνα.
Εξωτερικό συσκευής και πίνακας ελέγχου
• Καθαρίζονται με μαλακό, νωπό πανί.
• Αν είναι απαραίτητο, χρησιμοποιήστε
σαπουνόνερο ή ένα ήπιο, ουδέτερο
απορρυπαντικό (μη χρησιμοποιείτε απορρυπαντικά
που περιέχουν διαλύτες, διαβρωτικά, καθαριστικά
για τζάμια ή γενικής χρήσης-μπορεί να βλάψουν τις
επιφάνειες).
Εσωτερικό συσκευής
• Μετά από κάθε πλύση, αφήστε το καπάκι ανοικτό
για λίγη ώρα για να στεγνώσει το εσωτερικό της
συσκευής.
• Εάν δεν πλένετε ποτέ ή σπάνια τα ρούχα
σας στους 95°C, σας συνιστούμε να βάζετε
περιστασιακά ένα πρόγραμμα στους 95°C
χωρίς ρούχα, προσθέτοντας μια μικρή ποσότητα
απορρυπαντικού, για να κρατήσετε το εσωτερικό
της συσκευής καθαρό.
Λάστιχο καπακιού
• Ελέγχετε τακτικά την κατάσταση του λάστιχου του
καπακιού και καθαρίστε το που και που με ένα
υγρό πανί.
Σωλήνας(ες) παροχής νερού
• Ελέγχετε τακτικά τον ελαστικό σωλήνα παροχής για
σημεία αποσάθρωσης και ρωγμές. Αντικαταστήστε
τον, αν χρειαστεί.
Φίλτρο
• Ελέγχετε και να καθαρίζετε τακτικά το φίλτρο,
τουλάχιστον 3 ή 4 φορές το χρόνο (δείτε
“Καθαρισμός του φίλτρου/Αποστράγγιση των
απόνερων”).
Μη χρησιμοποιήσετε εύφλεκτα υγρά για τον
καθαρισμό της συσκευής.

GR 7
Πώς να πιάσετε ένα αντικείμενο που
έχει πέσει μεταξύ του κυλίνδρου και του
κάδου
Αν κάποιο αντικείμενο πέσει κατά λάθος ανάμεσα
στον κύλινδρο και στον κάδο, μπορείτε να το πιάσετε
χάρη σε μια από τις αφαιρούμενες λεπίδες του κάδου:
1. Βγάλτε το πλυντήριο από την πρίζα.
2. Βγάλτε τα ρούχα από τον κάδο.
3. Κλείστε τα πτερύγια του κάδου και γυρίστε τον
κάδο μισή στροφή (εικόνα 24).
4. Με ένα κατσαβίδι, πιέστε το πλαστικό άκρο ενώ
μετακινείτε τη λεπίδα από τα αριστερά προς τα
δεξιά (εικόνα 25, 26).
5. Θα πέσει μέσα στον κάδο.
6. Ανοίξτε τον κάδο: μπορείτε να πιάσετε το
αντικείμενο από την τρύπα του κάδου
7. Επανατοποθετήστε τη λεπίδα από το εσωτερικό
του κάδου: Τοποθετήστε το πλαστικό άκρο πάνω
από την οπή στη δεξιά πλευρά του κάδου (εικόνα
27).
8. ‘Yστερα μετακινήστε την πλαστική λεπίδα από
δεξιά προς αριστερά μέχρι να εφαρμόσει.
9. Κλείστε τα πορτάκια του κάδου, γυρίστε τον κάδο
μισή στροφή και ελέγξτε τη θέση της λεπίδας σε
όλα τα σημεία εφαρμογής της.
10. Ξαναβάλτε το πλυντήριο στη πρίζα.
ΥΓΡΑΣΙΑ ΠΟΥ ΑΠΟΜΕΝΕΙ ΣΤΟ ΦΟΡΤΙΟ ΠΛΥΣΗΣ ΜΕΤΑ
ΤΟ ΣΤΥΨΙΜΟ
Ο βαθμός υγρασίας που παραμένει στα ρούχα
μετά το στύψιμο εξαρτάται κυρίως από τον τύπο
του υφάσματος, το επιλεγμένο πρόγραμμα και την
ταχύτητα στυψίματος.
Η μικρότερη δυνατή υγρασία μπορεί να επιτευχθεί
χρησιμοποιώντας το πρόγραμμα πλύσης που
αναφέρεται στην ετικέτα ενέργειας με την μέγιστη
ταχύτητα στυψίματος. Αυτό το πρόγραμμα
έχει επισημανθεί στο ξεχωριστό διάγραμμα
προγραμμάτων ως “Πρόγραμμα αναφοράς για
την ενεργειακή ετικέτα”. Παρακάτω θα βρείτε μια
έρευνα σχετικά με την εναπομένουσα υγρασία
(σε ποσοστό %) αναφορικά με τις διάφορες
κλάσεις απόδοσης στυψίματος-στεγνώματος:
Κλάση απόδοσης
στυψίματος-
στεγνώματος
Εναπομένουσα υγρασία σε ποσοστό %
A (= μεγαλύτερη
απόδοση)
λιγότερο από 45
B 45 ή περισσότερο αλλά λιγότερο από 54
C
54
ή περισσότερο αλλά λιγότερο από
63
D
63
ή περισσότερο αλλά λιγότερο από
72
E 72
ή περισσότερο αλλά λιγότερο από
81
ΜΕΤΑΦΟΡΑ ΚΑΙ ΧΕΙΡΙΣΜΟΣ (εικόνα 30)
1. Βγάλτε το πλυντήριο από την πρίζα.
2. Κλείστε τη βρύση.
3. Βγάλτε το σωλήνα παροχής νερού και
αποστράγγισης.
4. Αδειάστε τα απόνερα από τους σωλήνες και
το πλυντήριο (δείτε “Καθαρισμός του φίλτρου/
Αποστράγγιση των απόνερων”). Περιμένετε
να κρυώσει το νερό για να αποφύγετε τυχόν
ατυχήματα.
5. Για να διευκολυνθείτε στη μετακίνηση της
συσκευής, τραβήξτε τη λαβή που βρίσκεται στο
κάτω μπροστινό μέρος (αν υπάρχει στο μοντέλο
σας) λίγο προς τα έξω με το χέρι και τραβήξτε το
μέχρι να σταματήσει με το πόδι. ‘Yστερα πιέστε τη
λαβή πάλι στην αρχική σταθερή της θέση.
6. Για τη μεταφορά τοποθετήστε ξανά το πλαίσιο
μεταφοράς.
7. Μεταφορά του πλυντηρίου σε όρθια θέση.
ΣΗΜΑΝΤΙΚΟ: Μη χρησιμοποιείτε τη συσκευή όταν η
λαβή είναι τραβηγμένη προς τα έξω.
ΚΑΘΑΡΙΣΜΟΣ ΤΟΥ ΦIΛΤΡΟΥ/ ΑΠΟΣΤΡΑΓΓΙΣΗ ΤΩΝ
ΑΠOΝΕΡΩΝ
Το πλυντήριο είναι εξοπλισμένο με αυτοκαθαριζόμενη
αντλία. Το φίλτρο συγκρατεί αντικείμενα όπως
κουμπιά, νομίσματα, παραμάνες κλπ. τα οποία
παράπεσαν μέσα στο πλυντήριο.
Σας συνιστούμε να ελέγχετε και να καθαρίζετε τακτικά
το φίλτρο, τουλάχιστον δύο ή τρεις φορές το χρόνο.
Ιδιαίτερα:
• Εάν το πλυντήριο δεν αδειάζει σωστά τα νερά ή δε
στύβει τα ρούχα.
• Εάν ανάβει η ενδεικτική λυχνία «καθαρισμού
αντλίας».
ΣΗΜΑΝΤΙΚΟ: Φροντίστε να αφήσετε το νερό να
κρυώσει αρκετά, πριν αδειάσετε το πλυντήριο.
Τα υπολείμματα νερού πρέπει επίσης να
αποστραγγίζονται και πριν από τη μεταφορά του
πλυντηρίου.
1. Βγάλτε το πλ
υντήριο από την πρίζα.
2. Ανοίξτε το καπάκι του φίλτρου με ένα κέρμα (εικ.28).
3. Βάλτε μια λεκάνη κάτω από το φίλτρο
4. Στρέψτε προσεκτικά το φίλτρο αριστερόστροφα
έως ότου αρχίσει να ρέει μια ποσότητα νερού, μην
το αφαιρείτε ακόμα.
5. Περιμένετε μέχρι να αδειάσει όλο το νερό.
6. Μετά ξεβιδώστε το φίλτρο τελείως και βγάλτε το
έξω (εικόνα 29).
7. Καθαρίστε το φίλτρο και το θάλαμο του φίλτρου.
8. Βεβαιωθείτε ότι η φτερωτή της αντλίας (στην
υποδοχή πίσω από το φίλτρο) γυρίζει ελεύθερα.
9. Εισαγάγετε ξανά το φίλτρο και βιδώστε
το εντελώς σε δεξιόστροφη κατεύθυνση.
Βεβαιωθείτε ότι το φίλτρο έχει βιδωθεί σωστά
μέχρι τέρμα.
10. Ρίξτε περίπου ένα λίτρο νερό μέσα στο πλυντήριο
μέσω του κάδου και ελέγξτε αν τρέχει νερό από το
φίλτρο.
11. Κλείστε το καπάκι του φίλτρου.
12. Συνδέστε ξανά το πλυντήριο.
La pagina si sta caricando...
La pagina si sta caricando...
La pagina si sta caricando...
La pagina si sta caricando...
La pagina si sta caricando...
La pagina si sta caricando...
La pagina si sta caricando...
La pagina si sta caricando...
La pagina si sta caricando...
La pagina si sta caricando...
La pagina si sta caricando...
La pagina si sta caricando...
La pagina si sta caricando...
La pagina si sta caricando...
La pagina si sta caricando...
La pagina si sta caricando...
-
 1
1
-
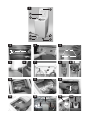 2
2
-
 3
3
-
 4
4
-
 5
5
-
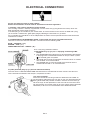 6
6
-
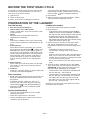 7
7
-
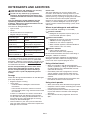 8
8
-
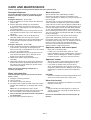 9
9
-
 10
10
-
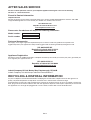 11
11
-
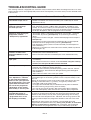 12
12
-
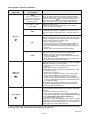 13
13
-
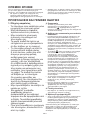 14
14
-
 15
15
-
 16
16
-
 17
17
-
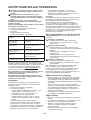 18
18
-
 19
19
-
 20
20
-
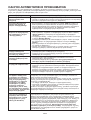 21
21
-
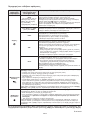 22
22
-
 23
23
-
 24
24
-
 25
25
-
 26
26
-
 27
27
-
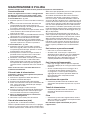 28
28
-
 29
29
-
 30
30
-
 31
31
-
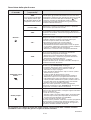 32
32
-
 33
33
-
 34
34
-
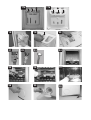 35
35
-
 36
36


Hotpoint ITW A 5852 W Manuale del proprietario
- Categoria
- Lavatrici
- Tipo
- Manuale del proprietario
- Questo manuale è adatto anche per
in altre lingue
- English: Hotpoint ITW A 5852 W Owner's manual
Altri documenti
-
Whirlpool ITWE 71252 W (EU) Manuale del proprietario
-
Ignis TDLR 70212 Guida utente
-
Whirlpool LTE 8106/2 Manuale del proprietario
-
Whirlpool ITWE 71252 W (EU) Guida utente
-
HOTPOINT/ARISTON WMTF 623 HR IT Guida utente
-
Whirlpool AWE6010 Guida utente
-
Ignis LTE6210 Guida utente
-
Whirlpool ITW D 61052 W (IT) Guida utente
-
Bosch WAW28620AU/12 Istruzioni per l'uso
-