AEG LAV74530-W Manuale utente
- Categoria
- Lavatrici
- Tipo
- Manuale utente
Questo manuale è adatto anche per

ÖKO-LAVAMAT 74330 update
The environmentally friendly washing machine
User information

2
Dear Customer,
Please read this user information carefully.
Pay particular attention to the section "Safety" on the first Info pages.
Please keep this user information in a safe place for later reference.
Pass it on to any future owners of the unit.
1
The warning triangle and /or signal words (Warning!, Caution!, Impor-
tant!) emphasise information which is important for your safety or for
the unit's functional reliability. It is imperative that this information is
observed.
1. This symbol guides you step by step through the operation of the appli-
ance.
2. ...
3
Next to this symbol you will find additional information and practical
tips on using the appliance.
2
Tips and information on economical and environmentally responsible
use of the unit are identified with the clover leaf.
For any faults which occur, this user information contains information
on how to remedy these faults yourself. See the section "What to do
if ..."
Printed on recycled paper.
Thinking ecologically means acting ecologically.

Contents
3
CONTENTS
Operating Instructions . . . . . . . . . . . . . . . . . . . . . . . . . . . . . . . . . . . . 6
Safety . . . . . . . . . . . . . . . . . . . . . . . . . . . . . . . . . . . . . . . . . . . . . . . . . . . . . . . . 6
Disposal . . . . . . . . . . . . . . . . . . . . . . . . . . . . . . . . . . . . . . . . . . . . . . . . . . . . . . 8
Environmental tips . . . . . . . . . . . . . . . . . . . . . . . . . . . . . . . . . . . . . . . . . . . . . 8
Unit description . . . . . . . . . . . . . . . . . . . . . . . . . . . . . . . . . . . . . . . . . . . . . . . 9
Front view . . . . . . . . . . . . . . . . . . . . . . . . . . . . . . . . . . . . . . . . . . . . . . . . . . . . 9
Drawer for detergent and care agent . . . . . . . . . . . . . . . . . . . . . . . . . . . . . 9
Control Panel . . . . . . . . . . . . . . . . . . . . . . . . . . . . . . . . . . . . . . . . . . . . . . . . . 10
Program Selector . . . . . . . . . . . . . . . . . . . . . . . . . . . . . . . . . . . . . . . . . . . . 10
Additional Program Buttons . . . . . . . . . . . . . . . . . . . . . . . . . . . . . . . . . . . 12
Consumption Values and Time Requirements . . . . . . . . . . . . . . . . . . . . . 13
What does "UPDATE“ mean? . . . . . . . . . . . . . . . . . . . . . . . . . . . . . . . . . . . . 13
Before the First Wash . . . . . . . . . . . . . . . . . . . . . . . . . . . . . . . . . . . . . . . . . . 14
Prepare washing cycle . . . . . . . . . . . . . . . . . . . . . . . . . . . . . . . . . . . . . . . . . . 14
Sort washing and prepare . . . . . . . . . . . . . . . . . . . . . . . . . . . . . . . . . . . . . . . . 14
Washing Types and Care Codes . . . . . . . . . . . . . . . . . . . . . . . . . . . . . . . . . . . 15
Washing Detergents and Care Agents . . . . . . . . . . . . . . . . . . . . . . . . . . . . . . 16
Which washing detergent and care agent? . . . . . . . . . . . . . . . . . . . . . . 16
How much washing detergent and care agent? . . . . . . . . . . . . . . . . . . . 16
Water softener . . . . . . . . . . . . . . . . . . . . . . . . . . . . . . . . . . . . . . . . . . . . . . . . . 16
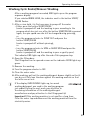
Run a Washing Cycle . . . . . . . . . . . . . . . . . . . . . . . . . . . . . . . . . . . . . . . . . . 17
Brief Instructions . . . . . . . . . . . . . . . . . . . . . . . . . . . . . . . . . . . . . . . . . . . . . . . 17
Set the Washing Program . . . . . . . . . . . . . . . . . . . . . . . . . . . . . . . . . . . . . . . . 18
Change Spin Speed / Select Rinse Hold . . . . . . . . . . . . . . . . . . . . . . . . . . . . . 18
Opening and Closing the Filling Door . . . . . . . . . . . . . . . . . . . . . . . . . . . . . . 19
Add the washing . . . . . . . . . . . . . . . . . . . . . . . . . . . . . . . . . . . . . . . . . . . . . . . 19
Add Washing Detergent/Care Agent . . . . . . . . . . . . . . . . . . . . . . . . . . . . . . . 20
Start the Washing Program . . . . . . . . . . . . . . . . . . . . . . . . . . . . . . . . . . . . . . 21
Completion of the Washing Program . . . . . . . . . . . . . . . . . . . . . . . . . . . . . . 21
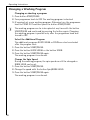
Changing a Washing Program . . . . . . . . . . . . . . . . . . . . . . . . . . . . . . . . . . . . 22
Washing Cycle Ended/Remove Washing . . . . . . . . . . . . . . . . . . . . . . . . . . . . 23

Contents
4
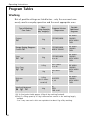
Program Tables . . . . . . . . . . . . . . . . . . . . . . . . . . . . . . . . . . . . . . . . . . . . . . . . 24
Washing . . . . . . . . . . . . . . . . . . . . . . . . . . . . . . . . . . . . . . . . . . . . . . . . . . . . . . 24
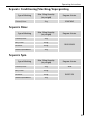
Separate Conditioning/Starching/Impregnating . . . . . . . . . . . . . . . . . . . . 25
Separate Rinse . . . . . . . . . . . . . . . . . . . . . . . . . . . . . . . . . . . . . . . . . . . . . . . . . 25
Separate Spin . . . . . . . . . . . . . . . . . . . . . . . . . . . . . . . . . . . . . . . . . . . . . . . . . . 25
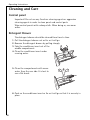
Cleaning and Care . . . . . . . . . . . . . . . . . . . . . . . . . . . . . . . . . . . . . . . . . . . . . 26
Control panel . . . . . . . . . . . . . . . . . . . . . . . . . . . . . . . . . . . . . . . . . . . . . . . . . . 26
Detergent Drawer . . . . . . . . . . . . . . . . . . . . . . . . . . . . . . . . . . . . . . . . . . . . . . 26
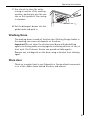
Washing Drum . . . . . . . . . . . . . . . . . . . . . . . . . . . . . . . . . . . . . . . . . . . . . . . . . 27
Main door . . . . . . . . . . . . . . . . . . . . . . . . . . . . . . . . . . . . . . . . . . . . . . . . . . . . . 27
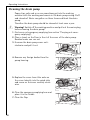
Cleaning the drain pump . . . . . . . . . . . . . . . . . . . . . . . . . . . . . . . . . . . . . . . . 28
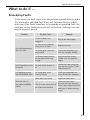
What to do if ... . . . . . . . . . . . . . . . . . . . . . . . . . . . . . . . . . . . . . . . . . . . . . . . 29
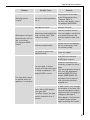
Remedying Faults . . . . . . . . . . . . . . . . . . . . . . . . . . . . . . . . . . . . . . . . . . . . . . . 29
If the washing results are not satisfactory . . . . . . . . . . . . . . . . . . . . . . . . . . 33
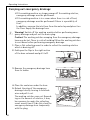
Carrying out emergency drainage . . . . . . . . . . . . . . . . . . . . . . . . . . . . . . . . . 34
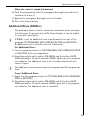
Additional Rinse (RINSE+) . . . . . . . . . . . . . . . . . . . . . . . . . . . . . . . . . . . . . . . . 35
Child Safety Feature . . . . . . . . . . . . . . . . . . . . . . . . . . . . . . . . . . . . . . . . . . . 36
Installation and connection instructions . . . . . . . . . . . . . . . . 37
Installation Safety Precautions . . . . . . . . . . . . . . . . . . . . . . . . . . . . . . . . . . 37
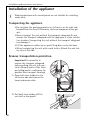
Installation of the appliance . . . . . . . . . . . . . . . . . . . . . . . . . . . . . . . . . . . . 38
Transporting the appliance . . . . . . . . . . . . . . . . . . . . . . . . . . . . . . . . . . . . . . . 38
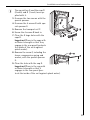
Remove transportation protection . . . . . . . . . . . . . . . . . . . . . . . . . . . . . . . . 38
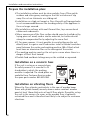
Prepare the installation place . . . . . . . . . . . . . . . . . . . . . . . . . . . . . . . . . . . . 40
Installation on a concrete base . . . . . . . . . . . . . . . . . . . . . . . . . . . . . . . . 40
Installation on vibrating floors . . . . . . . . . . . . . . . . . . . . . . . . . . . . . . . . . 40
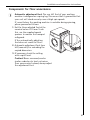
Compensate for floor unevenness . . . . . . . . . . . . . . . . . . . . . . . . . . . . . . . . . 41

Contents
5
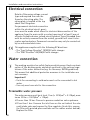
Electrical connection . . . . . . . . . . . . . . . . . . . . . . . . . . . . . . . . . . . . . . . . . . . 42
Water connection . . . . . . . . . . . . . . . . . . . . . . . . . . . . . . . . . . . . . . . . . . . . . 42
Permissible water pressure . . . . . . . . . . . . . . . . . . . . . . . . . . . . . . . . . . . . . . . 42
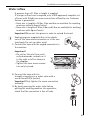
Water inflow . . . . . . . . . . . . . . . . . . . . . . . . . . . . . . . . . . . . . . . . . . . . . . . . . . 43
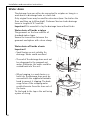
Water drain . . . . . . . . . . . . . . . . . . . . . . . . . . . . . . . . . . . . . . . . . . . . . . . . . . . 44
Delivery heads over 1m . . . . . . . . . . . . . . . . . . . . . . . . . . . . . . . . . . . . . . . . . . 45
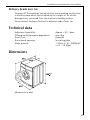
Technical data . . . . . . . . . . . . . . . . . . . . . . . . . . . . . . . . . . . . . . . . . . . . . . . . 45
Dimensions . . . . . . . . . . . . . . . . . . . . . . . . . . . . . . . . . . . . . . . . . . . . . . . . . . 45
Warranty conditions / Customer service centres . . . . . . . 46
Index . . . . . . . . . . . . . . . . . . . . . . . . . . . . . . . . . . . . . . . . . . . . . . . . . . . . . . . . 50
Service . . . . . . . . . . . . . . . . . . . . . . . . . . . . . . . . . . . . . . . . . . . . . . . . . . . . . . 51

Operating Instructions
6
OPERATING INSTRUCTIONS
1 Safety
The safety aspects of AEG electrical appliances comply with accepted
technical standards and the German Appliance Safety Law. However, as
manufacturers we regard it as our responsibility to inform you about
the following safety instructions.
Before Using for the First Time
• Refer to the "Installation and Connection Instructions" further on in
this user information.
• If units are delivered in the winter months at minus temperatures:
Store the washing machine at room temperature for a few hours
before putting it into operation.
Correct Use
• The washing machine is only intended for washing normal domestic
washing. If the appliance is used for a wrong purpose or wrongly
operated, the manufacturer cannot assume any liability for any dam-
ages.
• Additions or modifications to the washing machine are strictly for-
bidden due to safety reasons.
• Use only detergent which is suitable for washing machines. Refer to
the detergent manufacturer's instructions.
• The washing must not contain any flammable solvents. Also bear this
in mind when washing pre-cleaned washing.
• Do not use the washing machine for dry-cleaning.
• Dyes /dye-removing agents may only be used in the washing machine
if the manufacturer expressly permits use of these products. We can-
not accept liability for any damage.
• Use only water from the water mains. Use rain water or service water
only if it meets the requirements defined in DIN 1986 and DIN 1988.
• Frost damage is not covered by the warranty! If the washing machine
is in a room subject to possible frost hazards, emergency emptying
must be carried out if there is a risk of frost (see the Section "Carry-
ing out emergency emptying“).

Operating Instructions
7
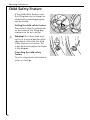
Child Safety
• Packaging materials (e.g. films, polystyrene) can be dangerous for
children. Risk of suffocation! Keep packaging away from children.
• Children frequently cannot recognise hazards involved in handling
electrical appliances. Therefore, ensure that they are properly super-
vised during operation and never allow children to play with the
washing machine -there is a risk that they can lock themselves inside it.
• Ensure that children or small animals do not climb into the washing
machine's drum.
• When disposing of washing machines pull out the mains plug, destroy
the door lock, cut off the electrical supply lead and dispose of the
plug and remaining cable. This means that playing children cannot
shut themselves in and cannot encounter a potentially lethal hazard.
General Safety
• Repairs to washing machines may only be carried out by skilled
persons. Improper repairs can cause significant hazards for the user.
If your appliance needs repairing, please contact customer service or
your dealer.
• Never put the washing machine into operation if the mains cable is
damaged or if the control panel, work top or base area is damaged in
such a way that the inside of the appliance is openly accessible.
• Before cleaning, care and maintenance work, switch off the washing
machine. Also, pull the mains plug out of the socket, or - in the case
of permanent connection - switch off the LS switch in the fuse box
or completely unscrew the screw-in fuse.
• Never pull the mains plug out of the socket by the cable. Always use
the plug.
• Multiple connectors, couplings and extension cables must not be
used. Fire hazard through overheating!
• Do not spray down the washing machine with a water jet. Danger of
electrical shock!
• The glass in the filling door become hot when high-temperature
washing programmes are used. Do not touch!
• Allow the washing solution to cool down before performing and
emergency emptying of the appliance, before cleaning the solution
pump or before an emergency opening of the filling door.
• Small animals can chew on power cables and water hoses. This can
cause a danger of electric shock and water damage. Keep small
animals away from washing machines.

Operating Instructions
8
2 Disposal
Disposing of the Packaging Material!
Dispose of the packaging of your washing machine correctly. All pakka-
ging materials used are environmentally-compatible and recyclable.
• Plastic parts are identified with internationally standardised abbrevi-
ations:
• Cardboard packaging is manufactured from recycled paper and
should be deposited in the waste paper collection for recycling.
Disposing of your old appliance!
When you put your unit out of operation one day, please bring it to
your nearest recycling centre or to your dealer.
2 Environmental tips
• A pre-wash cycle is not necessary in the case of washing which is not
excessively dirt. This saves detergent, water and time (and is gentle on
the environment.)
• If the indicated load capacities are taken full advantage of, the wash-
ing machine is especially efficient.
• For small loads, use only one half to one third of the recommended
detergent quantity.
• Suitable pre-treatment enables marks and limited amounts of dirt to
be removed. You can then wash at a lower temperature.
• Wash slightly to normally dirty cottons with the energy-saving pro-
gram.
• There is often no need for the softener. Try it once! If you use a drier,
your washing will become soft and fluffy even without a softener.
• In the case of medium to high water hardness (hardness range runs to
upwards, see "Detergent and care agents“), you should use a water
softener. The detergent can then always be metered for hardness
range I (= soft).
>PE< for polyethylene, e.g. packing films.
>PS< for polystyrene, e.g. cushion parts (always CFC-free)
>POM< for polyoxymethylene, e.g. plastic clips.

Operating Instructions
9
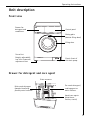
Unit description
Front view
Drawer for detergent and care agent
Drawer for
detergent and
conditioner
Filling door
Screw feet
(height-adjustable);
rear left: Automatic
adjustment foot
Control panel
Flap in front of
the drain pump
Rating plate
(behind filling door)
Pre-wash detergent/
soaking agent or
water softener
Main wash detergent
(powder form) and
possibly water softener
Stain removers
Liquid care agents
(conditioner,
finisher, starch)

Operating Instructions
10
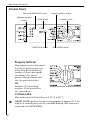
Control Panel
Program Selector
The program selector determines
the type of washing cycle (e.g.
water level, drum movement,
number of rinses, spin speed)
according to the type of
garments being washed, and
also the washing solution.
OFF
Switches off the washing
machine. All other positions
are "switched on".
COTTONS/LINEN
Main washing cycle Cottons/Linen at 30 °C to 95 °C.
2
ENERGY SAVING position: Energy-saving program at approx. 67 °C for
slightly to normally dirty cottons, extended washing time (cannot be
combined with QUICK WASH).
Spin speed/RINSE HOLD button
Additional program
buttons
OVER DOSING display
Program sequence display
DOOR display
Program selector
START/PAUSE button

Operating Instructions
11
EASY-CARES
Main washing cycle for easy-care textiles (mixed fabrics) at 40 °C to
60 °C.
EASY IRON position: Main washing cycle at 40 °C for easy-care textiles
which, with the aid of this program, only have to be either gently
ironed or not ironed at all.
DELICATES
Main washing cycle for delicates at 30 °C or 40 °C.
WOOL/P (Handwash)
Main washing cycle (cold up to 40 °C) for machine-washable woollens
and for hand-washable wool textile and silk with the care symbol
ï (handwash).
GENTLE RINSE
Separate gentle rinse e.g. for rinsing hand-washed textiles (2 rinses,
liquid care agent from rinsing compartment æ is added, short spin).
STARCHING
Separate starching, separate conditioner, separate impregnation of
damp washing (1 rinse, liquid care agent from the rinsing compartment
æ is added, spin).
PUMP OUT
Pumping off the water after a rinse hold (without spin).
3
RINSE HOLD means: The washing remains lying in the last rinsing water.
It is not spun.
SPIN
Pumping off the water after a rinse hold and spin, or separate spin of
hand-washed cottons/linen.
SHORT SPIN
Pumping off the water after a rinse hold and short spin or separate
short spin of sensitive textiles (easy-care washing, delicates, woollens).

Operating Instructions
12
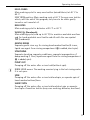
Additional Program Buttons
The additional program buttons are for adapting
the washing program to the dirtiness of the wash-
ing. Additional programs are not required for
washing which is not excessively dirty.
Various functions can be combined with each
other, depending on the program.
PRE WASH
Warm pre wash before the main washing cycle
which follows on automatically; with intermediate
spin for COTTONS/LINEN, without intermediate
spin for EASY-CARES and DELICATES.
SOAKING
Approximately 50 minutes at 30°C water temperature. This is followed
by the main washing cycle.
QUICK WASH
Shorter washing cycle for slightly dirty washing.
STAIN
For treating very dirty washing or stained washing. (In-wash stain
treatment is added during the program on a time-optimized basis.)
3
With the WOOL/P (Handwash) program, it is not possible to select the
additional programs (any pressed buttons have no effect).

Operating Instructions
13
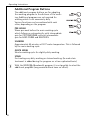
Consumption Values and Time Requirements
The values for selected programs in the following tables were deter-
mined under normal conditions. However, there is a helpful orientation
aid for domestic operation.
What does "UPDATE“ mean?
Your washing machine's washing programs are controlled by software.
New types of textiles or new detergents may require new washing pro-
grams in the future. In most cases, the software can be adapted to this.
For further information on the "update“, please consult the Customer
Service. You can also enquire about the costs for an "update“ with your
Customer Service.
Program Selector,
Temperature
Filling Quantity
in kg
Water
in Litres
Energy
in kWh
Time
in Minutes
COTTONS/LINEN 95 5 49 1,80 138
COTTONS/LINEN 60
1)
1) Note: Program setting for a test in accordance with EN 60 456. The consumption
values can deviate from the stated values depending on the water pressure,
hardness, inlet temperature, room temperature, type and quantity of washing,
the washing powder/liquid used, fluctuations in the mains voltage and selected
additional functions.
5 49 0,94 127
COTTONS/LINEN 40 5 54 0,60 119
EASY-CARES 40 2,5 45 0,50 78
DELICATES 30 2,5 45 0,25 55
WOOL/P (Handwash) 30 2 47 0,25 55

Operating Instructions
14
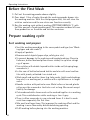
Before the First Wash
1. Pull out the washing powder drawer slightly.
2. Pour about 1 litre of water through the washing powder drawer into
the washing machine. With the next program start, this will close the
solution container and the eco-sluice can function correctly.
3. Run the washing cycle without washing (COTTONS/LINEN 95 °C, with
half the amount of washing detergent). This removes residues left over
from production on the drum and solution container.
Prepare washing cycle
Sort washing and prepare
• Sort the washing according to the care symbol and type (see "Wash-
ing types and care codes").
• Empty all pockets.
• Remove metal objects (paper clips, safety pins etc.).
• To prevent damage to the washing and tangled washing: Close zip
fasteners, button bed and pillow covers closed, tie up loose strings
e.g. of aprons.
• Turn articles with double layered textiles inside out (sleeping bags,
anoraks etc.).
• In the case of knitted coloured textiles and also with wool and tex-
tiles with jewelry attached: turn inside out.
• Wash small and sensitive items (e.g. baby socks, tights and stockings,
bras etc.) in a washing net, a cushion with a zip fastener or in larger
socks.
• Handle curtains with particular care. Metal rollers or burred, plastic
rollers must be removed or tied into a net or bag. We cannot accept
liability for damage.
• Coloureds and white items must not be washed together in a washing
cycle. This could discolour white washing or turn it grey.
• There is often excess dye in new, coloured items. It is best to wash
such items separately the first time.
• Mix small and large items. This improves the washing effect and the
washing is more favourably distributed during spinning.
• Fluff washing before placing into the washing machine.

Operating Instructions
15
• Do not place folded washing into the drum.
• Pay attention to the care instruction "wash separately" and "wash
separately several times".
Washing Types and Care Codes
The care codes help you choose the correct washing program.
The washing should be sorted according to type and care code.
The temperatures stated in the care codes are all maximum values.
Cottons ç
Textiles made of cotton and linen with this care code are insensitive to
mechanical stress and high temperatures. The program COTTONS/LINEN
is suitable for this type of washing.
Linen èë
Textiles made of cotton and linen with this care code are insensitive to
mechanical stresses. The program COTTONS/LINEN is suitable for this
type of washing.
Easy-Care Garments êí
Textiles such as finished cottons, cotton mixtures, viscose and synthet-
ics with this care code require mechanically more mild treatment. The
program EASY-CARES/EASY IRON is suitable for this type of washing.
Delicates ì
Textiles such as layered fibres, microfibres, viscose, synthetics and cur-
tains with this care code require very gentle treatment.
The program DELICATES is suitable for this type of washing.
Wool and Very Sensitive Washing 9 ìï
Textiles such as wool, wool mixtures and silk with this care code are
especially sensitive to mechanical stresses.
The program WOOL/P (Handwash) is suitable for this type of textiles.
Attention! Textiles with the care code
ñ
(Do not wash!) must not be
washed in the washing machine!

Operating Instructions
16
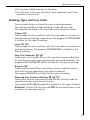
Washing Detergents and Care Agents
Which washing detergent and care agent?
Use only washing detergents and care agents which are suitable for use
in washing machines. Always follow the manufacturer's instructions.
How much washing detergent and care agent?
The amount to be used depends on:
• the dirtiness of the washing
• the hardness category of the mains water supply
• the filling quantity
2
If the detergent manufacturer gives no details of the dosing quantities
for minimum loads, add one third less for half loads and, in the case of
very small loads and for EASY IRON, only half the amount of detergent
recommended for a full load.
Refer to the detergent/care agent manufacturer's instructions on use
and dosage.
Water softener
For medium to high water hardness (hardness class II upwards), you
should use softener. Refer to the manufacturer's instructions. Then
always add the appropriate amount of detergent for hardness class I
(= soft). The responisable water works will provide information on the
local water hardness.
2
Since the water softener is rinsed in before the main detergent (water
pre-softening), 80% of the stated quantity of softener shown on the
package is sufficient.
Water hardness details
Hardness class
Water hardness in °dH
(German hardness scale)
Water hardness in mmol
(millimol per litre)
I - soft 0 - 7 to 1.3
II - medium hard 7 - 14 1.3 - 2.5
III - hard 14 - 21 2.5 - 3.8
IV - very hard greater than 21 greater than 3.8

Operating Instructions
17
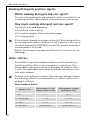
Run a Washing Cycle
Brief Instructions
A washing cycle is run in the following steps:
1. Set the correct washing program:
– Set the program and temperature with the program selector
– Set any additional program(s)
2. If necessary, change the spin speed/select RINSE HOLD.
3. Open the filling door and fill with washing.
4. Close the filling door.
5. Add washing detergent/care agent.
6. Start the washing program.
After the Washing Program Ends:
Attention! If the washing cycle ended with Rinse Hold, before opening
the filling door carry out PUMP, SPIN or SHORT SPIN.
7. Open the filling door and remove the washing.
8. Switch off the washing machine: Set the program selector to OFF.

Operating Instructions
18
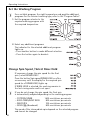
Set the Washing Program
3
For a suitable program, the right temperature and possible additional
programs for the relevant washing type, refer to the ”Program Tables”.
1. Set the program selector to the
required washing program with
the required temperature.
2. Select any additional programs:
The indicator for the selected additional program
lights up.
– Press another button to make different selection.
– Press the button again to deselect.
Change Spin Speed / Select Rinse Hold
If necessary, change the spin speed for the final
spin / select RINSE HOLD:
Press the button Spin speed/RINSE HOLD as often
as necessary until the display for the required spin
speed (or of RINSE HOLD) lights up.
If RINSE HOLD is selected, the washing remains in
the last rinsing water and is not spun.
3
If you do not change the spin speed, the final spin
is automatically adapted depending on the washing program:
The speed of the intermediate spin depends on the selected program
and cannot be changed.
– COTTONS/LINEN 1400 revolutions per minute
– EASY-CARES/EASY IRON 900 revolutions per minute
– DELICATES 700 revolutions per minute
– WOOL/P (Handwash) 900 revolutions per minute

Operating Instructions
19
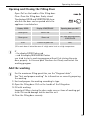
Opening and Closing the Filling Door
Open: Pull on the handle of the filling door.
Close: Press the filling door firmly closed.
The displays DOOR and START/PAUSE show
whether the door can be opened while the
appliance is switched on:
3
If
– the display DOOR flashes red
– and the display MAIN WASH flashes
you tried to start a washing program without first closing the main
door properly. In this case push the door shut firmly and restart the
washing program.
Add the washing
3
For the maximum filling quantities, see the "Program tables".
See "Sort and prepare washing" for information on correctly preparing
the washing.
1. Sort and prepare the washing according to type.
2. Open the filling door: Pull on the handle of the filling door.
3. Fill with washing.
Important! When closing the door, make sure no items of washing get
stuck! This could damage textiles and the unit.
4. Close the filling door securely.
Display DOOR Display START/PAUSE Opening door possible?
Glows green Flashes red Yes
Glows green Glows red
Yes, after pressing button
START/PAUSE
Is off Flashes or glows red
No
1)
1) The main door is locked because of a high water level or a high temperature.

Operating Instructions
20
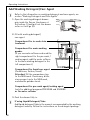
Add Washing Detergent/Care Agent
3
Refer to the information on washing detergents and care agents, see
section ”Washing Detergents and Care Agents”.
1. Open the washing detergent drawer:
grip inside the flap on the drawer at
the bottom (1) and pull out the drawer
as far as it will go (2).
2. Fill with washing detergent/
care agent
3. Push the drawer fully in.
3
If using Liquid Detergent/Tabs:
Add liquid detergent/tabs in the amount recommended by the washing
detergent industry. Follow the instructions on the detergent package.
Compartment for in-wash stain
treatment
Compartment for main washing
powder
(If you use water softener and need the
right compartment for the pre-wash /
soaking agent, add the water softener
to the main washing detergent in the
left compartment.)
Compartment for liquid care agent
(Conditioner, finisher, starch)
Attention! Fill the compartment up
to the MAX mark. If necessary, dilute
viscous agent up to the MAX mark,
and dissolve powder starch.
Compartment for pre-wash agent/soaking agent
(only for additonal programs PRE WASH and SOAKING
or for water softener
La pagina si sta caricando...
La pagina si sta caricando...
La pagina si sta caricando...
La pagina si sta caricando...
La pagina si sta caricando...
La pagina si sta caricando...
La pagina si sta caricando...
La pagina si sta caricando...
La pagina si sta caricando...
La pagina si sta caricando...
La pagina si sta caricando...
La pagina si sta caricando...
La pagina si sta caricando...
La pagina si sta caricando...
La pagina si sta caricando...
La pagina si sta caricando...
La pagina si sta caricando...
La pagina si sta caricando...
La pagina si sta caricando...
La pagina si sta caricando...
La pagina si sta caricando...
La pagina si sta caricando...
La pagina si sta caricando...
La pagina si sta caricando...
La pagina si sta caricando...
La pagina si sta caricando...
La pagina si sta caricando...
La pagina si sta caricando...
La pagina si sta caricando...
La pagina si sta caricando...
La pagina si sta caricando...
La pagina si sta caricando...
-
 1
1
-
 2
2
-
 3
3
-
 4
4
-
 5
5
-
 6
6
-
 7
7
-
 8
8
-
 9
9
-
 10
10
-
 11
11
-
 12
12
-
 13
13
-
 14
14
-
 15
15
-
 16
16
-
 17
17
-
 18
18
-
 19
19
-
 20
20
-
 21
21
-
 22
22
-
 23
23
-
 24
24
-
 25
25
-
 26
26
-
 27
27
-
 28
28
-
 29
29
-
 30
30
-
 31
31
-
 32
32
-
 33
33
-
 34
34
-
 35
35
-
 36
36
-
 37
37
-
 38
38
-
 39
39
-
 40
40
-
 41
41
-
 42
42
-
 43
43
-
 44
44
-
 45
45
-
 46
46
-
 47
47
-
 48
48
-
 49
49
-
 50
50
-
 51
51
-
 52
52


AEG LAV74530-W Manuale utente
- Categoria
- Lavatrici
- Tipo
- Manuale utente
- Questo manuale è adatto anche per
in altre lingue
- English: AEG LAV74530-W User manual