Nacon RIG600PRO_HS Guida utente
- Categoria
- Auricolari per cellulari
- Tipo
- Guida utente

600 PRO HS
USER GUIDE

EN /
2
Summary
Fit
Setup and basics
Set up PC
Set up Nintendo Switch
Charging your Headset
Power on or off
Adjust volume
Mute
The different modes
• Game mode
• Dual mode
• Bluetooth mode
How to switch modes?
How to pair your headset?
• USB-C Dongle
• Bluetooth
Multi-function button
How to customize your experience?
Safety
Support
3
4
4
4
4
4
5
6
6
6
6
6
6
6
6
7
7
8

EN /
3
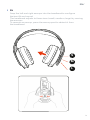
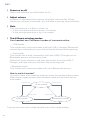
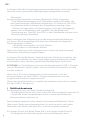
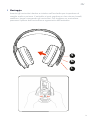
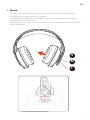
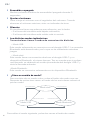
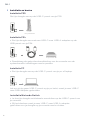
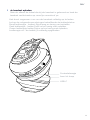
I Fit
Snap the left and right earcups into the headband to configure
the best fit and sound.
The headband adjusts to three sizes (small, medium, large) by moving
the earcups.
To remove an earcup, press the earcup post to detach it from
the headband.
S
M
L

EN /
4
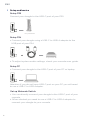
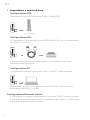
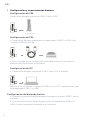
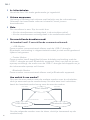
I Setup and basics
Setup PS5
Setup PS4
1. Connect your dongle using a USB-C to USB-A adaptor to the
Setup PC
1. Connect your dongle to the USB-C port of your PC or laptop.
2. To adjust system audio settings, check your console user guide.
Attention if you do not have USB-C port on your PC you will need
to use a USB-C to USB-Adaptor.
PlayStation 4®
PlayStation 5®
Set up Nintendo Switch
1. You can directly connect your dongle to the USB-C port of your
console.
2. When docked you need to use a USB-C to USB-A adaptor to
connect your dongle to your console.

EN /
5
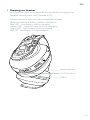
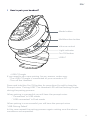
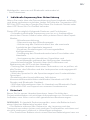
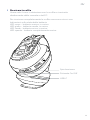
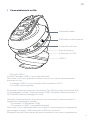
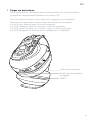
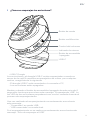
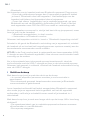
I Charging your Headset
Only use the cable provided with the headset and charge the
headset directly from your console or PC.
It takes around 2 hours to fully charge the headset.
Note the following Battery status indications:
Red LED – low battery and is charging
Yellow LED – medium battery and is charging
Green LED - high battery and is charging
LED Off - the battery is fully charged
Light indicator
On/Off button
USB-C

EN /
6
I Power on or off
I Adjust volume
Increase or decrease the volume using the volume dial. When
maximum volume is reached, you will hear a prompt tone indicator.
I Mute
The microphone is a flip to “mute” so:
•
If the microphone arm is down, it is active,
•
If the microphone arm is up, it is muted.
I The different wireless modes
Your headset has 3 different modes of communication:
•
USB mode:
This mode only communicates with the USB-C dongle. Bluetooth
connection is disabled so you will not be disturbed while gaming.
• Dual mode
:
This mode has a dual connection with the USB-C Dongle, and a
Bluetooth device, at the same time.
Note that if you receive a call then the audio, from the USB-C
Dongle, will stop and you will hear the incoming call.
• Bluetooth mode
:
This mode only communicates with your Bluetooth device.
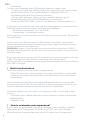
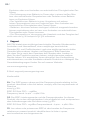
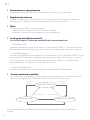
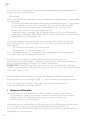
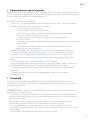
How to switch modes?
To switch from one mode to another, press the mode button once.
After three single presses the headset mode will be back to the
first mode.
To jump over the next mode double press the mode button.
Dual mode
USB mode Bluetooth mode
Single press
Short press Short press
Short press
Single press
Single press

EN /
7
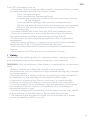
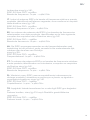
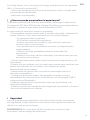
I How to pair your headset?
• USB-C Dongle
:
If you need to do a new pairing, for any reason, make sure:
- The USB-C Dongle is connected to your console or PC.
- Turn off the Headset.
Press and hold the On/Off button for more than 6s until to hear the
Prompt voice: “Pairing USB”. The Headset LED will be flashing Purple
during the pairing process.
When pairing is successful you will hear the prompt voice:
- “Connected” in USB mode,
- “USB connected” in Dual mode.
When pairing is unsccessful you will hear the prompt voice:
“USB Pairing Failed”.
In this case repeat the pairing process again making sure the above
conditions are respected.
Mode button
Multifonction button
Volume control
Light indicator
On/Off button
USB-C

EN /
8
• Bluetooth:
To pair your headset with a Bluetooth device, make sure:
- Press and hold the Mode button for more than 6s until to hear
the Prompt voice: “Pairing Bluetooth”. Headset LED will
be flashing Blue during pairing process.
- Open the `Settings’ menu on your mobile device, go to
Bluetooth and turn ON the Bluetooth connection.
If pairing is successful, you will see the message on your device but
will also hear a prompt voice, through the headset:
- “Bluetooth connected” in Dual mode,
- “Connected” in Bluetooth mode.
When pairing is unsuccessful you will hear the prompt voice: “Bluetooth
Pairing Failed”.
above conditions are respected.
WARNING: when in Dual mode you are paired to two devices (USB-C
Dongle and a Bluetooth device) but one communication has the priority
over the other.
If you answer an incoming call, for instance, the communication with the
USB-C Dongle will stop and the incoming call will be heard.
When the call is complete, the headset will automatically switch back to
the USB-C Dongle.
I Multi-function button
With this button you can, with a single press:
•
Play/Pause your music when your communication is activated,
•
Answer an incoming call when your Bluetooth communication
is activated.
Your headset remembers the latest Bluetooth device connected
so once you have set-up your device it will remember it even if you
switch between modes or power on/off your headset.
With this button you can with, a Long press: (ML> how long is the
press?)
• Activate your mobile device’s voice assistant, when connected
to Bluetooth,
• Reject a call.
I How to customize your experience?
If you want to go deeper into your headset customization, please
download the Companion APP RIG 600 PRO from the Google
PlayStore (for Android devices) and APP store (for iOs devices).

EN /
9
The APP will enable you to:
• Customize up to 3 audio profiles quickly, using the Classic mode,
or more precisely through the Expert mode:
- Your microphone gain.
- Your microphone monitoring level.
- Activate ear protection which limits the maximum volume
of the headset.
- Your equalizer settings (with pre-set configurations).
- Define the default mode when you power on your headset.
- Reduce the prompt tones and voices interaction during
headset use.
• Visualize tutorials to know how the APP and headset work.
• Test your headset via a test mode to check that all: buttons,
microphone and speakers are working as they should.
• Choose your Prompt voice language (from the 6 supported
languages).
• Set the power off timer in case of no communication activities
(headset with USB-C Dongle & Bluetooth devices.
• Get important information about your headset and Bluetooth
device.
• Get support via the FAQ and from our Customer Service.
I Safety
Please read the safety guide for important safety, charging, battery
and regulatory information before using your new headset.
WARNING:
Risk of explosion if the battery is replaced by an incorrect
type.
•
Battery cannot be subjected to high or low extreme.
temperatures, low air pressure at high altitude during use, storage
or transportation.
•
Replacement of a battery with an incorrect type that can result in
an explosion or the leakage of flammable liquid or gas.
•
Disposal of a battery into fire or a hot oven, or mechanically
crushing or cutting of a battery, that can result in an explosion.
•
Leaving a battery in an extremely high temperature surrounding
environment that can result in an explosion or the leakage of
flammable liquid or gas.
•
A battery subjected to extremely low air pressure that may result
in an explosion or the leakage of flammable liquid or gas.
•
The headset and dongle unit shall not be supplied by a power
source exceeding 15W (i.e. 5V 3A).

EN /
10
I Support
NACON offers a one year Limited (North America, Australia and
New Zealand), two years Limited (EU and UK) and one year Limited
(all other countries and regions) warranty. Please be aware that you
may have other rights depending on the laws of the state or country
where the product was purchased. We strongly advise you to keep
your receipt of purchase in order to prove the date of purchase of this
product. For warranty terms and conditions, visit our web site at
www.nacongaming.com
Email: [email protected]
Compliance
EN. The EIRP power values and the Frequencybands relating to this
product, identified in the list below, comply with the requirements of
Directive
2014/53/EU:
EIRP: RIG 600 PRO - <13dBm
Frequency band: (2,402 ~ 2,480) GHz
DE. Die EIRP-Leistungswerte und die Frequenzbander fur dieses
Produkt, die in der nachstehenden Liste aufgefuhrt sind, entsprechen
den Anforderungen der Richtlinie 2014/53/EU:
EIRP: RIG 600 PRO- <13dBm Frequenzband : (2,402 ~ 2,480) GHz
FR. Les valeurs de puissances EIRP et des bandes de Frequence
relatives au present produit, identifie dans la liste ci-apres,
sont conformes aux exigences de
la directive 2014/53/UE:
EIRP: RIG 600 PRO- <13dBm
Bande de frequence : (2,402 ~ 2,480) GHz
IT. I valori di potenza EIRP e le bande di frequenza relative a questo
prodotto, identificati nell’elenco seguente, sono conformi ai requisiti
della direttiva 2014/53/UE:
EIRP: RIG 600 PRO- <13dBm
Banda di frequenza: (2,402 ~ 2,480) GHz
ES. Los valores de potencia del IPESI y las bandas de frecuencias
relacionadas con este producto, identificadas en la lista siguiente,
cumplen los requisitos de la Directiva 2014/53/UE:
EIRP: RIG 600 PRO - <13dBm
Banda de frecuencia : (2,402 ~ 2,480) GHz

EN /
11
NL. De EIRP-vermogenswaarden en de frequentiebanden met
betrekking tot dit product, zoals vermeld in de onderstaande lijst,
voldoen aan de eisen van Richtlijn
2014/53/EU:
EIRP: RIG 600 PRO- <13dBm
Frequentieband : (2,402 ~ 2,480) GHz
PT. Os valores de potencia EIRP e as bandas de frequencia relativas a
este produto, identificados na lista abaixo, cumprem os requisitos da
Diretiva 2014/53/UE:
EIRP: RIG 600 PRO- <13dBm
Banda de frequencia : (2,402 ~ 2,480) GHz
PL.
dyrektywy 2014/53/UE:
EIRP: RIG 600 PRO - <13dBm
TR.
EIRP: RIG 600 PRO - <13dBm

EN /
12
DISTRIBUTORS /
DISTRIBUTEURS :
Bigben Interactive
DEUTSCHLAND GmbH
Bergheim, Deutschland
Bigben Interactive Belgium
s.a./n.v.
Waterloo, Belgium
Bigben Interactive
NEDERLAND b.v.
Hilversum, Nederland
Nacon Gaming ESPAÑA S.L.
Bigben Interactive ITALIA s.r.l
Legnano - MI, Italia
Nacon Gaming Inc.
SUPPORT :
FRANCE, du lundi au vendredi :
nacongaming.com
UK
DEUTSCHLAND, Montag bis
BELGIQUE,
NEDERLAND,
ESPAÑA,
ITALIA,
UNITED STATES,
MANUFACTURER / FABRICANT :
NACON - 396 - 466 Rue de la Voyette, CRT2 - 59273 Fretin, France

13
EN /

Licensed for sale in the European Union, United Kingdom, Australia, New Zealand, United States, Canada.
Manufactured by Nacon. - Licencié pour la vente en Union européenne, Royaume-Uni, Australie, Nouvelle-Zélande,
États-Unis, Canada. Fabriqué par Nacon. - Lizenziert für den Verkauf in der Europäischen Union, Großbritannien,
Australien, Neuseeland, den USA und Kanada. Hergestellt von Nacon. - Verkoopvergunning voor de Europese
Unie, het Verenigd Koninkrijk, Australië, Nieuw-Zeeland, de Verenigde Staten en Canada. Vervaardigd door Nacon.
- Autorizado para la venta en la Unión Europea, Reino Unido, Australia, Nueva Zelanda, Estados Unidos y Canadá.
Fabricado por Nacon. - Autorizzato alla vendita in Unione Europea, Regno Unito, Australia, Nuova Zelanda, Stati Uniti
Estados Unidos, Canadá. Fabricado pela Nacon.
All the trademarks belong to their respective owners. - Toutes les marques citées appartiennent à leurs propriétaires
respectifs.

600 PRO HS
BEDIENUNGSANLEITUNG

DE /
2
Inhaltsverzeichnis
Passform
Einrichtung und Grundlagen
Einrichtung PC
Einrichtung Nintendo Switch
Laden des Headsets
Ein- und Ausschalten
Einstellung der Lautstärke
Stumm
Die kabellosen Modi
• USB-Modus
• Dualer Modus
• Bluetooth-Modus
Umschalten zwischen den Modi
Kopplung des Headsets
• USB-C Dongle
• Bluetooth
Multifunktionstaste
Individuelle Anpassung Ihrer Nutzerfahrung
Sicherheit
Support
3
4
4
4
4
4
5
6
6
6
6
6
6
6
6
7
7
8

DE /
3
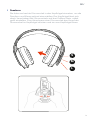
I Passform
Die linke und rechte Ohrmuschel in den Kopfbügel einrasten, um die
Passform und Klang optimal einzustellen. Der Kopfbügel lässt sich
durch Verschieben der Ohrmuscheln auf drei Größen (klein, mittel,
groß) einstellen. Zum Abnehmen einer Ohrmuschel den Knopf der
Ohrmuschel im Kopfbügel drücken und sie vom Kopfbügel lösen.
S
M
L

DE /
4
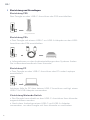
I Einrichtung und Grundlagen
Einrichtung PS5
Einrichtung PS4
1. Den Dongle mit einem USB-C-zu-USB-A-Adapter an den USB-
Einrichtung PC
1. Den Dongle an den USB-C-Anschluss des PCs oder Laptops
anschließen.
2. Informationen zu den Audioeinstellungen des Systems finden
Sie im Benutzerhandbuch Ihrer Konsole.
Achtung, falls Ihr PC über keinen USB-C Anschluss verfügt, einen
USB-C zu USB-Adapter verwenden.
PlayStation 4®
PlayStation 5®
Einrichtung Nintendo Switch
1. Der Dongle kann direkt an den USB-C-Anschluss Ihrer Konsole
angeschlossen werden.
2. Nach dem Andocken einen USB-C-auf-USB-A-Adapter
verwenden, um den Dongle mit Ihrer Konsole zu verbinden.

DE /
5
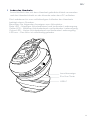
I Laden des Headsets
Ausschließlich das mit dem Headset gelieferte Kabel verwenden
und das Headset direkt an der Konsole oder dem PC aufladen.
Die Ladedauer bis zum vollständigen Aufladen des Headsets
beträgt etwa 2 Stunden.
Beachten Sie folgenden Anzeigen zum Akkustatus:
Rote LED – Niedriger Akkuladestand und laufender Ladevorgang,
Gelbe LED – Mittlerer Akkuladestand und laufender Ladevorgang,
Grüne LED – Hoher Akkuladestand und laufender Ladevorgang,
LED aus – Der Akku ist vollständig geladen.
Leuchtanzeige
Ein/Aus-Taste
USB-C

DE /
6
I Ein- und Ausschalten
Die Ein/Aus-Taste 3 Sekunden lang gedrückt halten.
I Einstellung der Lautstärke
Die Lautstärke lässt sich mit dem Lautstärkeregler erhöhen oder
verringern. Wenn die maximale Lautstärke erreicht ist, ertönt ein
Signalton.
I Stumm
Das Mikrofon kann «stumm geschaltet» werden:
• Wenn der Mikrofonarm unten ist, ist es aktiv
,
• Wenn der Mikrofonarm oben ist, ist es stummgeschaltet
.
I Die kabellosen Modi
Ihr Headset verfügt über 3 verschiedene Kommunikationsmodi:
• USB-Modus
:
Dieser Modus kommuniziert nur mit dem USB-C-Dongle. Die
Bluetooth-Verbindung ist deaktiviert, damit Sie beim Spielen nicht
gestört werden.
• Dualer Modus
:
Dieser Modus verfügt mit dem USB-C-Dongle und einem
Bluetooth-Gerät über eine gleichzeitige doppelte Verbindung.
Wenn Sie einen Anruf erhalten, wird der Ton vom USB-C-Dongle
unterbrochen und Sie hören den eingehenden Anruf.
• Bluetooth-Modus
:
Dieser Modus kommuniziert nur mit Ihrem Bluetooth-Gerät.
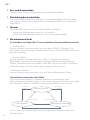
Umschalten zwischen den Modi
Um von einem Modus in einen anderen zu wechseln, die
Modustaste ein Mal drücken. Nach dreimaligem Drücken wechselt
der Headset-Modus wieder in den ersten Modus.first mode.
Um in den nächsten Modus zu springen, die Modustaste zwei
Mal drücken.
Dualer Modus
USB-Modus Bluetooth-Modus
Einfacher
Druck
Einfacher
Druck
Kurzer Druck Kurzer Druck
Kurzer Druck
Einfacher Druck
La pagina si sta caricando...
La pagina si sta caricando...
La pagina si sta caricando...
La pagina si sta caricando...
La pagina si sta caricando...
La pagina si sta caricando...
La pagina si sta caricando...
La pagina si sta caricando...
La pagina si sta caricando...
La pagina si sta caricando...
La pagina si sta caricando...
La pagina si sta caricando...
La pagina si sta caricando...
La pagina si sta caricando...
La pagina si sta caricando...
La pagina si sta caricando...
La pagina si sta caricando...
La pagina si sta caricando...
La pagina si sta caricando...
La pagina si sta caricando...
La pagina si sta caricando...
La pagina si sta caricando...
La pagina si sta caricando...
La pagina si sta caricando...
La pagina si sta caricando...
La pagina si sta caricando...
La pagina si sta caricando...
La pagina si sta caricando...
La pagina si sta caricando...
La pagina si sta caricando...
La pagina si sta caricando...
La pagina si sta caricando...
La pagina si sta caricando...
La pagina si sta caricando...
La pagina si sta caricando...
La pagina si sta caricando...
La pagina si sta caricando...
La pagina si sta caricando...
La pagina si sta caricando...
La pagina si sta caricando...
La pagina si sta caricando...
La pagina si sta caricando...
La pagina si sta caricando...
La pagina si sta caricando...
La pagina si sta caricando...
La pagina si sta caricando...
La pagina si sta caricando...
La pagina si sta caricando...
La pagina si sta caricando...
La pagina si sta caricando...
-
 1
1
-
 2
2
-
 3
3
-
 4
4
-
 5
5
-
 6
6
-
 7
7
-
 8
8
-
 9
9
-
 10
10
-
 11
11
-
 12
12
-
 13
13
-
 14
14
-
 15
15
-
 16
16
-
 17
17
-
 18
18
-
 19
19
-
 20
20
-
 21
21
-
 22
22
-
 23
23
-
 24
24
-
 25
25
-
 26
26
-
 27
27
-
 28
28
-
 29
29
-
 30
30
-
 31
31
-
 32
32
-
 33
33
-
 34
34
-
 35
35
-
 36
36
-
 37
37
-
 38
38
-
 39
39
-
 40
40
-
 41
41
-
 42
42
-
 43
43
-
 44
44
-
 45
45
-
 46
46
-
 47
47
-
 48
48
-
 49
49
-
 50
50
-
 51
51
-
 52
52
-
 53
53
-
 54
54
-
 55
55
-
 56
56
-
 57
57
-
 58
58
-
 59
59
-
 60
60
-
 61
61
-
 62
62
-
 63
63
-
 64
64
-
 65
65
-
 66
66
-
 67
67
-
 68
68
-
 69
69
-
 70
70


Nacon RIG600PRO_HS Guida utente
- Categoria
- Auricolari per cellulari
- Tipo
- Guida utente
in altre lingue
- français: Nacon RIG600PRO_HS Mode d'emploi
- español: Nacon RIG600PRO_HS Guía del usuario
- Deutsch: Nacon RIG600PRO_HS Benutzerhandbuch
- Nederlands: Nacon RIG600PRO_HS Gebruikershandleiding