
GS55AI100
User manual Dishwasher
Istruzioni per l’uso Lavastoviglie

Thank you for choosing one of our high-quality products.
To ensure optimal and regular performance of your appliance please read this
instruction manual carefully. It will enable you to navigate all processes perfectly
and most efficiently. To refer to this manual any time you need to, we recommend
you to keep it in a safe place. And please pass it to any future owner of the
appliance.
We wish you much joy with your new appliance.
CONTENTS
SAFETY INFORMATION 3
Children and vulnerable persons safety 3
General safety 3
Use 3
Care and cleaning 4
Installation 4
Frost precautions 4
Water connection 4
Electrical connection 5
Service centre 5
To discard the appliance 5
PRODUCT DESCRIPTION 6
CONTROL PANEL 7
On/off button 8
Programme button 8
Multitab button 8
Half-load button 8
Function buttons 8
Setting mode 8
USE OF THE APPLIANCE 9
SETTING THE WATER SOFTENER 9
Adjustment of the water softener 9
USE OF DISHWASHER SALT 10
USE OF DETERGENT AND RINSE AID 11
Use of detergent 11
Use of rinse aid 11
Adjust the rinse aid dosage 11
MULTITAB FUNCTION 12
LOADING CUTLERY AND DISHES 12
Hints and tips 12
The lower basket 13
The cutlery basket 14
The upper basket 15
Adjusting the height of the upper basket
16
WASHING PROGRAMMES 18
SETTING AND STARTING A WASHING
PROGRAMME 18
Starting the washing programme 18
Interruption of a washing programme 19
Cancelling the washing programme 19
End of the washing programme 19
Remove the items from the baskets 19
CARE AND CLEANING 21
To remove and clean the filters 21
WHAT TO DO IF… 22
The washing results and drying results are
not satisfactory 23
Activating the rinse aid dispenser 24
TECHNICAL DATA 24
ENVIRONMENT CONCERNS 25
INSTALLATION 25
To attach the appliance to the adjacent units
25
Other possibilities to attach the appliance to
the adjacent units 26
Water drain connection 26
Subject to change without notice
2 Contents

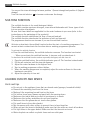
SAFETY INFORMATION
Before the installation and use, read this manual carefully:
• For your safety and the safety of your property.
• To help the environment.
• For the correct operation of the appliance.
Always keep these instructions with the appliance also if you move or give it to a different
person.
The manufacturer is not responsible if an incorrect installation and use causes damage.
Children and vulnerable persons safety
• Do not let persons, children included, with reduced physical sensory, reduced mental
functions or lack of experience and knowledge to use the appliance. They must have su-
pervision or instruction for the operation of the appliance by a person who is responsible
for their safety.
• Children must get supervision to make sure that they do not play with the appliance.
• Keep all packaging away from children. There is the risk of suffocation or injury.
• Keep all detergents in a safe area. Do not let the children touch the detergents.
• Keep children and pets away from the appliance when the door is open.
General safety
• Do not change the specifications of this appliance. There is the risk of injury and damage
to the appliance.
• Obey the safety instructions from the detergent manufacturer to prevent burns to eyes,
mouth and throat.
• Do not drink the water from the appliance. Particles of detergent can stay in your appli-
ance.
• Do not keep the appliance door open without supervision. This to prevent injury and to
fall on an open door.
• Do not sit or stand on the open door.
Use
• The appliance is only for domestic use. Do not use the appliance for other uses to pre-
vent injury to persons and damage to property.
• Only use the appliance to clean accessories that are applicable for dishwashers.
• Do not put flammable products or items that are wet with flammable products in, near
or on the appliance. Risk of explosion or fire.
• Put the knives and all items with sharp points in the cutlery basket with their points
down. If not, put in a horizontal position in the upper basket or in the knife basket. (Not
all models have the knife basket).
• Use only specified products for dishwashers (detergent, salt, rinse aid).
• Types of salt that are not specified for dishwashers can cause damage to the water soft-
ener.
• Fill the appliance with salt before you start a washing programme. Remaining salt in the
appliance can cause corrosion or make a hole in the bottom of the appliance.
• Do not fill the rinse aid dispenser with other products than the rinse aid, (dishwasher
cleaning agent, liquid detergent). This can cause damage to the appliance.
Safety information
3

• Make sure that the spray arms can move freely before you start a washing programme.
• The appliance can release hot steam if you open the door while a washing programme
operates. There is a risk of skin burns.
• Do not remove the dishes from the appliance until the washing programme is comple-
ted.
Care and cleaning
• Before you clean the appliance, deactivate it and disconnect the mains plug from the
mains socket.
• Do not use flammable products or products that can cause corrosion.
• Do not use the appliance without the filters. Make sure that the installation of the filters
is correct. An incorrect installation causes unsatisfactory washing results and damage to
the appliance.
• Do not use spray water or steam to clean the appliance. Risk of electrical shock and
damage to the appliance.
Installation
• Make sure that the appliance is not damaged. Do not install or connect a damaged appli-
ance, contact the supplier.
• Remove all packaging before you install and use the appliance.
• Only a qualified person must do the electrical connection, the plumbing and the installa-
tion of the appliance. This to prevent the risks of structural damage or injury.
• Make sure that the mains plug is disconnected from the mains socket during installation.
• Do not drill into the sides of the appliance to prevent damage to hydraulic components
and electrical components.
• Make sure that the appliance is installed below and adjacent to safe structures.
Frost precautions
• Do not install the appliance where the temperature is less than 0 °C.
• The manufacturer is not responsible for frost damage.
Water connection
• Use new hoses to connect the appliance to the water supply. Do not use used hoses.
• Do not connect the appliance to new pipes or pipes not used for a long time. Let the
water flow for some minutes, then connect the inlet hose.
• Make sure not to squash or cause damage to the water hoses when you install the appli-
ance.
• Make sure that the water couplings are tight to prevent a water leakage.
• The first time you use the appliance, make sure that the hoses do not have water leaks.
• The water inlet hose has a safety valve and a double sheath with an inner mains cable.
There is pressure in the water inlet hose only when the water flows. If there is a leak in
the water inlet hose, the safety valve interrupts the flow of water.
– Be careful when you connect the water inlet hose:
– Do not put the water inlet hose or the safety valve in water.
– If the water inlet hose or the safety valve are damaged, immediately disconnect the
mains plug from the mains socket.
– Contact the service centre to replace the water inlet hose with safety valve.
4 Safety information

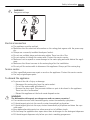
WARNING!
Dangerous voltage.
Electrical connection
• The appliance must be earthed.
• Make sure that the electrical information on the rating plate agrees with the power sup-
ply.
• Always use a correctly installed shockproof socket.
• Do not use multiple plugs and extension cables. There is a risk of fire.
• Do not replace or change the mains cable. Contact the service centre.
• Make sure not to squash or cause damage to the mains plug and cable behind the appli-
ance.
• Make sure that there is access to the mains plug after the installation.
• Do not pull the mains cable to disconnect the appliance. Always pull the mains plug.
Service centre
• Only a qualified person can repair or work on the appliance. Contact the service centre.
• Use only original spare parts.
To discard the appliance
• To prevent the risk of injury or damage:
– Disconnect the mains plug from the mains socket.
– Cut off the mains cable and discard it.
– Remove the door catch. This prevents children or pets to be closed in the appliance.
There is a risk of suffocation.
– Discard the appliance at the local waste disposal centre.
WARNING!
The dishwasher detergents are dangerous and can cause corrosion !
• If an accident occurs with these detergents, contact immediately a physician.
• If the detergent gets into the mouth, contact immediately a physician.
• If the detergent gets into the eyes, contact immediately a physician and clean the eyes
with water.
• Keep dishwasher detergents in a safe area and out of children touch.
• Do not keep the appliance door open when there is detergent in the detergent dispenser.
• Fill the detergent dispenser only before you start a washing programme.
Safety information
5

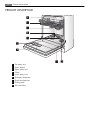
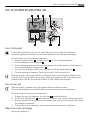
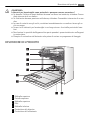
PRODUCT DESCRIPTION
1 Top spray arm
2 Upper basket
3 Upper spray arm
4 Filters
5 Lower spray arm
6 Detergent dispenser
7 Rinse aid dispenser
8 Rating plate
9 Salt container
6 Product description

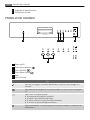
CONTROL PANEL
A
B
C
1 2 4 53
6
1 On/off button
2 Programme button
3 Multitab button
4 Half-load button
5 Indicator lights
6 Function buttons
Indicators
Washing phase indicator. It comes on when the washing phase or the rinsing
phase operates.
Drying phase indicator. It comes on when the drying phase operates.
End indicator. It comes on when:
• The washing programme is completed.
• You adjust the level of the water softener.
• You activate or deactivate the rinse aid dispenser.
• There is a malfunction of the appliance.
Rinse aid indicator. It comes on when it is necessary to fill the rinse aid dispenser.
1)
Salt indicator. It comes on when it is necessary to fill the salt container.
1)
After you fill the container, the salt indicator can stay on for some hours. This
does not have an unwanted effect on the operation of the appliance.
1) When the salt container and/or the rinse aid dispenser are empty, the related indicators do not come on while a
washing programme operates.
Control panel 7

Programme indicators
When you set a washing programme the related indicator comes on. Refer to
‘Washing programmes’.
On/off button
Press this button to activate or deactivate the appliance.
Programme button
Press this button again and again until the indicator of the washing programme comes on.
Refer to 'Washing programmes'.
Multitab button
Press this button to activate or deactivate the multitab function. Refer to 'Multitab func-
tion'.
Half-load button
Use this function when it is necessary to start a washing programme with a small load.
The half-load function decreases the programme time and the consumption of water and
energy.
When you use this function, put the load in the two baskets and decrease the detergent
quantity.
Activate or deactivate the half-load function before the start of a washing programme. You
cannot activate or deactivate the function while a washing programme operates.
The half-load function is not available for all washing programmes. Refer to 'Washing pro-
grammes'.
Function buttons
With these buttons you can:
• Adjust electronically the level of the water softener. Refer to 'Setting the water softener'.
• Activate and deactivate the rinse aid dispenser (only with the multitab function on). Re-
fer to 'What to do if...'.
• Cancel a washing programme in operation. Refer to 'Setting and starting a washing pro-
gramme'.
Setting mode
The appliance must be in setting mode for these operations:
• To set and start a washing programme.
• To adjust electronically the level of the water softener.
Activate the appliance. The appliance is in setting mode when:
• All the programme indicators come on.
Activate the appliance. The appliance is not in setting mode when:
• Only one programme indicator comes on.
8 Control panel

– It is necessary to cancel the programme to go back to the setting mode. Refer to 'Set-
ting and starting a washing programme'.
USE OF THE APPLIANCE
1. Be sure that the set level of the water softener agrees with the water hardness in your
area. If not, adjust the water softener.
2. Fill the salt container with dishwasher salt.
3. Fill the rinse aid dispenser with rinse aid.
4. Load cutlery and dishes into the appliance.
5. Set the correct washing programme for the type of load and soil.
6. Fill the detergent dispenser with the correct quantity of detergent.
7. Start the washing programme.
If you use the combi detergent tablets ('3 in 1', '4 in 1', '5 in 1'), use the multitab function
(refer to 'Multitab function').
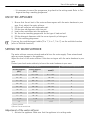
SETTING THE WATER SOFTENER
The water softener removes minerals and salts from the water supply. These minerals and
salts can cause damage to the appliance.
Adjust the level of the water softener if this does not agree with the water hardness in your
area.
Contact your local water authority to know the water hardness in your area.
Water hardness Water hardness adjustment
German degrees
(dH°)
French degrees
(TH°)
mmol/l
51 - 70 91 - 125 9.1 - 12.5 10
43 - 50 76 - 90 7.6 - 9.0 9
37 - 42 65 - 75 6.5 - 7.5 8
29 - 36 51 - 64 5.1 - 6.4 7
23 - 28 40 - 50 4.0 - 5.0 6
19 - 22 33 - 39 3.3 - 3.9 5
15 - 18 26 - 32 2.6 - 3.2 4
11 - 14 19 - 25 1.9 - 2.5 3
4 - 10 7 - 18 0.7 - 1.8
2
1)
< 4 < 7 < 0.7
1
2)
1) Factory position.
2) Do not use salt at this level.
Adjustment of the water softener
1. Activate the appliance. Make sure that the appliance is in setting mode.
Use of the appliance
9

2. Press and hold function button (B) and function button (C) at the same time until the
indicators of function buttons (A), (B) and (C) flash.
3. Release function button (B) and function button (C).
4. Press function button (A).
• The indicators of function button (B) and function button (C) go off.
• The indicator of function button (A) continues to flash.
• The end indicator starts to flash. The number of flashes shows the current adjust-
ment. Example: 5 flashes / pause / 5 flashes = level 5.
5. Press function button (A) to change the adjustment. Each time you press function but-
ton (A), the adjustment goes to the subsequent level.
6. Deactivate the appliance to confirm.
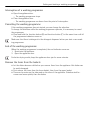
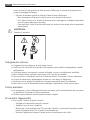
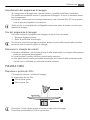
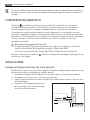
USE OF DISHWASHER SALT
How to fill the salt container:
1. Turn the cap counterclockwise and open the salt container.
2. Fill the salt container with 1 litre of water (only for the first time you fill with salt).
3. Use the funnel to fill the salt container with salt.
4. Remove the salt around the opening of the salt container.
5. Turn the cap clockwise to close the salt container.
It is correct that water comes out from the salt container when you fill it with salt.
10 Use of dishwasher salt

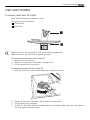
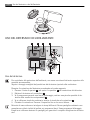
USE OF DETERGENT AND RINSE AID
2
0
0
3
1
2
3
4
-
+
M
A
x
1
2
3
4
5
6
7
Use of detergent
To help the environment, do not use more than the correct quantity of detergent.
Follow the detergent manufacturer recommendations on the detergent packaging.
Do these steps to fill the detergent dispenser:
1.
Press the release button
2
to open the lid
7
of the detergent dispenser.
2.
Put the detergent in the dispenser
1
.
3. If the washing programme has a prewash phase, put a small quantity of detergent in
the prewash detergent compartment
3
.
4.
If you use the detergent tablets, put the tablet in the detergent dispenser
1
.
5. Close the detergent dispenser. Press the lid until it locks into position.
Different brands of detergent dissolve in different times. Some detergent tablets do not
have the best cleaning results during short washing programmes. Use long washing pro-
grammes when you use the detergent tablets to fully remove the detergent.
Use of rinse aid
Rinse aid makes it possible to dry the dishes without streaks and stains.
The rinse aid dispenser automatically adds rinse aid during the last rinsing phase.
Do these steps to fill the rinse aid dispenser:
1.
To open the rinse aid dispenser, turn the cap
4
counterclockwise
2.
Fill the rinse aid dispenser
5
with rinse aid. The mark 'max' shows the maximum level.
3. Remove the spilled rinse aid with an absorbent cloth to prevent too much foam during
the washing programme.
4. To close the rinse aid dispenser, put the cap in position and turn it clockwise.
Adjust the rinse aid dosage
Factory set: position 3.
Use of detergent and rinse aid
11

You can set the rinse aid dosage between position 1 (lowest dosage) and position 4 (highest
dosage).
Turn the rinse aid selector
6
to increase or decrease the dosage.
MULTITAB FUNCTION
The multitab function is for combi detergent tablets.
These tablets contain agents as detergent, rinse aid and dishwasher salt. Some types of tab-
lets can contain other agents.
Be sure that these tablets are applicable for the water hardness in your area (refer to the
instructions on the packaging of the products).
The multitab function deactivates the flow of rinse aid and salt.
The multitab function deactivates the indicators of salt and rinse aid.
The programme duration can increase if you use the multitab function.
Activate or deactivate the multitab function before the start of a washing programme. You
cannot activate or deactivate the function when a washing programme operates.
To activate the multitab function
• Press the multitab button, the multitab indicator comes on. The function is activated.
– When you activate the multitab function, it stays on until you deactivate it.
To deactivate the multitab function and use separately detergent, salt and rinse aid
1. Press the multitab button, the multitab indicator goes off. The function is deactivated.
2. Fill the salt container and the rinse aid dispenser.
3. Adjust the water hardness to the highest level.
4. Start a washing programme without dishes.
5. When the washing programme is completed, adjust the water softener to the water
hardness in your area.
6. Adjust the quantity of rinse aid.
LOADING CUTLERY AND DISHES
Hints and tips
• Do not put in the appliance items that can absorb water (sponges, household cloths).
• Remove the remaining food from the items.
• Make soft the remaining burned food on the items.
• Put hollow items (cups, glasses and pans) with the opening down.
• Make sure that water does not collect in containers or in bowls.
• Make sure that cutlery and dishes do not bond together.
• Make sure that the glasses do not touch other glasses.
• Put small items in the cutlery basket.
• Mix the spoons with other cutlery to prevent them to bond together.
• When you put the items in the baskets, make sure that the water can touch all surfaces.
• Put light items in the upper basket. Make sure that the items do not move.
• Water droplets can collect on plastic items and non-stick pans.
12 Multitab function

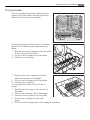
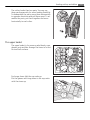
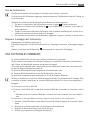
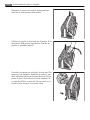
The lower basket
Put the saucepans, lids, plates, salad bowls and
cutlery in the lower basket. Arrange the service
dishes in the front part of the basket.
The rows of prongs in the rear part of the basket
can be flat to load pots, pans, bowls and deep
dishes.
1. Hold the two rows of prongs on the right side
at the rear part of the basket.
2. Lift the rows of prongs out of the guides.
3. Fold the rows of prongs.
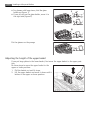
1. Hold the two rows of prongs on the left
side at the rear part of the basket.
2. Lift the rows of prongs out of the guides.
3. Fold the rows of prongs.
You can adjust the width of the left row of
prongs.
1. Hold the row of prongs at the rear part of
the basket.
2. Pull the row of prongs until it disengages.
3. Push the row of prongs out of the guide.
4. Put the row of prongs into the other
guide.
5. Push the row of prongs down until it engages in position.
Loading cutlery and dishes 13

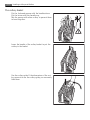
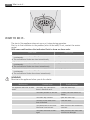
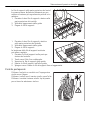
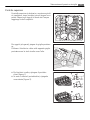
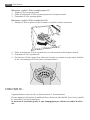
The cutlery basket
Put the forks and spoons with the handles down.
Put the knives with the handles up.
Mix the spoons with other cutlery to prevent them
to bond together.
Lower the handle of the cutlery basket to put the
cutlery in the basket.
Use the cutlery grids. If the dimensions of the cut-
lery prevent to use the cutlery grids, you can easily
hide them.
14 Loading cutlery and dishes

The cutlery basket has two parts. You can use
these parts separately for more loading flexibility.
To disassemble the parts, move them horizontally
in opposite directions and pull them apart. To as-
semble the parts, put them together and move
horizontally to each other.
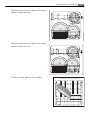
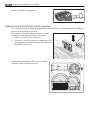
The upper basket
The upper basket is for saucers, salad bowls, cups,
glasses, pots and lids. Arrange the items to let wa-
ter touch all surfaces.
For longer items fold the cup racks up.
Put the glasses with long stems in the cup racks
with the stems up.
Loading cutlery and dishes 15

• For glasses with long stems, fold the glass
holder up (figure 1).
• If you do not use the glass holder, move it to
the right side (figure 2).
Put the glasses on the prongs.
Adjusting the height of the upper basket
If you put large plates in the lower basket, first move the upper basket to the upper posi-
tion.
Do these steps to move the upper basket to the
upper or lower position:
1. Pull the basket out until it stops.
2. Lift the upper basket and move it down until it
latches in the upper or lower position.
16 Loading cutlery and dishes

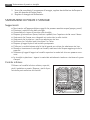
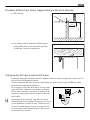
Maximum dimensions for plates with upper
basket in upper position.
Maximum dimensions for plates with upper
basket in lower position
Position of large plates in lower basket
18
25
32
20
25
30
Loading cutlery and dishes 17

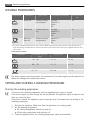
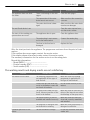
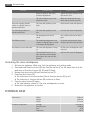
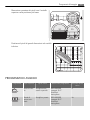
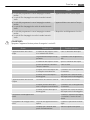
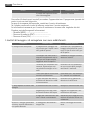
WASHING PROGRAMMES
Programme Type of soil Type of load Programme description Half-load func-
tion
Heavy soil Crockery, cutlery,
pots and pans
Prewash
Wash 70 °C
Rinses
Dry
Yes
1)
Normal soil Crockery and cut-
lery
Prewash
Wash 50 °C
Rinses
Dry
No
Normal or
light soil
Delicate crockery
and glassware
Wash 45 °C
Rinses
Dry
No
1) This is the standard programme for test institutes. With this programme you have the most efficient use of
water and energy consumption for crockery and cutlery with normal soil. Refer to the supplied leaflet for test
information.
Consumption values
Programme Programme time (mi-
nute)
Energy (kWh) Water (litre)
116 - 126 1.9 - 2.1 22 - 24
165 - 175 1.0 - 1.1 14 - 15
65 - 75 0.8 - 0.9 13 - 14
The water pressure and temperature, the variations of the mains supply and the quantity of
dishes can change the consumption values.
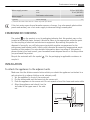
SETTING AND STARTING A WASHING PROGRAMME
Starting the washing programme
You can set the washing programme with the appliance door open or closed.
If the door is open, you can change the setting because the appliance starts to operate only
after you close the door.
If the door is closed, the appliance starts to operate after 3 seconds from the setting of the
washing programme.
1. Activate the appliance. Make sure that the appliance is in setting mode.
2. Set the washing programme.
• The related programme indicator comes on.
• All the other programme indicators go off.
3. Close the appliance door, the washing programme starts automatically.
18 Washing programmes

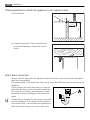
Interruption of a washing programme
• Open the appliance door.
– The washing programme stops.
• Close the appliance door.
– The washing programme continues from the point of interruption.
Cancelling the washing programme
If the washing programme has not started, you can change the selection.
To change the selection while the washing programme operates, it is necessary to cancel
the programme.
• Press and hold the function button (B) and function button (C) at the same time until all
the programme indicators come on.
Make sure that there is detergent in the detergent dispenser before you start a new wash-
ing programme.
End of the washing programme
When the washing programme is completed, the end indicator comes on.
1. Deactivate the appliance.
2. Open the appliance door.
For better drying results, keep the appliance door ajar for some minutes.
Remove the items from the baskets
• Let the dishes become cold before you remove them from the appliance. Hot dishes can
be easily damaged.
• First remove the items from the lower basket, then from the upper basket.
• There can be water on the sides and on the door of the appliance. Stainless steel be-
comes cool more quickly than the dishes.
Setting and starting a washing programme
19

20 Setting and starting a washing programme
La pagina si sta caricando...
La pagina si sta caricando...
La pagina si sta caricando...
La pagina si sta caricando...
La pagina si sta caricando...
La pagina si sta caricando...
La pagina si sta caricando...
La pagina si sta caricando...
La pagina si sta caricando...
La pagina si sta caricando...
La pagina si sta caricando...
La pagina si sta caricando...
La pagina si sta caricando...
La pagina si sta caricando...
La pagina si sta caricando...
La pagina si sta caricando...
La pagina si sta caricando...
La pagina si sta caricando...
La pagina si sta caricando...
La pagina si sta caricando...
La pagina si sta caricando...
La pagina si sta caricando...
La pagina si sta caricando...
La pagina si sta caricando...
La pagina si sta caricando...
La pagina si sta caricando...
La pagina si sta caricando...
La pagina si sta caricando...
La pagina si sta caricando...
La pagina si sta caricando...
La pagina si sta caricando...
La pagina si sta caricando...
-
 1
1
-
 2
2
-
 3
3
-
 4
4
-
 5
5
-
 6
6
-
 7
7
-
 8
8
-
 9
9
-
 10
10
-
 11
11
-
 12
12
-
 13
13
-
 14
14
-
 15
15
-
 16
16
-
 17
17
-
 18
18
-
 19
19
-
 20
20
-
 21
21
-
 22
22
-
 23
23
-
 24
24
-
 25
25
-
 26
26
-
 27
27
-
 28
28
-
 29
29
-
 30
30
-
 31
31
-
 32
32
-
 33
33
-
 34
34
-
 35
35
-
 36
36
-
 37
37
-
 38
38
-
 39
39
-
 40
40
-
 41
41
-
 42
42
-
 43
43
-
 44
44
-
 45
45
-
 46
46
-
 47
47
-
 48
48
-
 49
49
-
 50
50
-
 51
51
-
 52
52


Aeg-Electrolux P09113082865 Manuale utente
- Tipo
- Manuale utente
- Questo manuale è adatto anche per
in altre lingue
Altri documenti
-
Electrolux GA554IF Manuale utente
-
-
-
Novamatic GS927ISIL Manuale utente
-
-
-
-
-
Electrolux ESI66010K Manuale utente