HP PageWide Enterprise Color MFP 785 Printer series Guida utente
- Tipo
- Guida utente

EN
NOTE: The printer MFP model is shown in this procedure. However,
the instructions are correct for all printer models.
FR
REMARQUE: Le modèle MFP est présenté dans cette procédure.
Toutefois, les instructions sont correctes pour tous les modèles
d’imprimante.
DE
HINWEIS: Für dieses Verfahren ist das MFP-Druckermodell
dargestellt. Die Anweisungen sind aber für alle Druckermodelle
gültig.
IT
NOTA: In questa procedura è mostrato il modello MFP della
stampante. Tuttavia, le istruzioni sono valide per tutti i modelli
distampanti.
ES
NOTA: En este procedimiento se muestra el modelo de impresora
MFP. No obstante, las instrucciones son válidas para todos los
modelos de impresora.
ZHCN
注:此过程中展示的是打印机的多功能一体机型
号。但是,这些说明适用于所有打印机型号。
JA
注記:この手順では、MFP モデル プリンタを示していま
す。ただし、説明はすべてのモデルに共通です。
참고: 이 절차에서는 프린터 MFP 모델이 표시됩니다. 그러나
모든 프린터 모델에 대한 지침은 동일하게 적용됩니다.
KO
PT
NOTA: O modelo de impressora MFP é mostrado neste
procedimento. No entanto, as instruções estão corretas para
todos os modelos de impressora.
RU
ПРИМЕЧАНИЕ. В рамках этой процедуры демонстрируется
многофункциональная модель принтера. Тем не менее
инструкции действительны в отношении всех моделей
принтеров.
A7W93-67047 (8GB)
A7W94-67005 (16GB)
A7W94-67006 (128GB)
www.hp.com/support/pagewidecolor750
www.hp.com/support/pagewidecolor772MFP
Lea esto primero
eMMC.indd 1 4/11/2017 9:45:02 PM

1
2
EN
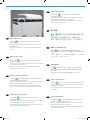
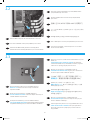
Remove the rear cover
CAUTION:
The exposed area is electrostatic discharge
sensitive (ESD).
Locate the rear cover latch at the top left corner of the cover
(inside the cover).
TIP: The rear cover has an embossed mark where the latch is
located.
FR
Retrait du capot arrière
ATTENTION:
La zone exposée est sensible aux décharges
électrostatiques (DES).
Localisez le loquet du capot arrière dans le coin supérieur gauche
du capot (à l’intérieur du capot).
ASTUCE: Le capot arrière comporte une marque en relief à
l’endroit où le loquet se situe.
DE
Entfernen der hinteren Abdeckung
VORSICHT:
Die freiliegende Fläche reagiert empfindlich auf
elektrostatische Entladung (ESD).
Suchen Sie an der oberen linken Ecke der Abdeckung (Innenseite)
nach der Verriegelung für die hintere Abdeckung.
TIPP: Die hintere Abdeckung verfügt über eine eingeprägte
Markierung, an der Stelle, an der sich die Verriegelung befindet.
IT
Rimuovere il coperchio posteriore
ATTENZIONE:
L’area esposta è sensibile alle scariche
elettrostatiche (ESD).
Individuare il fermo del coperchio posteriore nell’angolo superiore
sinistro del coperchio (all’interno del coperchio).
SUGGERIMENTO: Sul coperchio posteriore è presente un segno in
rilievo che indica la posizione del fermo.
ES
Retire la cubierta posterior
PRECAUCIÓN:
El área expuesta es sensible a descargas
electroestáticas (ESD).
Localice el cierre de la cubierta posterior en la esquina superior
izquierda de la cubierta (dentro de la cubierta).
SUGERENCIA: La cubierta posterior tiene una marca en relieve
donde se encuentra el cierre.
卸下后盖
注意:
暴露在外的区域容易被静电释放 (ESD)
损坏。
找到盖板左上角的后盖闩锁(在盖板内部)。
提示:后盖在闩锁所在之处有一个压印的标记。
ZHCN
JA
後部カバーを取り外します
注意:
露出した部分は静電放電 (ESD)に敏感です。
後部カバーのラッチをカバーの左上隅 (カバーの内側) に置
きます。
ヒント:後部カバーのラッチがある位置には、エンボス加
工されたマークが付いています。
후면 덮개 분리
주의:
노출된 영역은 전자기 방전에 민감합니다(ESD).
덮개의 왼쪽 상단(덮개 내부)에서 후면 덮개 래치의 위치를
찾습니다.
팁: 래치가 위치한 후면 덮개에는 돌출 표시가 있습니다.
KO
PT
Remover a tampa traseira
CUIDADO:
A área exposta é sensível a descarga elétrica (ESD).
Localize a trava da tampa traseira e o canto superior esquerdo da
tampa (dentro da tampa).
DICA: A tampa traseira tem uma marca em relevo onde a trava
élocalizada.
RU
Снятие задней крышки
ОСТОРОЖНО!
Рассматриваемая область чувствительна
кэлектростатическому разряду (ЭСР).
Найдите защелку задней крышки, расположенную в левом
верхнем углу крышки (под крышкой).
СОВЕТ. На заднюю крышку нанесена тисненая отметка в месте
расположения защелки.
eMMC.indd 2 4/11/2017 9:45:02 PM

1.2
3
1.1
EN
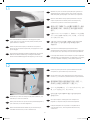
Use a small flat-blade screwdriver to careful pry the top left
corner of the rear cover away from the printer, and then push in
against the latch to release it.
EN
Rotate the top of the cover away from the printer (callout 1), and
then lift it up to remove it (callout 2).
FR
Utilisez un petit tournevis plat pour extraire le coin supérieur
gauche du capot arrière de l’imprimante, puis appuyez sur loquet
pour le dégager.
FR
Faites pivoter le dessus du capot hors de l’imprimante (légende1),
puis soulevez-le pour le retirer (légende2).
DE
Verwenden Sie einen kleinen Schlitzschraubendreher, um die obere
linke Ecke der hinteren Abdeckung vorsichtig herauszuhebeln.
Drücken Sie anschließend gegen die Verriegelung, um sie zu lösen.
DE
Drehen Sie die Oberseite der Abdeckung vom Drucker weg(1),
und heben Sie sie dann an, um sie zu entfernen(2).
IT
Utilizzare un piccolo cacciavite a punta piatta per sganciare con
delicatezza l’angolo superiore sinistro del coperchio posteriore
dalla stampante, quindi spingere contro il fermo per sganciarlo.
IT
Ruotare la parte superiore del coperchio allontanandolo dalla
stampante (1), quindi sollevarlo per rimuoverlo (2).
ES
Utilice un destornillador de hoja plana para extraer la esquina
superior izquierda de la cubierta posterior de la impresora y,
acontinuación, presione contra el cierre para soltarlo.
ES
Gire la parte superior de la cubierta hacia fuera de la impresora
(número1) y, a continuación, levántela (número2) para extraerla.
使用小型平口螺丝刀小心地撬开后盖的左上角以
使其脱离打印机,然后顶住闩锁向里按以将其
松开。
旋转盖板的顶部以使其脱离打印机(图注 1),
然后向上抬起它以将其卸下(图注 2)。
ZHCN
ZHCN
JA
小型のマイナス ドライバを使って、後部カバーの上左端を
プリンタから注意深く取り外します。その後、ラッチに向
かって押して外します。
JA
カバーの上部を回転させ、プリンタから外します (1)。その
後、カバーを持ち上げて、外します (2)。
소형 일자 스크루 드라이버를 사용하여 프린터 후면 덮개의
왼쪽 상단을 조심스럽게 들어낸 다음 래치에 밀어 넣어
개방합니다.
KO
덮개 상단을 프린터 바깥쪽으로 돌린 다음(1) 들어 올려서
분리합니다(2).
KO
PT
Use uma chave de fenda plana pequena para encaixar
cuidadosamente a parte superior esquerda da tampa traseira para
fora da impressora, e depois empurre contra a trava para liberá-la.
PT
Gire a parte superior da tampa para fora da impressora
(legenda1) e depois levante para removê-la (legenda 2).
RU
С помощью небольшой плоской отвертки осторожно подденьте
левый верхний угол задней крышки, отсоединив его от принтера,
после чего надавите на защелку, чтобы разблокировать ее.
RU
Поверните верхнюю часть крышки по направлению от
принтера (выноска1), затем поднимите ее (выноска2),
чтобыснять.
eMMC.indd 3 4/11/2017 9:45:03 PM

2
2.1
4
EN
EN
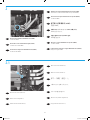
Remove the embedded MultiMedia Card (eMMC)
Locate the eMMC.
Remove one screw (callout 1).
FR
FR
Retrait de la carte multimédia intégrée (eMMC)
Localisez le module eMMC.
Retirez une vis (légende1).
DE
DE
Entfernen der integrierten MultiMedia Card (eMMC)
Suchen Sie die eMMC.
Entfernen Sie die Schraube(1).
IT
IT
Rimuovere la scheda multimediale incorporata (eMMC)
Individuare la scheda multimediale incorporata (eMMC).
Rimuovere la vite indicata (1).
ES
ES
Extracción de la tarjeta multimedia incorporada (eMMC)
Localice la eMMC.
Retire un tornillo (número1).
卸下嵌入式多媒体卡 (eMMC)
找到 eMMC。
卸下一个螺钉(图注 1)。
ZHCN
ZHCN
JA
JA
内蔵マルチメディア カード (eMMC) の取り外し
eMMC を見つけます。
1 個のねじ (1) を取り外します。
내장형 멀티미디어 카드(eMMC) 분리
eMMC를 찾습니다.
나사 1개(1)를 분리합니다.
KO
KO
PT
PT
Remover o cartão MultiMedia incorporado (eMMC)
Localize o eMMC.
Remova um parafuso (legenda 1).
RU
RU
Извлечение встроенного модуля MultiMedia Card (eMMC)
Найдите модуль eMMC.
Открутите винт (выноска 1).
eMMC.indd 4 4/11/2017 9:45:03 PM

2.2
2.3
5
EN
EN
Pull the eMMC straight off the main PCA (MPCA) to remove it.
Remove the holder (callout 1) from the eMMC (callout 2).
REINSTALL TIP: Reverse the removal steps to install the
replacement eMMC.
FR
FR
Tirez le module eMMC du PCA principal (MPCA) pour le retirer.
Retirez le support (légende1) de l’eMMC (légende2).
ASTUCE DE RÉINSTALLATION: Inversez les étapes de retrait pour
installer l’eMMC de remplacement.
DE
DE
Ziehen Sie die eMMC-Einheit gerade aus der Hauptplatine
(MainPrinted Circuit Assembly, MPCA) heraus, um sie zu entfernen.
Entfernen Sie die Halterung(1) aus der eMMC-Einheit(2).
TIPP FÜR DIE NEUINSTALLATION: Führen Sie die Entnahmeschritte in
umgekehrter Reihenfolge aus, um die Ersatz-eMMC zu installieren.
IT
IT
Tirare la la scheda multimediale incorporata (eMMC) dal PCA
principale (MPCA) per rimuoverla.
Rimuovere il supporto (1) dalla scheda multimediale incorporata
(eMMC) (2).
SUGGERIMENTO PER LA REINSTALLAZIONE: Per installare la
scheda multimediale incorporata (eMMC) di ricambio, seguire in
ordine inverso i passaggi seguiti per la rimozione.
ES
ES
Extraiga la eMMC en línea recta de la PCA principal (MPCA)
parasacarlo.
Retire el soporte (número1) de la eMMC (número2).
SUGERENCIA DE REINSTALACIÓN: Siga los pasos de extracción
a la inversa para instalar el eMMC de repuesto.
直着从主 PCA (MPCA) 中抽出 eMMC 以将其卸下。
从 eMMC(图注 2)上卸下夹持器(图注 1)。
装回提示:颠倒拆卸步骤以安装置换 eMMC。
ZHCN
ZHCN
JA
JA
メインの PCA (MPCA) から eMMC をまっすぐ引き出して取り
外します。
eMMC (2) からホルダー (1) を取り外します。
再取り付けのヒント: 取り外し手順を逆に実行して交換
eMMC を取り付けます。
eMMC를 똑바로 당겨 메인 PCA(MPCA)에서 분리합니다.
eMMC(2)에서 홀더(1)를 분리합니다.
재설치 시 유용한 정보: 분리 단계를 반대로 수행하여 교체
eMMC를 설치합니다.
KO
KO
PT
PT
Puxe o eMMC para fora do PCA principal (MPCA) para removê-lo.
Remova o suporte (legenda 1) do eMMC (legenda 2).
DICA DE REINSTALAÇÃO: Reverta as etapas de remoção para
instalar o eMMC de substituição.
RU
RU
Потяните модуль eMMC, чтобы вытащить его из основной
печатной платы (MPCA).
Снимите держатель (выноска1) с модуля eMMC (выноска2).
СОВЕТ ПО ОБРАТНОЙ УСТАНОВКЕ. Повторите действия по
демонтажу в обратном порядке для установки сменного
модуля eMMC.
eMMC.indd 5 4/11/2017 9:45:03 PM

eMMC.indd 6 4/11/2017 9:45:03 PM

eMMC.indd 7 4/11/2017 9:45:03 PM

© Copyright 2017 HP Development Company, L.P.
www.hp.com
eMMC.indd 8 4/11/2017 9:45:04 PM
-
 1
1
-
 2
2
-
 3
3
-
 4
4
-
 5
5
-
 6
6
-
 7
7
-
 8
8


HP PageWide Enterprise Color MFP 785 Printer series Guida utente
- Tipo
- Guida utente
in altre lingue
- English: HP PageWide Enterprise Color MFP 785 Printer series User guide
- français: HP PageWide Enterprise Color MFP 785 Printer series Mode d'emploi
- español: HP PageWide Enterprise Color MFP 785 Printer series Guía del usuario
- Deutsch: HP PageWide Enterprise Color MFP 785 Printer series Benutzerhandbuch
- русский: HP PageWide Enterprise Color MFP 785 Printer series Руководство пользователя
- português: HP PageWide Enterprise Color MFP 785 Printer series Guia de usuario
- 日本語: HP PageWide Enterprise Color MFP 785 Printer series ユーザーガイド
Documenti correlati
-
HP LaserJet Managed E50045 series Guida utente
-
HP PageWide Managed P77760 Multifunction Printer series Guida utente
-
-
-
HP LaserJet Managed MFP E82540du-E82560du series Guida d'installazione
-
HP PageWide Enterprise Color MFP 586 series Guida d'installazione
-