La pagina si sta caricando...

www.rotronic.comEnglish
CO
2
-DISPLAY
Short Instruction Manual
1 GENERAL DESCRIPTION
This CO
2
panel is an accurate wall mount and desktop data logger that displays and records relative
humidity, temperature and CO
2
. Date and time is additionally displayed.
2 PROGRAMMING
Most of the settings, such as memory clear, CO
2
status indicator, units (°C/°F), sampling rate, pres-
sure compensation and real time clock can all be changed using the function keys.
3 POWER SUPPLY
The CO
2
panel uses 12 VDC power adapter, which is included in the package.
4 DISPLAY
GOOD CO
2
value is in “GOOD” range
NORMAL CO
2
value is in “NORMAL” range
POOR CO
2
value is in “POOR” range
% Unit of relative humidity
°C/°F Unit of temperature (Celsius/Fahrenheit)
REC Blinking in automatic logging mode
5 USB STICK CONNECTION
Recorded data can be easily downloaded to USB stick and save as *.XLS le. Easily analyze the re-
corded data through the free software HW4 or through Excel.
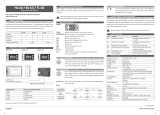
Opening for a simple CO
2
calibration
Function keys
USB stick slot
Humidity/Temperature sensor cover
Desktop stand
12 VDC adapter port
65
6 FUNCTIONS KEYS
START/ESC • “START”, Press longer to start automatic logging mode
(REC is blinking)
• “ESC”, Press longer to stop logging mode
• “ESC”, Exits setup and calibration mode
SET In normal mode, press longer to enter setup mode
UP Press to select unit or increases value in setup mode
DOWN /
DONWLOAD
• Press to select unit or decreases value in setup
• Press longer to download data to USB stick
7 OPERATION
7.1 POWER ON/OFF
Once the 12VDC power adaptor is connected, the device will be automatically powered on. At power
on, it performs 30 seconds countdown for device warm up, then enters normal mode with real time
clock displayed. To power off, unplug the power adaptor.
7.2 DATE/TIME SETUP
When device is powered on, hold down “SET” key for 2 seconds until entering device setup mode.
Press “UP” or “DOWN” key to select the program (P 50, displayed in right-middle panel) and press
“SET” key to enter.
First, choose the time format as 24 hour or 12 hour by press “UP” or “DOWN” key and then press
“SET” key to conrm. Now, start to input the real time clock value from year, month, day, hour to
minute. Press “UP” or “DOWN” key to adjust and the press “SET” key to conrm.
After the date and time are set, a clearance of the memory must be performed. Press “UP” or
“Down” key to select P 10 and press “SET” key to enter P11. Press “UP” or “Down” key to choose
“YES” to clear previous memories and press “SET” to conrm. Then, press “ESC” key twice to return
to normal mode.
7.3 UNIT SETUP
Hold down “SET” key for 2 seconds until entering meter setup mode. Press “UP” or “DOWN” key to
select the program P 30 and press “SET” key to enter. Press “UP” or “DOWN” key to select °F or °C
and the press “SET” key to conrm. Press “ESC” key to return to normal mode.
7.4 TAKING MEASUREMENT
The device starts measurement when power on and update readings every second.
7.5 CO
2
CONDITION INDICATOR
The meter features light bar indicator to have user easily recognize the indoor air quality. (See “Meter
Setup” section for setting Normal & Poor threshold).
7.6 DATA LOGGING
The meter can automatically record readings of CO2/TEMP./RH for long time environment monitor-
ing. The memory capacity is 6000 points for each parameter. Users can set up sampling rate from 1
minute to 12 hours and 59 minutes. The factory default rate is 1 minute.
First, setup the data record mode you need. Hold down “SET” key for 2 seconds until entering meter
setup mode. Press “UP” or “DOWN” key to select the program P 10 and press “SET” key twice to
enter P12. In P12, select the data record mode as "STOP" or "LOOP". Press "UP" or "DOWN" key to
select and then press "SET" to conrm.
"STOP": The device stops logging while the memory space is full.
"LOOP": After the memory is full, it starts to overwrite the oldest data.
Second, setup the sampling rate. Once nishing the P12 and press “SET” key, it enters P13. Press
“UP” or “DOWN” key to adjust the sample rate from hour to minute and press “SET” key to conrm.
Press “ESC” key to return to normal mode. After sampling rate setting and data record mode are
completed, press “ START” key for 2 seconds under normal mode to start logging. The “REC” LED
turn into green and ash on panel to indicate the logging is in process.
To terminate data logging, press “ ESC” key for 2 seconds and green LED light vanish. Repeat above
to start another run of logging. If the data record mode is programmed as "STOP", "REC" LED turn
into red color and ash while the logging memory space is full.
7.7 MEMORY DOWNLOAD
The meter features logged memory download function by using a USB stick instead of connecting it
with a computer. Before download, press “ESC” key for 2 seconds to stop the logging. Plug USB stick
(max. 8GB memory) to USB slot on device left side, hold down “DOWN” for more than 2 seconds until
seeing " USb” appears on panel and then “USb” starts ashing on panel to indicate the downloading
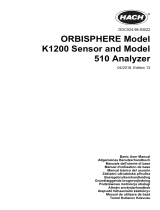
REC
CO
2
Real time clock
Temperature
Humidity
is in process. It will take minutes to fully download the memory. The data downloading time depends
on memory size and USB stick.
The download data is saved as *.XLS le in USB stick. Using free Rotronic software HW4 or Excel to
analyze the data. Suggest formatting your USB stick as FAT32 before using. If error code E60 ~ E65
appears on panel, suggest trying another model of USB memory stick.
Attention: In some cases when the size of the logged memory is large, it can happen that
the display shows an error code (E60 - E65). Check the USB memory stick, the data transfer
usually works. If not, repeat the process.
8 METER SETUP
Hold down “ SET” key for more than 2 seconds until entering setup mode. To exit setup, press “ESC”
to return to normal mode. The available meter setup program are shown in below. Press “UP” or
“DOWN” key to select the program (P10, P20, P30, P40 or P50) in main menu and press “SET” key to
enter sub menu. Press “SET” key to select different sub menu (P11, P12, P13 or P14), programmable
setting then ashes on panel. Press “UP” or “DOWN” key to adjust and press “SET” to conrm. To
leave without saving, press “ESC” key to return.
P 10 (Lo9) Logging related setup Note:
• DONE: displayed while memory is c leared
• STOP: Stop while memory is full
• LOOP: Overrides oldest values when
memory is full
Note:
• Factory preset at 1 minute
• The format is Hour: Min
P 11 (CLr), Clear logging memory
Choose YES/NO
P12 (End), Data record mode
Choose STOP/LOOP
P13 & P14 (rATE), Logging sampling rate
Choose from 00:01 to 12:59
P 20 (CO
2
) CO
2
related setup Note:
• Adjustable level is 400 to 1700 ppm
preset at 1000 ppm
• Adjustable level is 1000 to 2000 ppm
preset at 1700 ppm
• ABC preset as ON
P 21 (Nor) lower limit of “NORMAL” icon
P 22 (Poor) lower limit of “POOR” icon
P 23 (AbC) ABC function on/off
P 30 (uniT) Temperature unit setup Note:
• Factory preset °C
P 31, choose °C/°F
P 40 (PrES) Pressure compensation Note:
• Factory preset at 1013 hpa
• The adjustable scale is every 1 hpa
P41 (hPA) Choose from 700 to 1990 hpa
P 50 (rTC) Real Time Clock setup Note:
• Factory preset at 12 H
• Factory preset at 2013.01.01, 12:00
P 51 choose 12 or 24 hour format
P 52~54 Input Year/Month/Day
P 55~56 Input Hour/Minute
9 HUMIDITY CALIBRATION
This meter can be calibrated either via 35 % rH & via 80 % rH humidity standards. The ambient
condition is recommended as stable 25 °C.
Caution: Do not calibrate the humidity without the default humidity standards. Otherwise,
it will cause permanent damage. Contact Rotronic for humidity standards or services. Single
point calibration will cause error code E11 or non accurate reading. Always do dual point
calibration to complete a process. Suggest starting calibration from low humidity.
Pull out the humidity probe from panel
Before calibration, pull out the humidity probe
from cover in panel rear side.
9.1 CALIBRATION VIA HUMIDITY STANDARDS
Power on the device, plug the sensor probe into 35% humidity standard. Press “SET”
+”START”+”DOWN” keys simultaneously for 3 seconds to enter calibration mode. Press “UP” or
“DOWN” key to select 350 (35.0% calibration) and press “SET” to start. “Calibrating value” (35.2%
if at 25°C) is blinking on the LCD.
Waiting for 60 minutes to complete the 35% calibration. To quickly save, press “SET” key any time.
800 (80.0% calibration) comes right after 35% calibration is done. Within 20 minutes, press “SET”
key to start 80.0% calibration. “calibrating value” are blinking on the LCD. Waiting for 60 minutes
to complete the 80% calibration. To quickly save, press “SET” key any time. Now, the device is well
calibrated. To abort without saving, press “ESC” to quit without saving.
10 CO
2
CALIBRATION
Caution: Do not calibrate the meter in the air with unknown CO
2
concentration. Otherwise, it
will be wrongly calibrated and leads to inaccurate measurements.
The meter can be calibrated in fresh outdoor
air (on sunny day) at 400 ppm CO
2
. Besides the
400 ppm, the meter can also be calibrated at
0 ppm or any value under 990 ppm. The latest
calibration point is treated as nal and meter
will ignore the previous calibration data.
Press “SET” +”START”+”DOWN” keys simul-
taneously for 3 seconds to enter calibration
mode. Press “UP” or “DOWN” key to select 400
(400 ppm) or 0 (0 ppm) CO
2
calibration. 0 ppm function is only for 0ppm CO
2
calibration. For other
CO
2
value, please choose 400 ppm and press “SET” to enter. Once choosing the calibration value,
press SET to start and see “CAL” and CO
2
value blink on LCD.
Wait about 10 minutes until the blinking stops to indicate the calibration is completed.
To abort calibration without saving, press “ESC” at any time.
11 TROUBLE SHOOTING
Error Messages Solution
E01 CO
2
sensor is out of order Turn off meter and re-start again
E33 CO
2
sensor is out of order Retry CO
2
calibration
E02 Measured value is under range Put meter in normal condition
E03 Measured value is over range Put meter in normal condition
E11 RH calibration error Retry humidity calibration
E31 Temp. sensor or AD damaged Return for repair
E32 Memory IC damaged Return for repair
E33 RH sensor or circuit damaged Return for repair
E60~E65 USB download error Suggest to format USB stick or try a new
type of memory stick.
12 TECHNICAL DATA
Humidity/accuracy 0.1~99.9 %/±3 %(10~95 %@25 °C). ±5 %(others)
Temperature/accuracy 0...50 °C/±0.3 °C@5~40 °C
CO
2
/accuracy 0...9999 ppm/±(30 ppm+5% of reading)@0~5000 ppm
Storage and transit -20...60 °C/10...90 %rh, non condensing
Operating limit at electronics 0...50 °C
Memory 6000 records auto logging for each parameter
Dimension, mm 330(L) x 250(W) x 50(H)
Weight 1400 g
Power consumption Max. 0.7 A
DC power type 12 V DC
PC connection USB stick
12.8000.3008E

www.rotronic.comDeutsch
CO
2
-DISPLAY
Kurzbedienungsanleitung
1 ALLGEMEINE BESCHREIBUNG
Dieses CO
2
Display für Wand und Tisch zeigt die jeweilige Feuchtigkeit, Temperatur und den CO
2
Gehalt an und zeichnet diese auf. Datum und Zeit werden zusätzlich angezeigt.
2 PROGRAMMIERUNG
Die meisten Einstellungen, wie z. B. Speicher löschen, CO
2
Status Indikator, Einheiten (°C/°F), Auf-
zeichnungsintervall und Datum Uhrzeit können alle über die Funktionstasten geändert werden.
3 STROMVERSORGUNG
Das CO
2
Display hat einen 12 Volt Gleichspannungs-Poweradapter, der in Ihrem Paket mit enthalten ist.
4 DISPLAY
GOOD CO
2
Wert ist in “gutem” Bereich
NORMAL CO
2
Wert ist in “normalem” Bereich
POOR CO
2
Wert ist in “schlechtem” Bereich
% Einheit für jeweilige Luftfeuchtigkeit
°C/°F Einheit für Temperatur (Celsius/Fahrenheit)
REC Blinkt bei automatischem Aufzeichnungsmodus
5 USB STICK VERBINDUNG
Aufgezeichnete Daten können problemlos auf einen USB Stick heruntergeladen und als *.XLS le ge-
speichert werden. Die aufgezeichneten Daten können einfach mit der kostenlosen Rotronic Software
HW4 oder mit Excel ausgewertet werden.
Öffnung für eine einfache CO
2
Justierung
Funktionstasten
USB Stecker
Feuchte/Temperatur-Sensorabdeckung
Tischständer
12 V Adapteranschluss
65
6 FUNKTIONSTASTEN
START/ESC • “START”, Drücken Sie länger, um den automatischen Aufzeichnungs
modus zu starten (REC blinkt)
• “ESC”, Drücken Sie länger, um den Aufzeichnungsmodus zu beenden
• “ESC”, Beendet den Setup- und Justierungsmodus
SET Drücken Sie im Normalmodus länger, um in den Setupmodus zu
gelangen
UP Drücken Sie im Setupmodus, um die Einheit auszuwählen oder den Wert
zu erhöhen
DOWN /
DONWLOAD
• Drücken Sie im Setupmodus, um die Einheit auszuwählen oder den
Wert zu verringern
• Drücken Sie länger, um Daten auf den USB Stick herunterzuladen
7 BETRIEB
7.1 POWER AN/AUS
Wenn der 12 Volt Gleichspannungsadapter angeschlossen ist, ist das Gerät automatisch in Betrieb.
Bei Inbetriebnahme dauert es 30 Sekunden, bis sich das Instrument aufgewärmt hat und im Nor-
malmodus die Echtzeit angezeigt wird. Um auszuschalten, stecken Sie das Gerät aus.
7.2 DATUM/ZEIT SETUP
Wenn das Gerät in Betrieb ist, drücken Sie 2 Sekunden lang die “SET” Taste, um in den Setupmodus
zu gelangen. Drücken Sie die “UP” oder “DOWN” Taste, um das Programm auszuwählen (P 50, an-
gezeigt auf dem Display rechts in der Mitte) und drücken Sie die “SET” Taste. Wählen Sie zuerst das
Format (24 Stunden- oder 12 Stunden-Anzeige) durch Drücken der Tasten "UP" oder "DOWN" und
bestätigen Sie dann mit “SET”.Jetzt können Sie die Werte für die Echtzeituhr (Jahr, Monat, Tag, Stun-
de und Minute) eingeben. Drücken Sie “UP” oder “DOWN” zur Anpassung und drücken Sie dann
“SET”, um Ihre Einstellung zu bestätigen.
Nachdem Datum und Zeit eingestellt sind, muss der Speicher gelöscht werden. Drücken Sie “UP”
oder “Down”, um P10 auszuwählen und drücken Sie “SET”, um nach P11 zu gelangen. Drücken Sie
“UP” oder “Down”, um " YES“ auszuwählen”, um frühere Speicherungen zu löschen und drücken
Sie “SET”, um zu bestätigen. Dann drücken Sie “ESC” zweimal, um in den Normalmodus zurück-
zukehren.
7.3 SETUP DER EINHEITEN
Drücken Sie zwei Sekunden lang die “SET” Taste, bis Sie in den Messgerät Setupmodus gelangen.
Drücken Sie "UP" oder "DOWN", um das Programm P 30 auszuwählen und drücken Sie dann die
“SET” Taste. Drücken Sie "UP" oder "DOWN", um °F oder °C auszuwählen und drücken Sie die “SET”
Taste, um zu bestätigen. Drücken Sie "ESC", um in den Normalmodus zurückzukehren.
7.4 MESSUNG VORNEHMEN
Bei Betrieb beginnt das Gerät mit der Messung und aktualisiert die Messwerte jede Sekunde.
7.5 CO
2
GEHALT INDIKATOR
Das Messgerät besitzt einen Lichtbalken Indikator, für eine benutzerfreundliche Ablesung der Luft-
qualität im Innenraum (siehe unter “Messgerät Setup”, um Einstellungen für die Schwellenwerte
vorzunehmen).
7.6 DATENAUFZEICHNUNG
Das Messgerät kann automatisch Messwerte von CO
2
, Temperatur und relative Feuchte zur langfristi-
gen Beobachtung der Umgebung aufzeichnen. Die Speicherkapazität ist 6000 Punkte für jeden Para-
meter. Man kann den Aufzeichnungsintervall von 1 Minute bis 12 Stunden und 59 Minuten einstellen.
Die Werkseinstellung ist 1 Minute. Stellen Sie zuerst den benötigten Datenaufzeichnungsmodus ein.
Drücken Sie 2 Sekunden lang die “SET” Taste, bis Sie im Messgerät Einstellungsmodus sind. Drücken
Sie “UP” oder “DOWN”, um das Programm P10 auszuwählen und drücken Sie “SET” zweimal, um zu
P12 zu gelangen. In P12 wählen Sie den Datenaufzeichnungsmodus "STOP" oder "LOOP". Drücken
Sie "UP" oder "DOWN", um zu wählen und drücken Sie dann "SET", um zu bestätigen.
"STOP": Das Gerät beendet die Aufzeichnung, wenn der Speicher voll ist.
"LOOP": Nachdem der Speicher voll ist, beginnt es die alten Daten zu überschreiben.
Zweitens, Einstellung des Aufzeichnungsintervalls. Wenn Sie P12 fertiggestellt haben, drücken Sie
“SET” und gelangen so zu P13. Drücken Sie “UP” oder “DOWN”, um dem Aufzeichnungsintervalls
von Stunde und Minute einzustellen und drücken Sie die “SET” Taste, um zu bestätigen. Drücken Sie
"ESC", um in den Normalmodus zurückzukehren. Nachdem die Einstellung des Aufzeichnungsinter-
valls und der Datenaufzeichnungsmodus abgeschlossen sind, drücken Sie “START” für 2 Sekunden
im Normalmodus, um die Aufzeichnung zu beginnen.
Die “REC” LED wechselt nach grün und blinkt auf dem Display, um anzuzeigen, dass die Aufzeich-
nung läuft.Um die Datenaufzeichnung zu beenden, drücken Sie zwei Sekunden lang “ESC” und die
grüne LED Anzeige erlischt. Wiederholen Sie die oben stehenden Anweisungen, um eine andere Auf-
zeichnung einzuspeichern. Wenn der Datenaufzeichnungsmodus auf "STOP" programmiert wurde,
wechselt die "REC" LED Anzeige auf Rot und blinkt, falls der Aufzeichnungsspeicher voll ist.
REC
CO
2
Datum / Uhrzeit
Temperatur
Feuchte
7.7 SPEICHER HERUNTERLADEN
Das Messgerät besitzt eine Funktion zum Herunterladen des Aufzeichnungsspeichers mit Hilfe eines
USB Sticks, anstatt einer Verbindung zu einem Computer. Drücken Sie vor dem Herunterladen die
“ESC” Taste für 2 Sekunden, um die Aufzeichnung zu beenden. Stecken Sie den USB Stick (max.
8GB Speicher) in den USB Eingang auf der linken Seite des Gerätes, drücken Sie für mehr als 2 Se-
kunden “DOWN”, bis Sie sehen, dass die Anzeige "USb” auf der Armaturentafel erscheint und dann
“USb” zu blinken beginnt, um darauf hinzuweisen, dass das Herunterladen in Gang gesetzt ist.
Es dauert einige Minuten, bis der volle Speicher heruntergeladen ist. Die Zeit für das Herunterladen
hängt von der Größe des Speichers und dem USB Stick ab. Die heruntergeladenen Daten werden als
*.XLS File auf dem USB Stick gespeichert. Benutzen Sie die kostenlose Rotronic Software HW4 oder
Excel, um die Daten auszuwerten. Wir raten Ihnen, Ihren USB Stick vor dem Gebrauch als FAT32 zu
formatieren. Falls der F ehlercode E60 ~ E65 auf dem Display erscheint, raten wir Ihnen, es mit einem
anderen Modell eines USB Speichersticks zu versuchen.
Achtung: In einigen Fällen, wenn die Grösse des Aufzeichnungsspeichers gross ist, kann es
vorkommen, dass auf dem Display ein Fehlercode (E60 - E65) angezeigt wird. Überprüfen Sie
den USB-Speicherstick, normalerweise wird die Datenübertragung korrekt durchgeführt.
Wenn nicht, wiederholen Sie den Vorgang.
8 MESSGERÄTE SETUP
Drücken Sie für mehr als 2 Sekunden “ SET", bis Sie in den Setupmodus gelangen. Drücken Sie
"ESC", um den Setupmodus zu verlassen und zum Normalmodus zurückzukehren. Die verfügbaren
Messgerät Setup Programme sind unten aufgeführt. Drücken Sie “UP” oder “DOWN”, um die Pro-
gramme (P10, P20, P30, P40 oder P50) im Hauptmenü auszuwählen und drücken Sie “SET”, um
in das Untermenü zu gelangen. Drücken Sie die “SET” Taste, um die verschiedenen Untermenüs
auszuwählen (P11, P12, P13 oder P14), programmierbare Einstellungen blinken auf dem Display.
Drücken Sie “UP” oder “DOWN”, um einzustellen und drücken Sie “SET”, um zu bestätigen. Um
ohne zu speichern zurückzukehren, drücken Sie "ESC".
P 10 (Lo9) Aufzeichnungseinstellungen Bitte beachten Sie:
• DONE: wird angezeigt, während der
Speicher geleert wird
• STOP: Stop, wenn der Speicher voll ist
• LOOP: Überschreibt die alten Werte,
wenn der Speicher voll ist
Bitte beachten Sie:
• Werkseinstellungen ist 1 Minute
• Das Format ist Stunde: Min
P 11 (CLr), Löschen das Messwertspeichers
Wählen Sie YES/NO
P12 (End), Datenaufzeichnung
Wählen Sie STOP/LOOP
P13 & P14 (rATE), Messwertintervall
Wählen Sie von 00:01 bis 12:59
P 20 (CO
2
) CO
2
related setup Bitte beachten Sie:
• Der einstellbare Bereich reicht von 400 bis
1700 ppm Voreinstellung auf 1000 ppm
• Der einstellbare Bereich reicht von 1000 bis
2000 ppm Voreinstellung auf 1700 ppm
• ABC Voreinstellung ON
P 21 (Nor) lower limit of “NORMAL” icon
P 22 (Poor) lower limit of “POOR” icon
P 23 (AbC) ABC function on/off
P 30 (uniT) Temperature unit setup Bitte beachten Sie:
• Auslieferungseinstellung °C
P 31, choose °C/°F
P 40 (PrES) Pressure compensation Bitte beachten Sie:
• Auslieferungseinstellung bei 1013 hpa
• Messeinheit ist für jeweils 1 hpa einstellbar
P41 (hPA) Choose from 700 to 1990 hpa
P 50 (rTC) Real Time Clock setup Bitte beachten Sie:
• Auslieferungseinstellung auf 12
Stundenanzeige
• Auslieferungseinstellung auf 2013.01.01,
12.00
P 51 choose 12 or 24 hour format
P 52~54 Input Year/Month/Day
P 55~56 Input Hour/Minute
9 KALIBRIERUNG
Das Messgerät kann entweder nach 35 %rF oder 80 %rF Feuchtigkeitsstandards justiert werden. Als
Raumbedingung wird eine beständige Temperatur von 25 Grad empfohlen.
Achtung: Justieren Sie die Feuchtigkeitsmessung nicht, ohne die Feuchtigkeitsstandards.
Ansonsten verursachen Sie einen dauerhaften Schaden am Gerät. Kontaktieren Sie Rotronic
für die Feuchtigkeitsstandards oder bei Fragen. Eine Ein-Punkt-Justierung hat die Fehler-
meldung E11 oder keinen präzisen Messwert zur Folge. Immer eine Zwei-Punkte-Justierung
vornehmen und bei der tiefen Feuchte beginnen.
Ziehen Sie den Feuchtigkeitsfühler aus
dem Display heraus
Ziehen Sie vor der Justierung den Feuchtigkeits-
fühler aus seiner Halterung auf der Rückseite
des Displays.
9.1 KALIBRIERUNG NACH FEUCHTIGKEITSSTANDARD
Nehmen Sie das Gerät in Betrieb, stecken Sie den Fühlersensor bei 35% Feuchtigkeitsstandard ein.
Drücken Sie die “SET” +”START”+”DOWN” Tasten gleichzeitig für 3 Sekunden, um in den Justie-
rungsmodus zu gelangen. Drücken Sie “UP” oder “DOWN”, um 350 (35.0% Justierung) auszuwäh-
len und drücken Sie “SET”, für den Start. “Justierungswert” (35.2% bei 25°C) beginnt auf der LCD
Anzeige zu blinken. Warten Sie 60 Minuten, um die 35% Justierung abzuschließen.
Für schnelles Speichern können Sie die “SET” Taste jederzeit drücken. 800 (80% Justierung) kommt
direkt nach Abschluss der 35% Justierung. Drücken Sie “SET” innerhalb von 20 Minuten, um die
80.0% Justierung vorzunehmen. "calibrating value" beginnt auf der LCD Anzeige zu blinken. War-
ten Sie 60 Minuten, um die 80% Justierung abzuschließen. Für schnelles Speichern können Sie die
“SET” Taste jederzeit drücken. Jetzt ist das Gerät ordnungsgemäss justiert. Um abzubrechen ohne
zu speichern drücken Sie "ESC".
10 KALIBRIERUNG CO
2
Achtung: Justieren Sie das Messgerät nicht mit unbekannten CO
2
Werten der Luft. Ansons-
ten ist es nicht richtig justiert und zeigt die Messwerte nicht präzise an.
Das Messgerät kann draussen an der frischen
Luft justiert werden (an einem sonnigen Tag)
bei 400 ppm CO
2
. Neben den 400 ppm, kann
das Messgerät auch auf 0 ppm oder jeden Wert
unter 990 ppm justiert werden. Der letzte Jus-
tierungspunkt wird als gültig betrachtet und
das Messgerät ignoriert alle vorausgehenden
Justierungsdaten.
Drücken Sie die “SET” +”START”+”DOWN” Tasten gleichzeitig für 3 Sekunden, um in den Justie-
rungsmodus zu gelangen. Drücken Sie “UP” oder “DOWN”, um eine 400 (400 ppm) oder 0 (0 ppm)
CO
2
Justierung auszuwählen. Die 0 ppm Funktion ist nur für 0 ppm CO
2
Justierung. Für andere CO
2
Werte, wählen Sie bitte 400 ppm aus und drücken “SET”, für die Eingabe. Wenn Sie den Justie-
rungswert gewählt haben, drücken Sie SET um zu beginnen und Sie sehen “CAL” und CO
2
Wert auf
der LCD Anzeige blinken.
Warten Sie circa 10 Minuten bis das Blinken aufhört und damit anzeigt, dass die Justierung ab-
geschlossen ist. Um die Kalibrierung ohne Speicherung abzubrechen, können Sie jederzeit "ESC"
drücken.
11 FEHLERBEHEBUNG
Fehler Mitteilungen Lösung
E01 CO
2
Sensor funktioniert nicht Messgerät ausschalten und noch einmal
beginnen
E33 CO
2
Sensor funktioniert nicht CO
2
-Kalibrierung noch einmal vornehmen
E02 Gemessener Wert entspricht
nicht dem ausgewählten Bereich
Setzen Sie das Messgerät auf normal
E03 Gemessener Wert entspricht
nicht dem ausgewählten Bereich
Setzen Sie das Messgerät auf normal
E11 RH Kalibrierfehler Stellen Sie die Feuchtekalibrierung neu ein
E31 Temp. Sensor oder AD beschädigt Bitte zur Reparatur einsenden
E32 IC Speicher beschädigt Bitte zur Reparatur einsenden
E33 RH Sensor oder Stromkreis beschädigt Bitte zur Reparatur einsenden
E60~E65 USB Fehler beim Herunterladen Formatieren Sie Ihren USB Stick oder
versuchen Sie den Vorgang noch einmal mit
einem anderen Typ von Memory Stick.
12 TECHNISCHE DATEN
Feuchte/Genauigkeit 0.1~99.9 %/±3 %(10~95 %@25 °C). ±5 %(andere)
Temperatur/ Genauigkeit 0...50 °C/±0.3 °C@5~40 °C
CO
2
/Genauigkeit 0...9999 ppm/±(30 ppm+5 % vom Anzeigewert) @0~5000 ppm
Aufbewahrung/Transport -20...60 °C/10...90 %rF, nicht kondensierend
Einsatztemperatur Elektronik 0...50 °C
Speicher 6000 Aufzeichnungen, automatische Aufzeichnung
für jeden Parameter
Abmessungen, mm 330(L) x 250(W) x 50(H)
Gewicht 1400 g
Stromverbrauch Max. 0.7 A
Speisung 12 V DC
PC Verbindung USB-Stick
12.8000.3008D

www.rotronic.comFrançais
CO
2
-DISPLAY
Mode d'emploi abrégé
1 DESCRIPTION GÉNÉRALE
Ce panneau de CO
2
mural ou de bureau est un enregistreur de données précis qui afche et enre-
gistre l’humidité relative, la température et le CO
2
. Il afche également la date et l’heure.
2 PROGRAMMATION
La plupart des réglages/paramètres, tel que la suppression de mémoire, l’indicateur de statut de
CO
2
, les unités (°C/°F), le taux d’échantillonnage, la compensation de pression et l’horloge à temps
réel peuvent tous être modiés à l’aide des touches de fonction.
3 ALIMENTATION
Le panneau de CO
2
utilise un adaptateur secteur de 12 VDC, inclus dans l’emballage.
4 AFFICHAGE
GOOD La valeur du CO
2
est « BONNE »
NORMAL La valeur du CO
2
est « NORMALE »
POOR La valeur du CO
2
est « FAIBLE »
% Unité d’humidité relative
°C/°F Unité de température (Celsius/Fahrenheit)
REC Signal clignotant du mode d’enregistrement automatique
5 CONNEXION CLÉ USB
Les données enregistrées peuvent être facilement transférées sur une clé USB et enregistrées en
format *.XLS. Analyse en toute simplicité des données enregistrées à l’aide du logiciel gratuit HW4
ou avec Excel.
Ouverture pour un simple étalonnage de CO
2
Touches de fonction
Entrée clé USB
Couvercle du capteur humidité/température
Support de bureau
Port adaptateur 12 VDC
65
6 TOUCHES DE FONCTION
START/ESC • “START”, Maintenez enfoncé pour enclencher le mode
d’enregistrement automatique (REC clignote)
• “ESC”, Maintenez enfoncé pour arrêter le mode d’enregistrement
• “ESC”, Quitter le mode de conguration et d’étalonnage
SET En mode normal, maintenez enfoncé pour entrer en mode conguration
UP Appuyez pour sélectionner l’unité ou augmenter la valeur en mode
conguration
DOWN /
DONWLOAD
• Appuyez pour sélectionner l’unité ou diminuer la valeur en mode
conguration
• Maintenez enfoncé pour télécharger des données sur la clé USB
7 UTILISATION
7.1 POWER ON/OFF
Une fois l’adaptateur secteur 12 VDC branché, l’appareil s’allumera automatiquement. À l’allumage,
il démarre un compte à rebours de 30 secondes pour permettre au dispositif de chauffer, puis passe
en mode normal en afchant l’horloge en temps réel. Débrancher l’adaptateur secteur pour éteindre
l’appareil.
7.2 RÉGLAGE DATE/HEURE
Lorsque le dispositif est sous tension, maintenez enfoncé la touche “SET” pendant 2 secondes
jusqu’à passer en mode conguration de l’appareil. Appuyez sur “UP” ou “DOWN” pour sélec-
tionner le programme (P 50, afché dans le panneau central-droit) et appuyez sur la touche “SET”
pour valider. Tout d’abord, choisissez le format horaire, soit 24 heures soit 12 heures en pressant
la touche “UP” ou “DOWN” puis pressez sur “SET” pour conrmer. Vous pouvez désormais entrer
les valeurs de l’horloge en temps réel, en commençant par l’année, le mois, le jour, l’heure et les mi-
nutes. Appuyez sur “UP” ou “DOWN” pour ajuster puis appuyez sur la touche “SET” pour conrmer.
Une fois l’heure et la date réglées, il est impératif de supprimer la mémoire. Appuyez sur la touche
“UP” ou “Down” an de sélectionner P 10 puis appuyez sur “SET” pour accéder à P11. Appuyez sur
“UP” ou “Down” pour choisir “OUI” an d’effacer les mémoires précédentes puis appuyez sur “SET”
pour conrmer. Appuyez ensuite sur la touche “ESC” deux fois pour repasser en mode normal.
7.3 RÉGLAGE DE L’UNITÉ
Maintenez enfoncé la touche “SET” pendant 2 secondes jusqu’à entrer en mode réglage de l’appa-
reil. Appuyez sur “UP” ou “DOWN” an de sélectionner le programme P 30 puis sur la touche “SET”
pour valider. Appuyez sur “UP” ou “DOWN” pour sélectionner °F ou °C puis appuyez sur la touche
“SET” pour conrmer. Pressez sur la touche “ESC” pour repasser en mode normal.
7.4 PRISE DE MESURE
L’appareil commence à mesurer au démarrage et met à jour les résultats toutes les secondes.
7.5 INDICATEUR D’ÉTAT DU CO
2
L’appareil possède un voyant indicateur pour permettre à l’utilisateur de facilement reconnaitre la
qualité de l’air intérieure. (Voir la section “Conguration Instrument” pour dénir un seuil Normal
& Faible)
7.6 JOURNAL DES DONNÉES
L’appareil peut enregistrer automatiquement les résultats de CO2/TEMP./RH pour une surveillance
de l’environnement à long terme. La capacité de mémoire est de 6000 points pour chaque para-
mètre. Les utilisateurs peuvent établir un taux d’échantillonnage de 1 minute à 12 heures et 59
minutes. Le taux par défaut est d’1 minute. Tout d’abord, régler le mode d’enregistrement de don-
nées dont vous avez besoin. Maintenez enfoncé la touche “SET” pendant 2 secondes jusqu’à passer
en mode conguration de l’appareil. Appuyez sur la touche “UP” ou “DOWN” pour sélectionner le
programme P 10 puis pressez sur “SET” deux fois pour entrer en P12. Un fois dans P12, sélectionner
le mode d’enregistrement de données, soit "STOP" soit "LOOP". Pressez sur "UP" ou "DOWN" pour
valider puis pressez sur "SET" pour conrmer.
"STOP": Le dispositif interrompt l’enregistrement lorsque la mémoire est pleine.
"LOOP": Une fois la mémoire pleine, les plus anciennes données sont écrasées.
Ensuite, congurez le taux d’échantillonnage. Lorsque P12 est terminé et que vous appuyez sur
“SET”, il entre en P13. Appuyez sur “UP” ou “DOWN” pour ajuster le taux d’échantillonnage en
partant de l’heure jusqu’à la minute puis pressez sur la touche “SET” pour conrmer. Pressez sur
“ESC” pour repasser en mode normal. Une fois le réglage du taux d’échantillonnage et le mode
d’enregistrement de données terminés, appuyez sur “ START” pendant 2 secondes en mode normal
pour lancer l’enregistrement. Le voyant lumineux “REC” devient vert et clignote sur le panneau pour
indiquer que l’enregistrement est en cours. Pour terminer l’enregistrement, appuyez sur “ ESC” pen-
dant 2 secondes et le voyant vert disparaitra. Répétez l’opération pour lancer un nouvel enregistre-
ment. Si le mode d’enregistrement de données est programmé sur "STOP", le voyant "REC" devient
rouge et clignote lorsque l’espace mémoire des données est plein.
REC
CO
2
Date / Heure
Température
Humidité
7.7 TÉLÉCHARGEMENT DE LA MÉMOIRE
L’instrument possède une fonction de téléchargement de données enregistrées avec la clé USB au
lieu de se connecter à un ordinateur. Avant de télécharger, appuyez sur la touche “ESC” pendant 2
secondes pour stopper l’enregistrement. Connectez la clé USB (max. 8GB de mémoire) sur le port
USB du côté gauche de l’appareil, maintenez enfoncé “DOWN” pendant plus de 2 secondes jusqu’à
voir apparaitre " USB” sur le panneau et le sigle “USB” se met à clignoter sur le panneau pour in-
diquer que le téléchargement est en cours. Quelques minutes sont nécessaires au téléchargement
complet de la mémoire. Le temps de téléchargement dépend de la taille de la mémoire et de la clé
USB. Les données téléchargées sont sous format *.XLS dans la clé USB. Le logiciel Rotronic HW4 ou
Excel sert à analyser les données. Il est recommandé de formater votre clé USB sous FAT32 avant de
l’utiliser. Si le code erreur E60 ~ E65 s’afche, essayez de suggérer un autre modèle de clé USB ash.
Attention : dans certains cas, si la taille de la mémoire d'enregistrement est importante, il
peut arriver qu'un code d'erreur (E60 - E65) s'afche à l'écran. Vériez la clé USB, normale-
ment le transfert de données est correct. Si ce n'est pas le cas, répétez la procédure.
8 CONFIGURATION DE L’INSTRUMENT
Maintenez enfoncé la touche “ SET” pendant plus de 2 secondes jusqu’à passer en mode congu-
ration. Pour sortir du mode conguration, pressez “ESC” pour revenir au mode normal. Les pro-
grammes de conguration disponibles de l’instrument sont listés ci-dessous. Appuyez sur “UP”
ou “DOWN” pour sélectionner le programme (P10, P20, P30, P40 or P50) dans le menu principal et
appuyez sur la touche “SET” pour entrer dans le sous-menu. Pressez sur la touche “SET” pour sélec-
tionner différents sous-menus (P11, P12, P13 or P14), les réglages programmables clignotent alors
sur le panneau. Appuyez sur “UP” ou “DOWN” pour ajuster puis pressez sur “SET” pour conrmer.
Pour quitter sans sauvegarder, appuyez sur “ESC” pour revenir en arrière.
P 10 (Lo9) Réglages liés à l’enregistrement Remarque:
• DONE : quand la mémoire est vide
• STOP : S’arrête quand la mémoire est pleine
• LOOP : Passe outre les plus vieilles entrées
quand la mémoire est pleine
Remarque :
• Réglé par défaut à 1 minute
• Le format est Heure : Min
P 11 (CLr), Supprimer la mémoire des
enregistrements Choisir OUI/NON
P12 (End), Mode d’enregistrement des
données Choisir STOP/LOOP
P13 & P14 (rATE), Enregistrement du
taux d’échantillonnage
À partir de 00:01 jusqu’à 12:59
P 20 (CO
2
) Réglages lies au CO
2
Remarque :
• Niveau ajustable va de 400 à 1700 ppm
préréglage à 1000 ppm
• Niveau ajustable va de 1000 à 2000 ppm
préréglage à 1700 ppm
• Préréglage ABC sur ON
P 21 (Nor) limite la plus faible de l’icône
“NORMAL”
P 22 (Faible) limite la plus faible de l’icône
“FAIBLE”
P 23 (AbC) Fonction ABC on/off
P 30 (uniT) Réglage de l’unité de température Remarque :
• Réglage usine sur °C
P 31, choisir °C/°F
P 40 (PrES) Compensation de pression Remarque :
• Préréglage d’usine à 1013 hpa
• Échelle réglable tous les 1 hpa
P41 (hPA) Choisir entre 700 et 1990 hpa
P 50 (rTC) Réglage horloge en temps réel Remarque :
• Préréglage d’usine sur 12H
• Préréglage d’usine sur 2013.01.01, 12.00
P 51 Choisir le format 12 ou 24 heure
P 52~54 Entrer Anne/Mois/Jour
P 55~56 Entrer Heure/Minute
9 ÉTALONNAGE DE L’HUMIDITÉ
Cet appareil peut être étalonné soit par 35 % rH & par 80 % rH d’étalon d’humidité. La condition
ambiante recommandée est de 25°C.
Attention : Ne pas faire d’étalonnage de l’humidité sans l’étalon d’humidité. Dans le cas
contraire, cela endommagerait l’unité de façon permanente. Contactez Rotronic pour les éta-
lons d’humidité ou d’autres services. L’étalonnage à point unique entrainera le code erreur
E11 ou bien des résultats erronés. Toujours entreprendre un étalonnage à deux points pour
exécuter un processus. Il est recommandé de lancer un étalonnage avec un faible taux
d’humidité.
Retirer la sonde d’humidité du panneau
Avant l’étalonnage, retirez la sonde d’humidité
du couvercle au dos du panneau.
9.1 ÉTALONNAGE VIA LES ÉTALONS D’HUMIDITÉ
Mettre sous tension l’appareil, brancher la sonde sur 35% d’étalon d’humidité. Appuyez simulta-
nément sur les touches “SET” +”START”+”DOWN” pendant 3 secondes pour passer en mode éta-
lonnage. Appuyez sur “UP” ou “DOWN” pour sélectionner 350 (35.0% d’étalonnage) puis pressez
sur “SET” pour commencer. “La valeur d’étalonnage” (35.2% si à 25°C) clignote sur l’écran LCD.
Patientez 60 minutes pour compléter l’étalonnage à 35%. Pour faire une sauvegarde rapide, ap-
puyez sur la touche “SET” à n’importe quel moment. 800 (étalonnage à 80.0%) vient juste après la
n de l’étalonnage à 35%. Dans les 20 minutes qui suivent, appuyez sur la touche “SET” pour lan-
cer l’étalonnage à 80.0%. “Valeur de l’étalonnage” clignote alors sur l’écran. Patientez 60 minutes
pour compléter l’étalonnage à 80%. Pour faire une sauvegarde rapide, appuyez sur la touche “SET”
à n’importe quel moment. L’appareil est désormais étalonné correctement. Pour interrompre sans
sauvegarder, appuyez sur “ESC” pour terminer sans sauvegarder.
10 ÉTALONNAGE DU CO
2
Attention : Ne pas faire d’étalonnage si l’appareil se situe dans un air à un taux de CO
2
inconnu. Dans le cas contraire, l’étalonnage sera erroné et entrainera de fausses mesures.
Il est possible d’entreprendre l’étalonnage de
l’appareil à l’extérieur (les jours ensoleillés)
avec un CO
2
à 400 ppm. À part 400 ppm, l’éta-
lonnage de l’appareil peut aussi environner 0
ppm ou toute autre valeur en dessous de 990
ppm. Le dernier point d’étalonnage est consi-
déré comme le dernier et l’appareil ignore alors
les dernières données d’étalonnage.
Appuyez simultanément sur les touches “SET” +”START”+”DOWN” pendant 3 secondes pour pas-
ser en mode d’étalonnage. Appuyez sur “UP” ou “DOWN” pour sélectionner 400 (400 ppm) ou 0
(0 ppm) d’étalonnage de CO
2
. La fonction 0 ppm sert uniquement aux étalonnages de CO
2
à 0ppm.
Pour une autre valeur de CO
2
, veuillez choisir 400 ppm puis appuyer sur “SET” pour valider. Une fois
la valeur d’étalonnage choisie, appuyez sur SET pour commencer; la valeur “CAL” et le CO
2
clignotent
alors sur l’écran LCD.
Attendre environ 10 minutes jusqu’à l’arrêt du clignotement qui indique la n de l’étalonnage. Pour
interrompre l’étalonnage sans sauvegarder, appuyez sur “ESC” à tout moment.
11 RÉSOLUTION DES PROBLÈMES
Erreur Messages Solution
E01 La sonde de CO
2
ne fonctionne plus Éteignez l’appareil et redémarrez-le
E33 La sonde de CO
2
ne fonctionne plus Relancer l’étalonnage
E02 La valeur mesurée est inférieure
à la moyenne
Mettre l’appareil en condition normale
E03 La valeur mesurée est inférieure
à la moyenne
Mettre l’appareil en condition normale
E11 Erreur d’étalonnage RH Relancer l’étalonnage d’humidité
E31 Temp. sonde ou AD endommagé Renvoi pour réparation
E32 Mémoire IC endommagée Renvoi pour réparation
E33 Sonde RH ou circuit endommagé Renvoi pour réparation
E60~E65 Erreur téléchargement USB Suggérer nouveau format clé USB ou
essayer une nouvelle clé USB ash.
12 DONNÉES TECHNIQUES
Humidité/exactitude 0.1~99.9 %/±3 %(10~95 %@25 °C). ±5 %(autres)
Température/exactitude 0...50 °C/±0.3 °C@5~40OC
CO
2
/exactitude 0...9999 ppm/±(30 ppm+5% du résultat) @0~5000 ppm
Rangement et transit -20...60 °C/10...90 %HR, sans condensation
Limite d’utilisation des électroniques 0...50 °C
Mémoire 6000 enregistrements automatiquement pour chaque
paramètre
Dimension, mm 330(L) x 250(W) x 50(H)
Poids 1400 g
Consommation électrique Max. 0.7 A
Type d’alimentation DC 12 V DC
Connexion PC Clé USB
12.8000.3008F

www.rotronic.comItaliano
CO
2
-DISPLAY
Manuale di istruzioni breve
1 DESCRIZIONE GENERALE
Questo pannello CO
2
è un data logger di precisione, da parete e da tavolo, che visualizza e memoriz-
za i valori di umidità relativa, temperatura e CO
2
. Il dispositivo mostra inoltre la data e l'ora.
2 PROGRAMMAZIONE
È possibile utilizzare i tasti funzione per programmare la maggior parte delle impostazioni, come ad
esempio quelle riguardanti la cancellazione dei dati in memoria, l'indicatore di stato CO
2
, l'unità di
misura (°C/°F), la frequenza di campionamento, la compensazione della pressione e l'orologio interno.
3 ALIMENTAZIONE
Il pannello CO
2
utilizza un adattatore 12VDC, incluso nella confezione.
4 DISPLAY
GOOD Il valore di CO
2
è "BUONO"
NORMAL Il valore di CO
2
è "NORMALE"
POOR Il valore di CO
2
è "SCARSO"
% Unità di umidità relativa
°C/°F Unità di misura della temperatura (Celsius/Fahrenheit)
REC Lampeggia in modalità di registrazione dati automatica
5 CONNESSIONE CHIAVE USB
I dati memorizzati possono essere facilmente scaricati su una chiave USB e salvati come le *.XLS.
È possibile analizzare i dati registrati in maniera semplice e intuitiva utilizzando il software gratuito
HW4 o Excel.
Posizione sensore CO
2
FTasti Funzione
Connettore USB
Posizione sensore di Umidità/Temperatura
Supporto da tavolo
Porta adattatore 12 VDC
65
6 TASTI DI FUNZIONE
START/ESC • “START”, Tenere premuto per avviare la modalità di registrazione dati
automatica (REC lampeggerà)
• “ESC”, Tenere premuto per interrompere la modalità di registrazione
• “ESC”, Premere per uscire dalle modalità di congurazione e calibrazione
SET In modalità normale, tenere premuto per accedere alla modalità di
congurazione
UP Premere per selezionare l'unità di misura o per selezionare i valori
desiderati nella modalità congurazione
DOWN /
DONWLOAD
• Premere per selezionare l'unità di misura o per selezionare i valori
desiderati nella modalità congurazione
• Tenere premuto per scaricare i dati su una chiave USB
7 FUNZIONAMENTO
7.1 POWER ON/OFF
Una volta connesso l'adattatore di alimentazione 12 VDC, il dispositivo si accenderà automatica-
mente. All'accensione verrà effettuato un conto alla rovescia di 30 secondi durante lo start-up del
dispositivo. Successivamente si accederà alla modalità di funzionamento normale con la visualizza-
zione dell'orologio real time. Per spegnere il dispositivo disconnettere l'alimentatore.
7.2 IMPOSTAZIONI DATA/ORA
Quando il dispositivo è acceso, premere il tasto "SET" per 2 secondi per accedere alla modalità di
congurazione del dispositivo. Premere i tasti "UP" o "DOWN" per selezionare il programma (P 50,
visualizzato nel pannello centrale a destra) e premere il tasto "SET" per confermare. Per prima cosa,
selezionare il formato 24 ore o 12 ore premendo i tasti "UP" o "DOWN" e premere il tasto "SET" per
confermare. Successivamente, inserire i valori del clock real time per anno, mese, giorno, ore, e
minuti. Premere i tasti "UP" o "DOWN" per regolare i valori e premere il tasto "SET" per confermare.
Dopo aver completato l'impostazione dell'ora e della data, è necessario effettuare la cancellazione
dei dati in memoria. Premere i tasti "UP" o "DOWN" per selezionare P 10 e premere il tasto "SET"
per accedere a P11. Premere i tasti "UP" o "DOWN" e selezionare "YES" per eliminare tutti i dati
memorizzati in precedenza e premere "SET" per confermare. Inne, Premere due volte il tasto "ESC"
per ritornare alla modalità normale.
7.3 CONFIGURAZIONE UNITÀ
Premere il tasto "SET" per 2 secondi per accedere alla modalità delle impostazioni di misurazione.
Premere i tasti "UP" o "DOWN" per selezionare il programma P 30 e premere il tasto "SET" per con-
fermare. Premere i tasti "UP" o "DOWN" per selezionare °F oppure °C e premere il tasto "SET" per
confermare. Premere il tasto "ESC" per ritornare alla modalità normale.
7.4 EFFETTUARE DELLE MISURAZIONI
Il dispositivo inizia ad effettuare le misurazioni a partire dall'accensione e aggiorna le letture ogni
secondo.
7.5 INDICATORE DELLE CONDIZIONI DI CO
2
Il dispositivo di misurazione presenta un indicatore luminoso a barre per una lettura intuitiva della
qualità dell'aria. (Fare riferimento alla sezione " Meter Setup " per impostare le soglie dei valori
Normale e Scarso).
7.6 REGISTRAZIONE DEI DATI
Il dispositivo di misurazione può registrare automaticamente le letture di CO
2
/TEMP./RH per un mo-
nitoraggio prolungato dell'ambiente. La capacità della memoria è di 6000 punti per ogni parametro.
È possibile impostare la frequenza di campionamento da 1 minuto a 12 ore e 59 minuti. L'impo-
stazione predenita per la frequenza di campionamento è di 1 minuto. Per prima cosa, impostare
la modalità di registrazione dei dati desiderata. Premere il tasto "SET" per 2 secondi per accedere
alla modalità delle impostazioni di misurazione. Premere i tasti "UP" o "DOWN" per selezionare il
programma P 10 e premere due volte il tasto "SET" per accedere a P12. In P12, selezionare la mo-
dalità di registrazione dei dati scegliendo tra "STOP" o "LOOP". Premere i tasti "UP" o "DOWN" per
selezionare e premere il tasto "SET" per confermare.
"STOP": Il dispositivo interrompe la registrazione dei dati quando la memoria è piena.
"LOOP": Quando la memoria è piena, il dispositivo continua a registrare nuovi dati sovrascrivendo
i dati più vecchi.
Ora impostare la frequenza di campionamento. Dopo aver completato le impostazioni su P12, pre-
mendo il tasto "SET" si accede a P13. Premere i tasti "UP" o "DOWN" per regolare la frequenza di
campionamento da ore a minuti e premere il tasto "SET" per confermare. Premere il tasto "ESC" per
ritornare alla modalità normale. Una volta completata la congurazione della frequenza di campio-
namento e della modalità di registrazione dati, premere il tasto "START" per 2 secondi in modalità
normale per avviare la registrazione. L'indicatore LED "REC" sul pannello diventerà verde e lampeg-
gerà per indicare che la registrazione dei dati è in corso. Per interrompere la registrazione dei dati,
premere il tasto "ESC" per 2 secondi. Il LED verde si spegnerà. Ripetere i passaggi descritti sopra
per avviare un'altra serie di registrazioni.Se è stata impostata la modalità di registrazione dei dati
"STOP", l'indicatore LED "RED" diventerà rosso e lampeggerà quando la memoria è piena.
REC
CO
2
Data / Ora
Temperatura
Umidità
7.7 DOWNLOAD DEI DATI IN MEMORIA
Il dispositivo permette di effettuare il download delle registrazioni in memoria usando direttamente
una chiave USB, senza dover connettere il dispositivo ad un computer. Prima di iniziare il download,
premere il tasto "ESC" per 2 secondi per interrompere la registrazione dei dati. Collegare una chia-
ve USB (max 8GB di memoria) al connettore USB sul lato sinistro del dispositivo, premere il tasto
"DOWN" per più di 2 secondi, no a visualizzare la scritta "USB" sul pannello. La scritta "USB" sul
pannello inizierà a lampeggiare, indicando che il download è in corso. Saranno necessari alcuni mi-
nuti per scaricare tutti i dati in memoria. La durata del download dipende dalla dimensione dei dati
in memoria e dal tipo di chiave USB. I dati scaricati verranno salvati in un le *.XLS sulla chiave USB.
È possibile utilizzare il software Rotronic gratuito HW4 o Excel per analizzare i dati. Si raccomanda
di formattare la propria chiave USB come FAT32 prima di effettuare il download. Se sul pannello
appare il codice di errore E60 ~ E65, si suggerisce di provare ad usare un altro modello di chiave USB.
Attenzione: In alcuni casi, quando la dimensione della memoria registrata è grande, può
accadere che il display visualizzi un codice di errore (E60 - E65). Controllare che il trasferi-
mento dei dati alla scheda di memoria USB funzioni. In caso contrario, ripetere il processo.
8 IMPOSTAZIONI DI MISURAZIONE
Premere il tasto "SET" per più di 2 secondi per accedere alla modalità di congurazione. Per uscire
dalla modalità di congurazione, premere "ESC" per ritornare alla modalità normale. I programmi
delle impostazioni di misurazione disponibili sono indicati nella gura sottostante. Dal menù prin-
cipale, premere i tasti "UP" o "DOWN" per selezionare il programma (P10, P20, P30, P40 o P50) e
premere il tasto "SET" per accedere ai sottomenù. Premere il tasto "SET" per selezionare i diversi
sottomenù (P11, P12, P13 o P14). Le impostazioni programmabili lampeggeranno sul pannello. Pre-
mere i tasti "UP" o "DOWN" per regolare i valori e premere il tasto "SET" per confermare. Per uscire
senza salvare le modiche, premere il tasto "ESC".
P 10 (Lo9) Impostazioni di registrazione
dei dati
Nota:
• DONE: la scritta viene visualizzata per indicare
l'avvenuta cancellazione dei dati in memoria
• STOP: Interrompe la registrazione quando
la memoria è piena
• LOOP: Sovrascrive i dati più vecchi quando
la memoria è piena
Nota:
• L'impostazione predenita è 1 minuto
• Il formato è Ore: Min
P 11 (CLr), Cancella le registrazioni in
memoria Scegliere YES/NO
P12 (End), Modalità di registrazione dei dati
Scegliere STOP/LOOP
P13 & P14 (rATE), Frequenza di campiona-
mento dei dati Scegliere un valore tra 00:01
e 12:59
P 20 (CO
2
) Impostazioni CO
2
Nota:
• Il livello regolabile è compreso tra 400 e
1700ppm L'impostazione predenita è
1000ppm
• Il livello regolabile è compreso tra 1000 e
2000ppm L'impostazione predenita è 1700ppm
• ABC è precongurato su ON
P 21 (Nor) limite inferiore per l'icona
"NORMAL" (normale)
P 22 (Poor) limite inferiore per l'icona
"POOR" (scarso)
P 23 (AbC) funzione ABC on/off
P 30 (Unità) Impostazione dell'unità di
misura per la temperatura
Nota:
• L'impostazione predenita è °C
P 31, scegliere °C/°F
P 40 (PrES) Compensazione della pressione Nota:
• L'impostazione predenita è 1013 hpa
• L'intervallo di regolazione dei valori è 1 hpa
P41 (hPA) Scegliere un valore da 700 a
1990 hpa
P 50 (rTC) Congurazione Orologio Real Time Nota:
• L'impostazione predenita è 12H
• L'impostazione predenita è 2013.01.01,
12.00
P 51 scegliere il formato 12 o 24 ore
P 52~54 Immettere Anno/Mese/Giorno
P 55~56 Immettere Ora/Minuti
9 CALIBRAZIONE DELL'UMIDITÀ
Il dispositivo può essere calibrato usando gli standard per l'umidità di 35%rH e 80%rH. Si raccoman-
da di effettuare la calibrazione in un ambiente con una temperatura stabile di 25°C.
Attenzione: Non calibrare l'umidità senza utilizzare gli standard per l'umidità predeniti.
L'utilizzo di altri strumenti può causare danni permanenti. Contattare Rotronic per gli stan-
dard e i servizi di calibrazione. Una calibrazione singola comporta il codice di errore E11 o
una lettura non accurata. Effettuare sempre una calibrazione su due punti per completare
il procedimento. Si suggerisce di iniziare la calibrazione partendo da un'umidità più bassa.
Estrarre la sonda per l'umidità dal pannello
Prima della calibrazione, estrarre la sonda per
l'umidità dalla copertura sul lato posteriore del
pannello.
9.1 CALIBRAZIONE CON STANDARD DI UMIDITÀ
Accendere il dispositivo, inserire il sensore della sonda nello standard di umidità 35%. Premere i
tasti “SET” +”START”+”DOWN” contemporaneamente per 3 secondi per accedere alla modalità di
calibrazione. Premere i tasti "UP" o "DOWN" per selezionare 350 (calibrazione al 35.0%) e premere
"SET" per avviare la calibrazione. "Calibrating value" (valore di calibrazione) (35.2% a 25°C) lampeg-
gerà sul display LCD. Attendere 60 minuti per il completamento della calibrazione a 35%. Per salvare
velocemente, premere "SET" in ogni momento. Subito dopo il completamento della calibrazione a
35%, è necessario effettuare la calibrazione a 800 (80%). Entro 20 minuti, premere il tasto "SET"
per iniziare la calibrazione 80.0%. "Calibrating value" (valore di calibrazione) lampeggerà sul display
LCD. Attendere 60 minuti per il completamento della calibrazione a 80%. Per salvare velocemente,
premere "SET" in ogni momento. Al termine della procedura, il dispositivo sarà calibrato corretta-
mente. Per interrompere senza salvare, premere il tasto "ESC".
10 CALIBRAZIONE CO
2
Attenzione: Non calibrare il dispositivo se nell'aria c'è una concentrazione sconosciuta di
CO
2
. La calibrazione effettuata dove la concentrazione di CO
2
è sconosciuta causerà errori di
calibrazione e misurazioni inaccurate.
Il dispositivo può essere calibrato su un valore
di CO
2
di 400ppm in un luogo fresco all'aperto
(durante una giornata di sole). Oltre che a 400
ppm, il dispositivo può essere calibrato a 0
ppm o su un qualunque valore sotto i 990 ppm.
L'ultimo valore di calibrazione sarà considerato
denitivo e il dispositivo ignorerà i dati di cali-
brazione precedenti.
Premere i tasti “SET” +”START”+”DOWN” contemporaneamente per 3 secondi per accedere alla mo-
dalità di calibrazione. Premere i tasti "UP" o "DOWN" per selezionare la calibrazione CO
2
400 (400
ppm) oppure 0 (0 ppm). La funzione 0 ppm è valida solo per la calibrazione CO
2
a 0ppm. Per tutti
gli altri valori di CO
2
, selezionare 400 ppm e premere "SET" per confermare. Una volta selezionato il
valore di calibrazione, premere SET per avviare. La scritta "CAL" e il valore CO
2
lampeggeranno sul
display LCD.
Attendere circa 10 minuti. Il display smetterà di lampeggiare indicando il completamento della ca-
librazione. Per interrompere la calibrazione senza salvare, premere "ESC" in qualunque momento.
11 RISOLUZIONE PROBLEMI
Errore Messaggi Soluzione
E01 Il sensore CO
2
non è in funzione Spegnere e riavviare il dispositivo
E33 Il sensore CO
2
non è in funzione Provare ad effettuare nuovamente la calibrazione
E02 Il valore misurato è al di sotto
dell'intervallo
Rimettere il dispositivo in condizioni di
funzionamento normale
E03 Il valore misurato è al di sotto
dell'intervallo
Rimettere il dispositivo in condizioni di
funzionamento normale
E11 Errore calibrazione RH Provare ad effettuare nuovamente la calibrazione
E31 Sensore Temp. o AD
danneggiato
Provvedere alla restituzione del componente per
la riparazione
E32 Memoria IC danneggiata Provvedere alla restituzione del componente per
la riparazione
E33 Sensore RH o circuito
danneggiato
Provvedere alla restituzione del componente per
la riparazione
E60~E65 Errore download USB Formattare la chiave USB o provare un altro tipo di
dispositivo di archiviazione USB.
12 DATI TECNICI
Umidità/precisione 0.1~99.9 %/±3 % (10~95 %@25 °C). ±5 % (altri)
Temperatura/precisione 0...50 °C/±0.3 °C@5~40 °C
CO
2
/precisione 0...9999 ppm/±(30 ppm+5% di lettura) @0~5000 ppm
Stoccaggio e transito -20...60°C/10...90%UR, senza condensazione
Limite di funzionamento per
le componenti elettroniche
0...50 °C
Memoria 6000 registrazioni automatiche di dati per ogni
parametro
Dimensioni, mm 330(L) x 250(W) x 50(H)
Peso 1400 g
Consumo elettrico Max. 0.7 A
Tipo di alimentazione DC 12 V DC
Connessione PC Chiave USB
12.8000.3008I
1/4