Dometic RH449LDBI Manuale utente
- Categoria
- Scatole fresche
- Tipo
- Manuale utente

207.5396.04
RH 423 LDA
RH 439LD RH 449LD
Type: MB20-60
miniBar
Free-standing and Built-in versions
Frei stehende Versionen und Einbauversionen.
Version pose libre et version encastrable.
Versione normale e versione da incasso.
Vrijstaand model en inbouw model.
Versiónes de unidad libre y versiónes de unidad empotrada
Versão isolada e Versão incorporada.
Operating Instructions
Bedienungsanleitung
Mode d'emploi
Istruzioni per l'uso
Handleiding
Manual de Instrucciones
Instruções de Utilização
IT
BE
DE
NL
PT
GB
ES

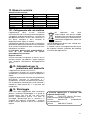
Thank you for choosing our appliance. We are sure it will provide you with trouble-free use.
In the following, we would like to familiarise you with some symbols, which we bring to your attention to ensure
the safe and efficient operation of the appliance:
source of danger, in event of improper operation
suggested useful tips to read
information concerning environmental protection
This refrigerator is intended for the storage of food and drinks.
2
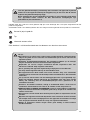
Attention!
This product is designed to be operated by adults. Children should not be
allowed to tamper with the controls or play with the product.
Any electrical work required to install this appliance should be carried out by a
qualified electrician.
This product should be serviced by an authorised Service Engineer, and only
genuine spare parts should be used.
It is dangerous to alter the specifications or modify this product in any way.
Care must be taken to ensure that the appliance does not stand on the
electrical supply cable.
There are working parts in this product which heat up. Always ensure that there
is adequate ventilation as a failure to do this will result in component failure and
possible content loss. See installation instructions.
Parts which heat up should not be exposed. Wherever possible the back of the
product should be close to a wall but leaving the required distance for
ventilation as stated in the installation instructions.
Before defrosting, cleaning or maintenance work is carried out, be sure to
switch off the appliance and unplug it.
DO NOT USE SHARP INSTRUMENTS to scrape off frost or ice. Under no
circumstances should solid ice be forced off the cooling plate. Solid ice should
be allowed to thaw when defrosting the appliance. See defrost instructions.
This appliance is heavy. Care should be taken when moving it.
Under no circumstances should you attempt to repair the appliance yourself.
Repairs carried out by inexperienced persons may cause injury or more serious
malfunctioning. Refer to your local Service Centre and always insist on genuine
spare parts.
In this appliance the storage of any toxic or explosive substance is forbidden!
Please read these operating instructions carefully before putting the
refrigeration unit into operation. If you later sell or dispose of it, please ensure
that the new owner receives these operating instructions.
Please follow the installation details below carefully. Guarantee is valid for
products installed as described only. (See chapter 4.1.)
GB

3
Attention!
Warranty arrangements are in accordance with EC Directive 44/1999/CE and
the normal conditions applicable in the country concerned.
For warranty or other servicing, such as spare-parts, please contact our Dometic
Service Network.
The warranty does not cover any damage due to improper use.
The warranty does not cover any modifications to the appliance or the use of
non-original Dometic spare-parts.
The warranty does not apply if the installing and operating instructions are not
adhered to.
When contacting Dometic Service Network, please state the model, product
number and serial number. You will find this information on the data plate inside
of the refrigerator.
CONTENTS
1. Unpacking
2. View of the appliance
3. Cleaning
4. Positioning the appliance
4.1. Installation instruction
4.1.1. Built-in version
4.1.2. Free-standing version
5. Using the appliance
5.1. Initial operation
5.2. Temperature regulation
6. Ice cubes
7. Useful suggestions
8. Defrosting, cleaning and maintenance
8.1. Automatic defrost function
8.2. Interior light
9. Reversing the door hang
10. Replacing the decorative door panel
11. Customer service
12. Putting into operation, technical data
12.1. Connecting to electrical mains
13. Environmental protection information
14. Recycling
GB

4
1. Unpacking
After removal from the cardboard packaging, make
sure the appliance is not damaged. If you find damage
to the appliance resulting from transport, report it
immediately to the transportation firm.
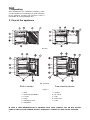
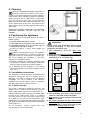
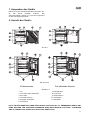
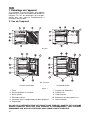
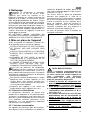
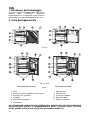
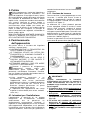
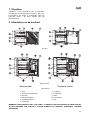
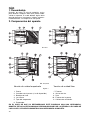
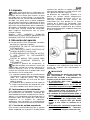
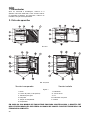
2. View of the appliance
1. Door
2. Door lock (if available)
3. Ice tray
4. Lamp
5. Evaporator cover
6. Evaporator
7. Shelves
8. Air sensor
9. Foot
10. Door racks
11. C o w l
Figure 1.
IN CASE IF YOUR REFRIGERATOR IS EQUIPPED WITH LOCK, DOMETIC ZRT DO NOT ACCEPT
LIABILITY FOR LOSS OR DAMAGE OF KEYS. HOWEVER A COMPLETE LOCK CAN BE SUPPLIED.
Built-in version Free-standing version
GB
RH 439/449
RH 423

5
3. Cleaning
Clean the refrigerator thoroughly at intervals, as
necessary. Remove the shelves; these, parts,
as well as the cabinet interior and the door should be
washed with a warm solution of sodium bi-carbonate.
Finally wipe over with a cloth rinsed in warm water
only, and dry with a clean cloth. Do not wash any
plastic parts in water that is more than hand warm, and
do not expose them to dry heat. The outside of the
cabinet should be wiped down regularly with a clean,
damp cloth.
NEVER USE STRONG CHEMICALS OR ABRASIVE
CLEANING MATERIALS ON ANY PART OF THE
CABINET.
4. Positioning the appliance
When first using this refrigerator please consider the
following points:
ENSURE REFRIGERATOR IS LEVEL
THE PIPEWORK AT THE BACK GETS HOT IN USE
THE REFRIGERATOR HAS NO 'MOTOR' AND IS
THEREFORE VIRTUALLY SILENT
ALLOW AT LEAST 3 HRS. FOR SIGNS OF
COOLING
During the refrigeration process, the appliance
gives off heat from the condenser (under the
upper part of the rear cover) into the surrounding air.
The more ventilated the condenser is, the more
effective the refrigeration will be.
The other condition for satisfactory operation is that
the appliance is levelled. This could be checked by
placing a glass of water on top of the appliance.
It is important that the appliance is not directly
exposed to radiated heat (sunlight, radiator, near an
oven, etc.).
4.1. Installation instructions
The refrigerator is equipped with an electrically heated
absorption cooling unit which is virtually silent in
operation. The fridge is designed for free-standing
installation, but can be built-in if the following
conditions are complied with to ensure satisfactory
operation and maximum cooling efficiency.
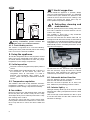
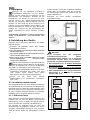
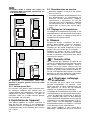
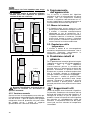
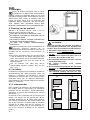
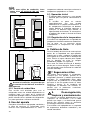
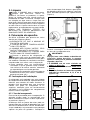
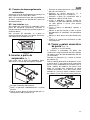
4.1.1. Built-in version
This version is planned for building-in purposes. The
miniBar can be screwed to the furniture using the
fittings at the bottom. Drive in the screws (figure 2).
Difference between pivot points can be equalized with
the help of the sliding hinge, which is a standard
accessory for this version. The hinge recommended
to fix onto the top third of the refrigerator's door.
Please make sure before final fixing that the flat sliding
part allows normal door opening in order to avoid door
sticking (figure 2).
At the building-in process please take into
consideration the items listed below.
Figure 2.
IMPORTANT
Please follow the installation details below
carefully. Guarantee is valid for products
installed as described only.
1. The refrigerator must be le
vel both
directions
2. There should be 20 mm clearance to the wall
3. Ventilation must be provided as shown in
alternatives A, B, C or D (fig. 3-4)
Figure 3.
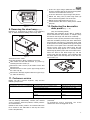
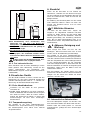
4. The ventilation duct must at least measure
105 mm x the width of the refrigerator
5. Only
the entire cooling unit must project into
the duct as shown
6. Air passing thr
ough the duct must not be
preheated by any source of heat
7. Ventilation grills, if used, must have an free
openings of at leas
t 200 cm² each
miniCool
Air in
Air out
Ventilation grille
A
B
Air out
Air in
miniCool
miniBar
miniBar
GB

6
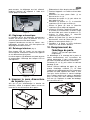
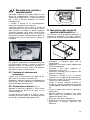
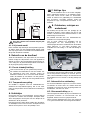
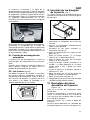
Figure 4.
During installation, please ensure the
mains plug is accessible at all times.
4.1.2. Free-standing version
This version is supposed to be used free-standing.
Cooling unit covers protect the hot parts of the cooling
units. Feet ensure sufficient ventilation.
5. Using the appliance
To start the refrigerator connect the plug to the socket
outlet. The empty refrigerator needs about 6-7 hours
at normal ambient temperature to reach the proper
temperature in the storage compartment.
5.1. Initial operation
The device must be plugged into a properly earthed
socket.
The miniBar starts automatically with a self-test. If
the electronics do not detect any fault, the
refrigerator starts to cool down. If a fault is
detected, the refrigerator stops cooling. If this
occurs, please consult your authorised Customer
Service.
5.2. Temperature regulation
The miniBar is fitted with a fully automatic electronic
temperature regulator. It is not needed to set the
temperature of the storage compartment manually.
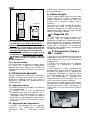
6. Ice cubes
Fill the ice tray up to 4/5 with drinking water, cover with
the lid and place the closed ice tray on the ice-tray
shelf. Wipe off any excess water to prevent the ice tray
from freezing to the surface.
To remove the cubes from the ice tray, hold it under
running water. Remove the lid with the ice cubes from
the ice tray and the ice cubes can now be taken out
easily.
miniCool
min. 60 mm
Ventilation grille
Air in
miniCool
Air in
Air out
C
D
Air out
7. Useful suggestion
Do not overfill the appliance. If possible, always
store pre-cooled food and/or drinks. It is advisable
to leave some space between the products in the
cabinet to ensure efficient and even cooling. If the
shelves are packed too tightly there may be
unacceptable temperature variations.
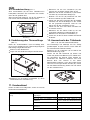
8. Defrosting, cleaning and
maintenance
Frost will gradually form on the cooling plate and it
must not be allowed to become too thick since it
restricts the cooling.
This miniBar is fitted with a fully automatic
electronic temperature regulator.
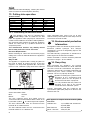
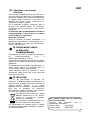
The frost will melt and the defrost water will run
through the drain tube from the drip channel into an
evaporating vessel located at the bottom rear of the
refrigerator. (Fig. 5) The defrost water will evaporate
automatically into the circulating air and the vessel
will not need emptying.
Figure 5.
To switch off the unit, disconnect the refrigerator
from the electricity supply and leave the cabinet
door open. After defrosting the cabinet interior
should be wiped out with a clean, damp cloth.
8.1. Automatic defrost function
The first defrosting phase commences 39 hours
after the start and lasts for two hours.
After this, the device operates for 22 hours at a
time, followed by a defrosting period of 2 hours.
8.2. Interior light (fig. 6.)
Two light-emitting diodes (A) on an electronic PCB
illuminate the cooling compartment when the door
is opened.
Two sensors (B) control whether the door is open
or not and the LEDs and the door control as well
will work accordingly.
miniBar
miniBar
GB

7
Figure 6.
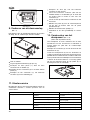
9. Reversing the door hang (Fig. 7.)
Reversing is suggested to perform in the following
way, in order to avoid breaking of the hinge bolt:
Figure 7.
Disconnect the mains
Lay the appliance down carefully on its back
Take down the two foot-extension (1) pieces by
removing the two screws (2)
Remove the four screws (4) and take out the two
fixing feet (3)
Remove the four screws (7) the upper hing (5) and
the cover cap (6)
Remove the door (8), together with the upper hinge
(5), from the housing
4
5
11
22
6
3
8
7
9
B
A
Insert the upper hinge (attached the miniBar)
and the covering plate in the slot on the opposite
side and secure with four screws (7).
Insert the door on the upper hinge and place it.
Mount the fixing feet (3) with hinge bolts (9)
placed into the opposite side of the feet
Mount the two foot-extension pieces (1)
Check that the door closes easily and is sealed
properly.
10. Replacing the decorative
door panel (Fig. 7., 8.)
(only free-standing model)
Removing and mounting of the door is similar to
that of described in the previous, 9 chapter. (Only
the foot on the hinge-side has to be removed!)
Remove screws (4) and pull off the frame edge (5).
Slide the decorative panel (6) out of the door frame
and insert the new panel (7), so that the upper edge
of the panel runs exactly parallel to the upper edge of
the frame. A new panel can be inserted more easily
into the upper edge of the frame when the two
corners are cut off by approx. 5 x 5 mm (8). Put the
frame edge (5) back in place and secure with screws.
Place the door on the lower hinge (9), slot the
upper hinge into the opening, press together with
the door against the housing and secure with the
two screws (11).
Figure 8.
GB
11. Customer service
Before you call a service engineer, carry out the
following simple tests:
Problem
The appliance does not cool sufficiently
The appliance does not cool at all.
Possible cause
Too much food to be cooled was put in.
Door is not shut properly.
Internal air circulation is restricted.
Refrigerator not level.
Plug is not connected to the mains socket
properly
There is no voltage in the mains socket.
Solution
Put in less food to be be cooled.
Check if the door is shut.
Provide inside cool air circulation.
Level refrigerator.
Check if the connection is
proper.
Check if there is voltage.
If after checking all the above points, the refrigerator is
still not working satisfactorily, contact your nearest
service engineer. State the problem, model, product-
and serial-number.
(Details of the model, product- and serial-number are
to be found on the data label in the top left of the
inside compartment.)
This refrigerator is equipped with overheating
protection.
An authorised service technician can check
whether this has beentriggered or not.

Upon completion there must be no cut, or stray
strands of wire present and the cord clamp must be
secure over the outer sheath.
13. Environmental protection
information
The appliance does not contain any CFCs/HCFCs.
Ammonia (natural hydrogen and nitrogen
compound) is used as a refrigerating agent in the
refrigeration unit.
The ozone-friendly cyclopentane is activated as a
motive agent for the PU foam insulation.
Sodium chromate is used for corrosion protection
(less than 2 weight % of the coolant).
14. Recycling
After unpacking the appliance, the packing
materials should be delivered to a local collection
site. At the end of its useful lifetime, the appliance
should be delivered to a specialized collection and
reprocessing firm, which reclaims the usable
materials. The rest is properly destroyed.
Appliances bearing this symbol must be
deposited at the designated local
reception point for the disposal of
electrical and electronic equipment.
It is not permitted that this product be
disposed of by way of the normal
household refuse collection system.
Dometic refrigerators bear this symbol on the
specifications plate (data plate) to be found in the
interior of the unit.
This appliance complies with the following EEC
directives:
LVD-Directive 73/23/EEC with amendment
90/683/EEC
EMC-Directive 89/336/EEC
RoHS - Directive 2002/95/EC
In the event of a fault developing, contact your nearest
Service Centre-see local telephone directory.
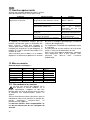
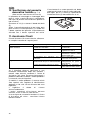
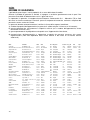
12. Putting into operation
Technical data:
12.1. Connecting to electrical mains
The appliance may only be operated from
nominal voltage mains as shown on the data
plate. The appliance mains plug may be connected to
a mains socket earthed in accordance with regulations.
Any electrical work required to install this appliance
should be carried out by a qualified electrician or
competent person.
The manufacturer declines any liability should
these safety measures not be observed.
Electrical Requirements
Before switching on, make sure the electricity supply
voltage is the same as that indicated on the appliance
rating plate.
Only for UK:
The appliance is supplied with a 3 Amp plug fitted. In
the event of having to change the fuse in the plug
supplied, a 3 Amp ASTA approved (BS 1362) fuse
must be used. Should the plug need to be replaced
for
any reason, the wires in the mains lead are coloured
in accordance with the following code:
Green and Yellow: Earth
Blue: Neutral
Brown: Live
The wire coloured green and yellow must be
connected to the terminal marked with the letter "E" or
by the earth symbol or coloured green and yellow.
The wire coloured blue must be connected to the
terminal "N" or coloured black.
The wire coloured brown must be connected to the
terminal marked "L" or coloured red.
8
GB
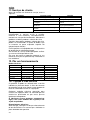
Model RH 423LDA RH 439LD RH 449LD
Type MB20-60 MB20-60 MB20-60
Gross volume 23 litres 24,5 litres 30 litres
Mains operation 220 - 240V (AC 220 - 240V (AC) 220 - 240V (AC)
Input 75W 65W 65W
Energy consumption 0,8 kWh/24h 0.7 kWh/24h 0.8 kWh/24h
Climate class N NN
Refrigerant 159g H
2
O+86g NH
3
147g H
2
O+98g NH
3
147g H
2
O+98g NH
3

9
Vielen Dank, dass Sie sich für eines unserer Produkte entschieden haben. Wir hoffen, es wird Ihnen jahrelang
zuverlässige Dienste leisten. In dieser Anleitung möchten wir Sie mit einigen Symbolen vertraut machen, die
Ihnen beim sicheren und effizienten Einsatz des Geräts helfen werden:
Gefahr bei unsachgemäßem Einsatz des Geräts
Empfehlungen für die Benutzung des Geräts
Informationen zum Umweltschutz
Dieses Kühlgerät dient ausschließlich der Aufbewahrung von Speisen und Getränken.
Achtung!
Dieses Gerät darf nur von Erwachsenen betrieben werden. Kinder sollten nicht
unbeaufsichtigt mit dem Gerät oder den Bedienelementen spielen.
Notwendige Arbeiten an der Elektrik zur Installation dieses Geräts dürfen nur
von einem qualifizierten Elektriker durchgeführt werden.
Notwendige Wartungsarbeiten müssen von einem Elektriker durchgeführt und
es dürfen ausschließlich Originalersatzteile verwendet werden.
Es kann gefährlich sein, das Gerät oder einzelne Komponenten in irgendeiner
Weise zu verändern.
Achten Sie darauf, dass das Netzkabel niemals unter dem Gerät eingeklemmt
wird
Einige Komponenten im Geräteinnern heizen sich im Betrieb auf. Stellen Sie
sicher, dass stets ausreichend Luftzirkulation zur Verfügung steht, da das Gerät
sonst beschädigt werden kann und der Inhalt verdirbt. Siehe auch
Installationsanweisungen.
Heiße Gerätekomponenten dürfen nicht frei zugänglich sein. Stellen Sie das
Gerät daher mit der Rückwand gegen eine Wand. Halten Sie dabei aber den in
den Installationsanweisungen angegebenen Mindestabstand ein, damit die
erforderliche Luftzirkulation gewährleistet ist.
Ziehen Sie vor dem Abtauen, der Reinigung oder Wartungsarbeiten stets den
Netzstecker.
Schaben Sie das Eis NICHT MIT EINEM SPITZEN GEGENSTAND ab. Entfernen
Sie fest sitzendes Eis niemals mit Gewalt von den Kühlrippen. Lassen Sie es in
Ruhe abtauen. Siehe dazu Abtauanweisungen.
Das Gerät hat ein beträchtliches Gewicht. Seien Sie vorsichtig, wenn Sie es
bewegen.
Versuchen Sie niemals, das Gerät selbst zu reparieren. Reparaturen durch
fachfremde Personen können zu Verletzungen oder zu Schäden am Gerät
führen. Wenden Sie sich an Ihren örtlichen Händler und verlangen Sie
ausdrücklich Originalersatzteile.
Die Lagerung von giftigen oder explosiven Stoffen in dem Kühlgerät ist nicht
gestattet!
Bitte lesen Sie diese Anleitung sorgfältig, bevor Sie das Gerät einsetzen. Sollten
Sie das Gerät weiter verkaufen oder entsorgen, übergeben Sie bitte diese
Anleitung dem neuen Besitzer.
Bitte beachten Sie die folgenden Installationsanweisungen genau.
Garantieleistungen können nur in Anspruch genommen werden, wenn die
Installation gemäß den Installationsanweisungen erfolgt. (siehe Kapitel 4.1)
D

10
INHALT
1. Auspacken des Geräts
2. Ansicht des Geräts
3. Reinigung
4. Aufstellung des Geräts
4.1. Installationsanweisungen
4.1.1. Einbauversionen
4.1.2. Frei stehende Version
5. Einsatz des Geräts
5.1. Erste Inbetriebnahme
5.2. Temperaturregelung
6. Eiswürfel
7. Nützliche Hinweise
8. Abtauen, Reinigung und Wartung
8.1. Automatische Abtaufunktion
8.2. Innenbeleuchtung
9. Umkehrung des Türanschlags
10. Auswechseln der Türblende
11. Kundendienst
12. Inbetriebnahme, Technische Daten
12.1. Anschluss an das Stromnetz
13. Informationen zum Umweltschutz
14. Recycling
Achtung!
Die Garantiebedingungen entsprechen der EU-Richtlinie 44/1999/CE und den
im jeweiligen Bestimmungsland geltenden Gesetzen.
Bei Fragen zu Garantie und Kundendienst sowie für Ersatzteile wenden Sie sich
bitte an unser Dometic Servicenetzwerk.
Die Garantie deckt keine Schäden durch unsachgemäße Benutzung ab.
Die Garantie deckt keine Änderungen am Gerät oder den Einsatz nicht-
originaler Ersatzteile von Dometic ab.
Die Garantie erlischt, wenn das Gerät nicht gemäß den Anweisungen installiert
und benutzt wird.
Nennen Sie bitte das Modell sowie die Produkt- und die Seriennummer des
Geräts, wenn Sie sich mit dem Dometic Servicenetzwerk in Verbindung setzen.
Diese Informationen finden Sie auf dem Typenschild im Innern des Kühlgerätes.
D

11
1. Auspacken des Geräts
Entfernen Sie den Verpackungskarton und prüfen Sie,
ob das Gerät Schäden aufweist. Bei
Transportschäden wenden Sie sich bitte umgehend
an das Transportunternehmen.
2. Ansicht des Geräts
1. Tür
2. Türschloss (falls vorhanden)
3. Eisschale
4. Innenbeleuchtung
5. Vorplatte Verdampfer
6. Verdampfer
7. Einlegeböden
8. Luftsensor
9. Bodenrahmen
10. Türeinlagen
11. Abluftgitter
Abbildung 1.
FALLS IHR KÜHLGERÄT MIT EINEM TÜRSCHLOSS AUSGESTATTET IST, ÜBERNIMMT DOMETIC ZRT
KEINE HAFTUNG FÜR VERLOREN GEGANGENE ODER BESCHÄDIGTE SCHLÜSSEL. SCHLÖSSER
SIND ALS KOMPLETTE EINHEIT ALS ERSATZTEIL ERHÄLTLICH.
Einbauversion Frei stehende Version
D
RH 439/449
RH 423

12
werden. Achten Sie vor der endgültigen Montage
darauf, dass nur die flache Seite des Scharniers
ein störungsfreies Öffnen und Schließen der Tür
erlaubt (Abbildung 2).
Beachten Sie beim Einbau nachfolgend
aufgeführten Punke.
Abbildung 2.
WICHTIG
Bitte beachten Sie die folgenden
Installationsanweisungen genau.
Garantieleistungen können nur in Anspruch
genommen werden, wenn die Installation
gemäß den Installationsanweisungen erfolgt.
1. Das Kühlgerät muss in beiden Richtungen
w
aagerecht stehen
2. Es müssen 20 mm Abstand zu den Wänden
eingehalten werden
3. Eine Luftzirkulation muss
entsprechend den
Alternativen A, B, C, oder D garantiert
werden (Abb. 3-4)
Abbildung 3.
3. Reinigung
Reinigen Sie das Kühlgerät gründlich in
regelmäßigen Abständen und bei Bedarf.
Räumen Sie das Gerät aus und entfernen Sie die
Einlegeböden und Türeinlagen. Reinigen Sie die
Innenflächen des Geräts und der Tür mit einer
warmen Lösung aus Natriumhydrogenkarbonat.
Wischen Sie mit klarem, warmem Wasser nach und
trocknen Sie das Gerät mit einem sauberen Tuch.
Reinigen Sie die Kunststoffteile nicht in Wasser, das
mehr als handwarm ist. Setzen Sie diese Teile keiner
Heißluft aus. Reinigen Sie die Außenwände des
Geräts regelmäßig mit einem sauberen, feuchten
Tuch.
VERWENDEN SIE NIEMALS STARKE CHEMIKALIEN
ODER SCHEUERMITTEL ZUR REINIGUNG DES
GERÄTS.
4. Aufstellung des Geräts
Beachten Sie bei der ersten Benutzung des Geräts
folgende Punkte:
ACHTEN SIE DARAUF, DASS DAS GERÄT
WAAGERECHT STEHT
DIE LEITUNGEN AUF DER RÜCKSEITE WERDEN
IM BETRIEB HEISS
DAS GERÄT ARBEITET OHNE KOMPRESSOR. ES
LÄUFT DAHER SEHR LEISE
ERST NACH DREI STUNDEN KANN MIT EINER
WAHRNEHMBAREN KÜHLLEISTUNG
GERECHNET WERDEN
Während des Kühlprozesses gibt das Gerät vom
Kondensator (im oberen Bereich der Rückseite)
Wärme in die Umgebung ab. Je besser die Belüftung
des Geräts ist, desto höher ist die Kühlleistung.
Wichtig für den einwandfreien Betrieb ist auch die
waagerechte Aufstellung des Geräts. Das kann
sehr einfach durch Stellen eines vollen
Wasserglases auf den Deckel geprüft werden.
Setzen Sie das Gerät nicht direkter
Wärmestrahlung aus (Sonnenlicht, Heizkörper,
Ofen, usw.).
4.1. Installationsanweisungen
Das Kühlgerät arbeitet mit einem elektrisch beheizten
Absorptionskühler und ist extrem leise im Betrieb. Das
Kühlgerät ist als frei stehendes Gerät konzipiert, kann
aber unter Beachtung der folgenden Anforderungen
für einen zufriedenstellenden Betrieb und maximale
Kühlleistung auch eingebaut betrieben werden.
4.1.1. Einbauversionen
Diese Versionen sind als Einbaugeräte konzipiert. Die
miniBar kann mit den am Boden vorgesehenen
Halterungen in einem Schrank verschraubt werden.
Setzen Sie dazu die Schrauben ein (Abbildung 2).
Der Abstand zur Möbeltür kann mit Hilfe des
Gleitscharniers ausgeglichen werden, das diesen
Versionen serienmäßig beigefügt ist. Das Scharnier
sollte im oberen Drittel der Kühlgerätetür montiert
D
miniBar
miniBar
Lüftungsrost

13
Abbildung 4.
4.Die Zuluftleitung muss mindestens eine
Dimension von 1
05 mm x der Breite des
Kühlgerätes aufweisen
5. Die gesamt
e Kühleinheit muss wie gezeigt in
den Luftstrom ragen
6. Die zirk
ulierende Luft darf von keinem anderen
Gerät oder sonstwie aufgeheizt werden
7. Lüftungsgrills, die verwendet werden sollen,
müssen einen Querschnitt von mindes
tens 200
cm² haben
Achten Sie bei der Installation darauf, dass
das Netzkabel stets zugänglich bleibt.
4.1.2. Frei stehende Version
Diese Versionen sind zur freien Aufstellung in einem
Raum gedacht. Eine Abdeckung schützt vor den
heißen Komponenten der Kühleinheit. Der
Bodenrahmen sorgt mit seinem Grill für ausreichende
Luftzirkulation.
5. Einsatz des Geräts
Um das Gerät in Betrieb zu setzen, stecken Sie den
Netzstecker ein. Ein leeres Kühlgerät benötigt bei
normaler Raumtemperatur etwa 6 - 7 Stunden zur
Erreichung der korrekten Betriebstemperatur.
5.1. Erste Inbetriebnahme
Schließen Sie das Gerät an eine geerdete
Steckdose an.
miniBar startet automatisch mit einem Selbsttest.
Wenn die Elektronik keinen Defekt erkennt, beginnt
das Gerät zu kühlen. Wird ein Fehler erkannt,
beginnt das Gerät nicht zu kühlen. In diesem Fall
benachrichtigen Sie bitte Ihren zuständigen
Kundendienst.
5.2. Temperaturregelung
Die miniBar ist mit einer vollautomatischen,
elektronischen Temperatursteuerung ausgestattet.
Die Kühltemperatur muss daher nicht manuell
eingestellt werden.
miniCool
mind. 60 mm
Lftungsrost
miniCool
Lufteingang
Luftausgang
C
D
Luftausgang
Lufteingang
6. Eiswürfel
Füllen Sie die Eisschale zu vier Fünftel mit
Trinkwasser, schließen Sie den Deckel und legen
Sie die Schale auf die Schalenablage. Wischen Sie
zuvor die Schale trocken, damit sie nicht auf der
Ablage festfriert.
Zur Ablösung der Eiswürfel halten Sie die Schale
unter fließendes Wasser. Öffnen Sie dann den
Deckel. Die Eiswürfel lassen sich nun leicht
herausnehmen.
7. Nützliche Hinweise
Überfüllen Sie das Gerät nicht. Lagern Sie
möglichst nur vorgekühlte Getränke und/oder
Speisen im Gerät. Lassen Sie stets etwas Platz
zwischen den Speisen und Getränken, damit die
Kühlluft gleichmäßig und zuverlässig zirkulieren
kann. Bei zu vollen Einlegeböden kann es zu
unerwünscht hohen Temperaturunterschieden im
Gerät kommen.
8. Abtauen, Reinigung und
Wartung
Nach einiger Zeit bildet sich Eis auf den
Kühlrippen. Diese Eisschicht darf nicht zu dick
werden, da sie die Kühlleistung beeinträchtigt.
Die miniBar ist mit einer vollautomatischen,
elektronischen Temperatursteuerung ausgestattet.
Das Eis schmilzt und das entstehende Tauwasser
läuft vom Tropfkanal über einen Dränageschlauch
in eine Verdunstungswanne auf der Rückseite
unter dem Kühlgerät. (Abb. 5). Dort verdunstet das
Wasser automatisch und wird in die Umgebungsluft
abgegeben. Daher muss die Wanne nicht von
Hand entleert werden.
Zum Ausschalten des Geräts ziehen Sie den
Netzstecker und öffnen die Tür. Nach dem Abtauen
reinigen Sie das Innere des Geräts mit einem
sauberen, feuchten Tuch.
Abbildung 5.
8.1. Automatische Abtaufunktion
Die erste Abtauphase beginnt 39 Stunden nach
dem ersten Einschalten und dauert zwei Stunden.
Danach kühlt das Gerät jeweils 22 Stunden
ununterbrochen, gefolgt von einer zweistündigen
Abtauphase.
D
miniBar
miniBar
Lüftungsrost

14
8.2. Innenbeleuchtung (Abb. 6.)
Zwei Leuchtdioden (A) auf einer elektronischen
Leiterplatte beleuchten den Innenraum des Geräts,
wenn die Tür geöffnet wird.
Zwei Sensoren (B) erkennen, ob die Tür geöffnet ist
und steuern die Leuchtdioden entsprechend.
Abbildung 6.
9. Umkehrung des Türanschlags
(Abb. 7)
Damit der Scharnierbolzen nicht beschädigt wird,
muss bei der Umkehrung des Türanschlags folgende
Reihenfolge eingehalten werden:
Ziehen Sie den Netzstecker
Legen Sie das Gerät vorsichtig auf die Rückseite
Abbildung 7.
Entfernen Sie die beiden Schraubfüße (1) durch
Herausdrehen der Schrauben (2)
4
5
11
22
6
3
8
7
9
B
A
Entfernen Sie die vier Schrauben (4) und
nehmen Sie die beiden starren Füße (3) ab
Entfernen Sie die vier Schrauben (7), das obere
Scharnier (5) und die Abdeckkappe (6)
Nehmen Sie die Tür (8) zusammen mit dem
oberen Scharnier (5) vom Gehäuse ab
Setzen Sie das obere Scharnier (an der miniBar
montiert) und die Abdeckkappe in den Schlitz
auf der gegenüber liegenden Seite ein und
ziehen Sie die vier Schrauben (7) fest.
Setzen Sie die Tür in das obere Scharnier ein
und richten sie aus.
Montieren Sie die starren Füße (3) mit den
gegenüber montierten Scharnierbolzen (9)
Montieren Sie die beiden Schraubfüße (1)
Prüfen Sie, ob die Tür leicht schließt und korrekt
abdichtet.
10. Auswechseln der Türblende
(Abb. 7-8) (nur frei stehende Versionen)
Die Demontage und Montage der Tür erfolgt
gemäß Kapitel 10 (hier müssen nur die Füße auf
der Scharnierseite entfernt werden).
Entfernen Sie die Schrauben (4) und ziehen die
Rahmeneinfassung (5) ab.
Ziehen Sie die alte Türblende (6) heraus und
setzen die gewünschte Blende (7) ein. Dabei muss
die Oberkante der Blende exakt parallel zur
Oberkante des Rahmens verlaufen. Die neue
Blende lässt sich leichter in die obere
Rahmenkante einführen, wenn die beiden Ecken
etwa 5x5 mm ausgeschnitten werden (8). Setzen
Sie die Rahmeneinfassung wieder ein und ziehen
Sie die Schrauben fest.
Abbildung 8.
D
11. Kundendienst
Prüfen Sie bitte zuerst Folgendes, bevor Sie unseren
Kundendienst kontaktieren:
Problem
Die Kühlleistung des Geräts ist zu
gering
Das Gerät kühlt nicht
Mögliche Ursache
Zu viele zu warme Speisen wurden
eingelagert
Die Tür ist nicht korrekt verschlossen
Die Luft kann im Kühlfach nicht
zirkulieren
Der kühlschrank nicht nivellert.
Der Stecker sitzt nicht korrekt in der
Steckdose
Die Steckdose ist ohne Strom
Abhilfe
Weniger Speisen einlagern
Tür korrekt verschließen
Schaffen Sie Platz zwischen den
Speisen, damit die Luft zirkulieren kann
Der Kühlschrank muss nivelliert sein.
Stecker korrekt anschließen
Steckdose auf Funktion prüfen

Arbeitet das Gerät nach Prüfen der vorgenannten
Punkte trotzdem nicht einwandfrei, kontaktieren Sie
bitte den Kundendienst. Beschreiben Sie das
Problem und nennen Sie bitte Typ und Modell sowie
Produkt- und Seriennummer.
(Einzelheiten zu Modell, Produkt- und Seriennummer
finden auf dem Typenschild im Innern des
Kühlgerätes.)
Dieser Kühlschrank ist mit einem Überhitzungsschutz
ausgerüstet.
Ein zugelassener Servicetechniker kann feststellen,
ob der Überhitzungsschutzausgelöst hat.
Kontaktieren Sie bei einem Gerätedefekt Ihren
örtlichen Händler. Die Anschrift finden Sie in Ihrem
Telefonbuch.
12. Inbetriebnahme
Technische Daten:
12.1. Anschluss an das Stromnetz
Das Gerät darf nur mit der auf dem Typenschild
angegebenen Spannung betrieben werden. Der
Netzstecker des Geräts darf nur an eine geerdete und
den örtlichen Vorschriften entsprechende Steckdose
angeschlossen werden.
Notwendige elektrische Installationen zum Anschluss
des Geräts dürfen nur von einem Elektriker oder einer
anderen kompetenten Person durchgeführt werden.
Der Hersteller lehnt jegliche Haftung ab, wenn
diese Sicherheitsmaßnahmen nicht beachtet
werden.
Elektrische Anforderungen
Prüfen Sie vor dem Einschalten, ob die Netzspannung
den Angaben auf dem Typenschild entspricht.
13. Informationen zum
Umweltschutz
Das Gerät enthält keinerlei FCKW/FKW.
Als Kältemittel wird Ammoniak (eine natürliche
Wasserstoff/Stickstoffverbindung) verwendet.
Als Einblasmittel für die PU-Schaumisolierung wird
das ozonfreundliche Zyklopentan verwendet.
Als Korrosionsschutz wird Natriumchromat verwendet
(weniger als 2 Gewichtsprozent des Kältemittels).
14. Recycling
Entsorgen Sie die Verpackung des Geräts
bei Ihrer örtlichen Müllabfuhr. Übergeben Sie das
Gerät am Ende seiner Lebensdauer einem
Entsorgungsunternehmen, dass die wieder
verwendbaren Materialien aufbereiten kann und
den Restmüll fachgerecht entsorgt.
Geräte, die mit diesem Symbol
gekennzeichnet sind, müssen an dem
örtlichen Sammelpunkt für die
Entsorgung von elektrischen und
elektronischen Geräten abgegeben
werden.
Dieses Produkt darf nicht über den normalen
Haushaltsabfall entsorgt werden.
Kühlschränke von Dometic enthalten das Symbol
auf dem Datenschild (Typenschild) im Inneren des
Gerätes.
Dieses Gerät entspricht den folgenden EU-
Richtlinien:
LVD-Richtlinie 73/23/EWG, mit Änderung
90/683/EWG
EMV-Richtlinie 89/336/EWG
RoHS-Richtlinie 2002/95/EG
15
D
Modell RH 423LDA RH 439LD RH 449LD
Typ MB20-60 MB20-60 MB20-60
Bruttovolumen 23 Liter 24,5 Liter 30 Liter
Netzbetrieb 220 - 240V (AC 220 - 240V (AC) 220 - 240V (AC)
Stromaufnahme 75W 65W 65W
Energieverbrauch 0,8 kWh/24h 0,7 kWh/24h 0,8 kWh/24h
Klimaklasse N NN
Kältemittel 159g H
2
O+86g NH
3
147g H
2
O+98g NH
3
147g H
2
O+98g NH
3

16
Nous vous remercions d'avoir porté votre choix sur l'un de nos produits. Nous espérons que cet
appareil vous donnera pendant longtemps entière satisfaction. Ce mode d'emploi a pour but de vous
familiariser avec les symboles suivants et de vous permettre une mise en œuvre efficace et sûre de
votre appareil :
Danger lié à une mise en œuvre inappropriée de l'appareil
Recommandations pour l'utilisation de l'appareil
Informations relatives à la protection de l'environnement
L'usage de ce réfrigérateur est destiné uniquement à conserver au frais des denrées alimentaires et
des boissons.
Attention!
Seuls des adultes ont le droit d'exploiter cet appareil. Ne laissez jamais des enfants
jouer avec l'appareil ou ses éléments de commande.
Seul un électricien ayant la compétence nécessaire, pourra se charger des travaux
électriques indispensables à l'installation de l'appareil.
Seul un électricien agréé devra se charger des travaux de maintenance, en utilisant
uniquement des pièces de rechange d'origine.
Toute modification de l'appareil ou de ses composants peut s'avérer dangereuse.
Faites attention à ce que le câble d'alimentation ne se coince jamais sous l'appareil.
La surface de quelques composants peut fortement s'échauffer au cours de
l'exploitation. Veillez à une aération suffisante, sous peine d'un endommagement de
l'appareil ; les denrées périssables à l'intérieur du réfrigérateur pourraient
également s'abîmer. Veuillez bien comparer aux directives d'installation.
Tout contact avec les surfaces brûlantes des composants est à éviter. Il faudra donc
veiller à placer l'appareil, sa partie arrière tournée vers un mur. Tout en veillant à
respecter les distances minimales indiquées dans les directives d'installation afin
de garantir l'aération nécessaire.
Débranchez toujours l'appareil avant de le dégivrer, de le nettoyer ou d'effectuer des
travaux d'entretien.
N'essayez jamais d'enlever le givre EN UTILISANT UN INSTRUMENT POINTU.
N'essayez jamais d'employer la force pour enlever le givre adhérant aux nervures de
refroidissement. Le givre fondra lors du dégivrage de l'appareil. Veuillez bien
comparer aux directives de dégivrage.
L'appareil est assez lourd. Faites donc attention si vous voulez le déplacer.
N'essayez en aucun cas de réparer vous-même l'appareil. Des réparatures
effectuées par un personnel manquant de l'expérience nécessaire, pourront
entraîner des blessures corporelles ou des détoriations de l'appareil. Si vous avez
besoin de pièces détachées, adressez-vous à votre dépositaire local et demandez
explicitement des pièces de rechange d'origine.
Il est interdit de stocker des substances toxiques ou explosives au réfrigérateur !
Veuillez bien lire attentivement ce mode d'emploi avant de mettre cet appareil en
service. Si vous deviez vendre ou céder l'appareil ultérieurement, veuillez bien
remettre ce mode d'emploi à son nouveau propriétaire.
Veillez à respecter scrupuleusement les directives suivantes d'installation. Au cas où
vous n'auriez pas installé l'appareil en vous conformant aux directives d'installation,
vous n'auriez plus aucun droit aux prestations de garantie. (Comparez au chapitre 4.1)
F

17
SOMMAIRE
1. Déballage de l'appareil
2. Vue de l'appareil
3. Nettoyage
4. Mise en place de l'appareil
4. 1. Directives d'installation
4. 1.1. Version encastrable
4. 1.2. Version pose libre
5. Exploitation de l'appareil
5. 1. Première mise en service
5. 2. Réglage de la température
6. Glaçons
7. Conseils utiles
8. Dégivrage, nettoyage et entretien
8. 1. Dégivrage automatique
8. 2. Éclairage intérieur
9. Inverser le sens d'ouverture de la porte
10. Remplacement de l'habillage de porte
11 Service après-vente
12. Mise en service, caractéristiques techniques
12. 1. Raccordement au secteur
13. Informations relatives à la protection de l'environnement
14. Recyclage
Attention!
Les conditions de garantie sont conformes à la Décision du Comité mixte
de l'EEE nº 44/1999 du 26 mars 1999 modifiant l'annexe (environnement) de
l'accord EEE, et également conformes aux lois applicables dans les divers
pays.
Si vous avez des questions concernant la garantie, le service après-vente
ou les pièces de rechange, veuillez bien vous adresser à notre réseau de
services Dometic.
Les dommages résultant d'un usage inapproprié de l'appareil ne sont pas
couverts par la garantie.
Les modifications apportées à l'appareil ou l'utilisation de pièces de
rechange qui ne sont pas d'origine Dometic, ne sont pas couvertes par la
garantie.
Le non-respect des instructions d'installation ou du mode d'emploi,
entraîne l'extinction totale de cette garantie.
Veuillez bien préciser le modèle d'appareil, la référence du produit et le
numéro de série si vous voulez contacter le réseau de services Dometic.
Vous trouverez ces informations sur la plaque signalétique, située à
l'intérieur du réfrigérateur.
F

18
1. Déballage de l'appareil
A la réception, assurez-vous après avoir déballé
l'appareil qu'il n'a pas été endommagé pendant le
transport. En cas de dommages de transport,
veuillez bien vous adresser immédiatement à
l'entreprise de transport.
2. Vue de l'appareil
1. Porte
2. Serrure de porte (si existante)
3. Bac à glaçons
4. Éclairage intérieur
5. Couvercle pour le compartiment du bloc réfrigérant
6. Évaporateur
7. Clayettes de rangement
8. Capteur d'air
9. Cadre inférieur
10. Balconnets du contre porte lisse
11. Grille d'aération
Figure 1.
AU CAS OÙ LE RÉFRIGÉRATEUR EST ÉQUIPÉ D'UNE SERRURE, DOMETIC ZRT N'ASSUME
AUCUNE GARANTIE POUR DES CLÉS PERDUES OU ENDOMMAGÉES. VOUS POURREZ
COMMANDER UNE NOUVELLE SERRURE SOUS FORME D'UNITÉ COMPLÈTE.
Version pose libreVersion encastrable
F
RH 439/449
RH 423

19
3. Nettoyage
Nettoyez le réfrigérateur à intervalles
réguliers et en cas de besoin. Videz
l'appareil, puis retirez les clayettes et les
balconnets. Nettoyez les surfaces intérieures de
l'appareil et de la porte, en utilisant une solution
tiède d'hydrogénocarbonate de sodium. Rincez
ensuite l'appareil à l'eau claire tiède, puis terminez
en le séchant à l'aide d'un chiffon non humidifié.
N'utilisez pas d'eau trop chaude pour nettoyer les
parties en plastique. N'exposez pas ces parties à
de l'air trop chaud. Nettoyez régulièrement les
surfaces extérieures de l'appareil à l'aide d'un
chiffon propre et humide.
NE NETTOYEZ JAMAIS L'APPAREIL EN
UTILISANT DES PRODUITS CHIMIQUES TROP
AGRESSIFS OU DES PRODUITS ABRASIFS.
4. Mise en place de l'appareil
Veillez à respecter les indications suivantes lors
de la première mise en service de l'appareil :
FAITES ATTENTION À CE QUE L'APPAREIL
SE TROUVE SUR UNE SURFACE BIEN
PLANE.
LORS DE L'EXPLOITATION, LA TUYAUTERIE
ARRIÈRE PEUT DÉGAGER UNE FORTE
CHALEUR.
L'APPAREIL NE FAIT APPEL À AUCUN
COMPRESSEUR. ET FONCTIONNE DE CE
FAIT TRÈS SILENCIEUSEMENT.
IL FAUDRA ATTENDRE AU MOINS TROIS
HEURES POUR OBTENIR UNE PER-
FORMANCE FRIGORIFIQUE SIGNIFIANTE.
Au cours du processus de réfrigération,
l'appareil transmet la chaleur à l'air ambiant
par l'intermédiaire du condensateur (situé à la
partie supérieure du panneau arrière). Une bonne
ventilation de l'appareil améliorera de beaucoup
sa performance frigorifique.
Pour garantir son bon fonctionnement, il faudra
également veiller à placer l'appareil sur une
surface plane. Vous pourrez contrôler très
simplement le niveau en posant un verre d'eau
sur le couvercle de l'appareil.
N'exposez pas l'appareil à une source de
chaleur directe (soleil, radiateur, four, etc.).
4.1. Directives d'installation
Le réfrigérateur fonctionne au moyen d'un
refroidisseur à absorption et est particulièrement
silencieux. Ce réfrigérateur a été conçu pour une
pose libre, il pourra cependant être aussi encastré
si les conditions suivantes, nécessaires à une
exploitation et à une performance frigorifique
satisfaisantes, sont respectées.
4.1.1. Versions encastrables
Ces appareils ont été conçus pour être encastrés.
Vous pourrez visser le miniBar dans un meuble, en
utilisant les dispositifs de fixation, prévus à cet
effet, situés au fond de l'appareil. Ce qui se fera en
utilisant les vis (Fig. 2).
Des écarts entre les points de pivotement
pourront être compensés à l'aide de la
charnière coulissante, comprise dans le volume
de livraison standard de ces versions. Veillez à
monter la charnière au tiers supérieur de la
porte de l'appareil. Avant de terminer le
montage, veillez à ce que le côté plat de la
charnière n'empêche pas une ouverture et
fermeture normale de la porte (Fig. 2).
Au cours du montage, veillez à respecter les
consignes ci-dessous.
Figure 2.
FAITES BIEN ATTENTION
Veillez à respecter scrupuleusement les
directives suivantes d'installation. Au cas
où vous n'auriez pas installé l'appareil en
vous conformant aux directives
d'installation, vous n'auriez plus aucun
droit aux prestations de garantie.
1. Vérifiez la p
lanéité du réfrigérateur des
deux côtés.
2. Il faudra veiller à respecter une dis
tance
de 2
0 mm par r
apport aux murs.
3. Veillez à garantir une aération suffisante
conformément aux alternatives A, B, C,
ou D (fig. 3 à 4)
4. La conduite d'arrivée d'air frais doit être
dimensionnée afin de correspondre au
moins à 105 mm x de la lar
geur du
réfrigérateur.
5. L'ensemble du bloc réfrigérant doit se
trouver dans le courant d'air (comparer à
l'illustration).
6. V
eillez à ce qu'aucun appareil ne
réchauffe l'air circulant.
F

7. Il faudra veiller à utiliser des grilles de
ventilation dont la section transversale est
d'au moins 2
00 cm².
Figure 3
Figure 4
En procédant à l'installation, faites bien
attention à toujours garantir l'accès du câble
d'alimentation.
4.1.2. Version pose libre
Ces versions sont prévues pour une pose libre.
Un couvercle empêche tout contact avec la
surface brûlante des composants situés dans le
compartiment du bloc réfrigérant. La grille de
ventilation située sur le cadre inférieur garantit
une circulation suffisante d'air.
5. Exploitation de l'appareil
Pour mettre l'appareil en marche, branchez la
fiche de prise de courant. À une température
ambiante normale, un réfrigérateur vide atteindra
sa température de service normale après environ
6 à 7 heures.
miniCool
min. 60 mm
miniCool
C
D
Grille de ventilation
Sortie d’air
Sortie d’air
EntrŁe d’air
EntrŁe d’air
miniCool
Sortie d’air
EntrŁe d’air
Grille de ventilation
miniCool
A
B
EntrŁe d’air
Sortie d’air
5.1. Première mise en service
Branchez l'appareil à une prise de courant
mise à la masse.
Le miniBar procédera automatiquement à un
test d'autocontrôle. Si l'électronique ne
reconnaît aucune défaillance, l'appareil
commencera à fonctionnes. En cas de
reconnaissance d'une défaillance, l'appareil
ne commencera pas à fonctionner. Il vous
faudra alors en aviser votre service après
vente.
5.2. Réglage de la température
Le réglage de la température du miniBar se fait
automatiquement, par commande électronique.
Ce qui vous évitera un réglage manuel de la
température de refroidissement.
6. Glaçons
Remplissez quatre cinquièmes du bac à
glaçons d'eau potable, fermez le couvercle,
puis placez le bac à glaçons sur la clayette.
N'oubliez pas de sécher auparavant le bac à
glaçons afin qu'il ne colle pas à la clayette.
Dégagez les glaçons du bac à glaçons en
tenant ce dernier sous l'eau courante. Ouvrez
ensuite le couvercle. Vous pourrez alors retirer
facilement les glaçons.
7. Conseils utiles
Ne surchargez pas l'appareil. Essayez de ne
stocker au réfrigérateur que des boissons et/ou
des aliments auparavant réfrigérés. Veillez à
toujours laisser un espace suffisant entre les
denrées alimentaires et les boissons afin de
garantir un refroidissement fiable et régulier. En
cas de surchargement des clayettes, les effets
pourront en être des différences indésirables
de température à l'intérieur de l'appareil.
8. Dégivrage, nettoyage
et entretien
La formation de givre après une certaine
période d'exploitation est normale. Cette
couche de givre ne devra cependant pas par
trop s'épaissir, en raison de son influence
négative sur la performance frigorifique.
Le réglage de la température du miniBar se fait
automatiquement, par commande électronique.
L'eau de dégivrage résultant de la fonte du
givre, s'écoulera alors dans un bac collecteur
situé à l'arrière du réfrigérateur, en passant par
la gouttière et un tube d'écoulement. (Fig. 5).
Dans ce bac, l'eau de dégivrage s'évaporera
automatiquement dans l'air ambiant. Il est donc
inutile de vider ce bac manuellement.
Pour arrêter l'appareil, il vous suffira de le
débrancher ; n'oubliez pas de laisser ensuite la
20
F
miniBar
miniBar
miniBar
Entrèe d’air
Entrèe d’air
miniBar
Entrèe d’air
Entrèe d’air
La pagina si sta caricando...
La pagina si sta caricando...
La pagina si sta caricando...
La pagina si sta caricando...
La pagina si sta caricando...
La pagina si sta caricando...
La pagina si sta caricando...
La pagina si sta caricando...
La pagina si sta caricando...
La pagina si sta caricando...
La pagina si sta caricando...
La pagina si sta caricando...
La pagina si sta caricando...
La pagina si sta caricando...
La pagina si sta caricando...
La pagina si sta caricando...
La pagina si sta caricando...
La pagina si sta caricando...
La pagina si sta caricando...
La pagina si sta caricando...
La pagina si sta caricando...
La pagina si sta caricando...
La pagina si sta caricando...
La pagina si sta caricando...
La pagina si sta caricando...
La pagina si sta caricando...
La pagina si sta caricando...
La pagina si sta caricando...
La pagina si sta caricando...
La pagina si sta caricando...
La pagina si sta caricando...
La pagina si sta caricando...
La pagina si sta caricando...
La pagina si sta caricando...
La pagina si sta caricando...
La pagina si sta caricando...
-
 1
1
-
 2
2
-
 3
3
-
 4
4
-
 5
5
-
 6
6
-
 7
7
-
 8
8
-
 9
9
-
 10
10
-
 11
11
-
 12
12
-
 13
13
-
 14
14
-
 15
15
-
 16
16
-
 17
17
-
 18
18
-
 19
19
-
 20
20
-
 21
21
-
 22
22
-
 23
23
-
 24
24
-
 25
25
-
 26
26
-
 27
27
-
 28
28
-
 29
29
-
 30
30
-
 31
31
-
 32
32
-
 33
33
-
 34
34
-
 35
35
-
 36
36
-
 37
37
-
 38
38
-
 39
39
-
 40
40
-
 41
41
-
 42
42
-
 43
43
-
 44
44
-
 45
45
-
 46
46
-
 47
47
-
 48
48
-
 49
49
-
 50
50
-
 51
51
-
 52
52
-
 53
53
-
 54
54
-
 55
55
-
 56
56


Dometic RH449LDBI Manuale utente
- Categoria
- Scatole fresche
- Tipo
- Manuale utente
in altre lingue
- français: Dometic RH449LDBI Manuel utilisateur
- español: Dometic RH449LDBI Manual de usuario
- Deutsch: Dometic RH449LDBI Benutzerhandbuch
- Nederlands: Dometic RH449LDBI Handleiding
- português: Dometic RH449LDBI Manual do usuário
Documenti correlati
-
Dometic RH439LDFS Manuale utente
-
Dometic RH548 Istruzioni per l'uso
-
Dometic RH423LDA, RH439LD, RH449LD (Type: MB20-60) Istruzioni per l'uso
-
-
-
-
Dometic RH465LD Manuale utente
-
Dometic RH456LDE Manuale utente
-
-
