Hoover DXW4 H7A1TCEX-S Manuale utente

Categoria
Asciugatrici elettriche
Tipo
Manuale utente
FR
DE
IT
NLPT
ES
2
Index
Please read and follow these instructions
carefully and operate the machine
accordingly. This booklet provides important
guidelines for safe use, installation,
maintenance and some useful advice for best
results when using your machine.
Keep all documentation in a safe place for
future reference or for any future owners.
Please check that the following items are
delivered with the appliance:
Instruction manual
Guarantee card
Energy label
By placing the mark on this product,
we are confirming compliance to all relevant
European safety, health and environmental
requirements which are applicable in
legislation for this product.
Check that no damage has occurred to
the machine during transit. If it has, call for
service by GIAS. Failure to comply with the
above can compromise the safety of the
appliance. You may be charged for a service
call if a problem with your machine is caused
by misuse.
1. SAFETY REMINDERS
2. PREPARING THE LOAD
3. CLEANING AND ROUTINE
MAINTENANCE
4. WATER CONTAINER
5. DOOR AND FILTER AND CONDENSER
6. CONTROLS AND INDICATORS
7. SELECTING THE PROGRAMME AND
SET THE FUNCTION
8. TROUBLESHOOTING CUSTOMER
SERVICE
1.
SAFETY REMINDS
This appliance can be used by
children aged from 8 years and
above and persons with
reduced physical,sensory or
mental capabilities or lack of
experience and knowledge if they
have been given supervision or
instruction concerning use of the
appliance in a safe way and
understand the hazards
involved.Children shall not play
with the appliance. Cleaning and
user maintenance should not be
made by children without
supervision.Children of less than
3 years should be kept away
unless continuously supervised.
WARNING Misuse of a tumble
dryer may create a fire hazard.
This appliances is intended to be
used in household and similar
applications such as:
- Staff kitchen areas in shops ,
offices and other working
environments;
- Farm houses
- By clients in hotels, motels and
o t h e r r e s i d e n t i a l t y p e
environments;
- Bed and breakfast type
environments" A different use of
this appliance from house hold
environment or from typical
housekeeping functions,as
commercial use by expert or
trained users, is excluded even in
the above applications.
If the appliance is used in a
manner inconsistent with this it
may reduce the life of the
appliance and may void the
manufacturer’s warranty.
Any damage to the appliance
or other damage or loss
arising through use that is not
consistent with domestic or
household use ( even if
located in a domestic or
household environment)
shall not be accepted by the
manufacturer to the fullest
extent permitted by law.
This machine should only be
used for its intended purpose
as described in this manual.
Ensure that the instructions
for installation and use are
fully understood before
operating the appliance.
Do not touch the appliance
when hands or feet are damp
or wet.
Do not lean on the door when
loading the machine or use
the door to lift or move the
machine.
Do not allow children to play
with the machine or its
controls.
3
EN
WARNING Do not use the
product if the fluff filter is not in
position or is damaged; fluff
could be ignited.
WARNING Where the hot
surface symbol is located
the temperature rise during
operation of the tumble dryer
may be in excess of 60 degrees
C.
Remove the plug from the
electricity supply. Always
remove the plug before cleaning
the appliance.
Do not continue to use this
machine if it appears to be faulty.
Lint and fluff must not be
allowed to collect on the floor
around the outside of the
machine.
The final part of a tumble dryer
cycle occurs without heat (cool
down cycle) to ensure that the
items are left at a temperature
that ensures that the items will
not be damaged.
The tumble dryer is not to be
used if industrial chemicals have
been used for cleaning.
WARNING: Never stop a tumble
dryer before the end of the
drying cycle unless all items are
quickly removed and spread out
so that the heat is dissipated.
Maximum load drying weight:
see energy label.
Installation
Do not use adapters, multiple
connectors and/or extensions.
Never install the dryer against
curtains and be sure to prevent
items from falling or collecting
behind the dryer.
The appliance must not be
installed behind a lockable door,
a sliding door or a door with a
hinge on the opposite side to
that of the tumble dryer.
4
Important: During transport
ensure that the dryer is in an
upright position, if it's necessary
you can only flip in the side shown;
Caution: If the product is in
different side, wait at least 4 hours
before switching on so that the oil
c a n f l o w b a c k i n t o t h e
compressor. Failure to do this
could result in damage to the
compressor.
5
Do not dry unwashed items in
the tumble dryer.
WARNING Do not tumble dry
fabrics treated with dry cleaning
fluids.
WARNING Foam rubber
materials can, under certain
circumstances, when heated
b e c o m e i g n i t e d b y
spontaneous combustion.
Items such as foam rubber
(latex foam), shower caps,
waterproof textiles, rubber
backed articles and clothes or
pillows fitted with foam rubber
pads MUST NOT be dried in the
tumble dryer.
Always refer to the laundry care
labels for directions on
suitability for drying.
Clothes should be spin dried or
thoroughly wrung before they
are put into the tumble dryer.
Clothes that are dripping wet
should not be put into the dryer.
Lighters and matches must not
be left in pockets and NEVER
use flammable liquids near the
machine.
Glass fibre curtains should
NEVER be put in this machine.
Skin irritation may occur if other
garments are contaminated
with the glass fibres.
Items that have been soiled
with substances such as
cooking oil, acetone, alcohol,
p e t r o l , k e r o s e n e , s p o t
removers, turpentine, waxes
and wax removers should be
The Laundry
washed in hot water with an
extra amount of detergent
before being dried in the
tumble dryer.
Fabric softeners, or similar
products, should be used as
specified by the fabric
softener instructions.
Ventilation
Adequate ventilation must be
provided in the room where
the tumble dryer is located to
p r e v e n t g a s e s f r o m
appliances burning other
fuels, including open fires,
being drawn into the room
during operation of the
tumble dryer.
Installing the rear of the
appliance close to a wall or
vertical surface.
There should be a gap of at
least 12 mm between the
m a c h i n e a n d a n y
obstrubtions.The inlet and
outlet should be kept clear of
obstruct i o n .To ensure
adequate ventilation the
space between the bottom of
the machine and the floor
must not be obstructed.
Check regularly that the air
flowing through the dryer is
not restricted.
Check frequently the fluff
filter after use, and clean, if
necessary.
Prevent items from falling or
collecting behind the dryer as
EN
Do not install the product in a
low temperature room or in a
room where there is a risk of frost
occurring. At temperature around
freezing point the product may
not be able to operate properly:
there is a risk of damage if the
water is allowed to freeze in the
hydraulic circuit (valves, hoses,
pumps). For a better product
performance the ambient room
temperature must be between
5-35°C. Please note that
operating in cold condition
(between +2 and +5°C) might
simply some water condensation
and water drops on floor.
6
these may obstruct the air inlet
and outlet
NEVER install the dryer up
against curtains.
In cases where the dryer is
installed on top of a washing
machine, a suitable stacking kit
must be used according to the
follow configuration.
- Stacking kit Mod 35100019:
for minimum washing machine
depth 49 cm
- Stacking kit Mod 35900120:
for minimum washing machine
depth 51 cm
The stacking kit shall be one of
that above, obtainable from our
spare service.
The instructions for installation
and any fixing attachments, are
provided with the staking kit.
Air Outlets in the Base
Environmental Issues
All packaging materials used are
environmentally-friendly and recyclable.
Please help dispose of the packaging via
environmentally-friendly means. Your
local council will be able to give you details
of current means of disposal.
To ensure safety when disposing of an old
tumble dryer disconnect the mains plug
from the socket, cut the mains power cable
and destroy this together with the plug. To
prevent children shutting themselves in
the machine break the door hinges or the
door lock.
European Directive 2012/19/EU
This appliance is marked according
to the European directive 2012/19/EU
on Waste Electrical and Electronic
Equipment (WEEE).
WEEE contains both polluting substances
(which can cause negative consequences for
the environment) and basic components (which
can be re-used). It is important to have WEEE
subjected to specific treatments, in order to
remove and dispose properly all pollutants, and
recover and recycle all materials.
Individuals can play an important role in
ensuring that WEEE does not become an
environmental issue; it is essential to follow
some basic rules:
- WEEE should not be treated as household
waste.
- WEEE should be handed over to the relevant
collection points managed by the municipality or
by registered companies. In many countries, for
large WEEE, home collection could be present.
In many countries, when you buy a new
appliance, the old one may be returned to the
retailer who has to collect it free of charge on a
one-to-one basis, as long as the equipment is of
equivalent type and has the same functions as
the supplied equipment.
GIAS Service
To ensure the continued safe and efficient
operation of this appliance we recommend
that any servicing or repairs are only carried
out by an authorised GIAS service engineer.
7
Electrical Requirements
Tumble dryers are supplied to operate at a
voltage of 220-240V, 50 Hz single phase.
Check that the supply circuit is rated to at least
6 A.
Electricity can be extremely dangerous.
This appliance must be earthed.
The socket outlet and the plug on the
appliance must be of the same type.
Do not use multiple adapters and/or
extension leads.
The plug should be accessible for
disconnection after the appliance has
been installed.
You may be charged for a service
call if a problem with your machine is
caused by incorrect installation.
If the mains cord on this appliance
is damaged, it must be replaced by a
special cord which is ONLY obtainable
from the spares service. It must be
installed by a competent person.
Do not plug the machine in and
switch it on at the mains until the
installation is completed.For your safety,
this dryer must be correctly installed. If
there is any doubt about installation, call
GIAS Service for advice.
Adjusting the Feet
Once the machine is
in place the feet
should be adjusted to
ensure t hat t h e
machine is level.
C o n t a i n s f l u o r i n a t e d
g r e e n h o u s e g a s e s .
Hermetically sealed.
GWP1430
260
0,372
EN
2.
PREPARING THE LOAD
Before using the tumble dryer for the first time:
Please read this instruction book thoroughly.
Remove all items packed inside drum.
Wipe the inside of the drum and door with a
damp cloth to remove any dust which may have
settled in transit.
Make sure that the laundry you are going to
dry is suitable for drying in a tumble dryer, as
shown by the care symbols on each item.
Check that all fastenings are closed and that
pockets are empty. Turn the articles inside out.
Place clothes loosely in the drum to make sure
that they don't get tangled.
Clothes Preparation
Do Not Tumble Dry:
Silk, nylon stockings, delicate embroidery,
fabrics with metallic decorations, garments
with PVC or leather trimmings.
IMPORTANT: Do not dry articles which
have been treated with a dry cleaning fluid or
rubber clothes (danger of fire or explosion).
During the last 15 minutes the load is always
tumbled in cool air.
Only put into the tumble dryer laundry which has
been thoroughly wrung or spin-dried. The drier
the laundry the shorter the drying time thus
saving electricity.
ALWAYS
Check that the filter is clean before every
drying cycle.
NEVER
Put dripping wet items into the tumble dryer,
this may damage the appliance.
Energy Saving
. .
.
By care symbols
These can be found on the collar or inside seam:
Suitable for tumble drying.
Tumble drying at high temperature.
Tumble drying at low temperature only.
Do not tumble dry.
Sort the Load as Follows
Do not overload the drum, large items
when wet exceed the maximum
admissible clothes load (for example:
sleeping bags, duvets).
If the item does not have a care label it must
be assumed that it is not suitable for tumble
drying.
By amount and thickness
Whenever the load is bigger than the dryer
capacity, separate clothes according to
thickness (e.g. towels from thin underwear).
By type of fabric
Cottons/linen: Towels, cotton jersey, bed
and table linen.
Synthetics: Blouses, shirts, overalls, etc.
made of polyester or polyamid, as well as
for cotton/synthetic mixes.
3.
CLEANING AND ROUTINE
MAINTENANCE
WARNING! The Drum, door and load
may be very hot.
IMPORTANT Always switch off and
remove the plug from the electricity supply
before cleaning this appliance.
For electrical data refer to the rating
label on the front of the dryer cabinet (with
the door open).
Cleaning the Dryer
Clean the filter and empty the water
container after every
drying cycle.
Regularly clean the condenser.
After each period of use, wipe the inside
of the drum and leave the door open for a
while to allow circulation of air to dry it.
Wipe the outside of the machine and the
door with a soft cloth.
DO NOT use abrasive pads or cleaning
agents.
To prevent the door sticking or the build
up of fluff clean the inner door and gasket
with a damp cloth after every drying cycle.
8
OPERATION
Do not open the door during the automatic
programs in order to obtain a proper drying.
4.
WATER CONTAINER
The water removed from the laundry during the
drying cycle is collected in a container inside
the door of the dryer. When the container is full
the indicator on the control panel will
light, and the container MUST be emptied.
However, we recommend that the container is
emptied after each drying cycle.
NOTE: Very little water will collect during the
first few cycles of a new machine as an internal
reservoir is filled first.
To Remove the Container
1. Gently pull out the
water container holding
the handle. (A)
When it is full the
water container will
weigh about 6 kg.
2. T i l t t h e w a t e r
container to empty the
water out through the
spout. (B)
When empty, replace
the water container
back as shown; (C) first
insert the base of the
container into position
as shown (1) then
gentle push the top into
position (2).
3. Press Button to
restart the cycle.
NOTE: If you have the
option of drainage near
to the dryer you can use
the discharge kit to
provide a permanent
drainage for the water
c o l l e c t e d i n t h e
container of the dryer.
This means that you
don't have to empty the
water container.
A
B
1
C
1. Open the door and load the drum with
laundry. Ensure that garments do not
hinder closure of the door.
2. Gently close the door pushing it slowly
until you hear the door 'click' shut.
3. Turn the Programme Selector dial to
select the required drying programme (see
Programme Guide).
4. Press the button. The dryer will start
automatically and the indicator above the
button will be continuously lit.
5. If the door is opened during the
programme to check the laundry, it is
necessary to press to recommence
drying after the door has been closed.
6. When the cycle is nearing completion
the machine will enter the cool down
phase, the clothes will be tumbled in cool
air allowing the load to cool down.
7. Following the completion of the cycle the
drum will rotate intermittently to minimize
creasing. This will continue until the
machine is switched OFF or the door is
opened.
9
EN
5.
DOOR and FILTER
Pull on handle to open the door.
To restart the dryer, close the door and press
Start / Pause button.
WARNING! When the tumble dryer is in
use the drum and door may be VERY HOT.
Filter
IMPORTANT: To maintain the efficiency of
the dryer check that the fluff filter is clean
before each drying cycle.
1. P u l l t h e f i l t e r
upwards.
2. Open filter as shown.
3. Gently remove lint
using a soft brush or
your fingertips.
4. Snap the filte r
together and push
back into place.
1
2
Filter Care Indicator
Lights when the filter needs cleaning.
If the laundry is not drying check that the filter
is not clogged.
IF YOU CLEAN FILTER UNDER
WATER, REMEMBER TO DRY IT.
WARNING! If you open the door mid
cycle, before the cool-down cycle has
completed,the handle may be hot. Please use
extreme caution when attempting to empty
the water reservoir during the cycle.
10
To Clean the Condenser Filter
1. R e m o v e t h e
kickplate.
2. Turn the two locking
levers anti-clockwise
and pull out the front
cover.
3. Gently remove the
filter frame and clean
any dust or fluff with a
cloth from the filter. Do
not use water to clean
the filter.
4. Remove the sponge
gently from its place
and then wash the
sponge by holding it
under a running tap
turning it so to remove
any dust or fluff.
5. Refit the front cover
ensuring it is in the
c o r r e c t w a y ( a s
indicated by the arrow)
and pushed firmly into
place. Lock the two
levers by turning them
clockwise
6. Refit the kickplate.
1
2
3
4
5
Clean the filters before every cycle
Please pay attention that overloading or
bulky load can lead to door opening, in this
case please reduce the load capacity to
continue the drying cycle.
6.
CONTROLS AND
INDICATORS
A
C
11
1
2
3
4
5
6
7
8
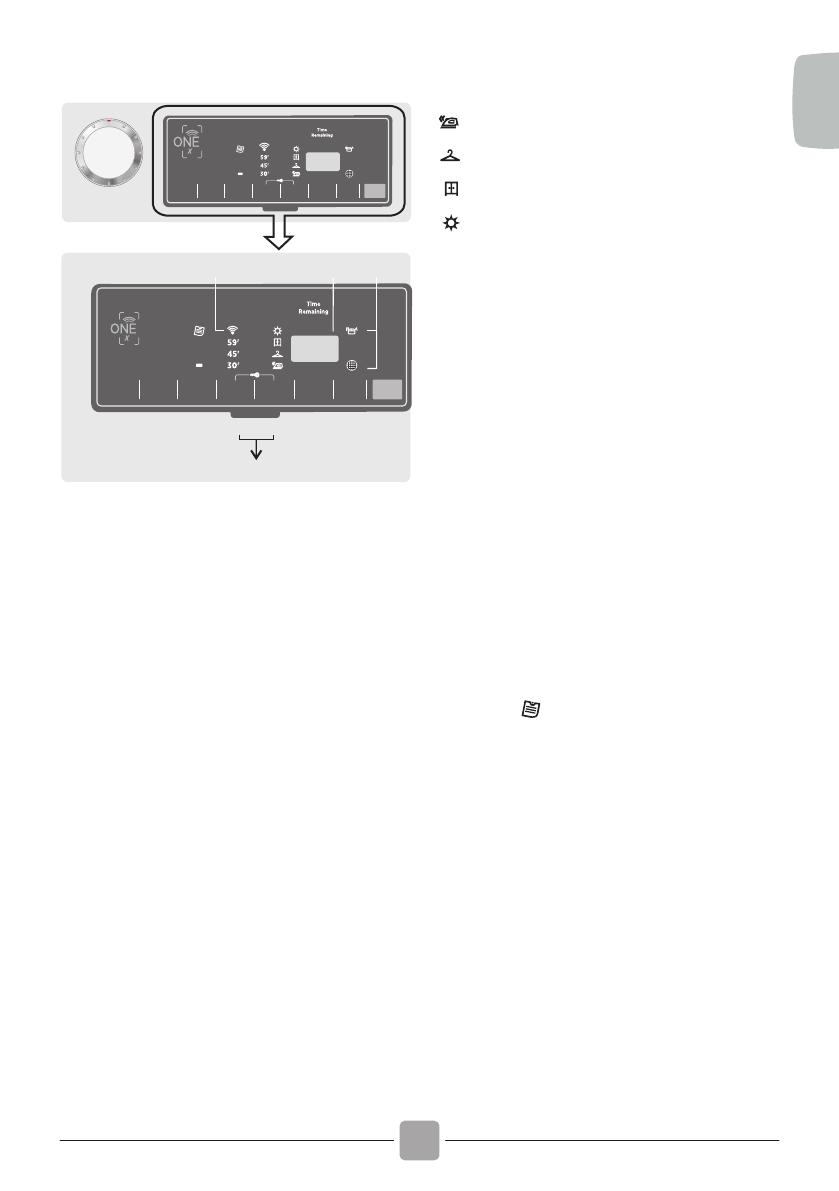
A-Programme Selector - Rotating the knob in
both directions it's possible to select the desired
drying program. To cancel the selections or
switch off the dryer rotate the knob on OFF.
B- Display Digit - The display shows the
remaining time for drying, the postponed time in
case of delayed start selection and other
notifications setting.
C-Buttons -
1.Start/Pause Button
To start the selected program and/or suspend it.
2.Delay Start Button
It allows to delay the start of the program from 1
to 24 hours in 1-hour intervals. The delay
selected is shown on the display.
After pressing the START button the time
showed decrease hour after hour.
Opening of the porthole with delayed start set,
after re-closing the porthole, press start again to
resume the counting.
3.Time cycle selection
It's possible transform a cycle from automatic to
programmed, up to 3 minutes after the start of
the cycle.
The progressive pressure increases the time in
10-minute intervals. After this selection to reset
the automatic dying functioning is necessary to
switch off the dryer In case of incompatibility, all
LEDs flash quickly for 3 times.
4.Drying Selection Button
It allows to set the desired dryness level editable
option up to 5 minutes after the starting of the
cycle:
- Ready to Iron : It leaves the garments
slightly wet to facilitate ironing.
- Dry Hanger : To get garment ready to be
hang
- Dry wardrobe : For laundry that can be
directly stored
-Extra-dry : To get completely dry garments,
ideal for full load.
This appliances is equipped with Drying Manager
Function. On automatic cycles, each level of
intermediate drying, prior to the reaching the
selected one, is indicated by flashing the light
indicator corresponding to the degree of drying
reached. In case of incompatibility, all LEDs flash
quickly for 3 times.
5.Rapids Button
It's possible switch an automatic program to
RAPID program, up to 3 minutes after the start of
the cycle. The progressive pressure increases the
time (30-45-59 minutes).
After this selection to reset the automatic dying
functioning is necessary to switch off the dryer In
case of incompatibility, all LEDs flash quickly for 3
times.
6.Best Ironing
This option allows to reduce folds and tangles,
thanks to alternating movements of the drum
during and after drying and automatically, setting
the ironi drying level (the drying level setting can
be modified after the option selection)
The option ca be set up to five minutes after the
start of the cycle and is activated only on
automatic cycles.
7.Memory
This option allows you to store the options set on
a cycle.
STORAGE When the cycle is running push the
button "memory" for three seconds. The control
light "memory" flashes for three times and stores
the set options connected to the cycle selected in
the flange.
Recall: After the selection of the cycle Push the
button "memory" for recall the stored options.
(not the cycle)
8. Keylock
This function allows to block unwanted changes
of the set options on the bezel , during drying
phase. Activation/Inactivation: Push 4 and 5
buttons simultaneously for two seconds . The
sign "LOC" appears on the display. Unlocking the
option, on the display appears the sign "Unl", only
once. In case of opening of 'porthole' with
activated key lock, the cycle stops but the lock is
kept: to restart the cycle, you must remove the
lock and restore Start. When the dryer is off, the
option is automatically inactivated.
Key lock can be modified at any time of the cycle.
B
D
E
e tra
Fi
e tra
Fi
EN
12
The wool drying cycle of this
m a ch i ne ha s b e en
approved by The Woolmark
Company for the drying of
machine washable wool
products provided that the
products are washed and
dried according to the instructions on the
garment label and those issues by the
manufacturer of this machine M1530.
In UK, Eire, Hong Kong and India the Woolmark
trade mark is a Certification trade mark.
Drying Guide
The standard cycle COTTON DRY ( ) is the
most energy efficient and best suited for drying
normal wet cotton laundry.
The table in last page shows the approximate
time and energy consumption of the main
drying programmes.
Technical Specifications
Drum capacty 78,5
Maxmum load See energy label
Heght 85 cm
Wdth 60 cm
Depth 48,7 cm
Energy class See energy label
EN 61121 Programme To Use
-DRY COTTON
- COTTON OR
-COTTON OR WHITES
-DELICATES OR SYNTHETIC
-IRON DRY COTTON
-EASY-CARE TEXTILE
Information for Test Laboratory
D- Led
Water tank - It lights up when it's necessary
to empty the condensate water tank.
Filter cleaning - It lights up when the
cleaning of the filters is requested (the door and
the lower filter.)
E- WI-FI (some models only)
In the models with the Wi-Fi option, the icon
indicates that the Wi-Fi system is working.
ONE Fi EXTRA area - There is an apposite
place in the bezel on which lay the
smartphone during the enrollment of the
machine to the APP. Follow the indications
on the phone display. ( only for Android
smartphone equipped with NFC technology)
Max.capacity declared
Max.4 Kg
Maximum Drying Weight
Cottons
Synthetics or Delicates
The real duration of drying cycle
depends by the starting humidity level of
the laundry due to spin speed, type and
amount of load, cleanliness of filters and
ambient temperature.
Automatic Anti crease
This option automatically activates an anti-
creases movement of the drum, pre cycle in
case of activation of the delay and at the end
of drying cycle for 6 hours. It is activated
every 10 minutes. To stop the movements
set the knob to OFF
Useful when it's not possible to remove
immediately the laundry.
Clean the filters before every cycle
Power consumpton of off-mode
0,40 W
Power consumpton of on-mode
0,75 W
7.
SELECTING THE PROGRAMME AND SET THE FUNCTION
13
PROGRAM
PROGRAM DESCRIPTION
DRYING
TIME
(min)
CAPACITY
(kg)
A new innovative cycle to dry different kinds of fabrics in the
same time. The dryer provides an alert when the lightweight
fabrics are dry and ready to are taking out. After this step it's
necessary to press start again to complete the dryng for the
leftovers heavier linens.
A delicate and specific cycle to dry dark or coloured cotton or
syntethics garments.
The perfect cycle to remove the smells from the linens
smoothing creases.
5
4
2.5
*
*
20’
* The real duration of drying cycle depends by the starting humidity level of the laundry due to spin speed, type
and amount of load, cleanliness of filters and ambient temperature.
The right cycle to dry cottons, sponges and towels.
Full
*
Program Eco normative (hang dry) drying. The most
efficient program in energy consumption. Suitable for
cottons and linens.
Full
*
This specifics cycle has been conceived to dry shirts minimizing
tangles and folds thanks specific movements of the drum. It's
recommended to take out the linens immediately after drying cycle.
2.5
*
Dedicated to dry uniformly fabrics like jeans or denim. It's
recommended flip over the garments before drying.
4
*
To dry delicate and synthetic fabrics that need an accurate
and specific treatment.
An special service to revitalize the waterproofing treatment
of the linens.
4
*
Dedicated to technical garments for sport and fitness, drying
gently with special care to avoid shrinking and deterioration
of elastic fibers.
Perfect cycle to dry uniformly duvets and revitalizing the
smoothness of the feathers.
4
4
2
*
*
*
Woolen clothes: the program can be used to dry up to 1 kg of
laundry (around 3 jumpers). It is recommended to reverse all
clothes before drying. Timing can change due to dimensions
and thickness of load and to spinning chosen during
washing. At the end of the cycle, clothes are ready to be
worn, but if they are heavier, edges can be a bit wet: it is
suggested to dry them naturally. It is recommended to
unload clothes at the very end of the cycle. Attention: felting
process of wool is irreversible; please dry exclusively clothes
with symbol (symbol "ok tumble"); this program is not
indicated for acrylic clothes.
1 70’
One specifics cycle that dry and in the same time helps to
reduce the main allergens as dust mites, pet hair, pollens
and residual of powder detergents.
4
Max 220’
Position that you have to select when you want to enable remote control through the App (via
Wi-Fi). For more details, see paragraph One Fi Extra
One Fi Extra
Specific cycle dedicated to dry huge linens size like curtains,
sheets and tableclothes. Thanks to a specifics movement of the
drum the linens will be dry minimazing tangles and folds.
5
Max 220’
EN
ONE FI EXTRA
This appliance is equipped with ONE Fi
EXTRA technology that allows you to control
it remotely via App, thanks to Wi-Fi function.
MACHINE ENROLLMENT (ON APP)
Download the Hoover Wizard App on your
device.
Using an Android smartphone equipped
with NFC technology (Near Field
Communication), the enrollment
process is simplified (Easy Enrollment);
in this case, follow the instructions on
the phone display, PLACE AND KEEP IT
NEAR the ONE Fi EXTRA logo on the
machine dashboard, when requested to
do so by the App.
NOTES:
If you do not know the position of
your NFC antenna, slightly move the
smartphone in a circular motion
over the ONE Fi EXTRA logo until the
App confirms the connection. In
order for the data transfer to be
successful, it is essential TO KEEP
THE SMARTPHONE ON THE
DASHBOARD DURING THESE THE
F E W S E C O N D S O F T H E
PROCEDURE; a message on the
device will inform about the correct
outcome of the operation and advise
you when it is possible to move the
smartphone away.
Thick cases or metallic stickers on
your smartphone could affect or
prevent the transmission of data
between machine and telephone. If
necessary, remove them.
T h e r e p l a c e m e n t o f s o m e
components of the smartphone (e.g.
back cover, battery, etc...) with non-
original ones, could result in the NFC
antenna removal.
ENABLE REMOTE CONTROL (VIA
APP) After the machine enrollment,
every time you want to manage it
remotely through the App, firstly you
have to load the laundry, the detergent,
close the door and select the ONE FI
EXTRA position on the machine. From
that moment on you can manage it
through the App commands.
The Hoover Wizard App is available for
devices running both Android and iOS,
both for tablets and for smartphones.
Get all the details of the ONE Fi EXTRA
functions by browsing the App in DEMO
mode.
Open the App, create the user profile and
enroll the appliance following the instructions
on the device display or the "Quick Guide"
attached on the machine.
Place your smartphone so that the NFC
antenna on its back matches the
position of the ONE Fi EXTRA logo on
the appliance (as illustred below).
14
WIRELESS PARAMETERS
Wireless Standard
802.11 b/g/n
Frequency range
Max Trasmit Power
2,412 GHz. - 2,484 GHz
Parameter
Specifications
Minimum
Receiving
Sensitivity
802.11b (11Mbps) +18,5 ± 2 dBm
802.11 g (54Mbps)
+16 ± 2 dBm
802.11 n (HT20, MCS7)
+14 ± 2 dBm
802.11b (11Mbps)
-93 dBm
802.11 g (54Mbps)
-85 dBm
802.11 n (HT20, MCS7)
-82 dBm
NOTE : In case of door opening with remote
controll on, to restore the connection with the
App, close the porthole and press start. The
cycle will resume from where it stopped.
15
8.
TROUBLESHOOTING
What Might be the Cause of...
Defects you can remedy yourself
Before calling service for technical advice please
run through the following checklist. A charge will
be made if the machine is found to be working or
has been installed incorrectly or used incorrectly.
If the problem persists after completing the
recommended checks, please call Service, they
may be able to assist you over the telephone.
Time display to end could change during
drying cycle. The time to end is continuously
checked during the drying cycle and the time
is adjusted to give the best estimation time.
The displayed time may increase or decrease
during the cycle and this is normal.
Drying time is too long/clothes are not dry
enough
Have you selected the correct drying
time/programme?
Were the clothes too wet? Were the clothes
thoroughly wrung or spindried?
Does the filter need cleaning?
Is the dryer overloaded?
The dryer does not operate
Is there a working electricity supply to the
dryer? Check using another appliance such as a
table lamp.
Is the plug properly connected to the mains
supply?
The dryer is noisy…
Switch off the dryer and contact GIAS
Service for advice.
The Indicator is on…
Does the filter need cleaning?
The Indicator is on…
Does the water container need
emptying?
CUSTOMER SERVICE
Should there still be a problem with your
dr yer after complet ing all the
recommended checks, please call
service for advice.
They may be able to assist you over the
telephone or arrange for a suitable
appointment for an engineer to call under
the terms of your guarantee. However, a
charge may be made if any of the
following applies to your machine:
Is found to be in working order.
Has not been installed in accordance
with the installation instructions.
Has been used incorrectly.
Spares
Service
Always use genuine spares, available
direct from service.
For service and repairs call your local
service engineer.
The manufacturer declines all
responsibility in the event of any
printing mistakes in this booklet. The
manufacturer also reserves the right
to make appropriate modifications to
its products without changing the
essential characteristics.
Is there a power failure?
Has the fuse blown?
Is the door fully closed?
Is the dryer switched on, both at the mains
supply and at the machine?
Has the drying time or the programme
been selected?
Has the machine been switched on again
after opening the door?
WIRELESS PARAMETERS
With this the Candy Hoover Group Srl,
declares that this appliance marked with
complies with the essential
requirements of the Directive 2014/53/EU.
To receive a copy of the declaration of
c o n f o r m i t y, p l e a s e c on ta ct t he
manufacturer at: www.candy-group.com
Wireless Standard
ISO/IEC 14443 Type A and NFC Forum Type 4
Frequency band
Magnetic field limit
13,553-13,567 MHz (centre frequency 13,560 MHz)
< 42dBμA/m (at 10 meters)
Parameter
Specifications
EN
16
Index
Veuillez lire et suivre ces instructions avec
soin et utiliser la machine en conséquence.
Ce livret contient des instructions importantes
sur la sécurité d'utilisation, l'installation et
l'entretien de la machine, ainsi que des
conseils utiles pour obtenir les meilleurs
résultats possibles lors de son utilisation.
Conservez toute la documentation dans un
endroit sûr pour pouvoir vous y reporter à une
date ultérieure ou la transmettre aux
prochains propriétaires
Vérifiez que les articles suivants ont bien été
livrés avec l’appareil :
Manuel d'utilisation
Carte de garantie
Étiquette d'énergie
En utilisant le symbole sur ce produit,
no us déclar ons sur no tre propre
responsabilité que ce produit est conforme à
toutes les normes européennes relatives à la
sécurité, la santé et à l'environnement.
Vérifiez que la machine ne s'est pas
détériorée en transit. Si c'est le cas, contactez
GIAS pour une opération de dépannage. Le
non-respect de ces instructions peut
compromettre la sécurité de votre appareil. Un
appel de service peut vous être facturé si la
défaillance de votre appareil est causée par
une mauvaise utilisation.
1. RAPPELS DE SÉCURITÉ
2. PRÉPARATION DE LA CHARGE
3. NETTOYAGE ET ENTRETIEN DE
ROUTINE
4. RÉSERVOIR D’EAU
5. PORTE ET FILTRE
6. COMMANDES ET INDICATEURS
7. SÉLECTION DU PROGRAMME
8. DÉPISTAGE DE PANNES & SERVICE
CLIENTÈLE
1.
RAPPELS DE SÉCURITÉ
Cet appareil peut être utilisé par
des enfants âgés de 8 ans et
plus, ou des personnes
présentant un handicap
physique, moteur ou mental, et
manquant de connaissance sur
lutilisation de lappareil, si elles
sont sous la surveillance d’une
personne, d o n n a n t des
instructions pour une utilisation
en toute curide l’appareil.
Les enfants ne doivent pas
jouer avec l'appareil.
Le nettoyage et l’entretien de
l’appareil ne doit pas être fait
p a r d e s e n f a n t s s a n s
surveillance d’un adulte.
ATTENTION La mauvaise
utilisation d un che-linge
risque de causer un incendie.
Le produit est conçu pour être
u t i l i s é d a n s u n f o y e r
domestique, comme - Le coin
cuisine dans des magasins ou
des lieux de travail,
- Employés et clients dans un
hôtel, un motel ou résidence de
ce type,
- Dans des bed and breakfast,
- Service de stock ou similaire,
mais pas pour de la vente au
détail.
La durée de vie de l’appareil
peut être réduite ou la garantie
du fabricant annulée si
lappareil nest pas utilisé
correctement.
Tout dommage ou perte
résultant d'un usage qui n'est
pas conforme à un usage
domestique (même s'ils sont
s i t u é s d a n s u n
environnement domestique
ou un ménage) ne sera pas
acceptée par le fabricant
dans toute la mesure
permise par la loi.
Cette machine est conçue
uniquement pour usage
domestique, à savoir pour
sécher le linge domestique
et les vêtements.
Cette machine ne doit être
utilisée que pour l emploi
auquel elle est destinée et
qui est décrit dans ce
manuel.
Assurez-vous d'avoir bien
compris les instructions
d'installation et d'utilisation
avant de faire fonctionner la
machine.
Ne touchez pas la machine
si vous avez les mains ou les
pieds mouillés ou humides.
Ne vous appuyez pas sur la
porte lorsque vous chargez
la machine et n'utilisez pas la
porte pour soulever ou
déplacer la machine.
Ne laissez pas des enfants
jouer avec la machine ou
avec ses commandes.
ATTENTION Nutilisez pas
cette machine si le filtre à
peluches n est pas en place
ou s il est endommagé ; les
peluches risquent en effet de
s'enflammer.
17
FR
ATTENTION L’augmentation de
températur e pendant le
fonctionnement du sèche-linge
peut être supérieure à 60°C là
se trouve le symbole de
surface chaude .
Débranchez le courant du
secteur. Retirez toujours la prise
avant de nettoyer la machine.
Cessez d’utiliser la machine si
elle semble défectueuse.
Veillez à ce que les peluches ne
puissent pas s’accumuler sur le
sol, à l’extérieur de la machine.
Il se peut que l’intérieur du
tambour soit très chaud. Veillez
à ce que le sèche-linge termine
son cycle de refroidissement
avant d’en sortir le linge.
La dernière partie du cycle
s'effectue à froid (cycle de
refroidissement)pour garantir la
préservation des textiles.
AVERTISSEMENT: Le sèche-
linge ne doit pas être utilisé si le
lavage a été effectavec des
produits chimiques.
AVERTISSEMENT: Ne jamais
arrêter le sèche-linge avant la fin
du cycle de séchage à condition
que les éléments sont retirés
rapidement et répartis de telle
sorte que la chaleur puisse se
dissiper.
Installez l'arrière de l'appareil
près d'un mur ou d'une surface
verticale.
Charge maximum pour le
séchage:Se reporter à l'étiquette
énergétique.
Installation
N'utilisez pas d'adaptateurs, de
multi-prises et/ou de rallonges.
Veillez à ne pas installer le
sèche-linge contre des rideaux
et assurez-vous que rien ne
puisse tomber ou s’accumuler
derrière le sèche-linge.
Cet appareil ne doit pas être
installé derrière une porte
verro uillab le, une p orte
coulissante ou une porté munie
de gonds placée en face de la
porte du sèche-linge.
18
Important : Pendant le
transport, l’appareil doit être
stocké dans sa position normale
dutilisation. Si nécessaire,
lappareil peut être incliné
comme montré ci-dessous.
Attention : Si le produit est
transporté différemment,
attendez au moins 4 heures
avant d’allumer l’appareil, ceci
afin que le gaz liquide retourne
dans le compresseur. En cas de
non respect de cette procédure,
le compresseur pourrait être
endommagé
19
Ne séchez pas des tements non
lavés dans le sèche-linge.
ATTENTION NE chez PAS les
tissus qui ont été trais avec des
liquides de nettoyage à sec.
ATTENTION Quand elles sont
c h a u ffée s , le s m o u s s e s
alvéolaires peuvent dans certains
cas brûler par combustion
spontae Les articles en mousse
caoutchouc (mousse de latex), les
bonnets de douche, le textile
imperméable, les articles
caoutchoutés et les tements ou
coussins rembourrés de mousse
caoutchouc NE DOIVENT PAS
être chés dans le che-linge.
Reportez-vous toujours aux
étiquettes d’entretien du linge pour
rifier le mode de séchage
recomman.
Les vêtements doivent être
essorés en machine ou à la main
avant d’être placés dans le che-
linge. Les vêtements qui
dégoulinent NE DOIVENT PAS
être mis dans le che-linge.
Enlevez les briquets et les
allumettes des poches et veillez à
ne JAMAIS utiliser des liquides
inflammables à proximi de la
machine.
Les rideaux en fibres de verre ne
doivent JAMAIS être placés dans
cette machine. La contamination
dautres vêtements par les fibres
de verre peut entraîner des
irritations de la peau.
Les articles qui ont été souillés par
des substances telles que huile de
cuisson, acétone, alcool, trole,
kérosène, produit anti-taches,
térébenthine, cire et capant pour
Le Linge
cire doivent être las à l'eau
chaude avec une quantité
supplémentaire de détergent
avant d'être séchés dans le
sèche-linge.
Les agents adoucissants, et
autres produits similaires,
d o i v e n t ê t r e u t i l i s é s
conformément aux instructions
fournies par le fabricant du
produit.
Ventilation
La pièce se trouve le che-
linge doit avoir une ventilation
adéquate de manière à ce que
les gaz des appareils qui
brûlent d’autres combustibles,
y compris les cheminées, ne
soient pas attirés dans la pièce
pendant que le sèche-linge est
en marche
Installez l'arrière de l'appareil
près d'un mur ou d'une surface
verticale.
Il doit y avoir un espace
minimum de 12 mm entre la
machine et quelconque
obstacle. L'entrée et la sortie
d'air doivent être dégagées.
Pour assurer une ventilation
adéquate, l'espace entre le
bas de la machine et le sol ne
doit pas être obstrué.
Lair d’ échappement ne doit
pas être évacué par un conduit
qui est également utilisé pour
é v a c u e r l e s f u m é e s
déchappement dappareils
qui brûlent du gaz ou d’autres
combustibles.
FR
Ne pas installer le produit
dans une pce à la température
basse le risque de formation
de glace est possible. A la
température de conlation de
l'eau, le produit risque de ne pas
fonctionner correctement. Si l'eau
du circuit hydraulique se glace,
les composants suivants risquent
d'être endommas : soupape,
pompe, tubes. Afin de garantir les
meilleures performances du
produit, la température de la
pièce doit être comprise entre
+2°C et +3C. Veuillez noter que
l'utilisation à des températures
basses (entre 2° et 15°C) peut
entrner une condensation de
l'eau et des gouttes sur le sol.
Vérifiez régulièrement que l air
peut circuler librement autour du
sèche-linge.
Contrôlez régulièrement le filtre à
peluches après usage et
nettoyez-le si nécessaire.
Veillez à ce que rien ne puisse
tomber ou s’accumuler entre les
côtés et l’arrière du sèche-linge
afin de ne pas obstruer l'entrée et
la sortie d’air.
N installez JAMAIS le sèche-
linge contre des rideaux.
Dans le cas ou le sèche-linge est
positionné en colonne au dessus
d'une machine à laver, un kit de
superposition approprdoit être
utilisé, selon la configuration
suivante.
Kit Mod 35100019: pour un lave
linge avec une profondeur min.
49 cm
Kit Mod 35900120: pour un lave
linge avec une profondeur min.
51 cm
Le kit de superposition est
disponible auprès du service
p i è c e s d é t a c h é e s . L e s
instructions pour l'installation de
l'appareil et de ses accessoires
sont fournis avec le kit.
20
Air Outlets in the Base
  • Page 1 1
  • Page 2 2
  • Page 3 3
  • Page 4 4
  • Page 5 5
  • Page 6 6
  • Page 7 7
  • Page 8 8
  • Page 9 9
  • Page 10 10
  • Page 11 11
  • Page 12 12
  • Page 13 13
  • Page 14 14
  • Page 15 15
  • Page 16 16
  • Page 17 17
  • Page 18 18
  • Page 19 19
  • Page 20 20
  • Page 21 21
  • Page 22 22
  • Page 23 23
  • Page 24 24
  • Page 25 25
  • Page 26 26
  • Page 27 27
  • Page 28 28
  • Page 29 29
  • Page 30 30
  • Page 31 31
  • Page 32 32
  • Page 33 33
  • Page 34 34
  • Page 35 35
  • Page 36 36
  • Page 37 37
  • Page 38 38
  • Page 39 39
  • Page 40 40
  • Page 41 41
  • Page 42 42
  • Page 43 43
  • Page 44 44
  • Page 45 45
  • Page 46 46
  • Page 47 47
  • Page 48 48
  • Page 49 49
  • Page 50 50
  • Page 51 51
  • Page 52 52
  • Page 53 53
  • Page 54 54
  • Page 55 55
  • Page 56 56
  • Page 57 57
  • Page 58 58
  • Page 59 59
  • Page 60 60
  • Page 61 61
  • Page 62 62
  • Page 63 63
  • Page 64 64
  • Page 65 65
  • Page 66 66
  • Page 67 67
  • Page 68 68
  • Page 69 69
  • Page 70 70
  • Page 71 71
  • Page 72 72
  • Page 73 73
  • Page 74 74
  • Page 75 75
  • Page 76 76
  • Page 77 77
  • Page 78 78
  • Page 79 79
  • Page 80 80
  • Page 81 81
  • Page 82 82
  • Page 83 83
  • Page 84 84
  • Page 85 85
  • Page 86 86
  • Page 87 87
  • Page 88 88
  • Page 89 89
  • Page 90 90
  • Page 91 91
  • Page 92 92
  • Page 93 93
  • Page 94 94
  • Page 95 95
  • Page 96 96
  • Page 97 97
  • Page 98 98
  • Page 99 99
  • Page 100 100

Hoover DXW4 H7A1TCEX-S Manuale utente

Categoria
Asciugatrici elettriche
Tipo
Manuale utente