3com 3CRPCIN175 Manuale utente
- Categoria
- Schede di interfaccia / adattatori
- Tipo
- Manuale utente
Questo manuale è adatto anche per

www.3com.com
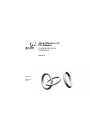
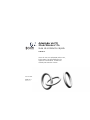
3Com Wireless 11n
PCI Adapter
Quick Installation Guide
3CRPCIN175
M/N: WL-601
10016657 Rev AA
March 2008
Antes de usar este equipo por primera vez,
lo invitamos a leer detenidamente las
siguientes instrucciones. Guarde este
manual para consultas futuras.

3Com Corporation, 350 Campus Drive, Marlborough, MA USA 01752-3064
Copyright © 2005-2008, 3Com Corporation. All rights reserved. No part of this documentation may be
reproduced in any form or by any means or used to make any derivative work (such as translation,
transformation, or adaptation) without written permission from 3Com Corporation.
3Com Corporation reserves the right to revise this documentation and to make changes in content from time
to time without obligation on the part of 3Com Corporation to provide notification of such revision or
change.
3Com Corporation provides this documentation without warranty, term, or condition of any kind, either
implied or expressed, including, but not limited to, the implied warranties, terms or conditions of
merchantability, satisfactory quality, and fitness for a particular purpose. 3Com may make improvements or
changes in the product(s) and/or the program(s) described in this documentation at any time.
If there is any software on removable media described in this documentation, it is furnished under a license
agreement included with the product as a separate document, in the hard copy documentation, or on the
removable media in a directory file named LICENSE.TXT or !LICENSE.TXT. If you are unable to locate a copy,
please contact 3Com and a copy will be provided to you.
UNITED STATES GOVERNMENT LEGEND
If you are a United States government agency, then this documentation and the software described herein are
provided to you subject to the following:
All technical data and computer software are commercial in nature and developed solely at private expense.
Software is delivered as “Commercial Computer Software” as defined in DFARS 252.227-7014 (June 1995) or
as a “commercial item” as defined in FAR 2.101(a) and as such is provided with only such rights as are
provided in 3Com’s standard commercial license for the Software. Technical data is provided with limited
rights only as provided in DFAR 252.227-7015 (Nov 1995) or FAR 52.227-14 (June 1987), whichever is
applicable. You agree not to remove or deface any portion of any legend provided on any licensed program or
documentation contained in, or delivered to you in conjunction with, this User Guide.
Unless otherwise indicated, 3Com registered trademarks are registered in the United States and may or may
not be registered in other countries.
3Com and the 3Com logo are registered trademarks of 3Com Corporation.
Intel, Pentium, and Celeron are registered trademarks of Intel Corporation. Microsoft and Windows are
registered trademarks of Microsoft Corporation.
All other company and product names may be trademarks of the respective companies with which they are
associated.

Check the Package Contents
Before you start with the installation, verify that your PCI Adapter
package includes the following items:
■ One 3Com Wireless 11n PCI Adapter with standard PCI
bracket
■ Three remote antennas
■ One low-profile PCI bracket
■ One 3Com Installation CD-ROM, which contains the driver
for the PCI Adapter
■ This 3Com Wireless 11n PCI Adapter Quick Installation Guide
■ One warranty flyer
If any of these items are damaged or missing, please contact your
3Com network supplier immediately.
Check the Minimum System Requirements
You can install the PCI Adapter on any desktop computer with
Microsoft
®
Windows
®
XP, Windows 2000, or Windows Vista.
If using Windows 2000, please download the driver and utility
from the 3Com web site.
Your computer must also have, at least, the following:
■ Available PCI slot
■ 733 MHz Intel
™
Pentium
™
III or Celeron processor (or
equivalent)
■ 256 MB of RAM

4 Check the Package Contents
■ 7 MB of free disk space
■ CD-ROM drive
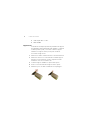
Check the PCI Bracket
The standard PCI bracket to which the PCI Adapter is attached by
default is for standard, full-height desktops. If you are using a
low-profile desktop, you need to replace the standard bracket
with the low-profile bracket for the PCI Adapter to fit.
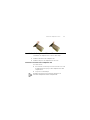
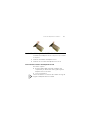
To replace the PCI bracket:
1 Remove the three nuts and washers attached to the three
threaded antenna connectors.
2 Remove the two screws that secure the PCI Adapter to the
bracket. (Be careful not to let the shielding cover fall off, as these
screws also hold that in place.) Save the screws.
3 Replace the standard bracket with the low-profile bracket.
4 Fasten the PCI Adapter to the low-profile bracket with the screws.
5 Replace the three nuts and washers that you removed in step 1.

Installing the Wireless PCI Adapter 5
Installing the Wireless PCI Adapter
Installing the PCI Adapter is a two-step process:
1 Install the PCI Adapter hardware
2 Install the 3Com PCI Adapter driver
Install the PCI Adapter Hardware
You will need:
■ A Phillips screwdriver to remove the computer case and slot
cover and to secure the PCI Adapter into the slot.
■ Antistatic protection
Attach the antennas to the antenna connectors only after you
secure the PCI Adapter into the slot.
To install the PCI Adapter into a PCI slot:
1 Shut down your computer, and unplug the power cord from the
power source.
2 Using antistatic protection, remove the computer cover.
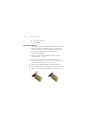
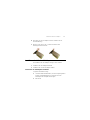
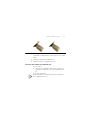
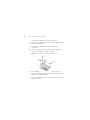
3 Locate an empty PCI slot and remove the slot cover. See 1 in
Figure 1. Save the screw.

6 Installing the Wireless PCI Adapter
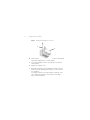
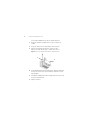
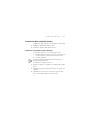
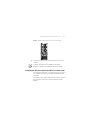
Figure 1 Inserting the PCI Adapter into a PCI Slot
4 Insert the PCI Adapter into the slot, and then press it down gently
until it seats snugly in the slot. See 2 in Figure 1.
5 Secure the PCI Adapter into the slot using the screw that you
removed earlier.
6 Replace the computer cover.
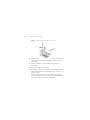
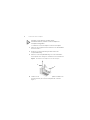
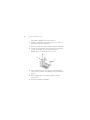
7 Attach the 3 antennas to the PCI Adapter’s antenna connectors,
and then turn the threaded parts clockwise to secure them. Do
not overtighten.
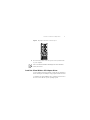
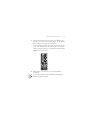
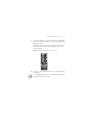
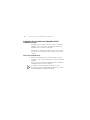
For optimal reception, position the antennas so that the center
one is straight up and the two either side are at a 45 degree
angle, as shown in Figure 2.
1
2

Install the 3Com Wireless PCI Adapter Driver 7
Figure 2 Adjusting the Antennas for Best Reception
8 Reconnect the power cord to the power source, and then turn
on your computer.
9 If the Found New Hardware Wizard appears when Windows
starts, click Cancel.
Install the 3Com Wireless PCI Adapter Driver
Your PCI Adapter includes a CD that contains the 3Com Wireless
Driver. Running the PCI Adapter setup program installs the driver.
To install the 3Com PCI Adapter driver, follow the instructions in
the next sections based on your operating system.

8 Install the 3Com Wireless PCI Adapter Driver
Windows XP Installation
1 With the computer on and Windows running, insert the 3Com
Installation CD into the CD-ROM drive.
The 3Com Wireless 11n PCI Adapter Installation Manager setup
menu appears.
If the setup menu does not appear, click Start > Run, and then
type
d:\AutoRun.exe (where d: is the drive letter assigned to
your CD-ROM drive).
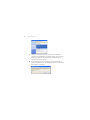
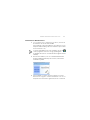
2 On the setup menu, click Install/Uninstall Wireless Product. The
wizard prepares for installation.
3 The 3Com End User Software License Agreement appears. Read
the agreement carefully, click I accept the terms of the license
agreement to agree to all the terms and conditions, and click
Next.

Install the 3Com Wireless PCI Adapter Driver 9
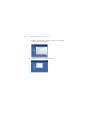
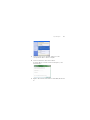
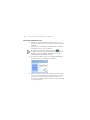
4 Choose your country and then click Next.
5 Click Install.

10 Install the 3Com Wireless PCI Adapter Driver
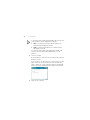
6 When the message InstallShield Wizard Complete appears,
click Finish. You have completed installing the 3Com Wireless PCI
Adapter driver.
7 On the setup menu, click Exit.

Install the 3Com Wireless PCI Adapter Driver 11
Windows Vista Installation
1 With the computer on and Windows running, insert the 3Com
Installation CD into the CD-ROM drive.
The 3Com Wireless 11n PCI Adapter Installation Manager setup
menu appears.
If the setup menu does not appear, click > All Programs >
Accessories > Run, and then type
d:\AutoRun.exe (where d: is
the drive letter assigned to your CD-ROM drive).
2 On the setup menu, click Install/Uninstall Wireless Product. The
wizard prepares for installation.
3 The 3Com End User Software License Agreement appears. Read
the agreement carefully, and then click I accept the terms of the
license agreement to agree to all the terms and conditions. Now
click Next.

12 Install the 3Com Wireless PCI Adapter Driver
4 Choose your country and then click Next.

Install the 3Com Wireless PCI Adapter Driver 13
5 Click Install.
6 When the message
InstallShield Wizard Complete appears,
click Finish. You have completed installing the 3Com Wireless PCI
Adapter driver.
7 On the setup menu, click Exit.

14 What to Do Next
What to Do Next
This section first covers connecting on Windows XP and then
connecting on the Windows Vista operating system.
Connecting on Windows XP
By default, the PCI Adapter now scans for access points in range.
To connect to a specific access point, you must configure your
wireless connection using the Windows Zero Configuration (WZC)
tool.
Ensure that you have Windows XP Service Pack 2 installed on your
computer.
Ensure that the Use Windows to configure my wireless network
settings check box is selected in the Wireless Network Connection
Properties tab.
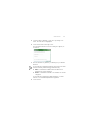
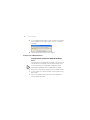
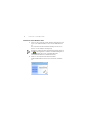
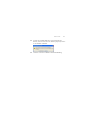
8 Click the network icon in the system tray to view Wireless
Networks.

What to Do Next 15
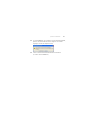
9 Click Refresh network list to reload and search for available
wireless devices. Select a wireless network in the list and click
Connect to join the selected wireless network.
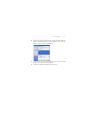
10 If wireless security is activated for the selected wireless network,
the Wireless Network Connection Window appears. Input the
Network key and click Connect.
11 If there is no security activated for the selected wireless network,
a warning window appears. Click Connect Anyway.
.
12 Close the Wireless Network Connection list window.

16 What to Do Next
Connecting on Windows Vista
Windows Vista WLAN AutoConfig
The PC will begin functioning in Station Mode (as a Client) with
your Wireless LAN network as soon as the Network Key is set up.
If you do not have an existing wireless network, first set up your
wireless router before you use your PC in Station Mode.
1 Start your PC and connect with an existing WLAN AP.
2 Have the Network Key (WEP Key or WPA Key) ready if your
Wireless Network requires a security code.
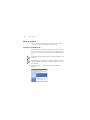
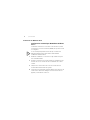
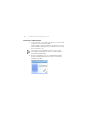
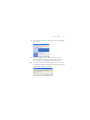
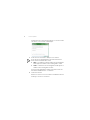
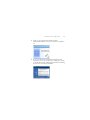
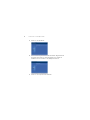
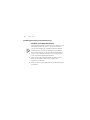
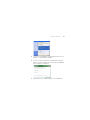
3 Right click on the Wireless Network icon in the system tray.
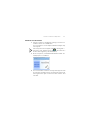
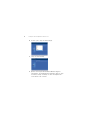
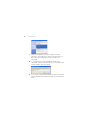
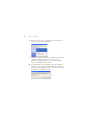
4 Select Connect to a network from the Wireless Network icon
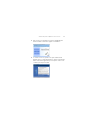
menu. The Wireless Network Connection dialog box appears, as
shown here:

What to Do Next 17
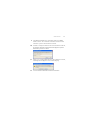
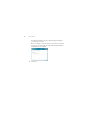
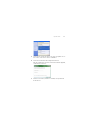
5 Select the Wireless Network of your choice by clicking on its
name. The entire block is highlighted.
6 Select Connect in the lower right corner.
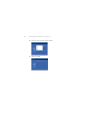
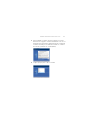
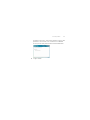
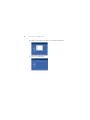
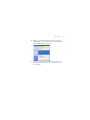
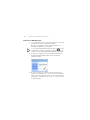
The next Wireless Network Connection dialog box appears, as
shown here:
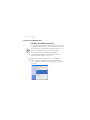
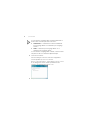
7 Enter the Network Key (WEP Key or WPA Key) for your Wireless
Network.
If your network is using WEP encryption, then a HEX or an ASCII
format is necessary when entering your Network key:
■ HEX — 10 Characters in HEX notation for 40 bit or 26
characters for 128 bit encryption.
■ ASCII — 5 Characters for 40 bit or 13 characters for 128 bit
encryption.
If your network is using WPA or WPA2 encryption, you must
enter an 8 – 63 character alphanumeric key-phrase.
8 Select Connect.

18 What to Do Next
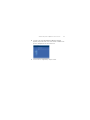
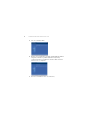
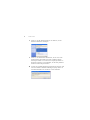
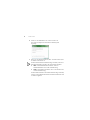
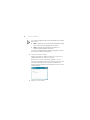
The Wireless Network Connection dialog box appears again as
you are being connected.
Once successfully connected to Generic1, as shown next, click the
check box to Save this network. Verify that Start this connection
automatically is also enabled.
9 Click Close.

Troubleshooting Installation 19
Troubleshooting Installation
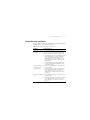
Refer to Table 1 for a list of issues that you may encounter during
installation and some suggested solutions.
Tab le 1 Installation Issues and Possible Solutions
Problem Possible Solution
Installation program
does not finish or the
driver fails to load
Use the Device Manager to resolve resource
conflicts that may exist. To start the Device
Manager, go to the Control Panel, double-click
System, and then click the Device Manager tab.
■ If the hardware item for the PCI Adapter under
Network adapters has a yellow exclamation
point, right-click the item, and then click
Update Driver. Follow the instructions on the
Hardware Update Wizard to update the PCI
Adapter driver.
■ If the hardware item for the PCI Adapter does
not appear under Network adapters, repeat
the setup procedure.
Windows shows the
PCI Adapter as an
unknown device
■ Verify that the PCI Adapter is inserted properly
into the PCI slot.
■ If the PCI Adapter is inserted properly into the
slot and Windows still does not recognize it,
use the Device Manager to remove the
unknown device, and then repeat the setup
procedure.
Power/Activity LED is
off
■ Verify that the PCI Adapter is inserted properly
into the PCI slot.
■ Verify that the driver was installed successfully
by checking the status of the device on the
Device Manager. See “What to Do Next” on
page 14.

20 Register Your Product for Services and Repair
Register Your Product for Services and Repair
To obtain telephone support as part of your warranty and other
service benefits, you must first register your product at:
http://eSupport.3com.com/
Telephone Technical Support and Repair
3Com offers telephone, e-mail, and Internet access to technical
support and repair services. To access these services for your
region, use the appropriate telephone number, URL, or e-mail
address from the following URL:
http://csoweb4.3com.com/contactus/
La pagina sta caricando ...
La pagina sta caricando ...
La pagina sta caricando ...
La pagina sta caricando ...
La pagina sta caricando ...
La pagina sta caricando ...
La pagina sta caricando ...
La pagina sta caricando ...
La pagina sta caricando ...
La pagina sta caricando ...
La pagina sta caricando ...
La pagina sta caricando ...
La pagina sta caricando ...
La pagina sta caricando ...
La pagina sta caricando ...
La pagina sta caricando ...
La pagina sta caricando ...
La pagina sta caricando ...
La pagina sta caricando ...
La pagina sta caricando ...
La pagina sta caricando ...
La pagina sta caricando ...
La pagina sta caricando ...
La pagina sta caricando ...
La pagina sta caricando ...
La pagina sta caricando ...
La pagina sta caricando ...
La pagina sta caricando ...
La pagina sta caricando ...
La pagina sta caricando ...
La pagina sta caricando ...
La pagina sta caricando ...
La pagina sta caricando ...
La pagina sta caricando ...
La pagina sta caricando ...
La pagina sta caricando ...
La pagina sta caricando ...
La pagina sta caricando ...
La pagina sta caricando ...
La pagina sta caricando ...
La pagina sta caricando ...
La pagina sta caricando ...
La pagina sta caricando ...
La pagina sta caricando ...
La pagina sta caricando ...
La pagina sta caricando ...
La pagina sta caricando ...
La pagina sta caricando ...
La pagina sta caricando ...
La pagina sta caricando ...
La pagina sta caricando ...
La pagina sta caricando ...
La pagina sta caricando ...
La pagina sta caricando ...
La pagina sta caricando ...
La pagina sta caricando ...
La pagina sta caricando ...
La pagina sta caricando ...
La pagina sta caricando ...
La pagina sta caricando ...
La pagina sta caricando ...
La pagina sta caricando ...
La pagina sta caricando ...
La pagina sta caricando ...
La pagina sta caricando ...
La pagina sta caricando ...
La pagina sta caricando ...
La pagina sta caricando ...
La pagina sta caricando ...
La pagina sta caricando ...
La pagina sta caricando ...
La pagina sta caricando ...
La pagina sta caricando ...
La pagina sta caricando ...
La pagina sta caricando ...
La pagina sta caricando ...
La pagina sta caricando ...
La pagina sta caricando ...
La pagina sta caricando ...
La pagina sta caricando ...
La pagina sta caricando ...
La pagina sta caricando ...
La pagina sta caricando ...
La pagina sta caricando ...
La pagina sta caricando ...
La pagina sta caricando ...
La pagina sta caricando ...
La pagina sta caricando ...
La pagina sta caricando ...
La pagina sta caricando ...
La pagina sta caricando ...
La pagina sta caricando ...
La pagina sta caricando ...
La pagina sta caricando ...
La pagina sta caricando ...
La pagina sta caricando ...
La pagina sta caricando ...
La pagina sta caricando ...
La pagina sta caricando ...
La pagina sta caricando ...
La pagina sta caricando ...
La pagina sta caricando ...
La pagina sta caricando ...
La pagina sta caricando ...
La pagina sta caricando ...
La pagina sta caricando ...
La pagina sta caricando ...
La pagina sta caricando ...
La pagina sta caricando ...
La pagina sta caricando ...
La pagina sta caricando ...
La pagina sta caricando ...
La pagina sta caricando ...
La pagina sta caricando ...
La pagina sta caricando ...
La pagina sta caricando ...
La pagina sta caricando ...
La pagina sta caricando ...
La pagina sta caricando ...
La pagina sta caricando ...
La pagina sta caricando ...
La pagina sta caricando ...
La pagina sta caricando ...
La pagina sta caricando ...
-
 1
1
-
 2
2
-
 3
3
-
 4
4
-
 5
5
-
 6
6
-
 7
7
-
 8
8
-
 9
9
-
 10
10
-
 11
11
-
 12
12
-
 13
13
-
 14
14
-
 15
15
-
 16
16
-
 17
17
-
 18
18
-
 19
19
-
 20
20
-
 21
21
-
 22
22
-
 23
23
-
 24
24
-
 25
25
-
 26
26
-
 27
27
-
 28
28
-
 29
29
-
 30
30
-
 31
31
-
 32
32
-
 33
33
-
 34
34
-
 35
35
-
 36
36
-
 37
37
-
 38
38
-
 39
39
-
 40
40
-
 41
41
-
 42
42
-
 43
43
-
 44
44
-
 45
45
-
 46
46
-
 47
47
-
 48
48
-
 49
49
-
 50
50
-
 51
51
-
 52
52
-
 53
53
-
 54
54
-
 55
55
-
 56
56
-
 57
57
-
 58
58
-
 59
59
-
 60
60
-
 61
61
-
 62
62
-
 63
63
-
 64
64
-
 65
65
-
 66
66
-
 67
67
-
 68
68
-
 69
69
-
 70
70
-
 71
71
-
 72
72
-
 73
73
-
 74
74
-
 75
75
-
 76
76
-
 77
77
-
 78
78
-
 79
79
-
 80
80
-
 81
81
-
 82
82
-
 83
83
-
 84
84
-
 85
85
-
 86
86
-
 87
87
-
 88
88
-
 89
89
-
 90
90
-
 91
91
-
 92
92
-
 93
93
-
 94
94
-
 95
95
-
 96
96
-
 97
97
-
 98
98
-
 99
99
-
 100
100
-
 101
101
-
 102
102
-
 103
103
-
 104
104
-
 105
105
-
 106
106
-
 107
107
-
 108
108
-
 109
109
-
 110
110
-
 111
111
-
 112
112
-
 113
113
-
 114
114
-
 115
115
-
 116
116
-
 117
117
-
 118
118
-
 119
119
-
 120
120
-
 121
121
-
 122
122
-
 123
123
-
 124
124
-
 125
125
-
 126
126
-
 127
127
-
 128
128
-
 129
129
-
 130
130
-
 131
131
-
 132
132
-
 133
133
-
 134
134
-
 135
135
-
 136
136
-
 137
137
-
 138
138
-
 139
139
-
 140
140
-
 141
141
-
 142
142
-
 143
143
-
 144
144


3com 3CRPCIN175 Manuale utente
- Categoria
- Schede di interfaccia / adattatori
- Tipo
- Manuale utente
- Questo manuale è adatto anche per
in altre lingue
- English: 3com 3CRPCIN175 User manual
- français: 3com 3CRPCIN175 Manuel utilisateur
- español: 3com 3CRPCIN175 Manual de usuario
- Deutsch: 3com 3CRPCIN175 Benutzerhandbuch
- português: 3com 3CRPCIN175 Manual do usuário