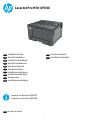
HP LaserJet Pro M701 Guida d'installazione
- Categoria
- Giocattoli
- Tipo
- Guida d'installazione
Questo manuale è adatto anche per

1
EN
Installation Guide
www.hp.com/support/ljM701
www.hp.com/support/ljM706
FR
Guide d’installation
DE
Installationshandbuch
IT
Guida all’installazione
ES
Guía de instalación
CA
Guia d’instal·lació
DA
Installationsvejledning
NL
Installatiehandleiding
FI
Asennusopas
NO
Installasjonsveiledning
PT
Guia de instalação
SV
Installationshandbok
ES
Lea esto primero
LaserJet Pro M701/M706

2
1
EN
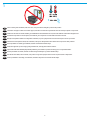
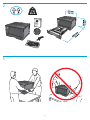
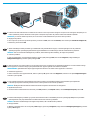
Select a sturdy, well-ventilated, dust-free area, away from direct sunlight to position the product.
FR
Choisissez un support solide et un endroit propre, bien aéré et à l'abri du rayonnement direct du soleil pour placer votre produit.
DE
Stellen Sie das Gerät an einem stabilen, gut durchlüfteten und staubfreien Ort auf, der nicht direktem Sonnenlicht ausgesetzt ist.
IT
Posizionare il prodotto in un'area piana, ben ventilata, priva di polvere e lontana dalla luce diretta del sole.
ES
Busque una supercie sólida en un lugar bien ventilado, sin polvo y alejado de la luz solar directa para colocar el producto.
CA
Seleccioneu una superfície sòlida, ben ventilada, sense pols i allunyada de la llum directa del sol per situar-hi el producte.
DA
Placer produktet i et stabilt, godt udluftet, støvfrit område uden direkte sollys.
NL
Plaats het apparaat op een stevige, goed geventileerde, stofvrije plek uit direct zonlicht.
FI
Sijoita laite tukevalle alustalle pölyttömään paikkaan, johon aurinko ei paista suoraan ja jossa on hyvä ilmanvaihto.
NO
Plasser produktet i et stabilt, støvfritt område med god ventilasjon og utenfor direkte sollys.
PT
Escolha um local rme, bem ventilado, sem poeira e longe da exposição direta à luz do sol para instalar o dispositivo.
SV
Placera produkten i ett stadigt, väl ventilerat, dammfritt utrymme och fritt från direkt solljus.
La pagina si sta caricando...
La pagina si sta caricando...
La pagina si sta caricando...

6
6
EN
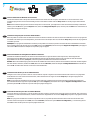
1. Connect the power cord between the product and a grounded AC outlet. Make sure your power source is adequate for the product
voltage rating. The voltage rating is on the product label. The product uses 220-240 Vac and 50/60 Hz.
CAUTION: To prevent damage to the product, use only the power cord that is provided with the product.
2. Turn on the product.
3. To verify that your product prints, press the OK button, open the Reports menu, select the Conguration Report option, and then press the
OK button.
FR
1. Connectez le cordon d'alimentation entre le produit et une prise secteur avec mise à la terre. Vériez que la source d’alimentation électrique
est adéquate pour la tension nominale du produit. Cette tension nominale est indiquée sur l’étiquette du produit. Le produit fonctionne à
220-240VCA et à 50/60Hz.
ATTENTION: an d'éviter d'endommager le produit, utilisez uniquement le cordon d'alimentation fourni avec le produit.
2. Mettez le produit sous tension.
3. Pour vérier que le produit imprime, appuyez sur le bouton OK, ouvrez le menu Rapports, sélectionnez l'option Rapport de conguration,
puis appuyez sur le bouton OK.
DE
1. Verbinden Sie das Netzkabel mit dem Gerät und einer geerdeten Steckdose mit Wechselspannung. Stellen Sie sicher, dass Ihre Stromquelle
für die Betriebsspannung des Geräts geeignet ist. Die Betriebsspannung nden Sie auf dem Geräteetikett. Das Gerät wird mit 220bis 240V
Wechselspannung und 50/60Hz betrieben.
ACHTUNG: Um Schaden am Gerät zu vermeiden, sollten Sie ausschließlich das Netzkabel verwenden, das im Lieferumfang des Geräts
enthaltenist.
2. Schalten Sie das Gerät ein.
3. Um zu überprüfen, ob das Gerät druckt, drücken Sie auf OK, önen Sie das Menü Berichte, wählen Sie die Option Konguratsionbericht und
drücken Sie dann auf OK.
IT
1. Collegare il cavo di alimentazione del prodotto a una presa CA con messa a terra. Accertarsi che la fonte di alimentazione sia adeguata alla
tensione del prodotto specicata sulla relativa etichetta. Il prodotto utilizza 220-240 Vca e 50/60 Hz.
ATTENZIONE: per evitare di danneggiare il prodotto, utilizzare solo il cavo di alimentazione fornito in dotazione.
2. Accendere il prodotto.
3. Per vericare che il prodotto in uso sia in grado di stampare, premere il pulsante OK, aprire il menu Rapporti, quindi selezionare l'opzione
Rapporto di congurazione e inne premere il pulsante OK.
ES
1. Conecte el cable de alimentación entre el producto y una toma CA con conexión a tierra. Compruebe que la alimentación sea la correcta para
la clasicación de tensión del producto. La clasicación de tensión se encuentra en la etiqueta del producto. El producto utiliza 220-240VCA
y 50/60Hz.
PRECAUCIÓN: Para evitar daños al producto, utilice solo el cable de alimentación que se proporciona con él.
2. Encienda el producto.
3. Para comprobar que el producto imprime, pulse el botón OK, abra el menú Informes, seleccione la opción Informe de conguración y, a
continuación, pulse el botón OK.
La pagina si sta caricando...
La pagina si sta caricando...

9
7
8
9
EN
Choose a software install method.
NOTE: You must have administrator privileges on the computer to install
the software.
FR
Choisissez une méthode d'installation du logiciel.
REMARQUE: pour installer ce logiciel sur l'ordinateur, vous devez
disposer des privilèges d'administrateur.
DE
Wählen Sie eine Methode zur Softwareinstallation.
HINWEIS: Sie müssen über Administratorrechte auf dem Computer
verfügen, um die Software installieren zu können.
IT
Scegliere un metodo di installazione del software.
NOTA: per installare il software, è necessario disporre dei privilegi di
amministratore.
ES
Elija un método de instalación de software.
NOTA: Debe tener privilegios de administrador en el ordenador para
instalar el software.
CA
Trieu un mètode d’instal·lació del programari.
NOTA: heu de tenir drets d’administrador a l’ordinador per instal·lar el
programari.
DA
Vælg en softwareinstallationsmetode.
BEMÆRK: Du skal have administratorrettigheder på computeren for at
kunne installere softwaren.
NL
Kies een software-installatiemethode.
LET OP: u dient over beheerdersrechten te beschikken om de software
teinstalleren.
FI
Valitse ohjelmiston asennustapa.
HUOMAUTUS: Ohjelmiston asentaminen tietokoneeseen edellyttää
järjestelmänvalvojan oikeuksia.
NO
Velg en metode for å installere programvaren.
MERK: Du må ha administratorrettigheter på datamaskinen for å kunne
installere programvaren.
PT
Escolha um método de instalação de software.
NOTA: Você deve ter privilégios de administrador para instalar
o software.
SV
Välj en installationsmetod för programvara.
OBS! Du måste ha administratörsbehörighet på datorn för att installera
programvaran.

10
7
EN
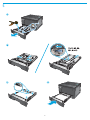
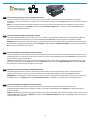
Software installation for Windows wired networks:
Connect the network cable to the product and the network. Insert the CD into the computer, and follow the on-screen instructions. If the
installation program does not start automatically, browse to the CD drive. Double-click the Setup.exe le to run the program and install the
product.
NOTE: If the installation program does not detect the product on the network, you might need to enter the IP address manually. To nd the IP
address, press the OK button, open the Reports menu, select the Conguration Report option, and then press the OK button. The IP address is
listed on the rst page of the report.
FR
Installation du logiciel pour les réseaux câblés Windows:
Reliez le produit au réseau à l'aide du câble réseau. Insérez le CD dans l'ordinateur et suivez les instructions aichées à l'écran. Si le programme
d'installation ne démarre pas automatiquement, parcourez le lecteur CD. Cliquez deux fois sur le chier Setup.exe pour exécuter le programme
et installer le produit.
REMARQUE: si le programme d'installation ne détecte pas le produit sur le réseau, il peut être nécessaire de saisir manuellement l'adresse IP.
Pour connaître l'adresse IP, appuyez sur le bouton OK, ouvrez le menu Rapports, sélectionnez l'option Rapport de conguration, puis appuyez
sur le bouton OK. L'adresse IP est indiquée sur la première page du rapport.
DE
Softwareinstallation für drahtgebundene Windows-Netzwerke:
Schließen Sie das Netzwerkkabel an das Gerät und an das Netzwerk an. Legen Sie die CD in den Computer ein, und befolgen Sie die
Anweisungen auf dem Bildschirm. Wenn das Installationsprogramm nicht automatisch gestartet wird, wechseln Sie zum CD-Laufwerk.
Doppelklicken Sie auf die Datei „Setup.exe“, um das Programm auszuführen und das Gerät zu installieren.
HINWEIS: Wenn das Installationsprogramm das Gerät auf dem Netzwerk nicht erkennt, müssen Sie die IP-Adresse eventuell manuell eingeben.
Um die IP-Adresse zu nden, drücken Sie auf OK, önen Sie das Menü Berichte, wählen Sie die Option Konguratsionbericht und drücken Sie
dann auf OK. Sie nden die IP-Adresse auf der ersten Seite des Berichts.
IT
Installazione del software per le reti cablate Windows:
Collegare il cavo di rete al prodotto e alla rete. Inserire il CD nel computer e seguire le istruzioni visualizzate sullo schermo. Se il programma
di installazione non viene avviato automaticamente, andare all'unità CD. Fare doppio clic sul le Setup.exe per eseguire il programma di
installazione del prodotto.
NOTA: se il programma di installazione non trova il prodotto sulla rete, potrebbe essere necessario immettere manualmente l'indirizzo IP.
Perindividuare l'indirizzo IP, premere il pulsante OK, aprire il menu Rapporti, quindi selezionare l'opzione Rapporto di congurazione e inne
premere il pulsante OK. L'indirizzo IP è riportato nella prima pagina del rapporto.
ES
Instalación de software para redes con cable de Windows:
Conecte el cable de red al producto y a la red. Introduzca elCD en el equipo y siga las instrucciones que aparecen en pantalla. Si el programa de
instalación no se inicia automáticamente, examine la unidad de CD. Haga doble clic en el archivo Setup.exe para ejecutar el programa e instalar
el producto.
NOTA: Si el programa de instalación no detecta el producto en la red, es posible que deba introducir la dirección IP de forma manual. Para
encontrar la dirección IP, pulse el botón OK, abra el menú Informes, seleccione la opción Informe de conguración y, a continuación, pulse el
botón OK. La dirección IP aparece en la primera página del informe.
La pagina si sta caricando...
La pagina si sta caricando...

13
8
EN
Software installation for Windows USB connections:
1. Insert the CD into the computer, and follow the on-screen instructions. If the installation program does not start automatically, browse to
the CD drive. Double-click the Setup.exe le to run the program and install the product.
2. Connect the USB cable only when the software prompts you, and then follow the onscreen instructions to nish the procedure.
FR
Installation logicielle pour connexionsUSB Windows:
1. Insérez le CD dans l'ordinateur et suivez les instructions aichées à l'écran. Si le programme d'installation ne démarre pas automatiquement,
parcourez le lecteur CD. Cliquez deux fois sur le chier Setup.exe pour exécuter le programme et installer le produit.
2. Branchez le câble USB uniquement lorsque le logiciel vous y invite, puis suivez les instructions aichées à l'écran pour terminer la procédure.
DE
Softwareinstallation für Windows USB-Verbindungen:
1. Legen Sie die CD in den Computer ein, und befolgen Sie die Anweisungen auf dem Bildschirm. Wenn das Installationsprogramm nicht
automatisch gestartet wird, wechseln Sie zum CD-Laufwerk. Doppelklicken Sie auf die Datei „Setup.exe“, um das Programm auszuführen und
das Gerät zu installieren.
2. Schließen Sie das USB-Kabel nur an, wenn die Software Sie dazu auordert und befolgen Sie dann die Anweisungen auf dem Bildschirm,
umden Vorgang abzuschließen.
IT
Installazione del software per connessioni USB Windows:
1. Inserire il CD nel computer e seguire le istruzioni visualizzate sullo schermo. Se il programma di installazione non viene avviato
automaticamente, andare all'unità CD. Fare doppio clic sul le Setup.exe per eseguire il programma di installazione del prodotto.
2. Collegare il cavo solo quando viene richiesto dal software, quindi seguire le istruzioni visualizzate per completare la procedura.
ES
Instalación de software para conexiones USB de Windows:
1. Introduzca elCD en el equipo y siga las instrucciones que aparecen en pantalla. Si el programa de instalación no se inicia automáticamente,
examine la unidad de CD. Haga doble clic en el archivo Setup.exe para ejecutar el programa e instalar el producto.
2. Conecte el cable USB solo cuando el software se lo solicite y, a continuación, siga las instrucciones que aparecen en pantalla para completar
el proceso.
CA
Instal·lació de programari per a connexions USB del Windows:
1. Inseriu el CD a l’ordinador i seguiu les instruccions de la pantalla. Si el programa d’instal·lació no s’inicia automàticament, navegueu ns a la
unitat del CD. Feu doble clic al txer Setup.exe per executar el programa i instal·lar el producte.
2. Connecteu el cable USB només quan el programari us ho demani i, a continuació, seguiu les instruccions de la pantalla per completar el procés.
DA
Softwareinstallation til Windows USB-forbindelser:
1. Sæt cd’en i computeren, og følg vejledningen på skærmen. Hvis installationsprogrammet ikke starter automatisk, skal du navigere til
cd-drevet. Dobbeltklik på len Setup.exe for at køre programmet og installere produktet.
2. Tilslut først kablet, når softwaren beder dig om det, og følg derefter instruktionerne på skærmen for at fuldføre proceduren.
NL
Software-installatie voor USB-verbindingen in Windows:
1. Plaats de cd in de computer en volg de instructies op het scherm. Als het installatieprogramma niet automatisch wordt gestart, bladert u
naar het cd-station. Dubbelklik op het bestand Setup.exe om het programma uit te voeren en het apparaat te installeren.
2. Sluit de USB-kabel pas aan wanneer de software hierom vraagt en volg de instructies op het scherm om de procedure te voltooien.
FI
Ohjelmiston asentaminen Windowsin USB-yhteyksiä varten:
1. Aseta CD-levy tietokoneeseen ja noudata näyttöön tulevia ohjeita. Jos asennusohjelma ei käynnisty automaattisesti, hae ja valitse
CD-asema. Suorita laitteen asennusohjelma kaksoisnapsauttamalla Setup.exe-tiedostoa.
2. Liitä USB-kaapeli vasta, kun ohjelmisto kehottaa tekemään niinja viimeistele asennus noudattamalla näytön ohjeita.
NO
Programvareinstallering for USB-tilkoblinger for Windows:
1. Sett CDen inn i datamaskinen, og følg instruksjonene på skjermen. Hvis installasjonsprogrammet ikke starter automatisk, må du bla¨
til CD-stasjonen. Dobbeltklikk på len Setup.exe for å kjøre programmet og installere produktet.
2. Ikke koble til USB-kabelen før du blir bedt om det, og følg deretter instruksjonene på skjermen for å fullføre prosessen.
La pagina si sta caricando...

15
9
EN
Software installation for Mac OS X:
1. If you are using a USB or a wired network connection, connect the cable now.
2. Insert the CD into the computer, and follow the on-screen instructions. Installation is complete.
NOTE: For network connections, if the installation program does not detect the product on the network, you might need to enter the IP address
manually. To nd the IP address, press the OK button, open the Reports menu, select the Conguration Report option, and then press the OK
button. The IP address is listed on the rst page of the report.
FR
Installation logicielle sous Mac OSX:
1. Si vous utilisez une connexion USB ou un réseau câblé, connectez le câble maintenant.
2. Insérez le CD dans l'ordinateur et suivez les instructions aichées à l'écran. L’installation est terminée.
REMARQUE: pour les connexions réseau, si le programme d'installation ne détecte pas le produit sur le réseau, il peut être nécessaire de saisir
manuellement l'adresse IP. Pour connaître l'adresse IP, appuyez sur le bouton OK, ouvrez le menu Rapports, sélectionnez l'option Rapport de
conguration, puis appuyez sur le bouton OK. L'adresse IP est indiquée sur la première page du rapport.
DE
Softwareinstallation für Mac OS X:
1. Wenn Sie eine USB- oder eine kabelgebundene Netzwerkverbindung verwenden, schließen Sie das Kabel jetzt an.
2. Legen Sie die CD in den Computer ein, und befolgen Sie die Anweisungen auf dem Bildschirm. Die Installation ist beendet.
HINWEIS: Wenn das Installationsprogramm bei Netzwerkverbindungen das Gerät auf dem Netzwerk nicht erkennt, müssen Sie die IP-Adresse
eventuell manuell eingeben. Um die IP-Adresse zu nden, drücken Sie auf OK, önen Sie das Menü Berichte, wählen Sie die Option
Kongurationsbericht und drücken Sie dann auf OK. Sie nden die IP-Adresse auf der ersten Seite des Berichts.
IT
Installazione del software per Mac OS X:
1. Se si utilizza una connessione di rete cablata o USB, collegare subito il cavo.
2. Inserire il CD nel computer e seguire le istruzioni visualizzate sullo schermo. L'installazione è stata completata.
NOTA: per le connessioni di rete, se il programma di installazione non rileva il prodotto sulla rete, potrebbe essere necessario immettere
manualmente l'indirizzo IP. Per individuare l'indirizzo IP, premere il pulsante OK, aprire il menu Rapporti, quindi selezionare l'opzione
Rapporto di congurazione e inne premere il pulsante OK. L'indirizzo IP è riportato nella prima pagina del rapporto.
ES
Instalación de software para MacOSX:
1. Si utiliza una conexión de red USB o por cable, conecte el cable.
2. Introduzca elCD en el equipo y siga las instrucciones que aparecen en pantalla. Se completó la instalación.
NOTA: Para conexiones de red, si el programa de instalación no detecta el producto en la red, es posible que deba introducir la dirección IP
de forma manual. Para encontrar la dirección IP, pulse el botón OK, abra el menú Informes, seleccione la opción Informe de conguración y,
acontinuación, pulse el botón OK. La dirección IP aparece en la primera página del informe.
CA
Instal·lació de programari per al Mac OS X:
1. Si feu servir una connexió mitjançant USB o una connexió de xarxa amb l, connecteu el cable.
2. Inseriu el CD a l’ordinador i seguiu les instruccions de la pantalla. La instal·lació ha nalitzat.
NOTA: per a connexions de xarxa, si el programa d’instal·lació no detecta el producte a la xarxa, potser haureu d’introduir l’adreça
IP manualment. Per trobar l’adreça IP, premeu el botó OK, obriu el menú Informes, seleccioneu l’opció Informe de conguració i, a continuació,
premeu el botó OK. L’adreça IP apareix a la primera pàgina de l’informe.
DA
Softwareinstallation på Mac OS X:
1. Hvis du bruger en USB- eller kabelbaseret netværksforbindelse, skal du tilslutte kablet nu.
2. Sæt cd’en i computeren, og følg vejledningen på skærmen. Installationen er udført.
NOTE: Hvis installationsprogrammet ved netværksforbindelser ikke registrerer produktet på netværket, skal du muligvis indtaste IP-adressen
manuelt. Du kan nde IP-adressen ved at trykke på knappen OK, åbne menuen Rapporter, vælge indstillingen Kongurationsrapport og der-
efter trykke på knappen OK. IP-adressen står på første side i rapporten.
La pagina si sta caricando...

17
10
EN
Setup is complete. If you did not register your product during software installation go to www.register.hp.com to register now. The HP Help
and Learn Center and other documentation are on the CD that came with the product or in the HP Program folder on your computer. The HP
Help and Learn Center is a product help tool that provides easy access to product information, HP product Web support, troubleshooting
guidance, and regulatory and safety information.
For regulatory compliance information, see the Warranty and Legal Guide on the product CD or at the following Web site:
www.hp.com/support/ljM701
or www.hp.com/support/ljM706.
FR
L’installation est terminée. Si vous n'avez pas enregistré votre produit lors de l'installation du logiciel, rendez-vous sur www.register.hp.com
pour le faire dès maintenant. Le centre d'aide et d'apprentissage HP (HP Help and Learn Center) ainsi que d'autres documents se trouvent sur
le CD livré avec le produit ou dans le dossier dédié aux programmes HP sur votre ordinateur. Le centre d'aide et d'apprentissage HP est un outil
d'aide qui fournit un accès facile aux informations sur le produit, à une assistance en ligne pour les produits HP, à un guide de dépannage et à
des informations relatives à la réglementation et à la sécurité.
Pour les informations relatives à la conformité, consultez le Guide de garantie et d'informations légales sur le CD du produit ou sur le siteWeb
suivant:
www.hp.com/support/ljM701
ou www.hp.com/support/ljM706.
DE
Die Einrichtung ist abgeschlossen. Falls Sie Ihr Gerät während der Softwareinstallation nicht registriert haben, besuchen Sie die Website
www.register.hp.com, um es jetzt zu registrieren. Das HPHelp and Learn Center sowie weitere Dokumentation benden sich auf der CD,
diedem Gerät beiliegt, oder im HPProgrammordner auf Ihrem Computer. Das HPHelp and Learn Center ist eine Produkthilfe für einfachen
Zugri auf Produktinformationen, Web-Support für HPProdukte, Hinweise zur Fehlerbehebung sowie Zulassungs- und Sicherheitsinformationen.
Informationen zur Erfüllung behördlicher Bestimmungen nden Sie im Handbuch zu Garantie und rechtlichen Hinweisen auf der Geräte-CD
oder auf der folgenden Website:
www.hp.com/support/ljM701
oder www.hp.com/support/ljM706.
IT
La congurazione è stata completata. Se durante l'installazione del software non è stata eseguita la registrazione del prodotto, visitare il
sito Web www.register.hp.com per eseguire la registrazione. HP Help and Learn Center e documentazione aggiuntiva sono disponibili sul CD
fornito con il prodotto o nella cartella dei programmi HP sul computer. HP Help and Learn Center è uno strumento di assistenza che fornisce
accesso facilitato alle informazioni sul prodotto, supporto Web ai prodotti HP, guida alla risoluzione dei problemi e informazioni relative alla
sicurezza e alle normative.
Per informazioni sulla conformità normativa, vedere il documento Garanzia e informazioni di carattere legale disponibile sul CD del prodotto
o nel seguente sito Web:
www.hp.com/support/ljM701
o www.hp.com/support/ljM706.
ES
La instalación ha terminado. Si no registró el producto durante la instalación del software, vaya a www.register.hp.com para registrarlo ahora.
El centro de ayuda y formación de HP se incluye junto con otra documentación en elCD suministrado con el producto o en la carpeta
Programa de HPde su equipo. El centro de ayuda y formación de HP es una herramienta de ayuda para el producto que permite acceder
fácilmente a información del producto, asistencia Web del productoHP, guía para la solución de problemas e información legal y de seguridad.
Para obtener información sobre el cumplimiento de normativas, consulte la garantía y guía legal delCD del producto o vaya al siguiente
sitioWeb:
www.hp.com/support/ljM701
o www.hp.com/support/ljM706.
La pagina si sta caricando...
La pagina si sta caricando...
La pagina si sta caricando...
-
 1
1
-
 2
2
-
 3
3
-
 4
4
-
 5
5
-
 6
6
-
 7
7
-
 8
8
-
 9
9
-
 10
10
-
 11
11
-
 12
12
-
 13
13
-
 14
14
-
 15
15
-
 16
16
-
 17
17
-
 18
18
-
 19
19
-
 20
20


HP LaserJet Pro M701 Guida d'installazione
- Categoria
- Giocattoli
- Tipo
- Guida d'installazione
- Questo manuale è adatto anche per
in altre lingue
- English: HP LaserJet Pro M701 Installation guide
- français: HP LaserJet Pro M701 Guide d'installation
- español: HP LaserJet Pro M701 Guía de instalación
- Deutsch: HP LaserJet Pro M701 Installationsanleitung
- Nederlands: HP LaserJet Pro M701 Installatie gids
- português: HP LaserJet Pro M701 Guia de instalação
- dansk: HP LaserJet Pro M701 Installationsvejledning
- svenska: HP LaserJet Pro M701 Installationsguide
- suomi: HP LaserJet Pro M701 Asennusohje
Documenti correlati
-
HP LaserJet Pro M435 Multifunction Printer series Guida d'installazione
-
-
-
-
-
-
-
-
HP LaserJet Pro M1536 Multifunction Printer series Guida d'installazione
-