Hergom Estufa Shelburne HF Istruzioni per l'uso
- Categoria
- Stufe
- Tipo
- Istruzioni per l'uso
Questo manuale è adatto anche per

Estufa de leña - Wood stove - Poêle à bois - Stufa a legna - Estufa de Lenha
CRAFTSBURY
&
SHELBURNE
INSTRUCCIONES PARA INSTALACIÓN, USO Y MANTENIMIENTO
INSTALLATION, USE AND MAINTENANCE INSTRUCTIONS
INSTRUCTIONS D’INSTALLATION, DE SERVICE ET D’ENTRETIEN
ISTRUZIONI PER L’INSTALLAZIONE, L’USO E LA MANUTENZIONE
INSTRUCÇÕES PARA A INSTALAÇÃO, UTILIZAÇÃO E MANUTENÇÃO

2

3
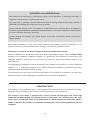
INDUSTRIAS HERGÓM, S.L., no se responsabiliza de los daños ocasionados, originados por alteraciones
en sus productos que no hayan sido autorizados por escrito, o por instalaciones defectuosas.
Asimismo, se reserva el derecho a modificar sus fabricados sin previo aviso.
Industrias Hergóm, S.L., domiciliada en Soto de la Marina - Cantabria - España, ofrece una garantía
de TRES AÑOS para sus apa ratos. Industrias Hergom, S.L. garantiza durante 10 años la existencia de
piezas de reparación y de un servicio técnico adecuado a partir de la fecha en la que este producto
deje de fabricarse.
La cobertura geográfica de ésta garantía incluye sólo los países en los que Industrias Hergóm, S.L.,
una empresa filial o un importador oficial realizan la distribución de sus productos y en los que es de
obligado cumplimiento la Directiva Comunitaria 2019/771/UE.
La garantía contará a partir de la fecha de compra del aparato señalada en el resguardo de la garantía
y cubre únicamente los deterioros o roturas debidos a defectos o vicios de fabricación.
La garantía deberá estar acompañada de la factura de compra.
AVISO IMPORT
ANTE
Si el aparato no se instala adecuadamente, no le dará el excelente servicio para el que ha sido
concebido. Lea enteramente estas instrucciones y confíe el trabajo a un especialista.
Su aparato va protegido superficialmente con una pintura anticalórica, especial para
temperaturas elevadas. En los primeros encendidos, es normal que se produzca un ligero humo, al
evaporarse alguno de sus componentes, que permite a la pintura tomar cuerpo. Por ello
recomendamos, ventilar la habitación hasta que este fenómeno desaparezca.
BIENVENIDOS a la familia HERGOM.
Agradecemos la
distinción
que nos ha dispensado con la elección de nuestra Estufa Hergom, que
representa en técnica y estilo un importante avance sobre las clásicas estufas de leña.
Su nueva estufa Hergom, quizás, el sistema de calefacción por combustibles sólidos más avanzado
que hoy se conoce. Poseer una Estufa HERGOM es la manifestación de un sentido de calidad
excepcional.
Por favor, lea este manual en su totalidad. Su propósito es familiarizarle con el aparato, indicándole
normas para su instalación, funcionamiento y mantenimiento, que le serán muy útiles. Consérvelo
y acuda a él cuando lo necesite.
Si después de leer este manual necesita alguna aclaración complementaria, no dude en acudir a
su proveedor habitual.

4
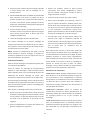
1 - INTRODUCCIÓN
¡IMPORTANTE! Todas las reglamentaciones locales,
incluidas las que hagan referencia a normas nacionales
o europeas han de cumplirse cuando se instala el
aparato.
La manera de instalar la Estufa influirá decisivamente en
la seguridad y buen funcionamiento del mismo.
Es muy importante realizar una buena instalación.
Para que la instalación de la Estufa y de la chimenea sea
correcta, es aconsejable que se realice por un
profesional.
La Estufa cede su calor por radiación, calentando
directamente paredes, techos, etc.
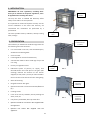
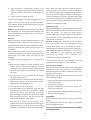
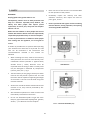
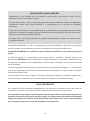
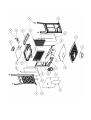
2 - PRESENTACIÓN
Las estufas de leña Craftsbury y Shelburne tienen las
siguientes características principales:
• Construida en hierro fundido, con piezas
ensambladas, selladas y atornilladas entre sí.
• Hogar forrado de hierro fundido.
• Concebida para utilizar sólo con leña.
• Hogar que permite quemar leña de hasta 40/45 cm.
de longitud según modelo.
• Válvula de regulación de aire primario.
• Sistema indirecto de alimentación de aire primario,
que desciende por el plano interior del cristal (auto
limpieza) hacia el fondo del hogar. Provisto, además,
de un orificio de aire primario situado en la parte
central inferior del hogar para favorecer el
encendido
• Auto limpieza de cristal.
• Puerta frontal batiente con cristal.
• Salida de humos opcional, horizontal o vertical. Ø150
mm (6”).
• Tornillos de nivelación.
• Cede su calor por radiación, calentando
directamente paredes, techos, etc.
• Se suministra totalmente montada de fábrica, con
salida vertical.
• Conector opcional para toma de entrada de aire del
exterior (o estancia independiente). No suministrado
con el aparato.
• Escudo trasero de chapa opcional. No suministrado
con el aparato.
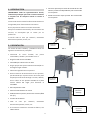
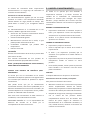
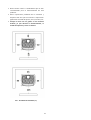
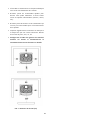
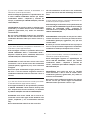
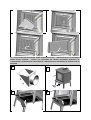
FIG. 1
FIG. 2
FIG. 3
Válvula aire
primario
Mando de
cierre
Posibilidad salida
horizontal
Tornillos de
nivelación
Toma aire exterior
(Accesorio:
9921074)
Trasera postiza
(Accesorio:
9921073)

5
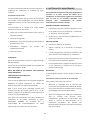
3 - FUNCIONAMIENTO DE LA ESTUFA
Una vez que su estufa ha sido instalada, y conectada a
la chimenea, está preparada para encender el fuego.
Aunque el funcionamiento de su estufa es fácil, el
proceso de combustión de combustibles sólidos es
complejo, ya que intervienen varios factores y se
necesita tiempo y experiencia para comprender como
se realiza.
Antes de encender su estufa por primera vez, es
necesario familiarizarse con los distintos sistemas de
control y partes de su aparato, cómo escoger la leña,
cómo encenderla y usarla diariamente.
TENGA SIEMPRE MUY EN CUENTA que la estufa produce
calor y por lo tanto debe mantener alejados de la misma
a niños, ropa, muebles... ya que el contacto con la
misma puede producir quemaduras.
Le damos a continuación algunos consejos con los que
conocer adecuadamente su estufa y funcionamiento,
que rogamos lea atentamente.
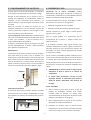
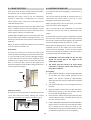
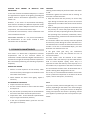
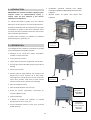
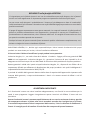
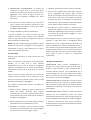
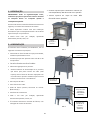
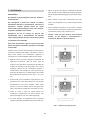
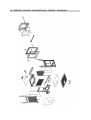
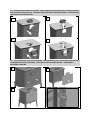
Mando puerta
La puerta frontal le permite acceder al interior del hogar
para cargar leña en su estufa y para su limpieza, y le
proporciona la visión del fuego a través del cristal. Para
abrir la puerta, levante el mando hasta la posición (del
reloj) en las 10 horas y tire de la puerta. Para cerrar la
puerta, presione la puerta contra el marco bajando el
mando a la posición (del reloj) de las 8 horas. (Fig.4).
FIG. 4
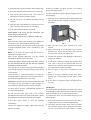
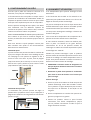
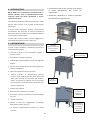
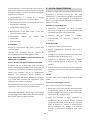
Control de aire primario
El control de aire primario permite regular la cantidad
de aire que entra en el hogar. Desplazando el mando
hacia adelante se aumenta la entrada de aire primario.
(Fig. 5)
FIG. 5
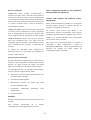
4 - ENCENDIDO Y USO
Importante en el primer encendido: pueden
desprenderse algunas gotas de agua de su estufa por
condensación, producida por la humedad del ambiente
donde su estufa haya estado almacenada.
Es imprescindible que el primer encendido se realice
lentamente. Las razones son las siguientes:
• Estabilizar las piezas de hierro fundido.
• Realizar el curado del cemento sellante de juntas.
Cuando encienda su primer fuego la estufa emitirá
algunos humos y gases.
Esto es normal debido a la evaporación de los
componentes de la pintura y aceites usados para
fabricar su estufa.
Si lo considera necesario, abra alguna ventana para
ventilar la habitación. Los humos y gases normalmente
persisten durante los 10 ó 20 primeros minutos del
encendido. Los olores y humos desaparecerán cuando
la estufa esté “curada”.
En los primeros encendidos pueden producirse otros
olores de los materiales que existen en la zona cercana
a la estufa. Estos olores desaparecerán con el tiempo.
Puede disminuir estos olores abriendo las ventanas o
de otra forma, creando una ventilación alrededor de la
estufa.
• ¡IMPORTANTE¡ La altura total de la carga no debe
sobrepasar el 50% la altura de la cámara de
combustión.
• La estufa debe permanecer cerrada en todo
momento durante la combustión para evitar la
salida de humos. Abriéndolo solo durante las
recargas.
Primer encendido
• Abra la puerta y sitúe sobre el fondo un par de
pastillas de encendido. Coloque unas astillas
cruzadas sobre las pastillas. Las astillas serán
aproximadamente unas 10 piezas de 10/15 mm de
diámetro y de 25/40 cm. de longitud.
• Abra completamente el control de aire primario
deslizando el mando hacia adelante.
• Encienda las pastillas. Deje la puerta frontal
entornada, sin cerrar del todo, hasta que las astillas
comiencen a arder y el tiro comience a ascender.
ABRIR
CERRAR
CERRADO
ABIERTO

6
• Cierre la puerta y deje que el fuego se encienda.
Mantenga la puerta cerrada mientras la estufa esté
en funcionamiento. Asegúrese que la puerta de
cenicero está bien cerrada.
• MANTENGA TODO EL TIEMPO LA VISTA SOBRE SU
ESTUFA para mantener un fuego lento. El primer
fuego deberá calentar la estufa pero no debe
quemar cuando se toque. Deberá añadir, algunos
trozos de madera al fuego para conseguir una
temperatura adecuada en el primer encendido.
• Una vez esté caliente la estufa, pero que no queme
al tocar, cerrar el aire primario deslizando el mando
a tope hacia dentro, y dejar que el fuego se apague
completamente.
• Deje enfriar totalmente su estufa.
Su primer encendido y el primer encendido de cada
estación, deberán ser realizados como se ha descrito
anteriormente. Su paciencia será recompensada con
años de buen funcionamiento de su estufa.
NOTA: como las temperaturas de los gases han sido
bajas durante el primer encendido, la creosota se ha
formado muy rápidamente. Su cristal de la puerta se
habrá ensuciado. Un fuego caliente posterior lo
limpiará.
Uso diario
Su estufa está preparada para el uso diario, después del
primer encendido.
Antes de realizar un encendido de funcionamiento
habitual, si su estufa no se ha utilizado con frecuencia,
desde cierto tiempo, es aconsejable seguir el
procedimiento del primer encendido, al menos, para
minimizar las tensiones de un fuego fuerte sobre una
estufa fría.
Para realizar un encendido normal, proceda de la
siguiente forma:
• Abra la puerta y sitúe un par de pastillas sobre el
fondo del hogar. Coloque unas astillas cruzadas
sobre los periódicos. Las astillas serán
aproximadamente unas 10 piezas de 10/15 mm de
diámetro y de 25/40 cm. de longitud
• Abra completamente el control de aire primario
deslizando el mando hacia adelante.
• Encienda las pastillas. Deje la puerta frontal
entornada, sin cerrar del todo, hasta que las astillas
comiencen a arder y el tiro comience a ascender.
• Cierre la puerta y deje que el fuego se encienda.
• Una vez que las astillas se han encendido, abra la
puerta y añada troncos, pequeños primero, para
formar el fuego. Asegúrese que los leños están lejos
del cristal, con el fin de que el sistema de limpieza
de cristal funcione correctamente. Por otra parte,
mantenga la puerta frontal cerrada mientras la
estufa esté funcionando.
• Una vez que el fuego está bien encendido, use el
aire primario para regular el rango deseado de
funcionamiento. Deslizando el mando hacia
adelante, para conseguir un rango alto de
funcionamiento, y hacia dentro para un rango lento
de funcionamiento.
Nota: cuando abra la puerta para cargar leña o
recolocar los troncos en su estufa, es aconsejable
abrirla primero sólo un poco, esperar unos segundos y
después abrirla completamente. Este procedimiento
permitirá que el hogar este libre de humos cuando abra
la puerta de la estufa completamente y no salgan a la
estancia. Así mismo, recargar sobre un lecho de brasas
calientes y rojas reduce el humo y avivará la
combustión rápidamente.
Rangos de combustión
COMBUSTION ALTA: Cargar completamente el hogar
con leña sobre el lecho de brasas calientes y rojas o
sobre las llamas y abrir completamente el control de
aire primario. Un rango alto es recomendable una o dos
veces al día para calentar bien la chimenea y la estufa,
ayudando así a evitar la creación y acumulación de
creosota.
COMBUSTIÓN MEDIA: Colocar la leva del control de aire
primario sobre la mitad del recorrido, apropiado para
las necesidades de calor del área a calentar. Este rango
es adecuado cuando la estufa va a estar desatendida.
COMBUSTIÓN BAJA: Cierre el aire de control de aire
primario para una combustión lenta. Un bajo rango de
combustión durante periodos excesivamente largos no
es conveniente pues promueve la acumulación de
creosota.

7
El sistema de evacuación debe inspeccionarse
frecuentemente si el rango bajo de combustión se
mantiene continuadamente.
Precaución en calentar demasiado.
Un sobrecalentamiento significa que Vd. ha hecho
funcionar su estufa a una temperatura demasiado
elevada durante un largo período de tiempo. Esto
puede dañar su estufa y por consiguiente deberá
evitarlo.
Un sobrecalentamiento es el resultado de un tiro
excesivo, debido a alguna de estas razones:
• Válvula de Aire Primario excesivamente abierta
para el tipo de madera utilizada.
• Chimenea demasiado grande.
• Mantenimiento incorrecto de la estufa, lo que
puede producir infiltraciones de aire.
• Combustible inadecuado que produce altas
temperaturas.
• Puerta mal cerrada.
¡ATENCIÓN!
Durante el funcionamiento de la estufa, la puerta debe
permanecer cerrada.
Una entrada incontrolada de aire produce un
sobrecalentamiento que puede dañar la estufa.
NOTA: ¡¡CUALQUIER SINTOMA DE FUEGO EXCESIVO,
PUEDE ANULAR SU GARANTÍA!!
ESTUFAS CON ESMALTE EN MAYÓLICA ¡MUY
IMPORTANTE!
Es normal que con los encendidos de las estufas
esmaltadas con Mayólica aparezcan unas ligeras fisuras
en el esmalte que confieren al producto su aspecto
característico.
Pero puede ocurrir que por un calentamiento
incontrolado excesivo, estas fisuras producidas por la
diferencia de dilataciones entre el hierro fundido y los
esmaltes Mayólicas con componentes vítreos, puedan
producir un indeseado salto del esmalte.
Para evitar este inconveniente se debe controlar la
combustión, nunca sobrecalentar la estufa.
INDUSTRIAS HERGÓM S.L. no se responsabiliza del
deterioro del esmalte de la estufa por el
incumplimiento de estas instrucciones.
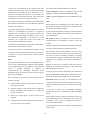
5 - LIMPIEZA Y MANTENIMIENTO
Su estufa es un aparato que está sometido a
temperaturas extremas y al efecto corrosivo de
residuos de la combustión. Su mantenimiento
periódico es esencial para conseguir una mayor
duración y mejor utilización de la misma. Para ello
recomendamos efectuar con frecuencia los siguientes
controles:
DURANTE LA TEMPORADA DE USO
• Inspeccionar visualmente la chimenea. Limpiar el
hollín y los alquitranes si estos han empezado a
acumularse en las paredes interiores de la estufa.
• Verificar si las puertas cierran herméticamente;
ajustarlas si es necesario.
CUANDO LA TEMPORADA FINALIZA
• Inspeccionar y limpiar la chimenea.
• Pasar la aspiradora por el interior de su estufa e
inspeccionarla.
• El hollín y los alquitranes (creosota) que se
acumulan en las paredes de su estufa reducen el
rendimiento.
• Inspeccionar las juntas de la puerta. Éstas deberán
reemplazarse cuando no realicen un cierre
perfecto.
• En las estufas pintadas, vuelva a pintar las piezas de
hierro fundido si es necesario. Para ello utilice
pintura anticalórica.
LIMPIEZA
La limpieza debe hacerse siempre con la estufa fría.
Prevenciones contra la creosota y su limpieza.
Para prevenir la formación de creosota:
• Mantener la estufa con el control de aire primario
abierto completamente durante 30 minutos
diariamente para quemar la creosota depositada en
el interior de la estufa y del sistema de evacuación.
• Después de recargar leña, mantenga la combustión
con el control de aire primario abierto
completamente durante 20 o 30 minutos. Esta
manera de operar asegura de antemano el
funcionamiento de la combustión secundaria, la
cual, cuando funciona, minimiza la formación de
creosota en la chimenea.

8
El tubo conector de chimenea debe ser inspeccionado
al menos mensualmente durante la estación de uso de
la estufa para determinar si se ha producido la
formación de creosota. Si el residuo de creosota tiene
un espesor de 6mm. acumulado debe eliminarla para
reducir el riesgo de incendio.
Si el cristal se ensucia con frecuencia, el rango de
temperatura de combustión es bajo; esto le indica el
riesgo de formación de creosota.
El sistema de evacuación de humos debe ser
inspeccionado en la conexión de la estufa y en el
extremo superior de la chimenea. Superficies frías
tienden a crear depósitos rápidamente, por esto es
importante inspeccionar la chimenea en el final
superior, pues es la zona más fría, al contrario de la
conexión de la estufa.
La creosota acumulada debe ser eliminada con un
cepillo limpiador específico diseñado para este uso.
Por esto es recomendable que antes de cada estación
de uso se haga una inspección profesional de todo el
sistema, limpiarlo y repararlo, si fuera necesario.
Juntas
Las juntas, normalmente deben cambiarse cada 2 ó 3
estaciones de uso, dependiendo de la utilización de la
estufa. Si el sellado de la puerta se pierde, una nueva
junta asegura el sellado adecuado y mejora el
funcionamiento de la estufa. Contacte con su
proveedor para que le suministre un juego de juntas
para su estufa.
Para reemplazar las juntas de la puerta proceda de la
siguiente forma:
1. Primero quite la vieja con un útil o punta de
cuchillo.
2. Limpie todos los canales de la junta con un cepillo
de alambre, para eliminar los residuos de cemento
y fibras.
3. Coloque la nueva junta en su sitio sin estirar el
material.
4. Cierre la puerta inmediatamente para presionar la
junta en su sitio y asegurar un sellado válido.
Se requiere el uso de las siguientes juntas:
CRISTAL: 1,30 m de longitud 6,35 mm. de diámetro,
(Cód. J14).
PUERTA FRONTAL: 1,50 m de longitud, 9,5 mm de
diámetro. Cordón negro de baja densidad (Cód. J38).
Cristal
No utilice su estufa con el cristal de la puerta roto. No
someta la puerta frontal a golpes ni portazos.
Si lo estima necesario, puede limpiar el cristal de la
puerta con un limpiador de cristales Hergóm, el cual le
suministrará su proveedor.
Nunca intente limpiar el cristal cuando la estufa esté
funcionando o el cristal esté caliente.
La mayoría de las partículas depositadas, pueden
limpiarse siguiendo las instrucciones de manejo del
limpiador.
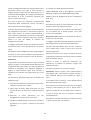
Para limpiar partículas difíciles, abra la puerta, retire el
arco situado en la parte superior bajo el techo, tire de
la puerta hacia arriba y sáquela de la estufa.
Pose la puerta sobre una mesa o banco de trabajo y
aplique el limpiador en el cristal permitiéndole actuar
durante unos minutos.
Deje la puerta en posición horizontal, para dejar que el
limpiador penetre mejor en la superficie del cristal.
Secar el limpiador con un trapo suave.
Importante: golpear o rayar el cristal deteriorará la
integridad del cristal. No use cuchillas ni esponjas de
acero, u otro material abrasivo como utensilio para
limpiar el cristal.
El cristal de la puerta es cerámico, fabricado
especialmente para el uso en estufas de leña.
No use para remplazarlo ningún otro cristal que no sea
el cerámico fabricado para el uso en estas estufas de
leña. Haga el cambio de cristal a través de su proveedor.
Si se rompe el cristal de la puerta deberá reponerse
inmediatamente.
Contacte con su proveedor para solicitar el cristal y
piezas necesarias para la reparación.
Si reemplaza el cristal Vd. mismo, use guantes de
trabajo y gafas de seguridad.

9
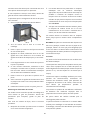
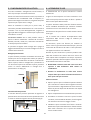
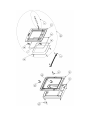
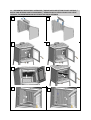
El procedimiento para el cambio de cristales y juntas de
cristal es el siguiente:
1. Abra la puerta y retire el arco situado en la parte
superior de ésta.
FIG. 6
2. Tire de la puerta hacia arriba y sáquela de la estufa.
3. Situé la puerta bocabajo horizontal sobre una
superficie lisa.
4. Aplique aceite penetrante en los tornillos de las
grapas del cristal. Saque los tornillos y levante las
grapas y las fibras cerámicas que existen bajo ellas.
5. Levante cuidadosamente el cristal dañado de la
puerta y arrójelo a la basura.
6. Si lo considera necesario sustituya el cordón de
fibra cerámica. Arránquelo de su posición y limpie
bien los restos del mismo. Coloque el nuevo cordón
de fibra cerámica con las dimensiones detalladas
anteriormente.
7. Situé el cristal sobre la junta en su posición en la
puerta.
8. Atornille de nuevo las grapas de retención del
cristal colocando bajo ellas las correspondientes
fibras cerámicas.
9. Vuelva a instalar la puerta en su posición, y
seguidamente el arco.
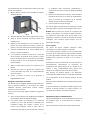
Recogida y eliminación de cenizas.
Las cenizas serán recogidas cuando la estufa este fría.
Use un guante protector si las cenizas aún están
calientes. Extreme precauciones cuando maneje,
almacene o tire las cenizas.
Para sacar las cenizas del hogar proceda de la siguiente
manera:
1. Abra la puerta frontal, y con ayuda de una rasqueta
y/o una pala, retire las cenizas del hogar.
2. Las cenizas deben ser arrojadas a un recipiente
metálico con una tapa hermética adecuada. No
introduzca ningún otro objeto o basura en el
interior del recipiente. Sitúe la tapa sobre el
recipiente y deje que las cenizas se enfríen. No sitúe
el recipiente sobre superficies combustibles o
suelos de vinilo, pues el recipiente puede estar muy
caliente.
3. Mientras se deshace de las cenizas, sitúe cerrado el
recipiente de cenizas en un suelo no combustible o
sobre el terreno en el exterior de la vivienda,
alejado de todo material combustible.
4. Si fuese necesario limpie el hogar.
Las cenizas deben mantenerse en el recipiente cerrado
hasta que todas las brasas estén completamente frías.
NUNCA deben situarse las cenizas en recipientes de
madera o de plástico, o en bolsas de papel o plástico,
no importa en tiempo que hace que el fuego se ha
apagado. Las brasas en el interior del lecho de cenizas
mantienen calor durante mucho tiempo una vez
eliminadas del hogar.
Hierro fundido
Las piezas de hierro fundido exteriores están
vitrificadas con esmalte mayólica o pintadas.
Los esmaltes pueden limpiarse con un limpiacristales
corriente. En la mayoría de los casos bastará con pasar
un paño ligeramente húmedo. (No mojar las partes
pintadas pues aparecerá el óxido si no se secan a
tiempo.)
El esmalte con el que está tratado su estufa, durante el
funcionamiento, sobremanera en momentos de
combustión alta, puede presentar un cambio de su
textura y color, produciéndose finas grietas que
vuelven a su estado natural al enfriarse la estufa.
Este proceso se produce debido a los diferentes
coeficientes de dilatación de los materiales empleados
en la preparación de este especial esmalte, de alta
calidad.
No utilizar paños húmedos para la limpieza de las piezas
pintadas.
La pintura utilizada es anticalórica 600ºC especial para
estufas. Si decide restaurar su estufa, consulte a su
proveedor para adquirir esta pintura especiaL
PRODUCTOS PARA LA CONSERVACIÓN
Industrias HERGÓM S.L. pone a su disposición una serie
de productos para la conservación de su Estufa y
chimenea:
Pintura anticalórica, pasta refractaria, limpiacristales.

10
6 - RECICLAJE DEL PRODUCTO
Su aparato se entrega embalado con plástico y una caja
de cartón sobre un palet de madera. Puede utilizar el
cartón y la madera como combustible en los primeros
encendidos del aparato, o bien llevarlo a un punto de
reciclado local. El plástico que protege al aparato debe
llevarse a un punto o centro de reciclado local
específico, no debe desecharse en los contenedores de
desecho convencional.
Todas las reglamentaciones locales, incluidas las que
hagan referencia a normas nacionales o europeas han
de cumplirse cuando se vaya a proceder al reciclado del
producto al final de su vida útil. Nunca debe eliminarse
el producto en los contenedores de desecho
convencional. Su aparato está compuesto por
componentes de fundición, acero, vidrio, materiales
aislantes y material eléctrico, que van ensamblados
mediante tornillos y remaches. Puede desmontarlo y
llevarlo a un punto o centro de reciclado local
específico. El cristal no debe depositarse en los
contenedores de desecho convencional.
7 - SEGURIDAD
ADVERTENCIA
Los aparatos a gas/leña/pellet se calientan durante el
funcionamiento.
En consecuencia, hay que actuar con precaución y
mantenerse alejado, especialmente evite la cercanía
de los niños, ancianos u otras personas que requieran
de especial atención así como mascotas mientras que
el aparato este encendido.
Asegúrese que los niños u otras personas no
familiarizadas con el funcionamiento del aparato sean
supervisados por personas responsables cuando se
acerquen a él.
Para la protección de quemaduras y para proteger el
acercamiento de niños o personas que no deban
entrar en contacto con el aparato coloque un
cortafuegos o separador.
Existen posibles riesgos que hay que tener en cuenta a
la hora de hacer funcionar su horno de combustibles
sólidos, sea cual fuere la marca. Estos riesgos pueden
minimizarse si se siguen las instrucciones y
recomendaciones que damos en este manual.
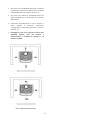
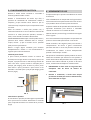
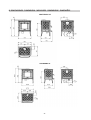
• Cuando se coloque la estufa, tener en cuenta las
distancias de seguridad necesarias, tanto del
aparato como de la chimenea, de las superficies
combustibles (paredes de madera o empapeladas,
suelo de madera, etc.,). Estas mismas distancias
deberán ser respetadas cuando el recubrimiento de
las paredes o zonas próximas sea susceptible de
deterioro o deformación por efecto de temperatura
(barnices, pinturas, P.V.C.. etc.). Fig. 7
• La base donde se va a colocar su estufa debe tener
una superficie plana y sin desniveles que eviten el
perfecto asentamiento de la misma. Esta base a su
vez, debe ser capaz de soportar el peso de la estufa.
La base de apoyo debe estar construida de
materiales resistentes al calor.
• Todas las zonas que rodeen la estufa deben ser
resistentes a la temperatura, si no es así, se debe
tener previsto poder proteger con material ignifugo.
• Las cenizas deberán vaciarse en un recipiente
metálico y sacarse inmediatamente de la casa.
• No deben utilizarse jamás combustibles líquidos
para encender su estufa. Mantenga alejado
cualquier tipo de líquido inflamable (gasolina,
petróleo, alcohol, etc.).

11
• Nunca utilizar carbón o combustibles que no sean
recomendados para el funcionamiento de este
producto.
• Hacer inspecciones periódicas de la chimenea y
limpiarla cada vez que sea necesario. Inspeccionar
igualmente el estado de juntas, cristal, tornillos, etc.
• Proteja la mano con un guante u otro material
aislante, ya que durante el funcionamiento, el
mando de apertura y cierre se calienta.
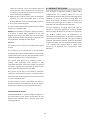
CRAFTSBURY HF
SHELBURNE HF
FIG. 7 - DISTANCIAS DE SEGURIDAD (cm)

12
INDUSTRIAS HERGÓM, S.L., may not be held liable for any damages caused by alterations in its
products that have not been authorised in writing, or for defective installation work.
Furthermore, it reserves the right to change its products without prior warning.
Industrias Hergóm, S.L. domiciled in Soto de la Marina (Cantabria) - Spain, offers a THREE YEARS
warranty on its products. Industrias Hergom, S.L. guarantees the existence of repair parts and
adequate technical service for 10 years from the date on which this product ceases to be
manufactured.
The geographical coverage of the said warranty only includes the countries in which Industrias
Hergom, S.L., a subsidiary company or an official importer distribute its products and where
Community Directive 2019/771/UE is in force.
The warranty comes into force on the purchase date of the product as indicated on the warranty
document and only covers damage or breakages due to manufacturing defects.
IMPORT
ANT NOTE
If the device is not installed correctly, it will not provide the excellent service for which it has been
designed. Please, read these instructions in full and trust the work to a specialist.
The surface of your device is protected by a coat of special anti-heat paint that resists high
temperatures. When lighting the fireplace for the first few times, the said paint may emit some
fumes. This is normal and is due to the evaporation of certain components of the paint while it
adapts to the heat. We, therefore, recommend ventilating the room until this phenomenon ceases
to appear.
WELCOME to the HERGÓM family.
We would like to thank you for choosing our Stove, which represents, in technique and style, a
significant improvement on typical wood stoves.
Your new Stove is, perhaps, the most advanced solid fuel heating system known today. Owning a
HERGOM Stove displays an exceptional sense of quality.
Please read this manual in full. Its purpose is to familiarise users with the device by explaining
extremely useful installation, operational and maintenance instructions. Keep this manual at hand
for future reference whenever necessary.
If, after reading this manual, you should require any further clarification, please consult your
regular dealer.

13
1 - INTRODUCTION
IMPORTANT! All local regulations, including those
that refer to national or European regulations, must
be applied when installing this device.
The way the stove is installed will decisively affect
safety issues and its correct operation.
It is important to install the fireplace correctly. For the
correct installation of the stove and chimney, we
recommend the installation be performed by a
professional.
The stove provides heat by radiation; directly heating
walls, ceilings...
2 - PRESENTATION
The Craftsbury or Shelbourne wood burning heater has
the following main characteristics:
• It is constructed in cast iron, with assembled parts,
sealed and screwed together.
• Cast iron lined.
• It is designed for use with firewood only.
• A hearth that allows to burn wood logs of up to 40
cms. long.
• Primary air regulation valve.
• Indirected system of primary air supply, that
descends down the inside plan of the glass (self
cleaning) towards the bottom of the hearth.
Supplied, as well, with a primary air hole located in
the low central of the hearth to favour the lighting.
• Glass self-cleaning.
• Hinged front door with glass.
• Optional horizontal or vertical smoke exit Ø150 mm
(6”).
• Leveling screws.
• It lets of its heat by radiation, directly heating the
walls, roofs, etc.
• Fully factory assembled, with top smoke flue.
• Optional outside air connection. Not supplied with
the appliance.
• Optional rear shield. Not supplied with the
appliance.
FIG. 1
FIG. 2
FIG. 3
Primary air
valve
Door
Handle
Option of rear
smoke flue exit
included
Leveling
screws
Outside air
connection
(Accesory:
9921074)
Rear shield
(Accesory:
9921073)

14
3 - USING THE STOVE
Once your stove has been installed and connected to
the chimney, you are ready to light the fire.
Although your stove is easy to use, the combustion
process of solid fuels is complicated, as it involves
several factors and it takes time and experience to
understand the process.
Before lighting your stove for the first time, please take
time to become familiar with the different control
systems and parts of the unit, how to choose the wood,
how to light it and use it on a daily basis.
ALWAYS KEEP IN MIND that the stove generates heat
and, therefore, keep children, clothing, furniture... at a
distance to prevent burns from direct contact with the
appliance.
Below, we have included some advice on your stove and
on its use. Please read with care.
Door handle
The front door allows you to access the inside of the
hearth to load the wood logs in your heater and to clean
it, and it provides a view of the fire through the glass.
To open the door, lift up the control handle up to the
position (as on a clock) of 10 o’clock and pull from the
door. To close the door, push the door against the
frame lowering the control handle to the position (as on
a clock) of 8 o’clock. (Fig.4)
FIG. 4
Primary air control
The primary air control permits to regulate the amount
of air that enters the hearth. Moving the control
outwards the primary air entrance increases. (Fig. 5)
FIG. 5
4 - LIGHTING UP AND USE
It is essential that the first lighting is carried out in a
slow way.
The cast iron must be warmed up: Excessive heat on a
new heater may cause cracks in the iron or cause
damages to other parts of the heater,
When you light the fire for the first time, your heater
will let off some smoke and gases.
This is normal due to the evaporation of the paint
components and the oils used to manufacture your
heater.
If you consider it necessary, open a window to ventilate
the room. The smoke and gases normally persist during
the first 10 or 20 minutes of the lighting. The smells and
smoke will disappear when the heater is “cured”.
During the first lightings there may be other smells of
materials that are in the nearby area to the heater.
These smells will disappear in time. You may reduce
these smells opening the windows or by other means,
creating ventilation around the heater.
• IMPORTANT! The total height of the fire load
should not exceed 50% of the height of the
combustion chamber.
• The heater must be closed at all times during
combustion to prevent smoke from leaking out.
Only open to add fuel.
First lighting
• Open the door and place a couple of lighting tablets
on the base. Put some crossed splinters on the
tablets. The splinters should be approximately
about 10 pieces of 10/15 mm in diameter and 25/40
cms. long.
• Fully open the primary air control sliding the control
forward.
• Light the tablets. Leave the front door half open,
without fully closing it, until the splinters start to
burn and the draught begins to rise.
• Close the door and let the fire light. Keep the door
closed while the heater is working. Ensure the ash
pan door is firmly closed.
• AT ALL TIME KEEP YOUR EYES ON YOUR HEATER to
keep a low fire. The first fire must heat the heater
but it should not burn when you touch it. You
should add some pieces of wood to the fire to reach
an adequate temperature in the first lighting.
CLOSE
OPEN
OPEN
CLOSE

15
• Once the heater is hot, but does not burn to the
touch, close the primary air by sliding the control to
the limit inwardly, and let the fire completely go
out.
• Let your heater cool down entirely.
The first time you light it and the first lighting of each
season, must be carried out as previously described.
Your patience will be compensated by years of a good
operating of your heater.
NOTE: as the gas temperatures have been low during
the first lighting, the creosote has formed quickly. The
glass on the door has probably got dirty. A subsequent
hot fire will clean it.
Daily use
Before carrying out a regular lighting operation, if your
heater has not been used often, for a long time, it is
recommendable to follow the first lighting procedure,
at least, to minimize the tensions of a strong fire on a
cold heater.
Before loading the heater, ensure the ash pan door is
closed and the ash pan is in its place. If the ash pan door
should open, the heater could over-heat and get
damaged.
To perform a normal lighting, do so in the following
way:
• Open the door and place a couple of tablets on the
hearth’s base. Put some crossed splinters on some
newspapers. The splinters should be approximately
about 10 pieces of 10/15 mm in diameter and 25/40
cms. long.
• Fully open the primary air control by moving the
control towards the front.
• Light the tablets up. Leave the front door half open,
without fully closing it, until the splinters start to
burn and the draught begins to rise.
• Close the door and let the fire light.
• Once the splinters have caught fire, open the door
and add logs, first small ones, to form the fire. Make
sure the logs are far from the glass, so that the
glass’s cleaning system works correctly. On the other
hand, keep the front door and the ash pan door
closed while the heater is operating.
• Once the fire is well lit, use the primary air to
regulate the level of operating desired. Moving the
control towards the front, to obtain a high level of
operating, and inwardly for a low level of operating.
Note: When you open the door to load the wood or
replace the logs in your heater, it is recommendable to
first open only a little, wait a few seconds and then after
open it wide. This procedure will permit the hearth to
be free of smoke when you open the heater door wide
and so it does not fill the room. Likewise, to reload on a
bed of hot and red embers reduces the smoke and will
intensify the combustion rapidly.
Combustion levels
HIGH COMBUSTION: Fully load the hearth with wood on
the hot and red ember bed or on the flames and entirely
open the primary air control. A high level is
recommended once or twice a day to heat the chimney
and the heater up well, preventing the creation and
accumulation of creosote.
MEDIUM COMBUSTION: Place the primary air control
lever at the middle of the run, appropriate for the
heating needs of the area to be warmed. This level is
adequate when the heater is going to be unattended.
LOW COMBUSTION: Close the primary air control for a
slow combustion. A low combustion level during
excessively long periods is not convenient as it
stimulates the creosote accumulation.
The flue system must be often checked if the low
combustion level is used on a continuous basis.
Excessive fire precaution
Excessive fire means that the heater is running at higher
temperatures than those previously recommended.
Excessive fire must be carefully avoided as it may cause
damages to your heater.
Overheating is the result of excessive draw, due to any
of the following reasons:
• The Primary Air Valve is excessively open for the type
of wood being used.
• The chimney is too big.
• Improper maintenance of the stove, which may
result in air infiltration.
• Inappropriate fuel that produces high temperatures.
• Door not closed correctly.
ATTENTION!
During operation of the heater, the door should remain
closed.
Any uncontrolled intake of air produces overheating
that can damage the stove.
NOTE: ANY SYMPTOM OF EXCESSIVE FIRE MAY ANNUL
YOUR WARRANTEE!!

16
HEATERS WITH ENAMEL IN MAJOLICA VERY
IMPORTANT!
In the case of stoves enamelled in Majolica, it is normal
for slight fissures to appear in the glazing, providing the
product with its characteristic appearance, once the
heater is lit.
However, in the event of uncontrolled overheating,
these fissures caused by the different expansion levels
of the cast iron and the Majolica enamel with vitreous
components, can cause the enamel to chip.
To avoid this inconvenience, control combustion and
never overheat the heater.
INDUSTRIAS HERGÓM S.L. may not be held liable for
the deterioration of the stove’s enamel if these
instructions are not followed.
5 - CLEANING & MAINTENANCE
Your heater is a device that is subjected to extreme
temperatures and to the corrosive effects of
combustion residual materials. Regular maintenance is
essential for a longer life and improved user experience.
We recommend performing the following inspections
frequently.
DURING THE SEASON
• Perform a visual inspection of the chimney. Clean
soot and tar if they have begun to accumulate on the
inner walls of the heater.
• Check whether the doors close tightly; adjust if
necessary.
AT THE END OF THE SEASON
• Inspect and clean the chimney.
• Use the vacuum cleaner to clean inside the heater
and inspect it.
• Any soot and tar (creosote) that has accumulated on
the walls of the heater will hinder performance.
• Inspect door seals. These should be replaced when
they no longer seal the door perfectly.
• In the case of painted heaters, paint the cast iron
parts again if necessary
CLEANING
Cleaning should always be performed when the heater
is cold.
Preventions against the creosote and its cleaning. To
avoid the creosote formation:
• Keep the heater with the primary air control fully
open during 30 minutes daily to burn the creosote
deposited in the inside of the heater and of the flue
system.
• After reloading the wood, keep the combustion with
the primary air control fully open during 20 or 30
minutes. This way of operating ensures, beforehand,
the operating of the secondary combustion, which,
when functioning, minimises the creosote formation
in the chimney.
The connector tube to the chimney must be inspected
at least every month during the season the heater is in
use to determine if creosote has formed. If the creosote
residue is of 6 mm in accumulated depth, you must
eliminate it to reduce the fire risk.
If the glass often gets dirty, the combustion
temperature level is low; this indicates the risk of
creosote formation.
The flue system must be checked at the heater
connection and in the chimney’s top end. Cold surfaces
tend to create deposits rapidly, that’s why it is
important to check the chimney at the top end, as it is
the coldest area, as opposed to the heater connection.
The accumulated creosote must be eliminated with a
specific cleaning brush designed for this use.
This is why it is recommended that before each season
of use a professional inspection is carried out of all the
system, clean it and repair it, if necessary.
Joints
The joints normally must be changed every 2 or 3 used
seasons, depending on the heater’s use. If the sealing of
the door is missing, a new joint ensures an adequate
sealing and improves the heater’s operating. Contact
your supplier to provide you with a set of joints for your
heater.

17
To replace the door joints proceed in the following way:
1. First take away the old one with a tool or knife tip.
2. Clean all the joint channels with a wire brush, to
eliminate the cement and fibre residue.
3. Put the new joint in its without spreading out the
material.
4. Close the door immediately to put pressure on the
joint in its place and ensure a correct sealing.
The use of the following joints is required:
FRONT DOOR: 1.50 m long, 9,5 mm in diameter. Low
density black cord (Code J38)
GLASS: 1.30 m long 6,35 mm. In diameter (Code J14)
Glass
Do not use the heater with the door glass broken. Do
not knock or slam the front door when shutting.
If deemed necessary, you may clean the door glass with
a Hergóm Window Cleaner that is provided by your
supplier.
Never try to clean the glass when the heater in
operating or the glass is hot.
Most of the particles deposited, may be cleaned
following the cleaner’s use instructions.
To clean the difficult particles, open the door, remove
the arch placed under the top, pull the door upwards
and detach it from the heater.
Place the door on a table or working surface and apply
the cleaning product on the glass letting it work during
a few minutes.
Leave the door in a horizontal position, to allow the
cleaning product to better penetrate the glass surface.
Dry the cleaning product with a soft cloth.
Important: to knock or scratch the glass will deteriorate
its integrity. Do not use blades or metal sponges, or
other abrasive materials as tools to clean the glass.
The door glass is ceramic, manufactured specially for
the use of wood heaters.
Do not use any other glass that is not ceramic
manufactured for the use of these wood heaters. Make
the replacement of the glass through your supplier.
If the door glass breaks it must be replaced
immediately.
Contact your supplier to request a glass and necessary
parts for its repair.
Should you replace the glass yourself, use working
gloves and safety glasses.
The procedure to change the glasses and glass joints is
the following:
1. Open the door, remove the arch placed under the
top, and pull the door upwards and detach it from
the heater.
FIG. 6
2. Place the door front down horizontal on a flat
surface.
3. Apply penetrating oil on the glass cramp screws.
Withdraw the screws and lift the cramps and the
ceramic fibres that may be under them.
4. Carefully lift the door’s damaged glass and throw it
away in the rubbish
5. If you deem necessary, replace the ceramic fibre
cord. Tear it out from its position and clear the
leftovers of it. Place the new ceramic fibre cord with
the measurements before detailed.
6. Place the glass on the joint in its position on the
door.
7. Screw in the glass fastening cramps once again,
placing the corresponding ceramic fibres under
them.
8. Fit the door in its position again, and after that, fit
the arch.
Cleaning ash.
The ashes will be cleared when the heater is cold. Use a
protecting glove when the ashes are hot. Be very careful
when you handle, store or throw away the ashes.
To remove the ashes from the hearth proceed in the
following way:
1. Open the hearth door and remove the ashes with a
scraper and a shovel or another adequate tool.
2. The ashes must be thrown away from the hearth
into a metal container with an appropriate hermetic
top. Do not introduce any other object or rubbish

18
inside the container. Cover the container with the
top and let the ashes cool down. Do not place the
container on combustible surfaces or vinyl floors, as
the container may be very hot.
3. While you get rid of the ashes, place the closed ash
container on a non combustible floor or on the
ground outdoors, far from all combustible materials.
4. If necessary clean the hearth.
The ashes must be kept in the closed container until the
embers are completely cold.
NEVER place the ashes in wooden or plastic containers,
or in paper or plastic bags, regardless of the time
elapsed since the fire has been put out. The embers
inside the ash bed keep heat during a long time once
they have been removed from the hearth.
Cast iron
The external cast iron parts are vitrified with majolica
enamel.
The enamels may be cleaned with a normal window
cleaning product. Generally all needed is to clean it with
a slightly damp cloth. (Do not wet the painted parts as
oxidation will appear if it is not quickly dried.)
The enamel with which your Craftsbury heater is
treated, while operating, most specially in high
combustion moments, may show changes in its texture
and colour, causing fine cracks that go back to their
natural state when the heater cools down.
This process occurs due to the different expansion
coefficients of the materials used in the elaboration of
this special high quality enamel. Do not use damp cloths
to clean the painted parts.
The paint used is an anti caloric 600ºC one which is
specific for heaters. If you decide to repair your heater,
contact your supplier to purchase the special paint.
MAINTENANCE PRODUCTS
Industrias HERGÓM, S.L. places a range of products for
the preservation of your heater and chimney at your
disposal: heat resistant paint, refractory putty, glass
cleaning products.
6 – PRODUCT RECYCLING
Your appliance is delivered packed in plastic and a
cardboard box on a wooden pallet. You can use
cardboard and wood as fuel for the first lightings of the
appliance, or take it to a local recycling point. The
plastic that protects the device must be taken to a
specific local recycling point or center, it must not be
disposed of in conventional waste dumpster.
All local regulations, including those that refer to
national or European regulations, must be applied
when recycling this device at the end of its useful life.
The product should never be disposed of in
conventional waste dumpster. Its appliance is made up
of components made of cast iron, steel, glass, insulating
materials and electrical material, which are assembled
using screws and rivets. You can disassemble it and take
it to a specific local recycling point or center. Glass
should not be disposed of in conventional waste
dumpster.

19
7 - SAFETY
WARNING!
Gas/log/pellet units get hot when in use.
Consequently, owners must act with precaution and
keep at a distance. Especially keep children, the
elderly and other people who require special
supervision, as well as pets, away from the fireplace
when it is in use.
Make sure that children or other people who are not
familiar with how the device works are supervised by
responsible people when they are near the fireplace.
In order to prevent burns or children or other people
from coming near the appliance, use a fire grille or
screen.
A number of possible risks are present when operating
your solid fuel oven with fuel of any brand. The said
risks can be minimised if the instructions and
recommendations included in this manual are
followed.
• When installing the stove, observe the necessary
safety distances for the oven and chimney from
combustible surfaces (wooden or papered walls,
wooden floors...). Safety distances must be
respected when the lining on walls or nearby areas
may be damaged or deformed by temperature
(varnish, paint, PVC...). Fig. 7
• The base where you are going to install your heater
must be flat and provide a perfect seat. The said
base must also be capable of supporting the weight
of the heater. The base must be built using heat
resistant materials.
• All the area around the heater should must be heat
resistant. If not, they must be protected by fire-
proof material.
• Ash should be emptied into a metal container and
immediately removed from the house.
• Do not use flammable liquids to light the stove.
Keep any type of flammable liquid (petrol, gasoline,
alcohol,....) at a distance from the fireplace.
• Never use coal or fuels that are not recommended
for the operation of this product.
• Periodically inspect the chimney and clean
whenever necessary. Also inspect the state of
joints, glass, screws...
• Protect your hands with a glove or other insulating
material because, during operation, the opening
and closing handle will be hot.
CRAFTSBURY HF
SHELBURNE HF
FIG. 7 – SECURITY MEASURES (cm)

20
INDUSTRIAS HERGÓM, S.L., n’assume pas la responsabilité de dommages provoqués par l’altération
de ses produits qui n’aurait pas été autorisée par écrit ou résultant d’installations défectueuses.
INDUSTRIAS HERGÓM, S.L., se réserve le droit de modifier ses produits sans avertissement
préalable.
Industrias Hergóm, S.L., domiciliée à Soto de la Marina - Cantabrie - Espagne, offre une garantie de
TROIS ANS pour ses appareils. Industrias Hergom, S.L. garantit l'existence de pièces de rechange et
d'un service technique adéquat pendant 10 ans à compter de la date à laquelle ce produit cesse
d'être fabriqué.
La couverture géographique de cette garantie n’inclut que les pays où Industrias Hergóm, S.L., a une
entreprise filiale ou un importateur officiel qui distribuent ses produits et où la Directive
Communautaire 2019/771/UE est d’application obligatoire.
La garantie entrera en vigueur à partir de la date d’achat de l’appareil figurant sur le document de la
garantie et ne couvre que les détériorations ou cassures provoquées par des défauts ou vices de
fabrication.
AVERTISSEMENT IMPORTANT
Si le appareil n’est pas bien installé il ne prêtera pas le service excellent pour lequel il a été conçu.
Lisez la totalité de ces instructions et confiez le travail à un spécialiste.
Votre appareil est protégé en surface par une peinture anti-calorique, spéciale pour températures
élevées. Pendant les premiers allumages il est normal qu’une légère fumée se dégage lorsque l’un
de ses composants s’évapore, ce qui permet à la peinture de prendre corps. Nous recommandons
d’aérer la pièce jusqu’à ce que ce phénomène disparaisse.
BIENVENUS à la famille HERGOM.
Nous vous remercions d’avoir choisi notre Poêle Glance, qui représente en technique et style un
progrès important dans le monde des poêles à bois.
Votre nouveau poêle est probablement le système de chauffage avec combustibles solides le plus
avancé connu aujourd’hui. Posséder un Poêle HERGOM est la manifestation d’un sens de la qualité
exceptionnel.
Merci de lire ce manuel en entier. Il vous servira à connaître l’appareil et vous indiquera des normes
pour son installation, son fonctionnement et son entretien qui vous seront très utiles. Conservez-
le pour de futures consultations.
Si après la lecture de ce manuel vous avez besoin d’éclaircissements complémentaires, n’hésitez
pas à recourir à votre fournisseur habituel.
La pagina sta caricando ...
La pagina sta caricando ...
La pagina sta caricando ...
La pagina sta caricando ...
La pagina sta caricando ...
La pagina sta caricando ...
La pagina sta caricando ...
La pagina sta caricando ...
La pagina sta caricando ...
La pagina sta caricando ...
La pagina sta caricando ...
La pagina sta caricando ...
La pagina sta caricando ...
La pagina sta caricando ...
La pagina sta caricando ...
La pagina sta caricando ...
La pagina sta caricando ...
La pagina sta caricando ...
La pagina sta caricando ...
La pagina sta caricando ...
La pagina sta caricando ...
La pagina sta caricando ...
La pagina sta caricando ...
La pagina sta caricando ...
La pagina sta caricando ...
La pagina sta caricando ...
La pagina sta caricando ...
La pagina sta caricando ...
La pagina sta caricando ...
La pagina sta caricando ...
La pagina sta caricando ...
La pagina sta caricando ...
La pagina sta caricando ...
La pagina sta caricando ...
La pagina sta caricando ...
La pagina sta caricando ...
La pagina sta caricando ...
La pagina sta caricando ...
La pagina sta caricando ...
La pagina sta caricando ...
-
 1
1
-
 2
2
-
 3
3
-
 4
4
-
 5
5
-
 6
6
-
 7
7
-
 8
8
-
 9
9
-
 10
10
-
 11
11
-
 12
12
-
 13
13
-
 14
14
-
 15
15
-
 16
16
-
 17
17
-
 18
18
-
 19
19
-
 20
20
-
 21
21
-
 22
22
-
 23
23
-
 24
24
-
 25
25
-
 26
26
-
 27
27
-
 28
28
-
 29
29
-
 30
30
-
 31
31
-
 32
32
-
 33
33
-
 34
34
-
 35
35
-
 36
36
-
 37
37
-
 38
38
-
 39
39
-
 40
40
-
 41
41
-
 42
42
-
 43
43
-
 44
44
-
 45
45
-
 46
46
-
 47
47
-
 48
48
-
 49
49
-
 50
50
-
 51
51
-
 52
52
-
 53
53
-
 54
54
-
 55
55
-
 56
56
-
 57
57
-
 58
58
-
 59
59
-
 60
60


Hergom Estufa Shelburne HF Istruzioni per l'uso
- Categoria
- Stufe
- Tipo
- Istruzioni per l'uso
- Questo manuale è adatto anche per