
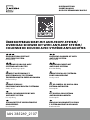
ÜBERKOPFBRAUSESET MIT ANTI-TROPF-SYSTEM/
OVERHEAD SHOWER KIT WITH ANTI-DRIP SYSTEM/
COLONNE DE DOUCHE AVEC SYSTÈME ANTI-GOUTTES
ÜBERKOPFBRAUSESET MIT
ANTI-TROPF-SYSTEM
Kurzanleitung
OVERHEAD SHOWER KIT WITH
ANTI-DRIP SYSTEM
Short manual
COLONNE DE DOUCHE AVEC
SYSTÈME ANTI-GOUTTES
Guide de démarrage rapide
HOOFDDOUCHESET MET
ANTI-DRUP SYSTEEM
Korte handleiding
HORNÍ SPRCHA SE SYSTÉMEM
PROTI ODKAP ÁVÁNÍ
Stručný návod
KOMPLET NATRYSKOWY Z
DESZCZOWNICĄ Z SYSTEMEM
ZAPOBIEGAJĄCYM PRZED KAPANIEM
Krótka instrukcja
HORNÁ SPRCHA S
PROTIODKV APKÁ VACÍM SYSTÉMOM
Krátky návod
SET DE CABEZAL DE DUCHA CON
SISTEMA ANTIGOTEO
Guía rápida
NADGLAVNI KOMPLET ZA PRHO
S SISTEMOM PROTI KAPLJANJU
Kratka navodila
ZUHANYKÉSZLET CSEPEGÉSGÁTLÓ
RENDSZERREL
Rövid útmutató
HOVED-/HÅNDBRUSERSÆT MED
ANTI-DR YP SYSTEM
Kort vejledning
SET DOCCIA CON SISTEMA
ANTIGOCCIOLAMENTO
Guida rapida
IAN 385269_2107
KURZANLEITUNG
SHORT MANUAL
GUIDE DE DÉMARRAGE RAPIDE


3
DE/AT/CH Kurzanleitung Seite 11
GB/IE Short manual Page 15
FR/BE Guide de démarrage rapide Page 19
NL/BE Korte handleiding Pagina 23
PL Krótka instrukcja Strona 27
CZ Stručný návod Strana 31
SK Krátky návod Strana 35
ES Guía rápida Página 39
DK Kort vejledning Side 43
IT Guida rapida Pagina 47
HU Rövid útmutató Oldal 51
SI Kratka navodila Stran 55

4
WICHTIG, FÜR SPÄTERE BEZUGNAHME
AUFBEWAHREN: SORGFÄLTIG LESEN!
IMPORTANT, RETAIN FOR FUTURE
REFERENCE: READ CAREFULLY!
IMPORTANT, À CONSERVER POUR
CONSULTATION ULTÉRIEURE :
À LIRE ATTENTIVEMENT !
B
ELANGRIJK, BEWAREN VOOR LATERE
RAADPLEGING: ZORGVULDIG LEZEN!
WAŻNE, ZACHOWAĆ DO PÓŹNIEJSZE-
GO UŻYTKU: UWAŻNIE PRZECZYTAĆ
!
DŮLEŽITÉ, UCHOVEJTE PRO POZDĚJŠÍ
POUŽITÍ: PEČLIVĚ SI PŘEČTĚTE!
DÔLEŽITÉ, USCHOVAJTE PRE PRÍPAD
POUŽITIA V BUDÚCNOSTI: DÔKLAD
NE
SI PREČÍTAJTE POKYNY!
IMPORTANTE: CONSERVAR PARA
CONSULTAS POSTERIORES: LEER
ATENTAMENTE.
VIGTIGT, SKAL OPBEVARES TIL SENERE
BRUG: SKAL LÆSES OMHYGGELIGT!

5
IMPORTANTE, CONSERVARE PER
EVENTUALI NECESSITÀ FUTURE:
LEGGERE CON ATTENZIONE!
FONTOS, KÉSŐBBI HIVATKOZÁSOK
CÉLJÁBÓL ŐRIZZE MEG: OLVASSA EL
FIGYELMESEN!
POMEMBNO, SHRANITE ZA POZNEJŠO
UPORABO: NATANČNO PREBERITE!

6
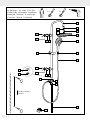
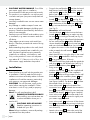
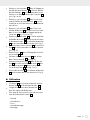
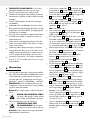
variabel
3
1
15
2
4
5
3
6
7
8
7
9
10
11
12
18
17
16
19
17
18
1516
14
13
21x 1x
variabel/variable /
variable
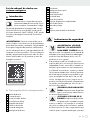
Sie benötigen · You need · Il vous faut
U hebt nodig · Wymagane · Potřebujete
Potrebujete · Necesita · Du skal bruge
Vi servono · Tarvitset · Du behöver:

7
A B
C D
E F
G H
115
115
19
115
14
13
1
13
9
14
11
9
19 115
15
114
1
11
15

8
P
I J
K L
M N
O
2 x 2 x
2 x
50 cm
50 cm
150 cm
150 cm
17
1
15
1
15
17
9
9
10
7
10
8 7
9
8
6
8
10
10
8
810

9
QR
ST
U
2
5
2
4
2
4
3
5
1
4
2
5
5

10

11 DE/AT/CH
Überkopfbrauseset mit
Anti-Tropf-System
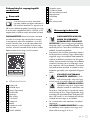
Einleitung
Bei diesem Dokument handelt es sich um
eine verkürzte Druckausgabe der voll-
ständigen Bedienungsanleitung. Durch
das Scannen des QR-Codes gelangen Sie direkt
auf die Lidl-Service-Seite (www.lidl-service.com)
und können durch die Eingabe der Artikelnummer
(IAN) 385269_2107 die vollständige Bedienungs-
anleitung einsehen und herunterladen.
WARNUNG! Beachten Sie die vollständige
Bedienungsanleitung und die Sicherheitshinweise,
um Personen- und Sachschäden zu vermeiden. Die
Kurzanleitung ist Bestandteil dieses Produkts. Mac
hen
Sie sich vor der Benutzung des Produkts mit allen
Bedien- und Sicherheitshinweisen vertraut. Bewahren
Sie die Kurzanleitung gut auf und händigen Sie alle
Unterlagen bei Weitergabe des Produkts an Dritte
mit aus.
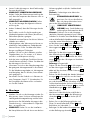
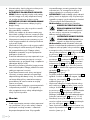
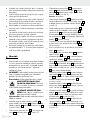
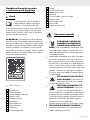
Teilebeschreibung
1 Brausestange
2 Überwurfmutter
3 Dichtung (Überkopfbrause)
4 Kugelgelenk
5 Überkopfbrause
6 Handbrause
7 Schlauchdichtung
8 Brauseschlauch
9 Umsteller
10 Anschlussschlauch
11 Werkzeug
12 Dichtung (Umsteller)
13 Messinggewinde
14 Verbindungsstück
15 Wandhalterung mit Abdeckrosette
16 Befestigungsschraube
17 Montageplatte
18 Dübel
19 Handbrausehalterung
Sicherheitshinweise
WARNUNG! LEBENS- UND
UNFALLGEFAHR FÜR KLEIN-
KINDER UND KINDER! Lassen
Sie Kinder niemals unbeaufsichtigt mit dem Ver-
packungsmaterial. Es besteht Erstickungsgefahr.
Halten Sie das Produkt von Kindern fern. Das
Produkt ist kein Spielzeug.
Dieses Produkt kann von Kindern ab 8 Jahren
und darüber sowie von Personen mit verringer-
ten physischen, sensorischen oder mentalen
Fähigkeiten oder Mangel an Erfahrung und
Wissen benutzt werden, wenn sie beaufsichtigt
werden oder bezüglich des sicheren Gebrauchs
des Produkts unterwiesen wurden und die dar-
aus resultierenden Gefahren verstehen. Kinder
dürfen nicht mit dem Produkt spielen. Reinigung
und Benutzerwartung dürfen nicht von Kindern
ohne Beaufsichtigung durchgeführt werden.
VORSICHT VOR ELEKTRISCHEM
SCHLAG! Vergewissern Sie sich vor
dem Bohren, dass sich keine elektri-
schen Leitungen an der Bohrstelle befinden.
VORSICHT! VERLETZUNGSGE-
FAHR! Stellen Sie sicher, dass alle
Teile unbeschädigt und sachgerecht
montiert sind. Bei unsachgemäßer Montage
besteht Verletzungsgefahr. Bitte beachten Sie,
dass Dichtungen Verschleißteile sind, welche
von Zeit zu Zeit ausgetauscht werden müssen.
Beschädigte Teile können die Sicherheit und
Funktion beeinflussen.
V2.0

12 DE/AT/CH
Lassen Sie die Montage nur durch fachkundige
Personen durchführen.
VORSICHT! VERBRÜHUNGSGEFAHR!
Achten Sie bei der Warmwassereinstellung da-
rauf, dass die Temperatur des Wassers nicht zu
heiß eingestellt ist.
VORSICHT! WASSERSCHADEN! Stellen
Sie vor der Montage die allgemeine Wasser-
zuführung ab.
Achten Sie darauf, dass alle Dichtungen korrekt
sitzen.
Das Produkt ist nicht für die Verwendung an
Niederdruckgeräten und offenen (drucklosen)
Elektrokleinspeichern geeignet.
Fehlerhaft montierte Brause-Sets können Wasser-
schäden verursachen!
Undichtigkeiten oder Wasseraustritt können zu
erheblichen Sachschäden an Gebäude oder
Hausrat führen. Prüfen Sie daher alle Verbin-
dungen sorgfältig auf Dichtigkeit.
Machen Sie sich vor der Installation mit allen
Gegebenheiten vor Ort vertraut, z. B. Wasse-
ranschluss und Absperrvorrichtung.
Auch bei einer sorgfältigen Produktion können
scharfe Kanten entstehen. Gehen Sie daher bei
der Montage mit Vorsicht vor.
Informieren Sie sich vor der Wandmontage über
das geeignete Montagematerial für Ihre Wand.
Für die Wandmontage haben wir Montagema-
terial beigelegt, das für übliches, festes Mauer-
werk geeignet ist.
Verwenden Sie das Produkt nur in Räumen mit
einer Temperatur über 0 °C. Unterbrechen Sie
bei Frostgefahr die Wasserzufuhr und entlee-
ren Sie das Produkt.
Montage
Machen Sie sich vor der Montage mit dem Pro-
dukt vertraut. Lesen Sie hierzu aufmerksam die
nachfolgende Montageanleitung und die Sicher-
heitshinweise. Bei fehlerhafter Montage ist die
Gewährleistung – insbesondere für Folgeschä-
den – ausgeschlossen.
VORSICHT! Drehen Sie vor der Installation
die Haupt-Wasserzufuhr ab. Ansonsten drohen
Verletzungsgefahr und/oder Sachbeschädi-
gungen.
Hinweis: Sie benötigen eine elektrische
Bohrmaschine.
STROMSCHLAGGEFAHR! Ver-
gewissern Sie sich vor dem Bohren,
dass sich keine elektrischen Leitun-
gen an der Bohrstelle befinden.
VORSICHT! VERLETZUNGS-
GEFAHR! Lesen Sie die Bedienungs-
anleitung Ihrer Bohrmaschine durch.
Hinweis: Entfernen Sie vor der Montage
sämtliches Verpackungsmaterial vom Produkt.
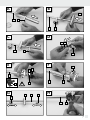
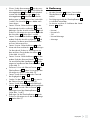
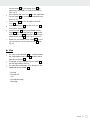
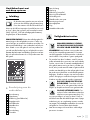
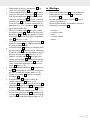
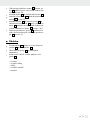
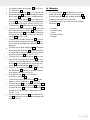
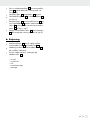
Schieben Sie zunächst eine Wandhalterung 15
und anschließend die Handbrausehalterung 19
sowie die zweite Wandhalterung 15 von unten
auf die Brausestange 1 (siehe Abb. A bis C).
Lösen Sie das Verbindungsstück 14 mit dem
Messinggewinde 13 vom Umsteller 9 (siehe
Abb. D).
Befestigen Sie das Messinggewinde 13 mit
dem Verbindungsstück 14 unten an der Brau-
sestange 1, indem Sie es mithilfe des Werk-
zeugs 11 gegen den Uhrzeigersinn festdrehen
(siehe Abb. E).
Achtung: Linksgewinde!
Drehen Sie den Umsteller 9 im Uhrzeigersinn
auf das Messinggewinde 13 und achten Sie
dabei auf den korrekten Sitz der Dichtung 12
(siehe Abb. F).
Richten Sie die Abstände der beiden Wandhal-
terungen 15 rechts und links von der Hand-
brausehalterung 19 an der Brausestange 1
aus und schrauben Sie die Schrauben mit einem
Schlitzschraubendreher (nicht im Lieferumfang
enthalten) an der Brausestange 1 fest, um die
Wandhalterungen 15 zu befestigen (siehe
Abb. G und H).
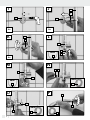
Markieren Sie die Bohrlöcher mithilfe der in
den Montageplatten 17 für die Befestigungs-
schrauben 16 vorgesehenen Löcher (ca. Ø
6 mm).
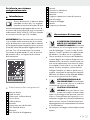
Bohren Sie nun die Befestigungslöcher und
führen Sie anschließend die Dübel 18 in die
Bohrlöcher ein (siehe Abb. I).
Befestigen Sie die beiden Montageplatten 17
mit den Befestigungsschrauben 16 .

13 DE/AT/CH
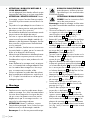
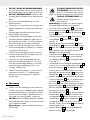
Führen Sie die Brausestange 1 mit den mon-
tierten Wandhalterungen 15 auf die Höhe der
Montageplatten 17 . Stecken Sie die Abdeck-
rosetten der Wandhalterungen 15 auf die
Montageplatten 17 und drehen Sie die Ab-
deckrosetten im Uhrzeigersinn fest (siehe Abb.
J und K). Der Umsteller 9 muss dabei nach
unten zeigen.
Setzen Sie eine Schlauchdichtung 7 in das
Gewinde des Anschlussschlauchs 10 ein und
befestigen Sie den Anschlussschlauch 10 durch
Drehen im Uhrzeigersinn am unteren Gewinde
des Umstellers 9 (siehe Abb. L und M).
Setzen Sie eine Schlauchdichtung 7 in das
andere Ende des Anschlussschlauchs 10 und
schrauben Sie diesen anschließend handfest
an Ihren Wasseranschluss.
Setzen Sie eine Schlauchdichtung 7 in die
Mutter des Brauseschlauchs 8 und befestigen
Sie diese durch Drehen im Uhrzeigersinn an
dem seitlichen Gewinde des Umstellers 9
(siehe Abb. N und O).
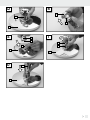
Setzen Sie eine Schlauchdichtung 7 auf das
andere Ende des Brauseschlauchs 8. Drehen
Sie anschließend die Handbrause 6 im Uhr-
zeigersinn handfest auf den Brauseschlauch 8
(siehe Abb. P).
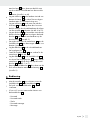
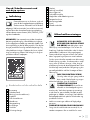
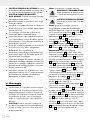
Entfernen Sie nun die Überwurfmutter 2 der
Überkopfbrause 5, indem Sie sie gegen den
Uhrzeigersinn drehen (siehe Abb. Q).
Setzen Sie die Dichtung 3 in das Gewinde
des Kugelgelenks 4.
Stecken Sie das Kugelgelenk 4 von unten in
die Überwurfmutter 2 (siehe Abb. R).
Setzen Sie die Dichtung 3 in die Überkopf-
brause 5 und schrauben Sie das Kugelgelenk
4 zusammen mit der Überwurfmutter 2 im
Uhrzeigersinn auf die Überkopfbrause 5
(siehe Abb. S und T).
Befestigen Sie die Überkopfbrause 5 durch
Drehen im Uhrzeigersinn an der Brausestange
1 (siehe Abb. U).
Bedienung
Mit dem Umsteller 9 können Sie zwischen
Überkopfbrause 5 und Handbrause 6
wählen.
Der Neigungswinkel der Überkopfbrause 5
ist individuell einstellbar.
Sie können zwischen 5 Strahlarten der Hand-
brause 6 wählen:
‒ Normal
‒ Normal-soft
‒ Soft
‒ Normal-Massage
‒ Massage

14

15 GB/IE
Overhead Shower Kit with
Anti-Drip System
Introduction
This document is a shorter printed version
of the complete instruction manual. By
scanning the QR code, you will be taken
straight to the Lidl service website (www.lidl-service.com)
where you can view and download the complete
instruction manual by entering the article number
(IAN) 385269_2107.
WARNING! Observe the complete instruction
manual and safety notes to prevent personal injury
and property damage. The short guide forms an
integral part of this product. Prior to using the product,
familiarize yourself with all operation and safety notes.
Keep the short manual well preserved and if you hand
the product on to third parties, all documentation
should be passed on as well.
Parts description
1 Shower bar
2 Union nut
3 Seal (Overhead shower head)
4 Ball joint
5 Overhead shower head
6 Handheld shower head
7 Hose seal
8 Shower hose
9 Diverter
10 Connection hose
11 Tool
12 Seal (diverter)
13 Brass thread
14 Connector
15 Wall bracket with covering rosette
16 Fixing screw
17 Installation plate
18 Wall plug
19 Handheld shower head holder
Safety notes
WARNING! DANGER TO LIFE
AND RISK OF ACCIDENTS FOR
INFANTS AND CHILDREN!
Never leave children unsupervised with the
packaging material. There is a danger of suffo-
cation. Keep this product out of the reach of
children. This product is not a toy.
This product may be used by children aged 8
years and up, as well as by persons with re-
duced physical, sensory or mental capacities
or lacking experience and knowledge, so long
as they are supervised or instructed in the safe
use of the product and understand the associ-
ated risks. Do not allow children to play with
the product. Cleaning and user maintenance
must not be performed by children without su-
pervision.
BEWARE OF ELECTRIC SHOCK!
Before drilling, ensure that there are
no electrical cables where you intend
to drill.
CAUTION! RISK OF INJURY!
Make sure that all parts are undam-
aged and correctly assembled. Im-
proper assembly may result in injury. Please
note that the seals are wear parts and must
be changed from time to time. Damaged parts
could impact safety and function.
Installation must only be performed by skilled
persons.
CAUTION! DANGER OF SCALDING!
When adjusting the temperature of hot water,
be sure not to set the water temperature too
high.

16 GB/IE
CAUTION! WATER DAMAGE! Shut off the
main water supply prior to installation.
Ensure that all the seals are positioned correctly.
This product is not suitable for use with low-pres-
sure tanks and open (non-pressurised) electrical
storage heaters.
Incorrectly installed shower sets can cause water
damage!
Any leakage or sudden escape of water can
cause considerable damage to buildings and
property. Therefore check carefully that all con-
nections are watertight.
Familiarise yourself with all local conditions prior
to installation, e.g. water connection and shut-
off device.
Sharp edges can arise even with careful pro-
duction. Therefore proceed with caution during
installation.
Before attaching the product to the wall, check
which mounting materials are suitable for your
wall. We have supplied mounting materials
suitable for an ordinary, solid masonry wall.
Only use the product in rooms with tempera-
tures above 0 °C. If there is a risk of frost, shut
off the water supply and drain the product.
Installation
Please familiarise yourself with the product prior
to installation. Carefully read the following in-
stallation instructions and safety advice. Incorrect
installation will void the warranty, particularly
with respect to consequential damages.
CAUTION! Turn off the water supply at the
mains before starting the installation. Other-
wise there is a risk of injury and/or property
damage.
Note: You will need an electric drill.
DANGER OF ELECTRIC SHOCK!
Before drilling, ensure that there are
no electrical cables where you in-
tend to drill.
CAUTION! RISK OF INJURY!
Read the operating instructions in-
cluded with your drill.
Note: Before installation, remove all packag-
ing material from the product.
First push the wall bracket
15
and then the hand-
hel
d shower head holder 19 and the second
wall bracket 15 over the shower bar 1 from
below (see Figures A to C).
Remove the connector 14 together with the brass
thread 13 from the diverter 9 (see Fig. D).
Attach the brass thread 13 with the connector
14 to the bottom of the shower bar 1 by tight-
ening it counterclockwise using the tool 11
(see Fig. E).
Attention: Left-hand thread!
Twist the diverter 9 clockwise onto the brass
thread 13 and when doing so make sure that
the seal 12 is correctly positioned (see Fig. F).
Adjust the spacing on the left and right between
the two wall brackets 15 and the handheld
shower head holder 19 on the shower bar 1,
and use a slot-head screwdriver (not included)
to tighten the screws on the shower bar 1 in
order to attach the wall brackets 15 (see Fig-
ures G and H).
Mark the drill holes using the holes in the instal-
lation plates 17 intended for the fixing screws
16 as a guide (approx. Ø 6 mm).
Now drill the mounting holes and then guide the
wall plugs 18 into the drilled holes (see Fig. I).
Attach both installation plates 17 using the
fixing screws 16 .
Hold the shower bar 1 with the installed wall
brackets 15 at the height of the installation
plates 17 . Put the covering rosettes for the wall
brackets 15 on the installation plates 17 and
turn the covering rosettes clockwise to tighten
(see Figures J and K). The diverter 9 must face
downwards when you do this.
Insert a hose seal 7 into the thread of the
connection hose 10 and attach the connection
hose 10 by twisting it clockwise onto the lower
thread of the diverter
9
(see Figures L and M).
Insert a hose seal 7 into the other end of the
connection hose 10 and screw this tightly onto
your water supply by hand.
Insert a hose seal 7 into the nut of the shower
hose 8 and attach this by twisting it clockwise
onto the side thread of the diverter 9 (see Fig-
ures N and O).
Attach a hose seal 7 to the other end of the
shower hose 8. Then connect the handheld

17 GB/IE
shower head 6 to the shower hose 8 by
tightening it by hand in a clockwise direction
(see Fig. P).
Now remove the union nut 2 on the overhead
shower head 5 by twisting it counterclockwise
(see Fig. Q).
Insert a seal 3 into the thread on the ball
joint 4.
Insert the ball joint 4 into the union nut 2
from below (see Fig. R).
Insert the seal 3 into the overhead shower
head 5 and screw the ball joint 4 together
with the union nut 2 clockwise onto the over-
head shower head 5 (see Figures S and T).
Attach the overhead shower head 5 by twist-
ing it clockwise onto the shower bar 1 (see
Fig. U).
Use
You can use the diverter 9 to switch between
the overhead shower head 5 and the hand-
held shower head 6.
The angle of the overhead shower head 5
can be adjusted by the user.
You can choose between 5 jet settings for the
handheld shower head 6:
‒ Normal
‒ Normal-soft
‒ Soft
‒ Normal-Massage
‒ Massage

18

19 FR/BE
Colonne de douche avec
système anti-gouttes
Introduction
Ce document est une version imprimée
abrégée du mode d‘emploi complet.
En scannant le code QR, vous accédez
directement à la page de service de Lidl
(www.lidl-service.com), et en saisissant le numéro
d‘article (IAN) 385269_2107, vous pouvez consulter
et télécharger le mode d‘emploi complet.
AVERTISSEMENT! Respectez le mode d‘emploi
complet et les consignes de sécurité afin d‘éviter tout
dommage corporel et matériel. Le guide de démar-
rage rapide fait partie intégrante de ce produit. Avant
d‘utiliser le produit, familiarisez-vous avec toutes les
instructions d‘utilisation et de sécurité. Conservez le
guide de démarrage rapide dans un endroit sûr et
remettez tous les documents lorsque vous transmettez
le produit à un tiers.
Descriptif des pièces
1 Barre de douche
2 Écrou-raccord
3 Joint (douche fixe)
4 Articulation à rotule
5 Douche fixe
6 Douchette à main
7 Joint tubulaire
8 Flexible de douche
9 Inverseur
10 Flexible de raccordement
11 Outil
12 Joint (inverseur)
13 Filetage en laiton
14 Pièce d‘assemblage
15 Support mural avec rosace de recouvrement
16 Vis de fixation
17 Plaque de montage
18 Cheville
19 Support pour douchette
Consignes de sécurité
AVERTISSEMENT! DANGER
DE MORT ET D‘ACCIDENT
POUR LES BÉBÉS ET LES EN-
FANTS! Ne laissez jamais les enfants mani-
puler sans surveillance les matériaux d‘emballage.
Risque d‘asphyxie. Gardez le produit hors de
portée des enfants. Le produit n’est pas un jouet.
Le produit peut être utilisé par des enfants âgés
de 8 ans et plus ainsi que par des personnes
ayant des capacités physiques, sensorielles ou
mentales réduites ou manquant d‘expérience
ou de connaissances, s‘ils sont surveillés ou s‘ils
ont été informés de l‘utilisation sûre du produit
et comprennent les risques liés à son utilisation.
Les enfants ne doivent pas jouer avec le produit.
Le nettoyage et l‘entretien ne doivent pas être
effectués par des enfants laissés sans surveillance.
PRENEZ GARDE AU RISQUE
D‘ÉLECTROCUTION ! Avant de
percer, vérifiez qu‘aucune ligne élec-
trique n‘est encastrée dans la zone du perçage.
ATTENTION! RISQUE DE
BLESSURES! Vérifiez que tous les
éléments sont en parfait état et cor-
rectement montés. Il existe un risque de blessures
si le montage est incorrect. Tenez compte du fait
que les joints sont des pièces d’usure devant être
remplacées de temps en temps. Les éléments
endommagés peuvent affecter la sécurité de
l‘utilisateur et le fonctionnement du produit.
Confiez exclusivement le montage à des
techniciens qualifiés.

20 FR/BE
ATTENTION! RISQUE DE BRÛLURE À
L‘EAU BOUILLANTE !
Lors du réglage de l’eau chaude, veillez à ce que
la température de l‘eau ne soit pas trop élevée.
ATTENTION! DÉGÂTS DES EAUX! Avant
le montage, coupez l‘arrivée d‘eau principale.
Contrôlez le positionnement correct de tous les
joints.
Ce produit n‘est pas adapté à une utilisation sur
des réservoirs basse pression et des petits ballons
électriques ouverts (hors pression).
Des ensembles de douche incorrectement montés
peuvent causer des dégâts des eaux !
Les fuites ou ruptures de conduites d’eau peuvent
occasionner d’importants dégâts matériels du
bâtiment ou des équipements ménagers. Veuillez
donc contrôler soigneusement l‘étanchéité de
tous les raccords.
Avant l’installation, familiarisez-vous avec toutes
les particularités sur place, par ex. les raccords
d’eau et les dispositifs de fermeture.
Même lorsque la fabrication a été effectuée avec
soin, des arêtes coupantes peuvent se former.
Procédez donc toujours avec prudence lors du
montage.
Avant d‘effectuer le montage mural, renseignez-
vous sur le matériel de montage adapté à votre
mur. Le matériel de montage fourni est conçu
pour une maçonnerie normale solide.
Utilisez uniquement le produit dans des pièces
dont la température ambiante est supérieure à
0°C. Coupez l‘arrivée d‘eau en cas de gel et
vidangez le produit.
Montage
Familiarisez-vous avec le produit avant de pro-
céder au montage. Pour cela, lisez attentivement
la notice de montage et les consignes de sécu-
rité qui suivent. La garantie ne couvre pas les
dégâts causés par un montage incorrect – en
particulier les dommages indirects.
ATTENTION! Avant l‘installation, coupez
l‘arrivée d‘eau principale. Sinon, il existe un risque
de blessure et/ou de dommages matériels.
Remarque : Il vous faut une perceuse électrique.
RISQUE DE CHOC ÉLECTRIQUE !
Avant de percer, vérifiez qu‘aucune
ligne électrique n‘est encastrée dans
la zone du perçage.
ATTENTION! RISQUE DE BLES-
SURES! Lisez les instructions d‘utili-
sation de votre perceuse.
Remarque : Avant le montage, veuillez retirer
du produit l‘ensemble des matériaux composant
l‘emballage.
Glissez tout d‘abord un support mural 15 puis
un support pour douchette 19 ainsi que le
second support mural 15 par le bas sur la
barre de douche 1 (voir Fig. A à C).
Retirez de l‘inverseur 9 la pièce d‘assemblage
14 avec le filetage en laiton 13 (voir Fig. E).
Fixez le filetage en laiton 13 avec la pièce d‘as-
semblage 14 en bas sur la barre de douche 1
en le serrant fermement dans le sens anti horaire
au moyen de l‘outil 11 (voir Fig. E).
Attention : Filetage à gauche !
Tournez l‘inverseur 9 dans le sens horaire sur le
filetage en laiton 13 et vérifiez le positionnement
correct du joint 12 (voir Fig. F).
Alignez les distances des deux supports muraux
15
à droite et à gauche du support pour douchette
19
sur la barre de douche 1 et vissez fermement
les vis au moyen d‘un tournevis plat (non fourni)
sur la barre de douche 1 afin de fixer les fixa-
tions murales 15 (voir Fig. G et H).
Marquez les trous de perçage à l‘aide des trous
prévus pour les vis de fixation
16
dans les plaques
de montage 17 (env. Ø 6 mm).
Percez maintenant les trous de fixation puis
introduisez les chevilles 18 dans les trous de
perçage (voir Fig. I).
Fixez les deux plaques de montage 17 au
moyen des vis de fixation 16 .
Passez la barre de douche 1 ainsi que les
supports muraux 15 montés à la hauteur des
plaques de montage 17 . Placez les rosaces de
recouvrement des supports muraux 15 sur les
plaques de montage 17 et tournez fermement
les rosaces de recouvrement dans le sens horaire
(voir Fig. J et K). L‘inverseur 9 doit être orienté
vers le bas.
La pagina si sta caricando...
La pagina si sta caricando...
La pagina si sta caricando...
La pagina si sta caricando...
La pagina si sta caricando...
La pagina si sta caricando...
La pagina si sta caricando...
La pagina si sta caricando...
La pagina si sta caricando...
La pagina si sta caricando...
La pagina si sta caricando...
La pagina si sta caricando...
La pagina si sta caricando...
La pagina si sta caricando...
La pagina si sta caricando...
La pagina si sta caricando...
La pagina si sta caricando...
La pagina si sta caricando...
La pagina si sta caricando...
La pagina si sta caricando...
La pagina si sta caricando...
La pagina si sta caricando...
La pagina si sta caricando...
La pagina si sta caricando...
La pagina si sta caricando...
La pagina si sta caricando...
La pagina si sta caricando...
La pagina si sta caricando...
La pagina si sta caricando...
La pagina si sta caricando...
La pagina si sta caricando...
La pagina si sta caricando...
La pagina si sta caricando...
La pagina si sta caricando...
La pagina si sta caricando...
La pagina si sta caricando...
La pagina si sta caricando...
La pagina si sta caricando...
La pagina si sta caricando...
La pagina si sta caricando...
La pagina si sta caricando...
-
 1
1
-
 2
2
-
 3
3
-
 4
4
-
 5
5
-
 6
6
-
 7
7
-
 8
8
-
 9
9
-
 10
10
-
 11
11
-
 12
12
-
 13
13
-
 14
14
-
 15
15
-
 16
16
-
 17
17
-
 18
18
-
 19
19
-
 20
20
-
 21
21
-
 22
22
-
 23
23
-
 24
24
-
 25
25
-
 26
26
-
 27
27
-
 28
28
-
 29
29
-
 30
30
-
 31
31
-
 32
32
-
 33
33
-
 34
34
-
 35
35
-
 36
36
-
 37
37
-
 38
38
-
 39
39
-
 40
40
-
 41
41
-
 42
42
-
 43
43
-
 44
44
-
 45
45
-
 46
46
-
 47
47
-
 48
48
-
 49
49
-
 50
50
-
 51
51
-
 52
52
-
 53
53
-
 54
54
-
 55
55
-
 56
56
-
 57
57
-
 58
58
-
 59
59
-
 60
60
-
 61
61


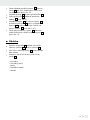
in altre lingue
- français: LIVARNO 385269 Le manuel du propriétaire
- español: LIVARNO 385269 El manual del propietario
- Deutsch: LIVARNO 385269 Bedienungsanleitung
- Nederlands: LIVARNO 385269 de handleiding
- slovenčina: LIVARNO 385269 Návod na obsluhu
- dansk: LIVARNO 385269 Brugervejledning
- polski: LIVARNO 385269 Instrukcja obsługi
Documenti correlati
-
LIVARNO 380149 Manuale del proprietario
-
-
-
-
-
-
-
-
-
Altri documenti
-
Bossini Z032204 + Z030203 000 Istruzioni per l'uso
-
GROHE VITALIO 26 400 Manuale utente
-
-
-
GROHE CONCETTO Manuale utente
-
-
-
-
-