Peerless DS-LEDLSCB-10X10 Guida d'installazione
- Tipo
- Guida d'installazione

12021-03-31 #:146-9063-1
DS-LEDLSCB Series
For LG LSCB
*Actual conguration may vary
ENG Installation video for reference only.
Read and follow instruction manual for full installation.

22021-03-31 #:146-9063-1
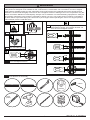
Symbols
ENG
WARNING
ENG
Do not overtighten screws.
ENG
Tools Needed for Assembly.
ENG
5/32"
(4mm)
3/8"
(10mm)
#
Skip to step.
ENG
Wear anti-static gloves.
ENG
1
2
ENG To properly tighten screws: Tighten until screw
head makes contact, then tighten another 1/2
turn. Do not overtighten screws.
4
+1/2
3
ENG - This product is designed to be installed on plywood walls. Hardware is included for plywood installation.
walls. Before installing make sure the supporting surface will support the combined load of the equipment and
hardware. Screws must be tightly secured. Do not overtighten screws or damage can occur and product may fail.
Never exceed the Maximum Load Capacity. Always use an assistant or mechanical lifting equipment to safely lift
and position equipment. This product is intended for indoor use only. Use of this product outdoors could lead to
call customer care at 1-800-865-2112.
WARNING
2.5mm

32021-03-31 #:146-9063-1
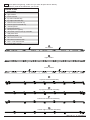
Parts List
Description
Aleft column
Bright column
Cinside column
Dtop left horizontal asy
Etop right horizontal asy
Fbottom left horizontal asy
Gbottom right horizontal asy
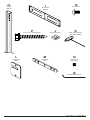
Hvertical spacer
Ihorizontal spacer
JM5 square nut (spare)
K3mm allen wrench two-tip T-handle
Lwall plate shim
Mconnector plate
NM5 x 5mm set screw
OM5 x 8mm socket screw
P#14 x 1.75" wood screw
Q2.5mm allen wrench
A
B
C
left column
right column
inside column
D
E
F
G
top left horizontal assembly
top right horizontal assembly
bottom left horizontal assembly
bottom right horizontal assembly
Parts (Before beginning, make sure you have all parts shown below).
Refer to parts list included with your model.
ENG

42021-03-31 #:146-9063-1
N
P
O
J
M5 x 5mm
set screw
#14 x 1.75" wood screw
M5 x 8mm
M5 square nut
L
HI
wall plate
shim
vertical
spacer horizontal
spacer
M
connector
plate
K
3mm allen wrench
two-tip T-handle
Q
2.5mm allen wrench

52021-03-31 #:146-9063-1
This page intentionally left blank.
ENG

62021-03-31 #:146-9063-1
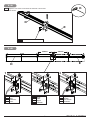
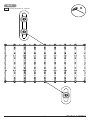
1-1
Optional: If connecting two top horizontal extrusions,
ENG
Remove and save hardware.
ENG
D
E
1-2
Use extrusion connectors to connect top horizontal
extrusions.
ENG
M (4) N (8)
K
E
D
Q

72021-03-31 #:146-9063-1
1-3
Replace one hook-on bracket in between connected
extrusions.
ENG
Use saved hardware.
ENG
K
E
D
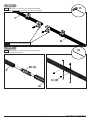
1-4
568mm 568mm
ENG
ESP
DEU
Adjust.
Ajuste.
Réglez.
Einstellen.
1 2 3
Loosen.
Desserrez.
Lösen.
ENG
ESP
DEU
ENG
ESP
DEU
Tighten.
Apriete.
Puis serrez.
Anziehen.
DE

82021-03-31 #:146-9063-1
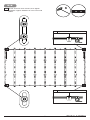
2-1
Optional: If connecting two bottom horizontal
ENG
Remove and save hardware.
ENG G
F
K
2-2
Use extrusion connectors to connect bottom
horizontal extrusions.
ENG
N (6)
M (3)
F
G
Q

92021-03-31 #:146-9063-1
F
G
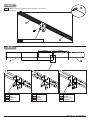
2-3
Replace one hook-on bracket in between connected
extrusions.
ENG
Use saved hardware.
ENG
K
2-4
F G
1 2 3
Loosen.
Desserrez.
Lösen.
ENG
ESP
DEU
ENG
ESP
DEU
Adjust.
Ajuste.
Réglez.
Einstellen.
ENG
ESP
DEU
Tighten.
Apriete.
Puis serrez.
Anziehen.
568mm 568mm

10 2021-03-31 #:146-9063-1
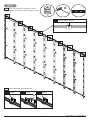
3
ENG - When installing Peerless wall mounts on a wood stud wall covered with plywood, verify that the wood
studs are a minimum of 2" x 4" nominal size and plywood is a minimum Grade BC, 1/2" (13 mm) thick. Plywood
may be covered by gypsum board (drywall) up to 5/8" thick.
WARNING
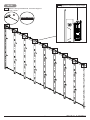
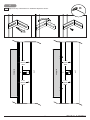
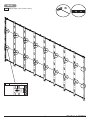
3-1
ENG When installing more than one display to a wood stud wall reinforced with plywood (minimum Grade BC, 1/2"
thick) that may be covered in gypsum board (drywall) up to 5/8" thick, the mounting surface must be plumb
(+/- .25”) across the height of the video wall and straight (+/- .25”) across the width of the video wall.

11 2021-03-31 #:146-9063-1
3-2
Use a laser level to keep mounting holes
level.
ENG
3.0"
(76mm)
display tile
7/8"(22mm) minimum
for mounting clearance

12 2021-03-31 #:146-9063-1
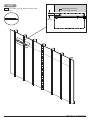
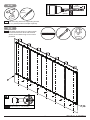
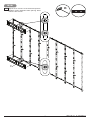
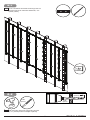
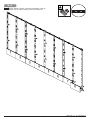
3-3
Level top horizontal extrusion and mark
mounting holes on plywood (must be
minimum Grade BC, 1/2" (13mm) thick.)
ENG
D,E

13 2021-03-31 #:146-9063-1
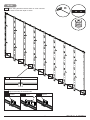
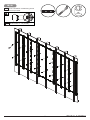
3-5
Level extrusion. Install using wood screws
provided.
ENG
3/8"
(10mm)
Maximum 80 in. • lb (9 N.M.).
ENG
3-4
Drill mounting holes into supporting surface
(1.75" (44mm) minimum depth required).
ENG
5/32"
(4mm)
1.75"
(44mm)
5/32"
(4mm)
D,E
P

14 2021-03-31 #:146-9063-1
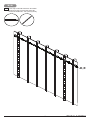
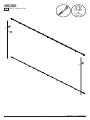
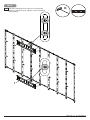
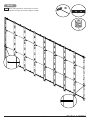
3-6
horizontal extrusion.
ENG
3/8"
(10mm)
ENG
P
H
H
H
D

15 2021-03-31 #:146-9063-1
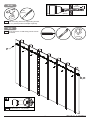
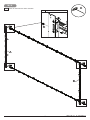
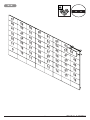
3-7
Use third vertical spacer to align bottom
then mark mounting holes on plywood (must be
minimum Grade BC, 1/2" (13mm) thick.)
ENG
F,G
H
ENG
H
F

16 2021-03-31 #:146-9063-1
F,G
3-9
Use third vertical spacer to align bottom
spacer, then install using wood screws
provided.
ENG
3/8"
(10mm)
Maximum 80 in. • lb (9 N.M.).
ENG
P
3-8
Drill mounting holes into supporting surface
(1.75" (44mm) minimum depth required).
ENG
5/32"
(4mm)
1.75"
(44mm)
5/32"
(4mm)

17 2021-03-31 #:146-9063-1
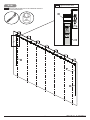
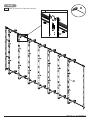
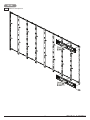
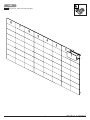
4
Remove vertical spacers.
ENG
3/8"
(10mm)
H

18 2021-03-31 #:146-9063-1
5-1
Hook on and secure outer columns.
ENG
B
A
Tighten hardware.
ENG
K
O

19 2021-03-31 #:146-9063-1
5-2
Hook on and secure all inside columns.
ENG
C
K
Tighten hardware.
ENG
O

20 2021-03-31 #:146-9063-1
6-1
Loosen hardware on columns.
ENG K
La pagina si sta caricando...
La pagina si sta caricando...
La pagina si sta caricando...
La pagina si sta caricando...
La pagina si sta caricando...
La pagina si sta caricando...
La pagina si sta caricando...
La pagina si sta caricando...
La pagina si sta caricando...
La pagina si sta caricando...
La pagina si sta caricando...
La pagina si sta caricando...
La pagina si sta caricando...
La pagina si sta caricando...
La pagina si sta caricando...
La pagina si sta caricando...
-
 1
1
-
 2
2
-
 3
3
-
 4
4
-
 5
5
-
 6
6
-
 7
7
-
 8
8
-
 9
9
-
 10
10
-
 11
11
-
 12
12
-
 13
13
-
 14
14
-
 15
15
-
 16
16
-
 17
17
-
 18
18
-
 19
19
-
 20
20
-
 21
21
-
 22
22
-
 23
23
-
 24
24
-
 25
25
-
 26
26
-
 27
27
-
 28
28
-
 29
29
-
 30
30
-
 31
31
-
 32
32
-
 33
33
-
 34
34
-
 35
35
-
 36
36


Peerless DS-LEDLSCB-10X10 Guida d'installazione
- Tipo
- Guida d'installazione
in altre lingue
Documenti correlati
-
Peerless DS-LEDL27-6X6 Guida d'installazione
-
-
-
-
Peerless DS-LEDTK-10VX10V Manuale utente
-
-
-