Giacomini KD410 Manuale utente
- Categoria
- Misurazione, test
- Tipo
- Manuale utente

KD410Y001 pag.1
KD410Y002 pag. 46

1
Dicembre 2018 - December 2018
KLIMAdoMotIc
IstruzIonI unItà dI controllo con dIsplay touch-screen
Control unit with touCh sCreen display instruCtion
Kd410y001
IT
INDICE
Pagina Paragrafo
2 Wizard iniziale
3 Aggiungere modulo attuatore KPM40 Hydro
6 Aggiungere sensore di temperatura/umidità K410W
9 Aggiungere modulo attuatore KPM45 Air
12 Cambio di stagione
13 Impostazione programmi crono
17 Modalità vacanza
18 Cambio nome stanza
20 Blocco password
21 Congurazione WiFi
23 Meteo tempo reale
24 Cambio data e ora
26 Impostazione spegnimento schermo e suoni
29 Funzioni principali
30 Panoramica stanze
31 Modica umidità deumidicatore
33 Modica set integrazione
35 Modica cambio stagione auto o manuale
37 Modica tempo apertura valvola miscelatrice
40 Modica parametri macchine dell’aria con KPM45 Air
42 Riprogrammazione del sistema
EN
SUMMARY
Page Paragraph
2 Starting Wizard
3 Adding the KPM40 Hydro actuator module
6 Adding K410W temperature/humidity sensor
9 Adding the KPM45 Hydro actuator module
12 Season change
13 Setting chrono programs
17 Vacation mode
18 Changing room name
20 Password lock
21 WiFi conguration
23 Real time weather
24 Change date and time
26 Setting screen and sound
29 Main funcitions
30 Rooms overview
31 Change dehumidicator humidity
33 Change integration set
35 Change the season, auto or manual
37 Change mixing valve opening time
40 Change parameters of air treatment units with KPM45 Air
42 Reprogramming the system
KD410Y001 Connect-RAD

2
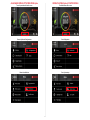
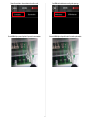
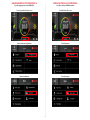
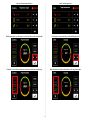
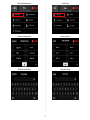
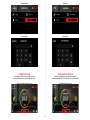
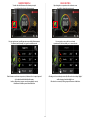
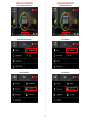
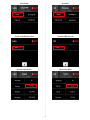
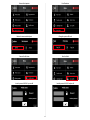
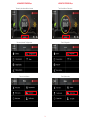
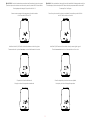
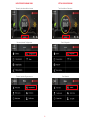
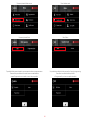
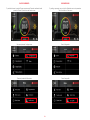
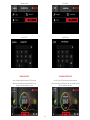
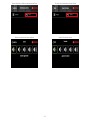
WIZARD INIZIALE
Scelta lingua
Scelta della nazione
Inserire il CAP
STARTING WIZARD
Choose the language
Choose the Country
Insert the ZIP code

3
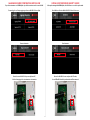
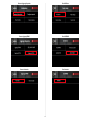
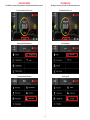
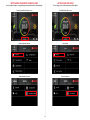
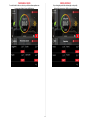
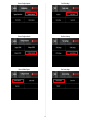
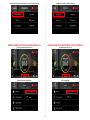
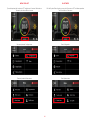
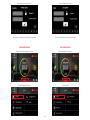
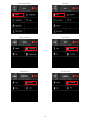
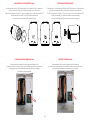
AGGIUNGERE MODULO ATTUATORE KPM40 Hydro
Toccare la parte bassa del touch screen
Premere il pulsante Congurazione
Entrare in Installazione
ADDING THE KPM40 Hydro ACTUATOR MODULE
Touch the bottom of the screen
Press Conguration
Press System setup

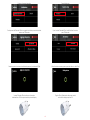
4
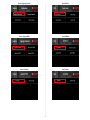
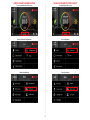
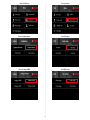
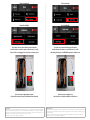
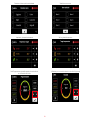
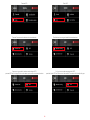
Entrare in Aggiungi dispositivo
Premere Aggiungi KPM40
Premere Automatico
Press Add Device
Press Add KPM40
Press Automatic

5
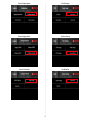
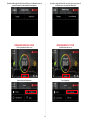
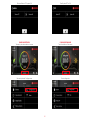
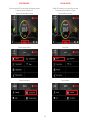
Premere Con miscelatrice o Senza miscelatrice in base alla necessità
Recarsi al KPM40 Hydro e premere il pulsante U1 per avviare la sincronizzazione
Press KPM40 with or without mixer according to the system type
Go near the KPM40 Hydro and press the button U1 to start the synchronization

6
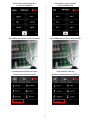
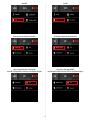
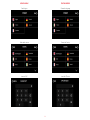
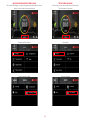
AGGIUNGERE SENSORE DI TEMPERATURA/UMIDITà K410W
Dopo la sincronizzazione con il KPM40 Hydro è possibile sincronizzare anche i sensori K410W.
Premere Agg. Access Point per aggiungere il sensore K410WY012 Access Point
Premere Automatico
Recarsi al sensore K410WY012 e premere il pulsante “A”,
il led rosso lampeggerà e la sincronizzazione sarà terminata
A
ADDING K410W TEMPERATURE/HUMIDITY SENSOR
After synchronizing with the KPM40 Hydro, the K410W sensors can also be synchronized.
Press Add Access Point to add the K410WY012 Access Point sensor
Press Automatic
Go near the K410WY012 sensor and press the “A” button,
the red LED will ash and the synchronization will be terminated
A

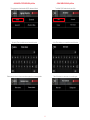
7
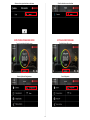
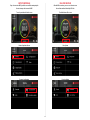
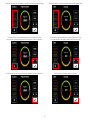
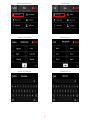
Dopo aver aggiunto l’Access Point è possibile aggiungere altri sensori K410W.
Entrare in Aggiungi K410W per aggiungere altri sensori K410WY002 o K410WY003
Premere Automatico
Recarsi al KPM40 Hydro ed eettuare le seguenti operazioni per sincronizzare il sensore K410W:
1) Selezionare il relè da associare al sensore K410W premendo il pulsante U2
2) Mantenere premuto per 2 sec. il tasto U2 per salvare l’associazione
3) Premere più volte il tasto U2 per spostarsi oltre l’uscita n°8, si spegneranno tutti i LED,
quindi tenere premuto per 2 sec. il pulsante U2 per salvare tutto e terminare l’impostazione.
After adding the Access Point, the other additional K410W sensors can be added.
Press Add K410W to add other K410WY002 or K410WY003 sensors
Press Automatic
Go near the KPM40 Hydro and do the following operations to synchronize the K410W sensor:
1) Select the relay to be associated with the K410W sensor by pressing the U2 button
2) Keep pressed for 2 seconds the U2 button to save the association
3) Press the U2 button repeatedly to move past output 8, all LEDs will turn o,
then press and hold for 2 seconds the U2 button to save everything and nish the setting.

8
Successivamente è possibile inserire il nome del locale dove è posizionato il sensore K410W...
...ed associare il sensore K410W alla stanza premendo il pulsante “A”,
il LED rosso lampeggerà
A
È necessario ripetere questa procedura no al completamento delle associazioni uscite-sensori,
no a un massimo di 4 KPM40 con o senza miscelatrice.
Then is possible to enter the name of the room where the K410W sensor is located...
... and associate the K410W sensor to the room by pressing the “A” button,
the red LED will ash
A
It is necessary to repeat this procedure until the ouput-sensor associations are completed,
up to a maximum of 4 KPM40 with or without mixer.

9
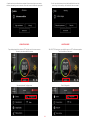
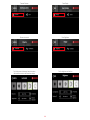
AGGIUNGERE MODULO ATTUATORE KPM45 Air
È possibile aggiungere no a 4 moduli KPM45 Air.
Toccare la parte bassa del touch screen
Premere il pulsante Congurazione
Entrare in Installazione
ADDING THE KPM45 Air ACTUATOR MODULE
Is possible to add up to 4 KPM45 Air modules.
Touch the bottom of the screen
Press Conguration
Press System setup

10
Entrare in Aggiungi dispositivo
Premere Aggiungi KPM45
Premere Automatico
Press Add Device
Press Add KPM45
Press Automatic

11
Selezionare la stanza o più stanze desiderate (massimo 6)
che comanderanno il modulo KPM45 Air
Recarsi al KPM45 Air e premere il pulsante U1 per avviare la sincronizzazione
Successivamente premere Stato Impianto per avviare il sistema
che inizierà a comunicare i dati tra i dispositivi installati
Select the desired room or more rooms (maximum 6)
that will control the KPM45 Air module
Go near the KPM45 Air and press the U1 button to start the synchronization
Then press System Status to start the system
that will begin to communicate data between the installed devices

12
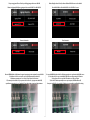
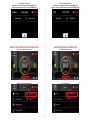
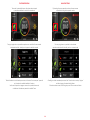
CAMBIO DI STAGIONE
È possibile cambiare la stagione direttamente dal display del KD410Y001.
Toccare la parte bassa del touch screen
Premere il pulsante Congurazione
Entrare in Modo Operativo
SEASON CHANGE
Is possible to change the season directly from the display of the KD410Y001.
Touch the bottom of the screen
Press Conguration
Press Operating mode

13
Selezionare la stagione desiderata e confermare
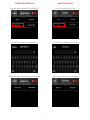
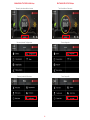
IMPOSTAZIONE PROGRAMMI CRONO
Toccare la parte bassa del touch screen
Premere il pulsante Congurazione
Select the desired season and conrm
SETTING CHRONO PROGRAMS
Touch the bottom of the screen
Press Conguration

14
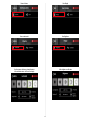
Premere il pulsante Programmazione
Selezionare la stagione da congurare
Selezionare la stanza o più stanze desiderate
Press Schedule
Select the season to be congured
Select the desired room or rooms

15
Impostare le 3 temperature desiderate
Nella Programmazione è possibile spostare il cursole nelle 24h con le freccie destra/sinistra
Posizionato il cursore nell’orario desiderato, selezionare una delle temperature di target
Set the 3 desired temperatures
In Schedule you can move the indicator in 24h with left/right arrow
When the indicator is in the desired timetable, select the target temperature

16
È possibile allungare la fascia desiderata premendo le freccie destra/sinistra
oppure togliere la selezione della temperatura di target con la freccia sottostante
Una volta impostata la giornata con le fasce orarie desiderate, premere il pulsante OK
A questo punto è possibile salvare e copiare le fasce orarie al giorno successivo,
salvare e passare al giorno successivo, salvare ed uscire alla schermata principale
It is possible to length the desired band by pressing the left/right arrow
or stop the selection of the target temperature with the below arrow
After setting the day timetable, press the OK button
Now it’s possible to save and copy the timetable to the next day,
save and go to the next day, save and exit to the main screen

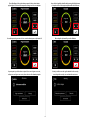
17
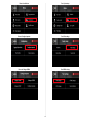
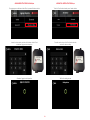
MODALITà VACANZA
È possibile portare tutte le stanze in OFF antigelo con la funziona vacanza.
Toccare la parte bassa del touch screen
Premere il pulsante Congurazione
Premere il pulsante Modo vacanza
VACATION MODE
With VACATION mode you can set all the rooms in OFF-antifreeze operation.
Touch the bottom of the screen
Press Conguration
Press Vacation mode

18
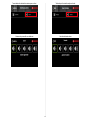
Scegliere come abilitare la funzione Vacanza e il Tipo
CAMBIO NOME STANZA
Toccare la parte bassa del touch screen
Premere il pulsante Congurazione
Choose how to enable the Vacation function and the Type
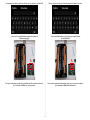
CHANGING ROOM NAME
Touch the bottom of the screen
Press conguration

19
Premere il pulsante Nome stanza
Selezionare la stanza desiderata
Modicare il nome della stanza
Press Room name
Select the desired room
Change the room name
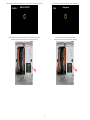
La pagina si sta caricando...
La pagina si sta caricando...
La pagina si sta caricando...
La pagina si sta caricando...
La pagina si sta caricando...
La pagina si sta caricando...
La pagina si sta caricando...
La pagina si sta caricando...
La pagina si sta caricando...
La pagina si sta caricando...
La pagina si sta caricando...
La pagina si sta caricando...
La pagina si sta caricando...
La pagina si sta caricando...
La pagina si sta caricando...
La pagina si sta caricando...
La pagina si sta caricando...
La pagina si sta caricando...
La pagina si sta caricando...
La pagina si sta caricando...
La pagina si sta caricando...
La pagina si sta caricando...
La pagina si sta caricando...
La pagina si sta caricando...
La pagina si sta caricando...
La pagina si sta caricando...
La pagina si sta caricando...
La pagina si sta caricando...
La pagina si sta caricando...
La pagina si sta caricando...
La pagina si sta caricando...
La pagina si sta caricando...
La pagina si sta caricando...
La pagina si sta caricando...
La pagina si sta caricando...
La pagina si sta caricando...
La pagina si sta caricando...
La pagina si sta caricando...
La pagina si sta caricando...
La pagina si sta caricando...
La pagina si sta caricando...
La pagina si sta caricando...
La pagina si sta caricando...
La pagina si sta caricando...
La pagina si sta caricando...
La pagina si sta caricando...
La pagina si sta caricando...
La pagina si sta caricando...
La pagina si sta caricando...
La pagina si sta caricando...
La pagina si sta caricando...
La pagina si sta caricando...
La pagina si sta caricando...
La pagina si sta caricando...
La pagina si sta caricando...
La pagina si sta caricando...
La pagina si sta caricando...
-
 1
1
-
 2
2
-
 3
3
-
 4
4
-
 5
5
-
 6
6
-
 7
7
-
 8
8
-
 9
9
-
 10
10
-
 11
11
-
 12
12
-
 13
13
-
 14
14
-
 15
15
-
 16
16
-
 17
17
-
 18
18
-
 19
19
-
 20
20
-
 21
21
-
 22
22
-
 23
23
-
 24
24
-
 25
25
-
 26
26
-
 27
27
-
 28
28
-
 29
29
-
 30
30
-
 31
31
-
 32
32
-
 33
33
-
 34
34
-
 35
35
-
 36
36
-
 37
37
-
 38
38
-
 39
39
-
 40
40
-
 41
41
-
 42
42
-
 43
43
-
 44
44
-
 45
45
-
 46
46
-
 47
47
-
 48
48
-
 49
49
-
 50
50
-
 51
51
-
 52
52
-
 53
53
-
 54
54
-
 55
55
-
 56
56
-
 57
57
-
 58
58
-
 59
59
-
 60
60
-
 61
61
-
 62
62
-
 63
63
-
 64
64
-
 65
65
-
 66
66
-
 67
67
-
 68
68
-
 69
69
-
 70
70
-
 71
71
-
 72
72
-
 73
73
-
 74
74
-
 75
75
-
 76
76
-
 77
77


Giacomini KD410 Manuale utente
- Categoria
- Misurazione, test
- Tipo
- Manuale utente
in altre lingue
- English: Giacomini KD410 User manual
Documenti correlati
Altri documenti
-
Ravelli HR EVO 14 Hydro Manuale del proprietario
-
 Bio Bronpi HYDRO Serie Installation, Operating And Service Instructions
-
 MCZ DUO HYDRO-AIR Guida d'installazione
-
Dell Stud Sensor MP2000 Manuale utente
-
 wavin Sentio Quick Manual
-
Emmeti X-ONE Orizzontale (1022DC-O e 1122DC-O) Manuale del proprietario
-
Hoover HOC3T3378B WIFI Manuale utente
-
Comelit Planux Memo Video Manuale utente
-
Extraflame System expansion motherboard kit Manuale del proprietario
-
ROSIERES RFZS3171PNI WIFI Manuale utente


