
Pedal Unit DDKU-P7 Owner's Manual
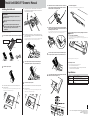
Installing the Pedalboard
Have a Phillips-head (+) screwdriver ready.
Please confirm that all parts shown in the illustration are provided.
Install the expression pedal.
2-1
Remove the tape from the connector in the hole of the pedal unit.
2-2
Remove the screw.
Be careful not to drop any screws inside the pedal umit during installation. Do not
discard the screw; you will need it later in step 3.
2-3
Hold the cable connector so that the two lines on the connector are
facing upward, then carefully plug it into the inside connector on the
bottom of the expression pedal.
2-4
Install the expression pedal to the corresponding indentation on the
pedal unit by first fitting the protrusion on the back side and then fitting
the front side as shown.
As you fit it in position, the front side of the expression pedal is slightly lifted. When
installing the expression pedal, be careful to avoid catching the connector.
Fix the expression pedal to the pedal unit while holding the
expression pedal, using the screw you removed in step 2-2.
Install the 2nd expression pedal.
4-1
Remove the tape from the connector in the hole of the pedal unit.
4-2
Remove the screw.
Be careful not to drop any screws inside the pedal unit during installation. Do not
discard the screw; you will need it later in step 5.
Precautions
Before installing/uninstalling, turn the power of the
Instrument off.
Take care not to drop the pedalboard or to pinch your
finger(s).
Do not remove the expression pedal and the 2nd
expression pedal once they have been installed, since
this may cause a faulty contact and result in a
malfunction.
1
Pedal Unit
2nd Expression Pedal Cord
Install the expression
pedal
Install the 2nd expression
pedal
Expression Pedal
2
3
4
4-3
Hold the cable connector so that the two lines on the connector are
facing upward, then carefully plug it into the inside connector on
the bottom of the second expression pedal.
4-4
Install the 2nd expression pedal to the corresponding indentation
on the pedal unit by first fitting the protrusion on the back side and
then fitting the front side as shown.
As you fit it in position, the front side of the 2nd expression pedal is slightly lifted. When
installing the 2nd expression pedal, be careful to avoid catching the connector.
Fix the 2nd expression pedal to the pedal unit while holding the
2nd expression pedal, using the screw you removed in step 4-2.
Connect the TO MAIN terminal of the Pedalboard to the TO PEDAL
terminal of the instrument using the cord.
• Convenient carrying handle
You can transport this pedal unit holding the carrying handle on the rear.
Do not hold the keys, since this may damage or result in a
malfunction.
• For users of the optional DDKU-L7
You can attach this pedal unit to the optional DDKU-L7 keyboard stand.
Fit the indented parts on the rear of the pedal unit onto the corresponding protrusions of the
DDKU-L7 keyboard stand.
To uninstall the pedalboard, reverse the procedure.
Post-assembly checklist
Once you’ve assembled the stand, check the following points:
• Does the pedalboard produce sounds?
• Confirm that the Pedalboard cord plugs are securely connected to each
terminal on the Main unit and pedalboard.
Specifications
5
6
Pedalboard 20 Keys (C - G), Initial Touch
Controls Footswiches (Left, Right), Expression pedal
Dimensions
(WxDxH), Weight
873 x 539 x 310mm (with the expression pedal installed), 13kg
Connector TO MAIN
U.R.G., Pro Audio & Digital Musical Instrument Division, Yamaha Corporation
© 2006 Yamaha Corporation
WH76610 ???MWDH?.?-01A0
Printed in Japan
JA
EN
-
 1
1

in altre lingue
- English: Yamaha DDKU-P7 Owner's manual
- français: Yamaha DDKU-P7 Le manuel du propriétaire
- español: Yamaha DDKU-P7 El manual del propietario
- Deutsch: Yamaha DDKU-P7 Bedienungsanleitung
- русский: Yamaha DDKU-P7 Инструкция по применению
- Nederlands: Yamaha DDKU-P7 de handleiding
- português: Yamaha DDKU-P7 Manual do proprietário
- dansk: Yamaha DDKU-P7 Brugervejledning
- čeština: Yamaha DDKU-P7 Návod k obsluze
- polski: Yamaha DDKU-P7 Instrukcja obsługi
- svenska: Yamaha DDKU-P7 Bruksanvisning
- 日本語: Yamaha DDKU-P7 取扱説明書
- Türkçe: Yamaha DDKU-P7 El kitabı
- română: Yamaha DDKU-P7 Manualul proprietarului