Motorola P7382i Manuale utente
- Categoria
- Cellulari
- Tipo
- Manuale utente
Questo manuale è adatto anche per

DIGITAL WIRELESS TELEPHONE
User's Guide

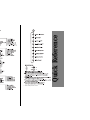
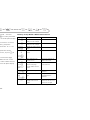
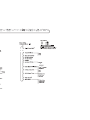
Options Menu
Quick Reference
** Network Dependent Feature

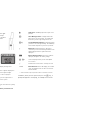
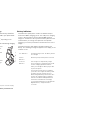
Special Keys
S
Press to turn phone on and off.
O
Press to accept call, setting, option,...
C
Press to reject call, setting, option,...
E
Press to enter the quick access features.
$
Press to access Options or Phone Book
menus.
<>
Press both simultaneously to lock the
keypad on flipless models; also use to scroll
left and right.
ª
Press the top to scroll up. Press the bottom
to scroll down.
f
Press to call Voicemail.
*
Making a Call
Enter
C
O
.
Receiving a Call
Press
O
.
Ending a Call
Press
O
,
C
.
Making an Emergency Call
Enter
911O
. The call will be directed to a
central emergency operator.
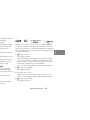
Quick Access Features
Press
E
followed by the appropriate key, or press
E
, scroll to the feature, and press
O
to select.
Adjust Ringer Volume
Press
E
followed by the volume button to increase or
decrease the ringer volume.
Recording a Voice Note Message
**
Press the Start/Stop Record button (
?
) on the side of the
phone. Press the button again to stop recording.
Playing a Voice Note Message
**
Select Messages, Voice Note, Play Voice Notes, or use
the Quick Access item.
Redialing the Last Number Called
1
Press
O
to display the last number dialed.
2
Press
O
to call the number.
One-Touch Dialing
Press and hold the appropriate digit key
1
to
9
.
Storing Numbers in the Phone Book
Press
E2
to store a number on the SIM card.
Recalling a Number from the Phone Book
Press the Smart Button (
=
), then scroll to the stored
number, or press the appropriate digit key to skip to a
particular letter. To make the call, hold down
=
for 1.5
seconds, or press
O
.
Dialing Phone Book Numbers
Enter
G
>O
Stopping a Call Alert
Press the volume button when the phone is ringing or
vibrating. This will stop the alert but not answer the call.
* Network and subscription dependent feature. Not available in all
areas.
** Use of this function is subject to varying State and Federal laws
regarding privacy and recording of phone conversations.
Quick Reference

Introduction
1
Introduction
Introduction
Welcome
Congratulations on your selection of a mobile phone from
Motorola
, a world leader in cellular technology. The Motorola
Timeport
™
P7389i phone is packed with features that help you stay in touch and in control. Specifically, this phone provides
you with a state-of-the-art wireless data feature via a technology known as General Packet Radio Service (GPRS). With
Motorola’s P7389i mobile phone and its GPRS feature, you can stay in touch and in control within your business world.
Control
• Customizable Quick Access Menu
E
-
Place nine of your most
frequently used features in your own personal menu so that they
can be accessed with just two key presses. Icons make each
feature easy to identify.
• Voice Note feature
}
-
Allows you to record a number of
personal voice messages or to record part of a phone call - useful
when you haven’t got pen and paper handy for taking down
directions or a message.
• Voice Control -
Use voice commands to call up Phone Book
entries and to select Quick Access options.
Power
• Superb battery performance
G
-
Each phone is capable of
several hours conversation or several days standby, but is still
small and light.
• Tri Band -
versions of the phone include the powerful Tri Band
feature which means that they can use 900, 1800 and 1900MHz
bands for greater call success and allow wider roaming
opportunities.
!
Before you use your phone, see “Your Battery” on page 16
for important information on charging a new battery.
Discretion
• VibraCall
®
alert
L
-
In locations where you don’t want your
phone to ring, or which are too noisy to hear your phone ring,
your phone can vibrate to alert you of a call.
• Wearable Holster -
Wear your phone in a stylish holster on your
belt. It is small enough and light enough to keep with you almost
anywhere, designed for your convenience, not meant to secure
your phone under all circumstances.
• Stop Call Alert -
Press the volume button when the phone is
ringing or vibrating. This will stop the alert but not answer the
call.
Personality™ feature
This cellular telephone incorporates the
Personality
™ feature. Unique
to
Motorola
, the
Personality
™ feature removes the complexity of
cellular communications by guiding you through the features and
presenting you with simple choices every step of the way. The
Personality
™ feature can also allow you to personalize the way you
use your phone—for example, different ringer tones, a phone book
and network selection preferences - all presented with clarity and
simplicity. In this manual, each of the
Personality
™ features is
identified with an
j
symbol to indicate that it is customizable to
meet your requirements.

Introduction
2
Personal Communications Sector
600 North U.S. Highway 45
Libertyville, Illinois 60048
1-800-331-6456 (United States)
1-888-390-6456 (TTY/TDD United States)
1-800-461-4575 (Canada)
www.motorola.com
MOTOROLA, the Stylized M Logo and all other trademarks indicated
as such herein are trademarks of Motorola, Inc. ® Reg. U.S. Pat. &
Tm. Off.All other product or service names are the property of their
respective owners.
© 2001 Motorola, Inc. All rights reserved. Printed in the U.S.A.
Manual number: 9889921K01-A
Cover number: 8988485L34-O
Computer Software Copyrights
The Motorola equipment described in this manual may include copy-
righted Motorola computer programs stored in semiconductor mem-
ories or other media. Laws in the United States and other countries
preserve for Motorola certain exclusive rights for copyrighted com-
puter programs, including the exclusive right to copy or reproduce in
any form the copyrighted computer program. Accordingly, any copy-
righted Motorola computer programs contained in the Motorola
equipment described in this manual may not be copied or reproduced
in any manner without the express permission of Motorola, Inc.

Contents
3
Contents
Safety
Important information for the efficient and safe operation of your phone............................................................................... 9
About Your Phone, Battery and SIM Card
Introduces your phone, explains how to charge and maintain batteries, explains about your SIM Card..............................13
Making and Receiving Phone Calls
Explains how to make single or conference calls, how to redial, how to transfer a call, and how to end a call...................21
Using Voice Features
Explains how to use the voice note and voice control features on your phone....................................................................... 31
Using the Options Menu
Provides an explanation of the Options Menu and how to use it............................................................................................. 39
Using the Quick Access Menu
Provides an explanation of the quick access menu and how to use it ...................................................................................... 91
Accessories
Details the optional accessories available for use with your phone.......................................................................................... 97
What to Do If...
Helps you to solve problems that may occur............................................................................................................................... 99
Index
A comprehensive Index ............................................................................................................................................................... 109

Contents
4

About This Guide
5
About This Guide
Understanding This Guide
Many of your phone options are accessed by a simple menu system.
A full description of the menus and how to move around them is
covered in “Menu Navigation” on page 6.
Key Presses
Key presses are represented in this manual using symbols so that you
may locate and use the required sequence quickly. A sequence of key
presses may be shown as follows:
$OC
This means that you should press the
$
key followed by the
O
key and then the
C
key, in sequence, not simultaneously.
Entering Information
When you are requested to enter information, such as the number of
the phone you wish to call, this is represented in
bold
type. For
example:
C
—Enter the required telephone number.
A
—Enter your Personal Identification Number.
B
—Enter your unlock code.
G
—Enter the Phone Book location number.
Prompts and Messages
Your phone responds to key presses by displaying either easy to
understand prompts that guide you to the next action, or simple
messages confirming that your action is complete. Prompts and
messages are represented in this manual in LCD style, for example:
Enter PIN
or
Completed
.
Other Symbols
You will find the following symbols used throughout this manual:
A
A Note contains additional information which is relevant to
the feature/item.
!
A Caution contains important additional information which
is relevant to the efficient and/or safe usage of your phone.
j
This symbol indicates that the feature is a
Personality
™
feature that can be customized to meet your requirements.
i
This symbol indicates a short key sequence for the feature.

About This Guide
6
Menu Navigation
A large number of your phone’s options are accessed by using menus
which use a common approach for selection, change and
cancellation.
Read this section carefully before attempting to access a menu
option. When you understand the common approach to menu
navigation and how the menus are shown on the page, you will be
able to access and change options with ease.
Entering the Menus
Two different keys are used to access the menus:
$
enters the Options menu while in standby mode;
enters the In-call menu during a call.
E
enters the Quick Access menu.
Once entered, the menus use the
ª
,
<
,
>
,
O
and
C
keys in a common manner to access, select and change individual
options.
Leaving the Menus
To leave any of the menus, you can either press and hold the
C
key or repeatedly press the
C
key. Both of these actions will return
your phone to the standby mode.
i
Alternatively, a quicker way to leave the menus is to press
EC
.
Menus and Sub-menus
A
menu
is a simple list of options. Some of these options provide
access to a further list of options called a
sub-menu
.
Moving To and Selecting a Menu Option
To move from one option to another on the same level, use the scroll
key
ª
; press the bottom half to scroll forward and press the top half
to scroll backward. When you find the option you want, press the
O
key to select it.
Depending on the option you select, one of three things will happen:
• A brief message will be displayed confirming an action, for
example
Completed
.
• A prompt will be displayed requesting you to enter
information, for example
Enter PIN
or
Enter Name
.
• The first option of a sub-menu will be displayed. You can
select this option using the
O
key or browse through the
other options using the scroll keys.
To leave an option or sub-menu, press the
C
key. This will take
you back to the parent menu item.
Menu Options with Security Codes
Some options are protected from misuse by requiring you to enter
one of the security codes. To use these options, you must enter the
requested code before proceeding.

About This Guide
7
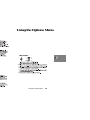
Menu Navigation—A Working Example
The following steps will take you through how to switch the
Extended Menus option on:
1
When the phone is in the standby mode, press the
$
key.
This will access the Options menu and
Access Internet
will
be displayed.
*
2
Press the
ª
key repeatedly to go to the
Phone Setup
menu
item.
3
Press the
O
key to select the sub-menu.
4
Press the
ª
key repeatedly until the
Extended Menus
sub-
menu item is shown in the display.
5
Press the
O
key to select this item. You can now select
between
On
or
Off
, the current setting will be shown with a
z character. If the z character is next to
Off, press ª and
then O to switch on the Extended Menus. If the z
character is next to
On, press C to leave the setting as it is.
* If your service provider has added their own menu, Access
Internet will not be the first item in the Options menu.
† Availability depends on the type and settings of the SIM card,
and/or your subscription to these features.

About This Guide
8
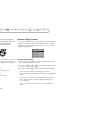
j Short, Extended and Personalized Menus
With the Personality™ feature you can personalize the menus by
choosing which features you want readily available. The features that
are less frequently used can be stored out of sight.
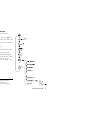
The menu diagrams in this manual show the condition of the menu
settings when you first receive your phone. Some features are in the
Short Menu and are shown in bold type. Other features are in the
Extended Menu and appear in italics.
You can change which features appear in the Short and Extended
Menus, and therefore personalize the menus, to suit your
requirements.
If you want to move a feature from the Short Menu to the Extended
Menu (or from the Extended Menu to the Short Menu), go to the
feature and then hold down the
O key until a prompt appears
offering the following choices:
• Add the current feature to the Short Menu/Extended Menu.
• Leave the current feature in the Short/Extended Menu.
Select the option you want by pressing the O key.
The settings for some menu features cannot be changed.

Safety and General Information
9
Safety and General Information
IMPORTANT INFORMATION ON SAFE AND EFFICIENT
OPERATION. READ THIS INFORMATION BEFORE USING
YOUR PHONE.
Exposure To Radio Frequency Energy
Your Motorola phone is designed to comply with the following
national and international standards and guidelines regarding
exposure of human beings to radio frequency electromagnetic
energy:
• United States Federal Communications Commission, Code of
Federal Regulations; 47 CFR part 2 sub-part J
• American National Standards Institute (ANSI) / Institute of
Electrical and Electronic Engineers (IEEE) C95. 1-1992
• Institute of Electrical and Electronic Engineers (IEEE) C95.1-
1999 Edition
• National Council on Radiation Protection and Measurements
(NCRP) of the United States, Report 86, 1986
• International Commission on Non-Ionizing Radiation
Protection (ICNIRP) 1998
• National Radiological Protection Board of the United Kingdom
1995
• Ministry of Health (Canada) Safety Code 6. Limits of Human
Exposure to Radiofrequency Electromagnetic Fields in the
Frequency Range from 3 kHz to 300 GHz, 1999
• Australian Communications Authority Radiocommunications
(Electromagnetic Radiation - Human Exposure) Standard 1999
(applicable to wireless phones only)
To assure optimal phone performance and make sure human
exposure to radio frequency electromagnetic energy is within the
guidelines set forth in the above standards, always adhere to the
following procedures:
PORTABLE PHONE OPERATION AND EME
EXPOSURE
Antenna Care
Use only the supplied or an approved replacement
antenna. Unauthorized antennas, modifications, or attachments
could damage the phone and may violate FCC regulations.
DO NOT hold the antenna when the phone is “IN USE”.
Holding the antenna affects call quality and may cause the phone
to operate at a higher power level than needed.
Phone Operation
When placing or receiving a phone call, hold your phone as you
would a wireline telephone. Speak directly into the
microphone.
Body-worn Operation
To maintain compliance with FCC RF exposure guidelines, if you
wear a phone on your body when transmitting, always place the
phone in a Motorola supplied or approved clip, holder,
holster, case, or body harness. Use of non-Motorola-approved
accessories may exceed FCC RF exposure guidelines. If you do
not use a body-worn accessory, and are not using the phone
held in the normal use position at the ear, ensure the phone
and its antenna are at least one inch (2.5 cm) from your
body when transmitting.

Safety and General Information
10
Data operation
When using any data feature of the phone, with or without an
accessory cable, position the phone and its antenna at least
one inch (2.5 cm) from the body.
Approved Accessories
For a list of approved Motorola accessories, visit our website at
www.mot.com.
ELECTROMAGNETIC INTERFERENCE/
COMPATIBILITY
Note: Nearly every electronic device is susceptible to
electromagnetic interference (EMI) if inadequately shielded,
designed or otherwise configured for electromagnetic
compatibility.
FACILITIES
To avoid electromagnetic interference and/or compatibility
conflicts, turn off your phone in any facility where posted notices
instruct you to do so. Hospitals or health care facilities may be
using equipment that is sensitive to external RF energy.
AIRCRAFT
When instructed to do so, turn off your phone when on board an
aircraft. Any use of a phone must be in accordance with
applicable regulations per airline crew instructions.
MEDICAL DEVICES
Pacemakers
The Health Industry Manufacturers Association recommends that
a minimum separation of 6 inches (15 centimeters) be maintained
between a handheld wireless phone and a pacemaker.These
recommendations are consistent with the independent research
by, and recommendations of, Wireless Technology Research.
Persons with pacemakers should:
• ALWAYS keep the phone more than six inches (15
centimeters) from their pacemaker when the phone is turned
ON.
• not carry the phone in the breast pocket.
• use the ear opposite the pacemaker to minimize the potential
for interference.
• turn the phone OFF immediately if you have any reason to
suspect that interference is taking place.
Hearing Aids
Some digital wireless phones may interfere with some hearing
aids. In the event of such interference, you may want to consult
your hearing aid manufacturer to discuss alternatives.
Other Medical Devices
If you use any other personal medical device, consult the
manufacturer of your device to determine if it is adequately
shielded from RF energy. Your physician may be able to assist you
in obtaining this information.
SAFETY AND GENERAL
USE WHILE DRIVING
Check the laws and regulations on the use of phones in the area
where you drive. Always obey them.
When using your phone while driving, please:
• Give full attention to driving and to the road.
• Use hands-free operation, if available.
• Pull off the road and park before making or answering a call if
driving conditions so require.

Safety and General Information
11
OPERATIONAL WARNINGS
FOR VEHICLES WITH AN AIR BAG
Do not place a portable phone in the area over an air bag or in
the air bag deployment area. Air bags inflate with great force. If a
portable radio is placed in the air bag deployment area and the
air bag inflates, the phone may be propelled with great force and
cause serious injury to occupants of the vehicle.
POTENTIALLY EXPLOSIVE ATMOSPHERES
Turn off your phone prior to entering any area with a potentially
explosive atmosphere, unless it is a phone type especially
qualified for use in such areas as “Intrinsically Safe” (for example,
Factory Mutual, CSA, or UL Approved). Do not remove, install, or
charge batteries in such areas. Sparks in a potentially explosive
atmosphere can cause an explosion or fire resulting in bodily
injury or even death.
NOTE: The areas with potentially explosive atmospheres referred
to above include fueling areas such as below decks on boats, fuel
or chemical transfer or storage facilities, areas where the air
contains chemicals or particles, such as grain, dust or metal
powders, and any other area where you would normally be
advised to turn off your vehicle engine. Areas with potentially
explosive atmospheres are often but not always posted.
BLASTING CAPS AND AREAS
To avoid possible interference with blasting operations, turn off
your phone when you are near electrical blasting caps, in a
blasting area, or in areas posted: “Turn off two-way radio.”Obey
all signs and instructions.
OPERATIONAL CAUTIONS
ANTENNAS
Do not use any portable phone that has a damaged
antenna. If a damaged antenna comes into contact with your
skin, a minor burn can result.
BATTERIES
All batteries can cause property damage and/or bodily injury such
as burns if a conductive material such as jewelry, keys, or beaded
chains touch exposed terminals. The conductive material may
complete an electrical circuit (short circuit) and become quite hot.
Exercise care in handling any charged battery, particularly when
placing it inside a pocket, purse, or other container with metal
objects.
ITC01-027

Safety and General Information
12

About Your Phone, Battery and SIM Card
13
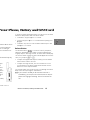
About Your Phone, Battery and SIM Card
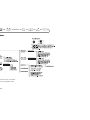
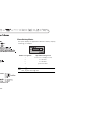
Special Keys
S Turns the phone on and off.
O Accept call, setting, option.
C Reject call, setting, option.
E Enter the quick access menu.
$ Press to access the Options and Phone Book menus.
<> Press both simultaneously to lock the keypad on
flipless models; also use to scroll left and right.
ª Press the top to scroll up and press the bottom to
scroll down.
f Press to call Voicemail
*
.
AThe shape of the keys that appear in the manual may vary
slightly from those on the phone.
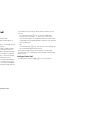
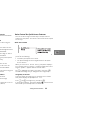
The Smart Button
The Smart Button (=) is on the left side of your
phone, below the volume button. Press it to
quickly access all your Phone Book entries, and
then either scroll through the entries using the
volume button or press one of the alphanumeric
keys to search for a specific name. For example,
press 7 to search for the name Pam, or press
7 four times to search for the name Sam.
AIf a Phone Book entry does not have a name,
it will not be displayed.
If you are using the optional headset, you can also use the smart
button to make, answer and end calls as follows:
• To answer a call, press = for 1.5 seconds.
• To end a call, press = for 1.5 seconds and then quickly press
= again.
• To make a call, enter or recall a number and then press and
hold = for 1.5 seconds.
Volume Button
The Volume button ( ) is on the left side of your phone,
above the Smart Button. The button is used for adjusting the
keypad, earpiece and ringer volume. A volume meter will display
the current volume setting. The meter will disappear after a short
time, or if you press O or C.
• To adjust the keypad and earpiece volume, press the button
with no other features selected.
• To adjust the ringer volume, first select the
Adjust Ring
Volume option in the Phone Setup menu and then use the
button to set the required volume.
The volume button can also be used to scroll through the Phone
Book entries after pressing the smart button.
AIf you receive a call and you do not want to answer it
immediately, you can press the volume button to stop the
phone from ringing or vibrating. This will not answer the
call.
* Network and subscription dependent feature. Not available in all areas.

About Your Phone, Battery and SIM Card
14
The Start/Stop Record Button
The Start/Stop Record button (?) is on the right
side of your phone. Press it to start and stop
recording
*
Voice Note. Refer to “Using the Voice
Note Voice Recorder” on page 31 for more
information.
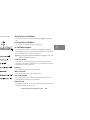
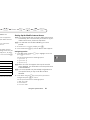
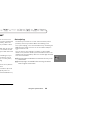
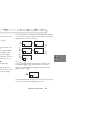
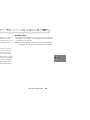
The Display
The display on your phone can
show alphanumeric characters as
well as useful information
symbols.The various elements of the
display are as follows:
In addition, when you are expected to press the O key, a
prompt will appear in the display, for example
Completed?.
* Recording of phone calls is subject to varying State and Federal laws regarding
privacy and recording of phone comversations.
ABC123 Characters are used to display messages and
telephone numbers.
rx
Signal Strength. The more segments displayed in
the bar graph, the better the signal strength.
k
In Use. Displayed when a call is in progress.
l
Roam. Displayed when you are registered on a
system other than your home system.
n
Home Zone. Availability depends on your service
provider.
o
Short Message Service
*
. Displayed when the
phone has received a message. The symbol will
flash when your message storage area is full.
p
Voicemail Waiting Indicator**. Displayed when
you have a voice message waiting. The availability
of this feature depends on your service provider.
h
Ringer On. Displayed when the call ringer is
selected. If you select the No Ring or Vibrate or the
Vibrate Only options this symbol will not be
displayed.
q
Battery Charge Indicator. The more segments
displayed, the greater the battery charge.
B...K
Icons are displayed when you are in the Quick
Access menu.
z
Indicates that a menu item is currently selected.
12:00
Real Time Clock
. In the idle display, the real time
clock can display the time in either a 12-hour or
24-hour format.
* Network and subscription dependent feature. Not available in all areas.

About Your Phone, Battery and SIM Card
15
Low Temperature Use
The liquid crystal display used in your phone will behave
differently at extremely low temperatures. You may notice that
the display responds slowly to key presses; this is to be expected
and does not affect the phone operation in any way.
Earpiece Connector
The earpiece connector is on the left side of your phone, above
the volume button. Use this connector for the optional headset
accessories available from your Motorola dealer.
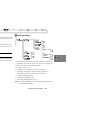
Communicating with External Devices
To communicate with a compatible external device, such as a
personal computer or a fax machine, your phone includes the
following features:
• an infra-red lens located next to the antenna on the top of the
phone
• an RS-232 serial data port located at the bottom of the phone
Setting up the Infra-Red Feature
i Press E. Select the Quick Access feature or, after the
tone, say the Voice Tag name.
Before you can transfer your data:
• Align the infra-red lens on your phone with the infra-red lens
on the external device.
• Make sure that the infra-red feature is active in both the
phone and the external device.
The phone and the external device can be up to 12 inches apart.
For operating details, see “Activate IR Port” on page 75.
Setting up the RS-232 Serial Data Port
The RS-232 serial data port requires a Motorola 3-pin
RS-232 serial data cable. This is available from your Motorola
dealer.
To connect the cable to your external device, refer to the
manufacturer’s documentation.
The RS-232 Serial Data Port has been FCC approved.
Looking After Your Phone
• Never leave your phone or battery in extreme temperatures
(over 60˚C or 140ºF), for example behind glass in very hot,
direct sunlight.
• To clean your phone, use a moistened or antistatic cloth. Do
not use a dry or electrostatically charged cloth.
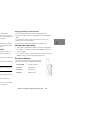
The Status Indicator
The status indicator on the top of the phone
provides you with the following information:
Incoming Call Alternate Red/Green
In Service Flashing Green
No Service Flashing Red
Roaming Flashing Yellow

About Your Phone, Battery and SIM Card
16
Your Battery
Charging a New Battery
New batteries are supplied in a totally uncharged state.
To ensure maximum battery performance, a new battery (or
battery that has not been used for several months) should be
charged for at least 14 hours before use.
AA new battery will require several full charge/discharge
cycles in order to achieve its optimum performance.
AA new battery, or a battery that has not been used for
several months, may cause a premature fully charged
indication. Ignore this indication and let the battery charge
for several more hours, remove and re-insert the battery into
the charger, and charge for an additional 14 hours.
Important Battery Information
! Always treat your batteries with care.
! Never leave your battery in extremely high
temperatures (over 60˚C (140ºF)), for example behind
glass in very hot, direct sunlight.
! Only Motorola Original Accessory batteries can be
charged in the phone or the optional desktop charger.
This is to protect you and your phone from the risks of
incorrect charging.
ADo not use lithium ion batteries at extremely low
temperatures as the maximum standby/talk time will not be
available when cold.
To ensure that you enjoy maximum battery life and use your
battery to its fullest capacity, the battery should be at or near
room temperature when charging.
Battery Performance and Maintenance
• Best battery performance will be achieved when you regularly
charge and discharge batteries as instructed in this manual.
• Battery performance is affected by network configuration,
signal strength, features selected, and temperature.
• Set
Battery Saving Mode to On (see “Phone Setup Menu”
on page 72) and/or
Frequency of Search to Slow or
Medium (see “Network Selection Menu” on page 80).
• If left unused, a fully charged battery will discharge itself in
approximately one month.
• When not in use, store your battery uncharged in a cool, dark
and dry place.

About Your Phone, Battery and SIM Card
17
Low Battery Warning
When the battery level is low and only a few minutes of talk time
remain, a warning signal (two double beeps) will sound, the
border of the battery symbol will begin to flash, and
Low
Battery will be displayed.
When the battery is completely discharged, your phone will turn
off.
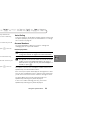
Removing Your Battery
! Switch off your phone before removing the battery.
Failure to do so may damage your phone memory.
1 Press the release catch on the
battery compartment and lift
off the cover.
2 Push the battery toward the
top of the phone and lift the
battery out from the bottom
end.
Fitting Your Battery
1 Remove the battery
compartment cover.
2 Align the connection on the
battery with the connection on
the phone.
3 Press the battery toward the
connection and push it
downward until it clicks into
place. Replace the cover.
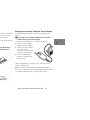
Charging Your Battery Using the Travel Charger
The travel charger can power the phone and charge a fitted
battery.
! Ensure that the local mains voltage at your location
matches that of your travel charger.
Fit a battery onto your phone. To charge your battery:
1 Attach the correct adapter
plug to the travel charger.
2 Connect the travel charger
to the phone. (The
connector is keyed and can
only be inserted one way.)
3 Insert the travel charger
plug into a suitable mains
power socket.
When charging begins, your phone emits a beep-tone and
flashes the battery icon.
AYour phone can be either on or off during charging.
The state of charging is monitored and displayed by your phone.
See “Battery Meter Indicators” on page 19 for details.
La pagina sta caricando ...
La pagina sta caricando ...
La pagina sta caricando ...
La pagina sta caricando ...
La pagina sta caricando ...
La pagina sta caricando ...
La pagina sta caricando ...
La pagina sta caricando ...
La pagina sta caricando ...
La pagina sta caricando ...
La pagina sta caricando ...
La pagina sta caricando ...
La pagina sta caricando ...
La pagina sta caricando ...
La pagina sta caricando ...
La pagina sta caricando ...
La pagina sta caricando ...
La pagina sta caricando ...
La pagina sta caricando ...
La pagina sta caricando ...
La pagina sta caricando ...
La pagina sta caricando ...
La pagina sta caricando ...
La pagina sta caricando ...
La pagina sta caricando ...
La pagina sta caricando ...
La pagina sta caricando ...
La pagina sta caricando ...
La pagina sta caricando ...
La pagina sta caricando ...
La pagina sta caricando ...
La pagina sta caricando ...
La pagina sta caricando ...
La pagina sta caricando ...
La pagina sta caricando ...
La pagina sta caricando ...
La pagina sta caricando ...
La pagina sta caricando ...
La pagina sta caricando ...
La pagina sta caricando ...
La pagina sta caricando ...
La pagina sta caricando ...
La pagina sta caricando ...
La pagina sta caricando ...
La pagina sta caricando ...
La pagina sta caricando ...
La pagina sta caricando ...
La pagina sta caricando ...
La pagina sta caricando ...
La pagina sta caricando ...
La pagina sta caricando ...
La pagina sta caricando ...
La pagina sta caricando ...
La pagina sta caricando ...
La pagina sta caricando ...
La pagina sta caricando ...
La pagina sta caricando ...
La pagina sta caricando ...
La pagina sta caricando ...
La pagina sta caricando ...
La pagina sta caricando ...
La pagina sta caricando ...
La pagina sta caricando ...
La pagina sta caricando ...
La pagina sta caricando ...
La pagina sta caricando ...
La pagina sta caricando ...
La pagina sta caricando ...
La pagina sta caricando ...
La pagina sta caricando ...
La pagina sta caricando ...
La pagina sta caricando ...
La pagina sta caricando ...
La pagina sta caricando ...
La pagina sta caricando ...
La pagina sta caricando ...
La pagina sta caricando ...
La pagina sta caricando ...
La pagina sta caricando ...
La pagina sta caricando ...
La pagina sta caricando ...
La pagina sta caricando ...
La pagina sta caricando ...
La pagina sta caricando ...
La pagina sta caricando ...
La pagina sta caricando ...
La pagina sta caricando ...
La pagina sta caricando ...
La pagina sta caricando ...
La pagina sta caricando ...
La pagina sta caricando ...
La pagina sta caricando ...
La pagina sta caricando ...
La pagina sta caricando ...
La pagina sta caricando ...
La pagina sta caricando ...
La pagina sta caricando ...
La pagina sta caricando ...
-
 1
1
-
 2
2
-
 3
3
-
 4
4
-
 5
5
-
 6
6
-
 7
7
-
 8
8
-
 9
9
-
 10
10
-
 11
11
-
 12
12
-
 13
13
-
 14
14
-
 15
15
-
 16
16
-
 17
17
-
 18
18
-
 19
19
-
 20
20
-
 21
21
-
 22
22
-
 23
23
-
 24
24
-
 25
25
-
 26
26
-
 27
27
-
 28
28
-
 29
29
-
 30
30
-
 31
31
-
 32
32
-
 33
33
-
 34
34
-
 35
35
-
 36
36
-
 37
37
-
 38
38
-
 39
39
-
 40
40
-
 41
41
-
 42
42
-
 43
43
-
 44
44
-
 45
45
-
 46
46
-
 47
47
-
 48
48
-
 49
49
-
 50
50
-
 51
51
-
 52
52
-
 53
53
-
 54
54
-
 55
55
-
 56
56
-
 57
57
-
 58
58
-
 59
59
-
 60
60
-
 61
61
-
 62
62
-
 63
63
-
 64
64
-
 65
65
-
 66
66
-
 67
67
-
 68
68
-
 69
69
-
 70
70
-
 71
71
-
 72
72
-
 73
73
-
 74
74
-
 75
75
-
 76
76
-
 77
77
-
 78
78
-
 79
79
-
 80
80
-
 81
81
-
 82
82
-
 83
83
-
 84
84
-
 85
85
-
 86
86
-
 87
87
-
 88
88
-
 89
89
-
 90
90
-
 91
91
-
 92
92
-
 93
93
-
 94
94
-
 95
95
-
 96
96
-
 97
97
-
 98
98
-
 99
99
-
 100
100
-
 101
101
-
 102
102
-
 103
103
-
 104
104
-
 105
105
-
 106
106
-
 107
107
-
 108
108
-
 109
109
-
 110
110
-
 111
111
-
 112
112
-
 113
113
-
 114
114
-
 115
115
-
 116
116
-
 117
117
-
 118
118


Motorola P7382i Manuale utente
- Categoria
- Cellulari
- Tipo
- Manuale utente
- Questo manuale è adatto anche per
in altre lingue
- English: Motorola P7382i User manual
Documenti correlati
-
Motorola Satellite Series 9500 Manuale utente
-
-
Motorola T720 CDMA Manuale utente
-
-
-
-
-
-
-
Motorola 9505 Manuale utente