Bticino 366511 Istruzioni per l'uso
- Categoria
- Altoparlanti della soundbar
- Tipo
- Istruzioni per l'uso

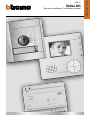
366511
Video Kit
Manuale installatore • Installation manual
LE06206AC01PC-18W39
La pagina si sta caricando...
La pagina si sta caricando...
La pagina si sta caricando...

Video Kit
5
1
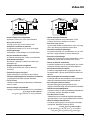
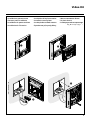
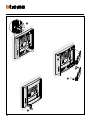
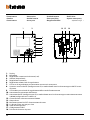
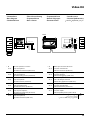
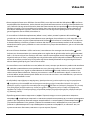
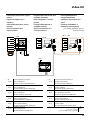
• Installazione posto esterno
• Entrance panel installation
• Installation du poste extérieur
• Installation der Türstation
• Instalación de la placa exterior
• Installatie externe plaats
• Instalação da unidade externa
• Εγκατάσταση εξωτερική θέση
• Монтаж внешнего блока
• Dış ünte kurma
• Instalacja panelu zewnętrznego
2
3
4
La pagina si sta caricando...
La pagina si sta caricando...
La pagina si sta caricando...
La pagina si sta caricando...
La pagina si sta caricando...

Video Kit
11
1
2
3
4
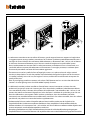
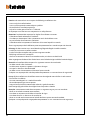
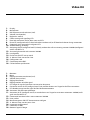
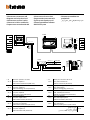
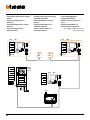
• Attenzione: il citofono deve rispettare le seguenti regole installative:
- deve essere installato solo in ambienti interni
- non deve essere esposto a stillicidio o a spruzzi d’acqua
- non ostruire le aperture di ventilazione
- deve essere usato unicamente all’interno del Kit in cui è venduto
Ogni uso improprio dell’articolo puó comprometterne le caratteristiche di sicurezza.
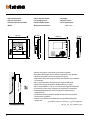
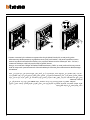
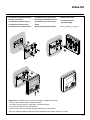
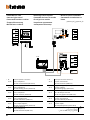
• Installazione del posto interno
• Handset installation
• Installation du poste interne
• Installation der Hausstation
• Instalación de la unidad interior
• Installatie van het intern punt
• Instalação da unidade interna
• Εγκατάσταση τη εσωτερική
θέση
• Монтаж внутреннего блока
• Dahl ünte kurma
• Instalacja miejsca
wewnętrznego
La pagina si sta caricando...
La pagina si sta caricando...

14
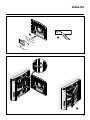
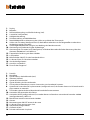
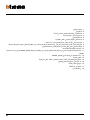
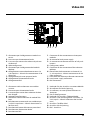
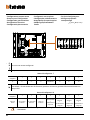
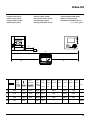
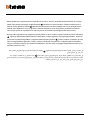
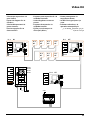
1 - Display.
2 - Microfono.
3 - Regolazione suoneria ed esclusione (Led).
4 - Volume (altoparlante).
5 - Regolazione luminosità.
6 - Regolazione colore e led di segnalazione.
7 - LED rosso di segnalazione per attivazione serratura e/o stato porta.
8 - Apertura serratura del PE (configurato con P) in modo diretto senza la chiamata oppure del PE in con-
nessione.
9 - LED bicolore rosso/verde di segnalazione dello stato di funzionamento.
10 - Attivazione/Disattivazione della fonica.
11 - Attivazione del PE (configurato con P) in modo diretto senza la chiamata oppure attivazione attuatore
346200 (configurato con P e MOD=9).
12 - Comando luce scale con attuatore 346200.
13 - Altoparlante.
14 - Microinterruttore ON/OFF di terminazione di tratta.
15 - J1: Master/Slave, estrarre per slave.
16 - Sede dei configuratori.
17 - Collegamento al BUS.
18 - Pulsante di chiamata al piano.
• Posto interno
• Handset
• Poste interne
• Hausstation
• Unidad interior
• Intern punt
• Unidade interna
• Εσωτερική θέση
• Внутренний блок
• Dahl ünte
• Aparat wewnętrzny
3
4
5
6
2
7
8
9
101112
1
13
14 15 16
18 17
La pagina si sta caricando...
La pagina si sta caricando...
La pagina si sta caricando...
La pagina si sta caricando...
La pagina si sta caricando...
La pagina si sta caricando...

Video Kit
21
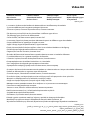
• Posto esterno
• Entrance panel
• Poste extérieur
• Türstation
• Placa exterior
• Externe plaats
• Unidade externa
• Εσωτερικού σηείου
• Внешний блок
• Dış ünte
• Panelu zewnętrznego
3
4
5
6
1
2
1
99
38
1
8
4
5
8
7
14
10 11 12
15
1
13
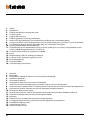
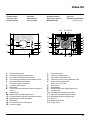
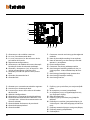
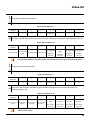
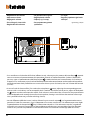
1 - Pulsanti di chiamata.
2 - Vetrino di protezione telecamera.
3 - LED verde indicazione porta aperta.
4 - LED verde indicazione comunicazione attiva.
5 - LED verde chiamata inoltrata.
LED rosso sistema occupato.
6 - Cartellino portanome.
7 - Microfono.
8 - LED bianchi illuminazione notturna campo di
ripresa.
9 - Altoparlante.
10 - Regolazione volume altoparlante.
11 - Connettore Mini USB per la programmazione.
12 - Regolazione volume microfono.
13 - Telecamera.
14 - Sensore luminosità ambientale.
15 - Vite di fissaggio.
1 - Call pushbuttons.
2 - Camera protection glass.
3 - Door open notification LED.
4 - Communication active notification LED.
5 - Green call forwarded LED.
Red system busy LED.
6 - Name plate.
7 - Microphone.
8 - White field of view night lighting LED.
9 - Loudspeaker.
10 - Loudspeaker volume adjustment.
11 - Mini-USB programming connector.
12 - Microphone volume adjustment.
13 - Camera.
14 - Room light sensor.
15 - Fixing screw.
La pagina si sta caricando...
La pagina si sta caricando...
La pagina si sta caricando...

Video Kit
25
2
1
7 6
3
4
5
9 8
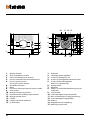
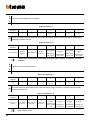
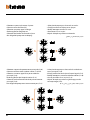
1 - Connettore per il collegamento ai moduli suc-
cessivi.
2 - J2 estrarre per alimentazione locale.
3 - J1 estrarre per attivare due colonne di pulsanti
di chiamata.
4 - Sede configuratori.
5 - Connettore per il collegamento del modulo
teleloop.
6 - Collegamento e comando elettroserratura (18
V 4A impulsivi - 250 mA di mantenimento su 30
Ohm max).
7 - Collegamento pulsante apriporta locale.
8 - Collegamento alimentazione locale.
9 - Collegamento BUS.
1 - Connector for the connection to subsequent
modules.
2 - J2 remove for local power supply.
3 - J1 remove to activate two columns of call push-
buttons.
4 - Configurator socket.
5 - Connector for the connection of the inductive
teleloop.
6 - Electric door lock connection and control (18
V – 4A impulsive – 250 mA maintenance on 30
Ohm maximum).
7 - Local door lock release pushbutton connection.
8 - Local power supply connection.
9 - BUS connection.
1 - Connecteur de branchement aux modules
suivants.
2 - J2 extraire pour alimentation locale.
3 - J1 extraire pour activer deux colonnes de bou-
tons d’appel.
4 - Logement configurateurs.
5 - Connecteur de branchement du module Tele-
loop.
6 - Branchement et commande serrure électrique
(18 V 4A à impulsions - 250 mA de maintien sur
30 Ohm max.)
7 - Branchement bouton d’ouverture porte local.
8 - Branchement alimentation locale.
9 - Branchement BUS.
1 - Verbinder für den Anschluss an weitere Module.
2 - J2 entfernen für lokale Speisung.
3 - J1 entfernen, um zwei Spalten Ruftasten zu
aktivieren.
4 - Sitz für Konfiguratoren.
5 - Verbinder für Anschluss Teleloop-Modul.
6 - Anschluss und Steuerung elektr. Türschloss (18
V 4 A Impuls - 250 mA Haltestrom bei 30 Ohm
max.)
7 - Anschluss Türöffner lokal.
8 - Anschluss lokale Speisung.
9 - BUS - Anschluss.
La pagina si sta caricando...
La pagina si sta caricando...

28
P N S T M
J
1
J
2
•
P
possono non essere configurati
N
S
T
temporizzatore serratura
Numero del configuratore - T
0 = nessun
configuratore
1 2 3 4 5 6 7
4 s 1 s 2 s 3 s come pulsante 6 s 8 s 10 s
M
attivazione / disattivazione toni di chiamata, apertura serratura e gestione illuminazione notturna
sempre ON.
Numero del configuratore - M
0 = nessun
configuratore
1 2 3 4 5 6 7
Tutti i toni
attivati
Tono serratura
disattivato
Tono di chiamata
disattivato
Tutti i toni
disattivati
Tutti i toni attivati
+
retroilluminazione
sempre ON
Tono serratura
disattivato
+
retroilluminazione
sempre ON
Tono di chiamata
disattivato
+
retroilluminazione
sempre ON
Tutti i toni
disattivati
+
retroilluminazione
sempre ON
Tutte le volte che si modifica la configurazione è necessario togliere e ridare l’alimentazione all’impianto, attendendo
circa 1 minuto.
• Configurazione posto esterno
• Entrance panel configuration
• Configuration poste extérieur
• Konfiguration Türstation
• Configuración placa exterior
• Configuratie externe plaats
• Configuração unidade externa
•
ιαρρύθιση εξωτερικού σηείου
• Конфигурация внешнего
блока
• Dış ünite konfigürasyonu
• Konfiguracja panelu
zewnętrznego
La pagina si sta caricando...
La pagina si sta caricando...
La pagina si sta caricando...
La pagina si sta caricando...
La pagina si sta caricando...
La pagina si sta caricando...
La pagina si sta caricando...
La pagina si sta caricando...
La pagina si sta caricando...
La pagina si sta caricando...
La pagina si sta caricando...
La pagina si sta caricando...
La pagina si sta caricando...

42
> 3s
1
2
16
• Selezione suoneria chiamata al piano.
• Selection call to the floor bell.
• Sélection sonnerie appel à l’étage.
• Änderung Rufton Etagentaster.
• Selección del timbre de llamada al piso.
• Kies belgeluid oproep aan verdieping.
• Selecção do toque para chamada ao andar.
• Επιλογή κουδουνιού κλήση στον όροφο.
• Выбор мелодии звонка на этаж.
• Kat araması zl ses seçm.
• Wybór dźwięku wywołania z dzwonka.
> 3s
1
2
16
• Selezione suoneria da posto esterno principale (S=0).
• Selection call from main outdoor station (S=0) bell.
• Sélection sonnerie appel d’un poste extérieur
principal (S=0).
• Änderung Rufton der Haupttürstation (S=0).
• Selección timbre llamada desde el puesto exterior
principal (S=0).
• Kies belgeluid oproep vanuit eerste externe post (S=0).
• Selecção do toque para chamada da unidade ex-
terna principal (S=0).
• Επιλογή κουδουνιού από κύριο εξωτερικό σηείο (S=0).
• Выбор мелодии с главного внешнего блока (S=0).
• Ana dış ünteden zl ses seçm (S=0).
• Wybór dźwięku wywołania z głównego panelu
zewnętrznego (S=0).

Video Kit
43
> 3s
1
2
16
• Selezione suoneria chiamata intercom.
• Selection call intercom bell.
• Sélection sonnerie appel intercom.
• Änderung interner Rufton.
•
Selección del timbre de llamada intercom
.
• Kies belgeluid intercom oproep gebouw.
• Selecção do toque para chamada intercomomunicador.
• Επιλογή κουδουνιού κλήση intercom.
• Выбор мелодии звонка интеркомм.
• İntercom araması zl ses seçm.
• Wybór dźwięku wywołania interkomowego.
intercom

44
• Modalità Push to Talk
• Push to Talk mode
• Modalité Push to Talk
• Modus Push toTalk
• Función Push to Talk
• Push to Talk functie
• Função Push to Talk
• Τρόπο Push to Talk
• Режим Push to Talk
• Push to Talk (Bas
Konuş) Yöntem
• Tryb Push to Talk
• Se il posto esterno si trova in un ambiente particolarmente rumoroso è possibile, durante la conversazione,
attivare la funzione Push to Talk al fine di ottenere una comunicazione meno disturbata. Durante la conversa-
zione è possibile attivare la funzione Push to Talk nel seguente modo.
- Premere il tasto Connessione per almeno 2 secondi per parlare con il posto esterno. Il Led rimane verde.
- Rilasciare il tasto per poter ascoltare dal posto esterno. Il Led diventa rosso.
- Per terminare la connessione premere brevemente il tasto Connessione. Il Led si spegne.
• If the entrance panel is in a particularly noisy place, during the conversation the Push to Talk function can be
activated for a less disturbed call. During the conversation the Push to Talk function can be activated as follows.
- Press the Connection key for at least 2 seconds to talk to the entrance panel. The LED remains green.
- Release the key to ear from the entrance panel. The LED becomes red.
- To end the connection press the connection key briefly. The LED goes out
• Si le poste externe se trouve dans un environnement particulièrement bruyant, il est possible d’activer durant
la conversation la fonction Push to Talk pour obtenir une meilleure communication. Durant la conversation, il
est possible d’activer la fonction Push to Talk en procédant comme suit.
- Appuyer sur la touche Connexion pendant au moins 2 secondes pour parler avec le poste externe. Le voyant
reste vert.
- Relâcher la touche pour pouvoir écouter depuis le poste externe. Le voyant devient rouge.
- Pour mettre fin à la connexion, appuyer brièvement sur la touche connexion. Le voyant s’éteint.
• Wenn die Türstation in einem besonders geräuschvollen Bereich installiert ist, kann man während des Gesprächs
die Funktion Push to Talk drücken, um diese Geräusche zu überwinden. Während des Gesprächs kann die
Funktion Push to Talk folgendermaßen aktiviert werden.
- Die Verbindungstaste mindestens 2 Sekunden lang drücken, um mit der Türstation zu sprechen. Die grüne
Meldeleuchte leuchtet immer noch.
- Taste loslassen, um die Türstation hören zu können. Die Meldeleuchte leuchtet rot auf.
- Um die Verbindung abzubrechen, die Verbindungstaste kurz drücken. Die Meldeleuchte erlischt
• Si la placa exterior se encuentra en un ambiente con un alto nivel de ruido, durante la conversación es posible
activar la función Push to Talk para obtener una comunicación con menor interferencias. Durante la conver-
sación es posible activar la función Push to Talk en el modo siguiente.
- Presione la tecla de conexión almenos 2 segundos para conversar con la placa exterior. El led permanece
verde.
- Suelte la tecla para poder escuchar desde la placa exterior. El led se vuelve rojo.
- Para terminar la conexión, presione brevemente la tecla de conexión. El led se apaga.
• Indien het extern punt zich op een bijzonder lawaaierige plaats bevindt, is het mogelijk, tijdens het gesprek, de
functie Push to Talk te activeren teneinde een minder gestoorde communicatie te verkrijgen. Tijdens het gesprek is
het mogelijk de functie Push to Talk te activeren op de volgende manier.
- De drukknop van Verbinding gedurende minstens 2 seconden indrukken om met het externe punt te
communiceren. De led blijft groen.
- De toets loslaten om vanuit het externe punt te kunnen luisteren. De led wordt rood.
- Om de verbinding te beëindigen, eventjes de toets. van verbinding indrukken. De led gaat uit.
La pagina si sta caricando...
La pagina si sta caricando...
La pagina si sta caricando...
La pagina si sta caricando...
La pagina si sta caricando...
La pagina si sta caricando...
La pagina si sta caricando...

BTicino SpA si riserva il diritto di variare in qualsiasi momento i contenuti illustrati nel presente stampato e di
comunicare, in qualsiasi forma e modalità, i cambiamenti apportati.
BTicino SpA reserves at any time the right to modify the contents of this booklet and
to comunicate in any form and modality, the charges brought to the same.
Timbro installatore
Installer stamp
BTicino SpA
Viale Borri, 231
21100 Varese - Italy
www.bticino.com
-
 1
1
-
 2
2
-
 3
3
-
 4
4
-
 5
5
-
 6
6
-
 7
7
-
 8
8
-
 9
9
-
 10
10
-
 11
11
-
 12
12
-
 13
13
-
 14
14
-
 15
15
-
 16
16
-
 17
17
-
 18
18
-
 19
19
-
 20
20
-
 21
21
-
 22
22
-
 23
23
-
 24
24
-
 25
25
-
 26
26
-
 27
27
-
 28
28
-
 29
29
-
 30
30
-
 31
31
-
 32
32
-
 33
33
-
 34
34
-
 35
35
-
 36
36
-
 37
37
-
 38
38
-
 39
39
-
 40
40
-
 41
41
-
 42
42
-
 43
43
-
 44
44
-
 45
45
-
 46
46
-
 47
47
-
 48
48
-
 49
49
-
 50
50
-
 51
51
-
 52
52


Bticino 366511 Istruzioni per l'uso
- Categoria
- Altoparlanti della soundbar
- Tipo
- Istruzioni per l'uso
in altre lingue
- English: Bticino 366511 Operating instructions
- français: Bticino 366511 Mode d'emploi
- español: Bticino 366511 Instrucciones de operación
- Deutsch: Bticino 366511 Bedienungsanleitung
- Nederlands: Bticino 366511 Handleiding
- português: Bticino 366511 Instruções de operação
- polski: Bticino 366511 Instrukcja obsługi
- eesti: Bticino 366511 Kasutusjuhend
- Türkçe: Bticino 366511 Kullanma talimatları
Documenti correlati
-
Bticino 366811 Istruzioni per l'uso
-
-
-
-
-
-
-
-
-