Watchguard Firebox T10/T10-W Guida Rapida
- Tipo
- Guida Rapida

Quick Start Guide
Firebox
®
T10 / T10-W
HW Models: DS1AE3 and DS3AE3
WatchGuard® Technologies, Inc.
Guide de démarrage rapide
Kurzanleitung
Guía Rápida
Guia de início rápido
快速設定手冊
Guida introduttiva

2 3
Activate Your FIrebox
Go to www.watchguard.com/activate
1. Log in to your WatchGuard account, or create a new account*.
*If you create a new account, return to www.watchguard.com/activate after you nish the account
creation process.
2. Type the serial number for your device.
3. During activation, select your setup method:
• RapidDeploy QuickStart – Automatically download and apply a QuickStart
conguration le to your device, pre-congured with security settings
recommended by WatchGuard.
• Classic Activation – Use the Web Setup Wizard to create a basic conguration le
for your device.
4. Use the setup directions in this guide that match the method you selected.
English

4 5
Computer Internet
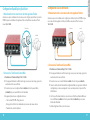
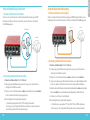
Classic Activation Setup
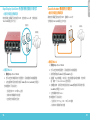
1. Connect Your Firebox and Power it On
Make sure your computer is congured to use DHCP. When you connect to the Firebox,
it will assign an IP address on the 10.0.1.0/24 network.
2. Connect to the Web UI
A. Go to https://10.0.1.1:8080
B. You can safely ignore certicate warnings, because the device uses a
self-signed certicate.
C. Log in with the user name admin and the passphrase readwrite.
D. Follow the directions in the Web Setup Wizard to create a basic conguration le for
a new device. Click More Information if you have questions.
E. When the Wizard completes, log in to the Web UI with the admin user account and
the Admin (readwrite) passphrase you set during the Wizard.
F. Install the Firebox in your network.
Your device has a basic conguration:
• Allows outbound FTP, Ping, DNS, TCP, and UDP connections
• Blocks all unrequested trac from the external network
English
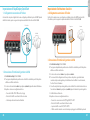
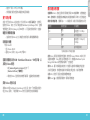
RapidDeploy QuickStart Setup
1. Connect Your FIrebox and Power it On
Make sure the computers on your network are congured to use DHCP. When you install
your Firebox, it will assign an IP address on the 10.0.1.0/24 network.
2. Connect to the Web UI
A. Go to https://10.0.1.1:8080
B. You can safely ignore any certicate warnings you see because the device uses a
self-signed certicate.
C. Log in with the user account admin and the Admin (readwrite) passphrase you set
during activation.
Your device has a basic conguration:
• Allows outbound TCP, UDP, and ping trac
• Blocks all unrequested trac from the external network
• Includes optimized security settings
Your Network
Internet
English

6 7
• Inspects outgoing FTP, HTTP, and HTTPS trac
• Uses licensed security services to protect the trusted and optional networks
Next Steps
Congratulations! You have nished basic setup of your Firebox. You can use the Web UI to
view and edit your conguration and to manage and monitor your Firebox. Or, you can
download and install WatchGuard System Manager (WSM) and use Policy Manager and the
WSM suite of management and monitoring tools. Here are some recommendations to help
you get started:
Verify your Internet connectivity
• With your Firebox installed in your network, make sure that your users can
successfully browse the Internet.
Get the latest software
To upgrade the Firebox OS:
1. Log in to Fireware Web UI.
2. Select System > Upgrade OS.
To get the latest version of WSM, WatchGuard Dimension, VPN
clients, and other software for your Firebox:
1. Go to www.watchguard.com/support and click Download Software.
2. Find the software downloads page for your Firebox model and select the
software you want to install.
Explore the features and functions of your Firebox
Browse the Web UI or the tools in WatchGuard System Manager and click Help on any page
or dialog box to learn more about the management, monitoring, and security features of
your Firebox.
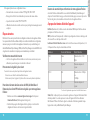
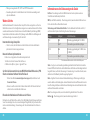
About the Device Status Lights
Fail Over – Lights when there is a WAN failover from the primary external interface to the
backup interface.
WAP - (Wireless models only) Lights when the device is activated as a wireless access point
or as a wireless client.
Network interface status indicators – The three network interfaces are labeled 2, 1, 0.
There are two status indicators for each interface.
Indicator Indicator color Interface Status
1000 Yellow Link speed: 1000 Mbps
Blinks* Data sent and received
10/100 Green Link speed: 10 Mbps or
100 Mbps
Blinks* Data sent and received
* Blink speed increases as the data ow increases
Status – Shows when there is a management connection to the device. The Status
indicator is lit for 30 seconds after you connect to the device with the Fireware XTM Web
UI or the command line interface. It is also lit when the device is polled by WatchGuard
System Manager.
Mode – Shows the status of the external network connection. If the device can connect
to the external network and send trac, the indicator is green. The indicator ashes if the
device cannot connect to the external network and send trac.
Attn – Lights when you start the device with the Reset button pressed.
Power ( ) – The power indicator is lit when the device is on.
English

8 9
Reset the Device to Factory-Default Settings
If you ever need to, you can restore your Firebox to its factory-default settings. For
example, if you do not know the administrator account passphrase or you want to start
over with RapidDeploy QuickStart, you can reset your device. Make sure you back up your
conguration before you upgrade. The conguration can be restored if necessary.
For more information, see the Hardware Guide for your Firebox, available at:
www.watchguard.com/help/documentation/hardware.asp
激活设备
1.访问 www.watchguard.com/activate
2.登录您的 WatchGuard 帐户,或者创建一个新帐户*。
*如果创建新帐户,请在完成帐户创建过程之后返回到 www.watchguard.com/activate。
3. 输入设备的序列号。
4. 在激活期间,选择设置方法:
• RapidDeploy QuickStart(RapidDeploy 快速部署) – 自动下载快速部署配置
文件并将其应用到您的设备,其中预配置了 WatchGuard 推荐的安全设置。
• Classic Activation(常规激活)–使用网络设置向导为您的设备创建一个基本
的配置文件。
5. 请根据您选择的方法使用本手册中对应的设置说明。
简体中文

10 11
简体中文
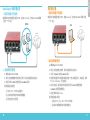
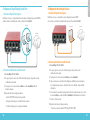
RapidDeploy 快速部署设置
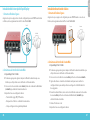
1. 连接您的设备并开启电源
确保网络中的计算机配置为使用 DHCP。在安装 Firebox 后,它将在 10.0.1.0/24 网络
上分配一个 IP 地址。
2. 连接到网页管理界面
A. 访问https://10.0.1.1:8080
B. 您可以安全地忽略看到的任何证书警告,因为该设备使用自签名证书。
C. 使用用户帐户 admin 和管理员密码 (readwrite) 登录。
您的设备具备基本配置:
• 允许出站 TCP、UDP 和 Ping 数据流
• 阻止来自外部网络的所有未请求的数据流
• 包含经过优化的安全设置
您的网络
Internet
计算机
Internet
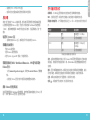
常规激活设置
1. 连接您的设备并开启电源
确保您的计算机配置为使用 DHCP。连接 Firebox 后,它将在 10.0.1.0/24 网络上分配
一个 IP 地址。
2.连接到网页管理界面
A.访问 https://10.0.1.1:8080
B. 您可以安全地忽略证书警告,因为该设备使用自签名证书。
C. 以用户名 admin 和密码 readwrite 登录。
D. 按照网络设置向导中的说明为新设备创建一个基本的配置文件。如有问题,请单
击“More Information”(更多信息)。
E. 在向导完成后,使用您在向导中设置的用户帐户 admin 和管理员密码
(readwrite) 登录网页管理界面。
F. 在您的网络中安装 Firebox。
您的设备具备基本配置:
• 允许出站 FTP、Ping、DNS、TCP 和 UDP 连接
• 阻止来自外部网络的所有未请求的数据流
简体中文

12 13
• 检测传出 FTP、HTTP 和 HTTPS 流量
• 使用许可的安全服务来保护受信任的网络和可选网络
后续步骤
恭喜!您已经完成了 Firebox 的基本设置。您可以使用网页管理界面查看和编辑配置,
以及管理和监控您的 Firebox。或者,您也可以下载并安装 WatchGuard 系统管理器
(WSM),使用策略管理器和 WSM 管理与监控工具套件。下面是帮助您入门的一些
建议:
验证您的Internet 连接
• 在网络中安装 Firebox 之后,确保您的用户可以成功浏览 Internet。
获取最新版本的软件
升级 Firebox 操作系统:
1.登录 Fireware 网页管理界面。
2.选择“System > Upgrade OS”(系统 > 升 级 操 作 系 统 )。
获取最新版本的 WSM、WatchGuard Dimension、VPN 客户端和其他
Firebox 软件:
1.访问 www.watchguard.com/support 并单击 Download Software(下载软
件)。
2.找到您的 Firebox 型号的软件下载页面并选择想要安装的软件。
探索Firebox 的特性和功能
浏览网页管理界面或 WatchGuard 系统管理器,单击任意页面或对话框的上的“Help”(帮
助),详细了解 Firebox 的管理、监控和安全功能。
关于设备状态指示灯
故障转移 – 当 WAN 从主要外部接口向备份接口进行故障转移时将亮起。
WAP -(仅限无线型号)当设备作为无线接入点或无线客户端激活时将亮起。
网络接口状态指示灯 – 三个网络接口分别标记为 2、1 和 0。每个接口有两个状态指示
灯。
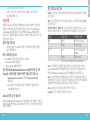
指示灯 指示灯颜色 接口状态
1000
黄色
链路速度:1000 Mbps
闪烁* 发送和接收数据
10/100
绿色
链路速度:10 Mbps 或
100 Mbps
闪烁* 发送和接收数据
*闪烁速度会随着数据流量的增加而加快
状态 – 在设备有管理连接时亮起。使用 Fireware XTM 网页管理界面或命令行接口连接
到设备后,状态指示灯将亮起并持续 30 秒。当 WatchGuard 系统管理器轮询设备时也
会亮起。
模式 – 显示外部网络连接的状态。如果设备可以连接到外部网络并发送数据流,该指
示灯将为绿色。如果设备无法连接到外部网络和发送数据流,该指示灯将闪烁。
注意– 如果在启动设备时按下“重置”按钮,该指示灯将亮起。
电源 ( ) – 当设备处于开启状态时,电源指示灯将亮起。
简体中文

14 15
将设备重置为出厂默认设置
如果需要,可以将 Firebox 重置为其出厂默认设置。例如,如果您不知道管理员帐户
的密码或者想要使用“RapidDeploy 快速部署”方式重新配置,可以重置设备。请在
升级之前备份您的配置。这样可以在需要时恢复升级前的配置。
如需了解更多信息,请参阅 Firebox 硬件指南,网址为:
www.watchguard.com/help/documentation/hardware.asp
Activation de votre appliance Firebox
1. Rendez-vous à l'adresse www.watchguard.com/activate
2. Connectez-vous à votre compte WatchGuard ou créez un nouveau compte*.
*Si vous créez un nouveau compte, retournez à l'adresse www.watchguard.com/activate à la n
duprocessus de création du compte.
3. Saisissez le numéro de série de votre appareil.
4. Lors de l'activation, sélectionnez votre méthode de conguration:
• RapidDeploy QuickStart: téléchargement et application automatiques d'un
chier de conguration QuickStart sur votre appareil. Ce chier est pré-conguré
avec les paramètres de sécurité recommandés par WatchGuard.
• Classic Activation: utilisation de l'Assistant de conguration Web pour générer
un chier de conguration de base pour votre appareil.
5. Suivez les instructions de conguration correspondant à la méthode sélectionnée.
Français

16 17
Ordinateur Internet
Conguration Classic Activation
1.Branchement et mise sous tension de votre appliance Firebox
Assurez-vous que votre ordinateur est conguré pour utiliser le protocole DHCP. Lorsque
vous connectez votre appliance Firebox, elle attribue une adresseIP sur le réseau
10.0.1.0/24.
2. Connexion à l'interface utilisateur Web
A. Rendez-vous à l'adresse https://10.0.1.1:8080
B. Votre appareil utilisant un certicat auto-signé, vous pouvez, sans risque, ignorer les
avertissements liés aux certicats.
C. Connectez-vous avec le nom d'utilisateur admin et le mot de passe readwrite.
D. Suivez les instructions de l'Assistant de conguration Web pour générer un chier de
conguration pour un nouvel appareil. Si vous avez des questions, cliquez sur Plus
d'informations.
E. Une fois que l'Assistant a terminé, connectez-vous à l'interface utilisateur Web avec
le nom d'utilisateur admin et le mot de passe Admin (readwrite) que vous avez
dénis dans l'Assistant.
F. Installez l'appliance Firebox sur votre réseau.
Français
Français
Conguration RapidDeploy QuickStart
1. Branchement et mise sous tension de votre appliance Firebox
Assurez-vous que les ordinateurs de votre réseau sont congurés pour utiliser le protocole
DHCP. Lorsque vous installez votre appliance Firebox, elle attribue une adresseIP sur le
réseau 10.0.1.0/24.
1. Connexion à l'interface utilisateur Web
A. Rendez-vous à l'adresse https://10.0.1.1:8080
B. Votre appareil utilisant un certicat auto-signé, vous pouvez, sans risque, ignorer les
avertissements liés aux certicats.
C. Connectez-vous avec le compte utilisateur admin et le mot de passe Admin
(readwrite) que vous avez dénis lors de l'activation.
Votre appareil présente une conguration de base:
• Trac sortant TCP, UDP et Ping autorisés.
• Blocage de tout le trac non demandé en provenance du réseau externe.
• Paramètres de sécurité optimisés.
Votre réseau
Internet

18 19
Examen des caractéristiques et fonctions de votre appliance Firebox
Accédez à l'interface utilisateur Web ou aux outils de WatchGuard System Manager et
cliquez sur l'icône d'Aide d'une page ou d'une boîte de dialogue pour en savoir plus sur les
fonctions de gestion, de surveillance et de sécurité de votre appliance Firebox.
À propos des témoins d'état de l'appareil
Fail Over (Basculement): s'allume en cas de basculement WAN depuis l'interface externe
principale vers l'interface de secours.
WAP (modèles sans l uniquement): s'allume lorsque l'appareil est activé en tant que point
d'accès sans l ou en tant que client sans l.
Indicateurs d'état de l'interface réseau: les trois interfaces réseau sont étiquetées 2, 1 et
0. Chaque interface comporte deux indicateurs d'état.
Indicateur Couleur de l'indicateur État de l'interface
1000 Jaune Vitesse des liens: 1000
Mbps
Clignote* Données envoyées et
reçues
10/100 Vert Vitesse des liens: 10 Mbps
ou
100 Mbps
Clignote* Données envoyées et
reçues
* La vitesse de clignotement augmente avec le débit du ux de données
Status (État): indique qu'il y a une connexion de gestion avec l'appareil. L'indicateur d'état
s'allume pendant 30 secondes après avoir connecté l'appareil à l'interface utilisateur
Web Fireware XTM ou à l'interface de ligne de commande. Il s'allume également lorsque
l'appareil est sondé par WatchGuard System Manager.
Français
Votre appareil présente une conguration de base:
• Autorisation des connexions sortantes FTP, Ping, DNS, TCP et UDP.
• Blocage de tout le trac non demandé en provenance du réseau externe.
• Inspection du trac sortant FTP, HTTP et HTTPS
• Utilisation de services de sécurité sous licence pour protéger les réseaux approuvés et
en option
Étapes suivantes
Félicitations! Vous avez à présent terminé la conguration de base de votre appliance Firebox.
Vous pouvez utiliser l'interface utilisateur Web pour consulter et modier votre conguration,
mais aussi pour gérer et contrôler votre appliance. Autrement, vous pouvez télécharger et
installer WatchGuard System Manager (WSM) et utiliser Policy Manager et la suite WSM d'outils
de gestion etde surveillance. Voici quelques recommandations pour débuter:
Vériez votre connectivité Internet
• Une fois votre appliance Firebox installée sur votre réseau, assurez-vous que vos
utilisateurs peuvent naviguer correctement sur Internet.
Procurez-vous le logiciel le plus récent
Pour mettre à niveau le système d'exploitation de l'appliance Firebox:
1. Connectez-vous à l'interface utilisateur Web de Fireware.
2. Sélectionnez System > Upgrade OS (Système > Mise à niveau du système d'exploitation).
Pour obtenir la toute dernière version de WSM, de WatchGuard
Dimension, des clients VPN et d'autres logiciels pour votre appliance
Firebox:
1. Rendez-vous à l'adresse www.watchguard.com/support et cliquez sur
Download Software (Téléchargements de logiciels).
2. Recherchez la page des téléchargements de logiciels pour votre modèle
d'appliance Firebox et sélectionnez le logiciel à installer.

20 21
Mode: indique l'état de la connexion du réseau externe. Si l'appareil peut se connecter
au réseau externe et envoyer du trac, cet indicateur est vert. Si l'appareil ne peut pas se
connecter au réseau externe et envoyer du trac, cet indicateur clignote.
Attn: s'allume lorsque vous démarrez l'appareil tout en maintenant le bouton Reset
(Réinitialiser) enfoncé.
Power (Alimentation) ( ): l'indicateur d'alimentation s'allume lorsque l'appareil est sous
tension.
Rétablissement des paramètres d'usine de l'appareil
En cas de besoin, vous pouvez réinitialiser votre appliance Firebox sur ses paramètres
d'usine. Par exemple, vous pouvez réinitialiser votre appareil si vous ne connaissez pas
le mot de passe du compte administrateur ou si vous souhaitez recommencer à l'aide
de RapidDeploy QuickStart. Assurez-vous de sauvegarder votre conguration avant de
procéder à la mise à niveau. Au besoin, vous pourrez restaurer votre conguration.
Pour en savoir plus, reportez-vous au Guide du matériel pour votre appliance Firebox,
disponible àl'adresse suivante:
www.watchguard.com/help/documentation/hardware.asp
Firebox aktivieren
1. Rufen Sie die Website www.watchguard.com/activate auf.
2. Melden Sie sich bei Ihrem WatchGuard-Account an oder erstellen Sie ein neues Konto*.
*Falls Sie ein neues Konto erstellen, kehren Sie nach erfolgreichem Abschluss zur Seite www.watchguard.
com/activate zurück.
3. Geben Sie die Seriennummer Ihres Geräts ein.
4. Wählen Sie bei der Aktivierung eines der folgenden Setup-Verfahren aus:
• RapidDeploy-Schnellstart – Sie können automatisch eine Schnellstart-
Kongurationsdatei auf Ihr Gerät herunterladen und ausführen. Hierbei sind die von
WatchGuard empfohlenen Sicherheitseinstellungen bereits vorkonguriert.
• Klassische Aktivierung – Erstellen Sie mithilfe des Web-Setup-Assistenten eine
Basiskongurationsdatei für Ihr Gerät.
5. Folgen Sie den Setup-Anweisungen in diesem Handbuch für das von Ihnen gewählte
Verfahren.
Deutsch

22 23
Computer Internet
Setup mit klassischer Aktivierung
1. Firebox anschließen und einschalten
Stellen Sie sicher, dass Ihr Computer für die Verwendung von DHCP konguriert ist. Wenn Sie eine
Verbindung zu Ihrer Firebox herstellen, wird eine IP-Adresse im Netzwerk 10.0.1.0/24 zugewiesen.
2. Verbindung zum Web-Interface herstellen
A. Rufen Sie die Website https://10.0.1.1:8080 auf.
B. Eventuell angezeigte Zertikatswarnungen können Sie ignorieren, da das Gerät ein
selbstsigniertes Zertikat verwendet.
C. Melden Sie sich mit dem Benutzernamen admin und dem Kennwort readwrite an.
D. Folgen Sie den Anweisungen im Web-Setup-Assistenten, um eine Basiskongurationsdatei
für ein neues Gerät zu erstellen. Klicken Sie bei weiteren Fragen auf More Information.
E. Melden Sie sich nach Abschluss des Assistenten mit dem Benutzerkonto admin und dem Admin-
Kennwort (readwrite), das Sie bei der Aktivierung festgelegt haben, am Web-Interface an.
F. Installieren Sie die Firebox in Ihrem Netzwerk.
Ihr Gerät verfügt über die folgende Basiskonguration:
• Unterstützung von ausgehenden FTP-, Ping-, DNS-, TCP- und UDP-Verbindungen
• Blockierung von nicht angefordertem Datenverkehr aus dem externen Netzwerk
Deutsch
Setup mit RapidDeploy-Schnellstart
1. Firebox anschließen und einschalten
Stellen Sie sicher, dass die Computer in Ihrem Netzwerk für die Verwendung von DHCP
konguriert sind. Wenn Sie Ihre Firebox installieren, wird eine IP-Adresse im Netzwerk
10.0.1.0/24 zugewiesen.
2. Verbindung zum Web-Interface herstellen
A. Rufen Sie die Website https://10.0.1.1:8080 auf.
B. Etwaig angezeigte Zertikatswarnungen können Sie ignorieren, da das Gerät ein
selbstsigniertes Zertikat verwendet.
C. Melden Sie sich mit dem Benutzerkonto admin und dem Admin-Kennwort (readwrite)
an, das Sie während der Aktivierung festgelegt haben.
Ihr Gerät verfügt über die folgende Basiskonguration:
• Unterstützung für ausgehenden TCP-, UDP- und Ping-Datenverkehr
• Blockierung von nicht angefordertem Datenverkehr aus dem externen Netzwerk
• Bereitstellung optimierter Sicherheitseinstellungen
Ihr Netzwerk
Internet

24 25
Informationen zu den Statusanzeigen des Geräts
Fail Over – Diese Anzeige leuchtet bei WAN-Failover zwischen der primären externen
Schnittstelle und der Backup-Schnittstelle.
WAP (nur bei Drahtlosmodellen) – Diese Anzeige leuchtet, wenn das Gerät als Wireless Access
Point oder als drahtloser Client aktiviert wurde.
Statusanzeigen der Netzwerkschnittstellen – Die drei Netzwerkschnittstellen sind mit 2, 1
und 0 bezeichnet. Für jede Schnittstelle gibt es zwei Statusanzeigen.
Anzeige Farbsignal Schnittstellenstatus
1000 Gelb Verbindungsgeschwindigkeit: 1000 MBit/s
Blinkt* Daten werden gesendet und empfangen
10/100 Grün
Verbindungsgeschwindigkeit: 10 MBit/s oder
100 MBit/s
Blinkt* Daten werden gesendet und empfangen
* Bei zunehmendem Datenverkehr erhöht sich die Blinkfrequenz
Status – Zeigt an, ob eine Verwaltungsverbindung zum Gerät besteht. Nachdem Sie über die
Fireware XTM-Web-Schnittstelle oder die Befehlszeilenschnittstelle eine Verbindung zum Gerät
hergestellt haben, leuchtet die Statusanzeige 30 Sekunden lang. Sie leuchtet außerdem, wenn
das Gerät vom WatchGuard System Manager abgefragt wird.
Mode – Zeigt den Status der externen Netzwerkverbindung an. Die Anzeige leuchtet grün,
wenn das Gerät eine Verbindung zum externen Netzwerk herstellen und Datenverkehr senden
kann. Die Anzeige blinkt, wenn das Gerät keine Verbindung zum externen Netzwerk herstellen
und keinen Datenverkehr senden kann.
Attn – Diese Anzeige leuchtet, wenn Sie das Gerät mit gedrückter Reset-Taste starten.
Ein/Aus ( ) – Diese Anzeige leuchtet, wenn das Gerät eingeschaltet ist.
Deutsch
• Prüfung von ausgehendem FTP-, HTTP- und HTTPS-Datenverkehr
• Verwendung lizenzierter Sicherheitsdienste zum Schutz vertrauenswürdiger und
optionaler Netzwerke
Weitere Schritte
Herzlichen Glückwunsch! Sie haben das Basis-Setup für Ihre Firebox abgeschlossen. Über das
Web-Interface können Sie Ihre Konguration anzeigen lassen sowie bearbeiten und Ihre Firebox
verwalten und überwachen. Alternativ können Sie den WatchGuard System Manager (WSM)
herunterladen und installieren und den Policy Manager und die WSM-Suite mit Management-
und Überwachungstools verwenden. Tipps für den Start:
Internetverbindung überprüfen
• Stellen Sie sicher, dass Ihre Nutzer nach der Installation der Firebox im Netzwerk
problemlos im Internet navigieren können.
Neueste Software implementieren
So führen Sie ein Upgrade des Firebox-Betriebssystems durch:
1. Melden Sie sich beim Fireware-Web-Interface an.
2. Wählen Sie die Option „System > Upgrade OS“ aus.
So rufen Sie die neueste Version von WSM, WatchGuard Dimension, VPN-
Clients und anderer Software für die Firebox ab:
1. Rufen Sie die Website www.watchguard.com/support auf, und klicken Sie auf
Download Software.
2. Gehen Sie auf die Seite mit den Software-Downloads für Ihr Firebox-Modell und
wählen Sie die zu installierende Software aus.
Erkunden der Merkmale und Funktionen der Firebox
Durchsuchen Sie das Web-Interface oder die Tools in WatchGuard System Manager und klicken
Sie auf einer beliebigen Seite oder in einem beliebigen Dialogfeld auf „Help“, um weitere Infor-
mationen zu den Verwaltungs-, Überwachungs- und Sicherheitsmerkmalen Ihrer Firebox zu
erhalten.

26 27
Gerät auf Werkseinstellungen zurücksetzen
Falls erforderlich, lassen sich jederzeit die Werkseinstellungen Ihrer Firebox wiederherstellen.
Sie können Ihr Gerät beispielsweise zurücksetzen, wenn Sie das Kennwort für das
Administratorkonto vergessen haben oder den RapidDeploy QuickStart durchführen möchten.
Sichern Sie jedoch unbedingt Ihre Konguration, bevor Sie ein Upgrade durchführen. Die
Konguration kann dann bei Bedarf wiederhergestellt werden.
Weitere Informationen nden Sie im Hardwarehandbuch für Ihre Firebox. Sie nden es unter:
www.watchguard.com/help/documentation/hardware.asp
Attivazione di Firebox
1. Vai su www.watchguard.com/activate
2. Accedi al tuo account WatchGuard, oppure creane uno nuovo*.
* Se crei un nuovo account, ritorna a www.watchguard.com/activate dopo aver terminato laprocedura
dicreazione dell’account.
3. Digita il numero di serie del tuo dispositivo.
4. Durante l’attivazione, seleziona il metodo di installazione preferito:
• RapidDeploy QuickStart – Scarica automaticamente e applica il le di congurazione
sultuo dispositivo, con le impostazioni di sicurezza consigliate da WatchGuard.
• Attivazione classica – Utilizza la procedura guidata, attraverso l’interfaccia di gestione
viaWeb, per creare il le di congurazione base per il tuo dispositivo.
5. Utilizza le istruzioni per l’installazione contenute in questa guida, corrispondenti
almetodoselezionato.
Italiano

28 29
Computer Internet
Impostazioni di attivazione classiche
2. Collegamento e accensione di Firebox
Verica che il computer in uso sia congurato per utilizzare il protocollo DHCP. Quando installi
iltuoFirebox, questo assegnerà al computer un indirizzo IP nella sottorete10.0.1.0/24.
3. Connessione all’interfaccia di gestione via Web
A. Vai all'indirizzo https://10.0.1.1:8080
B. Puoi ignorare tranquillamente qualsiasi avviso di certicato visualizzato perché il dispositivo
utilizza un certicato autormato.
C. Accedi con il nome utente admin e la passphrase readwrite.
D. Per creare un le di congurazione di base per il nuovo dispositivo, segui le indicazioni
contenute nella procedura guidata per l’installazione basata sul Web. In caso di domande,
faiclic su Ulteriori informazioni.
E. Una volta completata la procedura guidata, accedere all’interfaccia utente basata sul web con
l’account utente admin e la passphrase (readwrite) impostata durante la procedura guidata.
F. Installa il Firebox nella tua rete.
Il dispositivo contiene una congurazione di base:
• Consente le connessioni in uscita FTP, Ping, DNS, TCP e UDP
• Blocca tutto il traco non richiesto dalla rete esterna
• Ispeziona il traco in uscita FTP, HTTP e HTTPS
• Utilizza i servizi di sicurezza concessi in licenza per proteggere le reti adabili e opzionali
Italiano
Italiano
Impostazione di RapidDeploy QuickStart
1. Collegamento e accensione di Firebox
Assicurati che i computer collegati alla rete siano congurati per utilizzare il protocollo DHCP. Quando
installi il tuo Firebox, questo assegnerà al computer un indirizzo IP nella sottorete10.0.1.0/24.
1. Connessione all’interfaccia di gestione via Web
A. Vai all'indirizzo https://10.0.1.1:8080
B. Puoi ignorare tranquillamente qualsiasi avviso di certicato visualizzato perché il dispositivo
utilizza un certicato autormato.
C. Accedi con l’account utente admin e la passphrase (readwrite) impostata durante l’attivazione.
Il dispositivo contiene una congurazione di base:
• Consente il traco TCP e UDP in uscita, e il ping
• Blocca tutto il traco non richiesto dalla rete esterna
• Include impostazioni di sicurezza ottimizzate
La tua rete
Internet

30 31
Informazioni sulle spie di stato del dispositivo
Fail Over – Si accende in caso di failover WAN dall’interfaccia esterna primaria all’interfaccia
dibackup.
WAP – (Solo nei modelli wireless) Si accende quando il dispositivo viene attivato come un punto
diaccesso wireless o un come un client wireless.
Indicatori di stato della scheda di rete – Le tre schede di rete sono indicate come 2, 1, 0.
Perognischeda sono disponibili due indicatori di stato.
Indicatore Colore dell’indicatore Stato dell’interfaccia
1000 Giallo Velocità collegamento: 1000 Mbps
Lampeggi* Dati inviati e ricevuti
10/100 Verde Velocità collegamento: 10 Mbps o 100 Mbps
Lampeggi* Dati inviati e ricevuti
* La velocità di lampeggio aumenta insieme all’incremento del
ussodi dati
Stato – Si accende quando viene stabilita una connessione per la gestione del dispositivo.
L’indicatore di stato si accende per 30 secondi una volta collegatisi al dispositivo mediante
l’interfaccia utente basata sul web di Fireware XTM o l’interfaccia a riga di comando. Si accende anche
quando il dispositivo viene sondato da WatchGuard System Manager.
Modo – Mostra lo stato della connessione alla rete esterna. Se il dispositivo può collegarsi alla rete
esterna e inviare traco, l’indicatore è verde. Se il dispositivo non può collegarsi alla rete esterna e
inviare traco, l’indicatore lampeggia.
Attn – Si accende quando il dispositivo viene avviato premendo il pulsante Reset.
Alimentazione ( ) – L’indicatore dell’alimentazione si accende quando il dispositivo viene acceso.
Italiano
Passaggi successivi
Congratulazioni! L’installazione di base di Firebox è completata. Per visualizzare e modicare la
congurazione in uso e per gestire e monitorare Firebox, utilizza l’interfaccia di gestione via Web.
Inalternativa, è possibile scaricare e installare WatchGuard System Manager (WSM) e utilizzare
PolicyManager e la suite di strumenti gestionali e di monitoraggio WSM. Di seguito alcuni consigli
utili per iniziare:
Verica della connessione a Internet
• Dopo avere installato Firebox nella tua rete, verica che gli utenti possano navigare in
Internet senza problemi.
Aggiornamento del software
Per aggiornare il sistema operativo Firebox:
1. Accedi all’interfaccia utente Web Fireware.
2. Seleziona System > Upgrade OS.
Per ottenere l’ultima versione di WSM, WatchGuard Dimension, client
VPN e altro software per Firebox:
1. Vai su www.watchguard.com/support e fai clic su Download Software.
2. Cerca la pagina per scaricare il software di Firebox e seleziona
il oftware che desideri installare.
Esplorazione delle caratteristiche e delle funzionalità di Firebox
Per ulteriori informazioni sulle funzionalità di gestione, monitoraggio e sicurezza di Firebox, sfogliare
l’interfaccia utente basata sul web o gli strumenti di WatchGuard System Manager e fare clic su ? o su
qualsiasi altra pagina o nestra di dialogo.

32 33
Ripristino delle impostazioni di fabbrica del dispositivo
Se necessario, è possibile ripristinare le impostazioni di fabbrica di Firebox. Per esempio, il dispositivo
può essere resettato se non si conosce la passphrase dell’account administrator o si desidera riavviare
con RapidDeploy QuickStart. Prima di eettuare l’aggiornamento, assicurarsi di eseguire il backup
della congurazione. Se necessario, la congurazione può essere ripristinata.
Per maggiori informazioni, consulta la Guida all'hardware del tuo Firebox, disponibile all’indirizzo:
www.watchguard.com/help/documentation/hardware.asp
デバイスのアクティベー ション を 行う
1. www.watchguard.com/activate
にアクセスします。
2. 登録済みの
WatchGuard
アカウントにログインするか、 新しいアカウントを作成します
*
。
*
新しいアカウントを作成する場合は、アカウントの作成が完了してからもう一度
www.watchguard.com/activate
にアクセスしてください。
3. デバイスのシリアル番号を入力します。
4. アクティベーションの実行時にセットアップ方法を選択します。
• RapidDeploy QuickStart
–
QuickStart
設定ファイルを自動的にダウンロードしてデバ
イスに適用します。このファイルは、
WatchGuard
で推奨しているセキュリティ設定を事
前に設定したものです。
• 従来のアクティベーション
–
ウェブセットアップ・ウィザードを使用して、デバイスの基本
設定ファイルを作成します。
5. 選択した方法に応じて、本ガイドのいずれかのセットアップ手順に従います。
日本語

34 35
コンピュータ インターネット
従 来 の アク ティベ ー ション に よる セ ットアップ
1. デバイスを 接 続して電 源 を入れる
コンピュータが
DHCP
を使用するように設定されていることを確認します。
Firebox
への接続時に、
10.0.1.0/24
ネットワーク上の
IP
アドレスが割り当てられます。
2. WebUI
に接続する
A. https://10.0.1.1:8080
にアクセスします。
B. Firebox
デバイスは自己署名証明書を使用するため、証明書に関する警告は無視して
かまいません。
C. ユーザー名
admin
とパスフレーズ
readwrite
でログインします。
D. ウェブセットアップ・ウィザードの手順に従って、新しいデバイスの基本設定ファイルを作
成します。詳しい手順を確認する場合は、
[More Information]
をクリックしてくだ さ い 。
E. ウィザードが完了したら、ウィザードで設定したユーザー・アカウント
admin
と管理用パ
スフレーズ
readwrite
で ウェブ
UI
にログインします。
F. ネットワークに
Firebox
をインストールします。
デバイスの基本設定は次のとおりです。
• アウトバウンド
FTP
、
Ping
、
DNS
、
TCP
、
UDP
接続を可能にする
• 外部ネットワークからのすべての要求されないトラフィックをブロック
RapidDeploy QuickStart
に よる セットアップ
1. デバイスを 接 続して電 源 を入 れ る
ネットワーク上のコンピュータが
DHCP
を使用するように設定されていることを確認します。
Firebox
のインストール時に、
10.0.1.0/24
ネットワーク上の
IP
アドレスが割り当てられます。
2. WebUI
に接続する
A. https://10.0.1.1:8080
にアクセスします。
B. 自己署名証明書を使用するため、証明書に関する警告は無視してかまいません。
C. アクティベーションの実行時に設定したユーザー・アカウント
admin
と管理用パスフレー
ズ
readwrite
でログインします。
デバイスの基本設定は次のとおりです。
• アウトバウンドの
TCP
、
UDP
、および
ping
トラフィックを許可
• 外部ネットワークからのすべての要求されないトラフィックをブロック
• セキュリティ設定を最適化
ネ ットワ ー ク
インターネット
日本語

36 37
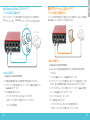
デバイスのステータス・ライトについて
Fail Over
–
プライマリ外部インターフェイスからバックアップ・インターフェイスへの
WAN
フェ
イルオーバーの発生時に点灯します。
WAP -
(無線モデルのみ)デバイスを無線アクセス・ポイントまたは無線クライアントとしてアク
ティベートした場合に点灯します。
ネットワーク・インターフェイスのステータス・インジケータ
–
3
つのネットワーク・インターフェイ
スには、それぞれ
2
、
1
、
0
というラベルが付けられています。それらのインターフェイスのそれ
ぞれに
2
種類のステータス・インジケータがあります。
インジケータ インジケータの色 インターフェイスのステータス
1000
黄色
リンク速 度
:1000 Mbps
点滅
*
データを送受信
10/100
緑色
リンク速 度
:10 Mbps
または
100 Mbps
点滅
*
データを送受信
*
データの量が多いほど高速に点滅します
Status
–
デバイスへの管理接続のステータスを示します。このインジケータは、
Fireware XTM
の
Web UI
またはコマンドライン・インターフェイスでデバイスに接続したときに、
30
秒間点灯
します。また、
WatchGuard System Manager
によるデバイスのポーリング時にも点灯します。
Mode
–
外部ネットワーク接続 のステータスを示します。 外部ネットワークに接続してトラフィック
を送信できる場合、このインジケータは緑色になります。外部ネットワークに接続してトラフィック
を送信することができない場合は点滅します。
Attn
–
デバイスの起動時にリセット・ボタンを押すと点灯します。
Power ( )
–
デバイスの電源が入っているときに点灯します。
• 外部に向けた
FTP
、
HTTP
、
HTTPS
トラフィックを検査
• 信頼できるネットワークとオプション
ネットワーク保護のため、ライセンス式セキュリテ
ィ
サービスを使用
次のステップ
おめでとうございます。これで
Firebox
の基本セットアップが完了しました。
Web UI
を使って、
設定の閲覧と編集、および
Firebox
の管理
/
監視が可能です。また、
WatchGuard System
Manager
(
WSM
)をダウンロードしてインストールし、
Policy Manager
や
WSM
スイートに含ま
れる管理
/
監視ツールを利用することもできます。それらの作業の手始めとして、いくつかの推奨
事項を次に示します。
インターネット接続を確認する
• ネットワークにインストールした
Firebox
で、ユーザーがインターネットを正常に閲覧で
きることを確認します。
最 新 のソフトウェア を入手 する
Firebox OS
をアップグレードする手 順は次のとおりです。
1. Fireware Web UI
にログインしま す。
2. System > Upgrade OS
を 選 択しま す。
Firebox
用に、最新版の
WSM
、
WatchGuard Dimension
、
VPN clients
、
その 他 のソフトウェアを 入 手 するには
:
1. www.watchguard.com/support
にアクセスし、
Download Software
をクリックしま す。
2.
お使いのモデルに対応したソフトウェア
ダウンロード
ページを探し、
インストール
するソフトウェアを選択します。
Firebox
の機能について調べる
WatchGuard System Manager
の ウェブ
UI
やツールを参照し、それぞれのページまたはダイア
ログ
ボックスで
[Help]
をクリックして、
Firebox
の管理、監視、およびセキュリティの機能の詳細
を確認してください。
日本語

38 39
デバイスの設定を工場出荷時の状態に戻す
必要に応じて、
Firebox
の設定を工場出荷時の状態に戻すことができます。たとえば、管理者ア
カウントのパスフレーズを忘れた場合や、
RapidDeploy QuickStart
でセットアップをやり直した
い場合に、デバイスをリセットすることができます。アップグレードを行うときは、実行前に設定
をバックアップしてください。そうすれば、必要に応じて設定を復元することができます。
詳細については、下記のサイトでお使いの
Firebox
向けのハードウェア
ガイドを参照してください。
www.watchguard.com/help/documentation/hardware.asp
장치 활성화
1. www.watchguard.com/activate로 이동합니다.
2. WatchGuard 계정으로 로그인하거나 새 계정을 만듭니다*.
*새 계정을 만들 경우 계정 생성 과정을 마친 후 www.watchguard.com/activate로 돌아가십시오.
3. 장치의 일련 번호를 입력합니다.
4. 활성화 과정을 진행하는 중에 원하는 설정 방법을 선택합니다.
• RapidDeploy QuickStart – WatchGuard에서 권장하는 보안 설정으로 사전
구성된 QuickStart 구성 파일을 자동으로 다운로드하여 장치에 적용합니다.
• Classic Activation – Web Setup Wizard를 사용하여 장치에 대한 기본 구성
파일을 만듭니다.
5. 이 가이드에서 선택한 방법에 맞는 설정 지침을 따릅니다.
한국어
La pagina si sta caricando...
La pagina si sta caricando...
La pagina si sta caricando...
La pagina si sta caricando...
La pagina si sta caricando...
La pagina si sta caricando...
La pagina si sta caricando...
La pagina si sta caricando...
La pagina si sta caricando...
La pagina si sta caricando...
La pagina si sta caricando...
La pagina si sta caricando...
La pagina si sta caricando...
La pagina si sta caricando...
La pagina si sta caricando...
La pagina si sta caricando...
La pagina si sta caricando...
La pagina si sta caricando...
La pagina si sta caricando...
-
 1
1
-
 2
2
-
 3
3
-
 4
4
-
 5
5
-
 6
6
-
 7
7
-
 8
8
-
 9
9
-
 10
10
-
 11
11
-
 12
12
-
 13
13
-
 14
14
-
 15
15
-
 16
16
-
 17
17
-
 18
18
-
 19
19
-
 20
20
-
 21
21
-
 22
22
-
 23
23
-
 24
24
-
 25
25
-
 26
26
-
 27
27
-
 28
28
-
 29
29
-
 30
30
-
 31
31
-
 32
32
-
 33
33
-
 34
34
-
 35
35
-
 36
36
-
 37
37
-
 38
38
-
 39
39


Watchguard Firebox T10/T10-W Guida Rapida
- Tipo
- Guida Rapida
in altre lingue
Documenti correlati
-
Watchguard ML3AE8 Firebox M200 Network Security Guida utente
-
-
-
-
-
-
-
-
-