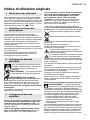
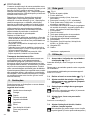
Metabo BS 18 LTX BL Impuls Istruzioni per l'uso
- Categoria
- Martelli perforatori
- Tipo
- Istruzioni per l'uso

www.metabo.com Made in Germany
de Originalbetriebsanleitung 7
en Original instructions 11
fr Notice d'utilisation originale 15
nl Oorspronkelijke gebruiksaanwijzing 19
it Istruzioni per l’uso originali 23
es Manual original 27
pt Manual original 31
sv Bruksanvisning i original 35
fi Alkuperäinen käyttöopas 39
no Originalbruksanvisning 43
da Original brugsanvisning 47
pl Instrukcja oryginalna 51
el Πρωτότυπες οδηγίες λειτουργίας 55
hu Eredeti használati utasítás 60
ru Оригинальное руководство по
эксплуатации 64
BS 18 LTX BL Impuls
BS 18 LTX BL Quick
BS 18 LTX Impuls
BS 18 LTX Quick
SB 18 LTX BL Impuls
SB 18 LTX BL Quick
SB 18 LTX Impuls
SB 18 LTX Quick

2
0
1
6.
1 ( 7.8)
3 ( 7.5)2
4 ( 7.4)
6 ( 7.3)
7 ( 7.11)
5 ( 7.6)
8 ( 7.11)
9 ( 7.2)
10 ( 7.1)
11 ( 7.1)
12 ( 7.2)
13 ( 7.6)
14 ( 6.)
15 ( 7.7)
A
18 V...3,0 Ah ...6.25594 ... Li-Power Extreme
18 V...4,0 Ah ...6.25591 ... Li-Power Extreme
18 V...5,2 Ah ...6.25592 ... Li-Power Extreme
etc.

3
= 50 %
= 100 %
= 75 %
= 25 %
= 50 %
= < 20 %
SC 60 Plus
ASC 30-36
ASC 15
ASC 30 etc.
7.1
7.3
7.2
B
C
D

4
max. Nm
Nm ... Nm
1...11
=
=
=
=
Impuls
Nm ... Nm
1...10
=
=
=
Impuls
max. Nm
7.4
7.6
7.6
4
E
G
F
...18 LTX Impuls / Quick,
...18 LTX BL Impuls
...18 LTX BL Quick

b
a
b
1
7.9
7.11
7.10
7.8
2.
I
1.
3.
... Quick
J
... Quick
H
K
6
5

1.
12.
L
M
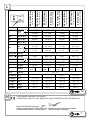
BS 18 LTX BL Impuls
*1) Serial Number: 02241..
BS 18 LTX BL Quick
*1) Serial Number: 02197..
BS 18 LTX Impuls
*1) Serial Number: 02191..
BS 18 LTX Quick
*1) Serial Number: 02193..
SB 18 LTX BL Impuls
*1) Serial Number: 02240..
SB 18 LTX BL Quick
*1) Serial Number: 02199..
SB 18 LTX Impuls
*1) Serial Number: 02192..
SB 18 LTX Quick
*1) Serial Number: 02200..
UV 18
n
0
/min,
rpm
0 - 600 0 - 500 0 - 600 0 - 500
0 - 2050 0 - 1700 0 - 2050 0 - 1700
M
1
Nm (in-lbs)
44 (390) 55 (487) 44 (390) 55 (487)
M
2
Nm (in-lbs)
49 (434) 60 (531) 49 (434) 60 (531)
M
3
Nm (in-lbs)
90 (797) 110 (974) 90 (797) 110 (974)
M
4
Nm
(in-lbs)
0,8-20
(7 - 177)
6,5-24
(58 - 212)
0,8-20
(7 - 177)
6,5-24
(58 - 212)
0,8-8
(7 - 71)
1,7-11
(15 - 97)
0,8-8
(7 - 71)
1,7-11
(15 - 97)
D
1 max
mm (in)
13 (
1
/
2
)
D
2 max
mm (in) 50 (2)
65 (2
9
/
16
)
50 (2)
65 (2
9
/
16
)
D
3 max
mm (in)
--
16 (
5
/
8
)16(
5
/
8
)
s /min, bpm - - 38950 32300
m kg (lbs) 1,9 (4.2) 2,0 (4.4) 2,0 (4.4) 2,1 (4.6)
G UNF(in)
1/2“ - 20
UNF
- 1/2“ - 20
UNF
- 1/2“ - 20
UNF
- 1/2“ - 20
UNF
-
D
max
mm (in)
13 (
1
/
2
)
a
h, ID
/K
h, I
D
m/s
2
- - 18 / 1,5 13 / 1,5
a
h, D
/K
h,
D
m/s
2
< 2,5 / 1,5 < 2,5 / 1,5 < 2,5 / 1,5 < 2,5 / 1,5
a
h, S
/K
h,
S
m/s
2
< 2,5 / 1,5 < 2,5 / 1,5 < 2,5 / 1,5 < 2,5 / 1,5
L
pA
/K
pA
dB(A)
76/3 80/3 91/3 91/3
L
WA
/K
WA
dB(A)
87/3 91/3 102/3 102/3
12.
*2) 2014/30/EU, 2006/42/EC, 2011/65/EU
*3) EN 60745-1:2009+A11:2010, EN 60745-2-1:2010, EN 60745-2-2:2010, EN 50581:2012
2018-05-09, Bernd Fleischmann
Direktor Produktentstehung & Qualität (Vice President Product Engineering & Quality)
*4) Metabowerke GmbH - Metabo-Allee 1 - 72622 Nuertingen, Germany

DEUTSCH de
7
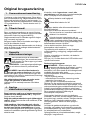
Originalbetriebsanleitung
Wir erklären in alleiniger Verantwortlichkeit: Diese
Akku-Bohrschrauber und -Schlagbohrmaschinen,
identifiziert durch Type und Seriennummer *1),
entsprechen allen einschlägigen Bestimmungen
der Richtlinien *2) und Normen *3). Technische
Unterlagen bei *4) -
Abb. M.
Die Bohr- und Schlagbohrmaschinen sind geeignet
zum Bohren ohne Schlag in Metall, Holz, Kunststoff
und ähnlichen Materialien sowie zum Schrauben
und Gewindebohren.
Die Schlagbohrmaschinen sind zusätzlich zum
Schlagbohren in Mauerwerk, Ziegel und Stein
geeignet.
Für Schäden durch nicht bestimmungsgemäßen
Gebrauch haftet allein der Benutzer.
Allgemein anerkannte Unfallverhütungsvorschriften
und beigelegte Sicherheitshinweise müssen
beachtet werden.
Beachten Sie die mit diesem Symbol
gekennzeichneten Textstellen zu Ihrem
eigenen Schutz und zum Schutz Ihres
Elektrowerkzeugs!
WARNUNG – Zur Verringerung eines
Verletzungsrisikos Betriebsanleitung lesen.
WARNUNG Lesen Sie alle Sicherheits-
hinweise und Anweisungen. Versäumnisse
bei der Einhaltung der Sicherheitshinweise und
Anweisungen können elektrischen Schlag, Brand
und/oder schwere Verletzungen verursachen.
Bewahren Sie alle Sicherheitshinweise und
Anweisungen für die Zukunft auf.
Geben Sie Ihr Elektrowerkzeug nur zusammen mit
diesen Dokumenten weiter.
Tragen Sie Gehörschutz bei der Benutzung von
Schlagbohrmaschinen (Maschinen mit der
Bezeichnung SB...). Die Einwirkung von Lärm
kann Gehörverlust bewirken.
Benutzen Sie den mit dem Gerät gelieferten
Zusatzhandgriff (ausstattungsabhängig). Der
Verlust der Kontrolle kann zu Verletzungen führen.
Halten Sie das Gerät an den isolierten
Griffflächen, wenn Sie Arbeiten ausführen, bei
denen das Einsatzwerkzeug verborgene
Stromleitungen treffen kann. Der Kontakt mit
einer spannungsführenden Leitung kann auch
metallene Geräteteile unter Spannung setzen und
zu einem elektrischen Schlag führen.
Überzeugen Sie sich, dass sich an der Stelle, die
bearbeitet werden soll, keine Strom-, Wasser-
oder Gasleitungen befinden (z.B. mit Hilfe eines
Metallsuchgerätes).
Akkupacks vor Nässe schützen!
Akkupacks nicht dem Feuer aussetzen!
Keine defekten oder deformierten Akkupacks
verwenden!
Akkupacks nicht öffnen!
Kontakte der Akkupacks nicht berühren oder
kurzschließen!
Aus defekten Li-Ion-Akkupacks kann eine
leicht saure, brennbare Flüssigkeit
austreten!
Falls Akkuflüssigkeit austritt und mit der
Haut in Berührung kommt, spülen Sie sofort
mit reichlich Wasser. Falls Akkuflüssigkeit in
Ihre Augen gelangt, waschen Sie sie mit sauberem
Wasser aus und begeben Sie sich unverzüglich in
ärztliche Behandlung!
Bei einer defekten Maschine den Akkupack aus der
Maschine nehmen.
Akkupack aus der Maschine entnehmen bevor
irgendeine Einstellung, Umrüstung, Wartung oder
Reinigung vorgenommen wird.
LED-Leuchte (14): LED-Strahlung nicht direkt mit
optischen Instrumenten betrachten.
Staubbelastung reduzieren:
WARNUNG - Einige Stäube, die durch
Sandpapierschleifen, Sägen, Schleifen,
Bohren und andere Arbeiten erzeugt werden,
enthalten Chemikalien, von denen bekannt ist, dass
sie Krebs, Geburtsfehler oder andere
Fortpflanzungsschäden verursachen. Einige
Beispiele für diese Chemikalien sind:
- Blei aus bleihaltigem Anstrich,
- mineralischer Staub aus Mauersteinen, Zement
und anderen Mauerwerkstoffen, und
- Arsen und Chrom aus chemisch behandeltem
Holz.
Ihr Risiko durch diese Belastung variiert, je
nachdem, wie oft Sie diese Art von Arbeit
ausführen. Um Ihre Belastung mit diesen
Chemikalien zu reduzieren: Arbeiten Sie in einem
gut belüfteten Bereich und arbeiten Sie mit
zugelassener Schutzausrüstung, wie z. B. solche
Staubmasken, die speziell zum Herausfiltern von
mikroskopisch kleinen Partikeln entwickelt wurden.
Dies gilt ebenso für Stäube von weiteren
Werkstoffen, wie z. B. einige Holzarten (wie Eichen-
oder Buchenstaub), Metalle, Asbest. Weitere
bekannte Krankheiten sind z. B. allergische
1. Konformitätserklärung
2. Bestimmungsgemäße
Verwendung
3. Allgemeine
Sicherheitshinweise
4. Spezielle Sicherheitshinweise

DEUTSCHde
8
Reaktionen, Atemwegserkrankungen. Lassen Sie
Staub nicht in den Körper gelangen.
Beachten Sie die für Ihr Material, Personal,
Anwendungsfall und Einsatzort geltenden
Richtlinien und nationale Vorschriften (z.B.
Arbeitsschutzbestimmungen, Entsorgung).
Erfassen Sie die entstehenden Partikel am
Entstehungsort, vermeiden Sie Ablagerungen im
Umfeld.
Verwenden Sie für spezielle Arbeiten geeignetes
Zubehör. Dadurch gelangen weniger Partikel
unkontrolliert in die Umgebung.
Verwenden Sie eine geeignete Staubabsaugung.
Verringern Sie die Staubbelastung indem Sie:
- die austretenden Partikel und den Abluftstrom der
Maschine nicht auf sich, oder in der Nähe
befindliche Personen oder auf abgelagerten
Staub richten,
- eine Absauganlage und/oder einen Luftreiniger
einsetzen,
- den Arbeitsplatz gut lüften und durch saugen
sauber halten. Fegen oder blasen wirbelt Staub
auf.
- Saugen oder waschen Sie Schutzkleidung. Nicht
ausblasen, schlagen oder bürsten.
Transport von Li-Ion-Akkupacks:
Der Versand von Li-Ion Akkupacks unterliegt dem
Gefahrgutrecht (UN 3480 und UN 3481). Klären Sie
beim Versand von Li-Ion Akkupacks die aktuell
gültigen Vorschriften. Informieren sie sich ggfs. bei
ihrem Transportunternehmen. Zertifizierte
Verpackung ist bei Metabo erhältlich.
Versenden Sie Akkupacks nur, wenn das Gehäuse
unbeschädigt ist und keine Flüssigkeit austritt. Zum
Versenden den Akkupack aus der Maschine
nehmen. Die Kontakte gegen Kurzschluss sichern
(z. B. mit Klebeband isolieren).
Die Abbildungen finden Sie am Anfang der
Betriebsanleitung.
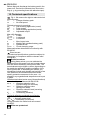
Symbol-Erläuterung:
Bewegungsrichtung
Langsam
Schnell
erster Gang
zweiter Gang
Schrauben
Bohrer
ohne Drehmomentbegrenzung
Schlagbohren
Drehmoment
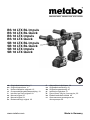
Abb. A
1 Schnellspann-Bohrfutter
2 Zusatzhandgriff
3 Schaltschieber (Bohren, Schlagbohren) *
4S
chaltschieber (1./2. Gang)
5 Taste (Wechsel zwischen „max. Drehmoment“ und
der an Stellrad (13) eingestellten Funktion) *
6 Drehrichtungsumschalter (Drehrichtungsein-
stellung, Transportsicherung) - beidseitig der
Maschine
7 Bit-Depot *
8 Gürtelhaken *
9T
aste zur Akkupack-Entriegelung
10 Taste der Kapazitätsanzeige
11 Kapazitäts- und Signalanzeige
12
Akkupack
13 Stellrad (Impulsfunktion,
Drehmomentbegrenzung, ggf.
„max.
Drehmoment“) *
14 LED-Leuchte
15 Schalterdrücker
* ausstattungsabhängig
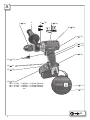
7.1 Akkupack, Kapazitäts- und
Signalanzeige
Abb. B
Vor der Benutzung den Akkupack aufladen.
Laden Sie den Akkupack bei Leistungsabfall wieder
auf.
Die optimale Aufbewahrungstemperatur liegt
zwischen 10°C und 30°C.
7.2 Akkupack entnehmen, einsetzen
Abb. C
7.3 Drehrichtung, Transportsicherung
(Einschaltsperre) einstellen
Abb. D
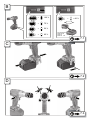
7.4 Getriebestufe wählen
Abb. E
Schalterschieber (4) nur bei Stillstand des
Motors betätigen!
7.5 Bohren, Schlagbohren einstellen
Abb. A
Schaltschieber (3) betätigen.
7.6 Drehmomentbegrenzung, maximales
Drehmoment, Impulsfunktion einstellen
Nicht längere Zeit mit eingeschalteter
Impulsfunktion arbeiten! (Der Motor kann sich
überhitzen.)
Maschinen mit der Bezeichnung
...18 LTX BL Quick...:
Abb. F
Drehen Sie am Stellrad (13) um die
Impulsfunktion einzuschalten (Taste (5) blinkt)
oder um die Drehmomentbegrenzung
einzuschalten (Taste (5) leuchtet dauernd)
Für Maximales Drehmoment (Bohrstellung)
drücken Sie die Taste (5) (Taste (5) ist nicht
5. Abbildungen
6. Überblick
Nm
7. Benutzung

DEUTSCH de
9
beleuchtet). Um die Einstellungen des Stellrades
wieder zu aktivieren: Taste (5) erneut drücken oder
am Stellrad drehen.
Maschinen mit der Bezeichnung ...18 LTX Impuls/
Quick, ...18 LTX BL Impuls:
Abb. G
Am Stellrad (13) die gewünschte Betriebsart
einstellen:
1...10 = Drehmomentbegrenzung
Bohrer = maximales Drehmoment
Impuls = Impulsfunktion
7.7 Ein-/Ausschalten, Drehzahl einstellen
Abb. A
Einschalten, Drehzahl: Schalterdrücker (15)
drücken. Die Drehzahl kann am
Schalterdrücker durch Eindrücken verändert
werden.
Ausschalten: Schalterdrücker (15) loslassen.
Hinweis: Das Geräusch, das beim
Ausschalten der Maschine auftritt, ist
bauartbedingt (Schnellstopp) und hat auf
Funktion und Lebensdauer der Maschine
keinen Einfluss.
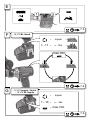
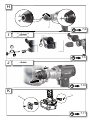
7.8 Schnellspann-Bohrfutter
Abb. H
Bei weichem Werkzeugschaft muss eventuell nach
kurzer Bohrzeit nachgespannt werden.
Hinweise für
Maschinen mit der Bezeichnung
SB...
:
1. Das nach dem Öffnen des Bohrfutters eventuell
hörbare Ratschen (funktionsbedingt) wird durch
das Gegendrehen der Hülse ausgeschaltet.
2. Einsatzwerkzeug spannen:
Hülse in Richtung "GRIP, ZU" drehen, bis der
spürbare mechanische Widerstand
überwunden ist.
Achtung! Werkzeug ist jetzt noch nicht
gespannt! So lange kräftig weiterdrehen (dabei
muss es "klicken"), bis kein Weiterdrehen
mehr möglich ist - erst jetzt ist das Werkzeug
sicher gespannt.
Reinigen: Gelegentlich die Maschine mit dem
Schnellspann-Bohrfutter senkrecht nach unten
halten und Hülse vollständig in Richtung
„GRIP, ZU“ drehen, dann vollständig in
Richtung „AUF, RELEASE“ drehen. Der
angesammelte Staub fällt aus dem
Schnellspann-Bohrfutter.
7.9 Bohrfutter abschrauben
Abb. I
Das Anschrauben erfolgt sinngemäß in
umgekehrter Reihenfolge.
7.10 Bohrfutter mit Schnellwechselsystem
Quick (bei BS 14.4 LTX Quick, BS 18 LTX
Quick)
Abb. J
Abnehmen: Verriegelungsring nach vorne
schieben (a) und Bohrfutter nach vorne
abziehen (b).
Anbringen: Verriegelungsring nach vorne
schieben und Bohrfutter bis zum Anschlag auf die
Bohrspindel aufschieben.
7.11 Gürtelhaken (ausstattungsabhängig) /
Bit-Depot anbringen
(ausstattungsabhängig)
Abb. K
Gürtelhaken (8), wie gezeigt, links anbringen.
Bit-Depot (7), wie gezeigt, rechts anbringen.
8.1
Multifunktionales Überwachungssystem
der
Maschine
Schaltet sich die Maschine selbstständig aus,
dann hat die Elektronik den Selbstschutz-
Modus aktiviert. Es ertönt ein Warnsignal
(Dauerpiepsen). Dieses geht nach max. 30
Sekunden oder nach Loslassen des Schalter-
drückers (15) aus.
Trotz dieser Schutzfunktion kann bei
bestimmten Anwendungen eine Überlastung
und als Folge dessen eine Beschädigung der
Maschine auftreten.
Ursachen und Abhilfe:
1. Akkupack fast leer
Abb. A, B (Die
Elektronik schützt den Akkupack vor Schaden
durch Tiefstentladung).
Blinkt eine LED-Leuchte (11), ist der Akkupack
fast leer. Ggf. Taste (10) drücken und den
Ladezustand an den LED-Leuchten (11) prüfen.
Ist der Akkupack fast leer, muss er wieder
aufgeladen werden!
2. Länger andauernde Überlastung der Maschine
führt zur Temperaturabschaltung.
Lassen sie Maschine oder Akkupack abkühlen.
Hinweis: Fühlt sich der Akkupack sehr warm an,
ist das Abkühlen des Akkupacks in einem „AIR
COOLED“-Ladegerät schneller möglich.
Hinweis: Die Maschine kühlt schneller ab, wenn
man sie im Leerlauf laufen lässt.
3. Metabo Sicherheitsabschaltung: Die
Maschine wurde selbsttätig ABGESCHALTET.
Bei zu hoher Strom-Anstiegsgeschwindigkeit
(wie sie z.B. bei einer plötzlichen Blockierung
oder einem Rückschlag auftritt) wird die
Maschine abgeschaltet. Maschine am
Schalterdrücker (15) ausschalten. Danach
wieder einschalten und normal weiterarbeiten.
Vermeiden sie weitere Blockierungen.
Maschine am Schalterdrücker (15) ausschalten.
Danach normal weiterarbeiten. Vermeiden sie
weitere Blockierungen.
8.2 Hinweise
Die LED-Leuchte (14) schaltet sich nach einer
bestimmten Zeit automatisch aus.
Zum Aktivieren der Elektronikfunktionen:
Schalterdrücker (15) drücken.
Verwenden Sie nur original Metabo-Akkupacks und
Metabo-Zubehör.
8. Störungsbeseitigung
9. Zubehör

DEUTSCHde
10
Verwenden Sie nur Zubehör, das die in dieser
Betriebsanleitung angegebenen Anforderungen
und Kenndaten erfüllt.
Zubehör sicher anbringen. Wird die Maschine in
einem Halter betrieben: Die Maschine sicher
befestigen. Der Verlust der Kontrolle kann zu
Verletzungen führen.
Zubehör-Komplettprogramm siehe
www.metabo.com oder Hauptkatalog.
Reparaturen an Elektrowerkzeugen dürfen
nur durch eine Elektrofachkraft ausgeführt
werden!
Mit reparaturbedürftigen Metabo Elektrowerk-
zeugen wenden Sie sich bitte an Ihre Metabo-
Vertretung. Adressen siehe www.metabo.com.
Ersatzteillisten können Sie unter www.metabo.com
herunterladen.
Akkupacks nicht ins Wasser werfen.
Schützen Sie die Umwelt und werfen Sie
Elektrowerkzeuge und Akkupacks nicht in
den Hausmüll. Befolgen Sie nationale
Vorschriften zu getrennter Sammlung und zum
Recycling ausgedienter Maschinen, Verpackungen
und Zubehör.
Vor dem Entsorgen den Akkupack im Elektrowerk-
zeug entladen. Die Kontakte gegen Kurzschluss
sichern (z. B. mit Klebeband isolieren).
Abb. L. Änderungen im Sinne des technischen
Fortschritts vorbehalten.
U = Spannung des Akkupacks
n
0
= Leerlaufdrehzahl
Anziehmoment beim Schrauben:
M
1
= weicher Schraubfall (Holz)
M
2
= Impulsmoment
M
3
= harter Schraubfall (Metall)
M
4
= Anziehmoment einstellbar
Max. Bohrerdurchmesser:
D
1 max
= in Stahl
D
2 max
= in Weichholz
D
3 max
= in Beton
s = max. Schlagzahl
m = Gewicht (mit kleinstem Akkupack)
G = Spindelgewinde
D
max
= Bohrfutter-Spannweite
Messwerte ermittelt gemäß EN 60745.
Gleichstrom
Die angegebenen technischen Daten sind
toleranzbehaftet (entsprechend den jeweils
gültigen Standards).
Emissionswerte
Diese Werte ermöglichen die Abschätzung
der Emissionen des Elektrowerkzeugs und den
Vergleich verschiedener Elektrowerkzeuge. Je
nach Einsatzbedingung, Zustand des
Elektrowerkzeuges oder der Einsatzwerkzeuge
kann die tatsächliche Belastung höher oder
geringer ausfallen. Berücksichtigen Sie zur
Abschätzung Arbeitspausen und Phasen
geringerer Belastung. Legen Sie aufgrund
entsprechend angepasster Schätzwerte
Schutzmaßnahmen für den Anwender fest, z.B.
organisatorische Maßnahmen.
Schwingungsgesamtwert (Vektorsumme dreier
Richtungen) ermittelt entsprechend EN 60745:
a
h, ID
= Schwingungsemissionswert
(Schlagbohren in Beton)
a
h, D
= Schwingungsemissionswert
(Bohren in Metall)
a
h, S
= Schwingungsemissionswert
(Schrauben ohne Schlag)
K
h, ...
= Unsicherheit (Schwingung)
Typische A-bewertete Schallpegel:
L
pA
= Schalldruckpegel
L
WA
= Schallleistungspegel
K
pA
, K
WA
= Unsicherheit (Schallpegel)
Beim Arbeiten kann der Geräuschpegel 80 dB(A)
überschreiten.
Gehörschutz tragen!
10. Reparatur
11. Umweltschutz
12. Technische Daten

ENGLISH en
11
Original instructions
On our own responsibility, we hereby declare that
these battery-powered drilling screwdrivers and
impact drills, identified by type and serial number
*1), meet all relevant requirements of directives *2)
and standards *3). Technical documents at *4) -
Fig. M.
The drills and impact drills are suitable for drilling in
metal, wood, plastic and similar materials, and also
for screwdriving and thread tapping.
The impact drills are also suited for drilling in
masonry, brickwork and stone.
The user bears sole responsibility for any damage
caused by improper use.
Generally accepted accident prevention regula-
tions and the enclosed safety information must be
observed.
For your own protection and for the
protection of your power tool, pay atten-
tion to all parts of the text that are marked
with this symbol!
WARNING – Reading the operating instruc-
tions will reduce the risk of injury.
WARNING Read all safety warnings and
instructions. Failure to follow all safety warn-
ings and instructions may result in electric shock,
fire and/or serious injury.
Keep all safety instructions and information for
future reference.
Pass on your electrical tool only together with these
documents.
Wear ear protectors with impact drills
(machines with the designation SB). Exposure
to noise can cause hearing loss.
Use auxiliary handles supplied with the tool
(depending on the model). Loss of control can
cause personal injury.
Hold power tool by insulated gripping
surfaces, when performing an operation where
the cutting accessory/fastener may contact
hidden wiring. Cutting accessory/fasteners
contacting a "live" wire, may make exposed metal
parts of the power tool "live" and could give the
operator an electric shock.
Ensure that the spot where you wish to work is free
of power cables, gas lines or water pipes (e.g.
by using a metal detector).
Protect battery packs from water and mois-
ture!
Do not expose battery packs to naked flame!
Do not use faulty or deformed battery packs!
Do not open battery packs!
Do not touch or short-circuit battery packs!
Slightly acidic, flammable fluid may leak from
defective li-ion battery packs!
If battery fluid leaks out and comes into
contact with your skin, rinse immediately
with plenty of water. If battery fluid leaks out
and comes into contact with your eyes, wash them
with clean water and seek medical attention imme-
diately.
If the machine is defective, remove the battery pack
from the machine.
Remove the battery pack from the machine before
any adjustments, conversions or servicing are
performed.
Before fitting the battery pack, make sure that the
machine is switched off.
LED lights (14): Do not observe the LED radiation
directly with optical instruments.
Reducing dust exposure:
WARNING - Some dust created by power
sanding, sawing, grinding, drilling, and other
construction activities contains chemicals known to
cause cancer, birth defects or other reproductive
harm. Some examples of these chemicals are:
- Lead from lead-based paints,
- Crystalline silica from bricks and cement and
other masonry products, and
- Arsenic and chromium from chemically treated
lumber.
Your risk from these exposures varies, depending
on how often you do this type of work. To reduce
your exposure to these chemicals: work in a well
ventilated area, and work with approved safety
equipment, such as those dust masks that are
specially designed to filter out microscopic
particles.
This also applies to dust from other materials such
as some timber types (like oak or beech dust),
metals, asbestos. Other known diseases are e.g.
allergic reactions, respiratory diseases. Do not let
dust enter the body.
Observe the relevant guidelines and national
regulations for your material, staff, application and
place of application (e.g. occupational health and
safety regulations, disposal).
Collect the particles generated at the source, avoid
deposits in the surrounding area.
Use suitable accessories for special work. In this
way, fewer particles enter the environment in an
uncontrolled manner.
Use a suitable extraction unit.
1. Declaration of Conformity
2. Specified Use
3. General safety instructions
4. Special Safety Instructions

ENGLISH en
12
Reduce dust exposure with the following measures:
- do not direct the escaping particles and the
exhaust air stream at yourself or nearby persons
or on dust deposits,
- use an extraction unit and/or air purifiers,
- ensure good ventilation of the workplace and keep
clean using a vacuum cleaner. Sweeping or
blowing stirs up dust.
- Vacuum or wash the protective clothing. Do not
blow, beat or brush.
Transport of li-ion battery packs:
The shipping of li-ion battery pack is subject to laws
related to the carriage of hazardous goods (UN
3480 and UN 3481). Inform yourself of the currently
valid specifications when shipping li-ion battery
packs. If necessary, consult your freight forwarder.
Certified packaging is available from Metabo.
Only send the battery pack if the housing is intact
and no fluid is leaking. Remove the battery pack
from the machine for sending. Prevent the contacts
from short-circuiting (e.g. by protecting them with
adhesive tape).
Illustrations are provided at the beginning of the
operating instructions.
Symbol explanation:
Movement direction
Slow
Fast
First gear
Second gear
Screws
Drill bit
Without torque limitation
Impact drilling
Torque
Fig. A
1 Keyless chuck
2 Additional handle
3 Slide switch (normal drilling, impact drilling) *
4S
lide switch (1st/2nd gear)
5 Button (switch between 'max. torque' and function
set at setting wheel (13)) *
6 Rotation selector switch (rotation setting,
transport lock) - both sides of the machine
7 Bit depot *
8 Belt hook *
9B
attery pack release button
10 Capacity indicator button
11 Capacity and signal indicator
12
Battery pack
13 Setting wheel (pulse function, torque control,
where applicable
'max. torque') *
14 LED lights
15 Trigger switch
*equipment-specific
7.1 Battery pack, capacity and signal display
Fig. B
Charge the battery pack before use.
If performance diminishes, recharge the battery
pack.
The ideal storage temperature is between 10 °C
and 30 °C.
7.2 Removing, replacing battery pack
Fig. C
7.3 Setting direction of rotation, transporting
safety device (switch-on lock)
Fig. D
7.4 Selecting gear stage
Fig. E
Only actuate slide switch (4) with the motor at
a standstill!
7.5 Setting for normal drilling, impact drilling
Fig. A
Press the slide switch (3).
7.6 Setting torque control, maximum torque,
pulse function
Do not work for long periods with pulse func-
tion switched on! (The motor can overheat.)
Machines with designation ...18 LTX BL Quick...:
Fig. F
Turn the setting wheel (13) to switch on the pulse
function (button (5) flashes) or to switch on the
torque control (button (5) lights up continuously)
For maximum torque (drilling position), press the
button (5) (the button (5) is not illuminated). To acti-
vate the settings of setting wheel again: press the
button (5) again or turn the setting wheel.
Machines with designation ...18 LTX Impuls/
Quick, ...18 LTX BL Impuls:
Fig. G
Set the desired operating mode at the setting wheel
(13):
1...10 = torque control
Drill bit = maximum torque
Impuls = pulse function
7.7 Switching on/off, setting speed
Fig. A
Switching on, speed: Press the trigger (15). The
speed can be changed by pressing in the
trigger.
Switching off: release the trigger switch (15). Note:
The noise that the machine makes when it
switches off is due to the design (quick stop)
5. Figures
6. Overview
Nm
7. Use

ENGLISH en
13
and has no influence on the function or the
service life of the machine.
7.8 Keyless chuck
Fig. H
With a soft tool shank, retightening may be required
after a short period of operation.
Notes on
machines with the designation SB...
:
1. The ratchet sound which can possibly be heard
after opening the drill chuck is functional and is
switched off by a reverse rotation of the sleeve.
2. Clamping tool:
Turn sleeve (1) in direction "GRIP, ZU" until the
noticeable mechanical resistance has been
overcome.
Caution! The chuck is not yet fully tight-
ened! Keep turning the sleeve (it must "click"
when turning)) until it cannot be turned any
further - only now is the tool safely clamped.
Cleaning: From time to time, hold the machine
vertically with the keyless chuck facing
downwards and turn the sleeve fully in direction
"GRIP, ZU" and then turn fully in direction
"AUF, RELEASE". The dust collected falls from
the keyless chuck.
7.9 Unscrewing chuck
Fig. I
Employ the same procedure when attaching the
chuck, except in reverse order.
7.10 Chuck with quick bit change system (for
BS 14.4 LTX Quick, BS 18 LTX Quick)
Fig. J
To remove: Push the interlock ring forward (a),
advance and pull off the chuck (b).
To mount: Push the interlock ring forward and
move the chuck as far as the limit stop on the drill
spindle.
7.11 Attaching the belt hook (depending on
machine features) / bit depot (depending
on machine features
Fig. K
Attach the belt hook to the left (8), as shown.
Attach the bit depot to the right (7), as shown.
8.1
The machine's multifunctional monitoring
system
If the machine switches off automatically, the
machine electronics have activated automatic
protection mode. A warning signal sounds (contin-
uous beeping). The beeping stops after a maximum
of 30 seconds or when the trigger (15) is released.
In spite of this protective function, overloading
is still possible with certain applications and
can result in damage to the machine.
Causes and remedies:
1. Battery pack almost empty
Fig. A, B (The
electronics protect the battery pack against
damage through total discharge).
If one LED is flashing (11), the battery pack is
almost flat. If necessary, press the (10) button
and check the LEDs (11) to see the charge
level. If the battery pack is almost flat, it must be
recharged.
2. Long continuous overloading of the machine will
activate the temperature cut-out.
Leave the machine or battery pack to cool.
Note: If the battery pack feels very warm, the
pack will cool more quickly in an "AIR COOLED"
charger.
Note: The machine will cool more quickly if you
operate it at idling speed.
3. Metabo safety shutdown: The machine was
SWITCHED OFF automatically. If the slew rate
of the current is too high (for example, if the
machine suddenly seizes or kickback occurs),
the machine switches off. Switch off the machine
at the trigger (15). Switch it on again and
continue to work as normal. Try to prevent the
machine from seizing.
Switch off the machine at the trigger (15). Then
continue working as normal. Try to prevent the
machine from seizing.
8.2 Note:
The LED lamp (14) switches off automatically after
a specific time.
To activate the electronic functions: press the
trigger (15).
Only use original Metabo battery packs and Metabo
accessories.
Use only accessories that fulfil the requirements
and specifications listed in these operating instruc-
tions.
Fit accessories securely. Secure the machine if it is
operated in a bracket. Loss of control can cause
personal injury.
For a complete range of accessories, see
www.metabo.com or the main catalogue.
Repairs to electrical tools must be carried out
by qualified electricians ONLY!
If you have Metabo electrical tools that require
repairs, please contact your Metabo service centre.
For addresses see www.metabo.com.
You can download spare parts lists from
www.metabo.com.
Do not allow battery packs to come into contact with
water!
To protect the environment, do not dispose of
power tools or battery packs in household
waste. Observe national regulations on
separated collection and recycling of disused
machines, packaging and accessories.
8. Troubleshooting
9. Accessories
10. Repairs
11. Environmental Protection

ENGLISH en
14
Before disposal, discharge the battery pack in the
power tool. Prevent the contacts from short-circu-
iting (e. g. by protecting them with adhesive tape).
Fig. L. We reserve the right to make technical
improvements.
U = Voltage of battery pack
n
0
= No-load speed
Tightening torque for screwing:
M
1
= Soft screwing application (wood)
M
2
= Pulse torque
M
3
= Hard screwing application (metal)
M
4
= Adjustable torque
Max. drill diameter:
D
1 max
= in steel
D
2 max
= in softwood
D
3 max
= in concrete
s = Max. impact rate
m = Weight (with smallest battery pack)
G = Spindle thread
D
max
= Chuck clamping range
Measured values determined in conformity with
EN 60745.
Direct current
The technical specifications quoted are subject to
tolerances (in compliance with the relevant valid
standards).
Emission values
Using these values, you can estimate the
emissions from this power tool and compare these
with the values emitted by other power tools. The
actual values may be higher or lower, depending on
the particular application and the condition of the
tool or power tool. In estimating the values, you
should also include work breaks and periods of low
use. Based on the estimated emission values,
specify protective measures for the user - for
example, any organisational steps that must be put
in place.
Vibration total value (vector sum of three directions)
determined in accordance with EN 60745:
a
h, ID
= Vibration emission value
(impact drilling into concrete)
a
h, D
= Vibration emission value
(drilling into metal)
a
h, S
= Vibration emission level (screwing
without impact)
K
h, ...
= Uncertainty (vibration)
Typical A-effective perceived sound levels::
L
pA
= Sound pressure level
L
WA
= Acoustic power level
K
pA
, K
WA
= Uncertainty (noise level)
During operation the noise level can exceed
80 dB(A).
Wear ear protectors!
12. Technical specifications

FRANÇAIS fr
15
Notice d'utilisation originale
Nous déclarons sous notre seule responsabilité :
ces perceuses-visseuses et perceuses à percus-
sion sans fil, identifiées par le type et le numéro de
série *1), sont conformes à toutes les prescriptions
applicables des directives *2) et normes *3). Docu-
ments techniques pour *4) -
fig. M.
Les perceuses et perceuses à percussion
conviennent pour les travaux de perçage sans
percussion sur métaux, bois, plastique et matériaux
assimilés, ainsi que pour le vissage et le taraudage.
Les perceuses à percussion sont également
conçues pour le perçage à percussion de murs,
briques et pierres.
L'utilisateur est entièrement responsable de tous
dommages résultant d'une utilisation non conforme
aux prescriptions.
Il est impératif de respecter les directives de
prévention des accidents reconnues et les
consignes de sécurité ci-jointes.
Pour des raisons de sécurité et afin de
protéger l'outil électrique, respecter les
passages de texte repérés par ce
symbole !
AVERTISSEMENT – Lire la notice d'utilisa-
tion afin d'éviter tout risque de blessures.
AVERTISSEMENT Lire toutes les
consignes de sécurité et instructions. Le
non-respect des consignes de sécurité et des
instructions peut être à l'origine d'un choc élec-
trique, d'un incendie et/ou de blessures graves.
Conserver toutes les consignes de sécurité et
instructions.
Transmettre uniquement l'outil électrique accom-
pagné de ces documents.
Porter une protection auditive lors de l'utilisa-
tion d'une perceuse à percussion (pour les
machines avec une désignation en SB...). Le
bruit est susceptible de provoquer une perte de
capacité auditive.
Utiliser la poignée complémentaire fournie
avec l'outil (suivant équipement). En cas de
perte de contrôle, il y a risque de blessures.
Lors de travaux où l'outil risque de rencontrer
des conducteurs électriques non apparents,
voire son câble d'alimentation, tenir l'outil
exclusivement par les côtés isolés des
poignées. Le contact avec un conducteur élec-
trique sous tension peut également mettre les
parties métalliques de l'appareil sous tension et
provoquer un choc électrique.
S'assurer que l'emplacement d'intervention ne
comporte aucune conduite électrique, d'eau ou
de gaz (par ex. à l'aide d'un détecteur de métaux).
Protéger les blocs batteries de l'humidité !
Ne pas exposer les blocs batteries au feu !
Ne pas utiliser de blocs batteries défectueux ou
déformés !
Ne pas ouvrir les blocs batteries !
Ne jamais toucher ni court-circuiter entre eux les
contacts d'un bloc batterie !
Un bloc batterie défectueux Li-Ion peut
occasionner une fuite de liquide légèrement
acide et inflammable !
En cas de fuite d'acide de la batterie venant
en contact avec la peau, rincer abondam-
ment à l'eau. En cas de projection dans les
yeux, les laver à l'eau claire et consulter immédiate-
ment un médecin!
Si la machine est défectueuse, retirer la batterie de
la machine.
Retirer le bloc batterie de l'outil avant toute opéra-
tion de réglage, de changement d'accessoire, de
maintenance ou de nettoyage.
S'assurer que l'outil est débranché au moment
d'introduire le bloc batterie.
Lampe à LED (14) : ne pas regarder directement
dans le rayonnement de la LED avec des instru-
ments optiques.
Réduction de la pollution aux particules fines :
AVERTISSEMENT - Certaines poussières
produites par le ponçage électrique, le sciage,
le meulage, le perçage et d’autres activités de
construction contiennent des agents chimiques qui
causent des cancers, des anomalies congénitales
ou d’autres dangers pour la reproduction. Voici
quelques exemples de tels agents chimiques :
- Le plomb des peintures à base de plomb,
- La silice cristalline des briques, du ciment et
d’autres produits de maçonnerie, et
- L’arsenic et le chrome du bois d'œuvre traité
chimiquement.
Les conséquences de telles expositions varient en
fonction de la fréquence à laquelle vous faites ce
type de travail. Pour réduire votre exposition à ces
agents chimiques, travaillez dans un endroit bien
ventilé et utilisez des équipements de protection
agréés, tels que les masques de protection contre
1. Déclaration de conformité
2. Utilisation conforme aux
prescriptions
3. Consignes de sécurité
générales
4. Consignes de sécurité
spéciales

FRANÇAISfr
16
la poussière qui sont conçus spécialement pour
filtrer les particules microscopiques.
Cela vaut également pour les poussières d’autres
matériaux, comme par exemple certains types de
bois (comme la poussière de chêne ou de hêtre), de
métaux et l’amiante. D’autres maladies connues
incluent par exemple les réactions allergiques et les
affections des voies respiratoires. Il est souhaitable
que le corps n’absorbe pas ces poussières.
Respectez les directives et les dispositions locales
applicables au matériau, au personnel, à
l’application et au lieu d’utilisation (par exemple
directives en matière de sécurité au travail,
élimination des déchets).
Collecter les particules émises sur le lieu
d’émission et éviter les dépôts dans
l’environnement.
Utiliser des accessoires adaptés pour les travaux
spécifiques. Cela permet d’éviter l’émission
incontrôlée de particules dans l’environnement.
Utiliser un système d'aspiration des poussières
adapté.
Réduire l’émission de poussières en :
- évitant d'orienter les particules sortantes et l'air
d'échappement de la machine vers vous ou vers
des personnes se trouvant à proximité ou vers des
dépôts de poussière,
- utilisant un système d’aspiration et/ou un
purificateur d’air,
- aérant convenablement le lieu de travail et en
l’aspirant pour le maintenir propre. Balayer ou
souffler les poussières les fait tourbillonner.
- Aspirer ou laver les vêtements de protection. Ne
pas les souffler, les battre, ni les brosser.
Transport de batteries Li-Ion :
L'expédition de batteries Li-Ion est soumise à la
législation sur les produits dangereux (UN 3480 et
UN 3481). Lors de l'envoi de batteries Li-Ion,
clarifiez les prescriptions actuellement valables. Le
cas échéant, veuillez vous renseigner auprès de
votre transporteur. Un emballage certifié est
disponible chez Metabo.
Envoyez uniquement des batteries dont le boîtier
est intact et qui ne présentent pas de fuite. Pour
l’envoi, sortez la batterie de l'outil. Protégez les
contacts de tout court-circuit (par exemple les isoler
à l'aide de ruban adhésif).
Les figures se trouvent au début de la notice d'utili-
sation.
Signification des symboles :
Sens de déplacement
Lent
Rapide
Première vitesse
Seconde vitesse
Vissage
Perceuse
sans limitation de couple
Perçage avec percussion
Couple
Fig. A
1 Mandrin à serrage rapide
2 Poignée additionnelle
3 Interrupteur coulissant (perçage, perçage à
percussion) *
4I
nterrupteur coulissant (1ère/2ème vitesse)
5 Bouton (commutation entre "couple max." et la
fonction réglée sut la molette (13)) *
6 Inverseur de sens de rotation (réglage du sens
de rotation, sécurité de transport), sur les deux
côtés de l'outil
7 Porte-embouts *
8 Crochet de sangle *
9T
ouche de déverrouillage du bloc batterie
10 Touche de l'indicateur de capacité
11 Indicateur de capacité et de signalisation
12
Bloc batterie
13 Molette (fonctionnement par impulsions,
limitation du couple, le cas échéant
"couple
max.") *
14 Voyant LED
15 Gâchette
*suivant version
7.1 Bloc batterie, indicateur de capacité et
de signalisation
Fig. B
Charger le bloc batterie avant utilisation.
En cas de baisse de puissance, recharger le bloc
batterie.
La température de stockage optimale se situe entre
10 °C et 30 °C.
7.2 Retirer, insérer le bloc batterie
Fig. C
7.3 Régler le sens de rotation, la sécurité de
transport (verrou de démarrage)
Fig. D
7.4 Sélectionner la vitesse
Fig. E
N'actionner l'interrupteur coulissant (4) que
lorsque le moteur est arrêté !
7.5 Réglage du perçage, du perçage à per-
cussion
Fig. A
Actionner le interrupteur coulissant (3).
5. Figures
6. Aperçu
7. Utilisation
Nm

FRANÇAIS fr
17
7.6 Réglage de la limitation du couple, du
couple maximal, du fonctionnement par
impulsions
Ne pas faire fonctionner longtemps quand le
fonctionnement par impulsions est branché !
(le moteur est susceptible de chauffer.)
Machines avec la désignation ...18 LTX BL Quick...
:
Fig. F
Tournez la molette (13) pour activer le fonctionne-
ment par impulsions (le bouton (5) clignote) ou la
limitation du couple (le bouton (5) est allumé en
continu)
Pour le couple maximal (position "perçage"),
presser la touche (5) (le bouton (5) n'est pas
allumé). Pour activer à nouveau les réglages de la
molette : presser à nouveau le bouton (5) ou tourner
la molette.
Machines avec la désignation ...18 LTX Impuls/
Quick, ...18 LTX BL Impuls :
Fig. G
Régler le mode souhaité via la molette (13) :
1...10 = limitation du couple
Foret = couple maximal
Impulsion= fonctionnement par impulsions
7.7 Mise en marche / à l'arrêt, régler la
vitesse
Fig. A
Marche, vitesse : appuyer sur la gâchette (15). La
vitesse peut être modifiée par une pression sur
la gâchette.
Arrêt : relâcher la gâchette (15). Remarque : le bruit
audible à l'arrêt de la machine est dû au type
de construction (arrêt rapide) et n'a aucune
influence sur le fonctionnement et la durée de
vie de la machine.
7.8 Mandrin à serrage rapide
Fig. H
En cas d'utilisation de tiges d'outil souples, il faudra
éventuellement effectuer un resserrage après un
court temps de perçage.
Informations sur les
machines portant la
dénomination SB...
:
1. Le cliquètement que l'on entend éventuellement
après avoir ouvert le mandrin (bruit dû au fonc-
tionnement) disparaîtra si l'on tourne la douille
dans le sens contraire.
2. Serrage de l'accessoire :
tourner la douille dans le sens "GRIP, ZU"
jusqu'à ce que la résistance mécanique percep-
tible soit surmontée.
Attention ! L'outil n'est alors pas encore
serré ! Continuer à tourner avec force (on doit
entendre un "clic") jusqu'à ce que l'on ne
puisse plus tourner du tout - ce n'est que main-
tenant que l'outil est véritablement serré.
Nettoyer : Tenir occasionnellement l'outil avec le
mandrin à serrage rapide en position verticale
vers le bas et tourner complètement la douille
dans le sens marqué "GRIP, ZU", puis tourner
complètement dans le sens marqué
"AUF, RELEASE". La poussière accumulée
tombe du mandrin à serrage rapide.
7.9 Dévissage du mandrin de perçage
Fig. I
Le vissage s'effectue dans l'ordre inverse.
7.10 Mandrin de perçage avec système de
changement rapide Quick (pour BS 14.4
LTX Quick, BS 18 LTX Quick)
Fig. J
Retrait : glisser la bague de verrouillage vers
l'avant (a) et retirer le mandrin de perçage par
l'avant (b).
Fixation : glisser la bague de verrouillage vers
l'avant et monter le mandrin de perçage jusqu'en
butée sur la broche de perçage.
7.11 Fixation du crochet de sangle (en fonc-
tion de l'équipement) / du porte-embouts
(en fonction de l'équipement)
Fig. K
Fixer le crochet de sangle (8) à gauche, comme
illustré.
Fixer le porte-embouts (7) à droite, comme illustré.
8.1
Système de surveillance multi-fonctions
de
l'outil
Si la machine s'arrête automatiquement, le
système électronique a activé le mode d'auto-
protection. Un signal d'avertissement retentit. Il
s'arrête après un délai de 30 secondes ou une fois
la gâchette (15) relâchée.
Malgré cette fonction de protection, lors de
certaines applications il peut en résulter une
surcharge dont la conséquence peut être un
endommagement de la machine.
Causes et solutions :
1. Bloc batterie presque vide
Fig. A, B (Le
système électronique protège le bloc batterie
des dommages dus à la décharge totale).
Si un voyant LED clignote (11), cela signifie que
le bloc batterie est presque vide. Le cas
échéant, appuyer sur la touche (10) et vérifier
l'état de charge par le biais des voyants LED
(11). Si le bloc batterie est presque vide, il doit
être rechargé !
2. Une surcharge trop longue de l'outil entraîne un
arrêt de surtempérature.
Laisser l'outil ou le bloc batterie refroidir.
Remarque : Si une chaleur excessive se dégage
du bloc batterie, il est possible d'accélérer son
refroidissement dans un chargeur "AIR
COOLED".
Remarque : l'outil refroidit plus rapidement
lorsqu'il tourne à vide.
3. Coupure de sécurité Metabo : la machine a été
ARRETEE automatiquement. Lorsque la vitesse
d'accroissement du courant est trop élevée
(comme c'est le cas par exemple lors d'un
blocage soudain ou d'un rebond), la machine est
désactivée. Arrêter la machine par l'intermé-
8. Dépannage

FRANÇAISfr
18
diaire de la gâchette (15). Ensuite, la redémarrer
et reprendre le travail normalement. Eviter tout
autre blocage.
Arrêter la machine par l'intermédiaire de la gâchette
(15). Ensuite, reprendre le travail normalement.
Eviter tout autre blocage.
8.2 Notes
La LED (14) s'éteint automatiquement après un
certain temps.
Pour activer les fonctions électroniques : presser la
gâchette (15).
Utilisez uniquement des batteries Metabo et des
accessoires Metabo originaux.
Utilisez uniquement des accessoires, qui sont
conformes aux exigences et aux données caracté-
ristiques indiquées dans les présentes instructions
d'utilisation.
Monter correctement les accessoires. Si la machine
est utilisée dans un support : fixer correctement la
machine. En cas de perte de contrôle, il y a risque
de blessures.
Voir programme complet des accessoires sur
www.metabo.com ou dans le catalogue principal.
Les travaux de réparation sur les outils élec-
triques doivent uniquement être effectués par
des électriciens !
Pour toute réparation sur un outil Metabo, veuillez
contacter votre agence Metabo. Voir les adresses
sur www.metabo.com.
Les listes des pièces de rechange peuvent être
téléchargées sur le site Internet www.metabo.com.
Ne pas jeter les blocs batteries dans l'eau.
Protégez l'environnement et ne jetez pas les
outils électriques et les blocs batteries avec
les ordures ménagères. Observez les régle-
mentations nationales concernant la collecte
séparée et le recyclage des machines, des embal-
lages et des accessoires.
Avant d'éliminer l'outil électrique, décharger son
bloc batterie. Protéger les contacts contre les court-
circuits (p. ex. les isoler à l'aide de ruban adhésif).
Fig. L. Sous réserve de modifications dans le
sens du progrès technique.
U = Tension du bloc batterie
n
0
= Vitesse à vide
Couple lors du vissage :
M
1
= vissage dans un matériau tendre (bois)
M
2
= couple d'impulsion
M
3
= vissage dans un matériau dur (métal)
M
4
= couple réglable
Diamètre maxi de foret :
D
1 max
= dans l'acier
D
2 max
= dans du bois tendre
D
3 max
= dans le béton
s = cadence de frappe max.
m = Poids (avec le plus petit bloc batterie)
G = Filet de la broche
D
max
= Capacité du mandrin de perçage
Valeurs de mesure déterminées selon NE 60745.
Courant continu
Les caractéristiques techniques indiquées sont
soumises à tolérance (selon les normes en vigueur
correspondantes).
Valeurs d'émission
Ces valeurs permettent l'estimation des émis-
sions de l'outil électrique et la comparaison entre
différents outils électriques. Selon les conditions
d'utilisation, l'état de l'outil électrique ou les acces-
soires utilisés, la sollicitation réelle peut plus ou
moins varier. Pour l'estimation, tenir compte des
pauses de travail et des phases de sollicitation
moindre. Définir des mesures de protection pour
l'utilisateur sur la base des valeurs estimatives
adaptées en conséquence, p. ex. mesures organi-
sationnelles.
Valeur vibratoire totale (somme vectorielle
tridirectionnelle) déterminée selon NE 60745 :
a
h, ID
= valeur d’émission de vibrations
(perçage avec percussions dans le
béton)
a
h, D
= valeur d'émission vibratoire (perçage
dans le métal)
a
h, S
= valeur d’émission de vibrations
(vissage sans percussion)
K
h,...
= incertitude (vibration)
Niveau sonore typique en pondération A :
L
pA
= niveau de pression acoustique
L
WA
= niveau de puissance acoustique
K
pA
, K
WA
= Incertitude (niveau sonore)
Pendant le fonctionnement, il se peut que le niveau
sonore dépasse les 80 db(A).
Porter un casque antibruit !
9. Accessoires
10. Réparation
11. Protection de l'environnement
12. Caractéristiques techniques

NEDERLANDS nl
19
Oorspronkelijke gebruiksaanwijzing
Wij verklaren op eigen en uitsluitende verantwoor-
ding: Deze accu-schroefboormachines en klop-
boormachines, geïdentificeerd door type en serie-
nummer *1), voldoen aan alle relevante bepalingen
van de richtlijnen *2) en normen *3). Technische
documentatie bij *4) -
Afb. M.
De boor- en klopboormachines zijn geschikt voor
het boren zonder slag in metaal, hout, kunststof en
soortgelijke materialen, en voor het schroeven en
draadboren
De klopboormachines zijn bovendien geschikt voor
het klopboren in metselwerk, baksteen en steen.
Voor schade door oneigenlijk gebruik is alleen de
gebruiker aansprakelijk.
De algemeen erkende veiligheidsvoorschriften en
de bijgevoegde veiligheidsvoorschriften dienen te
worden nageleefd.
Let ter bescherming van uzelf en de
machine op de met dit symbool aange-
geven passages!
WAARSCHUWING – Lees de gebruiksaan-
wijzing om het risico van letsel te vermin-
deren.
WAARSCHUWING Lees alle veiligheids-
voorschriften en aanwijzingen. Worden de
veiligheidsinstructies en aanwijzingen niet in acht
genomen, dan kan dit een elektrische schok, brand
en/of ernstig letsel tot gevolg hebben.
Bewaar alle veiligheidsvoorschriften en
aanwijzingen goed met het oog op toekomstig
gebruik.
Geef uw elektrisch gereedschap alleen met deze
documenten aan anderen door.
Draag oorbeschermers bij het gebruik van
slagboormachines (machines met de aandui-
ding SB...). Lawaai kan leiden tot gehoorverlies.
Gebruik de extra handgreep die bij de levering
van het apparaat inbegrepen is (afhankelijk
van de uitvoering). Verlies van controle kan tot
letsel leiden.
Houd het apparaat vast aan de geïsoleerde
greepvlakken wanneer u werkzaamheden
uitvoert waarbij het inzetgereedschap
verborgen stroomleidingen kan raken. Door het
contact met een spanningvoerende geleider
kunnen ook metalen apparaatonderdelen onder
spanning komen te staan, met een elektrische
schok als mogelijk gevolg.
Zorg er (bijv. met behulp van een metaaldetector)
voor dat zich op de plaats die bewerkt moet worden
geen stroom-, water- of gasleidingen bevinden.
Accupacks tegen vocht beschermen!
Accupacks niet aan vuur blootstellen!
Geen defecte of vervormde accupacks gebruiken!
Accupacks niet openen!
Contacten van de accupacks niet aanraken of kort-
sluiten!
Uit defecte Li-ion-accupacks kan een licht
zure, brandbare vloeistof lopen!
Wanneer er accuvloeistof naar buiten loopt
en met de huid in aanraking komt, deze
onmiddellijk afspoelen met overvloedig
water. Wanneer er accuvloeistof in uw ogen komt,
dient u ze uit te spoelen met schoon water en u
onmiddellijk onder behandeling van een arts te
stellen!
Bij een defecte machine dient u het accupack uit de
machine te halen.
Haal het accupack uit de machine voordat instel-,
ombouw-, onderhouds- of reinigingswerkzaam-
heden uitgevoerd worden.
Verzeker u ervan dat de machine bij het insteken
van het accupack uitgeschakeld is.
LED-werklampje (14): LED-straling niet direct met
optische instrumenten bekijken.
De stofbelasting verminderen:
WAARSCHUWING - Sommige stofdeeltjes
die worden geproduceerd bij het schuren,
zagen, slijpen, boren en ander werk bevatten
chemicaliën waarvan bekend is dat ze kanker,
geboorteafwijkingen of andere reproductieve
schade kunnen veroorzaken. Enkele voorbeelden
van deze chemicaliën zijn:
- lood van gelode verf,
- mineraalstof van bakstenen, cement en andere
metselwerkmaterialen, en
- arseen en chroom uit chemisch behandeld hout.
Het risico dat u hierbij loopt varieert, afhankelijk van
hoe vaak u met dit soort werk bezig bent. Om de
blootstelling aan deze chemicaliën te verminderen:
Werk in een goed geventileerde ruimte en werk met
goedgekeurde persoonlijke
beschermingsmiddelen zoals stofmaskers die
speciaal zijn ontwikkeld voor het filteren van
microscopische deeltjes.
Dit geldt ook voor stof van andere materialen, zoals
sommige houtsoorten (zoals eiken- of beukenstof),
metalen, asbest. Andere bekende ziekten zijn
1. Conformiteitsverklaring
2. Gebruik volgens de
voorschriften
3. Algemene
veiligheidsvoorschriften
4. Speciale
veiligheidsvoorschriften

NEDERLANDSnl
20
bijvoorbeeld allergische reacties, aandoeningen
van de luchtwegen. Laat geen stof in uw lichaam
komen.
Neem de richtlijnen en nationale voorschriften in
acht die van toepassing zijn op uw materiaal,
personeel, toepassing en locatie (bijv.
gezondheids- en veiligheidsvoorschriften,
verwijdering).
Verzamel de ontstane deeltjes op de plaats waar
deze ontstaan, voorkom dat deze neerslaan in de
omgeving.
Gebruik voor speciale werkzaamheden geschikt
toebehoor. Daardoor komen slechts weinig deeltjes
ongecontroleerd in de omgeving terecht.
Gebruik een geschikte stofafzuiging.
Verminder de stofbelasting door:
- de vrijkomende deeltjes en de af te voeren
luchtstroom van de machine niet op de gebruiker
zelf of in de buurt aanwezige personen of op
neergeslagen stof te richten,
- een afzuiginstallatie en/of een luchtfilter te
gebruiken,
- de werkplek goed te ventileren en door te
stofzuigen schoon te houden. Vegen of blazen
wervelt het stof op.
- Zuig of was de beschermende kleding. Niet
uitblazen, uitslaan of uitborstelen.
Transport van Li-ion-accupacks:
Op de verzending van Li-ion accupacks is het
voorschrift voor het transport van gevaarlijke stoffen
(UN 3480 en UN 3481) van toepassing. Informeer
bij het versturen van Li-ion accupacks naar de
actueel geldende voorschriften. Informeer u ook bij
uw transportbedrijf. Gecertificeerde verpakking is
bij Metabo verkrijgbaar.
Verstuur accupacks alleen als de behuizing
onbeschadigd is en er geen vloeistof uit lekt. Voor
het verzenden haalt u het accupack uit de machine.
De contacten tegen kortsluiting beschermen (bijv.
met tape isoleren).
De afbeeldingen vindt u aan het begin van de
gebruiksaanwijzing.
Verklaring symbolen:
Bewegingsrichting
Langzaam
Snel
Eerste versnelling
Tweede versnelling
Schroeven
Boren
Zonder draaimomentbegrenzing
Slagboren
Draaimoment
Afb. A
1 Snelspan-boorhouder
2 Extra handgreep
3 Schakelschuif (boren, slagboren) *
4S
chakelschuif (1e/2e versnelling)
5 Toets (wisseling tussen „max. draaimoment“ en de
bij de stelknop (13) ingestelde functie) *
6 Draairichtingsschakelaar (instelling van de
draairichting, transportbeveiliging) - aan beide
kanten van de machine
7 Bit-opslag *
8 Riemhaak *
9T
oets voor ontgrendeling van het accupack
10 Toets voor de indicatie van de capaciteit
11 Capaciteits- en signaalindicatie
12
Accupack
13 Stelknop (impulsgenerator, draaimomentbe-
grenzing, evt.
„max. draaimoment“) *
14 LED-lampje
15 Drukschakelaar
*afhankelijk van de uitvoering
7.1 Accupack, capaciteits- en signaalindica-
tie
Afb. B
Het accupack voor gebruik opladen.
Laad het accupack bij vermogensverlies weer op.
De optimale opslagtemperatuur ligt tussen 10°C en
30°C.
7.2 Accupack uitnemen, inbrengen
Afb. C
7.3 Draairichting, transportbeveiliging
(inschakelblokkering) instellen
Afb. D
7.4 Versnellingsstand kiezen
Afb. E
Schakelschuif (4) alleen bij stilstand van de
motor bedienen!
7.5 Boren, slagboren instellen
Afb. A
Schakelschuif (3) bedienen.
7.6 Draaimomentbegrenzing, maximaal
draaimoment, impulsgenerator instellen
Niet gedurende langere tijd met ingescha-
kelde impulsgenerator werken! (De motor kan
oververhit raken.)
Machines met de aanduiding ...18 LTX BL Quick...:
Afb. F
Draai aan de stelknop (13) om de impulsgene-
rator in te schakelen (toets (5) knippert) of de
5. Afbeeldingen
Nm
6. Overzicht
7. Gebruik
La pagina sta caricando ...
La pagina sta caricando ...
La pagina sta caricando ...
La pagina sta caricando ...
La pagina sta caricando ...
La pagina sta caricando ...
La pagina sta caricando ...
La pagina sta caricando ...
La pagina sta caricando ...
La pagina sta caricando ...
La pagina sta caricando ...
La pagina sta caricando ...
La pagina sta caricando ...
La pagina sta caricando ...
La pagina sta caricando ...
La pagina sta caricando ...
La pagina sta caricando ...
La pagina sta caricando ...
La pagina sta caricando ...
La pagina sta caricando ...
La pagina sta caricando ...
La pagina sta caricando ...
La pagina sta caricando ...
La pagina sta caricando ...
La pagina sta caricando ...
La pagina sta caricando ...
La pagina sta caricando ...
La pagina sta caricando ...
La pagina sta caricando ...
La pagina sta caricando ...
La pagina sta caricando ...
La pagina sta caricando ...
La pagina sta caricando ...
La pagina sta caricando ...
La pagina sta caricando ...
La pagina sta caricando ...
La pagina sta caricando ...
La pagina sta caricando ...
La pagina sta caricando ...
La pagina sta caricando ...
La pagina sta caricando ...
La pagina sta caricando ...
La pagina sta caricando ...
La pagina sta caricando ...
La pagina sta caricando ...
La pagina sta caricando ...
La pagina sta caricando ...
La pagina sta caricando ...
La pagina sta caricando ...
La pagina sta caricando ...
La pagina sta caricando ...
La pagina sta caricando ...
-
 1
1
-
 2
2
-
 3
3
-
 4
4
-
 5
5
-
 6
6
-
 7
7
-
 8
8
-
 9
9
-
 10
10
-
 11
11
-
 12
12
-
 13
13
-
 14
14
-
 15
15
-
 16
16
-
 17
17
-
 18
18
-
 19
19
-
 20
20
-
 21
21
-
 22
22
-
 23
23
-
 24
24
-
 25
25
-
 26
26
-
 27
27
-
 28
28
-
 29
29
-
 30
30
-
 31
31
-
 32
32
-
 33
33
-
 34
34
-
 35
35
-
 36
36
-
 37
37
-
 38
38
-
 39
39
-
 40
40
-
 41
41
-
 42
42
-
 43
43
-
 44
44
-
 45
45
-
 46
46
-
 47
47
-
 48
48
-
 49
49
-
 50
50
-
 51
51
-
 52
52
-
 53
53
-
 54
54
-
 55
55
-
 56
56
-
 57
57
-
 58
58
-
 59
59
-
 60
60
-
 61
61
-
 62
62
-
 63
63
-
 64
64
-
 65
65
-
 66
66
-
 67
67
-
 68
68
-
 69
69
-
 70
70
-
 71
71
-
 72
72


Metabo BS 18 LTX BL Impuls Istruzioni per l'uso
- Categoria
- Martelli perforatori
- Tipo
- Istruzioni per l'uso
in altre lingue
- English: Metabo BS 18 LTX BL Impuls Operating instructions
- français: Metabo BS 18 LTX BL Impuls Mode d'emploi
- español: Metabo BS 18 LTX BL Impuls Instrucciones de operación
- Deutsch: Metabo BS 18 LTX BL Impuls Bedienungsanleitung
- русский: Metabo BS 18 LTX BL Impuls Инструкция по эксплуатации
- Nederlands: Metabo BS 18 LTX BL Impuls Handleiding
- português: Metabo BS 18 LTX BL Impuls Instruções de operação
- dansk: Metabo BS 18 LTX BL Impuls Betjeningsvejledning
- polski: Metabo BS 18 LTX BL Impuls Instrukcja obsługi
- svenska: Metabo BS 18 LTX BL Impuls Bruksanvisningar
- suomi: Metabo BS 18 LTX BL Impuls Käyttö ohjeet
Documenti correlati
-
Metabo BS 18 LTX BL I Istruzioni per l'uso
-
-
-
-
-
-
-
Metabo BS 18 LT Istruzioni per l'uso
-
-
Metabo BS 18 LT BL Manuale utente