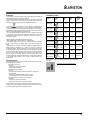
Ariston AHC 9.7F��LB X Guida utente
- Categoria
- Cappe da cucina
- Tipo
- Guida utente

EN FR ES
English, 13 Français, 18 Español, 23
PT IT AR
Português, 29 Italiano, 35
ةيبرع
ّ
, 41
AHGC 9.7F AB X
AHBS 6.7F AL X
AHBS 9.4F AM X
AHBS 9.7F AL X
AHF 9.4F AM X
AHF 6.4F AM X
AHBS 9.7F LTI X
AHC 9.7F ATI X
AHC 9.7F AB X
AHC 9.7F LB X
Instructions for use
Mode d’emploi
Instrucciones de uso
Instruções de uso
Istruzioni per l’uso

2
AHC 9.7F LB X

3

4

5

6

7

8

9

10

11

12

English
13
EN
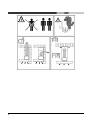
GENERAL SAFETY
• Before any cleaning or maintenance operation,
disconnect hood from the mains by removing the plug
or disconnecting the mains electrical supply.
• Always wear work gloves for all installation and
maintenance operations.
• This appliance can be used by children aged from 8
years and above and persons with reduced physical,
sensory or mental capabilities or lack of experience
and knowledge if they have been given supervision or
instruction concerning use of the appliance in a safe
way and understand the hazards involved.
• Children shall not be allowed to tamper with the
controls or play with the appliance.
• Cleaning and user maintenance shall not be made
by children without supervision.
• The premises where the appliance is installed must
be sufficiently ventilated, when the kitchen hood is
used together with other gas combustion devices or
other fuels.
• The hood must be regularly cleaned on both the
inside and outside (AT LEAST ONCE A MONTH).
• This must be completed in accordance with the
maintenance instructions provided. Failure to follow
the instructions provided regarding the cleaning of the
hood and filters will lead to the risk of fires.
• Do not flambé under the range hood.
• For lamp replacement use only lamp type indicated
in the Maintenance/Replacing lamps section of this
manual.
The use of exposed flames is detrimental to the filters
and may cause a fire risk, and must therefore be
avoided in all circumstances.
Any frying must be done with care in order to make
sure that the oil does not overheat and ignite.
CAUTION: Accessible parts of the hood may become
hot when used with cooking appliances.
• Do not connect the appliance to the mains until the
installation is fully complete.
• With regards to the technical and safety measures to be adopted for fume
discharging it is important to closely follow the regulations provided by the local
authorities.
• The air must not be discharged into a flue that is used for exhausting fumes
from appliance burning gas or other fuels.
• Do not
use or leave the hood without the lamp correctly mounted due to t
he
possible risk of electric shocks.
• Never use the hood without effectively mounted grids.
• The hood must NEVER be used as a support surface unless specifically
indicated.
• Use only t
he fixing screws supplied with the product for installation or, if no
t
supplied, purchase the correct screws type.
• Use the correct length for the screws which are identified in the Installation
Guide.
• In case of doubt, consult an authorized service assistance center or similar
qualif
ied person.
WARNING!
• Failure to install the screws or fixing device in accordance with these
instructions may result in electrical hazards.
• Do not use with a programmer, timer, separate remote control system or
any other device that switches on automatically.
The hood can look different to that illustrated in the drawings in this
booklet. The instructions for use, maintenance and installation, however,
remain the same.
Closely follow the instructions set out in this manual. All responsibility, for
any eventual inconveniences, damages or fires caused by not complying with the
instructions in this manual, is declined. This appliance is intended to be used in
household and similar application such as: - staff kitchen areas in shop, offices
and other working environments; - farm houses; - by clients in hotels, motels and
other residential type environments; - bed and breakfast type environments.
• It is important to conserve this booklet for consultation at any moment. In
the case of sale, cession or move, make sure it is together with the product.
• Read the instructions carefully: there is important information about
installation, use and safety.
• Do not carry out electrical or mechanical variations on the product or on t
he
discharge conduits.
• Before proceeding with the installation of the appliance verify that there are
no damaged all components. Otherwise contact your dealer and do not
proceed with the installation.
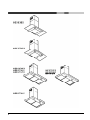
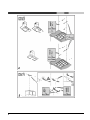
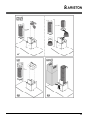
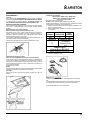
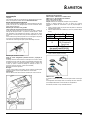
The minimum distance between the supporting surface for the cooking
equipment on the hob and the lowest part of the range hood must be not less
than 50cm from electric cookers and 65cm from gas or mixed cookers.
If the instructions for installation for the gas hob specify a greater distance, this
must be adhered to.

14
ELECTRICAL CONNECTION
The mains power supply must correspond to the rating indicated on the plate
situated inside the hood. If provided with a plug connect the hood to a socket in
compliance with current regulations and positioned in an accessible area, after
installation. If it not fitted with a plug (direct mains connection) or if the plug is not
located in an accessible area, after installation, apply a double pole switch in
accordance with standards which assures the complete disconnection of the
mains under conditions relating to over-current category III, in accordance with
installation instructions.
WARNING!
Before re-connecting the hood circuit to the mains supply and checking the
efficient function, always check that the mains cable is correctly assembled.
Replacing the power cable
The hood is provided with a special power cable ; if the cable is damaged,
request a new one from Technical Service.
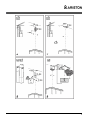
AIR VENT
(for the suction versions)
Connect the hood and discharge holes on the walls with a diameter equivalent to
the air outlet (connection flange).
Using the tubes and discharge holes on walls with smaller dimensions will cause
a diminution of the suction performance and a drastic increase in noise.
Any responsibility in the matter is therefore declined.
! Use a duct of the minimum indispensable length.
! Use a duct with as few elbows as possible (maximum elbow angle: 90°).
! Avoid drastic changes in the duct cross-section.
! The company declines any responsibility whenever these regulations are
not respected.
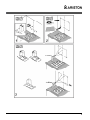
FILTERING OR DUCTING ?
! Your cooker hood is ready to be used in suction version.
To use the hood in filtering version the special ACCESSORY KIT must be
installed.
Check on the first pages of this manual if the ACCESSORY KIT is furnished
or must be bought separately.
Note: If furnished, in certain cases, the additional activated carbon filt
ering
system may be installed on the hood.
Information about the conversion of the hood from suction version to filtering
version is present in this manual.
Ducting version
In this case the fumes are conveyed outside of the building by means of a
special pipe connected with the connection ring located on top of the hood.
CAUTION!
The exhausting pipe is not supplied and must be purchased apart.
Diameter of the exhausting pipe must be equal to that of the connection ring.
CAUTION!
If
the hood is supplied with active charcoal filter, then it must be removed.
Filter version
The aspirated air will be degreased and deodorised before being fed back into
the room.
In order to use the hood in this version, you have to install a system of additional
filtering based on activated charcoal.

15
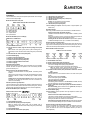
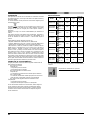
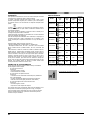
CONTROLS
The hood is fitted with a control panel with aspiration speed selection control and a light
switch to control cooking area lights.
Models with mechanical control panel
AHBS 9.4F AM X - A
HF 9.4F AM X - AHF 6.4F AM X
T1. ON/OFF light switch
T2. Speed 1/OFF switch
T3. 2-speed selection
T4. 3-speed selection
Models with Soft Button panel + LCD Display
AHBS 6.7F AL X - AHBS 9.7F AL
X
T1. Button ON/OFF suction motor
T2. Selection button for medium, high and intensive operating suction speed
(power).
Note: Intensive suction speed (power) intensiva (LED L1 flashing) lasts for
approximately 5 minutes, then the medium suction speed (power) is automatically
set.
T3. Selection button for ‘silent’ suction speed (power)
T4. Button ON/OFF lighting
L1. Status icon suction speeds (powers)
L2. St
atus icon saturation indicator for grease filter
L3. Status icon low (silent) suction speed (power)
L4. Status icon saturation indicator charcoal filter
L5. Status icon lighting
Reset filter saturation indicator
After perf
orming maintenance of the filter, press and hold button T3, the icon indicating
saturation will switch off. Repeat the operation if both icons indicating saturation
(grease and charcoal) are on.
Activation of the icon for c
harcoal filter saturation
The icon for charcoal filter saturation is normally disabled. To activate it, proceed
as follows:
With the hood off, press and hold for a long time and simultaneously T1 and T3:
L4 flashes at first then it switches on with steady light to indicate successful
activation.
Disabling the icon for charcoal filter saturation: repeat the above operation,
L4 switches on with steady light then flashes and in the end switches off to
indicate successful disabling.
Automatic operation at high temperature
Th
e hood is fitted with a sensor that detects the temperature. When this becomes too
high, the sensor automatically activates the medium suction speed (power). The hood
switches off when the temperature detected by the sensor has lowered significantly.
Models with Soft Button panel + Silent Speed
AHGC 9.7F AB X - AHC 9.7F AB X - AHC 9.7F LB X
T1. Button O
N/OFF suction motor
T2. Selection button operating suction speed (power)
Note: The intensive suction speed (power) (LED L3 flashing) lasts for
approximately 5 minutes, then the medium suction speed (power) is automatically
set (LED L2 on)
T3. Button ON/OFF lighting
T4. Selection button ‘silent’ suction speed (power)
L1. LED medium suction speed (power)
L2.
LED hi
gh suction speed (power)
L3 LED intensive suction speed (power) - timed (5 min.).
L4 LED filter saturation:
flashing: carry out maintenance of the charcoal filter;
on: carry out maintenance of grease filters.
L5 LED low (silent) suction speed (power)
L1+L2+L3 flashing in sequence: a
utom
atic operation at high temperature (see
related section)
Reset filter saturation
After carrying
out filter maintenance, press and hold button T1, LED L4 switches off.
Activation of the LED for char
coal filter s
aturation
The LED for charcoal filter saturation is normally disabled. To activate it, proceed
as follows:
With the hood off, press and hold for a long time and simultaneously T1 and T4:
L1 flashes first then L2 as well, to indicate successful activation.
Disabling the LED for charcoal filter saturation: repeat the above operation,
L1 and L2 start flashing first, then only L1, to indicate successful disabling.
Automatic operation at high temperature
Th
e hood is
fitted with a sensor that detects the temperature. When this becomes too
high, the sensor automatically activates the medium suction speed (power). The hood
switches off when the temperature detected by the sensor has lowered significantly.
Model with SOFT-TOUCH control panel
AHBS 9.7F LTI X - AHC 9.7F ATI X
To select hood functions, simply touch the controls:
T1. Button ON/OFF suction motor
T2. Button to
select medium suction speed (power)
T3. Button to select high and intensive suction speed (power)
Press once to select high suction speed (power) (LED L3 on);
Press again to select intensive suction speed (power) (LED L3 flashing).
Note: The intensive suction (power) speed lasts for approximately 5
minutes, then the high suction speed (power) is set automatically.
T4. Automatic shutdown button (Timer) and saturation indicator for charcoal
filter:
Automatic shutdown:
Press this button to set the automatic shutdown of the active suction speed
(power):
Silent suction speed (power): 20 minutes
Medium suction speed (power): 15 minutes
High suction speed (power): 10 minutes
Saturation indicator charcoal filter
When flashing, perform maintenance of the charcoal filter, if installed, then keep
the button T1 pressed for a long time to stop the flashing.
T5. Button to select ‘silent’ suction speed (power) and saturation indicator for
grease filter
Note: when flashing, perform maintenance of the grease filter; then keep the
button T1 pressed for a long time to stop the flashing.
T6. Button ON/OFF lighting
T2+T3+T4 flashing: autom
atic op
eration under high temperature conditions (see
relevant paragraph)
Activ
ation of the charcoal filter saturation indicator
This in
dicator is normally deactivated. To activate it, proceed as follows:
With the hood off, press and keep pressed simultaneously T2 and T3: T3 starts
flashing first, then T2 as well, to indicate successful activation.
Deactivation of charcoal filter saturation LED: repeat the operation described
above; T3 and T2 start flashing, then only T3 to indicate successful deactivation.
Automatic operation under high temperature conditions
The hood is equipped with a sensor which detects the temperature. When this
becomes too high, the sensor automatically turns on the medium suction speed
(power). The hood turns off as soon as the temperature detected by the sensor is
lowered significantly.

16
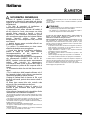
MAINTENANCE
Cleaning
Clean using ONLY a cloth dampened with neutral liquid detergent. DO NOT
CLEAN WITH TOOLS OR INSTRUMENTS. Do not use abrasive products. DO
NOT USE ALCOHOL!
Perimeter aspiration panel
Clean the perimeter aspiration panel with the same frequency as the ant-fats
filter, using a cloth and not too concentrated liquid detergent. Do not use
abrasive substances.
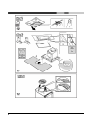
Maintenance of the anti-grease filters
Traps cooking grease particles.
This must be cleaned once a month (or when the filter saturation indication
system – if envisaged on the model in possession – indicates this necessity)
using non aggressive detergents, either by hand or in the dishwasher, which
must be set to a low temperature and a short cycle.
When washed in a dishwasher, the grease filter may discolor slightly, but this
does not affect its filtering capacity.
To remove the grease filter, pull the spring release handle.
Maintenance of the charcoal filter
It absorbs unpleasant odors caused by cooking.
The saturation of the charcoal filter occurs after more or less prolonged use,
depending on the type of cooking and the regularity of cleaning of the grease
filter.
In any case it is necessary to replace the cartridge at least every four mounths
(or when the filter saturation indication system – if envisaged on the model in
possession – indicates this necessity).The charcoal filter may NOT be washed or
regenerated.
Assembly
Hook the charcoal filter at the back on the metal tongue of the hood first, then on
the front with the two knobs.
Disassembly
Remove the charcoal filter by turning the knobs fixing it to the hood by 90°.
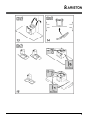
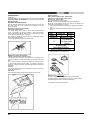
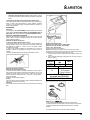
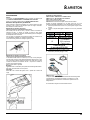
Replacing lamps
AHGC 9.7F AB X - AHBS 6.7F AL X - AHBS 9.4 AM X
AHBS 9.7F AL X - AHF 9.4F AM X - AHF 6.4F AM X
AHC 9.7F ATI X - AHC 9.7F AB X
Disconnect the appliance from the electricity.
Warning! Prior to touching the light bulbs ensure they are cooled down.
Replace the old light bulb with the one of the same type as specified in the
feature label or near the light lamp on the hood.
1. Using a flat head screwdriver or equivalent tool, carefully pry loose the light
cover.
2. Remove the damaged light and replace it with a new one (see the table
below):
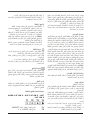
Lamp Power (W) Socket
20 G4
Voltage (V) Dimension (mm)
12
10 (Diameter)
22 (Light Center
Length)
ILCOS D Code
(according IEC 61231)
HSGST/C/UB-20-12-G4-10/22
3. Reinstall the light cover.
(it will snap shut).
AHBS 9.7F LT
I X - AHC 9.7F LB X
The hood is equippe
d with a lighting system based on LED technology.
The LEDs guarantee an optimum lighting, a duration up to 10 times as long as
the traditional lamps and allow to save 90% electrical energy.
For replacement, contact the technical service.

17
DISPOSAL
• This appliance is marked according to the European directive 2012/19/EC on
Waste Electrical and Electronic Equipment (WEEE).
• By ensuring this pr
oduct is disposed of correctly, you will help prevent potential
negative consequences for the environment and human health, which could
otherwise be caused by inappropriate waste handling of this product.
• The symbol
on the product, or on the documents accompanying the
product, indicates that this appliance may not be treated as household waste.
Instead it should be taken to the appropriate collection point for the re
cycling of
electrical and electronic equipment. Disposal must be carried out in accordance
with local environmental regulations for waste disposal.
• For further detailed information regarding the process, collection and recycling
of this product, please contact the appropriate department of your local
authorities or the local department for household waste or the shop where you
purchased this product.
Appliance designed, tested and manufactured according to:
• Safety: EN/IEC 60335-1; EN/IEC 60335-2-31, EN/IEC 62233.
• Performance: EN/IEC 61591; ISO 5167-1; ISO 5167-3; ISO 5168; EN/IEC
60704-1; EN/IEC 60704-2-13; EN/IEC 60704-3; ISO 3741; EN 50564; IEC
62301.
• EMC: EN 55014-1; CISPR 14-1; EN 55014-2; CISPR 14-2; EN/IEC 61000-3-2;
EN/IEC 61000-3-3. Suggestions for a correct use in order to reduce the
environmental impact: Switch ON the hood at minimum speed when you start
cooking and kept it running for few minutes after cooking is finished. Increase the
speed only in case of large amount of smoke and vapor and use boost speed(s)
only in extreme situations. Replace the charcoal filter(s) when necessary to
maintain a good odor reduction efficiency. Clean the grease filter(s) when
necessary to maintain a good grease filter efficiency. Use the maximum diameter
of the ducting system indicated in this manual to optimize effi
ciency and
minimize noise.
MALFUNCTIONS
If something appears not to be working properly, do the following simple checks
before calling Technical Service:
• If the hood is not working:
Check that:
- The power has not been disconnected.
- A speed has been selected.
• If the hood performs inefficiently:
Check that:
- The motor speed selected is sufficient for the amount of smoke and
vapours released.
- The kitchen is sufficiently ventilated to allow air intake.
- The charcoal filter is not worn (hood in filtering version).
• If the hood has turned off during normal functioning:
Check that:
- The power has not been disconnected.
- the omnipolar disconnection device has not tripped.
If the hood fails to operate correctly, briefly disconnect it from the mains power
supply for almost 5 sec. by pulling out the plug. Then plug it in again and try once
more before contacting the Technical Assistance Service.
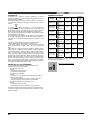
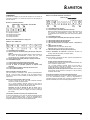
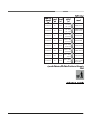
TECHNICAL DATA
Model
Height
(cm)
Width
(cm)
Depht
(cm)
Ø of
exhaust
tube
(cm)
AHBS6.7FALX
61,9 -114
70,4 - 114
59,8 45 15-12,5-12
AHBS9.4FAMX
AHBS9.7FALX
61,9 - 114
70,4 - 114
89,8 45 15-12,5-12
AHF6.4FAMX
60 – 112,5
68,5 –112,5
59,8 45 15-12,5-12
AHF9.4FAMX
60 – 112,5
68,5 –112,5
89,8 45 15-12,5-12
AHGC9.7FABX
62,3– 114,8
70,8 –114,8
89,8 45 15-12,5-12
AHBS9.7FLTIX
60 – 112,5
68,5 –112,5
89,8 45,5 15-12,5-12
AHC 9.7F ATI X
66,5 – 109
75 –115
89,8 50,5 15-12,5-12
AHC 9.7F AB X
66,5 – 109
75 –115
89,8 50 15-12,5-12
Please check the plat
e in order to verify the total absorption and the light
absorption.
Components not provided with the product
AHC 9.7F LB X

Français
18
FR
SÉCURITÉ GÉNÉRALE
• Avant tout entretien ou nettoyage du produit
débranchez l'alimentation électrique en retirant la
fiche électrique ou en coupant l'interrupteur général.
• Utilisez des gants de travail pour toute opération de
nettoyage ou d'entretien.
• Cet appareil peut être utilisé par des enfants âgés
d’au moins 8 ans et par des personnes ayant des
capacités physiques, sensorielles ou mentales
réduites ou dénuées d’expériences ou de
connaissances, sauf si ces personnes sont
correctement surveillées ou si des instructions
relatives à l'utilisation correcte de l'appareil
permettant d'éviter tout danger leur ont été
communiquées.
• Les enfants ne doivent pas jouer avec l’appareil.
• Le nettoyage et l’entretien par l’usager ne doivent
pas être effectués par des enfants sans surveillance.
• La pièce doit avoir une aération suffisante lorsque la
hotte est utilisée conjointement avec d'autres
appareils fonctionnant au gaz ou autres combustibles.
• La hotte doit être régulièrement nettoyée à la fois à
l'intérieur et à l'extérieur (AU MOINS UNE FOIS PAR
MOIS); cela devrait se faire en conformité avec les
instructions d'entretien. Le non respect des
instructions expressément fournies concernant le
nettoyage de la hotte et des filtres peut provoquer des
risques d'incendie.
• Ne pas flamber d’aliments sous la hotte.
• Pour le remplacement de la lampe, utilisez
uniquement le type de lampe spécifié dans la section
remplacement/maintenance lampe dans ce manuel.
L'utilisation d'une flamme nue est dommageable pour
les filtres et peut causer un incendie, par conséquent,
il est déconseillé de l'utiliser.
La friture doit être faite avec soin afin de s’assurer
que l’huile surchauffée ne prenne pas feu.
AVERTISSEMENT: Lorsque la table de cuisson est
en fonctionnement, les parties accessibles de la hotte
peuvent devenir très chaudes.
• Ne pas brancher l'appareil au réseau électrique
avant que l'installation est complètement terminée.
• En ce qui concerne les mesures techniques et de sécurité à prendre pour
l'évacuation des fumées, respectez strictement les dispositions des règlements
locales.
• L’air ne doit pas être envoyé dans un conduit utilisé pour évacuer les fumées
d’appareils utilisant du gaz ou un autre combustible.
• Ne pas utiliser ou laisser la hotte sans les lampes correctement montées, car
un éventuel risque de choc électrique est possible.
• N’utilisez jamais la hotte sans la grille montée correctement!
• La hotte ne doit JAMAIS être utilisée comme une surface d'appui, sauf
indication expresse.
• Utilisez uniquement les vis de fixation fournies avec le produit pour l'installation,
ou, si non fournies, acheter le type correct de vis.
• Utilisez la longueur correcte pour les vis qui sont identifiées dans le Guide
d'installation.
• En cas de doute, consultez votre centre de service agréé ou du personnel
qualifié.
ATTENTION !
• Le défaut
d'installer les vis et les dispositifs de fixation conformément à
ces inst
ructions peut entraîner des risques électriques.
• Ne pas mettre en marche au moyen d’un programmateur, d’une
minuterie, ou d’un système de commande à distance séparé ou tout
autre dispositif qui met l’appareil sous tension automatiquement.
La hotte peut avoir des configurations esthétiques différentes par rapport à
ce qui est illustré dans les dessins de ce manuel, cependant les
instructions pour l’utilisation, l’entretien et l’installation restent identiques.
Suivre impérativement les instructions de cette notice. Le constructeur
décline toute responsabilité pour tous les inconvénients, dommages ou
incendies provoqués à l’appareil et dûs à la non observation des instructions de
la présente notice. Cet appareil est destiné à être utilisé dans des applications
domestiques et analogues telles que : - des coins cuisines réservés au
personnel dans des magasins, bureaux et autres environnements professionnels
; - des fermes ; - l’utilisation par les clients des hôtels, motels et autres
environnements à caractère résidentiel ; - des environnements du type chambre
d’hôtes.
• Il est important de conserver ce livret pour pouvoir le consulter à tout
moment. En cas de vente, de cession ou de déménagement, assurez-vous
que la notice d'utilisation l'accompagne.
• Veuillez lire attentivement les instructions, vous trouverez des informations
importantes sur l'installation, le mode d'emploi et la sécurité.
• Ne pas effectuer des modifications électriques ou mécaniques sur le produit
ou sur les conduits d’évacuation.
• Avant d'installer l'appareil, vérifiez qu’il n’y a aucun composant
endommagé. Sinon, contactez votre revendeur et ne cont
inuez pas
l'installation.
La distance minimum entre la superficie de support des récipients sur le
dispositif de cuisson et la partie la plus basse de la hotte de cuisine ne doit pas
être inférieure à 50cm dans le cas de cuisinières électriques et de 65 cm dans le
cas de cuisinières à gaz ou mixtes.
Si les instructions d’installation du dispositif de cuisson au gaz spécifient une
plus grande distance, il faut en tenir compte.

19
BRANCHEMENT ÉLECTRIQUE
La tension électrique doit correspondre à la tension reportée sur la plaque
signalétique située à l’intérieur de la hotte. Si une prise est présente, branchez la
hotte dans une prise murale conforme aux normes en vigueur et placée dans
une zone accessible également après l’installation. Si aucune prise n’est
présente (raccordement direct au circuit électrique), ou si la prise ne se trouve
pas dans une zone accessible également après l’installation, appliquez un
disjoncteur normalisé pour assurer de débrancher complètement la hotte du
circuit électrique en conditions de catégorie surtension III, conformément aux
règlementations de montage.
ATTENTION!
Avant de rebranche
r le circuit de la hotte à l’alimentation électrique et d’en
vérifier le fonctionnement correct, contrôlez toujours que le câble d’alimentation
soit monté correctement.
Changement du câble d'alimentation
La hotte est pourvue d'un câble d'alimentation spécial; en cas de détérioration du
câble, en demander un neuf au service d'assistance technique.
ÉVACUATION DE L'AIR
(pour les versions aspirantes)
Relier la hotte aux tubes et trous d’évacuation de la paroi d’un diamètre
équivalent à la sortie de l’air (collier de raccord).
L’utilisation de tubes et des trous d'évacuation à paroi avec un diamètre inférieur
entraînera une diminution des performances d’aspiration et une nette
augmentation du bruit.
Nous déclinons toute responsabilité à cet égard.
! Utiliser un tuyau de la longueur strictement nécessaire.
! Les coudes du tuyau doivent être en nombre minime (angle maxi du coude:
90°).
! Éviter les variations excessives de section du tuyau.
! La société décline toute responsabilité si ces normes ne sont pas
respectées.
FILTRANTE OU ASPIRANTE ?
! Votre hotte est prête pour être utilisée en version aspirante.
Pour utiliser la hotte en version filtrante, il faut installer le KIT
ACCESSOIRES prévu.
Vérifier dans les premières pages de ce manuel si le KIT ACCESSOIRES
est déjà fourni ou s’il faut l’acheter à part.
Remarque: Si fourni dans le kit, dans certains cas, le système de filtration
supplémentaire à base de charbon actif pourrait déjà être installé dans la
hotte.
Les informations pour la transformation de la hotte de version aspirante à
version filtrante sont déjà contenues dans ce manuel.
Version aspirante
Les vapeurs sont évacuées vers l'extérieur à travers un conduit d'évacuation fixé
à la bride de raccord qui se trouve au-dessus de la hotte.
ATTENTION!
Le tuyau d’évacuat
ion n’est pas fourni et doit être acheté à part.
Le diamètre du tuyau d'évacuation doit être égal à celui de la bride de raccord.
ATTENTION!
Si la hotte est équipée d'un filtre à charbon, ce dernier doit être enlevé.
Version filtrante
L'air d'aspiration sera dégraissé et désodorisé avant d'être renvoyé dans la
pièce.
Pour utiliser la hotte dans cette version, vous devez installer un système de
filtrage supplémentaire basé sur charbon actif.

20
COMMANDES
La hotte est équipée d’un panneau de contrôle doté d’une commande de vitesse
d’aspiration et d’une commande d’éclairage du plan de cuisson.
Modèles avec panneau de contrôle mécanique
AHBS 9.4F
AM X - AHF 9.4F AM X - AHF 6.4F AM X
T1. Interrupteur lumières ON/OFF.
T2. Interrupteur OFF/vitesse 1
T3. Sélection vitesse 2
T4. Sélection vitesse 3
Modèles avec panneau de contrôle Soft Button + Display LCD
AHBS 6.7F AL X - AHBS 9.7F AL
X
T1. Touche ON/OFF moteur d’aspiration
T2. Touche de sélection vitesse (puissance) d’aspiration moyenne, haute et
intensive.
Note: La vitesse (puissance) d’aspiration intensive (LED L1 clignotant) a une
durée d'environ 5 minutes, puis la vitesse (puissance) d’aspiration moyenne est
automatiquement réglée.
T3. Touche de sélection vitesse (puissance) d’aspiration "silencieuse"
T4. Touche ON/OFF éclairage
L1. Icône d’état vitesses (pui
ssances) d’aspiration
L2. Icône d’état indicateur de saturation filtre à graisse
L3. Icône d’état vitesse (puissance) d’aspiration basse (silencieuse)
L4. Icône d’état indicateur de saturation du filtre à charbon
L5. Icône d’état Éclairage
Réinitialisation indicateur
saturation filtres
Après avoir effectué l'entretien du filtre, appuyez longuement sur la touche T3, l'icône
indiquant la saturation s’éteigne. Répétez l’opération si les deux icônes qui indiquent la
saturation (graisse et charbon) sont allumées.
Activation icône saturation
du filtre à charbon
L'icône de saturation du filtre à charbon est normalement désactivée. Pour
l'activer, procédez comme suit:
Avec la hotte arrêtée, appuyez et maintenez enfoncées et simultanément T1 et
T3: d’abord L4 clignote, puis est allumée à lumière fixe pour indiquer l’activation
réussie.
Désactivation icône saturation du filtre à charbon: répétez l'opération ci-
dessus, L4 s’allume à lumière fixe, puis clignote et s’éteigne pour indiquer la
désactivation.
Fonctionnement automatique à température élevée
La h
o
tte est équipée d'un capteur qui détecte la température. Lorsque la température
devient trop élevée, le capteur va activer automatiquement la vitesse (puissance)
moyenne d'aspiration. La hotte est désactivée lorsque la température détectée par le
capteur est réduite de façon significative.
Modèles avec panneau de contrôle Soft Button + Silent Speed
AHGC 9.7F AB X - AHC 9.7F AB X - AHC 9.7F LB X
T1. To
uche ON/OFF moteur d’aspiration
T2. Touche de sélection vitesse (puissance) d’aspiration de fonctionnement
Note: La vitesse (puissance) d’aspiration intensive (LED L3 clignotant) a une
durée d’environ 5 minutes, puis la vitesse (puissance) d’aspiration moyenne est
automatiquement réglée (LED L2 allumée)
T3. Touche ON/OFF éclairage
T4. Touche de sélection vitesse (puissance) d’aspiration "silencieuse"
L1. LED vitesse (puissance) d’aspiration moyenne
L2.
LED
vitesse (puissance) d’aspiration haute
L3 LED vitesse (puissance) d’aspiration intensive - temporisée (5 min.).
L4 LED de saturation des filtres:
clignotant: effectuer la maintenance du filtre à charbon.
ON: effectuer la maintenance des filtres à graisses.
L5 LED vitesse (puissance) d’aspiration basse (silencieuse)
L1+L2+L3 clignotant en séquence: Fo
nc
tionnement automatique à température
élevée (voir la section dédiée)
Réinitialisation saturation filtres
Après a
voir effectué l’entretien des filtres, appuyez et maintenez appuyée la touche
T1, la LED L4 va s’éteindre.
Acti
vation LED saturation du filtre à charbon
La LED de
saturation du filtre à charbon est normalement désactivée. Pour
l'activer, procédez comme suit:
Avec la hotte arrêtée, appuyez et maintenez enfoncées et simultanément T1 et
T4: d’abord L1 clignote, puis L2 clignote aussi pour indiquer l’activation réussie.
Désactivation LED saturation du filtre à charbon: répétez l'opération ci-
dessus, d’abord L1 et L2 clignotent, puis uniquement L1 pour indiquer la
désactivation réussie.
Fonctionnement automatique à température élevée
La
ho
tte est équipée d'un capteur qui détecte la température. Lorsque la température
devient trop élevée, le capteur va activer automatiquement la vitesse (puissance)
moyenne d'aspiration. La hotte est désactivée lorsque la température détectée par le
capteur est réduite de façon significative.
Modèle avec panneau de contrôle Ecran tactile
AHBS 9.7F LTI X - AHC 9.7F ATI X
Pour sélectionner les fonctions de la hotte il suffit de toucher les commandes:
T1. Touche ON/OFF moteur d'aspiration
T2. To
uche de sélection vitesse (puissance) d’aspiration moyenne
T3. Touche de sélection vitesse (puissance) d’aspiration haute et intensive
Appuyez une fois pour sélectionner la vitesse (puissance) d’aspiration haute
(LED L3 ON);
Appuyez encore une fois pour sélectionner la vitesse (puissance) d’aspiration
intensive (LED L3 clignotant).
Note: La vitesse (puissance) d’aspiration intensive a une durée d’environ 5
minutes, après cela la vitesse (puissance) d’aspiration haute est réglée
automatiquement.
T4. Touche arrêt automatique (Temporisateur) et indicateur saturation filtre à
charbon:
Arrêt automatique:
Appuyez sur cette touche pour régler l’arrêt automatique de la vitesse
(puissance) d’aspiration active:
Vitesse (puissance) d’aspiration silencieuse: 20 minutes
Vitesse (puissance) d’aspiration moyenne: 15 minutes
Vitesse (puissance) d’aspiration haute: 10 minutes
Indicateur saturation filtre à charbon
Lorsque clignotant, effectuez la maintenance du filtre à charbon, si installé;
ensuite maintenez enfoncée la touche T1 pour la faire cesser de clignoter.
T5. Touche de sélection vitesse (puissance) d’aspiration "silencieuse" et
indicatuer saturation filtre à graisse
Note: lorsque clignotante, effectuez la maintenance du filtre à graisse;
ensuite, maintenez enfoncée la touche T1 pour la faire cesser de clignoter.
T6. Touche ON/OFF éclairage
T2+T3+T4 clignotantes: fon
cti
onnement automatique dans des conditions de
température élevée (voir le paragraphe correspondant)
Activation indicateur saturation filtre à charbon
Cet indi
cateur est normalement désactivée. Pour l'activer, procédez comme suit:
Avec la hotte arrêtée, appuyez et maintenez enfoncées simultanément T2 et T3:
d’abord, T3 clignote, ensuite T2 aussi pour indiquer l’activation réussie.
La pagina si sta caricando...
La pagina si sta caricando...
La pagina si sta caricando...
La pagina si sta caricando...
La pagina si sta caricando...
La pagina si sta caricando...
La pagina si sta caricando...
La pagina si sta caricando...
La pagina si sta caricando...
La pagina si sta caricando...
La pagina si sta caricando...
La pagina si sta caricando...
La pagina si sta caricando...
La pagina si sta caricando...
La pagina si sta caricando...
La pagina si sta caricando...
La pagina si sta caricando...
La pagina si sta caricando...
La pagina si sta caricando...
La pagina si sta caricando...
La pagina si sta caricando...
La pagina si sta caricando...
La pagina si sta caricando...
La pagina si sta caricando...
La pagina si sta caricando...
La pagina si sta caricando...
La pagina si sta caricando...
La pagina si sta caricando...
-
 1
1
-
 2
2
-
 3
3
-
 4
4
-
 5
5
-
 6
6
-
 7
7
-
 8
8
-
 9
9
-
 10
10
-
 11
11
-
 12
12
-
 13
13
-
 14
14
-
 15
15
-
 16
16
-
 17
17
-
 18
18
-
 19
19
-
 20
20
-
 21
21
-
 22
22
-
 23
23
-
 24
24
-
 25
25
-
 26
26
-
 27
27
-
 28
28
-
 29
29
-
 30
30
-
 31
31
-
 32
32
-
 33
33
-
 34
34
-
 35
35
-
 36
36
-
 37
37
-
 38
38
-
 39
39
-
 40
40
-
 41
41
-
 42
42
-
 43
43
-
 44
44
-
 45
45
-
 46
46
-
 47
47
-
 48
48


Ariston AHC 9.7F��LB X Guida utente
- Categoria
- Cappe da cucina
- Tipo
- Guida utente
in altre lingue
- English: Ariston AHC 9.7F��LB X User guide
- français: Ariston AHC 9.7F��LB X Mode d'emploi
- español: Ariston AHC 9.7F��LB X Guía del usuario
- português: Ariston AHC 9.7F��LB X Guia de usuario
Documenti correlati
Altri documenti
-
Whirlpool IHVP 6.4 LL K Guida utente
-
ELICA Édith Classic Manuale utente
-
HOTPOINT/ARISTON HIGC 9.3F LB X Guida utente
-
Airforce Foehn Manuale utente
-
Fagor CFT-90BEPOCA Manuale del proprietario
-
Indesit IHVP66LMK Manuale del proprietario
-
Whirlpool F093973 Guida utente
-
-
-