ATTENTION: Pour réduire le risque de choc
électrique, ne pas ouvrir l'appareil, il n'y a aucune
partie à l'intérieur destinée à l'utilisateur. Conez
toutes les réparations à un personnel qualié.
CAUTION: To reduce the risk of electric shock,
do not open the device, there is no party inside
for the user. Refer all servicing to qualified
personnel.
ATENÇÃO: Para evitar o risco de choque
eléctrico, não desmonte o aparelho. Este não
contém qualquer peça passível de ser reparada
pelo utilizador. Confie todas as operações de
manutenção a um técnico qualicado.
L'éclair avec le symbole de la èche dans le triangle est un
signe d'alerte avertissant l'utilisateur de "tension dangereuse"
à l'intérieur de l'unité.
The lightning with the arrow symbol in the triangle is a warning
sign alerting the user to "dangerous voltage" inside the unit.
O símbolo de um relâmpago com uma seta na extremidade no
interior de um triângulo equilátero destina-se a alertar o utilizador
para a presença de uma “ tensão perigosa ” no aparelho.
Le point d'exclamation dans le triangle est un signe
d'alerte avertissant l'utilisateur d'instructions importantes
accompagnant le produit.
The exclamation point in the triangle is a warning sign alerting
the user of important instructions accompanying the product.
O ponto de exclamação no interior de um triângulo equilátero
destina-se a alertar o utilizador para a existência de instruções
importantes na documentação que acompanha o aparelho.
IMPORTANT
- La plaque signalétique gure sur le panneau arrière de l’appareil.
- Veiller à avoir une distance minimale de 5 cm autour de l'appareil
pour une aération sufsante et que la ventilation ne soit pas gênée
en recouvrant les orices d'aération de l'appareil avec des objets
tels que journaux, nappes, rideaux.
- Ne placez pas de sources de ammes nues, telles que des bougies
allumées sur l'appareil.
- Ne pas exposer l'appareil à des gouttes d'eau ou éclaboussures.
- Ne placez pas d'objets remplis de liquides, tels que verre, vase ou
objets similaires sur l'appareil.
- Ne pas jeter les piles dans le feu! Respectez l'environnement lors
de la disposition des piles usagées.
- Les piles ne doivent pas être exposées à une chaleur excessive
comme le soleil, le feu ou autre source de chaleur similaire.
- La che du cordon d'alimentation est utilisée comme dispositif
de débranchement et doit rester facilement accessible. Pour être
totalement déconnecté, cette che doit être débranchée du réseau
complètement. La prise de courant ne doit pas être obstruée et doit
être facilement accessible lors de son utilisation.
- Sous l'inuence du phénomène transitoire rapide et / ou phénomène
électrostatique électrique, le produit pourrait présenter des
dysfonctionnements et l'utilisateur devra faire une réinitialisation de
l'appareil.
IMPORTANT
- The Marking plate is located at the bottom of the device.
- Make sure to have a minimum distance of 5 cm around the unit for
sufcient ventilation.
- Ensure that the ventilation openings is not covered with items such
as newspapers, tablecloths, curtains, etc.
- Do not place naked ame sources, such as lighted candles on the
apparatus.
- Do not expose this appliance to dripping or splashing water.
- Do not place objects lled with liquids, such as glass, vase on the
device.
- Do not throw batteries into re! Respect the environment when
disposing of used batteries.
- Batteries should not be exposed to excessive heat such as
sunshine, re or other similar heat source.
- The power plug is used as a disconnect device and must be easily
accessible. To be completely disconnected from the power, the plug
of the appliance should be disconnected completely. The socket
must not be obstructed and should be easily accessible during
intended use.
- Under the inuence of fast transient and / or electrostatic electric
phenomenon, the product may malfunction and the user must
perform a power reset of the device.
IMPORTANT
- A placa de características situa-se na parte de trás do aparelho.
- Preveja um espaço mínimo de 5 cm à volta do aparelho para
assegurar uma ventilação suciente.
- Certique-se de que não tapa os orifícios de ventilação.
- Não coloque velas sobre ou na proximidade do aparelho.
- Certique-se de que não expõe o aparelho à chuva ou à humidade.
- Não coloque qualquer recipiente com líquido, como uma jarra, sobre
ou na proximidade do aparelho.
- Não deite as pilhas no fogo! Respeite o meio ambiente quando for
jogar fora pilhas usadas.
- Não exponha as pilhas a um calor excessivo, como raios solares,
fogo ou outras fontes de calor semelhantes.
- A cha de alimentação de rede permite desligar o aparelho.
para cortar completamente a alimentação do aparelho, desligue
completamente a cha de alimentação de rede da tomada de rede.
a cha de alimentação de rede não pode estar tapada e deve ser
facilmente acessível durante a utilização.
- Sob o efeito de fenómenos eléctricos transitórios e/ou electrostáticos,
o produto pode apresentar anomalias e pode ser necessário desligar
o aparelho da alimentação de rede durante alguns instantes.
Si à l'avenir, vous deviez vous débarrasser de ce produit,
sachez que les produits électriques usagés ne doivent pas
être jetés avec les ordures ménagères. Des installations
destinées au recyclage existent. Vériez auprès de votre
municipalité ou demandez à votre revendeur des conseils.
(Directive Déchets d'Equipements Electriques et Electroniques)
If in the future, you need to get rid of this product, please
note that Waste electrical products should not be disposed
of with household waste. Recycling facilities exist. Check
with your municipality or ask your dealer for advice.
(Directive for Waste Electrical and Electronic Equipment)
Caso, em algum momento no futuro, tenha de se descartar
deste aparelho, tenha em conta que os produtos eléctricos
não devem ser descartados com o lixo doméstico.
Informese para conhecer o centro de reciclagem mais
próximo. Informe-se junto das autoridades locais ou do
seu revendedor local para a obtenção de pormenores adicionais.
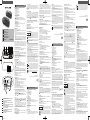
1. Afchage LED
2. Indicateur Alarm 1 buzzer
3. Indicateur Alarm 1 radio
4. Indicateur Sleep
5. Indicateur Alarm 2 buzzer
6. Indicateur Alarm 2 radio
7. Haut-parleur
8. Bouton de VOLUME
9. TUN-: Réglage arrière
HOUR: Réglage des heures
AL.1: Alarme 1
10. / AL.OFF: Veille / Marche; Arrêt de l'alarme
11. SNOOZE/ DIM/ SLEEP: Répétition de l'alarme; Gradateur
d'intensité lumineuse de l'écran; Sommeil (pour s'endormir avec
la radio)
12. TUN+: Réglage avant
MIN.: Réglage des minutes
AL.2: Alarme 2
13. MEM./ TIME SET: Mise en mémoire; Réglage de l'horloge
14. Compartiment à piles
15. Antenne laire FM
16. Cordon d'alimentation secteur
1. LED display
2. Alarm 1 buzzer indicator
3. Alarm 1 radio indicator
4. Sleep indicator
5. Alarm 2 buzzer indicator
6. Alarm 2 radio indicator
7. Speaker
8. VOLUME knob
9. TUN-: Setting down
HOUR: Hour setting
AL.1: alarm 1
10. / AL.OFF: ON/OFF button; Alarm stop
11. SNOOZE/ DIM/ SLEEP: Interval alarm repetition; Dimmer light
intensity of the screen; to fell asleep with the radio
12. TUN+: Setting up
MIN.: Minute setting
AL.2: alarm 2
13. MEM./ TIME SET: Memorizations; Setting the clock
14. Battery compartment
15. FM antenna
16. AC power cord
1. LED Visor
2. Indicador Alarm 1 buzzer
3. Indicador Alarm 1 radio
4. Indicador Sleep
5. Indicador Alarm 2 buzzer
6. Indicador Alarm 2 radio
7. Altifalante
8. Botão rotativo VOLUME
9. TUN-: Diminuir conguração
HOUR: Denir a hora
AL.1: alarme 1
10. / AL.OFF: Para ligar e desligar o aparelho; Paragem do
alarme
11. SNOOZE/ DIM/ SLEEP: Intervalo de repetição do alarme;
Abaixar a intensidade da luz da tela; dormir com o rádio
12. TUN+: Aumentar conguração
MIN.: Denir minutos
AL.2: alarme 2
13. MEM./ TIME SET: Memorizar; Congurar o relógio
14. Compartimento da bateria
15. Antena de o FM
16. Cabo de alimentação de rede
1. LED Anzeige
2. Alarm 1 buzzer-Anzeige
3. Alarm 1 radio –Anzeige
4. Einschlaffunktion -Anzeige
5. Alarm 2 buzzer-Anzeige
6. Alarm 2 radio-Anzeige
7. Lautsprecher
8. VOLUME Knopf
9. TUN-: Einstellung verringern
HOUR: Stunden einstellen
AL.1: Alarm 1
10. / AL.OFF: Ein/Aus; Alarm beenden
11. SNOOZE/ DIM/ SLEEP: Zeitintervall für die Alarmwiederholung;
Helligkeit der Displaybeleuchtung; Mit Musik vom Radio
einschlafen
12. TUN+: Einstellung erhöhen
MIN.: Minuten einstellen
AL.2: Alarm 2
13. MEM./ TIME SET: Senderspeicherplatz; Uhrzeit einstellen
14. Batteriefach
15. UKW-Kabelantenne
16. Netzstromkabel
Secteur: 230V 50 Hz (norme CE)
Piles: 2x1.5V, type AAA/R03/UM4 (non fournies) pour la sauvegarde
des mémoires.
Pour des performances optimale, des piles de type Alcaline son
recommandées. Ces piles doivent- être remplacées tous les 6 mois.
1. Insérez la prise du cordon d'alimentation dans une prise murale
standard.
2. Installez les piles de sauvegarde dans leur compartiment. Utilisez
uniquement la taille et le type de piles spéciées. Respectez la
polarité indiquée dans le compartiment. Une mauvaise Polarité peut
causer des dommages à l'appareil. Ne pas essayer de recharger les
piles, elles peuvent prendre feu ou exploser
Système de sauvegarde: Tous les réglages son conservés en
mémoire, cependant, l'heure de l'horloge pourrai de temps en temps
nécessiter un réajustement. En cas de coupure d'alimentation, si les
piles de sauvegarde ne sont pas installées, l'écran clignotera pour vous
indiquer une coupure de courant et la nécessité de refaire vos réglages.
En mode veille, appuyez sur le bouton pour mettre l’unité en
marche. Tenez cette touche appuyée pour éteindre l’unité.
1. En mode veille, appuyez longuement sur MEM./ TIME SET.
L'afcheur de l'horloge clignotera. Réglez l'heure avec HOUR et
les minutes avec MIN. (minutes).
2. Appuyez à nouveau sur MEM./ TIME SET pour conrmer.
REMARQUE: Si Pendant le temps de réglage aucune touche n'est
activée dans les 9 secondes, l'afchage présent à l'écran sera mis
automatiquement en mémoire.
3 - Annuler l'alarme
En mode veille, appuyez longuement sur AL.1 pour entrer en mode
de réglage d'alarme. Appuyez sur AL.1 plusieurs fois jusqu'à ce que
l'indicateur de l'alarme s'éteigne. L'alarme sera annulée de manière
permanente.
Remarque: La même procédure s’applique pour l’alarme 2 avec la
touche AL.2.
Recherche manuelle
1. Appuyez sur pour allumer la radio.
2. Pour une meilleure réception, étendre l'antenne laire FM.
3. Réglez le volume par bouton de VOLUME au niveau désiré.
4. Choisissez votre station souhaitée avec TUN+ ou TUN-.
5. Pour arrêter d'écouter la radio, appuyez et maintenez à nouveau
sur .
Recherche automatique
Appuyez et maintenez pendant quelques secondes TUN+ ou TUN-
pour lancer la recherche. La recherche automatique localise les
stations les plus puissantes. Une station avec un signal faible peut
être réglée manuellement en appuyant plusieurs fois sur TUN+ ou
TUN-.
REMARQUE: Au cours de l'opération de recherche le niveau sonore
est automatiquement mis en sourdine.
Stations préréglées
Cette unité peut enregistrer 10 stations FM.
Mémorisation manuelle
1. Sélectionnez une station radio manuellement ou en recherche
automatique.
2. Appuyez et maintenez enfoncée la touche MEM./ TIME SET. "P 01"
clignote sur l'écran.
3. Appuyez sur TUN+ ou TUN- pour sélectionner un canal.
4. Appuyez sur MEM./ TIME SET pour mémoriser.
5. Répétez les étapes 1-4 pour mémoriser d'autres stations.
Écoute des stations préréglées
Appuyez sur MEM./ TIME SET et recommencer l'opération autant de
fois que nécessaire pour sélectionner votre station.
Réglez le volume par bouton de VOLUME au niveau désiré.
1. En mode veille, appuyez longuement sur AL.1. L'écran clignote.
2. Appuyez sur AL.1 de nouveau pour choisir le source du réveil:
sonnerie ou radio FM.
3. Appuyez à nouveau sur / AL.OFF pour conrmer.
4. Appuyez sur HOUR et / ou MIN. pour régler l'heure de réveil
5. Appuyez sur / AL.OFF pour conrmer, l'indicateur d'alarme
s'allume.
Remarque:
- La même procédure s'applique pour l'alarme 2 avec le bouton AL.2.
- Si vous vous réveillez avec la radio, sélectionnez la station de votre
choix, appuyez longuement sur pour éteindre la radio avant que
l’heure de l’alarme n’arrive. Pour la sélection de station, veuillez
consulter « ÉCOUTER LA RADIO ».
- Le dernier niveau d'écoute étant mémorisé, le niveau sonore de
l'alarme en sera identique. Si vous vous réveillez avec la radio,
n'oubliez pas de vérier le volume sonore. Appuyez sur . Réglez
avec VOLUME. appuyez longuement sur .
- Si vous utilisez le mode sommeil avec un faible niveau sonore, nous
vous conseillons d'utiliser la fonction Buzzer pour vous réveiller.
Arrêt de l'alarme
1 - Répétition de l'alarme
Appuyez sur SNOOZE. L'alarme s'arrête et se déclenchera à
nouveau 9 minutes plus tard.
2 - Arrêt de l'alarme
Appuyez sur / AL.OFF. L'alarme 1 se déclenchera à nouveau le
jour suivant à la même heure.
1. In standby mode, press and hold AL.1 to enter into alarm setting
mode, the display blinks.
2. Press AL.1 again to select the source of wake up: Buzzer or FM
Radio.
3. Press / AL.OFF to conrm.
4. Press HOUR and / or MIN. to set the time of wake up
5. Press / AL.OFF to conrm, the alarm 1 indicator (Buzzer or
Radio) lights up.
Note:
- Same procedure applies for alarm 2 with AL.2 button.
- If you wake up with the radio, select your desired station, then long
press button to turn off the radio before the alarm time reaches.
For the station selecting, please refer to “LISTENING TO RADIO”.
- The previous level of listening is stored. The volume of the alarm will
be identical. If you wake up with the radio, do not forget to check the
volume level. Press and rotate VOLUME knob, then long press
again .
- If you use the sleep mode with low sound level, you should use the
buzzer to wake you up.
Stopping the Alarm
1 - Alarm repetition
Press SNOOZE. The alarm stops and will sound again 9 minutes
later.
2 - Alarm stop
Press / AL.OFF. The alarm1 will sound again the next day at the
same time.
3 - Alarm Cancellation
In Standby mode, long press AL.1 to enter into alarm setting mode.
Press AL.1 repeatedly to cancel until the alarm indicator lights off.
The alarm1 will be cancelled permanently.
Note: Same procedure applies for Alarm2 with AL.2 button.
1. No modo de standby, mantenha pressionado o botão AL.1 para
denir um alarme. A tela piscará.
2. Pressione AL.1 novamente para selecionar a fonte do despertador:
Campainha ou Rádio FM.
3. Pressione botão / AL.OFF para conrmar.
4. Utilize os botões HOUR para ajustar as horas. Utilize os botões
MIN. para ajustar as minutos.
5. Pressione o botão / AL.OFF para memorizar o ajuste do alarme.
A luz de indicação correspondente ao será exibida na tela.
Nota:
- O mesmo procedimento se aplica para Alarme 2 com o botão AL.2.
- Caso o despertador seja o rádio, selecione a sua estação desejada,
e mantenha pressionado o botão pressionado para desligar o
rádio antes do horário congurado para o despertador. Para
selecionar a estação, veja “OUVINDO AO RÁDIO”.
- O atual nível de volume que você estiver utilizando será guardado,
e o volume do alarme será o mesmo. Caso você utilize o rádio
como despertador, não esqueça de vericar o volume. Pressione
. Ajuste o volume através de botão rotativo VOLUME para o
nível desejado. Mantenha pressionado o botão pressionado para
desligar.
- Se regular a função adormecimento para um volume sonoro
bastante baixo antes de se deitar, aconselhamo-lo a utilizar o
despertar por buzzer.
Desactivação do alarme
1 - Paragem momentânea do alarme
Prima o botão SNOOZE para parar temporariamente o alarme. Este
soará de novo ao m de alguns minutos. (default: 9 minutos)
2 - Paragem do alarme
Prima o botão / AL.OFF: o alarme soará no dia seguinte à mesma
hora.
3 - Desactivação do alarme
No modo de standby, pressione AL.1 para entrar no modo de
denição do alarme. Pressione AL.1 várias vezes até que o indicador
luminoso do alarme se desligue. O alarme será permanentemente
cancelado.
Nota: O mesmo procedimento se aplica para Alarme 2 com o botão
AL.2.
AC: 230V 50Hz (CE)
DC: 2x1.5V, battery type AAA/R03/UM4 (not included) for back up.
For optimal performance, alkaline batteries are recommended.
These batteries must be replaced every six months.
Alimentação de rede: 230V 50Hz (norma CE)
ENERGIA: 2x1,5V, tipo de pilha AAA/R03/UM4 (não incluso) como
fonte de energia de reserva.
Recomenda-se a utilização de pilhas alcalinas. Para um
funcionamento óptimo, recomenda-se a substituição das pilhas
todos os 6 meses.
1. Ligue o cabo de alimentação de rede a uma tomada de rede.
2. Coloque as pilhas de reserva em seu compartimento. Utilize
apenas pilhas que respeitam as recomendações do fabricante.
Certique-se de que respeita a polaridade aquando da colocação
de pilhas (ver compartimento). A inobservância da polaridade
pode danicar o aparelho. Não tente recarregar pilhas não
recarregáveis. Podem sofrer um sobreaquecimento e explodir.
SISTEMA DE BACKUP: Todas as congurações são memorizadas,
entretanto, a hora do relógio poderá ocasionalmente precisar ser
reajustada. Quando houver uma falta de energia, caso as pilhas não
tenham sido colocadas, a tela piscará indicando a falta de energia e
será necessário refazer as suas congurações.
Netzstromversorgung: 230V 50Hz (EU-Norm)
DC: 2x1,5V Batterien des Typs AAA/R03/UM4 (nicht mitgeliefert) für
die Gangreserve.
Wir empfehlen den Gebrauch alkalischer Batterien. Damit das Gerät
optimal funktioniert, sollten Sie diese Batterien alle 6 Monate ersetzen.
1. Schließen Sie das Stromversorgungskabel an eine Steckdose an.
2. Legen Sie die Batterien für die Gangreserve in das Batteriefach
ein. Verwenden Sie nur Batterien, die den Vorgaben des
Herstellers entsprechen. Bitte beachten Sie die Polarität beim
Einlegen der Batterien (siehe Batteriefach). Die Nicht-Beachtung
der Polarität kann das Gerät beschädigen. Versuchen Sie nicht,
nicht-wiederauadbare Batterien wieder aufzuladen. Sie könnten
überhitzen und explodieren.
Datensicherung: Alle Einstellungen werden gespeichert, wobei die
Uhrzeit gelegentlich aktualisiert werden sollte. Falls der Strom ausfällt
und keine Batterien installiert sind, blinkt das Display und weist somit
darauf hin, dass es einen Stromausfall gibt und Sie die Einstellungen
erneut vornehmen müssen.
1. Insert the plug of power cord into a standard wall outlet.
2. Install the backup batteries in their compartment. Use only the
size and type of batteries specied. Respect the polarity indicated
in the compartment. Improper polarity can cause damage to the
device. Do not attempt to recharge the batteries, they can catch
re or explode
Backup System: All settings are memorized. However, the clock
time could occasionally need to be readjusted. In case of power
failure, if backup batteries are not installed, the screen will ash to
indicate this power failure and the necessity to redo your settings.
Pour s’endormir avec la radio, appuyez sur SNOOZE/ DIM/
SLEEP pour sélectionner 90-80-70-60-50-40-30-20 ou 10 minutes
d’écoute. L’indicateur de Sommeil s’allume. L’appareil s’éteindra
automatiquement après le délai spécié. Pour annuler la fonction
de mise en veille, appuyez sur SNOOZE/ DIM/ SLEEP plusieurs
fois jusqu'à ce que OFF s'afche, la raio s'éteindra également. Vous
pouvez appuyer sur de nouveau pour allumer la radio.
To fall asleep with the radio, press SNOOZE/ DIM/ SLEEP repeatedly
to select 90-80-70-60-50-40-30-20 or 10 minutes of listening. Indicator
lights up. The unit will automatically turn off after the specied time. To
cancel the sleep function, press SNOOZE/ DIM/ SLEEP repeatedly
until OFF is displayed. The radio will be turned off also. You can press
again to turn on the radio.
Para ir dormir com o rádio, então pressione SNOOZE/ DIM/ SLEEP
para selecionar 90-80-70-60-50-40-30-20 ou 10 minutos. O indicador
SLEEP se acenderá. O aparelho irá desligar automaticamente
depois de um horário especíco. Para cancelar a função dormir,
pressione SNOOZE/ DIM/ SLEEP várias vezes até que OFF seja
exibido, e o rádio também será desligado. Você pode pressionar
novamente para ligar o rádio.
Appuyez longuement sur DIM plusieurs fois pour sélectionner la
luminosité de l'écran: Forte ou Basse.
Long press DIM button repeatedly to select the brightness of the
screen: high or low.
Mantenha pressionado várias vezes o botão DIM para ajustar a
retro-iluminação do visor: BAIXO e ELEVADO.
ALIMENTATION:
Secteur: 230V 50Hz, 5W
Piles de sauvegarde: 3V 2x1.5V, type AAA/R03/UM4 (non fournies)
RADIO: FM: 87.5-108MHz
Dimensions: 190 (P) X 65 (L) X 83 (H) mm
POWER SUPPLY
AC: 230V 50Hz, 5W
DC: 3V 2x1.5V, Battery type AAA/R03/UM4 (not included) for back up.
RADIO: FM: 87.5 -108 MHz
Dimensions: 190 (L) X 65 (W) X 83 (H) mm
ALIMENTAÇÃO:
AC 230V 50 Hz, Consumo 5W
ENERGIA: 2x1,5V, tipo de pilha AAA/R03/UM4 (não incluso) como
fonte de energia de reserva.
RÁDIO: FM: 87.5-108 MHz
DIMENSÕES DO APARELHO: 190 (L) X 65 (W) X 83 (H) mm
In standby mode, press button once to turn on the unit. Long press
this button again to turn off the unit.
No modo de espera (standby), pressione o botão uma vez para
ligar o aparelho. Mantenha pressionado o botão no aparelho para
desligálo.
Drücken Sie im Standby-Modus einmal die Taste , um das Gerät
einzuschalten. Halten Sie die Taste am Gerät gedrückt, um das
Gerät auszuschalten.
1. In standby mode, press and hold MEM./ TIME SET button, the
display will ash. Set the time with HOUR (hour) and/ or MIN.
(minutes).
2. Press MEM./ TIME SET again to conrm.
NOTE: If during the adjustment time no key is activated in 9 seconds,
the current display will be automatically stored.
1. No modo de espera, mantenha pressionado o botão MEM./ TIME
SET e a tela começará a piscar. Utilize os botão HOUR para
ajustar as horas. Utilize os botão MIN. para ajustar as minutos .
2. Pressione uma vez mais o botão MEM./ TIME SET para conrmar
o ajuste.
NOTA: Com o visor do relógio a piscar, se nenhum botão for premido
dentro de 9 segundos, este voltará ao visor de relógio anterior.
1. Halten Sie im Standby-Modus die taste MEM./ TIME SET gedrückt,
bis das Display blinkt. Stellen Sie mit HOUR (Stunden) und / oder
MIN. (Minuten) die Uhrzeit entsprechend ein.
2. Drücken Sie wieder die Taste MEM./ TIME SET, um Ihre Einstellung
zu bestätigen.
HINWEIS: Wenn Sie während der Einstellung innerhalb von 9
Sekunden keine Taste drücken, wird die aktuelle Anzeige automatisch
gespeichert.
Manual Search
1. Press once to turn on the radio.
2. For best reception, extend the FM wire antenna.
3. Adjust the volume by rotating VOLUME knob to the desired level.
4. Choose your radio station with TUN+ or TUN-.
5. To stop listening to the radio, long press again.
Automatic search
Press and hold for few seconds TUN+ or TUN-, the automatic search
locates strong stations. A station with a weak signal can be set
manually by repeatedly pressing TUN+ or TUN-.
NOTE: During the search operation, the sound level is automatically
muted.
Preset stations
This unit can store 10 FM stations.
Manual storage
1. Select a radio station manually or in automatic search
2. Press and hold MEM./ TIME SET. "P 01" blinks on the screen.
3. Press TUN+ or TUN- to select a channel.
4. Press MEM./ TIME SET to save it.
5. Repeat steps 1-4 to store other stations.
Listening to station presets
Press MEM./ TIME SET and repeat the operation as many times as
necessary to select your station.
Rotate VOLUME knob to adjust the sound level.
Pré-programação de estações
Este aparelho pode guardar até 10 estações FM.
Armazenamento manual
1. Seleccione uma estação manualmente ou com a ajuda da
sintonização automática.
2. Mantenha pressionado o botão MEM./ TIME SET. A indicação
«P 01» aparece no visor.
3. Pressione TUN+ ou TUN- para selecionar a estação.
4. Pressione MEM./ TIME SET para armazenar a pré-denição
setting
5. Volte a executar as operações dos pontos 1 a 4 para memorizar
outras estações.
Ouvir as pré-programações
Pressione então MEM./ TIME SET e repita a operação quantas
vezes for necessário para selecionar a sua estação.
Ajuste o volume através de botão rotativo VOLUME para o nível
desejado.
Sintonização manual
1. Prima o botão para pôr o rádio a funcionar.
2. Para uma melhor recepção FM, estique a antena de o.
3. Ajuste o volume através de botão rotativo VOLUME para o nível
desejado.
4. Escolha a estação de rádio com TUN+ ou TUN-.
5. Para desligar o rádio, mantenha pressionado o botão .
Sintonização automática
Mantenha pressionado por alguns segundos TUN+ ou TUN-, e a
busca automática localizará as estações de sinais mais fortes. Uma
estação com sinal mais fraco poderá ser congurada ao pressionar
os botões TUN+ ou TUN- várias vezes manualmente.
NOTA: O som é automaticamente cortado durante a procura.
Manuelle Recherche
1. Drücken Sie die Taste , um das Radio einzuschalten.
2. Für einen besseren UKW-Empfang, rollen Sie die Kabelantenne
aus.
3. Stellen Sie die Lautstärke mit Hilfe des Drehrädchens Lautstärke
ein.
4. Wählen Sie den gewünschten Radiosender mit der TUN+ oder
TUN-.
5. Um das Radio auszuschalten, Halten Sie die Taste .
Automatische Sendersuche
Halten Sie die Tasten TUN+ oder TUN- einige Sekunden gedrückt,
um automatisch nach Sendern mit starkem Empfang zu suchen.
Drücken Sie wiederholt die Tasten TUN+ oder TUN-, um Sender mit
einem schwachen Signal manuell einzustellen.
HINWEIS: Während der Sendersuche wird der Ton automatisch
abgeschaltet.
Gespeicherte Radiosender
Sie können 10 UKW-Sender speichern.
Manuelle Vorauswahl
1. Wählen Sie einen Sender manuell oder anhand der automatischen
Sendersuche aus.
2. Halten Sie die Taste MEM./ TIME SET. „P 01“ blinkt im Display.
3. Wählen Sie mit den Tasten TUN+ oder TUN- einen Sender.
4. Drücken Sie MEM./ TIME SET zum Speichern der Einstellung
5. Wiederholen Sie die Schritte 1 bis 4 zum Speichern weiterer
Sender.
Hören der vorausgewählten Sender
Drücken Sie anschließend die Taste MEM./ TIME SET und
wiederholen Sie diese Vorgehensweise so lange, bis Sie den
gewünschten gespeicherten Radiosender gefunden haben.
Stellen Sie die Lautstärke auf den gewünschten Pegel ein.
EMPLACEMENT ET DESCRIPTION DES COMMANDES
LOCATION AND DESCRIPTION OF CONTROLS
CONTROLOS GERAIS
BESCHREIBUNG DES GERÄTES
PLUS D’INFORMATION
MORE INFORMATION
INFORMAÇÕES
ALIMENTATION
ALLUMER / ÉTEINDRE L’UNITÉ
RÉGLAGE DE L'HEURE
RÉGLAGE DE L'ALARME ET DU MODE DE RÉVEIL
SETTING THE ALARM AND THE ALARM MODE
SETTING THE ALARM AND THE ALARM MODE
ÉCOUTE DE LA RADIO
POWER SUPPLY
ALIMENTAÇÃO
STROMVERSORGUNG
FONCTION SOMMEIL
SLEEP FUNCTION
FUNÇÃO DORMIR
GRADATEUR D'INTENSITÉ LUMINEUSE DE L'ÉCRAN
DIMMER
AJUSTE DA LUMINOSIDADE DO VISOR
FICHE TECHNIQUE
TECHNICAL SPECI FICATIONS
CARACTERÍSTICAS TÉCNICAS
TURN ON/ OFF THE UNIT
LIGANDO/DESLIGANDO O APARELHO
GERÄT EIN-/AUSSCHALTEN
SETTING THE TIME
REGULAÇÃO DO RELÓGIO
EINSTELLEN DER UHRZEIT
LISTENING TO RADIO
AUDIÇÃO DO RÁDIO
RADIO HÖREN
M-168 UK/M-168 NY
RADIO-RÉVEIL PLL DOUBLE ALARME
DUAL ALARM CLOCK RADIO PLL
RÁDIO RELÓGIO PLL COM ALARME DUPLO
PLL RADIOWECKER MIT ZWEI ALARMEN
FR
GB
PT
DE
NEW ONE S.A.S
10, Rue de la Mission, 25480 Ecole Valentin, France
NEW ONE S.A.S
10, Rue de la Mission, 25480 Ecole Valentin, France
NEW ONE S.A.S
10, Rue de la Mission, 25480 Ecole Valentin, France
Nos emballages peuvent faire l’objet d’une consigne de tri,
pour en savoir plus: www.quefairedemesdechets.fr
FR Lire attentivement les instructions avant de faire
fonctionner l’appareil.
GB Please read the instruction carefully before
operating the unit.
PT Leia este manual com atenção antes de qualquer
utilização.
Bitte lesen sie dieses handbuch vor dem gebrauch
des gerätes sorgfältig durch.
DE
ES Antes de utilizar este aparato, lea atentamente las
siguientes instrucciones
Leggere attentamente questo manuale prima di
utilizzare l’apparecchio.
IT
NL Lees deze handleiding aandachtig voor u het
toestel gebruikt.
FR Manuel de l’utilisateur
GB User Manual
PT Manual do Utilizador
Benutzerhandbuch
DE
ES Manual de instrucciones
Manuale di istruzioni
IT
NL Handleiding

ACHTUNG: Um die Gefahr eines Stromschlags
zu verringern, bauen Sie das Gerät nicht
auseinander. Dieses Gerät enthält keinerlei Teile,
die vom Anwender repariert werden können.
Lassen Sie alle Reparaturen nur von einem
Fachmann ausführen.
ATENCIÓN: Para reducir el riesgo de descarga
eléctrica, no desmonte el aparato. En su interior
no hay ninguna pieza que pueda ser reparada por
el usuario. Cualquier servicio de mantenimiento
y reparación deberá confiarse únicamente a
personal técnico cualicado. OPGELET: Om het risico op elektrische schok
te verminderen, het toestel niet demonteren.
Het toestel bevat geen door de gebruiker te
herstellen onderdeel. Vertrouw elke herstelling
enkel toe aan bevoegd personeel.
ATTENZIONE: Per ridurre il rischio di scossa
elettrica, non smontare l’apparecchio. Questo
apparecchio non contiene pezzi riparabili
dall’utente. Per ogni riparazione rivolgersi
esclusivamente a un tecnico qualicato.
Dieses Symbol zeigt das Vorhandensein von gefährlichen
Spannungen im Innern des Gerätes an.
Este símbolo indica la presencia de tensión peligrosa en el
interior del aparato.
Dit symbool waarschuwt voor de aanwezigheid van
gevaarlijke spanning binnenin het toestel.
Questo simbolo indica la presenza di tensione pericolosa
all’interno dell’apparecchio.
Dieses Symbol zeigt an, dass die mit dem Gerät gelieferte
Dokumentation wichtige Anweisungen enthält.
Este símbolo indica que la documentación que acompaña al
aparato contiene instrucciones importantes.
Dit symbool herinnert eraan dat de met het toestel
meegeleverde documentatie belangrijke instructies bevat.
Questo simbolo indica che, nella documentazione che
accompagna l’apparecchio, sono presenti istruzioni importanti.
WICHTIG
- Das Typenschild ist auf der Rückseite des Gerätes angebracht.
- Achten sie auf einen mindestabstand von 5 cm um das gerät, um
eine ausreichende belüftung zu gewährleisten.
- Achten Sie darauf, dass Sie keinesfalls die Belüftungsöffnungen
des Gerätes bedecken.
- Stellen Sie keine offenen Flammen, wie brennende Kerzen auf das
Gerät.
- Achten sie darauf, dass sie ihr gerät niemals regen oder feuchtigkeit
aussetzen.
- Stellen sie keinen mit üssigkeit gefüllten behälter (wie z.b. eine
vase) auf oder in der nähe des geräts ab.
- Werfen sie die batterien nicht ins feuer! Denken Sie bei der
Batterien-Entsorgung unbedingt an die Umwelt.
- Der Akku oder die Batterie dürfen keiner übermäßig großen Hitze,
wie etwa Sonnenlicht, einem Feuer oder ähnlichem ausgesetzt
werden.
- Mit dem netzkabel kann das gerät vom stromnetz getrennt werden.
ziehen sie den netzstecker vollständig aus der netzsteckdose
heraus, um das gerät komplett vom stromnetz zu trennen. Der
netzstecker darf nicht behindert werden und muss während der
verwendung leicht zugänglich sein.
- Unter der einwirkung von vorübergehenden elektrischen oder
elektrostatischen phänomenen kann das produkt fehlfunktionen
aufweisen. Es kann sich als notwendig erweisen, das gerät einige
momente von der netzstromversorgung zu trennen.
ADVERTENCIA
- La placa de datos se halla en la parte trasera de la unidad.
- Deje libre un espacio de, al menos, 5 cm alrededor del aparato para
garantizar una ventilación adecuada.
- Asegúrese de que los oricios de ventilación no están obstruidos
con periódicos, manteles, cortinas, etc.
- No coloque velas encendidas cerca o encima del aparato.
- No exponga este aparato a la lluvia o la humedad.
- No coloque ningún recipiente con líquido, como un jarrón, cerca o
encima del aparato.
- ¡No tire las pilas al fuego! Respete el medio ambiente a la hora de
deshacerse de las pilas usadas.
- No exponga las pilas a temperaturas demasiado altas, como las
producidas por la exposición directa a los rayos del sol, al fuego o
a otras fuentes de calor.
- El enchufe le permite desconectar el aparato. Para cortar
completamente la alimentación, desenchufe el aparato de la toma
de corriente. Se ha de poder acceder fácilmente al enchufe durante
el uso del aparato; Procure que el acceso al mismo permanezca
despejado.
- Como resultado de fenómenos eléctricos transitorios y/o
electroestáticos, pueden producirse fallos en el funcionamiento
del aparato. En estos casos, puede ser necesario desenchufar el
aparato de la fuente de alimentación durante unos instantes.
BELANGRIJK
- Het kenmerkplaatje bevindt zich aan de achterkant van het toestel.
- Voorzie een ruimte van minimum 5 cm rond het toestel om te zorgen
voor voldoende ventilatie.
- De ventilatie mag niet worden geblokkeerd door de
ventilatieopeningen te bedekken met items als kranten, tafelkleed,
gordijnen, enz.
- Plaats geen kaars op of in de buurt van het toestel.
- Zorg ervoor dat u het toestel niet blootstelt aan regen of vochtigheid.
- Plaats geen enkele met vloeistof gevulde kom zoals een vaas op of
in de buurt van het toestel.
- Gooi de batterijen niet in vuur! Respect the environment when
disposing of used batteries.
- Stel de batterijen niet bloot aan een overmatige warmte zoals
zonnestralen, brand of andere gelijkaardige warmtebronnen.
- Via de stroomstekker kunt u het toestel uitschakelen. om de voeding
van het toestel volledig te verbreken, moet u de stroomstekker uit
het stopcontact trekken. de stroomstekker mag niet geblokkeerd
worden en moet tijdens het gebruik gemakkelijk toegankelijk zijn.
- Onder invloed van tijdelijke elektrische en/of elektrostatische
verschijnselen kan het product storingen ondervinden en kan het
noodzakelijk zijn om de stekker van het toestel gedurende enkele
minuten uit het stopcontact te trekken.
IMPORTANTE
- La targhetta si trova sul retro dell’apparecchio.
- Lasciare uno spazio di almeno 5 cm attorno all’apparecchio per
garantire una ventilazione sufciente.
- Garantire sempre la corretta ventilazione dell’apparecchio e non
ostruire le aperture di ventilazione.
- Non collocare delle candele sopra o vicino all’apparecchio.
- Non esporre l’apparecchio a pioggia o umidità.
- Non collocare alcun recipiente contenente liquidi, come un vaso,
sopra o in prossimità dell’apparecchio.
- Non gettare le pile nel fuoco! Smaltire le pile usate rispettando
l’ambiente.
- Non esporre le pile a fonti di calore eccessivo, come raggi solari,
fuoco o altre fonti di calore simili.
- La spina di alimentazione va di norma scollegata, e deve
essere facilmente accessibile. Per interrompere completamente
l’alimentazione dell’apparecchio, scollegare la spina di
alimentazione dalla presa di corrente. La presa di alimentazione
deve restare facilmente accessibile durante l’uso, accertarsi che
l’accesso alla presa sia libero.
- Per effetto di fenomeni transitori elettrostatici e/o elettrici, è possibile
che il prodotto non funzioni correttamente. In tal caso è opportuno
scollegare per qualche istante l’apparecchio dalla corrente.
Wenn Sie dieses Gerät später einmal entsorgen möchten,
beachten Sie bitte, dass elektrische Geräte nicht mit dem
Hausmüll entsorgt werden dürfen. Erkundigen Sie sich
nach der nächstgelegenen Wertstoffsammelstelle. Für
weitergehende Informationen wenden Sie sich an die
örtlichen Behörden oder an Ihren Händler.
Si en un futuro desea deshacerse de este aparato,
recuerde que los productos eléctricos no deben tirarse
junto a los desechos domésticos. Deposítelo en centros
de reciclaje adecuados. Consulte a las autoridades locales
o a su proveedor a este respecto.
Indien u dit toestel in de toekomst wilt weggooien, houd
er dan rekening mee dat elektrische toestellen niet mogen
weggeworpen worden met het huishoudelijke afval.
Informeer naar het dichtstbijzijnde recyclagecentrum. Voor
meer informatie wendt u zich tot de lokale overheden of
uw verdeler.
Se in futuro si desidera sbarazzarsi di questo apparecchio,
ricordare che le apparecchiature elettriche non devono
essere gettate insieme ai riuti domestici. Informarsi per
sapere dove si trova il centro di smistamento più vicino.
Per ulteriori dettagli, rivolgersi alle autorità locali o al
proprio rivenditore.
1. Halten Sie im Standby-Modus die taste AL.1 gedrückt. Die
Anzeige beginnt zu blinken.
2. Drücken Sie AL.1 - erneut , um den Weckrufmodus auszuwählen:
Buzzer oder FM-Radios.
3. Drücken Sie / AL.OFF zum Speichern der Einstellung.
4. Stellen Sie mit HOUR und / oder MIN. die Weckzeit ein.
5. Drücken Sie / AL.OFF, um den Alarm Einstellung zu bestätigen.
Im Display erscheint die entsprechende Anzeigeleuchte für Alarm1
(Buzzer oder Radio).
Hinweis:
- Dasselbe Verfahren gilt für Alarm 2 mit AL.2 -Taste.
- Falls Sie als Weckruf das Radio eingestellt haben, wählen Sie
nun den gewünschten Radiosender und Halten Sie die Taste
gedrückt, um das Radio noch vor Erreichen des Alarms
auszuschalten. Informieren Sie sich im Abschnitt „RADIO HÖREN“
über die Einstellung von Radiosendern.
- Der Weckruf ertönt mit der zuletzt verwendeten Lautstärke. Wenn
Sie Radio als Weckruf eingestellt haben, vergessen Sie nicht, die
Lautstärke entsprechend einzustellen. Drücken Sie und Stellen
Sie die Lautstärke auf den gewünschten Pegel ein. Und Halten Sie
die Taste .
- Wenn Sie einen Sleep-Timer Modus mit geringer Lautstärke
aktiviert haben, verwenden Sie besser den Buzzer als Weckruf.
Weckfunktion deaktivieren
1 - Alarmwiederholung
Drücken Sie die Taste SNOOZE, um den Alarm kurzfristig zu
unterbrechen. Der Alarm schaltet sich nach einigen Minuten wieder
ein. Standardeinstellung: 9 Minuten.
2 - Alarm beenden
Drücken Sie die Taste / AL.OFF, der Alarm schaltet sich am
nächsten Tag zur gleichen Uhrzeit wieder ein.
3 - Alarm deaktivieren
Halten Sie im Standby-Modus die taste AL.1 gedrückt. Dann drücken
Sie wiederholt die Taste AL.1, bis die Anzeigelampe für den Weckruf
erlischt. Der Weckruf ist nun dauerhaft deaktiviert.
Hinweis: Dasselbe Verfahren gilt für Alarm 2 mit AL.2 -Taste.
1. En modo de espera, pulse y mantenga de botón AL.1 y la pantalla
parpadeará.
2. Pulse de nuevo AL.1- para seleccionar la fuente de despertador:
Zumbador (Buzzer) o Radio FM.
3. Vuelva a pulsar el botón / AL.OFF para conrmar.
4. Utilice los botones HOUR para ajustar las horas. Utilice los
botones MIN. para ajustar las minutos.
5. Pulse de / AL.OFF- para guardar el ajuste de alarm. El indicador
correspondiente se encenderá.
Nota:
- El mismo procedimiento se aplica para la Alarma 2 con el botón
de AL.2.
- Si usted se despierta con la radio, seleccione la emiisora deseada,
pulse y mantenga el botón para apagar la radio antes de que
llegue la hora de la alarma. Para la selección de emisora, por favor
consulte “ESCUCHAR LA RADIO”.
1. In de standby-modus ingedrukt AL.1 in de alarmregelstand te
komen. De cijfers op het display knipperen.
2. Druk nogmaals op AL.1 om de wekbron te selecteren: zoemer
of FM-radio.
3. Druk op de / AL.OFF -toets om uw instellingen te bevestigen.
4. Druk op HOUR om de uren voor het alarm in te stellen. Druk op
MIN. om de minuten voor de wekker in te stellen.
5. Druk op de / AL.OFF -toets om de instelling van alarm 1 te
slaan. De corresponderende lichtindicator van zal weergegeven
worden op het scherm.
Opmerking:
- Dezelfde procedure geldt voor Alarm 2 met AL.2 -knop.
- Als u wekken met radio selecteert, selecteer dan de gewenste
zender en ingedrukt daarna om de radio uit te schakelen voor
de alarmtijd wordt bereikt. Voor meer informatie over het selecteren
van de radiozender, kijk onder het kopje “NAAR DE RADIO
LUISTEREN”.
- Het volume wordt tijdens het luisteren opgeslagen en het
alarmvolume zal dus gelijk zijn aan het volume waarmee de laatste
keer naar de radio heeft geluisterd. Vergeet dus niet het volume
te controleren als u de wekker heeft ingesteld op wekken met
radio. Druk op en Stel het volume naar wens in met behulp van
VOLUME-knop. En ingedrukt daarna nogmaals op .
- Als u het geluidsvolume voor het slapengaan instelt op laag, raden
wij u aan om het weksignaal zoemer te gebruiken.
Uitschakelen van het alarm
1 - Korte onderbreking van het alarm
Druk op de toets SNOOZE om het alarm tijdelijk te onderbreken. Dit
zal opnieuw weerklinken na enkele minuten. (standaard: 9 minuten)
2 - Stoppen van het alarm
Druk op de toets / AL.OFF: het alarm 1 weerklinkt morgen op
hetzelfde uur.
3 - Uitschakelen van het alarm
In de standby-modus ingedrukt AL.1 in de alarmregelstand te
komen. Druk herhaaldelijk op AL.1 tot de alarmindicator niet langer
wordt getoond. Het alarm wordt permanent geannuleerd.
Opmerking: Dezelfde procedure geldt voor Alarm 2 met AL.2 -knop.
1. In modalità standby, premere a lungo il AL.1 tasto dell'unità, il
display inizia a lampeggiare.
2. Premere di nuovo il tasto AL.1 per selezionare l'origine della
sveglia: cicalino o radio FM.
3. Premere nuovamente il tasto / AL.OFF per confermare
l’impostazione.
4. Premere HOUR e/o MIN. per impostare l’ora della sveglia.
5. Premere / AL.OFF per confermare l'impostazione di allarme. La
spia corrispondente appare sul display.
Nota:
- La stessa procedura si applica per l'allarme 2 con il tasto AL.2.
- Se si utilizza la radio come sveglia, selezionare la stazione
desiderata, quindi premere a lungo il per arrestare la radio
prima del raggiungimento dell’ora impostata. Per la selezione della
stazione, consultare la sezione “ASCOLTO DELLA RADIO”.
- Il volume della sveglia è uguale all’ultimo volume di ascolto, che
l’apparecchio memorizza in automatico. Se si utilizza la radio come
sveglia, ricordare di controllare il livello del volume. Premere e
Regolare il volume con la manopola VOLUME. quindi premere a
lungo il .
- Se si utilizza la funzione di spegnimento automatico prima di andare
a dormire e il volume è impostato su un livello basso, è consigliabile
scegliere la sveglia tramite cicalino.
Arresto della sveglia
1 - Ripetizione dell’allarme
Premere il pulsante SNOOZE per arrestare momentaneamente
l’allarme. Questo suonerà nuovamente dopo alcuni minuti. (Di
default: 9 minuti.)
2 - Arresto dell’allarme
Premere il pulsante / AL.OFF: l’allarme suonerà nuovamente il
giorno dopo alla stessa ora.
3 - Eliminazione dell’allarme
In modalità standby, premere a lungo il AL.1 tasto dell'unità. Quindi
premere più volte il tasto AL.1 no a quando l'indicatore della sveglia
non si spegne. A quel punto la sveglia è stata eliminata in modo
permanente.
Nota: la stessa procedura si applica per l'allarme 2, con il tasto AL.2.
- El nivel previo de audición es memorizado, el volumen de la
alarma será idéntico. Si se despierta con la radio, no se olvide de
comprobar el nivel del volumen. Pulse y Ajuste el volumen al
nivel deseado con los botón giratorio VOLUME. Pulse y mantenga
el botón para apagar la radio
- Si ajusta la función de desconexión automática con un volumen
bastante bajo antes de acostarse, le aconsejamos que utilice el
timbre para despertarse.
Desactivación de la alarma
1 - Detención momentánea de la alarma
Pulse el botón SNOOZE para detener momentáneamente la alarma.
Esta volverá a sonar transcurridos unos minutos. (por defecto: 9
minutos)
2 - Apagado de la alarma
Pulse el botón / AL.OFF: la alarma 1 volverá a sonar al día
siguiente a la misma hora.
3 - Desactivación de la alarma
En modo de espera, pulse y mantenga de botón AL.1. Después
pulse AL.1 repetidamente hasta que el indicador de alarma se
apague. La alarma se cancelará permanentemente.
Nota: El mismo procedimiento se aplica para la Alarma 2 con el
botón de AL.2.
Einschlafen mit dem Radio,Drücken Sie wiederholt die SNOOZE/
DIM/ SLEEP, um eine der folgenden Zeitspannen auszuwählen:
90, 80, 70, 60, 50, 40, 30, 20, 10 Minute (n). Die Anzeigeleuchte
für geht an. Die Einschlaf-Funktion ist aktiviert. Um den Sleep-Timer
zu deaktivieren, drücken Sie die Taste SNOOZE/ DIM/ SLEEP
wiederholt, bis im Display die Anzeige OFF erscheint; das Radio
wird ebenfalls ausgeschaltet. Drücken Sie die Taste erneut, um das
Radio wieder einzuschalten.
Para quedarse dormido con la radio, pulse SNOOZE/ DIM/ SLEEP
para seleccionar 90-80-70-60-50-40-30-20 o 10 minutos de escucha.
El indicador se encenderá. La unidad se apagará automáticamente
a la hora especicada. Para cancelar la función de temporizador de
apagado automático, pulse SNOOZE/ DIM/ SLEEP repetidamente
hasta que se muestre OFF. La radio se apagará también. Podrá
pulsar de nuevo para encender la radio.
Als u in slaap wilt vallen met de radio, druk daarna op SNOOZE/
DIM/ SLEEP om de luistertijd in te stellen op 90-80-70-60-50-40-
30-20 of 10 minuten. De SLEEP indicator licht op. Het apparaat zal
automatisch uitschakelen nadat de ingestelde tijd is verstreken. Druk
om de slaapfunctie te annuleren herhaaldelijk op SNOOZE/ DIM/
SLEEP tot OFF wordt getoond op het display, de radio wordt nu ook
uitgeschakeld. U kunt nogmaals op drukken om de radio weer in
te schakelen.
Per addormentarsi ascoltando la radio, premere il tasto SNOOZE/
DIM/ SLEEP per selezionare la durata dell’ascolto tra le opzioni
90-80-70-60-50-40-30-20 o 10 minuti. La spia si illuminerà.
L’apparecchio si spegnerà automaticamente allo scadere del periodo
selezionato. Per annullare la funzione Sleep premere più volte il tasto
SNOOZE/ DIM/ SLEEP, no a quando sul display non compare la
dicitura OFF: la radio si spegne. Per riaccendere la radio premere
il tasto .
Halten Sie im Standby-Modus wiederholt auf die Taste DIM, um die
Hintergrundbeleuchtung des Displays einzuschalten: HOCH und
NIEDRIG.
Pulse y mantenga el botón DIM de forma repetida para ajustar la
retroiluminación de la pantalla: BAJO y ALTO.
Houd herhaaldelijk op de DIM -toets om de achtergrondverlichting
van de display in te stellen. Er zijn 2 niveaus: LAAG en HOOG.
Premere a lungo il DIM per selezionare la luminosità dello schermo:
elevata o disattivata.
Stromversorgung:
AC 230V 50Hz,Verbrauch 5W
DC: 2x1,5V Batterien des Typs AAA/R03/UM4 (nicht mitgeliefert) für
die Gangreserve.
RADIO: UKW: 87.5-108MHz
AUSMAßE DES GERÄTES: 190 (T) X 65 (B) X 83 (H) mm
ALIMENTACIÓN
CA 230V 50 Hz, Consumo 5W
CC: 2x1.5V, modelo de pila AAA/R03/UM4 (no incluida) para la
reserva.
RADIO: FM: 87.5-108 MHz
Dimensions: 190 (alto) X 65 (ancho) X 83 (largo) mm
VOEDING:
AC 230V 50 Hz, Verbruik 5W
DC: 2x1.5V, batterijsoort AAA/R03/UM4 (niet meegeleverd) voor
backup.
RADIO: FM: 87.5-108 MHz
AFMETINGEN VAN HET TOESTEL: 190 (D) X 65 (B) X 83 (H) mm
ALIMENTAZIONE:
CA 230V 50 Hz, 5W
CC: 3V 2 batterie AAA/R03/UM4 1,5V di backup (non incluse).
RADIO: FM: 87.5-108 MHz
DIMENSIONI DELL’APPARECCHIO: 190 (L) X 65 (P) X 83 (A) mm
MOREINFORMATION
INFORMACIÓN
INLICHTINGEN
INFORMAZIONI
ALARM UND ALARMMODUS EINSTELLEN
AJUSTE DE LAS ALARMAS Y DE LOS MODOS DE
DESPERTADOR
HET ALARM EN DE ALARMMODUS INSTELLEN
REGOLAZIONE DELL’ALLARME E MODALITÀ DI SVEGLIA
SCHLUMMERFUNKTION (AUTOMATISCHES AUSSCHALTEN)
FUNCIÓN DE APAGADO AUTOMÁTICO (SLEEP)
SLAAPFUNCTIE
FUNZIONE “SLEEP” (Per addormentarsi con la radio)
DIMMER
AJUSTE DEL NIVEL DE INTENSIDAD DE LA LUZ DE LA
PANTALLA
SCHERMDIMMER
REGOLAZIONE DELLA LUMINOSITÀ
TECHNISCHE EIGENSCHAFTEN
CARACTERÍSTICAS TÉCNICAS
TECHNISCHE KENMERKEN
SPECIFICHE TECNICHE
NEW ONE S.A.S
10, Rue de la Mission, 25480 Ecole Valentin, France
NEW ONE S.A.S
10, Rue de la Mission, 25480 Ecole Valentin, France
NEW ONE S.A.S
10, Rue de la Mission, 25480 Ecole Valentin, France
M-168UK/IB/V0
NEW ONE S.A.S
10, Rue de la Mission, 25480 Ecole Valentin, France
1. Pantalla LED
2. Indicador alarm 1 – timbre
3. Indicador alarm 1 – radio
4. Indicador SLEEP (desconexión automática)
5. Indicador alarm 2 – timbre
6. Indicador alarm 2 – radio
7. Altavoces
8. Botón giratorio VOLUME
9. TUN-: Ajuste hacia abajo
HOUR: Ajuste de hora
AL.1: alarma 1
10. / AL.OFF: Botón encendido/ apagado; Apagado de la alarma
11. SNOOZE/ DIM/ SLEEP: Intervalo de repetición de la alarma;
Iluminación atenuada en pantalla; para dormirse con la radio
12. TUN+: Ajuste hacia arriba
MIN.: Ajuste de minutos
AL.2: alarma 2
13. MEM./ TIME SET: Memorizar; Congurar el reloj
14. Compartimento para la pila
15. Antena alámbrica FM
16. Cable de alimentación
1. LED-display
2. Alarm 1 buzzer –indicator
3. Alarm 1 radio –indicator
4. SLEEP -indicator
5. Alarm 2 buzzer –indicator
6. Alarm 2 radio –indicator
7. Luidsprekers
8. VOLUME-draaiknop
9. TUN-: Instelling verlagen
HOUR: Instellen uren
AL.1: alarm 1
10. / AL.OFF: aanzetten/ in standby Zetten; Stoppen van het alarm
11. SNOOZE/ DIM/ SLEEP: Alarm tijdelijk uitschakelen; lichtintensiteit
van het scherm; val in slaap met de radio
12. TUN+: Instelling verhogen
MIN.: Instellingen minuten
AL.2: alarm 2
13. MEM./ TIME SET: Geheugenopslag; De klok instellen
14. Batterijcompartiment
15. Draadantenne FM
16. Netsnoer
1. Display LED
2. Spia Alarm 1 buzzer
3. Spia Alarm 1 radio
4. Spia SLEEP
5. Spia Alarm 2 buzzer
6. Spia Alarm 2 radio
7. Altoparlanti
8. Manopola VOLUME
9. TUN-: Diminuire
HOUR: Impostazione delle ore
AL.1: Allarme 1
10. / AL.OFF: acceso/standby; Arresto dell’allarme
11. SNOOZE/ DIM/ SLEEP: Ripetizione dell’allarme; Regolatore
luminosità dello schermo; Per addormentarsi con la radio
12. TUN+: Aumentare
MIN.: Impostazione dei minuti
AL.2: Allarme 2
13. MEM./ TIME SET: Memorizzazione; Impostazione dell’ora
14. Vano pile
15. Antenna a lo FM
16. Cavo di alimentazione di rete
CA: 230V 50Hz (normativa europea)
CC: 2x1.5V, modelo de pila AAA/R03/UM4 (no incluida) para la
reserva.
Se recomienda la utilización de pilas alcalinas. Para obtener un
rendimiento óptimo, las pilas deben cambiarse cada 6 meses.
1. Conecte el cable de alimentación a una toma de corriente.
2. Instale las pilas de reserva en su compartimento. Utilice únicamente
pilas que cumplan las recomendaciones del fabricante. Respete la
polaridad al colocar las pilas (véase el interior del compartimento
de las pilas). Si no lo hace, podría estropear el aparato. No intente
recargar las pilas no recargables. Podrían sobrecalentarse y
explotar.
Sistema de reserva: Quedan memorizados todos los ajustes. Sin
embargo, de manera ocasional, la hora del reloj podría necesitar ser
ajustada de nuevo. En caso de avería de electricidad, si no estuvieran
instaladas las pilas, la pantalla parpadeará para indicar la avería de
electricidad y la necesidad de reprogramar los ajustes.
Netvoeding: 230V 50Hz (CE-norm)
DC: 2x1.5V, batterijsoort AAA/R03/UM4 (niet meegeleverd) voor
backup.
Het gebruik van alkalinebatterijen is aan te raden. Om een optimale
werking te verzekeren, is het aan te raden om de batterijen elke 6
maanden te vervangen.
1. Sluit het netsnoer aan op een stopcontact.
2. Installeer de backup batterijen in het daarvoor bestemde
compartiment. Gebruik uitsluitend batterijen die voldoen aan de
aanbevelingen van de fabrikant. Respecteer de polariteit wanneer
u batterijen plaatst (zie compartiment). Anders kan het toestel
beschadigd raken. Zorg ervoor dat u geen niet-oplaadbare batterijen
oplaadt. Ze zouden kunnen verhitten en ontploffen.
Geheugensysteem: Alle instellingen worden opgeslagen, maar het
is mogelijk dat de klok af en toe opnieuw moet worden bijgesteld.
Als er stroomuitval plaatsvindt terwijl er geen backupbatterijen zijn
geplaatst, dan zal de tijd op het scherm knipperen om aan te geven dat
er stroomuitval heeft plaatsgevonden en dat de instellingen opnieuw
moeten worden ingesteld.
Alimentazione di rete: 230V 50 Hz (norma CE)
CC: 2 batterie AAA/R03/UM4 1,5V di backup (non incluse).
Si raccomanda l’uso di pile alcaline. Per ottenere un funzionamento
ottimale, si raccomanda di sostituire le pile ogni 6 mesi.
1. Collegare il cavo di alimentazione di rete a una presa di corrente.
2. Inserire le batterie di backup nel relativo comparto. Utilizzare
soltanto pile che corrispondono alle indicazioni del fabbricante.
Rispettare la polarità durante l’inserimento delle pile (vedi
illustrazione nel comparto). Non rispettare la polarità può arrecare
danni all’apparecchio. Non cercare di ricaricare pile non ricaricabili.
Potrebbero surriscaldarsi ed esplodere.
Sistema di backup: tutte le impostazioni vengono memorizzate,
tuttavia potrebbe essere necessario riaggiustare l’ora di tanto in tanto.
In caso di interruzione dell’alimentazione, se le batterie di backup
non sono inserite, lo schermo inizia a lampeggiare per segnalare il
problema e la necessità di ricongurare le impostazioni.
En modo de espera, pulse una vez el botón para encender el
aparato. Vuelva a pulsar de nuevo este botón para apagar la unidad.
Druk in de standbymodus één keer op om het apparaat aan te
zetten. Houd op het apparaat ingedrukt om het apparaat uit te
schakelen.
In modalità standby, premere una volta il pulsante per accendere
l’apparecchio. Tenere premuto il tasto per spegnere l'unità.
1. En modo de espera, Pulse y mantenga pulsado el botón MEM./
TIME SET, la hora parpadeará en la pantalla. Utilice los botones
HOUR para ajustar las horas. Utilice los botones MIN. para ajustar
las minutos.
2. Vuelva a pulsar el botón MEM./ TIME SET para conrmar la
memorización.
NOTA: Cuando la pantalla del reloj parpadee, en caso de no pulsarse
ningún botón durante 9 segundos, ésta volverá a la visualización
previa del reloj.
1. Houd MEM./ TIME SET ingedrukt in de standbymodus, de cijfers
op het display knipperen. Gebruik de toetsen HOUR om de uren
in te stellen. Gebruik de toetsen MIN. om de minute in te stellen.
2. Druk nog een keer op de MEM./ TIME SET -toets om uw
instellingen te bevestigen.
OPMERKING: Als de tijdweergave knippert en er wordt geen knop
ingedrukt binnen 9 seconden, zal het terugkeren naar de vorige
tijdweergave.
1. In modalità standby, premere a lungo il MEM./ TIME SET tasto
dell'unità, le cifre dell'orologio lampeggiano, impostare l'ora con
HOUR. Regolare i minuti con tasto MIN..
2. Premere nuovamente il tasto MEM./ TIME SET per confermare
l’impostazione.
NOTA: se durante l’impostazione dell’ora con la schermata orologio
lampeggiante non viene premuto alcun tasto entro 9 secondi, il
dispositivo salva in automatico l’impostazione corrente.
Sintonización manual
1. Pulse el botón para encender el aparato
2. Extienda la antena alámbrica hasta obtener la mejor recepción
posible en la banda FM.
3. Ajuste el volumen al nivel deseado con los botón giratorio
VOLUME.
4. Seleccione su emisora de radio con los botones TUN+ o TUN-.
5. Para apagar la radio, pulse y mantenga de nuevo el botón .
Sintonización automática
Pulse y mantenga pulsado durante unos segundos los botones TUN+
o TUN-. La sintonización automática localiza emisoras potentes. Una
emisora con una señal débil podrá ser sintonizada de forma manual
pulsando repetidamente los botones TUN+ o TUN-.
NOTA: El sonido se cortará automáticamente durante la búsqueda.
Memorización de emisoras
Este aparato puede guardar un máximo de 10 emisoras FM.
Preajuste manual:
1. Seleccione una emisora de forma manual o con la sintonización
automática.
2. Pulse y mantenga pulsado el botón MEM./ TIME SET. La
indicación «P 01» parpadeará en la Pantalla.
3. Press TUN+ or TUN- to select a channel.
4. Pulse MEM./ TIME SET para guardar el ajuste predeterminado.
5. Repita los pasos 1 a 4 para memorizar otras emisoras de radio.
Escucha de las emisoras memorizadas
Después pulse MEM./ TIME SET y repita la operación tantas veces
como sea necesario para seleccionar su emisora.
Ajuste el volumen al nivel deseado con los botón giratorio VOLUME.
Handmatige afstemming
1. Druk op de toets om de radio in te schakelen.
2. Trek voor een betere FM-ontvangst de draadantenne uit.
3. Stel het volume naar wens in met behulp van VOLUME-knop.
4. Selecteer de gewenste radiozender met TUN+ en TUN-.
5. Druk om de radio uit te zetten Houd op de toets .
Automatische afstemming
Houd TUN+ of TUN- een paar seconden ingedrukt, er wordt
automatisch gezocht naar zenders met een sterk signaal. Een
zender met een zwak signaal kan handmatig worden gevonden door
herhaaldelijk op TUN+ of TUN- te drukken.
OPMERKING: Het geluid wordt automatisch uitgeschakeld tijdens
het zoeken.
Voorselecties van radiostations
Dit apparaat kan 10 FM -zenders opslaan.
Handmatige Voorselecties
1. Kies handmatig of met behulp van de automatische afstemming
een radiostation.
2. Houd MEM./ TIME SET voor een paar seconden ingedrukt. De
indicatie “P 01” knippert op de display.
3. Gebruik de TUN+ en TUN- -toetsen om een plaats toe te wijzen
in de voorselectie.
4. Druk op MEM./ TIME SET om de vooraf ingestelde instellingen
op te slaan.
5. Herhaal de stappen 1 tot 4 om andere radiostations te bewaren.
Luister naar de voorselecties
Druk daarna herhaaldelijk op MEM./ TIME SET om de gewenste
voorkeurszender te selecteren.
Stel het volume naar wens in met behulp van VOLUME-knop.
Sintonizzazione manuale
1. Premere il pulsante per accendere l’apparecchio.
2. Per migliorare la ricezione FM, stendere l’antenna a lo.
3. Regolare il volume con la manopola VOLUME.
4. Selezionare la stazione radio mediante il pulsante TUN+ o TUN-.
5. Para apagar la radio, premere a lungo il tasto dell'unità.
Sintonizzazione automatica
Tenere premuto per alcuni secondi il pulsante TUN+ o TUN-, la
ricerca automatica localizza le stazioni con segnale forte. Le stazioni
con segnale debole possono essere impostate manualmente
premendo ripetutamente TUN+ o TUN-.
NOTA: l’audio è automaticamente interrotto durante la ricerca.
Preselezione delle stazioni
Questo apparecchio può memorizzare 10 stazioni FM.
Preselezione manuale
1. Selezionare manualmente una stazione oppure attivare la
sintonizzazione automatica.
2. Tenere premuto per alcuni secondi MEM./ TIME SET. Sul display
l’indicazione “P 01” lampeggia.
3. Premere il pulsante TUN+ o TUN- per selezionare un canale.
4. Premere nuovamente il tasto MEM./ TIME SET per confermare
l’impostazione.
5. Ripetere i punti da 1 a 4 per memorizzare altre stazioni.
Ascolto delle preselezioni
Utilizzare il pulsante MEM./ TIME SET per selezionare direttamente
una preselezione di stazione.
Regolare il volume con la manopola VOLUME.
DESCRIPCIÓN DEL APARATO BESCHRIJVING VAN HET APPARAATDESCRIZIONE DELL’APPARECCHIO
ALIMENTACIÓN VOEDING
ALIMENTAZIONE
ENCENDER/APAGAR EL APARATO
HET APPARAAT AAN-/UITZETTEN
ACCENSIONE/SPEGNIMENTO DELL’APPARECCHIO
PUESTA EN HORA DEL RELOJ
INSTELLEN VAN DE KLOK
REGOLAZIONE DELL’ORA
FUNCIONAMIENTO DE LA RADIO
NAAR DE RADIO LUISTEREN
ASCOLTO DELLA RADIO
RADIO DESPERTADOR PLL CON ALARMA DUAL PLL WEKKERRADIO MET TWEE ALARMEN RADIOSVEGLIA PLL CON DOPPIO ALLARMEES NLIT
-
 1
1
-
 2
2


in altre lingue
- français: Muse M-168 UK Manuel utilisateur
- español: Muse M-168 UK Manual de usuario
- Deutsch: Muse M-168 UK Benutzerhandbuch
- Nederlands: Muse M-168 UK Handleiding
- português: Muse M-168 UK Manual do usuário