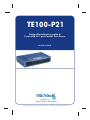
Trendnet TE100-P21 Quick Installation Guide
- Categoria
- Server di stampa
- Tipo
- Quick Installation Guide

Copyright ©2005. All Rights Reserved. TRENDware International, Inc.
TRENDnet
TRENDware, USA
What's Next in Networking
TE100-P21
Version 06.29.05
Guida all'installazione rapida di
2-port USB 2.0 1 port Parallel Print Server

Table of Contents
Italiano ......................................................................................................
1
Troubleshooting ........................................................................................
1
2
3
4
8
11
1. Prima dell'installazione .....................................................................
2. Specifiche prodotto ...........................................................................
3. Installazione hardware ......................................................................
4. Configurazione del server di stampa ................................................
5. Aggiunta di una stampante di rete al PC ...........................................

1
TE100-P21
Italiano
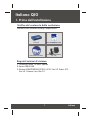
Verifica del contenuto della confezione
Assicurarsi che la confezione contenga i seguenti articoli:
1. Prima dell'installazione
Italiano QIG
Copyright ©2005. All Rights Reserved. TRENDware International, Inc.
TRENDnet
TRENDware, USA
What's Next in Networking
TE100-P21
Version 06.29.05
Guida all'installazione rapida di
2-port USB 2.0 1 port Parallel Print Server
Requisiti minimi di sistema
1. Processore Pentium 100 MHz o superiore
2. Almeno 8 MB di RAM
3. Windows 95/98/NT/ME/2000/XP/2003, HP-UX, Sun O.S, Solaris, SCO
Unix, AIX, Unixware, Linux, Mac O.S.
Guida utente su CD-ROM
Guida all'installazione rapida
Adattatore di alimentazione
(5 V, 2,5A)

2
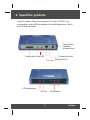
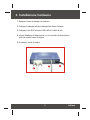
Il server di stampa è dotato di un connettore RJ-45, due slot USB 2.0, una
porta parallela e cinque LED che segnalano lo stato dell'alimentazione, l'attività
di rete e l'attività di stampa.
Porta parallela
LED alimentazione
Pulsante di ripristino
Connettore per
l'adattatore
di alimentazione
Porta USB
LED rete
Connettore RJ-45
LED stampante
Italiano
2. Specifiche prodotto

3
2
3
4
Italiano
1. Spegnere il server di stampa e le stampanti.
2. Collegare le stampanti alla porta stampanti del server di stampa.
3. Collegare il cavo RJ45 alla porta LAN e all'hub o switch di rete.
4. Inserire l'adattatore di alimentazione c.a. nel connettore di alimentazione
posto sul retro del server di stampa.
5. Accendere il server di stampa.
3. Installazione hardware

4
Italiano
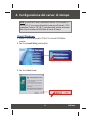
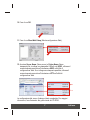
1. Inserire il CD-ROM del prodotto TE100-P21 nell'unità CD-ROM del
computer.
2. Fare clic su Install Utility (Installa utilità).
3. Fare clic su Next (Avanti).
NOTA: gli utenti MAC devono modificare l'indirizzo IP del computer in
192.168.0.X (X è un numero disponibile compreso nell'intervallo 1-253)
e immettere l'indirizzo 192.168.0.1 nella barra degli indirizzi del browser
Web al fine di accedere all'utilità Web del server di stampa.
Utenti Windows
4. Configurazione del server di stampa

5
Italiano
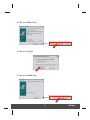
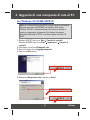
4. Fare clic su Next (Avanti).
5. Fare clic su Yes (Sì).
6. Fare clic su Finish (Fine).

6
Italiano
7. Fare doppio clic sull'icona PS-Utility (Utilità PS).
8. L'utilità rileva i server di stampa disponibili in rete. Selezionare il server di
stampa da configurare e fare clic su Change IP Address (Modifica indirizzo
IP).
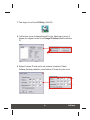
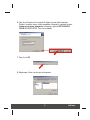
9. Digitare l'indirizzo IP valido per la rete esistente. Immettere il Default
Gateway (Gateway predefinito) ossia l'indirizzo IP locale del router in uso.

7
12. Annotare Server Name (Nome server) e Printer Name (Nome
stampante).Se si collega una stampante USB allo slot USB1, utilizzare il
nome stampante associato all'intestazione USB1 nell'utilità di
configurazione Web. Se si collega una stampante parallela, utilizzare il
nome stampante associato all'intestazione LPT3 nell'utilità di
configurazione Web.
La configurazione del server di stampa è stata completata. Per maggiori
informazioni, fare riferimento alla guida utente del CD-ROM.
Italiano
10. Fare clic su OK.
11. Fare clic su Show Web Setup (Mostra configurazione Web).

8
Italiano
5. Aggiunta di una stampante di rete al PC
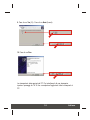
1. Windows 2000/XP: fare clic su Start Pannello di controllo.
Windows 95/98/ME: fare clic su Start Impostazioni Pannello di
controllo.
2. Fare doppio clic sull'icona Stampanti e fax.
3. Fare clic o doppio clic su Aggiungi stampante.
4. Fare clic su Next (Avanti).
5. Selezionare Stampante di rete e fare clic su Avanti.
For Windows 95/98/ME/2000/XP
Nota: se si utilizza Windows 95/98/ME, prima di eseguire la procedura
seguente assicurarsi che NETBEUI sia installato. Se si utilizza
Windows 2000/XP, è sufficiente attenersi alle istruzioni riportate di
seguito per aggiungere la stampante. Per ottenere informazioni
dettagliate sulla stampa TCP/IP, consultare la guida utente del CD-
ROM.

9
Italiano
6. Fare clic sull'opzione che consente di digitare il nome della stampante.
Digitare il nome del server e della stampante utilizzando il seguente formato:
\\nome server\nome_stampante. Ad esempio, digitare \\PS-184149\PS-
184149-U1 SENZA SPAZI. Fare clic su Avanti.
7. Fare clic su OK.
8. Selezionare il driver corretto per la stampante.

10
Italiano
9. Fare clic su Yes (Sì). Fare clic su Next (Avanti).
10. Fare clic su Fine.
La stampante è stata aggiunta al PC. Per installare più di una stampante,
ripetere i passaggi da 1 a 10 fino a completare l'aggiunta di tutte le stampanti al
PC.

11
Troubleshooting
Q1:
A1:
Q2:
A2:
Q3:
A3:
Q4:
A4:
Q5:
A5:
Q6:
A6:
Q7:
A7:
I cannot add a network printer after I typed the server name and printer name.
Please double check your hardware connections. Make sure that your printer is connected properly
to the print server and your power adapter is connected properly to a power outlet. (See 3. Hardware
Installation)
I have double checked my hardware connections and have verified that everything is connected
properly, but I still cannot connect to my printer after I typed in the server name and printer name.
Make sure that you are typing the correct printer name. If your USB printer is connected to the USB2
slot, then use the Printer Name that is by the USB2 heading in the web configuration utility. (See 4.
Configure the Print Server)
I verified that the hardware installation is correct and typed the correct printer name, but I still cannot
find the network printer.
Make sure that the server name and printer name is entered correctly. There should be no spaces,
and the back slashes that separate the server name and printer name should be this, \\, instead of this, //.
(See 5. Add Network Printer).
I typed in the server name and printer name correctly and successfully installed the network printer. But
I can't print a test page.
Make sure that the printer is online by turning the printer on. Make sure the power adapter of your
printer is properly connected to a power outlet.
I successfully added a network printer to my computer, and my printer is receiving power. I can also
print a test page, but I cannot print anything from Microsoft Word or other applications.
Make sure to set the newly installed network printer to your default printer.
I configured my print server to automatically receive an IP Address from a DHCP server, and now I
cannot go into the print server's web utility.
Open PS-Utility v2.00 (See 4. Configure the Print Server) to locate your Print Server's IP address.
For MAC users, press the Reset button at the back of the TE100-P21, hold the button for 15 seconds,
release the button, and enter http://192.168.0.1 in a web browser to access the web utility feature.
I pressed the reset button and held it for 15 seconds. I also typed in http://192.168.0.1 in a web browser,
but I still cannot access my print server.
Make sure to change your IP Address to 192.168.0.xxx where xxx is an available number between 2 to
253.
If you have any questions regarding the TE100-P21 2-port USB 2.0 and 1 port Parallel Print Server, please
contact Trendware Technical Support Department.
Certifications
This equipment has been tested and found to comply with FCC and CE Rules. Operation is subject to the following
two conditions:
(1) This device may not cause harmful interference.
(2) This device must accept any interference received including interference that may cause undesired operation.

Copyright ©2005. All Rights Reserved. TRENDware International, Inc.
@
TRENDnet
TRENDware, USA
What's Next in Networking
Product Warranty Registration
Please take a moment to register your product online.
Go to TRENDware’s website at http://www.TRENDNET.com
TRENDware International, Inc.
3135 Kashiwa Street. Torrance, CA 90505
http://www.TRENDNET.com
TRENDnet Technical Support
Contact
Telephone:
Fax:
Email:
1(310) 626-6252
1(310) 626-6267
Tech Support Hours
7:30am - 6:00pm Pacific Standard Time
Monday - Friday
Tech Support Hours
Telephone
Fax:
Deutsch : +49 (0) 6331 / 268-460
Français : +49 (0) 6331 / 268-461
Español : +49 (0) 6331 / 268-462
English : +49 (0) 6331 / 268-463
Italiano : +49 (0) 6331 / 268-464
Dutch : +49 (0) 6331 / 268-465
+49 (0) 6331 / 268-466
8:00am - 6:00pm Middle European Time
Monday - Friday
US/Canada Support Center European Support Center
Contact
-
 1
1
-
 2
2
-
 3
3
-
 4
4
-
 5
5
-
 6
6
-
 7
7
-
 8
8
-
 9
9
-
 10
10
-
 11
11
-
 12
12
-
 13
13
-
 14
14


Trendnet TE100-P21 Quick Installation Guide
- Categoria
- Server di stampa
- Tipo
- Quick Installation Guide
in altre lingue
- English: Trendnet TE100-P21
Documenti correlati
-
Trendnet TE100-P1U Quick Installation Guide
-
Trendnet TE100-P11 Scheda dati
-
-
Trendnet TW100-BRM504 Quick Installation Guide
-
-
Trendnet TBW-102UB Quick Installation Guide
-
Trendnet TE100-P21 Scheda dati
-
-
-
Trendnet TEW-423PI Quick Installation Guide