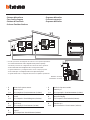
Bticino 361511 Istruzioni per l'uso
- Categoria
- Altoparlanti della soundbar
- Tipo
- Istruzioni per l'uso

361511
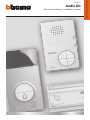
Audio Kit
Manuale installatore • Installation manual
LE08975AC01PC20W01

2
Attenzione: le operazioni di installazione, configurazione, messa in servizio e manutenzione devono essere effettuate
da personale qualificato.
Caution: Installation, configuration, starting-up and maintenance must be performed by qualified personnel.
Attention: les opérations d’installation, de configuration, de mise en service et d’entretien doivent être confiées à un
personnel qualifié.
Achtung: Die Installation, Konfiguration, Inbetriebnahme und Wartung dürfen nur von qualifizierten Fachleuten
vorgenommen werden.
Atención: Las operaciones de instalación, configuración, puesta en servicio y mantenimiento han de ser efectuadas
por personal cualificado.
Opgelet: Laat de installatie, de configuratie, de inbedrijfstelling en het onderhoud door gekwalificeerd personeel verrichten.
Atenção: As operações de instalação, configuração, colocação em serviço e manutenção devem ser realizadas por
pessoal qualificado.

Audio - Kit
3
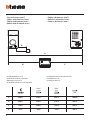
346040
PRI 110 - 240 V 50 - 60 Hz 370 mA - 225 mA
BUS 26.0 V 600 mA
BUS
PRI
PRI
BUS
230 Vac 12 V
230 Vac
346040
PRI 110 - 240 V 50 - 60 Hz 370 mA - 225 mA
BUS 26.0 V 600 mA
BUS
PRI
PRI
BUS
230 Vac 12 V
230 Vac
*
• Vecchio impianto a campanello
Impianto esistente con 3 fili e sola chiamata.
• Old system with bell
Existing system with 3 wires and just call.
• Ancienne installation a sonnette
Installation existante à 3 fils et un seul appel.
• Alte klingelanlage
Vorhandene 3-Leiter Anlage nur mit Ruffunktion.
• Vieja instalación con timbre
Instalación existente con 3 hilos y una llamada.
• Oude deurbelinstallatie
Bestaande 3-aderige installatie met alleen een
oproepfunctie.
• Antiga instalação em campaínha
Instalação existente com 3 fios e somente
chamada.
* Acquistabile separatamente
* Can be purchased separately
* Vendu séparément
* Auf Anfrage getrennt erhältlich
* A la venta por separado
* Apart verkrijgbaar
* Adquirível separadamente
• Nuovo impianto citofonico
Impianto realizzato senza modifiche ai 2 fili
esistenti: chiamata, citofono e serratura.
• New door entry system
System made without modifications to the 2 existing
wires; call, handset and electric door lock.
• Nouvelle installation phonique
Installation réalisée sans modifications sur les 2 fils
existants: appel, phone, et serrure électrique.
• Neue haustelefonanlage
Anlage ohne Änderungen an den vorhandenen
2 Leiter: Ruffunktion, Gegensprechanlage und
elektrisches Schloss.
• Nueva instalación interfónica
Instalación realizada sin las modificaciones a los
2 hilos existentes: llamada, portero y cerradura
eléctrica.
• Nieuwe deurtelefooninstallatie
Installatie aangelegd zonder wijzigingen aan de
2 bestaande aders: oproep, intercom en elektrisch
deurslot.
• Nova instalação do intercomunicador
Instalação realizada sem modificar os 2 fios
existentes: chamada, intercomunicador e
fechadura eléctrica.

4
• Cavi e distanze (mm
2
)
• Cables and distances (mm
2
)
• Câbles et distances (mm
2
)
• Kabeln und Abstände (mm
2
)
• Cables y distancias (mm
2
)
• Kabels en afstanden (mm
2
)
• Cabos e distâncias (mm
2
)
B C
A
D
346040
PRI 110 - 240 V 50 - 60 Hz 370 mA - 225 mA
BUS 26.0 V 600 mA
BUS
PRI
PRI
BUS
0,28 mm
2
BTicino
336904
BTicino
L4669
0,35 mm
2
1 mm
2
A 380 m 610 m 400 m 1000 m
B 200 m 290 m 210 m 580 m
C 180 m 320 m 190 m 560 m
D 30 m 50 m 30 m 100 m
• Installazione no a 3 PI
• Installation of up to 3 handsets
• Montage jusqu’à 3 PI
• Installation von bis zu 3 Türstationen
• Instalación con un máximo de 3 PI
• Installatie tot 3 PI
• Instalação até 3 UI
La pagina si sta caricando...

6
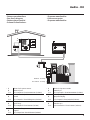
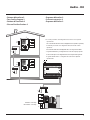
• Schema bifamiliare
• Two-family diagram
• Schéma bi-familiale
• Schema Zweifamilienhaus
• Esquema bifamiliar
• Schema tweegezins
• Esquema bifamiliar
346040
PRI 110 - 240 V 50 - 60 Hz 370 mA - 225 mA
BUS 26.0 V 600 mA
BUS
PRI
PRI
BUS
ON
OFF
ON
OFF
BUS
BUS
PL S+
S-
N
= –
= –
T = –
S = –
P
= –
–
=
2
1
B
BUS
B
A
P
= –
= –
= –
M
N
= –
= –
P
= –
= –
= –
M
N
= –
= *1
*
Bifamiliare - Two family
Monofamiliare - One family
* • Il secondo posto interno ed il configuratore 3501/1 devono essere acquistati separatemente.
• The second internal unit and the 3501/1 configurator must be purchased separately.
• Le deuxième poste interne et le configurateur 3501/1 doivent être achetés séparément.
• Die zweite Hausstation und der Konfigurator 3501/1 werden getrennt verkauft.
• La segunda unidad interior y el configurador 3501/1 se han de comprar por separado.
• De tweede binnenpost en de configurator 3501/1 moeten apart worden gekocht.
• A segunda unidade interna e o configurador 3501/1 devem ser adquiridos separadamente.
• A Pulsante locale apertura serratura.
B Chiamata al piano.
S+ S- 18 V; 4 A impulsivi. 250 mA mantenimento (30 Ω max).
• A Door lock release local pushbutton.
B Floor call.
S+ S- 18 V; 4 A impulsive. 250 mA holding current (30 Ω max).
• A Bouton local ouverture serrure.
B Appel à l’étage.
S+ S- 18 V; 4 A impulsifs. 250 mA entretien (30 Ω max).
• A Lokale Schlossöffnungstaste.
B Etagenruf.
S+ S- 18 V; 4 A impulsstrom. 250 mA Haltestrom (30 Ω max).
• A Pulsador local apertura cerradura.
B Llamada al piso.
S+ S- 18 V; 4 A por impulsos. 250 mA mantenimiento (30 Ω max).
• A Lokale knop opening slot.
B Oproep aan verdieping.
S+ S- 18 V; 4 A impulsief; 250 mA onderhoud (30 Ω max).
• A Botão local de abertura da fechadura.
B Chamada ao piso.
S+ S- 18 V; 4 A instantâneos. 250 mA continuos (30 Ω max).

Audio - Kit
7
• Schema bifamiliare 2
• Two-family diagram 2
• Schéma bi-familiale 2
•
Schema Zweifamilienhaus 2
• Esquema bifamiliar 2
• Schema tweegezins 2
• Esquema bifamiliar 2
Bifamiliare - Two family
Monofamiliare - One family
346040
PRI 110 - 240 V 50 - 60 Hz 370 mA - 225 mA
BUS 26.0 V 600 mA
BUS
PRI
PRI
BUS
BUS
PL S+
S-
ON
OFF
ON
OFF
BUS
BUS
N
= –
= –
T = –
S = –
P
= –
–
=
2
1
B
B
A
P
= –
= –
= –
M
N
= –
=
*1
P
= –
= –
= –
M
N
= –
= –
*
* • Il secondo posto interno ed il configuratore 3501/1 devono essere acquistati
separatemente.
• The second internal unit and the 3501/1 configurator must be purchased separately.
• Le deuxième poste interne et le configurateur 3501/1 doivent être achetés
séparément.
• Die zweite Hausstation und der Konfigurator 3501/1 werden getrennt verkauft.
• La segunda unidad interior y el configurador 3501/1 se han de comprar por separado.
• De tweede binnenpost en de configurator 3501/1 moeten apart worden gekocht.
• A segunda unidade interna e o configurador 3501/1 devem ser adquiridos
separadamente.
La pagina si sta caricando...

Audio - Kit
9
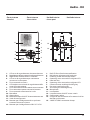
• Altezza consigliata salvo diversa normativa vigente.
• Recommended height, unless different regulations are specified.
• Hauteur conseillée sauf autre norme en vigueur.
• Empfohlene Höhe falls die gesetzlichen Vorschriften nichts anderes
vorschreiben.
• Altura recomendada salvo normativa vigente diferente.
• Aanbevolen hoogte behoudens andere normen in voege.
• Altura aconselhada a não ser se a norma em vigor for diferente.
160 – 165 cm
90 –130 cm
• Dati dimensionali
• Dimensional data
• Données dimensionnelles
• Maße
• Datos dimensionales
• Formaatgegevens
• Dados dimensionais
100 mm
190 mm
26 mm
90 mm
140 mm
27 mm

10
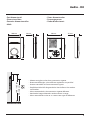
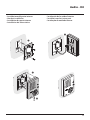
• Posto esterno
• Entrance panel
• Poste extérieur
• Türstation
• Placa exterior
• Externe plaats
• Unidade externa
1
2
3
4
12
11
10
9
8
7
6
5
1 - Morsetti di collegamento
2 - Pulsanti di chiamata
3 - LED connessione attiva
4 - LED indicazione porta aperta
5 - Microfono
6 - Regolazione microfono
7 - Regolazione altoparlante
8 - Switch mono/bifamiliare
9 - Pannello LED per illuminazione
pulsante di chiamata
10 - Sede dei configuratori
11 - Sensore di luminosità per
retroilluminazione notturna
12 - Altoparlante
1 - Bornes de branchement
2 - Boutons d’appel
3 - Voyant connexion active
4 - Voyant indication porte
ouverte
5 - Micro
6 - Réglage micro
7 - Réglage haut-parleur
8 - Commutateur mono/bi-familial
9 - Panneau Voyant d’éclairage
bouton d’appel
10 - Logement des configurateurs
11 - Capteur de luminosité pour
rétro-éclairage nocturne
12 - Haut-parleur
1 - Connection clamp
2 - Call pushbuttons
3 - Active connection LED
4 - Open door notification LED
5 - Microphone
6 - Microphone adjustment
7 - Loudspeaker adjustment
8 - One-family/two-family switch
9 - LED panel for call pushbutton
lighting
10 - Configurator socket
11 - Brightness sensor for night
backlighting
12 - Loudspeaker
1 - Aansluitklemmen
2 - Oproepknoppen
3 - Led verbinding geactiveerd
4 - Led aanduiding deur geopend
5 - Microfoon
6 - Regeling microfoon
7 - Regeling luidspreker
8 - Schakelaar een-/tweegezins
9 - Led paneel voor verlichting
oproepknop
10 - Plaats van de configuratoren
11 - Lichtsensor voor achtergrond-
verlichting ‘s nachts
12 - Luidspreker
1 - Anschlussklemmen
2 - Ruftasten
3 - LED Verbindung aktiv
4 - LED Anzeige Tür offen
5 - Mikrophon
6 - Einstellung des Mikrophons
7 - Einstellung des Lautsprechers
8 - Switch Ein-/Zweifamilienhaus
9 - LED-Tafel zur Beleuchtung
der Ruftaste
10 - Sitz der Konfiguratoren
11 - Helligkeitssensor zur
nächtlichen Rückbeleuchtung
12 - Lautsprecher
1 - Bornes de conexão
2 - Botões de chamada
3 - LED de conexão ativa
4 - LED indicação de porta aberta
5 - Microfone
6 - Regulação do microfone
7 - Regulação do altifalante
8 - Interruptor mono/bifamiliar
9 - Painel LED para iluminação
do botão de chamada
10 - Sede dos configuradores
11 - Sensor de luminosidade para
retroiluminação noturna
12 - Altifalante
1 - Bornes de conexión
2 - Pulsadores de llamada
3 - LED conexión activada
4 - LED indicación puerta abierta
5 - Micrófono
6 - Regulación del micrófono
7 - Regulación del altavoz
8 - Switch mono/bifamiliar
9 - Panel LED para iluminación
pulsador de llamada
10 - Alojamiento de los
configuradores
11 - Sensor de luminosidad para
retroiluminación nocturna
12 - Altavoz

Audio - Kit
11
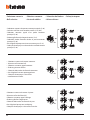
• Posto interno
• Handset
• Poste interne
• Hausstation
• Unidad interior
• Intern punt
• Unidade interna
2
1
3
4
5
6
7
10
9
8
11
14
15
12
13
1 - LED rosso di segnalazione esclusione chiamata
2 - Regolazione volume suoneria/esclusione chiamata
3 - Regolazione volume fonica in ricezione
4 - LED rosso di segnalazione per attivazione
serratura e/o stato porta
5 - Tasto comando serratura
6 - LED bicolore rosso/verde di segnalazione dello
stato di funzionamento
7 - Tasto attivazione/disattivazione comunicazione
8 - Tasto attivazione posto esterno/ciclamento
9 - Tasto comando accensione luci scale
10 - Microfono
11 - Altoparlante
12 - Microinterruttore ON/OFF di terminazione tratta
13 - Sede dei configuratori
14 - Morsetti per il collegamento di un pulsante
esterno di chiamata al piano
15 - Morsetti per il collegamento al BUS SCS 2 FILI
1 - Red LED for call exclusion notification
2 - Bell volume adjustment/call exclusion
3 - Incoming audio volume adjustment
4 - Operating status two-colour red/green LED
5 - Door lock key
6 - Operating status two-colour red/green LED
7 - Communication enabling/disabling key
8 - Entrance panel/cycling key
9 - Staircase light switching on key
10 - Microphone
11 - Loudspeaker
12 - Line termination ON/OFF micro-switch
13 - Configurator socket
14 - Clamps for the connection of an external call to
the floor pushbutton
15 - 2 WIRE SCS/BUS connection clamps
La pagina si sta caricando...

Audio - Kit
13
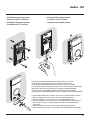
• Installazione posto esterno
• Entrance panel installation
•
Installation du poste extérieur
• Installation der Türstation
•
Instalación de la placa exterior
• Installatie externe plaats
•
Instalação da unidade externa
** Prima dell’installazione assicurarsi che la vite sia completamente avvitata.
** Before installing make sure that the screw is completely tightened.
** Avant l’installation, s’assurer que la vis soit complètement vissée.
** Vor der Installation sicherstellen, dass die Schraube richtig festgeschraubt ist.
** Antes de la instalación, compruebe que el tornillo esté completamente
enroscado.
** Vóór de installatie controleren of de schroef volledig vastgedraaid is.
** Antes da instalação vericar se o parafuso está completamente atarraxado.
* Per garantire l’impermeabilità montare le guarnizioni a corredo.
* To guarantee water tightness make sure to t the seals supplied.
* Pour garantir l’imperméabilité, monter les joints fournis à cet eet.
* Um die Abdichtung sicherzustellen, montieren Sie die mitgelieferten Dichtungen.
* Montar las juntas de la dotación para garantizar la impermeabilidad.
* Monteer de geleverde pakkingen om de waterdichtheid te waarborgen.
* Para garantir a impermeabilidade, montar as vedações fornecidas juntamente.
*
*
1
**
2
3
4
5
La pagina si sta caricando...
La pagina si sta caricando...

16
• Configurazione posto esterno
• Entrance panel configuration
• Configuration poste extérieur
• Konfiguration Türstation
• Configuración placa exterior
• Configuratie externe plaats
•
Configuração unidade externa
P T S N
P
- Possono non essere configurati.
- They do not need to be configured.
- Ils peuvent ne pas être configurés
- Brauchen nicht konfiguriert zu werden.
- Pueden no precisar configuración.
- Kunnen niet worden geconfigureerd.
- Podem não serconfigurados.
N
S
T
- Temporizzatore serratura (vedi tabella).
- Door lock timer relay (see table).
- Temporisation serrure (voir tableau).
- Zeitgeber schlossrelaiscerradura (siehe Tabelle).
- Temporizador relé cerradura (véase la tabla).
- Timer deurslotrelais (zie de tabel).
- Temporizador do relé da fechadura (veja a tabela).
– 1 2 3 4 5 6 7
4 s 1 s 2 s 3 s
*
6 s 8 s 10 s
* Funzionamento come pulsante per max. 10 sec. dopodichè entra in stand-by.
Per estendere tale funzionamento oltre i 10 sec. utilizzare l’attuatore 346210 configurato con MOD=5.
* Operation as pushbutton for 10 sec. max after which it goes in stand-by.
In order to extend this type of operation over 10 seconds, use the actuator, item 346210 configured with MOD=5.
* Fonctionnement comme bouton pendant 10 sec. max., ensuite passe en stand-by.
Pour étendre ce fonctionnement au-delà de 10 sec., utiliser l’actionneur 346210 configuré sur MOD=5.
* Die Tastenfunktion dauert max. 10 sec.; danach schaltet sie auf Standby. Um diese Funktion zu verlängern und mehr als 10 sec. dauern zu lassen, den Aktor 346210
verwenden und mit MOD=5 konfigurieren.
* Funcionamiento como pulsador durante al máx.10 s. después se pone en standby.
Para ampliar dicho funcionamiento a más de 10 s., use el actuador art. 346210 configurado con MOD = 5.
* 10 sec. lange werking als knop, vervolgens vindt de overschakeling naar stand-by plaats.
Laat deze functie langer dan 10 sec. duren met behulp van de actuator 346210 die als MOD=5 is geconfigureerd.
* Funcionamento como botão por um máximo de 10 segundos, depois disto dispõe-se em standby. Para prolongar este funcionamento por mais de 10 segundos,
utilizar o atuador 346210 configurado com MOD=5.
• Tutte le volte che si modifica la configurazione è necessario togliere e ridare l’alimentazione all’impianto, attendendo circa 1 minuto.
• Every time the configuration is altered the system must be switched off and back on again, waiting for about 1 minute.
• Chaque fois que l’on modifie la configuration, il faut retirer, puis redonner l’alimentation à l’installation, après avoir attendu environ 1 minute.
• Jedes Mal, wenn die Konfiguration geändert wird, den Strom abschalten, etwa 1 Minute warten und dann wieder einschalten.
• Cada vez que modifica la configuración, es necesario cortar y volver a dar alimentación a la instalación, después de esperar aproximadamente 1 minuto.
• Na iedere wijziging in de configuratie moet de installatie ongeveer 1 minuut van het elektriciteitsnet worden afgesloten.
• Todas as vezes que se modificar a configuração é necessário ligar e desligar a instalação da energia eléctrica, esperando cerca de 1 minuto.

Audio - Kit
17
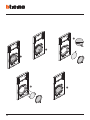
• Installazione del posto interno
• Handset installation
• Installation du poste interne
• Installation der Hausstation
• Instalación de la unidad interior
• Installatie van het intern punt
• Instalação da unidade interna
2
1
3
4

18
• Selezione suoneria
• Bell selection
• Sélection sonnerie
• Läutwerk wählen
• Selección del timbre
• Beltoon kiezen
• Selecção toques
• Selezione suoneria chiamata intercom.
• Selection call intercom bell.
• Sélection sonnerie appel intercom.
• Änderung interner Rufton.
• Selección del timbre de llamada intercom.
• Kies belgeluid intercom oproep gebouw.
• Selecção do toque para chamada
intercomomunicador.
> 3s
1
2
16
• Selezione suoneria da posto esterno principale (S=0).
• Selection call from main outdoor station (S=0) bell.
• Sélection sonnerie appel d’un poste extérieur
principal (S=0).
• Änderung Rufton der Haupttürstation (S=0).
• Selección timbre llamada desde el puesto exterior
principal (S=0).
• Kies belgeluid oproep vanuit eerste externe post (S=0).
• Selecção do toque para chamada da unidade externa
principal (S=0).
> 3s
1
2
16
> 3s
1
2
16
• Selezione suoneria chiamata al piano.
• Selection call to the floor bell.
• Sélection sonnerie appel à l’étage.
• Änderung Rufton Etagentaster.
• Selección del timbre de llamada al piso.
• Kies belgeluid oproep aan verdieping.
• Selecção do toque para chamada ao andar.
La pagina si sta caricando...

20
IT EN FR DE
P
+1
MOD=5
P
+1
P
+1
P
+1
MOD=9
P
+1
P
+2
MOD=9
P
+2
P
+3
MOD=9
P
+3
MOD=5
P
+2
P
+2
P
+3
MOD=5
P
+3
P
+3
P
+4
MOD=5
P
+4
P
+4
P
P
2
3
1 32
346210
1
2
3
1 32
346210
1
2
3
1 32
346210
1
2
3
1 32
346210
1
2
3
1 32
346210
1
2
3
1 32
346210
1
2
3
1 32
346210
1
2
3
1 32
346210
1
Attivazione del PE
(configurato con P) in mo do
di ret to sen za chia mata.
Ciclamento PE e telecamere
presenti nell’impianto. Chia-
mata diretta al centralino
di portineria se presente
nell’impianto
Activation of the EP
(configured with P) directly
without call.
System EP and camera
cycling. Direct call to the
switchboard, if installed as
part of the system
Activation du PE (configuré
avec P) en Mode direct sans
appel.
Cyclage PE et caméras
présents sur l’installation.
Appel direct au standard
de concierge si présent sur
l’installation
Aktivieren der Türstation
(konfiguriert mit P) Modus
direkt ohne Anruf
Taktieren der TS und der
Kameras der Anlage Direkter
Anruf von der Hauswartszen-
trale, falls in der Anlage
vorhanden
Attivazione/Disattivazione
della fonica
Audio enabling/disabling
Activation/Désactivation
phonique
Aktivierung und
Deaktivierung der
Audioanlage
P
+1
MOD=5
P
+1
P
+1
P
+1
MOD=9
P
+1
P
+2
MOD=9
P
+2
P
+3
MOD=9
P
+3
MOD=5
P
+2
P
+2
P
+3
MOD=5
P
+3
P
+3
P
+4
MOD=5
P
+4
P
+4
P
P
2
3
1 32
346210
1
2
3
1 32
346210
1
2
3
1 32
346210
1
2
3
1 32
346210
1
2
3
1 32
346210
1
2
3
1 32
346210
1
2
3
1 32
346210
1
2
3
1 32
346210
1
Apertura serratura del
PE (configurato con P)
in modo diretto senza la
chiamata oppure del PE in
connessione
Direct EP (configured with
P) door lock release without
call, or EP door lock release
during connection
Ouverture serrure du PE
(configuré avec P) de
manière directe sans l’appel
ou du PE en connexion
Schloss der Türstation (kon-
figuriert mit P) direkt öffnen
ohne dass ein Ruf eingetrof-
fen ist oder ohne Verbindung
mit der Türstation
P
+1
MOD=5
P
+1
P
+1
P
+1
MOD=9
P
+1
P
+2
MOD=9
P
+2
P
+3
MOD=9
P
+3
MOD=5
P
+2
P
+2
P
+3
MOD=5
P
+3
P
+3
P
+4
MOD=5
P
+4
P
+4
P
P
2
3
1 32
346210
1
2
3
1 32
346210
1
2
3
1 32
346210
1
2
3
1 32
346210
1
2
3
1 32
346210
1
2
3
1 32
346210
1
2
3
1 32
346210
1
2
3
1 32
346210
1
Comando luce scale con
attuatore 346210
Staircase light control
with actuator 346210
Commande lumière
escaliers avec actionneur
346210
Treppenlicht-Steuerung mit
Aktor 346210
P
+1
MOD=5
P
+1
P
+1
P
+1
MOD=9
P
+1
P
+2
MOD=9
P
+2
P
+3
MOD=9
P
+3
MOD=5
P
+2
P
+2
P
+3
MOD=5
P
+3
P
+3
P
+4
MOD=5
P
+4
P
+4
P
P
2
3
1 32
346210
1
2
3
1 32
346210
1
2
3
1 32
346210
1
2
3
1 32
346210
1
2
3
1 32
346210
1
2
3
1 32
346210
1
2
3
1 32
346210
1
2
3
1 32
346210
1
Apertura serratura del PE
(con fi gurato con P+1) in mo-
do di retto senza la chia mata
op pu re at ti va zione attuatore
346210 (con figurato con
P+1 e MOD=5) op pu re
at ti va zione attuatore 346230
(con figurato con P+1)
Door lock opening of EP
(con figured with P+1)
directly without the call or
activating the actuator Item
346210 (con figured with
P+1 and MOD=5) or acti-
vating the actuator 346230
(configured with P+1)
Ouverture serrure du PE
(con fi gu ré avec P+1) en
mode di rect sans l’appel
ou ac ti vation ac tion neur.
346210 (con fi gu ré avec
P+1 et MOD=5) ou ac ti-
va tion ac tion neur 346230
(con fi gu ré avec P+1)
Türöffnung der Türstation
(mit P+1 konfiguriert) oder
Aktivierung über den Akti-
vator 346210 (mit P+1 und
MOD=5) oder Aktivierung
über den Aktivator 346230
(mit P+1 konfiguriert)
MOD=5
P
+1
P
+1
P
+1
MOD=9
P
+1
P
+2
MOD=9
P
+2
P
+3
MOD=9
P
+3
P
+2
MOD=5
P
+2
P
+2
P
+3
MOD=5
P
+3
P
+3
P
+4
MOD=5
P
+4
P
+4
P
P
+1
N=1N=1–99
Intercom a tutti i posti
interni configurati N=1
Intercom to all handsets
configured with N=1
Intercom à tous les postes
internes configurés N=1
Gegensprechfunktion an
allen mit N=1 konfigurierten
Hausstationen
Intercom su se stesso,
invia la chiamata a tutti
gli apparecchi con uguale
indirizzo
Intercom on it self, sends the
call to all the devices with
the same address
Intercom sur lui-même,
envoie al’appel à tous les
appareils ayant une adresse
identique
Intercom mit einseitiger
Funktion: sendet den Ruf an
alle Geräte mit derselben
Adresse
La pagina si sta caricando...
La pagina si sta caricando...

Audio - Kit
23
• Questa funzione segnala lo stato della serratura (solo se l’impianto è predisposto mediante apposito
attuatore). Se è aperta il “led serratura” lampeggia, se è chiusa rimane spento. La funzione non è attivabile
contemporaneamente alla funzione Studio Professionale.
• This function indicates the status of the door lock (only for systems preset with appropriate actuator). If open the
„door lock LED“ flashes, and if closed, the LED stays off. The function cannot be activated together with the Office
function.
• Cette fonction signale l’état de la serrure (uniquement si l’installation est prévue à cet effet avec actionneur).
Si elle est ouverte, le “Voyant serrure” clignote, si elle est fermée, il reste éteint. La fonction ne peut pas être
activée conjointement à la fonction Bureau.
• Diese Funktion meldet den Status des Schlosses (nur wenn die Anlage mit entsprechendem Aktor versehen ist).
Wenn geöffnet, blinkt die „Led Schloss“; wenn geschlossen bleibt die Led ausgeschaltet. Die Funktion kann nicht
gleichzeitig mit der Büro-Funktion aktiviert werden.
• Esta función indica el estado de la cerradura (solamente con el sistema predispuesto mediante el actuador
correspondiente). Si está abierta, el “led cerradura” parpadea y si está cerrada permanece apagado. La
función no se puede activar al mismo tiempo que la función Oficina Profesional.
• Deze functie geeft de status van het slot (uitsluitend als de installatie daarvoor is voorbereid met de specifieke
actuator). De „led slot“ knippert als het slot ontgrendeld is. De led is uit als het slot vergrendeld is. Deze functie en
de functie Professionele studio kunnen niet tegelijkertijd worden geactiveerd.
• Esta função indica o estado da fechadura (apenas se a instalação estiver predisposta mediante expresso
atuador). Se estiver aberta o “led fechadura” resulta intermitente, se estiver fechada, permanece desligado.
A função não pode ser ativada simultaneamente à função Estúdio profissional.
• Funzione Stato porta
• Door state function
• Fonction État porte
• Funktion Türzustand
• Función Estado
puerta
• Staat deur
• Função Estado porta
• La funzione Studio Professionale ti permette di impostare l’apertura automatica della serratura in caso di
chiamata dal Posto Esterno, non puoi attivarla contemporaneamente alla funzione Stato Porta. Il lampeggio
del tasto serratura (
) indica che la funzione è attivata.
• The Office function gives the possibility of setting the automatic opening of the door lock in case of call from the
Entrance Panel. It cannot be activated at the same time as the Door Status function. The door lock key flashing
(
) indicates that the functions is active.
• La fonction Bureau permet de programmer l’ouverture automatique de la serrure en cas d’appel depuis le
Poste Externe ; elle n’est pas activable conjointement à la fonction État Porte. Le clignotement de la touche
serrure (
) indique que la fonction est activée.
• Mit der Büro-Funktion kann das Schloss nach einem Ruf von der Türstation automatisch geöffnet werden; diese
Funktion kann nicht gleichzeitig mit der Funktion Tür-Status aktiviert werden. Das Blinken der Schlosstaste
(
) meldet, dass die Funktion aktiv ist.
• La función Oficina Profesional le permite configurar la apertura automática de la cerradura al recibir una
llamada de la PE pero no la puede activar al mismo tiempo que la función Estado Puerta. El parpadeo de la
tecla cerradura (
) indica la activación de la función.
• Met de functie Professionele studio kunt u de automatische ontgrendeling van het slot bij een oproep vanaf de
buitenpost instellen. Deze functie en de functie Status deur kunnen niet tegelijkertijd worden geactiveerd. De
toets slot (
) knippert om aan te geven dat de functie geactiveerd is.
• A função Estúdio profissional permite-lhe definir a abertura automática da fechadura em caso de chamada
da Unidade Externa, não pode ativá-la simultaneamente à função Estado da Porta. A intermitência do botão
da fechadura (
) indica que a função está ativada.
• Funzione Studio
Professionale
• Office function
• Fonction Bureau
• Funktion Büro
• Función Oficina Profesional
• Functie professionele studio
• Função Escritório profissional
La pagina si sta caricando...

Audio - Kit
25
Leggere attentamente prima dell’uso e conservare per un riferimento futuro
Divieto di toccare le unità con le mani bagnate
Divieto di utilizzo di pulitori liquidi o aerosol
Divieto di occludere le aperture di ventilazione
Diveto di modicare i dispositivi
Divieto di rimuovere parti di protezione dai dispositivi
Divieto di installare le unità in prossimità di liquidi e polveri
Divieto di installare le unità in prossimità di fonti di calore
Divieto di installare le unità in prossimità di gas nocivi, polveri metalliche o simili
Divieto di ssaggio delle unità su superci non adatte
Pericolo di shock elettrico
Rischio caduta dei dispositivi a causa di cedimento della supercie su cui
sono installati o installazione inappropriata
Togliere l’alimentazione prima di ogni intervento sull’impianto
Attenzione: le operazioni di installazione, congurazione, messa in servizio e
manutenzione devono essere eettuate esclusivamente da personale quali-
cato. Assicurarsi che l’installazione a parete sia eettuata correttamente
Eettuare la posa dei cavi rispettando le normative vigenti
Collegare i cavi di alimentazione secondo le indicazioni
Per eventuali espansioni di impianto utilizzare solo gli articoli indicati
nelle speciche tecniche
Read carefully before use and keep for future reference
Touching the units with wet hands is forbidden
Using liquid cleaners or aerosols is forbidden
Blocking the ventilation openings is forbidden
Modifying the devices is forbidden
Removing protective parts from the devices is forbidden
Installing the units near liquids and powders is forbidden
Installing the units near heat sources is forbidden
Installing the units near harmful gases, metal dusts or similar is forbidden
Fastening the units on unsuitable surfaces is forbidden
Danger of electrical shock
Risk of devices falling because the surface on which they are installed
collapses or inappropriate installation
Switch the power supply OFF before any work on the system
Caution: Installation, conguration, starting-up and maintenance must
be performed exclusively by qualied personnel.
Check that the wall installation has been carried out correctly
Lay out the wires respecting the standards in force
Connect the power supply wires as indicated
Use only the items indicated in the technical specications for any
system expansions
Lire attentivement avant toute utilisation et installation de nos produits
et conserver pour toute consultation en cas de besoin.
Interdiction de toucher les unités avec les mains mouillées.
Interdiction d’utiliser des produits de nettoyage liquides ou des aérosols.
Interdiction de boucher les ouvertures de ventilation.
Interdiction de modier les dispositifs.
Interdiction des retirer les parties de protection des dispositifs.
Interdiction d’installer les unités à proximité de liquides et poudres/
poussières.
Interdiction d’installer les unités à proximité de sources de chaleur.
Interdiction d’installer les unités à proximité de gaz nocifs, de poudres
métalliques ou autres matières semblables.
Interdiction de xer les unités sur des surfaces non appropriées.
Risque d’électrocution
Risque de chute des dispositifs en cas de rupture de la surface sur
laquelle ils sont installés ou mauvaise installation.
Couper l’alimentation avant toute intervention sur l’installation.
Attention: les opérations d’installation, de conguration, de mise en
service et d’entretien doivent être conées à un personnel qualié.
S’assurer que l’installation murale est correctement eectuée.
Eectuer la pose des câbles dans le respect des normes en vigueur.
Brancher les câbles d’alimentation dans le respect des indications fournies.
Pour les éventuelles extensions de l’installation, utiliser uniquement les
articles indiqués dans les caractéristiques techniques.
Vor Gebrauch, die Hinweise aufmerksam durchlesen und sorgfältig auf-
bewahren, um sie auch in Zukunft nachschlagen zu können.
Verbot, die Einheiten mit nassen Händen zu berühren
Verbot, Flüssigreiniger oder Aerosol zu benutzen
Verbot, die Belüftungsschlitze abzudecken
Verbot, die Vorrichtungen zu ändern
Verbot, die Schutzbleche von den Vorrichtungen abzunehmen
Verbot, die Einheit in der Nähe von Flüssigkeiten und Staub zu in-
stallieren
Verbot, die Einheit in der Nähe von Wärmequellen zu installieren
Verbot, die Einheit in der Nähe von giftigem Gas, Metallstaub o. ä. zu in-
stallieren
Verbot, die Einheit an ungeeignete Flächen zu befestigen
Stromschlaggefahr
Risiko des Herabfallens der Vorrichtungen durch Nachlassen der Aua-
geäche oder wegen falscher Installation
Die Stromversorgung abtrennen, bevor an der Anlage gearbeitet wird.
Achtung: die Installation, Konguration, Inbetriebnahme und Wartung
dürfen nur von qualizierten Fachleuten vorgenommen werden.
Sicherstellen, dass die Wandmontage richtig vorgenommen wird
Die Kabeln gemäß geltenden Normen verlegen
Die Stromkabeln gemäß Anweisungen anschließen
Bei eventuellen Anlagenerweiterungen ausschließlich die Artikel
verwenden, die in den technischen Spezikationen angegeben sind
• Avvertenze e diritti del consumatore
• Warnings and consumer rights
• Avertissements et droits du consommateur
• Hinweise und Rechte der Verbraucher
• Advertencias y derechos del consumidor
• Waarschuwingen en rechten van de consument
• Advertências e direitos do consumidor
La pagina si sta caricando...
La pagina si sta caricando...

BTicino SpA
Viale Luigi Borri, 231
21100 Varese - Italy
www.bticino.com
BTicino SpA si riserva il diritto di variare in qualsiasi momento i contenuti illustrati nel presente stampato e di
comunicare, in qualsiasi forma e modalità, i cambiamenti apportati.
BTicino SpA reserves at any time the right to modify the contents of this booklet and
to communicate in any form and modality, the changes brought to the same.
Timbro installatore
Installer stamp
-
 1
1
-
 2
2
-
 3
3
-
 4
4
-
 5
5
-
 6
6
-
 7
7
-
 8
8
-
 9
9
-
 10
10
-
 11
11
-
 12
12
-
 13
13
-
 14
14
-
 15
15
-
 16
16
-
 17
17
-
 18
18
-
 19
19
-
 20
20
-
 21
21
-
 22
22
-
 23
23
-
 24
24
-
 25
25
-
 26
26
-
 27
27
-
 28
28


Bticino 361511 Istruzioni per l'uso
- Categoria
- Altoparlanti della soundbar
- Tipo
- Istruzioni per l'uso
in altre lingue
- English: Bticino 361511 Operating instructions
- français: Bticino 361511 Mode d'emploi
- español: Bticino 361511 Instrucciones de operación
- Deutsch: Bticino 361511 Bedienungsanleitung
- Nederlands: Bticino 361511 Handleiding
- português: Bticino 361511 Instruções de operação
Documenti correlati
-
Bticino 364232 Istruzioni per l'uso
-
-
-
-
-
-
-
-
-