
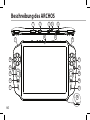
1
ENEN
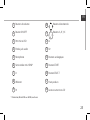
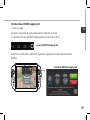
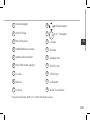
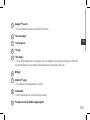
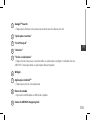
Table of contents
For more information, please consult the FAQs on www.archos.com. Make sure to read them before
considering any product return. Your deal may be no big deal. As we are often updating and improving
our products, your device’s software may have a slightly different appearance or modified functionality
than presented in this quick start guide.
Package Contents..................................................................................................................................
Getting started.......................................................................................................................................
Description of the device....................................................................................................................
Through the wizard...............................................................................................................................
Connecting to a WiFi network...........................................................................................................
ARCHOS mapping tool........................................................................................................................
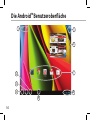
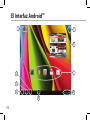
Android
TM
interface..............................................................................................................................
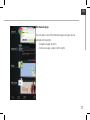
Getting familiar with Android
TM
......................................................................................................
Troubleshooting...................................................................................................................................
2
3
4
6
7
8
14
18
20

2
A70GT_FRONT VIEW_scale: 1/2
Warranty
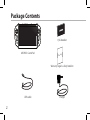
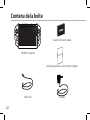
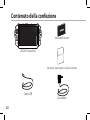
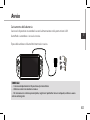
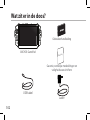
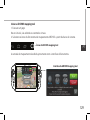
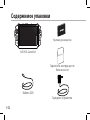
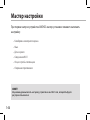
Package Contents
ARCHOS GamePad
USB cable
Charger
QSG booklet
Warranty legal & safety booklet

3
EUR
US
UK
A70GT_FRONT VIEW_scale: 1/2
EN
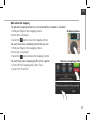
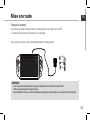
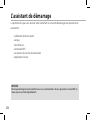
Getting Started
Charging
Charge your device by plugging your power cable into the micro-USB port.
The GamePad will turn on and start charging.
You can use your GamePad whilst it charges.
TIPS:
- Let your device charge completely the first time you use it.
- Use only the supplied charger.
- To receive more complete service, please register your product on www.archos.com/register.

4
A70GT_FRONT VIEW_scale: 1/2
10
12
14
15
17
A70GT_TOP VIEW_scale: 1/2
11
13
14
16
17
5
2
1
8
97
3 4 6
A70GT_BACK VIEW_scale: 1/2
18
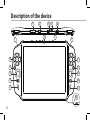
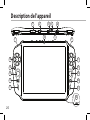
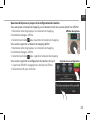
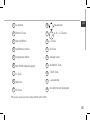
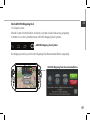
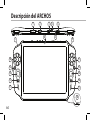
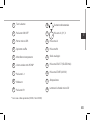
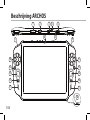
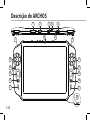
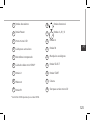
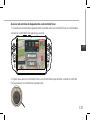
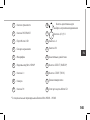
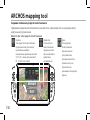
Description of the device

5
1
112
12
3
134
5
6
7 16
15
14
8
10
Y
B
A
X
17
9 18
EN
* With optional Mini-HDMI to HDMI cable.
Volume buttons Directional pad
ON/OFF button A, B, Y, X buttons
Micro-USB port L2 button
Headphone jack R2 button
Microphone Analog sticks
Mini-HDMI video output* SELECT button
L1 button START button
Camera Loudspeakers
R1 button Micro-SD card slot

6
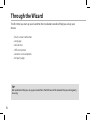
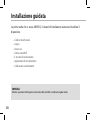
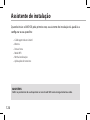
Through the Wizard
TIP:
We recommend that you set up your GamePad in the WiFi zone of the network that you will regularly
be using.
The rst time you start up your GamePad, the installation wizard will help you set up your
device:
- Touch-screen calibration
- Language
- Date & time
- WiFi connection
- Location service options
- 3rd party apps

7
EN
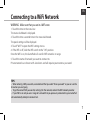
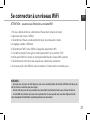
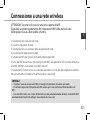
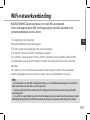
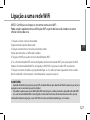
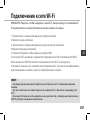
Connecting to a WiFi Network
TIPS:
- When entering a WiFi password, we recommend that you select “Show password” so you can see the
characters you are typing.
- To get the correct WiFi password (or settings) for the network, contact the WiFi network provider.
- If your WiFi is on and you are in range of a network that you previously connected to, your GamePad
will automatically attempt to connect to it.
WARNING: Make sure that you are in a WiFi zone.
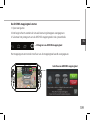
1. Touch the time in the status bar.
The status dashboard is displayed.
2. Touch the time a second time in the status dashboard.
The quick settings will be displayed.
3. Touch "WiFi" to open the WiFi settings menu.
4. If the WiFi is o, slide the WiFi switch to the "ON" position.
Once the WiFi is on, the GamePad will scan for WiFi networks in range.
5. Touch the name of network you want to connect to.
Private networks are shown with a lock icon and will require you to enter a password.

8
A70GT_FRONT VIEW_scale: 1/2
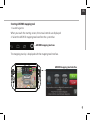
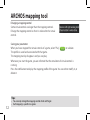
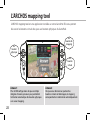
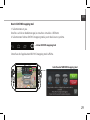
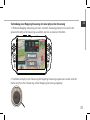
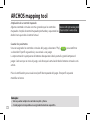
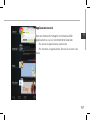
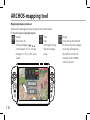
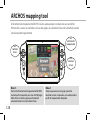
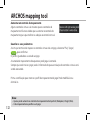
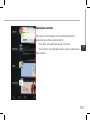
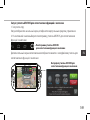
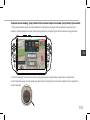
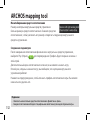
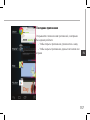
ARCHOS mapping tool
Tip2:
Whenever you launch a game whose virtual
controls are mapped, the right mapping profile
will automatically be selected.
Tip1:
Within ARCHOS mapping tool, there are already
mapping profiles for over 100 games. Also, many
games function automatically with physical
buttons.
ARCHOS mapping tool is an application installed in your GamePad. It allows you to link the
virtual controls of games to the physical controls of the GamePad by using mapping controls.
a
physical
control
a
mapping
control
a
virtual
control

9
A70GT_FRONT VIEW_scale: 1/2
EN
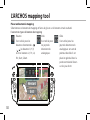
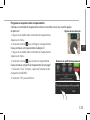
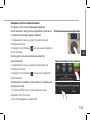
Starting ARCHOS mapping tool
1. Launch a game.
When you reach the starting screen, the virtual controls are displayed.
2. Select the ARCHOS mapping tool icon from the system bar.
The mapping overlay is displayed with the mapping tool interface.
ARCHOS mapping tool interface
ARCHOS mapping tool icon

10
A70GT_FRONT VIEW_scale: 1/2
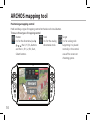
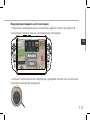
Positioning a mapping control
Hold and drag a type of mapping control to the desired virtual button.
Button
It is for the directional pad
, , , , the X, Y, B, A, buttons
and the L1, R1, L2, R2, Start,
Select buttons.
Stick
It is for the analog
directional sticks.
Target
It is for analog stick
targetting. It is placed
normally in the central
area of the screen on
shooting games.
There are three types of mapping control
ARCHOS mapping tool

11
A70GT_FRONT VIEW_scale: 1/2
EN
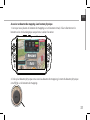
Linking a mapping control to a physical control
1. When a mapping control is placed on a virtual control, you are asked to select the desired
physical control you want to associate with it.
2. Once a physical control is associated to the mapping control, the name of the physical
control is displayed on the mapping control.

12
Enlarging a mapping control
Some virtual controls are larger than the mapping controls.
Enlarge the mapping control so that it is tailored to the virtual
control.
Saving your parameters
When you have mapped the virtual controls of a game, select "Play"
to validate .
The prole is saved and associated with that game.
The mapping overlay disappears and you can play.
Whenever you start the game, you are informed that the emulation of virtual controls is
running.
Press the notication to display the mapping prole of the game. You can either modify it, or
delete it.
Tips:
- You can only enlarge the mapping controls Stick and Target.
- Each mapping is specific to a game.
ARCHOS mapping tool

13
EN
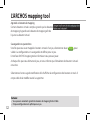
Q&A about the mapping
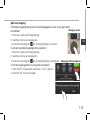
You placed a mapping control on a virtual control but no option is available?
1. Hold your nger on the mapping control.
A menu box is displayed
2. Select the
icon to set up the mapping control.
You want to remove a mapping control that you set?
1. Hold your nger on the mapping control.
A menu box is displayed
2. Select the
icon to remove the mapping control.
You want to remove a mapping prole set for a game?
1. From ARCHOS mapping tool, select "Clear".
2. Select "OK" to conrm.
Removing a mapping prole
Displaying options

14
1
2
3
5
6
7
8
4
9
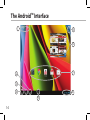
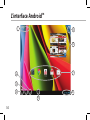
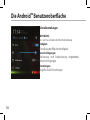
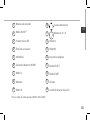
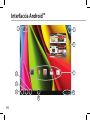
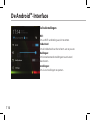
The Android
TM
Interface

15
EN
Google
TM
Search
Touch "Google" for text search or touch the microphone icon for voice search.
"Recent apps" button
"Home" button
"Back" button
"All Apps" button
Touch this icon to show all the applications and widgets installed on your ARCHOS.
All your downloaded applications are here.
Widget
Android
TM
apps shortcuts
Touch to start an application.
The status bar
Displays notications and quick settings
ARCHOS mapping tool icon
1
2
3
4
5
6
7
8
9

16
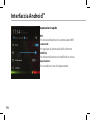
The Android
TM
Interface
The Quick settings
WiFi:
To turn on/o your WiFi connection.
Brightness:
To adjust the screen brightness.
Notications:
To activate/deactivate incoming notications.
Settings:
To access all your settings.

17
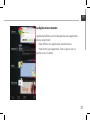
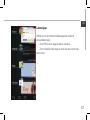
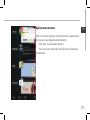
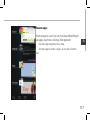
The Recent Apps
You can open a list of thumbnail images of apps you’ve
worked with recently:
- To open an app, touch it.
- To close an app, swipe it left or right.
EN

18
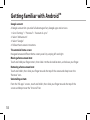
Getting familiar with Android
TM
Google account
A Google account lets you take full advantage of any Google apps and services.
1. Go to "Settings" > "Personal" > "Accounts & sync".
2. Select "Add account".
3. Select "Google".
4. Follow the onscreen instructions.
The extended home screen:
Navigate between dierent home screen panels by swiping left and right.
Moving a home screen item:
Touch and hold your nger onto it, then slide it to the desired location, and release your nger.
Removing a home screen item:
Touch and hold it, then slide your nger towards the top of the screen and drop it over the
"Remove" icon.
Uninstalling an item:
From the "All apps" screens, touch and hold it, then slide your nger towards the top of the
screen and drop it over the "Uninstall" bin.

19
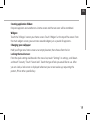
Creating application folders:
Drop one app icon over another on a home screen and the two icons will be combined.
Widgets:
Touch the "All Apps" icon on your home screen. Touch "Widgets" at the top of the screen. From
the main widgets screen, you can move around widgets just as you do for app icons.
Changing your wallpaper:
Hold your nger on a home screen at an empty location, then choose from the list.
Locking the touchscreen:
From the quick settings dashboard in the status bar, touch "Settings". In settings, scroll down
and touch "Security". Touch "Screen lock". Touch the type of lock you would like to use. After
you set a lock, a lock screen is displayed whenever your screen wakes up, requesting the
pattern, PIN or other specied key.
EN

20
Troubleshooting
If a new software is available for your device
You can download it from www.archos.com/support in the page Downloads > Firmware.
If your device is frozen:
Press the ON/OFF button for 10 seconds.
If your device doesn’t turn on:
1. Charge your device.
2. Press the ON/OFF button for 10 seconds.
If you want to extend the life of your battery:
Decrease the screen brightness and turn o the wireless connections if not in use.
If your device functioning is too slow:
Close all apps which are not currently used.
If your WiFi reception is too low:
Make sure you are not far from the WiFi hotspot.
Update the rmware of the device by downloading from http://www.archos.com/support.
Reset and redene your connection parameters.
Contact your WiFi connection provider.
La pagina sta caricando ...
La pagina sta caricando ...
La pagina sta caricando ...
La pagina sta caricando ...
La pagina sta caricando ...
La pagina sta caricando ...
La pagina sta caricando ...
La pagina sta caricando ...
La pagina sta caricando ...
La pagina sta caricando ...
La pagina sta caricando ...
La pagina sta caricando ...
La pagina sta caricando ...
La pagina sta caricando ...
La pagina sta caricando ...
La pagina sta caricando ...
La pagina sta caricando ...
La pagina sta caricando ...
La pagina sta caricando ...
La pagina sta caricando ...
La pagina sta caricando ...
La pagina sta caricando ...
La pagina sta caricando ...
La pagina sta caricando ...
La pagina sta caricando ...
La pagina sta caricando ...
La pagina sta caricando ...
La pagina sta caricando ...
La pagina sta caricando ...
La pagina sta caricando ...
La pagina sta caricando ...
La pagina sta caricando ...
La pagina sta caricando ...
La pagina sta caricando ...
La pagina sta caricando ...
La pagina sta caricando ...
La pagina sta caricando ...
La pagina sta caricando ...
La pagina sta caricando ...
La pagina sta caricando ...
La pagina sta caricando ...
La pagina sta caricando ...
La pagina sta caricando ...
La pagina sta caricando ...
La pagina sta caricando ...
La pagina sta caricando ...
La pagina sta caricando ...
La pagina sta caricando ...
La pagina sta caricando ...
La pagina sta caricando ...
La pagina sta caricando ...
La pagina sta caricando ...
La pagina sta caricando ...
La pagina sta caricando ...
La pagina sta caricando ...
La pagina sta caricando ...
La pagina sta caricando ...
La pagina sta caricando ...
La pagina sta caricando ...
La pagina sta caricando ...
La pagina sta caricando ...
La pagina sta caricando ...
La pagina sta caricando ...
La pagina sta caricando ...
La pagina sta caricando ...
La pagina sta caricando ...
La pagina sta caricando ...
La pagina sta caricando ...
La pagina sta caricando ...
La pagina sta caricando ...
La pagina sta caricando ...
La pagina sta caricando ...
La pagina sta caricando ...
La pagina sta caricando ...
La pagina sta caricando ...
La pagina sta caricando ...
La pagina sta caricando ...
La pagina sta caricando ...
La pagina sta caricando ...
La pagina sta caricando ...
La pagina sta caricando ...
La pagina sta caricando ...
La pagina sta caricando ...
La pagina sta caricando ...
La pagina sta caricando ...
La pagina sta caricando ...
La pagina sta caricando ...
La pagina sta caricando ...
La pagina sta caricando ...
La pagina sta caricando ...
La pagina sta caricando ...
La pagina sta caricando ...
La pagina sta caricando ...
La pagina sta caricando ...
La pagina sta caricando ...
La pagina sta caricando ...
La pagina sta caricando ...
La pagina sta caricando ...
La pagina sta caricando ...
La pagina sta caricando ...
La pagina sta caricando ...
La pagina sta caricando ...
La pagina sta caricando ...
La pagina sta caricando ...
La pagina sta caricando ...
La pagina sta caricando ...
La pagina sta caricando ...
La pagina sta caricando ...
La pagina sta caricando ...
La pagina sta caricando ...
La pagina sta caricando ...
La pagina sta caricando ...
La pagina sta caricando ...
La pagina sta caricando ...
La pagina sta caricando ...
La pagina sta caricando ...
La pagina sta caricando ...
La pagina sta caricando ...
La pagina sta caricando ...
La pagina sta caricando ...
La pagina sta caricando ...
La pagina sta caricando ...
La pagina sta caricando ...
La pagina sta caricando ...
La pagina sta caricando ...
La pagina sta caricando ...
La pagina sta caricando ...
La pagina sta caricando ...
La pagina sta caricando ...
La pagina sta caricando ...
La pagina sta caricando ...
La pagina sta caricando ...
La pagina sta caricando ...
La pagina sta caricando ...
La pagina sta caricando ...
La pagina sta caricando ...
La pagina sta caricando ...
La pagina sta caricando ...
La pagina sta caricando ...
La pagina sta caricando ...
La pagina sta caricando ...
La pagina sta caricando ...
-
 1
1
-
 2
2
-
 3
3
-
 4
4
-
 5
5
-
 6
6
-
 7
7
-
 8
8
-
 9
9
-
 10
10
-
 11
11
-
 12
12
-
 13
13
-
 14
14
-
 15
15
-
 16
16
-
 17
17
-
 18
18
-
 19
19
-
 20
20
-
 21
21
-
 22
22
-
 23
23
-
 24
24
-
 25
25
-
 26
26
-
 27
27
-
 28
28
-
 29
29
-
 30
30
-
 31
31
-
 32
32
-
 33
33
-
 34
34
-
 35
35
-
 36
36
-
 37
37
-
 38
38
-
 39
39
-
 40
40
-
 41
41
-
 42
42
-
 43
43
-
 44
44
-
 45
45
-
 46
46
-
 47
47
-
 48
48
-
 49
49
-
 50
50
-
 51
51
-
 52
52
-
 53
53
-
 54
54
-
 55
55
-
 56
56
-
 57
57
-
 58
58
-
 59
59
-
 60
60
-
 61
61
-
 62
62
-
 63
63
-
 64
64
-
 65
65
-
 66
66
-
 67
67
-
 68
68
-
 69
69
-
 70
70
-
 71
71
-
 72
72
-
 73
73
-
 74
74
-
 75
75
-
 76
76
-
 77
77
-
 78
78
-
 79
79
-
 80
80
-
 81
81
-
 82
82
-
 83
83
-
 84
84
-
 85
85
-
 86
86
-
 87
87
-
 88
88
-
 89
89
-
 90
90
-
 91
91
-
 92
92
-
 93
93
-
 94
94
-
 95
95
-
 96
96
-
 97
97
-
 98
98
-
 99
99
-
 100
100
-
 101
101
-
 102
102
-
 103
103
-
 104
104
-
 105
105
-
 106
106
-
 107
107
-
 108
108
-
 109
109
-
 110
110
-
 111
111
-
 112
112
-
 113
113
-
 114
114
-
 115
115
-
 116
116
-
 117
117
-
 118
118
-
 119
119
-
 120
120
-
 121
121
-
 122
122
-
 123
123
-
 124
124
-
 125
125
-
 126
126
-
 127
127
-
 128
128
-
 129
129
-
 130
130
-
 131
131
-
 132
132
-
 133
133
-
 134
134
-
 135
135
-
 136
136
-
 137
137
-
 138
138
-
 139
139
-
 140
140
-
 141
141
-
 142
142
-
 143
143
-
 144
144
-
 145
145
-
 146
146
-
 147
147
-
 148
148
-
 149
149
-
 150
150
-
 151
151
-
 152
152
-
 153
153
-
 154
154
-
 155
155
-
 156
156
-
 157
157
-
 158
158
-
 159
159
-
 160
160
-
 161
161
-
 162
162


in altre lingue
- français: Archos GamePad Le manuel du propriétaire
- español: Archos GamePad El manual del propietario
- Deutsch: Archos GamePad Bedienungsanleitung
- Nederlands: Archos GamePad de handleiding
- português: Archos GamePad Manual do proprietário
Documenti correlati
-
Archos GamePad 2 Manuale del proprietario
-
Manual del Usuario Archos 43 Manuale utente
-
Archos ArcBook Manuale utente
-
Archos 501889 Manuale utente
-
-
-
Archos 97 Carbon Manuale utente
-
-
-