Saeco HD8763/01 Guida Rapida
- Categoria
- Macchine da caffè
- Tipo
- Guida Rapida
Questo manuale è adatto anche per
La pagina sta caricando ...

IT
Benvenuto nel mondo Philips Saeco! Registratevi sul sito WWW.PHILIPS.COM/WELCOME per ricevere
consigli e aggiornamenti sulla manutenzione. In questo libretto sono riportate le istruzioni in bre-
ve per il corretto funzionamento della macchina.
Per le istruzioni complete scaricare il manuale utente dal WWW.PHILIPS.COM/SUPPORT
EN
Welcome to Philips Saeco! Register on WWW.PHILIPS.COM/WELCOME and you will receive tips and
updates on how to take care of your machine. This booklet contains quick instructions on how to
operate your machine properly.
For complete instructions download the usermanual from WWW.PHILIPS.COM/SUPPORT
DE
Herzlich Willkommen in der Welt von Philips Saeco! Registrieren Sie sich auf der Internetseite WWW.
PHILIPS.COM/WELCOME und erhalten Sie Hinweise und Aktualisierungen zur Wartung. In diesem
Heft werden die Hinweise für den korrekten Betrieb des Geräts in Kurzform dargestellt.
Die komplette Bedienungsanleitung können Sie auf WWW.PHILIPS.COM/SUPPORT herunterladen.
La pagina sta caricando ...
La pagina sta caricando ...
La pagina sta caricando ...
La pagina sta caricando ...
La pagina sta caricando ...

8
Safety instructions
Norme di sicurezza
www.philips.com/support
IT NORME DI SICUREZZA
La macchina è dotata di dispositivi di sicurezza.
È tuttavia necessario leggere attentamente le
indicazioni per la sicurezza descritte nelle pre-
senti istruzioni d'uso in modo da evitare danni
accidentali a persone o cose. Conservare questo
manuale per eventuali riferimenti futuri.
Attenzione
• Collegare la macchina a una presa a muro
adeguata, la cui tensione principale corri-
sponda ai dati tecnici dell’apparecchio.
• Evitare che il cavo di alimentazione penda
dal tavolo o dal piano di lavoro o che tocchi
super ci calde.
• Non immergere la macchina, la presa di
corrente o il cavo di alimentazione in acqua:
pericolo di shock elettrico!
• Non dirigere il getto di acqua calda verso
parti del corpo: pericolo di scottature!
• Non toccare super ci calde. Utilizzare i ma-
nici e le manopole.
• Rimuovere la spina dalla presa:
- se si veri cano delle anomalie;
- se la macchina rimarrà inutilizzata per
lungo tempo;
- prima di procedere alla pulizia della
macchina.
Tirare dalla spina e non dal cavo di alimen-
tazione. Non toccare la spina con le mani
bagnate.
• Non utilizzare la macchina se la spina, il cavo
di alimentazione o la macchina stessa risul-
tano danneggiati.
• Non alterare né modi care in alcun modo la
macchina o il cavo di alimentazione. Tutte
le riparazioni devono essere eseguite da un
centro assistenza autorizzato da Philips per
evitare qualsiasi pericolo.
• La macchina non è destinata all’uso da parte
di bambini con età inferiore a 8 anni.
• La macchina può essere utilizzata da bambini
di 8 anni di età (e superiore) se precedente-
mente istruiti riguardo ad un utilizzo corretto
della macchina e coscienti dei relativi pericoli
o sotto la supervisione di un adulto.
• Pulizia e manutenzione non devono essere
eseguite da bambini, a meno che non ab-
biano più di 8 anni e siano supervisionati da
un adulto.
• Tenere la macchina e il suo cavo di alimen-
tazione lontano dalla portata dei minori di 8
anni.
• La macchina può essere utilizzata da per-
sone con ridotte capacità siche, mentali,
sensoriali o con mancanza di esperienza
e/o competenze insu cienti se preceden-
temente istruite riguardo ad un utilizzo cor-
retto della macchina e coscienti dei relativi
pericoli o sotto la supervisione di un adulto.
• I bambini devono essere sorvegliati per assi-
curarsi che non giochino con l’apparecchio.
• Non inserire le dita o altri oggetti nel maci-
naca è.
Avvertenze
• La macchina è prevista per il solo uso dome-
stico e non è indicata per l’utilizzo in am-
bienti quali mense o zone cucina di negozi,
u ci, fattorie o altri ambienti lavorativi.
• Posizionare sempre la macchina su una su-
per cie piana e stabile.
• Non posizionare la macchina su super ci
calde, in prossimità di forni caldi, riscalda-
tori o analoghe sorgenti di calore.
• Immettere nel contenitore sempre e soltan-

9
Safety instructions
Norme di sicurezza
www.philips.com/support
EnglishItaliano
to ca è in grani. Ca è in polvere, solubile,
nonché altri oggetti, se inseriti nel conteni-
tore ca è in grani, possono danneggiare la
macchina.
• Lasciare ra reddare la macchina prima di
inserire o rimuovere qualsiasi componente.
• Non riempire il serbatoio con acqua calda o
bollente. Utilizzare solo acqua fredda pota-
bile non gassata.
• Per la pulizia, non utilizzare polveri abrasi-
ve o detergenti aggressivi. È su ciente un
panno morbido inumidito con acqua.
• E ettuare la decalci cazione della macchina
regolarmente. Sarà la macchina a indicare
quando è necessario procedere alla decal-
ci cazione. Se questa operazione non viene
svolta, l’apparecchio smetterà di funzionare
correttamente. In questo caso la riparazione
non è coperta da garanzia!
• Non tenere la macchina a una temperatura
inferiore a 0°C. L’acqua residua all’interno
del sistema di riscaldamento può congelare
e danneggiare la macchina.
• Non lasciare acqua nel serbatoio se la mac-
china non verrà utilizzata per un lungo pe-
riodo. L’acqua potrebbe subire delle conta-
minazioni. Ogni volta che si usa la macchina,
utilizzare acqua fresca.
Smaltimento
- I materiali d'imballaggio possono essere ri-
ciclati.
- Apparecchio: staccare la spina dalla presa e
tagliare il cavo di alimentazione.
- Consegnare l'apparecchio e il cavo di ali-
mentazione a un centro assistenza o a una
struttura pubblica per lo smaltimento dei
ri uti.
Ai sensi dell’art. 13 del Decreto Legislativo 25
luglio 2005, n. 151 "Attuazione delle Direttive
2005/95/CE, 2002/96/CE e 2003/108/CE, relati-
ve alla riduzione dell’uso di sostanze pericolose
nelle apparecchiature elettriche ed elettroni-
che, nonché allo smaltimento dei ri uti".
Questo prodotto è conforme alla Direttiva euro-
pea 2002/96/CE.
Il simbolo
riportato sul prodotto o sulla
confezione indica che il prodotto non può essere
trattato come ri uto domestico, ma deve essere
consegnato al centro di raccolta competente per
poterne riciclare i componenti elettrici ed elet-
tronici.
Provvedendo al corretto smaltimento del pro-
dotto, contribuite a salvaguardare l'ambiente
e le persone da possibili conseguenze negative
che potrebbero derivare da una gestione non
corretta del prodotto nella sua fase nale di vita.
Per maggiori informazioni sulle modalità di rici-
clo del prodotto vi preghiamo di contattare l'uf-
cio locale di competenza, il vostro servizio di
smaltimento ri uti domestici oppure il negozio
presso il quale avete acquistato il prodotto.

10
Instructions
Istruzioni
www.philips.com/support
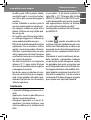
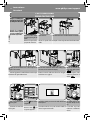
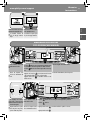
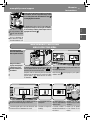
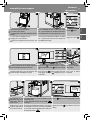
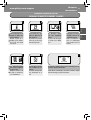
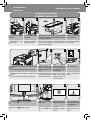
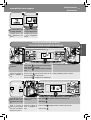
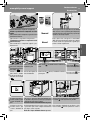
EN
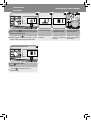
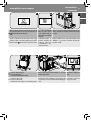
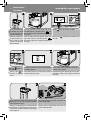
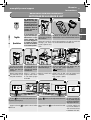
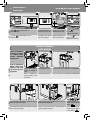
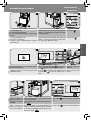
Remove the water tank lid. Lift the water tank using the
handle.
Rinse the water tank and ll it with fresh water up to the
MAX level.
Make sure it is fully inserted. Put the lid back on.
Remove the co ee bean hop-
per lid.
IT
Estrarre il coperchio del ser-
batoio dell'acqua.
Sollevare il serbatoio
dell'acqua utilizzando la
maniglia.
Risciacquare e riempire il serbatoio dell'acqua con acqua
fresca no al livello MAX.
Veri care che sia inserito a fondo. Riposizionare il coper-
chio.
Rimuovere il coperchio dal
contenitore ca è in grani.
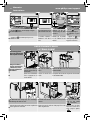
EN
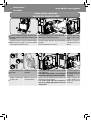
Slowly pour the co ee beans into the co ee bean hopper.
Put the lid back on the co ee bean hopper.
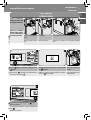
Insert the plug into the sock-
et located on the back of the
machine.
Insert the plug on the other
end of the power cord into a
wall socket.
Switch the power button
to "I".
IT
Versare lentamente il ca è in grani nel contenitore ca è
in grani.
Riposizionare il coperchio sul contenitore ca è in grani.
Inserire la spina nella presa
di corrente posta sul retro
della macchina.
Inserire la spina all’estre-
mità opposta del cavo di
alimentazione in una presa
di corrente a muro.
Portare l’interruttore su “I”.
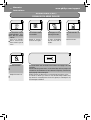
EN
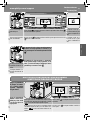
Press the button to turn on the machine.
Place a container under the
co ee dispensing spout.
The machine automatically
primes the circuit.
Then the machine starts
warming up.
IT
Premere il tasto per accendere la macchina.
Posizionare un contenitore
sotto l’erogatore ca è.
La macchina procede al ca-
ricamento automatico del
circuito.
Al termine del processo la
macchina inizia la fase di
riscaldamento.
FIRST INSTALLATION
PRIMA INSTALLAZIONE
MAX

11
www.philips.com/support
Instructions
Istruzioni
EnglishItaliano
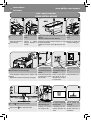
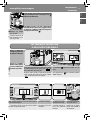
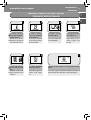
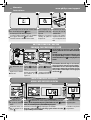
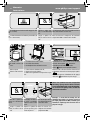
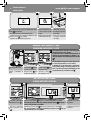
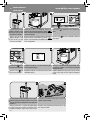
EN
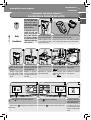
Repeat steps 1-3 twice, then
continue with step 5.
Place a container under the
water dispensing spout.
Press the
button. The machine shows the icon above.
Press the
button.
IT
Ripetere le operazioni dal
punto 1 al punto 3 per due
volte, quindi passare al
punto 5.
Posizionare un contenitore
sotto l’erogatore acqua.
Premere il tasto
. La macchina visualizza il simbolo in alto.
Premere il tasto
.
EN
Place a container under the
co ee dispensing spout.
Press the
button to select the pre-ground co ee func-
tion. Do NOT add pre-ground co ee.
Press the
button. The machine starts dispensing water.
When the dispensing is complete, empty the container.
IT
Posizionare un contenitore
sotto l’erogatore ca è.
Premere il tasto
per selezionare la funzione ca è pre-
macinato. NON aggiungere ca è pre-macinato.
Premere il tasto
. La macchina inizia a erogare acqua.
Al termine dell'erogazione, vuotare il contenitore.
MANUAL RINSE CYCLE
CICLO DI RISCIACQUO MANUALE
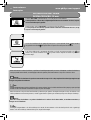
EN
The machine performs an
automatic rinse cycle.
The machine is ready for the
manual rinse cycle.
IT
La macchina esegue un ciclo
di risciacquo automatico.
La macchina è pronta per il
ciclo di risciacquo manuale.
1
2
1
3
1
2

12
Instructions
Istruzioni
www.philips.com/support
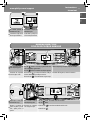
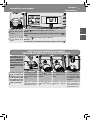
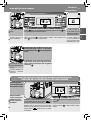
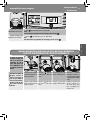
FIRST ESPRESSO / COFFEE
PRIMO ESPRESSO / CAFFÈ
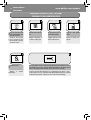
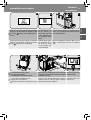
EN
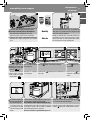
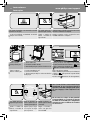
Adjust the co ee dispensing
spout.
Press the
button to brew
an espresso, or...
... press the button to
brew a co ee.
IT
Regolare l’erogatore ca è.
Premere il tasto
per
erogare un espresso o...
...premere il tasto per
erogare un ca è.
MY FAVOURITE ESPRESSO
IL MIO ESPRESSO IDEALE
EN
Select the desired aroma by
pressing the
button.
Press and hold the
button until the MEMO icon is displayed.
Note: To programme co ee, press and hold the
button until the MEMO icon
is displayed.
The machine is program-
ming.
IT
Selezionare l'aroma deside-
rato premendo il tasto
.
Tenere premuto il tasto
no a quando non viene visualizzata a display l’icona MEMO.
Nota: per programmare il ca è lungo, tenere premuto il tasto
no a quan-
do non viene visualizzata a display l’icona MEMO.
La macchina è in fase di pro-
grammazione.
EN
The machine reminds you to install the water
dispensing spout. Press the
button to con rm.
The machine will start dispensing hot water.
Dispense water until the no
water icon is displayed.
At the end, ll the water tank
again up to the MAX level.
IT
La macchina indica di installare l’erogatore dell’acqua.
Premere il tasto
per confermare.
La macchina inizia ad erogare acqua calda.
Erogare acqua no a visua-
lizzare il simbolo di man-
canza acqua.
Al termine, riempire nuova-
mente il serbatoio dell'ac-
qua no al livello MAX.
MAX
To brew two cups of espresso or co ee, press the de-
sired button twice consecutively.
Co ee brewing automatically stops when the preset
level is reached; press the
button to stop it earlier.
Per erogare due espressi o due ca è, premere il ta-
sto desiderato due volte consecutive.
L’erogazione del ca è si interrompe automatica-
mente quando viene raggiunto il livello impostato;
è tuttavia possibile interromperla in anticipo pre-
mendo il tasto
.

13
www.philips.com/support
Instructions
Istruzioni
EnglishItaliano
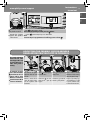
EN
Wait until the desired quan-
tity of co ee is reached.
... press
to stop the process. Stored!
Note: to stop programming for co ee, press the
button.
IT
Attendere no al raggiun-
gimento della quantità di
ca è desiderata.
.... premere
per interrompere il processo. Memorizzato!
Nota:
Per interrompere la programmazione di ca è lungo premere il tasto
.
OK
ADJUSTING THE CERAMIC COFFEE GRINDER
REGOLAZIONE MACINACAFFÈ IN CERAMICA
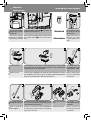
EN
Press and turn the grinder
adjustment knob one notch
at a time.
Select ( ) for coarse grind -
for a milder taste.
Select ( ) for ne grind - for a
stronger taste.
Brew 2-3 co ees to taste the
di erence. If co ee is watery,
change the grinder setting.
IT
Premere e ruotare di uno
scatto alla volta la mano-
pola di regolazione della
macinatura.
Selezionare (
) per maci-
natura grossa - gusto più
leggero.
Selezionare ( ) per macina-
tura ne - gusto più forte.
Erogare 2-3 prodotti per gu-
stare la di erenza. Se il ca è
è acquoso, modi care le im-
postazioni del macinaca è.
The grinder adjustment
knob inside the co ee
bean hopper MUST only
be turned when the ce-
ramic co ee grinder is
working.
La manopola di regola-
zione della macinatura,
posta all’interno del con-
tenitore ca è in grani,
DEVE essere ruotata solo
quando il macinaca è in
ceramica è in funzione.
1
2

14
Instructions
Istruzioni
www.philips.com/support
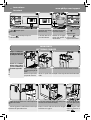
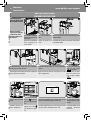
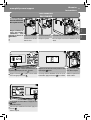
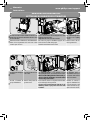
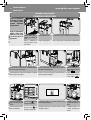
FIRST CAPPUCCINO
PRIMO CAPPUCCINO
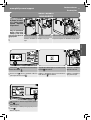
EN
Remove the water dispens-
ing spout by pressing the side
buttons.
Lift the carafe lid. Fill it with milk between the MIN and MAX level indicators.
IT
Rimuovere l’erogatore dell’ac-
qua premendo i tasti a lato.
Sollevare il coperchio della
cara a.
Riempirla con latte tra gli indicatori di livello MIN e MAX.
EN
Slightly tilt the milk carafe. Insert it all the way into the
guides of the machine.
Push the carafe towards the bottom while rotating at the
same time, until it is locked at the drip tray.
Pull out the milk carafe dis-
penser to the right up to the
icon.
IT
Inclinare leggermente la cara a del latte. Inserirla comple-
tamente nelle guide della macchina.
Premere e ruotare la cara a verso il basso no ad aggan-
ciarla alla vasca raccogligocce.
Estrarre l’erogatore della
cara a verso destra no al
simbolo
.
EN
Place a cup under the dis-
pensing spout.
Press the
button to brew
a cappuccino.
The machine reminds you to insert the carafe and the milk
carafe dispenser.
The machine dispenses the
milk froth directly into the
cup.
IT
Posizionare una tazza sotto
l’erogatore.
Premere il tasto per
erogare un cappuccino.
La macchina ricorda che è necessario inserire la cara a ed
estrarre l'erogatore della cara a.
La macchina eroga latte
emulsionato direttamente
in tazza.
MAX
MILK
1
1
2
Danger of scalding! Dis-
pensing may be preceded
by small jets of hot water.
Pericolo di scottature!
All’inizio dell’erogazione
possono veri carsi brevi
spruzzi di acqua calda.

15
www.philips.com/support
Instructions
Istruzioni
EnglishItaliano
MY FAVOURITE CAPPUCCINO
IL MIO CAPPUCCINO IDEALE
EN
Fill the carafe with milk and insert it in the machine. Pull out
the milk carafe dispenser to the right up to the
icon.
Place a cup under the dispensing spout.
Press and hold the
button until the “MEMO” icon is dis-
played.
IT
Riempire la cara a con il latte e posizionarla nella macchina.
Estrarre l’erogatore della cara a verso destra no al simbolo
. Posizionare una tazza sotto l’erogatore.
Tenere premuto il tasto no a visualizzare il simbolo
“MEMO” sul display.
EN
The machine reminds you to insert the carafe and pull out
the milk carafe dispenser.
The machine is heating up. The machine starts dispens-
ing milk froth into the cup.
Wait until the desired quan-
tity of milk is reached...
IT
La macchina ricorda che è necessario inserire la cara a ed
estrarre l’erogatore della cara a.
La macchina è in fase di ri-
scaldamento.
La macchina inizia ad ero-
gare il latte emulsionato
nella tazza.
Attendere no al raggiun-
gimento della quantità di
latte desiderata...
EN
Once the milk froth has been
dispensed, the machine
brews the co ee.
IT
Terminata l’erogazione del
latte emulsionato, la mac-
china eroga il ca è.
Danger of scalding! Dis-
pensing may be preceded
by small jets of hot water.
Pericolo di scottature!
All’inizio dell’erogazione
possono veri carsi brevi
spruzzi di acqua calda.
Co ee brewing and milk dispensing automatically
stop when the preset level is reached; press the
button to stop them earlier.
L’erogazione del latte e del ca è si interrompono
automaticamente quando viene raggiunto il livel-
lo impostato; è tuttavia possibile interromperle in
anticipo premendo il tasto
.
OK

16
Instructions
Istruzioni
www.philips.com/support
MILK FROTH
LATTE EMULSIONATO
EN
Slightly tilt the milk carafe. Insert it all the way into the
guides of the machine.
Push the carafe towards the bottom while rotating at the
same time, until it is locked at the drip tray.
Pull out the milk carafe dis-
penser to the right up to the
icon.
IT
Inclinare leggermente la cara a del latte. Inserirla comple-
tamente nelle guide della macchina.
Premere e ruotare la cara a verso il basso no ad aggan-
ciarla alla vasca raccogligocce.
Estrarre l’erogatore della
cara a verso destra no al
simbolo
.
EN
... press to stop the process.
Milk Stored!
The machine starts brewing
co ee into the cup.
Wait until the desired quan-
tity of co ee is reached...
... press
to stop the pro-
cess.
Cappuccino Stored!
IT
.... premere per interrompere il processo.
Latte Memorizzato!
La macchina inizia ad ero-
gare il ca è nella tazza.
Attendere no al raggiun-
gimento della quantità di
ca è desiderata...
.... premere
per inter-
rompere il processo.
Cappuccino Memorizzato!
OK
EN
Remove the water dispens-
ing spout by pressing the side
buttons.
Lift the carafe lid. Fill it with milk between the MIN and MAX level indicators.
IT
Rimuovere l’erogatore dell’ac-
qua premendo i tasti a lato.
Sollevare il coperchio della
cara a.
Riempirla con latte tra gli indicatori di livello MIN e MAX.
MAX
MILK
1
1
2
Danger of scalding! Dis-
pensing may be preceded
by small jets of hot water.
Pericolo di scottature!
All’inizio dell’erogazione
possono veri carsi brevi
spruzzi di acqua calda.

17
www.philips.com/support
Instructions
Istruzioni
EnglishItaliano
EN
Place a cup under the dis-
pensing spout.
Press the
button. The machine shows the icon above. Press the button to select
milk froth.
The machine reminds you to
insert the carafe and pull out
the milk carafe dispenser.
IT
Posizionare una tazza sotto
l’erogatore.
Premere il tasto
. La macchina visualizza il simbolo in alto. Premere il tasto per
selezionare il latte emulsionato.
La macchina ricorda che è
necessario inserire la cara a
ed estrarre l’erogatore della
cara a.
EN
The machine dispenses the
milk froth directly into the
cup.
IT
La macchina eroga latte
emulsionato direttamente
in tazza.
1
2
Milk dispensing automatically stops when the preset
level is reached; press the
button to stop it earlier.
L’erogazione del latte si interrompe automatica-
mente quando viene raggiunto il livello impostato;
è tuttavia possibile interromperla in anticipo pre-
mendo il tasto
.
ADJUSTING THE MILK FROTH LENGTH
REGOLAZIONE LUNGHEZZA LATTE EMULSIONATO
EN
Fill the carafe with milk and insert it in the machine. Pull out
the milk carafe dispenser to the right up to the
icon.
Place a cup under the dispensing spout.
Press the
button. The machine shows the icon above.
IT
Riempire la cara a con il latte e posizionarla nella macchina.
Estrarre l’erogatore della cara a verso destra no al simbolo
. Posizionare una tazza sotto l’erogatore.
Premere il tasto . La macchina visualizza il simbolo in
alto.
Danger of scalding! Dis-
pensing may be preceded
by small jets of hot water.
Pericolo di scottature!
All’inizio dell’erogazione
possono veri carsi brevi
spruzzi di acqua calda.

18
Instructions
Istruzioni
www.philips.com/support
EN
Press and hold the button until the “MEMO” icon is dis-
played. The machine reminds you to insert the carafe and
pull out the milk carafe dispenser.
The machine is heating-up. The machine starts dispens-
ing milk froth into the cup.
Wait until the desired quan-
tity of milk is reached...
IT
Tenere premuto il tasto no a visualizzare il simbolo
“MEMO” sul display. La macchina ricorda che è necessario
inserire la cara a ed estrarre l’erogatore della cara a.
La macchina è in fase di ri-
scaldamento.
La macchina inizia ad ero-
gare il latte emulsionato
nella tazza.
Attendere no al raggiun-
gimento della quantità di
latte desiderata...
EN
... press to stop the process.
Milk Stored!
IT
... premere per interrompere il processo.
Latte Memorizzato!
OK

19
www.philips.com/support
Instructions
Istruzioni
EnglishItaliano
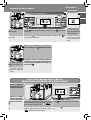
HOT WATER
ACQUA CALDA
EN
Insert the water dispensing
spout.
Lock it in place. Place a container under the hot water dispensing spout.
IT
Inserire l'erogatore dell'ac-
qua.
Bloccarlo in posizione. Posizionare un contenitore sotto l'erogatore dell'acqua
calda.
Danger of scalding! Dis-
pensing may be preceded
by small jets of hot water.
Pericolo di scottature!
All’inizio dell’erogazione
possono veri carsi brevi
spruzzi di acqua calda.
EN
Press the button. The icon above is displayed. Press the
button.
Check that the water dispensing spout is correctly installed.
Press
to con rm.
Pour the desired amount of
hot water.
IT
Premere il tasto . Sul display viene visualizzato il sim-
bolo in alto. Premere il tasto
.
Veri care che l’erogatore acqua sia installato correttamen-
te. Premere
per confermare.
Erogare la quantità di acqua
calda desiderata.
1
2
EN
To stop the hot water dispensing, press the button.
Remove the container.
IT
Per interrompere l’erogazione di acqua calda premere il
tasto
.
Rimuovere il contenitore.

20
Instructions
Istruzioni
www.philips.com/support
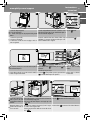
DESCALING - 35 min.
DECALCIFICAZIONE - 35 min.
EN
When the “CALC CLEAN” icon is displayed, you need to descale the machine.
Not doing this will ultimately make your appliance stop working properly. In this case repair is not covered
under your warranty.
IT
Quando viene visualizzato il simbolo “CALC CLEAN” è necessario procedere alla decalci cazione.
Se questa operazione non viene eseguita, l’apparecchio smetterà di funzionare correttamente. In que-
sto caso la riparazione non è coperta da garanzia.
EN
The descaling cycle (A) and the rinse cycle (B) may be paused by pressing the button. To resume the cycle, press the
button again. This allows you to empty the container or to stay away from the machine for a brief period of time.
IT
Il ciclo di decalci cazione (A) e di risciacquo (B) possono essere messi in pausa premendo il tasto ; per riprendere
il ciclo, premere nuovamente il tasto
. Questo consente di svuotare il contenitore o di assentarsi per un breve
periodo.
EN
Use the Descaling solution only. Its formula has been designed to ensure better machine performance. You can purchase separately the Descaling solution.
Please refer to the maintenance products page in this quick start guide for further details.
Warning:
Never drink the descaling solution or any products dispensed until the cycle has been carried out to the end. Never use vinegar as a descal-
ing solution.
Note:
During the descaling cycle do not switch o the machine. If this has happened you have to restart the descaling cycle to fully complete it. It will restart from
the point the descaling cycle had previously been left.
IT
Usare esclusivamente la soluzione decalci cante appositamente formulata per ottimizzare le prestazioni della macchina. La soluzione decalci cante
è in vendita separatamente. Per maggiori dettagli consultare la pagina relativa ai prodotti per la manutenzione nelle presenti istruzioni per l’uso.
Attenzione:
Non bere la soluzione decalci cante ed i prodotti erogati no al completamento del ciclo. Non utilizzare in nessun caso l’aceto come
decalci cante.
Nota:
non spegnere la macchina durante il ciclo di decalci cazione. In caso contrario, eseguire nuovamente il ciclo di decalci cazione dall’inizio ed attendere
no a che non sia terminato. Il ciclo di decalci cazione continuerà dal punto in cui è stato interrotto.

21
www.philips.com/support
Instructions
Istruzioni
EnglishItaliano
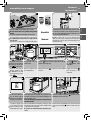
EN
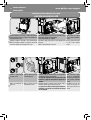
1 - Raise the dispensing spout;
2 - Press the side buttons;
3 - Remove and empty the drip tray and co ee grounds
drawer.
Insert the empty milk carafe. Remove the “INTENZA+” water
lter from the water tank if it was installed and replace it
with the small white original one.
Press the
button.
IT
1 - Alzare l'erogatore ca è;
2 - Premere i tasti laterali;
3 - Rimuovere e vuotare la vasca raccogligocce ed il cas-
setto raccoglifondi.
Inserire la cara a del latte vuota. Estrarre il ltro acqua
“INTENZA+” (se presente) dal serbatoio dell'acqua e sosti-
tuirlo con il ltrino bianco originale.
Premere il tasto
.
3
1
2
2
EN
The machine reminds you to insert the carafe and pull out
the milk carafe dispenser.
If you had pressed the
by mistake, press the but-
ton to quit.
Otherwise please go to step 6.
Pour the entire descaling
solution.
IT
La macchina ricorda che è necessario inserire la cara a ed
estrarre l’erogatore della cara a.
Se il tasto
è stato premuto per errore, premere il tasto
per uscire. Altrimenti passare al punto 6.
Versare tutta la soluzione
decalci cante.
EN
Fill the water tank with fresh
water up to the calc clean
level and place it back in the
machine.
Place a large container (1.5l) under both the milk carafe dis-
penser and the dispensing spout.
Pull out the milk carafe dispenser to the right up to the
icon.
Press the
button to start the descaling cycle.
IT
Riempire il serbatoio con ac-
qua fresca no al livello calc
clean e reinserirlo.
Posizionare un contenitore capiente (1,5l) sotto l’ erogato-
re cara a e sotto l’erogatore ca è.
Estrarre l’erogatore della cara a verso destra no al sim-
bolo
.
Premere il tasto
per avviare il ciclo di decalci cazione.
CALC
CLEAN

22
Instructions
Istruzioni
www.philips.com/support
EN
The descaling solution will be dispensed at intervals (dura-
tion: approx. 25 min).
When this icon is displayed,
the water tank is empty.
Rinse the water tank and ll it with fresh water up to the
MAX level. Place it back into the machine.
IT
La soluzione decalci cante sarà erogata ad intervalli (du-
rata: circa 25 min).
Quando viene visualizzato
questo simbolo, il serbatoio
dell’acqua è vuoto.
Risciacquare il serbatoio e riempirlo con acqua fresca no
al livello MAX. Reinserirlo nella macchina.
MAX
EN
When this icon is displayed,
the water tank is empty.
Repeat steps 12 to 16. Then
go to step 18.
Rinse the water tank and ll
it with fresh water up to the
MAX level.
IT
Quando viene visualizzato
questo simbolo, il serbatoio
dell'acqua è vuoto.
Ripetere le operazioni dal
punto 12 al punto 16, quin-
di passare al punto 18.
Risciacquare il serbatoio e
riempirlo con acqua fresca
no al livello MAX.
12
16
MAX
EN
Empty the container.
Remove and empty the ca-
rafe.
1 - Raise the dispensing spout;
2 - Press the side buttons;
3 - Empty the drip tray and place it back.
Install the milk carafe into the machine. Pull out the milk ca-
rafe dispenser to the right up to the
icon.
Place the container under the dispensing spout.
Press the
button to start the rinse cycle.
IT
Vuotare il contenitore.
Rimuovere e vuotare la ca-
ra a.
1 - Alzare l’erogatore ca è;
2 - Premere i tasti laterali;
3 - Vuotare la vasca raccogligocce e reinserirla in posizione.
Installare la cara a del latte nella macchina. Estrarre l’ero-
gatore della cara a verso destra no al simbolo
.
Riposizionare il contenitore sotto l’erogatore ca è.
Premere il tasto
per avviare il ciclo di risciacquo.
3
1
2
2
Note: The circuit needs to be cleaned with a preset
amount of water. If you had not lled up the water
tank to MAX level, the machine might require three or
more tanks for rinsing.’
Nota: Il circuito deve essere pulito con una quantità
di acqua preimpostata. Se il serbatoio dell’acqua non
viene riempito no al livello MAX, la macchina, per il
risciacquo, può richiedere il riempimento del serba-
toio per tre o più volte.

23
www.philips.com/support
Instructions
Istruzioni
EnglishItaliano
EN
When the amount of water needed for the rinse cycle has
been completely dispensed, this icon is displayed. Press the
button to quit the descaling cycle.
The machine automatically
primes the circuit. Thereaf-
ter the machine warms up
and performs an automatic
rinse cycle.
Remove the small white water lter and place back the “IN-
TENZA+” water lter (if installed) in the water tank. Remove
the carafe.
IT
Quando l’acqua richiesta per il risciacquo è stata comple-
tamente erogata, la macchina visualizza questo simbolo.
Premere il tasto
per uscire dal ciclo di decalci cazione.
La macchina esegue il ca-
ricamento automatico del
circuito. Poi esegue il ciclo
di riscaldamento e di ri-
sciacquo automatico.
Rimuovere il ltrino bianco e riposizionare il ltro acqua
“INTENZA+” (se presente) nel serbatoio dell’acqua. Ri-
muovere la cara a.
3
1
2
2
EN
1 - Raise the dispensing spout;
2 - Press the side buttons;
3 - Empty the drip tray and place it back.
Wash the brew group. for further guidance, see the “Brew
Group Cleaning” chapter.’
The machine is ready to brew
co ee.
IT
1 - Alzare l’erogatore ca è;
2 - Premere i tasti laterali;
3 - Vuotare la vasca raccogligocce e reinserirla in posizione.
Al termine del ciclo di decalci cazione, lavare il gruppo ca è
come descritto nel capitolo “Pulizia settimanale del gruppo
ca è”.
La macchina è pronta per
l’erogazione di ca è.

24
Instructions
Istruzioni
www.philips.com/support
3
1
2
2
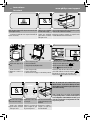
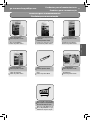
BREW GROUP CLEANING
PULIZIA DEL GRUPPO CAFFÈ
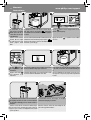
EN
Turn o the machine and unplug the power cord. Remove
the drip tray and co ee grounds drawer. Thereafter open the
service door.
Remove the brew group, press the «PUSH» button. Pull it
horizontally by the handle without turning it.
Remove the co ee residues
drawer and wash it thor-
oughly.
IT
Spegnere la macchina e scollegare il cavo di alimentazione.
Rimuovere la vasca raccogligocce e il cassetto raccoglifon-
di. Aprire quindi lo sportello di servizio.
Per estrarre il gruppo ca è premere il tasto «PUSH» tirando
la maniglia.
Estrarlo orizzontalmente senza ruotarlo.
Rimuovere il cassetto rac-
cogli ca è e lavarlo accura-
tamente.
EN
Carry out maintenance to the
brew group.
‘Pull down the lever for prop-
er alignment’
Insert the co ee residues drawer in its seat and ensure that
it is correctly in place.
If the co ee residues drawer is not correctly posi-
tioned, the brew group may not t into the machine.
Insert the brew group in its
seat again until it locks into
place without pressing the
“PUSH” button.
IT
Eseguire la manutenzione
del gruppo ca è.
Abbassare la leva per un
corretto allineamento.
Inserire il cassetto raccogli ca è nella sua sede avendo cura
di veri care che sia ben posizionato.
Se il cassetto raccogli ca è viene posizionato in
modo errato, il Gruppo ca è potrebbe non inserirsi
nella macchina.
Introdurre di nuovo in sede
il gruppo ca è no ad ag-
ganciarlo senza premere il
tasto “PUSH”.

25
www.philips.com/support
Instructions
Istruzioni
EnglishItaliano
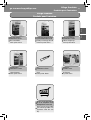
CLEANING THE MILK CARAFE
PULIZIA DELLA CARAFFA DEL LATTE
EN
Daily
Press the release buttons to
remove the top of the carafe.
Rinse the top of the carafe and the milk carafe with
lukewarm water. Remove all milk residues.
IT
Quotidiana
Premere i pulsanti di sgan-
cio per rimuovere la parte
superiore della cara a.
Risciacquare la parte superiore della cara a e la cara a del
latte con acqua tiepida. Rimuovere ogni residuo di latte.
1
1
2
It is important that you
clean the milk carafe
daily or after each use
as it preserves hygiene
and ensures perfect milk
froth consistency
È importante pulire la
cara a del latte ogni
giorno e dopo ogni uti-
lizzo al ne di mante-
nere l’igiene e garantire
la preparazione di latte
emulsionato dalla consi-
stenza perfetta
EN
Attach the top on the milk
carafe, ensuring it is locked
into place.
Remove the lid and ll the
milk carafe up to the MAX
level with fresh water.
Put the lid back onto the milk
carafe.
Pull out the milk carafe dis-
penser to the right up to the
icon.
Place a container under the
dispensing spout.
IT
Montare la parte superio-
re della cara a del latte
assicurandosi che sia ben
ssata.
Rimuovere il coperchio e
riempire la cara a del latte
con acqua fresca no al li-
vello MAX.
Riposizionare il coperchio
sulla cara a del latte.
Estrarre l’erogatore della
cara a verso destra no al
simbolo
.
Posizionare un contenitore
sotto l’erogatore.
EN
Press the button. The icon above is displayed.
Press the
button to select milk froth.
The machine reminds you to
insert the carafe and pull out
the milk carafe dispenser.
IT
Premere il tasto . Sul display viene visualizzato il sim-
bolo in alto.
Premere il tasto
per selezionare il latte emulsionato.
La macchina ricorda che è
necessario inserire la cara a
ed estrarre l'erogatore della
cara a.

26
Instructions
Istruzioni
www.philips.com/support
1
1
2
EN
Once the machine stops dis-
pensing water, the cleaning
is nished.
‘Put back the milk carafe by shifting it up to the
icon. Re-
move the milk carafe and empty it.’
Weekly
Press the release buttons to
remove the top of the carafe.
IT
Quando la macchina termi-
na l'erogazione di acqua, il
lavaggio è completato.
Reinserire l’erogatore della cara a facendolo scorrere no
al simbolo
. Rimuovere la cara a del latte e vuotarla.
Settimanale
Premere i pulsanti di sgan-
cio per rimuovere la parte
superiore della cara a.
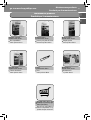
EN
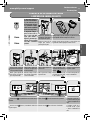
Remove the lid. Lift the dispenser to remove it from the top of the carafe. The milk carafe dispenser is made
up of ve parts that must be disassembled. Each part is indicated by a capital letter (A, B,
C, D, E).
Remove the suction tube
with the tting (A) from the
milk frother.
IT
Rimuovere il coperchio. Sollevare l’erogatore per estrarlo dalla parte superiore della cara a. L'erogatore della ca-
ra a è composto da cinque parti che devono essere smontate. Ogni parte è identi cata
da una lettera maiuscola (A, B, C, D, E).
Rimuovere il tubo di aspira-
zione con il raccordo (A) dal
montalatte.
EN
Remove the tting (B) from
the tube.
Detach the lid (C) from the milk carafe dispenser by pulling it
down while slightly pressing on the sides.
Disassemble further. Remove the tting (E) from
the milk frother by pulling it
outwards.
IT
Rimuovere il raccordo (B)
dal tubo di aspirazione .
Sganciare il coperchio (C) dall’erogatore della cara a del
latte premendo verso il basso ed esercitando una leggera
pressione ai lati.
Continuare a smontare. S lare il raccordo (E) dall'e-
mulsionatore del latte ti-
randolo verso l'esterno.
A
B
C
D
E
La pagina sta caricando ...
La pagina sta caricando ...
La pagina sta caricando ...
La pagina sta caricando ...
La pagina sta caricando ...
La pagina sta caricando ...
La pagina sta caricando ...
La pagina sta caricando ...
La pagina sta caricando ...
La pagina sta caricando ...
La pagina sta caricando ...
La pagina sta caricando ...
La pagina sta caricando ...
La pagina sta caricando ...
La pagina sta caricando ...
La pagina sta caricando ...
La pagina sta caricando ...
La pagina sta caricando ...
La pagina sta caricando ...
La pagina sta caricando ...
La pagina sta caricando ...
La pagina sta caricando ...
La pagina sta caricando ...
La pagina sta caricando ...
La pagina sta caricando ...
La pagina sta caricando ...
La pagina sta caricando ...
La pagina sta caricando ...
La pagina sta caricando ...
La pagina sta caricando ...
La pagina sta caricando ...
La pagina sta caricando ...
La pagina sta caricando ...
La pagina sta caricando ...
La pagina sta caricando ...
La pagina sta caricando ...
La pagina sta caricando ...
La pagina sta caricando ...
La pagina sta caricando ...
La pagina sta caricando ...
La pagina sta caricando ...
La pagina sta caricando ...
La pagina sta caricando ...
La pagina sta caricando ...
La pagina sta caricando ...
La pagina sta caricando ...
La pagina sta caricando ...
La pagina sta caricando ...
La pagina sta caricando ...
La pagina sta caricando ...
La pagina sta caricando ...
La pagina sta caricando ...
La pagina sta caricando ...
La pagina sta caricando ...
La pagina sta caricando ...
La pagina sta caricando ...
La pagina sta caricando ...
La pagina sta caricando ...
-
 1
1
-
 2
2
-
 3
3
-
 4
4
-
 5
5
-
 6
6
-
 7
7
-
 8
8
-
 9
9
-
 10
10
-
 11
11
-
 12
12
-
 13
13
-
 14
14
-
 15
15
-
 16
16
-
 17
17
-
 18
18
-
 19
19
-
 20
20
-
 21
21
-
 22
22
-
 23
23
-
 24
24
-
 25
25
-
 26
26
-
 27
27
-
 28
28
-
 29
29
-
 30
30
-
 31
31
-
 32
32
-
 33
33
-
 34
34
-
 35
35
-
 36
36
-
 37
37
-
 38
38
-
 39
39
-
 40
40
-
 41
41
-
 42
42
-
 43
43
-
 44
44
-
 45
45
-
 46
46
-
 47
47
-
 48
48
-
 49
49
-
 50
50
-
 51
51
-
 52
52
-
 53
53
-
 54
54
-
 55
55
-
 56
56
-
 57
57
-
 58
58
-
 59
59
-
 60
60
-
 61
61
-
 62
62
-
 63
63
-
 64
64
-
 65
65
-
 66
66
-
 67
67
-
 68
68
-
 69
69
-
 70
70
-
 71
71
-
 72
72
-
 73
73
-
 74
74
-
 75
75
-
 76
76
-
 77
77
-
 78
78
-
 79
79
-
 80
80
-
 81
81
-
 82
82
-
 83
83
-
 84
84


Saeco HD8763/01 Guida Rapida
- Categoria
- Macchine da caffè
- Tipo
- Guida Rapida
- Questo manuale è adatto anche per
in altre lingue
- English: Saeco HD8763/01 Quick start guide
- français: Saeco HD8763/01 Guide de démarrage rapide
- español: Saeco HD8763/01 Guía de inicio rápido
- Deutsch: Saeco HD8763/01 Schnellstartanleitung
- português: Saeco HD8763/01 Guia rápido