
OVN 610 / OVN 910
SCHEDA PRODOTTO
GB
5019 610 56205
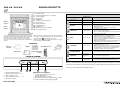
1.
Pannello comandi
2.
Ventola di raffreddamento
1)
(non visibile)
3.
Protezione Grill
2)
4.
Blocca Porta
3)
5.
Catalizzatore
6.
Protezione resistenza superiore
7.
Resistenza grill
8.
Resistenza superiore
9.
Lampada posteriore
10.
Ventola forno
11.
Resistenza inferiore (non visibile)
12.
Porta fredda del forno
1)
La ventola di raffreddamento può continuare a funzionare anche
dopo lo spegnimento del forno. Durante la Pirolisi la velocità della
ventola aumenta rispetto alla velocità delle funzioni di cottura.
2)
Impedisce il contatto diretto con il grill. Vi raccomandiamo,
comunque, di non toccare la protezione durante il funzionamento
del forno.
3)
Durante la funzione di pirolisi si attiva un dispositivo automatico di
“blocca porta” e sul display del programmatore si accende la spia in
corrispondenza di “ ”, e la lampada rimane spenta.
Durante la pirolisi la temperatura della porta aumenta, si consiglia
pertanto di
tenere lontani i bambini
.
ACCESSORI
PANNELLO COMANDI
1. Manopola selezione funzioni
2. Tasto di programmazione: (“set”)
3. Tasto di conferma (“ok”)
4. Tasti modifica valori tempo (“-” “+”)
5. Manopola termostato
Manopole a scomparsa
• Per usare la manopola premerla al centro.
• La manopola fuoriesce.
• Ruotarla sulla posizione desiderata.
A cottura ultimata posizionare la manopola sullo
0
e premerla
al centro per riportarla nella sua posizione originale.
Primo
Ultimo
ripiano
ripiano
Griglia:
Supporto
leccarda:
Sonda temperatura
al cuore:
Piastra dolci:
Kit “Grill Pan Set”:
1
2
5
3
4
Avvertenze:
Durante il ciclo di autopulizia (pirolisi), raccomandiamo di togliere tutti gli accessori dati in dotazione per non aumentare
ulteriormente le temperature esterne della porta e garantire una migliore efficienza di pulizia per la parte inferiore del forno.
Vedere tempi di preriscaldamento nella tabella di cottura.
Tabella Funzioni Forno
Funzione
Temperatura
regolabile
Descrizione Funzione
-
Forno spento
- -
LAMPADA
- • Accensione della lampada interna al forno.
STATICO
80°C - 250°C
• Per cuocere carne, pesce e pollame su un ripiano.
• Preriscaldare il forno alla temperatura di cottura desiderata e introdurre
gli alimenti nel forno.
• Si consiglia di utilizzare il secondo o il terzo ripiano.
VENTILATO
80°C - 250°C
• Per cuocere su max. 2 ripiani.
• Se necessario, si consiglia di invertire la posizione degli alimenti per
ottenere una cottura più omogenea.
• Non è necessario preriscaldare il forno (eccetto per pizze e focacce).
GRILL
80°C - 250°C
• Per arrostire carni e pollame.
• Inserire il supporto sul secondo ripiano ed infilare l'alimento sull'asta
dello spiedo fissandolo con le apposite forchette.
• Infilare lo spiedo fino in fondo nell'alloggiamento situato sulla paratia
posteriore a destra ed appoggiarlo sul supporto.
• Versare un po d'acqua nella leccarda posta sul primo ripiano per ridurre
i fumi e gli schizzi di grasso.
• Togliere la manopola di plastica prima di chiudere la porta ricordandosi
di reinserirla prima di estrarre l'alimento a fine cottura.
TURBOGRILL
80°C - 250°C
• Per grigliare grossi pezzi di carne (roast beef, arrosti).
• Preriscaldare il forno per 3 - 5 min.
• Durante la cottura la porta del forno deve rimanere chiusa.
• In caso di cottura di carne versare un po' di acqua nella leccarda (posta
sul primo ripiano) per ridurre i fumi e gli schizzi di grasso.
• Si consiglia di girare la carne durante la cottura.
SCONGELAMENTO
Fare riferimento alla
scheda programmatore
• Per scongelare gli alimenti a temperatura ambiente.
• Lasciare l'alimento nella confezione per impedire l'essicazione.
PYROLYSE
Ulteriori dettagli
disponibili nella scheda
programmatore
• Il tempo dell'autopulizia può essere regolato da un minimo di
1h / 30 min ad un massimo di 3 ore.
FUNZIONE SPECIALE
80°C / Scaldavivande
250°C Pizza
• Scaldavivande: permette di mantenere i cibi ad una temperatura
costante di circa 80°C.
• Pizza: ideale per la cottura della pizza e del pane 250°C.

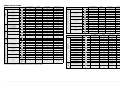
TABELLE DI COTTURA
*
Per i tempi di preriscaldo consultare la guida all’uso sezione “Funzioni speciali”.
CIBI
Funzione
Preriscaldamento
(minuti)
Ripiano
(dal basso)
Te m p e r a t u r a
(°C)
Te mp o d i c o t tu r a
(minuti)
Agnello, montone
12 2 200 90 - 110
14 2 200 90 - 110
Arrosto
(vitello, maiale, manzo)
(kg. 1)
12 2 200
100 - 110
14 2 200
100 - 110
Pollo, coniglio,
anatra
12 2 200 80 - 90
14 2 200 80 - 90
Tacchino
(kg. 3-4)
12 1 200 160 - 180
14 1
200
160 - 180
Oca (kg. 2)
12 2 200 100 - 130
14 2 200 100 - 130
(INTERO)
(1-2 kg)
Orata, branzino, tonno,
salmone, merluzzo
12 2 200 50 - 60
12 2 180 50 - 60
(IN TRANCI)
(1 kg.)
Pesce spada, tonno
12 2 200 50 - 60
12 3 180 50 - 60
Peperoni e pomodori ripieni
12 2 200 60 - 70
12 2 180 60 - 70
Patate al forno
12
2
200
50 - 60
14
2
200
50 - 60
Pizza - Pane
*
2
250
15 - 20
*
2 250 15 - 20
*
1-3
250
20 - 30
*
1-3
250
20 - 30
Torte a lievitazione
10 2 170 40 - 50
11 2 170 40 - 50
Torte ripiene
(al formaggio)
11 2 190 70 - 90
11 2 170 70 - 90
Crostata
11 2 180
50 - 60
12 2 180
50 - 60
Strudel
12 2 200
50 - 60
12 2 180
50 - 60
Biscotti
9 2 160 30 - 40
10 2 150 30 - 40
C
A
R
N
E
P
E
S
C
E
V
E
R
D
U
R
E
P
I
Z
Z
A
P
A
N
E
D
O
L
C
I
P
A
S
T
I
C
C
E
R
I
A
E
C
C
TABELLA DI COTTURA GRILL
Nota:
GRILL, girare le carni a metà cottura.
CIBI
Funzione
Preriscaldamento
(minuti)
Ripiano
(dal basso)
Te m p e r a t u r a
(°C)
Tempo di cottura
(minuti)
Bignè
11 2 190
40 - 50
12 2 180 40 - 50
To r t e s a l a t e
12 2 200 50 - 60
13 2 190 50 - 60
Torte ripiene alsla frutta
per es. ananas, pesche
11 2 180 50 - 60
12 2 180 50 - 60
Meringhe
7 2 120 150 - 180
- 2- 4 120 150 - 180
Vol-au-vent
12 2 200 30 - 40
13 2 190 30 - 40
Soufflé
12 2 200 50 - 60
13 2 190 50 - 60
Lasagne
12 2 200 50 - 60
13 2 190 50 - 60
CIBI Funzione
Preriscaldamento
(minuti)
Ripiano
(dal basso)
Te m p e r a t u r a
(°C)
Tempo di cottura
(minuti)
Costate 16 3-4
225-250
40 - 50
Cotolette 16 3-4
225-250
30 - 40
Salsicce 16 3-4
225-250
30 - 40
Braciole 16 3-4
225-250
30 - 40
Cosce di pollo 12 3-4
200-225
40 - 50
Spiedini 12 3-4
200-225
40 - 50
Costine 12 3-4
200-225
40 - 50
1/2 pollo 12 3
200-225
50 - 60
1/2 pollo 8 2
200-225
50 - 60
Pollo intero 8 2
200
60 - 70
Arrosto
(maiale, manzo)
8 2
200
70 - 80
Anatra 8 2
200-210
80 - 90
Cosciotto di agnello 8 2
200
70 - 80
Roast beef 9 2
225-250
50 - 60
Patate al forno 8 3 200-210 50 - 60
Pesce (orata, trota) 7 2 190-200 50 - 60
Pesce (tranci) 12 3-4 200-225 30 - 40
D
O
L
C
I
P
A
S
T
I
C
C
E
R
I
A
E
C
C
C
A
R
N
E
P
E
S
C
E

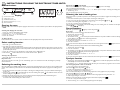
INSTRUCTIONS FOR USING THE ELECTRONIC TIMER NUTID
GB
Electronic timer
Starting the oven
When the oven is connected to the power supply for the first time, or reconnected after a power failure, the display indicates
“
12.00
”.
Selecting and changing the clock time:
1. Press “set”. The time of day flashes on the display.
2. Press button
“-”
or
“+”
to set the hour.
3. Press “set” and
“-”
or
“+”
to set the minutes.
4. Press “ok” to confirm.
To change the time:
Press and hold “ok” for 3 seconds. until the time flashes on the display. Repeat the steps described above.
Select cooking function:
1. Turn knob
to the chosen function.
2. Turn knob
to select the temperature.
(NB: during the “defrost” function, the temperature shown on the display is for guidance only and does not mean the oven
is heating up: the oven temperature remains comparable to room temperature, as per the description of the function in the
product description sheet).
3. Press “ok” to confirm; the oven will switch on. The indicator next to switches on.
4. The indicator switches off when the oven reaches the selected temperature.
To change the temperature:
1. Turn knob
and select the desired temperature.
Important notes:
To cancel any selection, turn knob
to
“0”
. Alternatively, press “set” to switch the oven off, maintaining the previously
selected functions.
Selecting the cooking time:
Select the cooking time (available with any function, except for the special functions) to turn the oven on for a specified period
of time. At the end of the specified time the oven will switch off automatically. The maximum programmed cooking time is 6
hours.
1. Set the function and the temperature (see chapter: “Selecting the cooking function”) up to point 2 without confirming by
pressing “ok”.
2. Press “set” (the indicator on the display lights up next to the cooking time symbol ) and, within 8 minutes, select the
desired cooking time using buttons
“-”
o
“+”
.
3. Confirm the selection by pressing “ok”; the oven switches on and the display shows the residual cooking time.
4. To change the previous temperature setting, turn knob
.
To return to the residual cooking time, wait 5 seconds.
Appearance of on the display:
Once the set time has elapsed, an acoustic signal is heard and appears on the display.
The oven will switch off automatically.
To change the cooking time, use button
“
-
”
or
“
-
”
“+”
. Return to point 3 chapter “Selecting the cooking time”.
1. Turn knob
to “0”
The time of day appears again on the display.
Selecting the end of cooking time
Using this function it is possible to preset the end of cooking time. The maximum programmed cooking time is 23 hours and
59 minutes.
1. Proceed as described in points 1 and 2 chapter “Selecting the cooking time”
2. Press “set” to set the end of cooking time: the indicator next to the symbol lights up .
3. Set the end of cooking time using button
“-”
or
“-”
“+”
.
4. Press “ok” to confirm the end of cooking time.
The oven will turn on automatically at the end of cooking time minus cooking time: the indicators on the display above the
symbols
will light up.
Special functions
Tu r n k n o b
to function
,
lights up next to the symbol .
Keep warm
This maintains a constant temperature of 80°C in the oven.
1. Turn knob
to the symbol
2. Press “ok” to confirm.
3. The indicator next to on the control panel switches off when a temperature of 80°C is reached, a factory-set time of 5
minutes flashes on the display and an acoustic signal sounds.
4. Place the food in the oven.
5. To change the preset time, use button
“+”
or
“+”
“-”
.
6. Press “ok” to confirm.
7. Once the set time has elapsed, the oven switches off, an acoustic signal is heard and appears on the display.
Pizza
This operates at a fixed temperature of 250°C and is ideal for baking pizzas.
1. Turn knob
to the symbol .
2. Press “ok” to confirm.
3. The indicator next to on the control panel switches off when a temperature of 250°C is reached, a factory-set time of
12 minutes flashes on the display and an acoustic signal is heard.
4. Place the food in the oven.
5. To change the preset time, use button “+” or
“+” “-”
.
6. Press “ok” to confirm.
7. Once the set time has elapsed, the oven switches off, an acoustic signal is heard and appears on the display.
Pyrolysis function
1. Turn knob
to the self-cleaning Pyrolysis function, and for 2 seconds the display shows clean
Cln
, the selector
automatically sets a minimum time of
1:30
.
2. Use buttons
“+” “-”
, to change duration of the self-clean cycle. The maximum programme time is 3 hours.
The end of pyrolysis time can be set as follows:
1. press “set” to set the end of pyrolysis time.
The indicator next to the symbol lights up.
2. Set the end of pyrolysis time using buttons
“+” “-”
.
3. Press “ok” to confirm the end of pyrolysis time.
The oven will automatically turn on at the end of pyrolysis time minus pyrolysis time (set previously).
The indicators above the symbols light up.
4. To increase pyrolysis time, press “set” and then set the new pyrolysis time using the button
“+”
.
5. Confirm by pressing the “ok” button”.
When the set time has elapsed, an acoustic signal is heard and the display shows .
6. Press “ok” to stop the acoustic signal.
7. Turn the knob
to “0”, the time of day appears again on the display.
Displays
Function selector knob
Setting button: (“set”)
Confirmation button (“ok”)
Buttons for changing time (
“-”
“+”
)
Thermostat knob
1
2
5
3
4

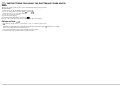
INSTRUCTIONS FOR USING THE ELECTRONIC TIMER NUTID
GB
Timer
The timer can only be set when the oven is not in use and allows a maximum setting of 6 hours.
To set the timer:
1. Leave knob
at
“0”
. The display shows the time of the day.
2. Press “set”. The indicator next to the symbol lights up .
Use buttons
“-”
or
“+”
to set the desired time.
3. Press “ok” to confirm the selection.
Once the set time has elapsed:
An acoustic signal sounds and flashes on the display .
Press “ok”: The acoustic signal stops. The time of day appears again on the display.
Childproof lock :
1. With knobs
and
set to “0”, press buttons
“-”
and
“+”
at the same time for 3 sec.
NB
:
Activation of the LOCK function is signalled by an acoustic signal, whereas the symbol will appear on the display.
When set, the display will continue to show the time.
1. The oven functions will not operate while the childproof lock is activated.
2. To deactivate the lock, repeat the sequence described in point 1.
-
 1
1
-
 2
2
-
 3
3
-
 4
4


IKEA 501 237 44 Program Chart
- Tipo
- Program Chart
- Questo manuale è adatto anche per
in altre lingue
- English: IKEA 501 237 44