AEG LAV74330-W Manuale utente
- Categoria
- Lavatrici
- Tipo
- Manuale utente
Questo manuale è adatto anche per

ÖKO-LAVAMAT 74335 update
The environmentally friendly washing machine
User information

2
Dear Customer,
Please read this instruction book carefully before using the appliance.
Please ensure you fully understand the safety instructions on the first
pages of this instruction book.
Retain the instruction book for future reference, and pass it on to any
future owners.
1
The warning triangle and / or key words (Warning!, Caution!, Impor-
tant!) give information that is important for your safety or the func-
tion of the appliance is highlighted. It is imperative that this
information is observed.
0 1. This symbol guides you step by step through the operation of the
appliance.
2. ...
3
This symbol gives you additional information and practical tips on using
the appliance.
2
Tips and information about the economical and environmentally
friendly use of the machine are marked with the clover leaf.
In the event of a malfunction, these operating instructions contain in-
formation on how to remedy these faults yourself. See the section
"What to do if ..."
Printed on recycled paper.
Thinking ecologically means acting ecologically ...

Contents
3
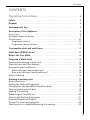
CONTENTS
Operating Instructions . . . . . . . . . . . . . . . . . . . . . . . . . . . . . . . . . . . . 6
Safety . . . . . . . . . . . . . . . . . . . . . . . . . . . . . . . . . . . . . . . . . . . . . . . . . . . . . . . . 6
Disposal . . . . . . . . . . . . . . . . . . . . . . . . . . . . . . . . . . . . . . . . . . . . . . . . . . . . . . 8
Environmental tips . . . . . . . . . . . . . . . . . . . . . . . . . . . . . . . . . . . . . . . . . . . . . 8
Description of the Appliance . . . . . . . . . . . . . . . . . . . . . . . . . . . . . . . . . . . . 9
Front view . . . . . . . . . . . . . . . . . . . . . . . . . . . . . . . . . . . . . . . . . . . . . . . . . . . . 9
Detergent dispenser drawer . . . . . . . . . . . . . . . . . . . . . . . . . . . . . . . . . . . . 9
Control panel . . . . . . . . . . . . . . . . . . . . . . . . . . . . . . . . . . . . . . . . . . . . . . . . . 10
Programme selector . . . . . . . . . . . . . . . . . . . . . . . . . . . . . . . . . . . . . . . . . . 10
Programme option buttons . . . . . . . . . . . . . . . . . . . . . . . . . . . . . . . . . . . . 12
Consumption data and wash times . . . . . . . . . . . . . . . . . . . . . . . . . . . . . . 13
What does UPDATE mean? . . . . . . . . . . . . . . . . . . . . . . . . . . . . . . . . . . . . . 13
Before the First Wash . . . . . . . . . . . . . . . . . . . . . . . . . . . . . . . . . . . . . . . . . . 14
Preparing a Wash Load . . . . . . . . . . . . . . . . . . . . . . . . . . . . . . . . . . . . . . . . . 14
Sorting and preparing a wash load . . . . . . . . . . . . . . . . . . . . . . . . . . . . . . . . 14
Washing Types and Care Symbols . . . . . . . . . . . . . . . . . . . . . . . . . . . . . . . . . 15
Detergents and Conditioners . . . . . . . . . . . . . . . . . . . . . . . . . . . . . . . . . . . . . 16
Which detergent and conditioner? . . . . . . . . . . . . . . . . . . . . . . . . . . . . . 16
How much detergent and conditioner? . . . . . . . . . . . . . . . . . . . . . . . . . 16
Water softening . . . . . . . . . . . . . . . . . . . . . . . . . . . . . . . . . . . . . . . . . . . . . . . . 16
Running a washing cycle . . . . . . . . . . . . . . . . . . . . . . . . . . . . . . . . . . . . . . . 17
Brief instructions . . . . . . . . . . . . . . . . . . . . . . . . . . . . . . . . . . . . . . . . . . . . . . . 17
Setting the Washing Programme . . . . . . . . . . . . . . . . . . . . . . . . . . . . . . . . . . 18
Changing the spin speed/Selecting Rinse Hold . . . . . . . . . . . . . . . . . . . . . . 18
Opening and closing the door . . . . . . . . . . . . . . . . . . . . . . . . . . . . . . . . . . . . 19
Loading the washing . . . . . . . . . . . . . . . . . . . . . . . . . . . . . . . . . . . . . . . . . . . . 19
Add detergent / conditioner . . . . . . . . . . . . . . . . . . . . . . . . . . . . . . . . . . . . . 20
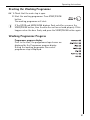
Starting the Washing Programme . . . . . . . . . . . . . . . . . . . . . . . . . . . . . . . . . 21
Washing Programme Progress . . . . . . . . . . . . . . . . . . . . . . . . . . . . . . . . . . . . 21
Change the washing programme . . . . . . . . . . . . . . . . . . . . . . . . . . . . . . . . . . 22
Washing cycle is complete/Removing the washing. . . . . . . . . . . . . . . . . . . . 23

Contents
4
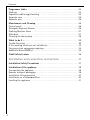
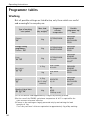
Programme tables . . . . . . . . . . . . . . . . . . . . . . . . . . . . . . . . . . . . . . . . . . . . . 24
Washing . . . . . . . . . . . . . . . . . . . . . . . . . . . . . . . . . . . . . . . . . . . . . . . . . . . . . . 24
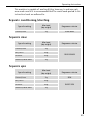
Separate conditioning/starching . . . . . . . . . . . . . . . . . . . . . . . . . . . . . . . . . 25
Separate rinse . . . . . . . . . . . . . . . . . . . . . . . . . . . . . . . . . . . . . . . . . . . . . . . . . 25
Separate spin . . . . . . . . . . . . . . . . . . . . . . . . . . . . . . . . . . . . . . . . . . . . . . . . . 25
Maintenance and Cleaning . . . . . . . . . . . . . . . . . . . . . . . . . . . . . . . . . . . . . 26
Control panel . . . . . . . . . . . . . . . . . . . . . . . . . . . . . . . . . . . . . . . . . . . . . . . . . . 26
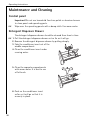
Detergent Dispenser Drawer . . . . . . . . . . . . . . . . . . . . . . . . . . . . . . . . . . . . . . 26
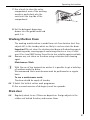
Washing Machine Drum . . . . . . . . . . . . . . . . . . . . . . . . . . . . . . . . . . . . . . . . . 27
Main door . . . . . . . . . . . . . . . . . . . . . . . . . . . . . . . . . . . . . . . . . . . . . . . . . . . . . 27
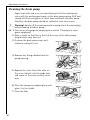
Cleaning the drain pump . . . . . . . . . . . . . . . . . . . . . . . . . . . . . . . . . . . . . . . . 28
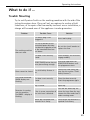
What to do if ... . . . . . . . . . . . . . . . . . . . . . . . . . . . . . . . . . . . . . . . . . . . . . . . 29
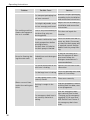
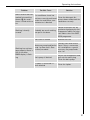
Trouble Shooting . . . . . . . . . . . . . . . . . . . . . . . . . . . . . . . . . . . . . . . . . . . . . . . 29
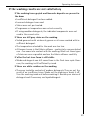
If the washing results are not satisfactory . . . . . . . . . . . . . . . . . . . . . . . . . . 33
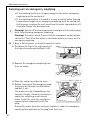
Carrying out an emergency emptying . . . . . . . . . . . . . . . . . . . . . . . . . . . . . . 34
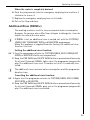
Additional Rinse (RINSE+) . . . . . . . . . . . . . . . . . . . . . . . . . . . . . . . . . . . . . . . . 35
Child Safety Feature . . . . . . . . . . . . . . . . . . . . . . . . . . . . . . . . . . . . . . . . . . . 36
Installation and connection instructions . . . . . . . . . . . . . . . . 37
Installation Safety Precautions . . . . . . . . . . . . . . . . . . . . . . . . . . . . . . . . . . 37
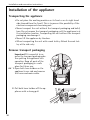
Installation of the appliance . . . . . . . . . . . . . . . . . . . . . . . . . . . . . . . . . . . . 38
Transporting the appliance . . . . . . . . . . . . . . . . . . . . . . . . . . . . . . . . . . . . . . . 38
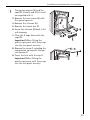
Remove transport packaging . . . . . . . . . . . . . . . . . . . . . . . . . . . . . . . . . . . . . 38
Installation-Site preparation . . . . . . . . . . . . . . . . . . . . . . . . . . . . . . . . . . . . . 40
Installation on a Suspended Floor . . . . . . . . . . . . . . . . . . . . . . . . . . . . . . . . . 40
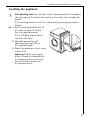
Levelling the appliance . . . . . . . . . . . . . . . . . . . . . . . . . . . . . . . . . . . . . . . . . . 41

Contents
5
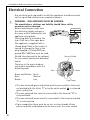
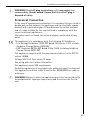
Electrical Connection . . . . . . . . . . . . . . . . . . . . . . . . . . . . . . . . . . . . . . . . . . 42
Water connection . . . . . . . . . . . . . . . . . . . . . . . . . . . . . . . . . . . . . . . . . . . . . 44
Water pressure . . . . . . . . . . . . . . . . . . . . . . . . . . . . . . . . . . . . . . . . . . . . . . . . . 44
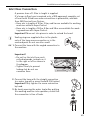
Inlet Hose Connection . . . . . . . . . . . . . . . . . . . . . . . . . . . . . . . . . . . . . . . . . . . 45
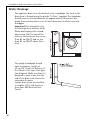
Water Drainage . . . . . . . . . . . . . . . . . . . . . . . . . . . . . . . . . . . . . . . . . . . . . . . . 46
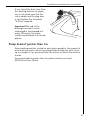
Pump head of greater than 1m . . . . . . . . . . . . . . . . . . . . . . . . . . . . . . . . . . . 47
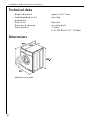
Technical data . . . . . . . . . . . . . . . . . . . . . . . . . . . . . . . . . . . . . . . . . . . . . . . . 48
Dimensions . . . . . . . . . . . . . . . . . . . . . . . . . . . . . . . . . . . . . . . . . . . . . . . . . . 48
Warranty conditions . . . . . . . . . . . . . . . . . . . . . . . . . . . . . . . . . . . . . . 49
Index . . . . . . . . . . . . . . . . . . . . . . . . . . . . . . . . . . . . . . . . . . . . . . . . . . . . . . . . 50
Service & Spare Parts . . . . . . . . . . . . . . . . . . . . . . . . . . . . . . . . . . . . . 51

Operating Instructions
6
Operating Instructions
1 Safety
The safety features of AEG electrical appliances comply with accepted
technical standards and the German Appliance Safety Law. However, we
also consider it our obligation as a manufacturer to inform you about
the following safety information.
Prior to initial start-up
• Observe the "Installation and Connection Instructions" in this in-
struction book.
• If the appliance is delivered in the winter months and temperatures
are below freezing: Store the washing machine at room temperature
for a few hours before putting it into operation.
Intended Use
• The washing machine is only intended for washing normal domestic
washing. If the appliance is used for any other purpose or incorrectly
operated, the manufacturer accepts no liability for any damages
which may result.
• It is dangerous to alter the specifications or attempt to modify this
product in any way.
• Only use detergents which are suitable for automatic washing ma-
chines, and follow the recommendations of the detergent manufac-
turer.
• Garments which have been in contact with flammable solvents
should not be washed. Also bear this in mind when washing pre-
cleaned washing.
• Do not use the washing machine for dry-cleaning.
• Dyes and bleaching agents may only be used if specifically permitted
by the manufacturer of these products. We cannot be held liable for
any damages.
• This appliance must be connected to the cold water supply only.
• Damage due to frost is not covered by the guarantee. If the washing
machine is located in a room in which below freezing temperatures
may occur, emergency emptying must be carried out (see "carrying
out an emergency emptying“).

Operating Instructions
7
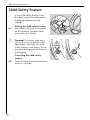
Child Safety
• Packaging materials (e.g. films, styrofoam) can be dangerous for chil-
dren. There is a risk of suffocation! Keep all packaging well away from
children.
• This appliance is designed to be operated by adults. Do not allow
children to tamper with the controls or play with the appliance.
• Pets and children have been known to climb into washing machines.
Please check the drum before use.
• When disposing of the appliance, cut off the mains cable, and destroy
the plug. Disable the door lock to prevent young children being
trapped inside.
General Safety
• Repairs to washing machines must only be carried out by qualified
personnel. Repairs carried out by inexperienced persons may cause
injury or serious malfunctioning. Contact your local AEG Service
Force Centre.
• Never operate the washing machine if the mains cable is damaged or
the control panel, work top or base area are damaged allowing inter-
nal components to be accessible.
• Switch off the appliance and isolate from the mains supply before
carrying out any cleaning or maintenance work.
• Do not use the mains cable to remove the plug from the socket. Al-
ways pull the plug itself.
• Adapters and extension cables must not be used. There is a danger
of overheating!
• Do not clean the washing machine with a water jet. There is a danger
of electric shock!
• During high temperature wash programmes the glass of the door may
become hot. Do not touch!
• Allow the water to cool down before cleaning the drain pump, carry-
ing out emergency emptying or opening the door in an emergency.
• Small animals/pets can chew on power cables and water hoses. This
can lead to the risk of electric shock and water damage to the appli-
ance and property. Keep small animals away from the appliance.

Operating Instructions
8
2 Disposal
Packaging
Dispose of the packaging material correctly. All packaging materials
used are environmentally friendly and can be disposed of without any
danger to the environment.
• Plastic parts can be recycled and are identified as follows:
• Cardboard packaging is manufactured from recycled paper and
should be deposited in the waste paper collection for recycling.
When disposing of the washing machine!
Cut off the mains cable and destroy the plug. Disable the door catch to
prevent young children becoming trapped inside. Use an authorised
disposal site.
2 Environmental tips
To save water and energy, and to help protect the environment, we rec-
ommend that you follow these tips.
• Do not use a pre-wash for normally soiled washing.
• It is more economical to wash full loads.
• When washing small loads, reduce the detergent by half to two
thirds.
• Pre-treat stains, and then wash at a lower temperature.
• Use the energy-saving programme when washing light to normally
soiled garments.
• In hard water areas, the use of a water softening agent can reduce
the amount of detergent necessary. See manufacturers recommen-
dations.
>PE<
for polyethylene, e.g. the outer covering and the bags in
the interior.
>PS< for polystyrene, e.g. padding (always CFC-free)
>POM< for polyoxymethylene, e.g. plastic clips

Operating Instructions
9
Description of the Appliance
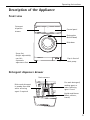
Front view
Detergent dispenser drawer
Detergent
dispenser
drawer
Main door
Screw feet
(height-adjustable);
rear left:
Automatic
adjustment foot.
Control panel
Flap in front of
drain pump
Rating plate
(behind door)
Pre-wash detergent/
soaking agent or
water softening
agent if used.
Main wash detergent
in powder form and
water softening
agent if required.
Stain removers
Liquid conditioners
(fabric softener,
starch)

Operating Instructions
10
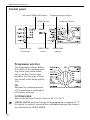
Control panel
Programme selector
The programme selector defines
the nature of the washing cycle
(e.g. water level, drum move-
ment, number of rinses, spin
speed) to suit the type of wash-
ing, as well as the washing solu-
tion.
OFF
Switches the washing machine
off, the machine is switched on
at all other positions.
COTTONS/LINEN
Main washing cycle Cottons / Linen at 30 °C to 95 °C
2
ENERGY SAVING position: Energy-saving programme at approx. 67 °C
for lightly to normally soiled cottons, extended washing time (cannot
be combined with QUICK WASH).
Spin speed / RINSE HOLD button
Programme op-
tion buttons
OVER DOSING
indicator
Programme progress display
DOOR Indicator
Programme selector
START/ PAUSE
button

Operating Instructions
11
EASY-CARES
Main washing cycle for easy-care textiles (mixed fabrics) at 40 °C to
60 °C.
EASY IRON position: Main washing cycle at 40 °C for easy-care fabrics
which, with the aid of this programme, only require a gentle iron, if any
ironing at all.
DELICATES
Main washing cycle for delicates at 30 °C or 40 °C.
WOOL P (hand wash)
Main washing cycle (cold to 40 °C) for machine-washable woollens and
for woollen fabrics and silk with the care symbol (hand wash).
GENTLE RINSE
Separate gentle rinsing e.g. for rinsing hand-washed fabrics (2 rinsing
cycles, liquid conditioner from compartment æ is rinsed in, short spin).
STARCHING
Separate starching, separate softening, separate conditioning of wet
washing (1 rinse, liquid conditioner is washed in from the compartment
æ, and a spin).
PUMP OUT
Pump out the water at the end of a rinse hold (without spinning).
3
Rinse hold means the washing remains in the last rinsing water and is
not spun.
SPIN
Pumping out the water after a rinse hold and spin, or separate spinning
of hand-washed cottons/linen.
SHORT SPIN
Pump out the water at the end of a rinse hold and short spin or sepa-
rate short spinning for delicate fabrics (easy-cares, delicates, woollens).

Operating Instructions
12
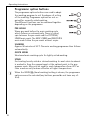
Programme option buttons
The programme options buttons are used to adapt
the washing program to suit the degree of soiling
of the washing. Programme options are not re-
quired for normally soiled washing.
The different functions can be combined together
depending on the programme.
PRE WASH
Warm pre wash before the main washing cycle
which follows on automatically. There is a short
spin between the pre-wash and the COTTONS /
LINEN main wash. The EASY-CARES and DELICATES
main wash follow the pre-wash without a spin.
SOAKING
Approx. 50 minutes at 30°C. The main washing programme then follows
automatically.
QUICK WASH
Shortened main washing cycle for lightly soiled washing.
STAIN
For treating heavily soiled or stained washing. In-wash stain treatment
is washed in from the compartment at the optimal point in the pro-
gramme cycle. May only be used for wash temperatures from 40°C as
stain removers only become effective at higher temperatures.
3
When the WOOL/P (hand washing) setting is chosen, the programme
options cannot be selected (any buttons pressed do not have any ef-
fect).

Operating Instructions
13
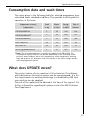
Consumption data and wash times
The values given in the following table for selected programmes were
calculated under standard conditions. They provide a useful guide for
operation in the home.
What does UPDATE mean?
The control system of your machine is fully electronic. The software
which determines this control system can be reprogrammed. If a fur-
ther improvement to washing technology is introduced by AEG then
your machine can be updated.
The cost of the update will be advised at the time of the request. For
further information regarding this please contact the AEG Customer
Care Department.
Programme selector/
temperature
Load
in kg
Water
in litres
Energy
in kWh
Time in
minutes
COTTONS/LINEN 95 5 49 1.80 144
COTTONS/LINEN 60
1)
1) Note: The selected programme is tested in accordance with EN 60 456. The
consumption values, however, can deviate depending on the following: water
pressure, water hardness, water inlet temperature, room temperature, washing
type and quantity, the detergent used, fluctuations in the mains voltage and the
selected programme options.
5 49 0.94 131
COTTONS/LINEN 40 5 54 0.60 128
EASY-CARES 40 2.5 54 0.50 82
DELICATES 30 2.5 50 0.30 55
WOOL/ P (handwash) 30 2 47 0.25 55

Operating Instructions
14
Before the First WashFirst Wash
0 1. Pull the detergent dispenser drawer out slightly.
2. Pour about 1 litre of water through the detergent dispenser drawer
into the washing machine. The next time a programme is started the
solution container will be closed and the OKO valve can function
correctly.
3. Carry out a washing cycle without any washing laundry (COTTONS 95,
using half the usual quantity of washing detergent). This removes any
residues from the drum and solution container which may have been
left during manufacturing.
Preparing a Wash Load
Sorting and preparing a wash load
• Sort washing according to the care symbol and type (see "Washing
types and care symbols").
• Empty all pockets.
• Remove metal objects (paper clips, safety pins etc.).
• In order to prevent bunching up of washing and damage to washing,
close zippers, button up duvet covers and pillow cases, and tie up
loose straps such as from aprons.
• Turn articles with double layered textiles inside out (sleeping bags,
anoraks etc.).
• Coloured, knitted fabrics, as well as wool and fabrics with appliqués
should be turned inside out.
• Place small and delicate items (e.g. socks, tights and stockings, bras
etc.) in a washing net, or pillow case.
• Handle curtains with care. Metal rollers or burred, plastic rollers must
be removed or tied into a net or bag. We cannot accept liability for
damage.
• Do not wash coloured and white washing together. This could discol-
our white washing or turn it grey.
• New, coloured washing often contains excessive dye. Wash these sep-
arately the first time.
• Mix small and large items of washing. This improves washing effi-
ciency and the washing is more evenly distributed during the spin-
ning cycle.

Operating Instructions
15
• Shake out washing before placing into the washing machine.
• Do not place folded washing into the drum.
• Observe tips such as "wash separately“ and "wash separately several
times".
Washing Types and Care Symbols
The care symbols help you chose the correct washing programme.
Washing should be sorted according to type and care symbol. The tem-
peratures indicated in the care symbols are the maximum temperatures.
Cottons ç
Fabrics made from cotton and linen with this care symbol will with-
stand maximum wash actions and high temperatures. The COTTONS /
LINEN programme is appropriate for this type of washing.
Linen èë
Fabrics made of cotton and linen which carry this care symbol will
withstand maximum wash actions. The COTTONS / LINEN programme is
appropriate for this type of washing.
Easy-cares êí
Fabrics such as treated cotton, cotton mixed fabrics, viscose and syn-
thetics which carry this care symbol need a softer wash action. The
EASY CARES / EASY IRON programme is appropriate for this type of
washing.
Delicates ì
Fabrics such as those with layered fibres, micro fibres, viscose, synthetics,
as well as curtains with this care symbol require particularly careful
handling. The DELICATES programme is appropriate for this type of
washing.
Wool and particularly sensitive washing 9ìï
Fabrics such as wool, wool mixtures and silk with this care symbol re-
quire a very gentle wash cycle. The WOOL /P (hand wash) programme
is suitable for this type of washing.
Important! Fabrics with this care symbol
ñ
(do not wash!) must not
be washed in washing machines.

Operating Instructions
16
Detergents and Conditioners
Which detergent and conditioner?
Use only detergents and conditioners which are suitable for use in au-
tomatic washing machines. Always follow the manufacturer's instruc-
tions.
How much detergent and conditioner?
The required quantity depends upon:
• the extent of soiling of the washing
• the hardness class of the mains water
• the amount of washing
2
Should the detergent manufacturer not specify the dosage quantity for
less than full loads, reduce the detergent accordingly: For a half load
reduce the quantity by 1/3. For a small load or an EASY IRON pro-
gramme reduce the quantity by 1/2.
Observe the instructions for use and dosing provided by the detergent
and conditioner manufacturer.
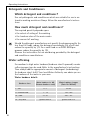
Water softening
For medium to high water hardness (hardness class II upwards) a water
softening agent can be used. Refer to the manufacturer's instructions.
Then always add the appropriate amount of detergent (underdosing)
for hardness class I (soft). Your local Water Authority can advise you on
the hardness of the water in your area.
Water hardness details
Hardness class
Water hardness in °dH
(German hardness scale)
Water hardness in ppm
(Parts Per Million)
I - soft 0 - 7 to 125
II - medium hard 7 - 14 125 - 250
III - hard 14 - 21 250 - 375
IV - very hard greater than 21 greater than 375

Operating Instructions
17
Running a washing cycle
Brief instructions
A washing cycle consists of the following steps:
0 1. Set the correct washing programme:
– Select the programme and temperature with the programme selector.
– Select any programme options if required.
2. If necessary, change the spin speed/select RINSE HOLD.
3. Open the door and load the washing.
4. Close the door.
5. Add the detergent/conditioner.
6. Start the washing programme with the START/PAUSE button.
When the washing programme has ended:
Important! If the washing cycle ended with a rinse hold, carry out
PUMP OUT, SPIN, or SHORT SPIN before opening the door.
7. Open the door and remove the washing.
8. Switch off the washing machine: Set the programmes selector to OFF.

Operating Instructions
18
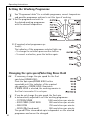
Setting the Washing Programme
3
See "Programme tables" for a suitable programme, correct temperature
and possible programme options to suit the type of washing.
0 1. Set the programme selector to
the desired washing programme
with the desired temperature.
2. If required, select programme op-
tion(s):
The indicator of the programme selected lights up.
– To change the selection press another button.
– To cancel a selection, press the button again.
Changing the spin speed/Selecting Rinse Hold
0 If necessary, change the spin speed for the final
spin/select RINSE HOLD:
Press the Spin speed/RINSE HOLD button
repeatedly until the indicator of the required
spin speed or of RINSE HOLD illuminates.
If RINSE HOLD is selected, the washing remains in
the final rinse water. It is not spun.
3
If you do not change the spin speed, the final spin
is automatically adjusted to suit the washing programme.
The speed of the intermediate spin is dependent on the selected
programme and cannot be changed.
– COTTONS/LINEN 1400 revolutions per minute
– EASY CARES / EASY IRON 900 revolutions per minute
– DELICATES 700 revolutions per minute
– WOOL /P (hand wash) 900 revolutions per minute

Operating Instructions
19
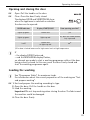
Opening and closing the door
0 Open: Pull the handle on the door.
0 Close: Press the door firmly closed.
The displays DOOR and START/PAUSE show
when the appliance is switched on whether
the door can be opened:
3
If
– the display DOOR flashes red,
– and the MAIN WASH display flashes,
an attempt was made to start a washing programme without the door
being correctly closed. In this case, press the door firmly closed and
start the washing programme again.
Loading the washing
3
See "Programme Tables" for maximum loads.
For information about the correct preparation of the washing see "Sort
and prepare washing".
0 1. Sort and prepare the washing according to type.
2. Open the door: Pull the handle on the door.
3. Load the washing.
Important! Do not trap washing when closing the door. The fabrics and
the machine could be damaged.
4. Close the door firmly.
DOOR Indicator Display START/PAUSE Door opening possible?
lights up green flashes red yes
lights up green lights up red
yes, after the START/PAUSE
key is pressed
is off
flashes red
or lights up red
no
1)
1) The door is locked because of a high water level or high temperature

Operating Instructions
20
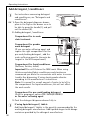
Add detergent / conditioner
3
For instructions concerning detergent
and conditioners, see "Detergents and
conditioners".
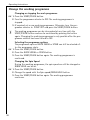
0 1. Open the detergent dispenser drawer.
press in the flap on the drawer so as to
be able to grasp the handle(1), and pull
out the drawer (2).
2. Adding detergent / conditioner
3. Push the detergent dispenser drawer fully in.
3
If using liquid detergent / tablets
Add liquid detergent / tablets in the quantity recommended by the
washing detergent manufacturer. Add liquid detergent with dosage
containers provided by the detergent manufacturer.
Compartment for in-wash
stain treatment
Compartment for powder
main detergent
(If you use water softening agent and
require the right compartment for the
pre-wash/soaking detergent , add the
water softening agent to the main de-
tergent in the left compartment.)
Compartment for liquid conditioner
(Softener, finisher, starch)
Important! Do not fill above the MAX mark. When using
thick concentrated fabric conditioners and starches we
recommend you dilute the concentrate with water to ensure
trouble-free dispensing. If using starch powder dissolve
according to the manufacturer´s instructions.
Note: It is normal for a small amount of water to be left in
the compartment for liquid conditioner; this will not affect
the wash results.
Compartment for pre-wash/soaking detergent
(Only for program
me options PRE-WASH/SOAKING)
or for water softening agent
La pagina sta caricando ...
La pagina sta caricando ...
La pagina sta caricando ...
La pagina sta caricando ...
La pagina sta caricando ...
La pagina sta caricando ...
La pagina sta caricando ...
La pagina sta caricando ...
La pagina sta caricando ...
La pagina sta caricando ...
La pagina sta caricando ...
La pagina sta caricando ...
La pagina sta caricando ...
La pagina sta caricando ...
La pagina sta caricando ...
La pagina sta caricando ...
La pagina sta caricando ...
La pagina sta caricando ...
La pagina sta caricando ...
La pagina sta caricando ...
La pagina sta caricando ...
La pagina sta caricando ...
La pagina sta caricando ...
La pagina sta caricando ...
La pagina sta caricando ...
La pagina sta caricando ...
La pagina sta caricando ...
La pagina sta caricando ...
La pagina sta caricando ...
La pagina sta caricando ...
La pagina sta caricando ...
La pagina sta caricando ...
-
 1
1
-
 2
2
-
 3
3
-
 4
4
-
 5
5
-
 6
6
-
 7
7
-
 8
8
-
 9
9
-
 10
10
-
 11
11
-
 12
12
-
 13
13
-
 14
14
-
 15
15
-
 16
16
-
 17
17
-
 18
18
-
 19
19
-
 20
20
-
 21
21
-
 22
22
-
 23
23
-
 24
24
-
 25
25
-
 26
26
-
 27
27
-
 28
28
-
 29
29
-
 30
30
-
 31
31
-
 32
32
-
 33
33
-
 34
34
-
 35
35
-
 36
36
-
 37
37
-
 38
38
-
 39
39
-
 40
40
-
 41
41
-
 42
42
-
 43
43
-
 44
44
-
 45
45
-
 46
46
-
 47
47
-
 48
48
-
 49
49
-
 50
50
-
 51
51
-
 52
52


AEG LAV74330-W Manuale utente
- Categoria
- Lavatrici
- Tipo
- Manuale utente
- Questo manuale è adatto anche per
in altre lingue
- English: AEG LAV74330-W User manual