
www.klarstein.com
DELFINO
Küchenmaschine
Food Processor
Robot de cocina
Robot de cuisine
Robot da cucina
10035479 10035480


3
DE
Sehr geehrter Kunde,
wir gratulieren Ihnen zum Erwerb Ihres Gerätes. Lesen Sie
die folgenden Hinweise sorgfältig durch und befolgen Sie
diese, um möglichen Schäden vorzubeugen. Für Schäden,
die durch Missachtung der Hinweise und unsachgemäßen
Gebrauch entstehen, übernehmen wir keine Haftung. Scannen
Sie den folgenden QR-Code, um Zugriff auf die aktuellste
Bedienungsanleitung und weitere Informationen rund um das
Produkt zu erhalten.
INHALTSVERZEICHNIS
Sicherheitshinweise4
Geräteübersicht5
Inbetriebnahme5
Zusammenbau und Bedienung6
Mischverhältnisse7
Reinigung und Pege8
Hinweise zur Entsorgung8
Hersteller8
TECHNISCHE DATEN
Artikelnummer 10035479, 10035480
Stromversorgung 220-240 V ~ 50/60 Hz
Leistung 1800 W
Fassungsvermögen Schüssel 7 L
English 9
Español 15
Français 21
Italiano 27

4
DE
SICHERHEITSHINWEISE
• Prüfen Sie vor der Benutzung die Spannung auf der Geräteplakette und schließen
Sie das Gerät nur an Steckdosen an, die der Spannung des Geräts entsprechen.
Wenn Sie sich nicht sicher sind, ob Ihre Anschlüsse den Anforderungen genügen
ziehen Sie einen Elektriker oder Ihren Stromanbieter zu Rate.
• Schalten Sie den Motor immer aus, bevor Sie den Stecker in die Steckdose stecken.
• Um Stromschlägen vorzubeugen, tauchen Sie die Gerätebasis nie komplett in
Wasser oder andere Flüssigkeiten.
• Falls das Netzkabel beschädigt ist, muss es vom Hersteller, einem autorisierten
Fachbetrieb oder einer ähnlich qualizierten Person ersetzt werden.
• Knicken Sie das Netzkabel nicht ab und lassen Sie es nicht über die Arbeitsäche
hängen, damit keiner daran hängenbleibt.
• Stellen Sie das Gerät nicht in die Nähe offener Herde, heißer Öfen oder leicht
entzündlicher Materialen, wie Vorhänge oder Textilien.
• Stellen Sie das Gerät vor der Benutzung auf eine stabile, ebene Oberäche.
• Kinder ab 8 Jahren, psychisch, sensorisch und körperlich eingeschränkte Menschen
dürfen das Gerät nur benutzen, wenn sie vorher von einer für sie verantwortlichen
Aufsichtsperson ausführlich mit den Funktionen und den Sicherheitsvorkehrungen
vertraut gemacht wurden und die damit verbundenen Risiken verstehen.
• Achten Sie darauf, dass Kinder nicht mit dem Gerät spielen.
• Stellen Sie das Gerät so nah wie möglich an die Stromquelle, damit Sie den Stecker
bei Bedarf schnell und leicht ziehen können.
• Überprüfen Sie das Netzkabel regelmäßig auf Schäden. Benutzen Sie das Gerät
nicht mit beschädigtem Netzkabel.
• Benutzen Sie das Gerät nur in Innenräumen und nur zum angegebenen
Verwendungszweck.
• Halten Sie Kinder vom Gerät fern und verstauen Sie es außerhalb der Reichweite
von Kindern.
• Benutzen Sie das Gerät nicht ohne Inhalt und nur unter Aufsicht.
• Fassen Sie während der Benutzung keine beweglichen Teile mit den Händen an.
• Bewahren Sie die Bedienungsanleitung auf und geben Sie das Gerät nur mit
Bedienungsanleitung weiter.
• Benutzen Sie nur Originalzubehör.
• Ziehen Sie den Stecker aus der Steckdose, bevor Sie das Gerät reinigen oder nicht
mehr benutzen.
• Schalten Sie das Gerät aus und ziehen Sie den Stecker, bevor Sie bewegliche Teile
wechseln oder entnehmen.
• Das Gerät enthält Teile, die dem Benutzer nicht zugänglich sind. Entfernen Sie keine
Abdeckungen und versuchen Sie nicht das Gerät selbst zu reparieren. Reparaturen
dürfen nur von qualizierten Fachkräften durch- geführt werden.
• Schließen Sie das Gerät nicht an Mehrfachsteckdosen, externe Timer oder
ferngesteuerte Steckdosen an.
Hinweis: Das Gerät ist nur für den Kurzzeitbetrieb ausgelegt, d.h. es sollte nicht
länger als 4 Minuten im Dauerbetrieb betrieben werden. Schalten Sie das Gerät
danach aus und lassen Sie den Motor abkühlen, bevor Sie ihn wieder einschalten.

5
DE
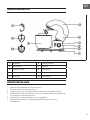
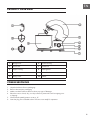
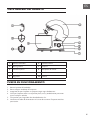
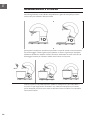
GERÄTEÜBERSICHT
1Knethaken 6Unteres Gehäuse
2Schwenkarm 7Standfuß
3Oberes Gehäuse 8Mixschüssel
4Kleiner Knopf 9Mixerblatt
5Drehregler 10 Schneebesen
INBETRIEBNAHME
1 Packen Sie das Gerät aus der Verpackung aus.
2 Entfernen Sie die Transportverpackung.
3 Vergewissern Sie sich, dass das Gerät keine Anzeichen von Schäden aufweist.
4 Stellen Sie das Gerät auf eine ebene, trockene, rutschfeste Fläche, damit das Gerät
nicht umkippen oder abrutschen kann.
5 Überprüfen Sie, ob der Drehregler auf „0“ eingestellt ist.
6 Stecken Sie den Stecker in eine geeignete Steckdose. Das Gerät ist nun
betriebsbereit.

6
DE
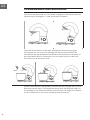
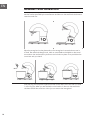
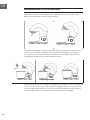
ZUSAMMENBAU UND BEDIENUNG
Mischen Sie die Lebensmittel wie vom Hersteller angegeben und drehen Sie dann den
kleinen Knopf im Uhrzeigersinn, um den Schwenkarm anzuheben.
Setzen Sie die Mixschüssel auf die Platte und drehen Sie die Mixschüssel gegen
den Uhrzeigersinn, bis sie xiert ist. Befestigen Sie dann Sie den Knethaken, den
Schneebesen oder das Mixerblatt an der Aufnahme am Schwenkarm und drehen Sie
das verwendete Zubehör im Uhrzeigersinn, bis es einrastet. Drücken Sie dann den
Schwenkarm mit der Hand nach unten.
Stecken Sie den Stecker in die Steckdose und stellen Sie den Drehregler auf P für kurze
Benutzung oder auf Stufe 1-6 für längere Benutzung. Wenn Sie fertig sind, stellen Sie
den Drehregler auf 0. Drehen Sie dann den kleinen Knopf im Uhrzeigersinn und heben
Sie den Schwenkarm an. Nun können Sie die Mixschüssel entfernen.

7
DE
MISCHVERHÄLTNISSE
Mischen und Kneten von Teig
Mischen Sie Mehl und Wasser in einem Verhältnis von 5:3. Die maximale Mehlmenge
beträgt 1,5 kg. Kneten Sie den Teig auf Stufe 1 für 30 Sekunden. Drehen Sie den Regler
dann auf Stufe 2 und kneten Sie den Teig für 30 Sekunden. Drehen Sie den Regler
dann auf Stufe 3 und kneten Sie den Teig für etwa 3 Minuten.
Hinweis: Achten Sie beim Befüllen der Mixschüssel darauf, dass die maximale
Menge an Mehl (1,5 kg) nicht überschritten wird. Verwenden Sie zum Kneten von
Teig den Knethaken oder das Mixerblatt.
Schlagen von Eiweiß oder Sahne
Schalten Sie die Geschwindigkeit 4 bis 6 ein und schlagen Sie das Eiweiß je nach
Größe der Eier etwa 4 Minuten lang ohne Unterbrechung steif. Wenn Sie Sahne
steifschlagen wollen, verwenden Sie 250 ml frische Sahne und und schlagen Sie die
Sahne auf Stufe 4 bis 6 etwa 5 Minuten lang steif.
Hinweis: Beim Füllen der Mixschüssel mit frischer Milch, Sahne oder anderen
Zutaten ist darauf zu achten, dass die maximale Menge (24 Eiweiß) nicht
überschritten wird. Verwenden Sie zum Schlagen von Eiweiß oder Sahne den
Schneebesen.
Mixen von Shakes, Cocktails oder anderen Flüssigkeiten
Mixen Sie die Zutaten nach Rezept etwa 4 Minuten lang auf Stufe 1 bis 6.
Hinweis: Überschreiten Sie nicht die Höchstmenge (7 L) für die Rührschüssel.
Verwenden Sie zum Mixen von Flüssigkeiten das Mixerblatt.

8
DE
REINIGUNG UND PFLEGE
• Vergewissern Sie sich vor der Reinigung, dass sich der Drehregler auf Position0
bendet und dass der Stecker aus der Steckdose gezogen wurde.
• Lassen Sie das Gerät vor der Reinigung abkühlen.
• Verwenden Sie zum Reinigen der Außenseite ein feuchtes Tuch und ein mildes
Reinigungsmittel.
• Verwenden Sie zur Reinigung der Innen- und Außenseite keine scheuernden
Reinigungsmittel oder Alkohol.
• Tauchen Sie das Gerät zum Reinigen niemals in Wasser ein.
• Der Knethaken, der Schneebesen und das Mixerblatt sind nicht
spülmaschinengeeignet. Das Zubehör sollte nur in warmem Wasser mit Spülmittel
gereinigt werden.
• Die Rührschüssel ist spülmaschinengeeignet. Die Schüssel kann aber auch
mit warmem Wasser und Spülmittel gereinigt werden. Verwenden Sie keine
scheuernden Reinigungsmittel.
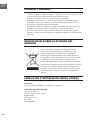
HINWEISE ZUR ENTSORGUNG
Wenn es in Ihrem Land eine gesetzliche Regelung zur
Entsorgung von elektrischen und elektronischen Geräten
gibt, weist dieses Symbol auf dem Produkt oder auf der
Verpackung darauf hin, dass dieses Produkt nicht im
Hausmüll entsorgt werden darf. Stattdessen muss es zu
einer Sammelstelle für das Recycling von elektrischen
und elektronischen Geräten gebracht werden. Durch
regelkonforme Entsorgung schützen Sie die Umwelt und die
Gesundheit Ihrer Mitmenschen vor negativen Konsequenzen.
Informationen zum Recycling und zur Entsorgung dieses
Produkts, erhalten Sie von Ihrer örtlichen Verwaltung oder
Ihrem Hausmüllentsorgungsdienst.
HERSTELLER & IMPORTEUR (UK)
Hersteller:
Chal-Tec GmbH, Wallstraße 16, 10179 Berlin, Deutschland.
Importeur für Großbritannien:
Chal-Tec UK limited
Unit 6 Riverside Business Centre
Brighton Road
Shoreham-by-Sea
BN43 6RE

9
EN
Dear Customer,
Congratulations on purchasing this device. Please read the
following instructions carefully and follow them to prevent
possible damages. We assume no liability for damage caused
by disregard of the instructions and improper use. Scan the QR
code to get access to the latest user manual and more product
information.
CONTENT
Safety Instructions10
Product Overview11
Commissioning11
Assembly and Operation12
Mixing Ratios13
Cleaning and Care14
Hints on Disposal14
Producer14
TECHNICAL DATA
Item number 10035479, 10035480
Power supply 220-240 V ~ 50/60 Hz
Power 1800 W
Bowl capacity 7 L

10
EN
SAFETY INSTRUCTIONS
• Before use, check the voltage on the device badge and connect the device only to
sockets which correspond to the voltage of the device. If you are not sure whether
your connections meet the requirements, consult an electrician or your power
supplier.
• Always turn the motor off before plugging the motor into an electrical outlet.
• To prevent electric shock, never completely immerse the base in water or other
liquids.
• If the power cord is damaged, it must be replaced by the manufacturer, an
authorized service center, or a similarly qualied person.
• Do not bend the power cord or allow it to hang over the work surface to prevent it
from getting caught.
• Do not place the appliance near open stoves, hot ovens, or easily ammable
materials such as curtains or textiles.
• Before use, place the appliance on a stable, level surface.
• Children 8 years of age and older, mentally, sensory and physically impaired
persons may only use the device if they have been thoroughly familiarized with
its functions and safety precautions by a supervisor responsible for them and
understand the associated risks.
• Ensure that children do not play with the device.
• Place the device as close as possible to the power source so that you can pull the
plug quickly and easily if necessary.
• Check the power cord regularly for damage. Do not use the unit with the power
cord damaged.
• Only use the unit indoors and for the specied purpose.
• Keep children away from the unit and stow it out of the reach of children.
• Do not use the device without contents and only under supervision.
• Do not touch any moving parts with your hands during use.
• Keep the operating instructions and pass on the device only with the operating
instructions.
• Only use original accessories.
• Unplug the appliance from the wall outlet before cleaning or discontinuing use.
• Switch off the appliance and disconnect the plug before changing or removing any
moving parts.
• The unit contains parts that are not accessible to the user. Do not remove any covers
and do not attempt to repair the unit yourself. Repairs may only be carried out by
qualied specialists.
• Do not connect the unit to multiple sockets, external timers or remotely controlled
sockets.
Note: The device is only designed for short-term operation, i.e. it should not be
operated continuously for more than 4 minutes. Then switch off the unit and let the
motor cool down before switching it on again.

11
EN
PRODUCT OVERVIEW
1Dough hook 6Lower housing
2Swivel arm 7Stand foot
3Upper housing 8Mixing bowl
4Small knob 9Mixer blade
5Rotary knob 10 Whisk
COMMISSIONING
1 Unpack the device from its packaging.
2 Remove the transport packaging.
3 Make sure that the device does not show any signs of damage.
4 Place the unit on a level, dry, non-slip surface to prevent the unit from tipping over
or slipping.
5 Check that the speed governor is set to „0“.
6 Insert the plug into a suitable socket. The unit is now ready for operation.

12
EN
ASSEMBLY AND OPERATION
Mix the food as specied by the manufacturer and then turn the small knob clockwise to
raise the swivel arm.
Place the mixing bowl on the plate and turn the mixing bowl counterclockwise until it
is xed. Then attach the dough hook, whisk or mixer blade to the holder on the swivel
arm and turn the used accessory clockwise until it locks into place. Then push down the
swivel arm with your hand.
Insert the plug into the power outlet and set the control dial to P for short use or to level
1-6 for long use. When you are nished, turn the knob to 0, then turn the small knob
clockwise and lift the swivel arm. Now you can remove the mixing bowl.

13
EN
MIXING RATIOS
Mixing and kneading of dough
Mix our and water in a ratio of 5:3, the maximum amount of our is 1.5 kg. Knead
the dough on level 1 for 30 seconds. Then turn the control to level 2 and knead the
dough for 30 seconds. Then turn the control to level 3 and knead the dough for about 3
minutes.
Note: When lling the mixing bowl, make sure that the maximum amount of our (1.5
kg) is not exceeded. Use the dough hook or mixer blade to knead dough.
Whipping of egg white or cream
Turn on speed 4 to 6 and beat the egg whites for about 4 minutes without interruption,
depending on the size of the eggs, until stiff. If you want to whip cream stiff, use 250 ml
fresh cream and and whip the cream at speed 4 to 6 for about 5 minutes until stiff.
Note: When lling the mixing bowl with fresh milk, cream or other ingredients, make
sure that the maximum amount (24 egg whites) is not exceeded. Use the whisk to beat
the egg whites or cream.
Mixing shakes, cocktails or other liquids
Mix the ingredients according to the recipe for about 4 minutes at levels 1 to 6.
Note: Do not exceed the maximum amount (7 L) for the mixing bowl. Use the mixer
blade to mix liquids.

14
EN
CLEANING AND CARE
• Before cleaning, make sure that the control dial is in position 0 and that the plug has
been removed from the socket.
• Let the appliance cool down before cleaning.
• Use a damp cloth and mild detergent to clean the outside of the unit.
• Do not use abrasive detergents or alcohol to clean the inside and outside.
• Never immerse the unit in water for cleaning.
• The dough hook, whisk and mixer blade are not dishwasher safe. The accessories
should only be cleaned in warm water with detergent.
• The mixing bowl is dishwasher safe. The bowl can also be cleaned with warm water
and detergent. Do not use abrasive cleaning agents.
DISPOSAL CONSIDERATIONS
If there is a legal regulation for the disposal of electrical
and electronic devices in your country, this symbol on the
product or on the packaging indicates that this product must
not be disposed of with household waste. Instead, it must be
taken to a collection point for the recycling of electrical and
electronic equipment. By disposing of it in accordance with
the rules, you are protecting the environment and the health of
your fellow human beings from negative consequences. For
information about the recycling and disposal of this product,
please contact your local authority or your household waste
disposal service.
MANUFACTURER & IMPORTER (UK)
Manufacturer:
Chal-Tec GmbH, Wallstrasse 16, 10179 Berlin, Germany.
Importer for Great Britain:
Chal-Tec UK limited
Unit 6 Riverside Business Centre
Brighton Road
Shoreham-by-Sea
BN43 6RE
United Kingdom

15
ES
Estimado cliente:
Le felicitamos por la adquisición de este producto. Lea
atentamente el siguiente manual y siga cuidadosamente las
instrucciones de uso con el n de evitar posibles daños. La
empresa no se responsabiliza de los daños ocasionados por
un uso indebido del producto o por haber desatendido las
indicaciones de seguridad. Escanee el código QR para obtener
acceso al manual de usuario más reciente y otra información
sobre el producto:
ÍNDICE
Indicaciones de seguridad16
Vista general del aparato17
Puesta en funcionamiento17
Montaje y utilización18
Proporciones de mezcla19
Limpieza y cuidado20
Hinweise zur entsorgung20
Hersteller20
DATOS TÉCNICOS
Número de artículo 10035479, 10035480
Suministro eléctrico 220-240 V ~ 50/60 Hz
Potencia 1800 W
Capacidad del recipiente 7 L

16
ES
INDICACIONES DE SEGURIDAD
• Antes de utilizar el aparato, compruebe la tensión en la placa técnica del mismo
y conecte el aparato a las tomas de corriente que se adecuen a dicha tensión. Si
no está seguro de que la toma de corriente cumpla este requisito, consulte con un
electricista o con su empresa suministradora de electricidad.
• Apague siempre el motor antes de conectar la clavija del aparato a la red.
• Para evitar descargas eléctricas, no sumerja el aparato, el cable de alimentación o
el enchufe en agua ni en cualquier otro líquido.
• Si el cable de alimentación está dañado, deberá ser sustituido por el fabricante,
una empresa autorizada o una persona cualicada.
• No doble el cable y procure que no quede colgando de la supercie en la que ha
colocado el robot para que nadie tropiece.
• No coloque el aparato cerca de hornos, supercies calientes o sustancias
fácilmente inamables como cortinas y otro tipo de tejidos.
• Antes de utilizar el aparato, colóquelo en una supercie nivelada y estable.
• Los niños mayores de 8 años y las personas con discapacidad física, sensorial
o psíquica pueden utilizar el aparato si han sido previamente instruidos por su
tutor o supervisor sobre el funcionamiento del mismo y conocen las funciones, las
indicaciones de seguridad y los riesgos asociados.
• No permita que los niños jueguen con el aparato.
• Coloque el aparato tan cerca como sea posible de una toma de red para que, en
caso necesario, pueda desenchufarlo fácilmente.
• Compruebe el cable de alimentación regularmente para detectar posibles
defectos. No utilice el aparato con el cable de alimentación dañado.
• Utilice este aparato únicamente en el interior y según el n para el que ha sido fabricado.
• Mantenga a los niños lejos del aparato y asegúrese de guardarlo en un lugar al
que los niños no puedan acceder.
• No utilice el aparato con el recipiente vacío y no deje el aparato desatendido
mientras está en funcionamiento.
• Cuando el aparato está en marcha, no toque las partes móviles con las manos.
• Conserve este manual de instrucciones y entréguelo también si va a ceder el
aparato a otra persona.
• Utilice solamente los accesorios autorizados.
• Desconecte el robot de la toma de corriente antes de limpiarlo o cuando no lo
utilice.
• Apague el aparato y desconecte el cable de alimentación antes de montar y
desmontar las piezas móviles.
• El aparato contiene piezas que no son accesibles para el usuario. NO abra la
cubierta y NO intente reparar el aparato usted mismo/a. Solamente un personal
técnico cualicado debe llevar a cabo las reparaciones.
• No conecte el aparato a tomas múltiples, tomas manejadas por control remoto ni
con temporizador.
Nota: El aparato solo está diseñado para un funcionamiento de corta duración,
es decir, no debe funcionar durante más de 4 minutos de forma continua. Después
de utilizar el aparato, apáguelo y deje que el motor se enfríe antes de volver a
encenderlo.

17
ES
VISTA GENERAL DEL APARATO
1Gancho amasador 6Carcasa inferior
2Brazo giratorio 7Soporte
3Carcasa superior 8Recipiente de mezcla
4Botón pequeño 9Batidor
5Regulador 10 Varillas
PUESTA EN FUNCIONAMIENTO
1 Retire el aparato del embalaje.
2 Retire cualquier embalaje de transporte.
3 Asegúrese de que el aparato no presenta ningún signo de deterioro.
4 Coloque el aparato sobre una supercie plana, seca y antideslizante para evitar
que se vuelque o resbale.
5 Compruebe que el regulador de velocidad esté a «0».
6 Introduzca el cable de alimentación en la toma de corriente. El aparato está listo
para usarse.

18
ES
MONTAJE Y UTILIZACIÓN
Mezcle todos los alimentos como indica el fabricante y, a continuación, gire el botón
pequeño en sentido horario para levantar el brazo giratorio.
Coloque el recipiente de mezcla sobre la placa y gírelo en sentido antihorario hasta
que quede jado. Fije a continuación el gancho amasador, las varillas o el batidor en
la inserción del brazo giratorio y enrosque el accesorio en sentido horario hasta que
encaje. A continuación, presione el brazo giratorio con la mano hacia abajo.
Conecte el enchufe a la toma de corriente y coloque el regulador en la posición P para
un uso breve o en los niveles 1-6 para usos más prolongados. Cuando haya terminado,
gire el regulador a la posición 0. A continuación, gire el botón pequeño en sentido
horario y levante el brazo giratorio. Ahora puede retirar el recipiente de mezcla.

19
ES
PROPORCIONES DE MEZCLA
Mezclar y amasar masa
Mezcle harina y agua en una proporción de 5:3. La cantidad máxima para mezclar es
de 1,5 kg. Amase la masa a nivel 1 durante 30 segundos. Posteriormente, coloque el
regulador en el nivel 2 y amase la masa durante 30 segundos. Posteriormente, coloque
el regulador en el nivel 3 y amase la masa durante 3 minutos.
Advertencia: A la hora de llenar el recipiente de mezcla, asegúrese de no superar
la cantidad máxima de harina (1,5 kg). Para amasar la masa, utilice el gancho
amasador o el batidor.
Montar claras o nata
Ajuste la velocidad de 4 a 6 y monte las claras en función del tamaño de los huevos
durante 4 minutos sin pausas. Si desea montar nata, utilice 250 ml de nata fresca y
móntela a nivel 4 a 6 durante unos 5 minutos.
Advertencia: Al rellenar el recipiente de mezcla con leche fresca, nata u otros
ingredientes, es importante tener en cuenta de que no se supere la cantidad máxima
(24 claras). Para montar claras o nata, utilice las varillas.
Mezclar batidos, cócteles u otros líquidos
Mezcle los ingredientes siguiendo la receta durante 4 minutos entre los niveles 1 a 6.
Advertencia: No supere la capacidad máxima (7 l) del recipiente de mezcla. Para
mezclar líquidos, utilice el batidor.

20
ES
LIMPIEZA Y CUIDADO
• Antes de la limpieza, asegúrese de que el regulador se sitúe en la posición 0 y de
que el enchufe se haya desconectado de la toma de corriente.
• Deje que el aparato se enfríe por completo antes de limpiarlo.
• Para limpiar la parte exterior, utilice un paño húmedo y un limpiador neutro.
• Para limpiar el interior y el exterior, no utilice productos abrasivos ni alcohol.
• No sumerja el aparato en agua para limpiarlo.
• El gancho amasador, las varillas y el batidor no son aptos para lavavajillas. Los
accesorios solo pueden lavarse en agua tibia con líquido lavavajillas.
• El recipiente de mezcla es apto para lavavajillas. No obstante, el recipiente
también se puede lavar en agua tibia con líquido lavavajillas. No utilice productos
abrasivos.
INDICACIONES SOBRE LA RETIRADA DEL
APARATO
Si en su país existe una disposición legal relativa a la
eliminación de aparatos eléctricos y electrónicos, este
símbolo estampado en el producto o en el embalaje
advierte que no debe eliminarse como residuo doméstico.
En lugar de ello, debe depositarse en un punto de recogida
de reciclaje de aparatos eléctricos y electrónicos. Una
gestión adecuada de estos residuos previene consecuencias
potencialmente negativas para el medio ambiente y la salud
de las personas. Puede consultar más información sobre el
reciclaje y la eliminación de este producto contactando con
su administración local o con su servicio de recogida de
residuos.
FABRICANTE E IMPORTADOR (REINO UNIDO)
Fabricante:
Chal-Tec GmbH, Wallstraße 16, 10179 Berlín, Alemania.
Importador para Gran Bretaña:
Chal-Tec UK limited
Unit 6 Riverside Business Centre
Brighton Road
Shoreham-by-Sea
BN43 6RE
United Kingdom
La pagina sta caricando ...
La pagina sta caricando ...
La pagina sta caricando ...
La pagina sta caricando ...
La pagina sta caricando ...
La pagina sta caricando ...
La pagina sta caricando ...
La pagina sta caricando ...
La pagina sta caricando ...
La pagina sta caricando ...
La pagina sta caricando ...
La pagina sta caricando ...
La pagina sta caricando ...
La pagina sta caricando ...
La pagina sta caricando ...
La pagina sta caricando ...
-
 1
1
-
 2
2
-
 3
3
-
 4
4
-
 5
5
-
 6
6
-
 7
7
-
 8
8
-
 9
9
-
 10
10
-
 11
11
-
 12
12
-
 13
13
-
 14
14
-
 15
15
-
 16
16
-
 17
17
-
 18
18
-
 19
19
-
 20
20
-
 21
21
-
 22
22
-
 23
23
-
 24
24
-
 25
25
-
 26
26
-
 27
27
-
 28
28
-
 29
29
-
 30
30
-
 31
31
-
 32
32
-
 33
33
-
 34
34
-
 35
35
-
 36
36


in altre lingue
- français: Klarstein 10035480 Manuel utilisateur
- español: Klarstein 10035480 Manual de usuario
- Deutsch: Klarstein 10035480 Benutzerhandbuch